Halftone is a technique that uses dots to create a deliberate screen-like image and textured effect. In recent years, it has become trendy in digital design.
This effect is often used in magazines, newspapers, and other printed materials. When applied correctly, it can add depth and dimension to an image, resulting in a softer, more pleasing, and appealing look.
So, if you have ever wanted to add interesting effects and textures to your images, but weren't sure where to start, then keep on reading to discover and learn everything you need to know regarding creating the halftone printing effect in Photoshop.
Without further ado, let’s get started!
In this article
What Are Halftone Effects?
Before we know how to create a halftone effect in Photoshop, let's have a basic understanding of it first.
In the 19th century, William Henry Fox Talbot introduced the halftone screen printing effect to create the illusion of tones in black and white images.
The halftone originated from printers who previously only worked with cyan, magenta, yellow, and black (CMYK). The solid colors were tiny dots placed together closely with continuous tones that remained unchanged. From the mixing and matching of these four colors, a wide range of colors emerged.
The effect is usually created by putting dots of ink on paper in different sizes and positions. This illusion uses optical bleeding to make the desired impression on the human eye. These color dots act like analog pixels that result in a recognizable image.
For instance, when you look at a pixelated picture and zoom it, you will see missing details. When you zoom out, the photo gets more minor and back to its original form.
Modern Definition and Usage
In the 21st century, the halftone is a static-visual technique applied in print and digital images to create continuous tone imagery using dots that vary in spacing and size to create a gradient effect.
Halftone produces a deliberate screen-like image distortion in different fields, such as pop art, graphic designing, and screen printing, to create nostalgic or vintage effects and make the images more captivating.
How To Use Photoshop To Create Halftone Printing Effect
Below we’ve provided detailed step-by-step guidance on creating a color halftone effect as well as black and white halftone printing effects in Photoshop:
1. How to Create Color Halftone Effect
If you want to create a color halftone effect in Photoshop, do the following steps in a sequence:
Step1 Launch the Photoshop software on your laptop/desktop, and drag and drop the image file on which you want to apply the Halftone effect.
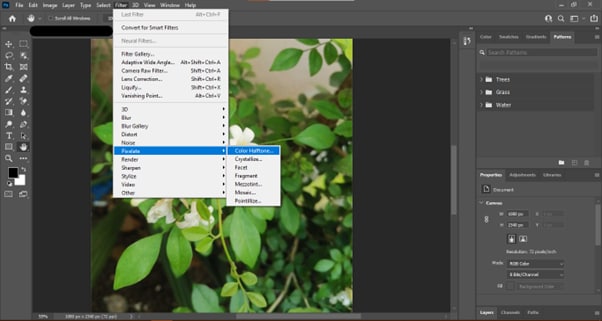
Step2 Click “Filters” in the top toolbar and select the “Pixelate” option from the drop-down menu.
Step3 Click the “Color Halftone” option from the menu. On the new pop-up window, adjust the radius and channel to configure the appearance of the effect.

That’s about it! You have successfully created the color halftone effect in Photoshop.
2. How to Create Black and White Halftone Effect
Follow these steps to create black and white halftone printing effect:
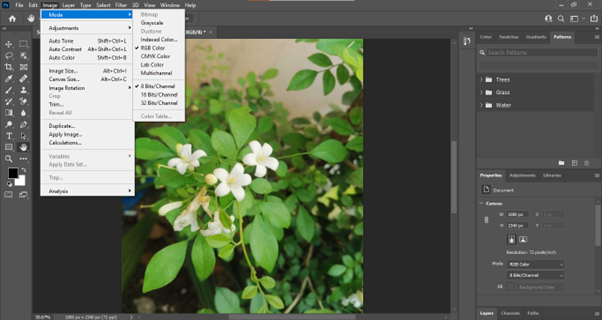
Step1 Open your image in Adobe Photoshop and click the “Image” option from the top taskbar.
Step2 Now, click the “Mode” option from the drop-down menu and select “Greyscale” to convert your RGB image.

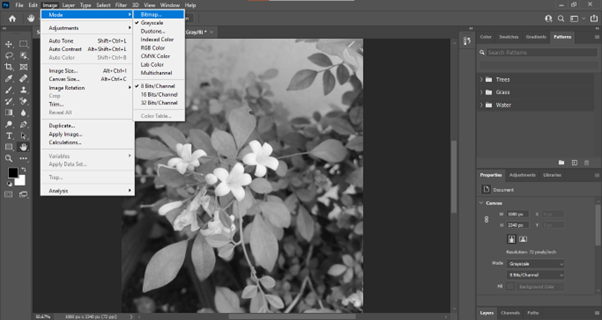
Step3 Again, open the image menu and click the “Mode” option. From the drop-down options, click “Bitmap…”

Step4 A dialogue box will open. Set the resolution to 1000, 1,500, or 2,000ppi to create smooth edges on your halftone. Next, click “Halftone Screen…” under the “Method” header and click “OK” to proceed further.
Now, you can adjust the frequency (Lines/Inch), angle (Degrees), and shape (Circle, Line, Cross, etc.) to determine how big your halftone dots are at the maximum diameter and their direction.
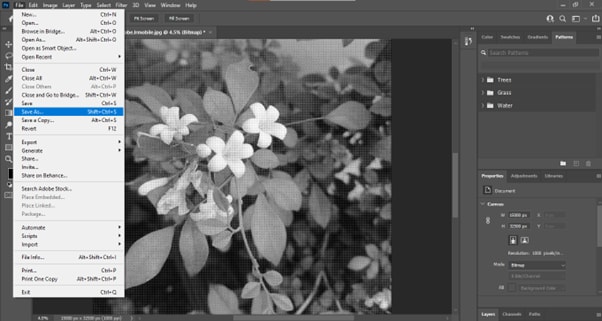
Step5 Finally, click “Files” from the top taskbar, scroll down, and select “Save As…” Save your file as PSD or TIFF and import it to InDesign to apply color.

Video Tutorial - How To Create Halftone Effect | Photoshop 2022
To help you better put the guidance into practice, we have prepared a video tutorial to deepen your understanding.
Two Concepts You Should Know In Creating Halftone Effect
Apart from the practical guidance, there are two important concepts you need to be aware of: radius and channels. Below, we’ve discussed both of them in detail to make things more understandable to you:
1. Radius
Radius refers to the size of the dots that make up the halftone image and is an important factor in determining the overall look of the photo.
You can adjust the sizes of the dots to change the gradient, spacing in between, and blur of the color and image. However, if you want a more subtle effect, you will need to use a smaller radius. For a more dramatic effect, like vintage comics, old ads, or DIY grunge zines., you will need to use a larger radius.
2. Channel
Channel refers to the number of values that are used to create the image. The more values you use, the more details will be visible.
The Channel setting of halftone effects affects how the dots are positioned and overlap. Each Channel is governed by a Screen Angle setting, which is listed in degrees. Changing the value modifies the angle at which Cyan, Magenta, Yellow, and Black dots are added to the pattern. When the dots overlap, a new color is created depending on the combination of the primary colors and black.
Conclusion
In this comprehensive guide, we've explored the halftone effect, how it originated and discussed its modern definition and usage. We've also provided step-by-step processes to help you create the halftone effect in Photoshop, both colored and black and white.
Furthermore, we discussed two important concepts (radius and channel) of the halftone screen printing effect to help you understand the technique in detail.
Hopefully, you’ve found this article helpful and can now add a new level of creativity to your images using the halftone effect in Adobe Photoshop.


 100% Security Verified | No Subscription Required | No Malware

