Recording a time-lapse video may not always capture the effect you want. Or perhaps, you want to create a time-lapse effect using the video footage you already have. In that case, you can use Sony VEGAS Pro to speed up your video.
VEGAS Pro has been a widely used software by video editors due to its capability for a wide range of video editing tasks. While it can be a bit pricey, this video editor strikes a good balance between power and ease of use compared to other advanced video editing programs like Adobe Premiere Pro.
If you want to learn how to speed up your video using Sony VEGAS Pro, our tutorial will guide you through the process step by step. And if you're looking for a more affordable alternative, we’ll also provide a good recommendation below.

In this article
Part 1. Speeding Up Videos in VEGAS Pro
Before we get into the process of speeding up your video on VEGAS Pro in detail, let’s first understand the basics of how video speed adjustments work. Video is made up of many still images (or frames) shown one after the other to create motion. When you speed up videos in VEGAS Pro, you’re squeezing more frames into a shorter time.
Some video content examples you can create by speeding up videos are:
- Timelapse of Scenery where you can capture and condense hours or days of natural events into a few minutes to highlight changes in the landscape
- Showcase lengthy processes like drawing, painting, or assembling items in a time-efficient manner
- Provide a quick glimpse of event setups or preparations
- Demonstrate changes over time, such as plant growth, building construction, or art project development, with accelerated footage

Part 2. How to Speed Up Videos using Sony VEGAS Pro
There are a number of ways to speed up your video on Sony VEGAS. They include changing the playback rate, using the Trim Stretch feature, and inserting a Velocity Envelope. Each method has different effects on how your video will look.
- Changing the Playback Rate: This method allows you to speed up or slow down your video by adjusting the rate at which the frames are played. This approach is straightforward but may affect smoothness if the speed change is significant.
- Using the Trim Stretch Feature: The Trim Stretch feature lets you adjust the speed of a clip by trimming it and stretching it to fit a new duration. It’s a simple way to speed up or slow down your video. But it can be tricky to know exactly how much you’ve changed the speed just by dragging the clip.
- Inserting a Velocity Envelope: A Velocity Envelope gives you more control over speed changes in your video (up to 10x faster). You can also adjust the speed at different points within the same clip. However, note that this feature does not affect the audio.
Method 1: Changing the Playback Rate
Step 1: Open the Properties window
Start by launching Sony VEGAS Pro and importing the video you want to edit. To change the playback rate, you can access the Properties window. Right-click on the video clip in the timeline and choose "Properties" from the menu that appears.
Step 2: Adjust the playback speed
In the Properties window, find the "Playback" section. Enter your desired frame rate into the appropriate field. To speed up the video, increase the rate above 1.000, with a maximum allowed speed of 4.000 (4 times the original speed).
You can also adjust additional settings in the Video Event section if necessary. Click "OK" to apply your changes.

Method 2: Using Trim Stretch (CTRL-Trim)
Step 1: Add a marker
After adding the clip to the timeline, ensure that you’ve disabled "Ignore Event Grouping." Then, find the midpoint of the video clip on the timeline. Position the timeline cursor at this point and press M to place an orange Marker on the timeline.
Step 3: CTRL-Trim the clip
Hold down the CTRL key and drag the right edge of the video clip inward toward the Marker. As you drag, you’ll notice that the audio clip trims along with the video, and its waveform compresses. Continue dragging until the edge of the video clip snaps to the Marker.

Step 3: Check the playback rate
Right-click on the video clip and select "Properties" to check the Playback Rate. The maximum playback rate adjustment is 4x faster. When you reach these limits, you won’t be able to drag the edge of the event further.
Method 3: Insert Velocity Envelope
Step 1: Insert the Velocity Envelope
Right-click on the video event and select Insert/Remove Envelope > Velocity. A green line, known as the Velocity Envelope, will appear near the bottom of the clip. This line controls the playback speed.

Step 2: Adjusting playback speed
Hover your mouse over the leftmost point on the Velocity Envelope. When your cursor turns into a hand with a pointing finger, you’ll see a pop-up displaying the current playback speed. Click on the green line and drag it upward to speed up the video. The further you drag, the faster the playback speed becomes, up to a maximum of 1,000% (10x faster).

Step 3: Using the Context Menu
You can also right-click on any point along the Velocity Envelope to bring up a context menu. This menu offers quick options for various playback speeds, including fast motion, slow motion, normal speed, and even custom values. You can enter a specific speed if you need precise control.
Part 3. How to Change the Speed of Multiple Clips All at Once
Instead of changing each clip individually, you can adjust the speed of multiple clips at once in Sony VEGAS Pro. What you need to do is group the clips first, and then you can use the Ctrl-Trim technique to apply the speed change to the entire group. Follow the guide below on how to speed up multiple video clips in VEGAS Pro:
Step 1: Group the selected clips
Select the desired clips in the timeline using the Selection Edit Tool. Then, right-click and select Group > Create New.

Step 2: Compress the clips to make them faster
Once you’ve grouped them, select Manual Edit Tool and hold the Ctrl key on the keyboard while dragging the end of the selected clip. If you are dragging them to the left, you’ll make them faster (maximum 4x). If you are dragging them to the right, they will become slower.

Part 4. VEGAS Pro Alternative to Speed Up Your Video
VEGAS Pro is compatible only with Windows 10 and later versions, so it may not be an ideal choice for Mac users. It also requires a system that meets high-performance demands to run smoothly. To use VEGAS Pro, you’ll need to subscribe starting from $19.99/month or opt for a Perpetual license at $199.
If that’s not within your budget or you need an alternative with greater capability and compatibility, one of the recommended options is Wondershare Filmora.
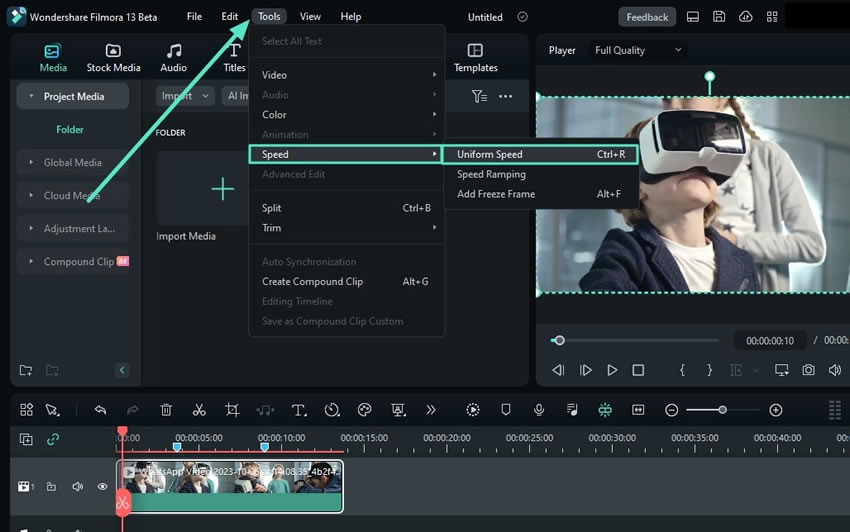
Filmora is another user-friendly software with powerful features capable of handling various video editing tasks. You can use Filmora on Windows and Mac. This software also has flexible pricing options, where you can start with the free version to see if it suits your needs.
With Filmora for Desktop, you can change the video playback speed from 0.01x to 100x. Moreover, there’s a Speed Ramp feature, which can help you create smooth transitions between different speeds. You can create some tricks like in the video here.
How to speed up videos with Filmora
Step 1: Adjust video speed using the speed controls
Start by selecting your video in the timeline. Then, click the Speed icon located in the toolbar above the timeline. From the options that appear, choose "Uniform Speed" to begin changing the playback speed of your video.
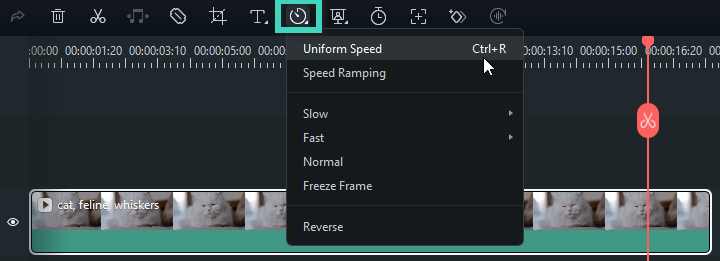
Step 2: Set the desired playback speed
To speed up your video, move the Speed slider to the right. Or, you can manually enter a speed value greater than 1 in the Duration field for more accurate adjustments.
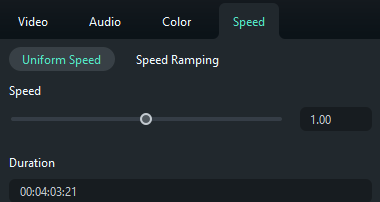
Step 3: Choose a fast speed preset
Alternatively, you can opt for a predefined speed setting. Go to Speed > Fast, and you'll find options for 2x, 4x, 8x, 20x, 50x, and 100x speeds. Select the preset that best suits your needs.

How to Make Various Speed Effects with Speed Ramping
Step 1: Access the Speed Ramping feature
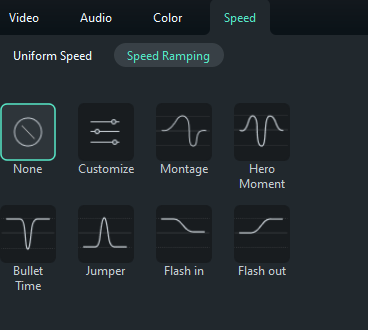
To create more dynamic speed changes throughout the video, you need to use Filmora’s Speed Ramping feature. Speed Ramping allows you to gradually speed up or slow down the video at specific points.
To access it, click on the Speed icon and select "Speed Ramping" from the options. Alternatively, you can select your video in the timeline. Then, go to Speed > Speed Ramping in the Property Panel on the right.
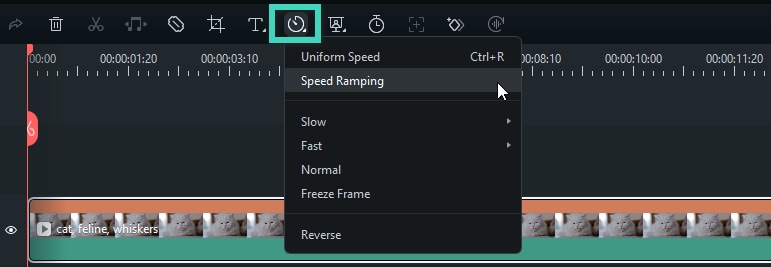
In the Speed Ramping settings, you’ll see various presets available. Refer to Filmora’s guide for detailed descriptions of each preset or experiment with them to find the best fit for your project.
Step 2: Adjust the speed points
Once you’ve chosen a preset, you can fine-tune the speed points. Drag the speed points up or down to adjust the speed, and move them left or right to change the video section affected by these changes.
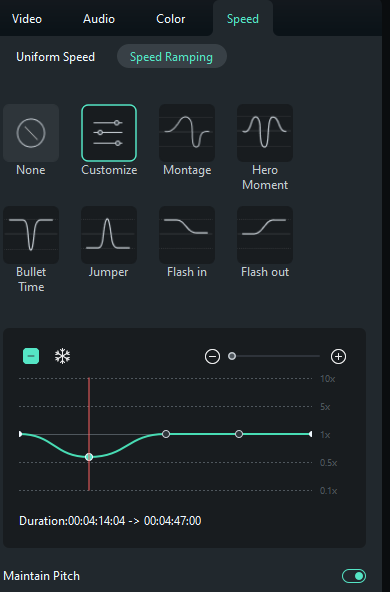
You can add or remove speed points by clicking the Plus (+) or Minus (-) icons. To freeze a part of your video, position the playhead where you want the freeze frame, and click the snow icon to add it. Then, set the desired duration and apply.
Step 3: Modify Speed in the Timeline
If you want a more hands-on approach, you can adjust the speed directly by dragging the edge of the video clip in the timeline. Press and hold the Ctrl key, then hover your mouse over the clip’s edge. To speed up the clip, you can drag the edge of the clip forward.
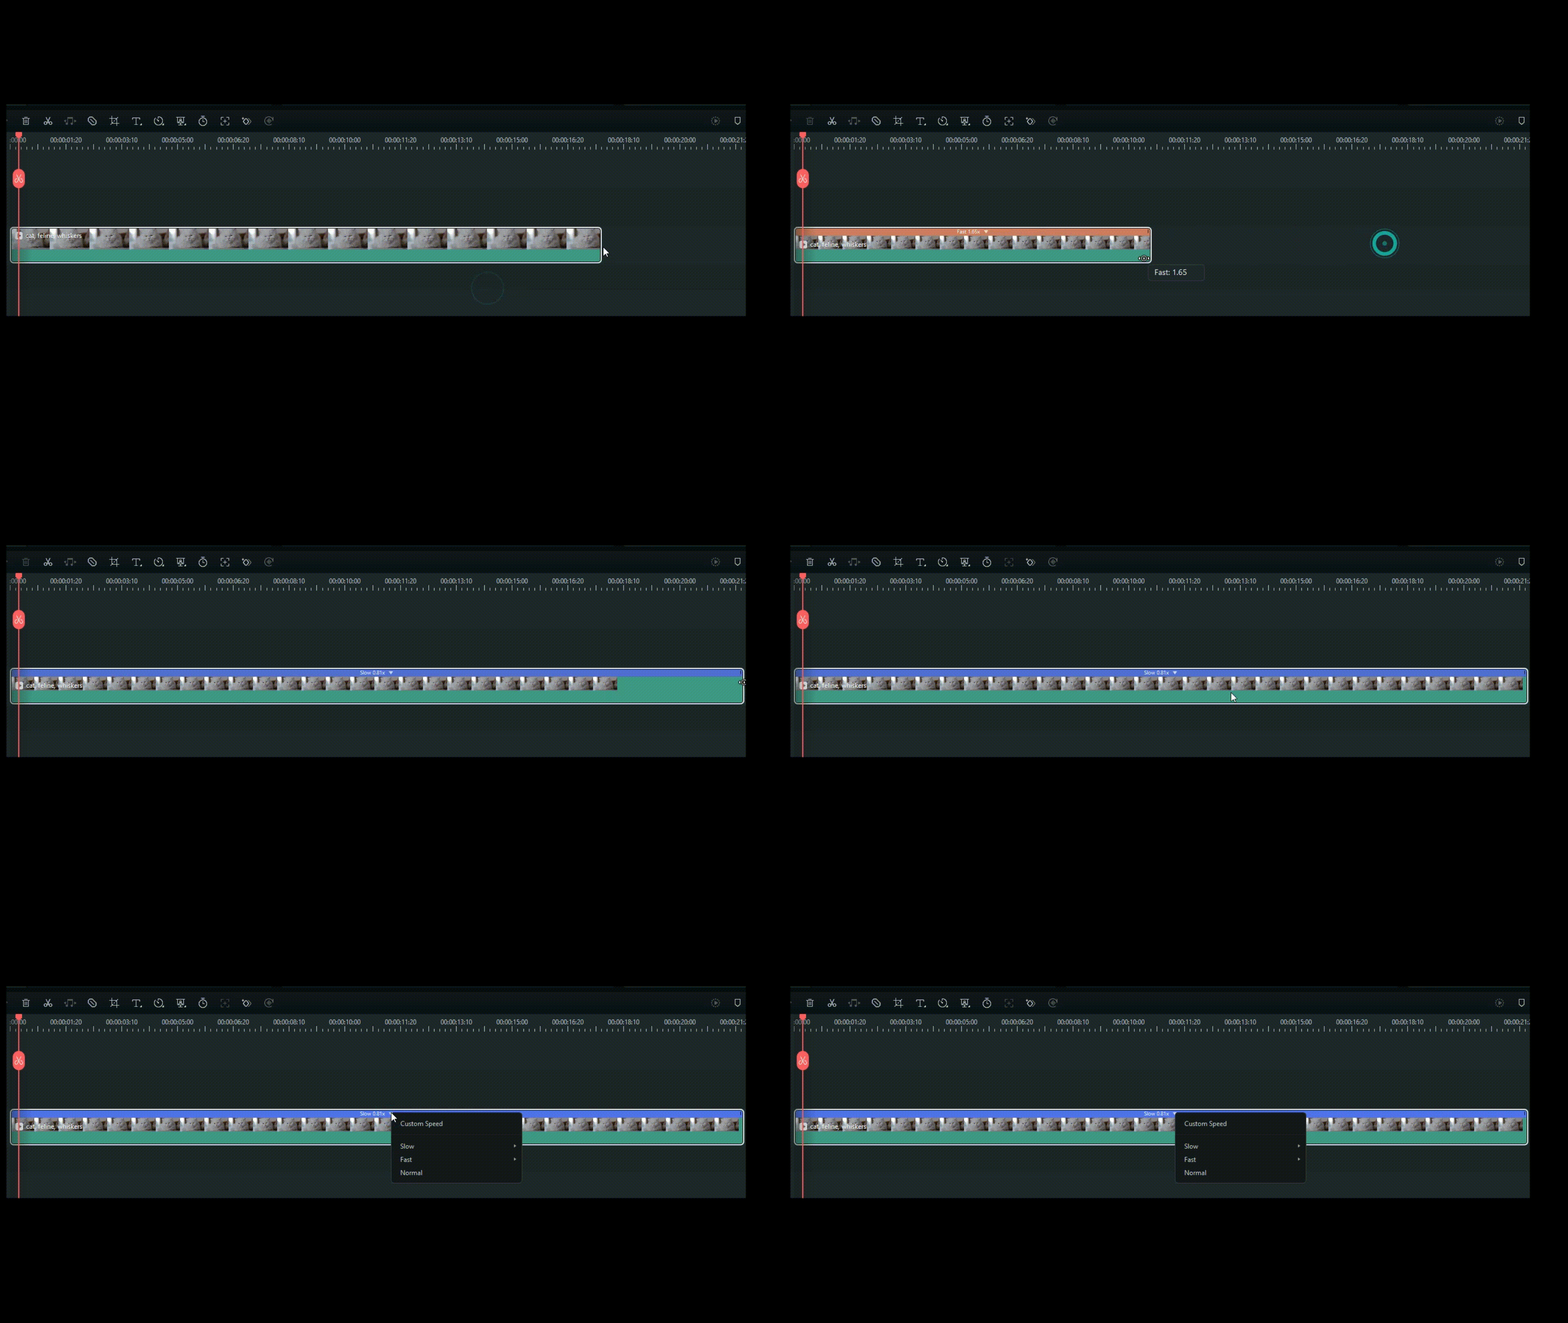
As you make adjustments, a red strip will appear when you increase the speed and a purple strip will show when the clip is slowed down.
Conclusion
There are a few ways to speed up your video with Sony VEGAS Pro. The simplest way is to change the playback video speed. But if you want more speed control, you can use the Velocity Envelope since you can speed up your video up to 10x using that method.
In case VEGAS Pro doesn’t cater to your needs, one of the recommended options is to use Wondershare Filmora. Filmora offers the ability to change your video speed up to 100x with ease. You can also create smooth speed transitions using the Speed Ramp feature, which lets you gradually speed up or slow down different sections of your video.


 100% Security Verified | No Subscription Required | No Malware

