
 100% Security Verified | No Subscription Required | No Malware

How do you make your PowerPoint slides flow so seamlessly that they feel like a continuous slide? That’s the power of Morph transition in PowerPoint! It allows you to create smooth, animated effects between slides, ensuring a seamless transition from one to the next.
In this guide, you'll learn how to use Morph in PowerPoint presentations. Plus, we’ll also guide you through recording your presentation and sharing it on YouTube. Morph transitions can take your slides to the next level. Let’s get started!

In this article
Part 1. Elevate Your PowerPoint Presentations with Morph Transition
Using Morph in PowerPoint presentations creates smooth transitions between slides instead of abrupt slide changes. It helps objects move naturally, making your slides more dynamic and professional. But what makes the Morph transition so special?
What Makes Morph So Special?
Unlike basic transitions, the Morph transition in PowerPoint tracks the movement between slides, creating smooth animations. Thus, you can move text, shift shapes, or zoom into images effortlessly—no complex animations are needed.
Instead of simply switching slides, Morph lets you create animated infographics, interactive timelines, and flowing text effects. For example, you can:
- Make a bullet list smoothly expand into a full slide.
- Move an object across the screen as if it’s gliding.
- Zoom into key details without using complex animations.
Real-World Uses of the Morph Transition in PowerPoint
You can use Morph PowerPoint transition to make slides in presentations look good. It has practical applications for different industries and use cases, including:
- Marketing Pitches – Make your sales presentations more engaging with smooth transitions.
- Educational Content – Help students follow along with visual explanations and interactive slides.
- Product Demos – Showcase product features by smoothly transitioning between different views.
- Business Reports – Make complex data and trends easier to understand with animated infographics.
Part 2. How to Create a M orph PowerPoint Presentation
Want to make a PowerPoint presentation with morph transitions? Below is a step-by-step guide on how to use Morph in your presentations for smooth animations between slides.
Step 1. Design Your Initial Slide
Open Microsoft PowerPoint and create a new presentation. Add the text, images, or objects you intend to animate on your first slide.
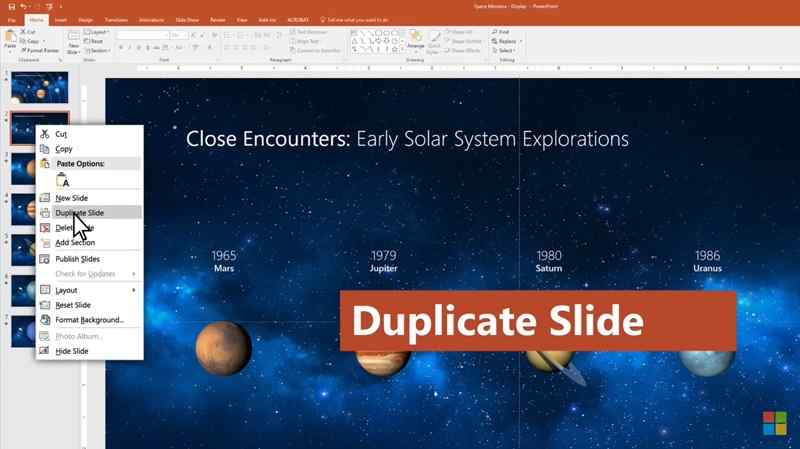
Step 2. Duplicate the Slide
In the thumbnail pane on the left, right-click the slide you've just created. Select Duplicate Slide to create an exact copy.
Step 3. Modify the Duplicated Slide
On the duplicated slide, adjust the position, size, or formatting of the objects you wish to animate. For example:
- Move text boxes to a new location.
- Resize images or shapes.
- Change colors or styles.
Step 4. Apply the Morph Transition
Select the second slide (the one you've modified) and navigate to the Transitions tab. Click on Morph to apply the transition effect.
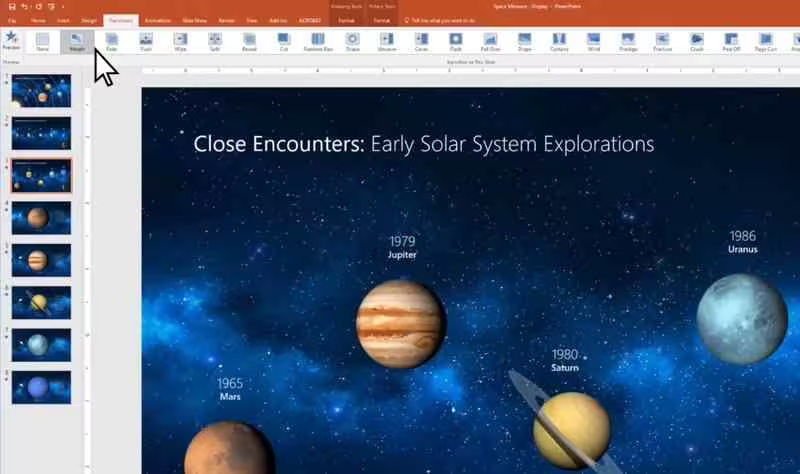
Step 5. Preview the Transition
Click on Preview in the Transitions tab to see how the Morph transition looks in your presentation.
Watch this video for a more detailed tutorial on how to apply morph transition in PowerPoint:
Part 3. Recording Your Morph Presentation and Sharing It on YouTube
A Morph animation PowerPoint looks great when presented live. But, by recording it allows you to share it with a broader audience. It’s also useful for creating online courses or video content for YouTube. Now, let’s learn how to record your Morph PowerPoint presentation and enhance it for sharing on YouTube.
Recording Options
There are two options you can use for recording a PowerPoint morph animation:
Option 1: Use PowerPoint’s Built-in Recording Feature
PowerPoint has a built-in tool that lets you capture your presentation. Follow these steps to record, manage, and save your PowerPoint presentation with narration:
Step 1. Open the PowerPoint presentation and navigate to the slide where you want to begin recording.
Step 2. Navigate to the top-right of your screen and click on the Record button.
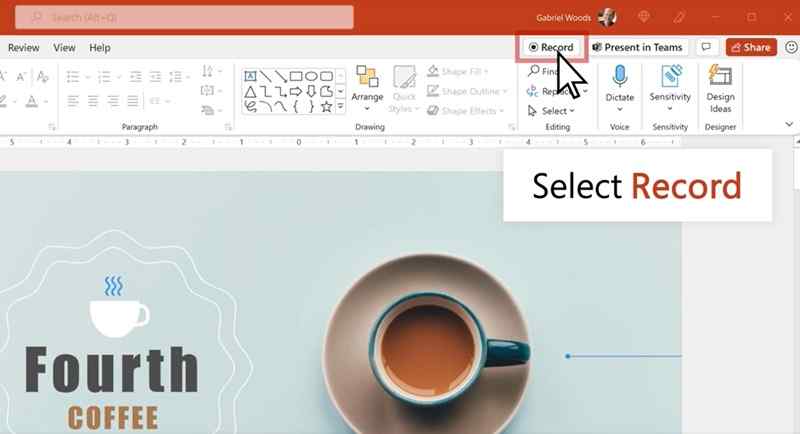
Step 3. When you're ready, click the red Record button. After a brief countdown, start speaking.

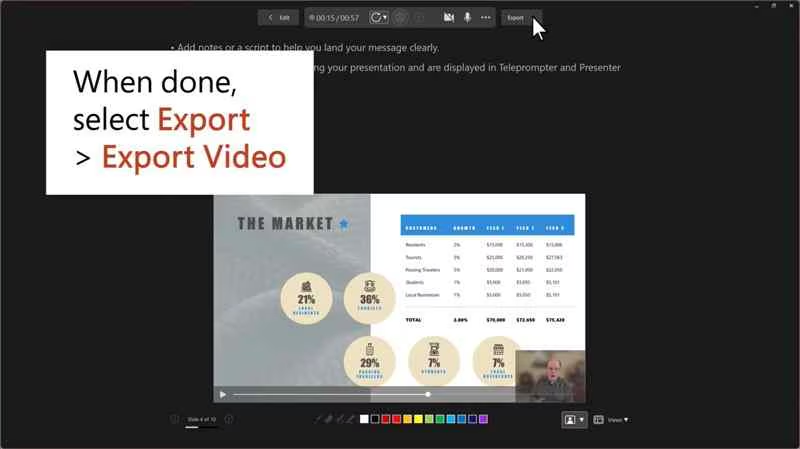
Step 4. Once you’ve recorded your Morph PowerPoint presentation, you can save and share it as a video. To save the presentation, click Export > Export Video.
Watch this video for a more detailed tutorial to record your presentation in PowerPoint:
Option 2: Using Wondershare Filmora for Screen Recording
PowerPoint’s built-in recording feature has a limitation, it can’t record voice narration while transitioning between slides. This means that if you're explaining something while a PowerPoint Morph animation is playing, your voice might not be recorded properly.
To avoid this issue and gain more control over your presentation’s quality, you can use Wondershare Filmora’s Screen Recorder feature. It allows you to capture your presentation, including during slide transitions without interruptions. Plus, you’ll have access to advanced editing tools to enhance the final video of the Morph PowerPoint presentation.
 secure download


Here’s the step-by-step guide on how to screen record in Filmora:
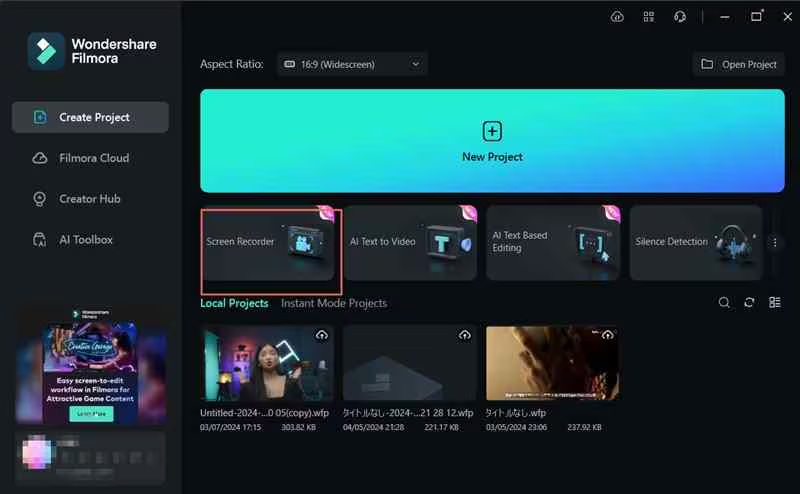
Step 1 Open Filmora’s Screen Recorder
Launch Wondershare Filmora and select Screen Recorder from the startup window. This action will open the recording interface, allowing you to customize your recording settings.
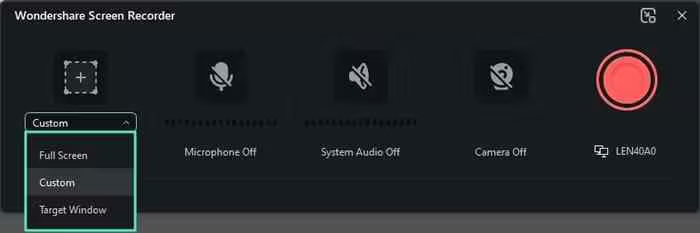
Step 2. Set Your Recording Area
After launching the screen recorder, choose how much of the screen you want to capture. Click the Screen Size icon and select one of these options:
- Full Screen – Captures the entire display.
- Custom – Allows you to manually adjust the recording dimensions.
- Target Window – Records only a specific application window, such as PowerPoint.
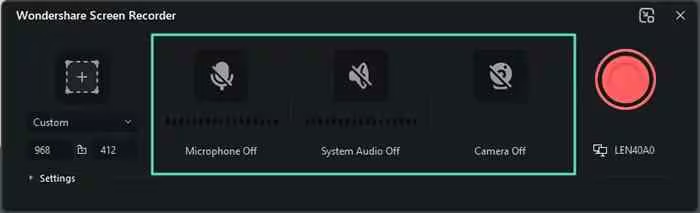
Step 3. Choose Your Audio and Video Inputs
Filmora lets you customize what gets recorded:
- Microphone – Enable this option to record your voice during the presentation.
- System Audio – Capture sounds from the presentation, including video clips or sound effects.
- Camera – Turn on your webcam if you want to include a video overlay of yourself presenting.
Step 4. Adjust Recording Settings
Click the Settings button in the lower-left corner. This button lets you fine-tune additional options like frame rate, output format, and recording quality.

Step 5. Start Recording
When you're ready, click the red Record button to begin. A countdown will appear before the recording starts, but you can skip it by selecting Start Directly. Once recording begins, you can pause, stop, or restart as needed.

Enhancing & Editing Your Recorded Presentation in Wondershare Filmora
After recording the morph PowerPoint presentation, you can enhance the video in Filmora before uploading it to YouTube. Filmora offers advanced AI features that can help you improve your presentation video.
Here are some AI-powered Filmora features that can take your PowerPoint Morph animation video to the next level:
1. Add Captions with AI Speech-to-Text
Manually adding subtitles can be time-consuming, but Filmora’s AI Speech-to-Text (STT) feature can make the process easier. This feature can auto-generate subtitles for your video, making your content more accessible to viewers.
Watch the video below to learn how to use the AI Speech-to-Text feature in Filmora:
2. Improve Voice Quality with AI Audio Denoise
If your recorded narration has background noise, Filmora’s AI Audio Denoise can help! This feature automatically removes unwanted noise and makes your audio clearer.
Watch the video below to learn how to use the AI Audio Denoise feature in Filmora:
3. Add Background Music with AI Music Generator
Adding background music to your video can set the tone for your presentation. It helps make it more dynamic and engaging. With Filmora’s AI Music Generator, you can create royalty-free music tailored to your presentation’s tone and mood.
Watch the video below to learn how to use the AI Music Generator feature in Filmora:
Conclusion
A Morph transition in PowerPoint can help transform your presentation into a smooth presentation. It allows you to create seamless animation between slides, making your presentation look like an animation. Using morph transition can elevate your business pitch, educational content, or marketing demo.
Once your Morph transitions are set, recording and editing your presentation ensures that it’s polished and ready to share. With tools like Filmora, you can refine your video with AI-powered features. Try creating your Morph PowerPoint presentation today and impress your audience with seamless animations!
