


Shooting with a 360° camera like a DJI model means you don’t have to worry much about framing while recording. However, the work doesn’t end there. Once you open the footage, you still need to choose the right angle, reframe the shot, and turn it into a standard video in a 16:9 or 9:16 aspect ratio.
Among the tools you can rely on is DJI Studio, DJI’s desktop editing software for working with DJI footage, including 360° videos. It’s available for Mac and Windows, with the latest version, v1.2.11, released on September 2, 2026. In this DJI Studio review, we’ll look at DJI Studio’s download process, 360° reframing, keyframes, transitions, editing tools, overall workflow, and pros and cons.
Part 1. What is DJI Studio?
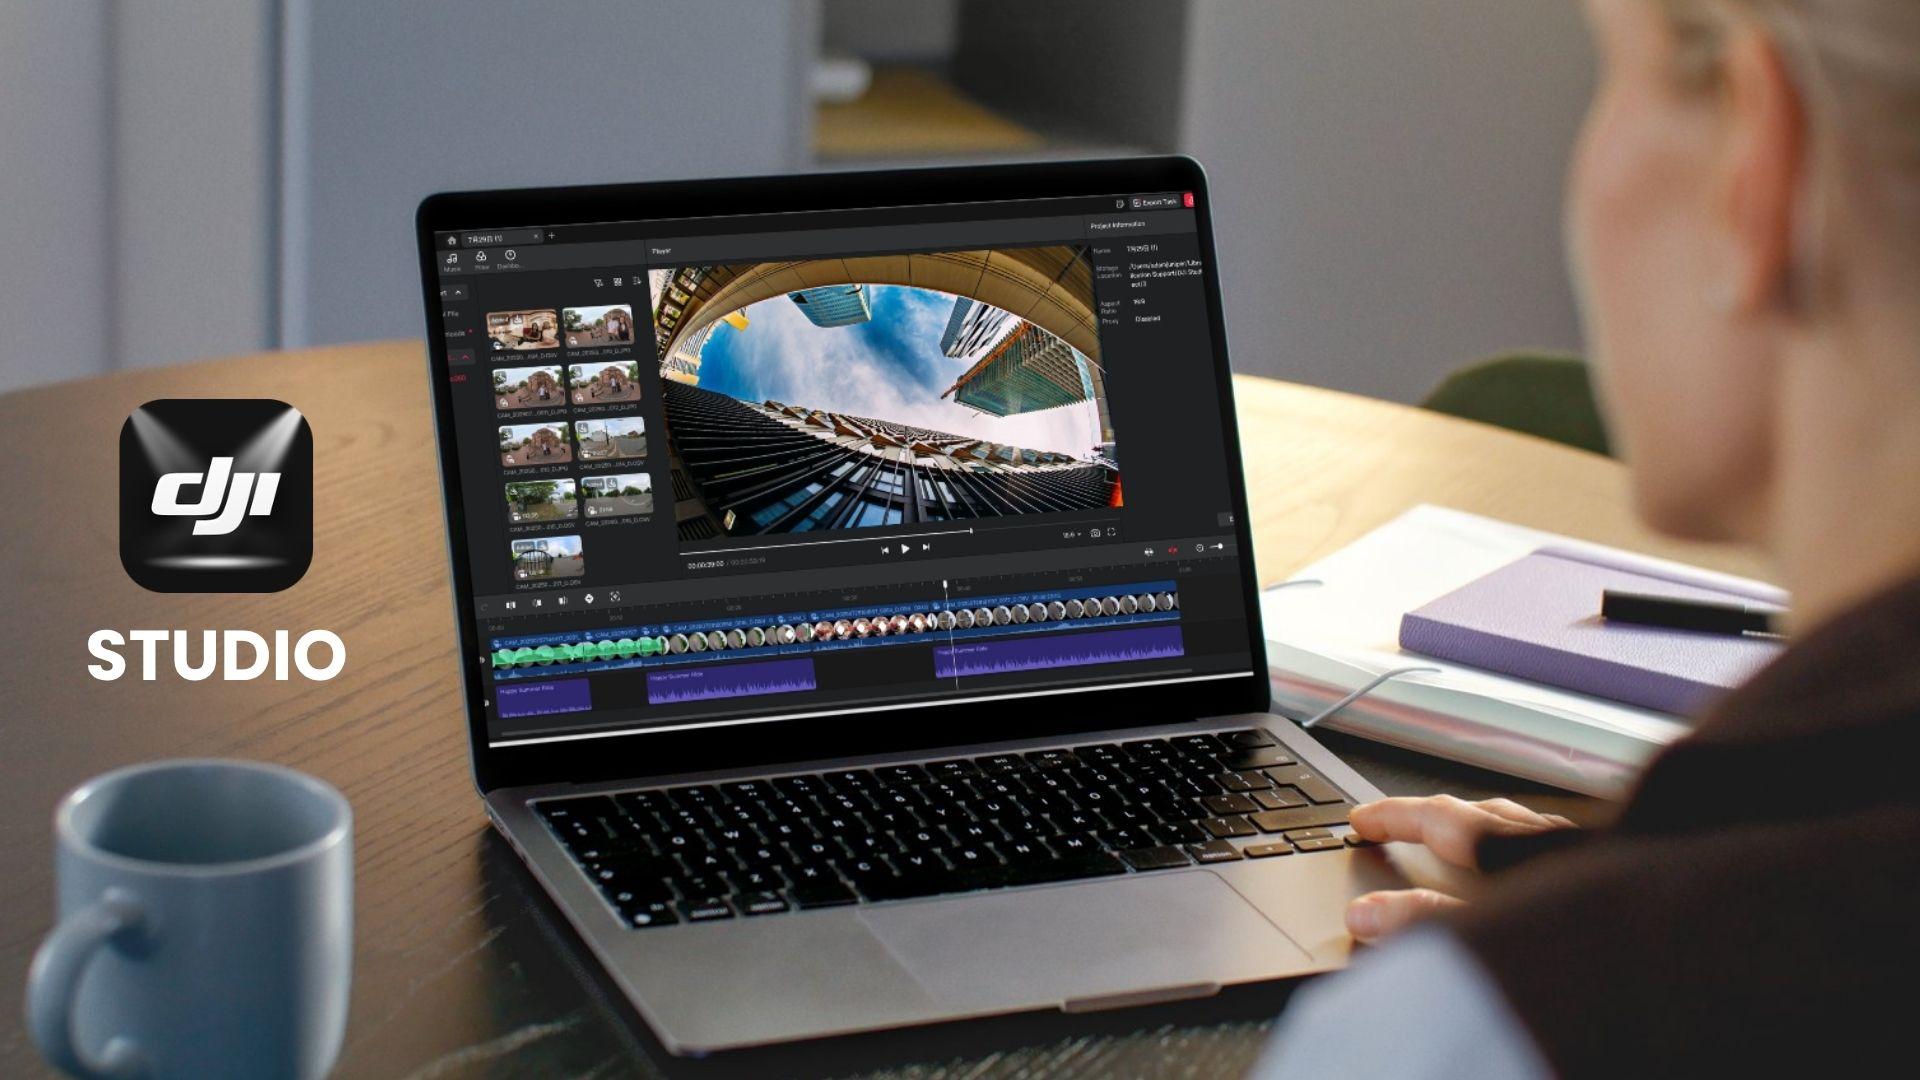
If you’ve recorded footage with a DJI camera and want to edit it on a computer, DJI Studio is DJI’s desktop editing software you can use to import, view, reframe, and edit your footage. It is listed under DJI’s Desktop Editors and is useful for working with panoramic and 360° videos from the Osmo 360. DJI also provides a dedicated tutorial for editing panoramic videos on a computer with DJI Studio.
For 360° footage, DJI Studio lets you decide how the final shot will look after recording. You can reframe the footage, adjust the viewpoint, and use keyframes to create camera movements. It also includes tools such as subject tracking, transitions, and effects for further editing.
Who Is DJI Studio For?
DJI Studio is a good fit for creators who regularly work with DJI 360° footage, including:
- DJI Osmo 360 users who want to edit panoramic footage on a computer
- Travel creators who want to choose the best angle after shooting
- Action and outdoor creators working with 360° footage
- POV and social media creators turning panoramic clips into standard videos
- Creators who prefer desktop editing on Mac or Windows
Part 2. DJI Studio Features: 360° Reframing, Keyframes, and Editing
DJI Studio lets you shape your 360° footage after shooting. There are several tools for choosing the viewing angle, adjusting the framing, and turning your footage into a standard video. You can also use keyframes to control how the camera view moves throughout a clip, then make basic edits before exporting the final video.
2.1 Reframing 360° Footage
With 360° footage, you can decide on the framing after recording instead of locking the camera angle while shooting. DJI Studio lets you adjust the view and turn the spherical recording into a standard video. You can:
- Change the viewing direction to choose which part of the 360° scene appears on screen
- Adjust the field of view to make the shot look wider or more focused
- Change the perspective to create different looks from the same recording
- Choose common aspect ratios such as 16:9, 9:16, and 1:1 for different platforms
2.2 Keyframe Editing
Keyframes control how the view changes throughout a clip. Instead of keeping one angle for the entire shot, you can set different viewpoints at different points on the timeline. You can use keyframes to:
- Move the viewpoint from one part of the scene to another
- Create pans and rotations around a subject or location
- Change the perspective as the clip progresses
- Control the timing of camera movement by moving keyframes along the timeline
2.3 Subject Tracking
Subject tracking helps keep a person or object in the selected frame as the footage moves. It can reduce manual adjustments needed when the subject moves across a 360° scene. You can use it to:
- Track a moving subject through the shot
- Keep the subject near the center of the frame
- Reduce manual keyframing for simple tracking shots
- Review and adjust the result when tracking loses the subject
2.4 DJI Studio Transitions and Effects
DJI Studio transitions help connect clips with smoother cuts, while filters and effects let you adjust the look of your footage. These tools keep the editing process simple while covering basic visual adjustments. The editing tools include:
- Transitions between clips
- Filters and visual effects for changing the look of footage
- Timeline editing to arrange and trim clips
- Keyframe-controlled effects for adding movement to selected shots
The options are more limited than in a full-featured video editing program, so complex projects may still require another editor.
2.5 Music and Audio
Once the visual elements are in place, you can add music to complement your video. DJI Studio provides music options for basic video editing. You can:
- Add background music to your video
- Place music alongside your edited clips on the timeline
- Combine the soundtrack with your footage before exporting
For detailed sound mixing, advanced audio effects, or more complex sound design, a dedicated video editor offers more control.
Part 3. How to Use DJI Studio: From 360° Footage to a Finished Video
To use DJI Studio, download the desktop software, import supported DJI footage, adjust the framing, and edit before exporting the final video. Below, we’ll cover the DJI Studio download options for Windows and Mac, and the basic steps for editing 360° footage.
DJI Studio Free Download for Windows & Mac
DJI Studio for Windows and Mac is available as a free desktop download from DJI’s official website. DJI lists the software under its Desktop Editors and currently includes the Osmo 360 among its supported products. For the official DJI Studio download, use DJI’s Download Center.
- DJI Studio Download for Windows: Choose the Windows version from the download page. The current installer is an .exe file.
- DJI Studio for Mac: Choose the Mac version. The current installer is provided as a .pkg file.
Before installing, check that your computer meets DJI’s recommended specifications, especially if you plan to work with high-resolution 360° footage.
DJI Studio PC Requirements
| Specification | Windows | Mac |
| Operating system | Windows 10 or later | macOS 11.0 or later |
| CPU | Intel Core 13th Gen or newer, preferably i7/i9; AMD Ryzen 7000 or newer, preferably Ryzen 7/9 | Apple M1 or newer |
| RAM | 16GB minimum recommended | 16GB minimum recommended |
| GPU | NVIDIA RTX 3060 12GB+ or AMD Radeon RX 6600 8GB+ recommended | Not separately specified by DJI |
| Current version | v1.2.11 | v1.2.11 |
|
Show More
Show Less
|
||
These are DJI’s recommended specifications for optimal performance, not the minimum hardware requirements for every function. It also recommends at least 16GB of RAM, along with relatively recent processors and a dedicated GPU for optimal performance.
How to Use DJI Studio
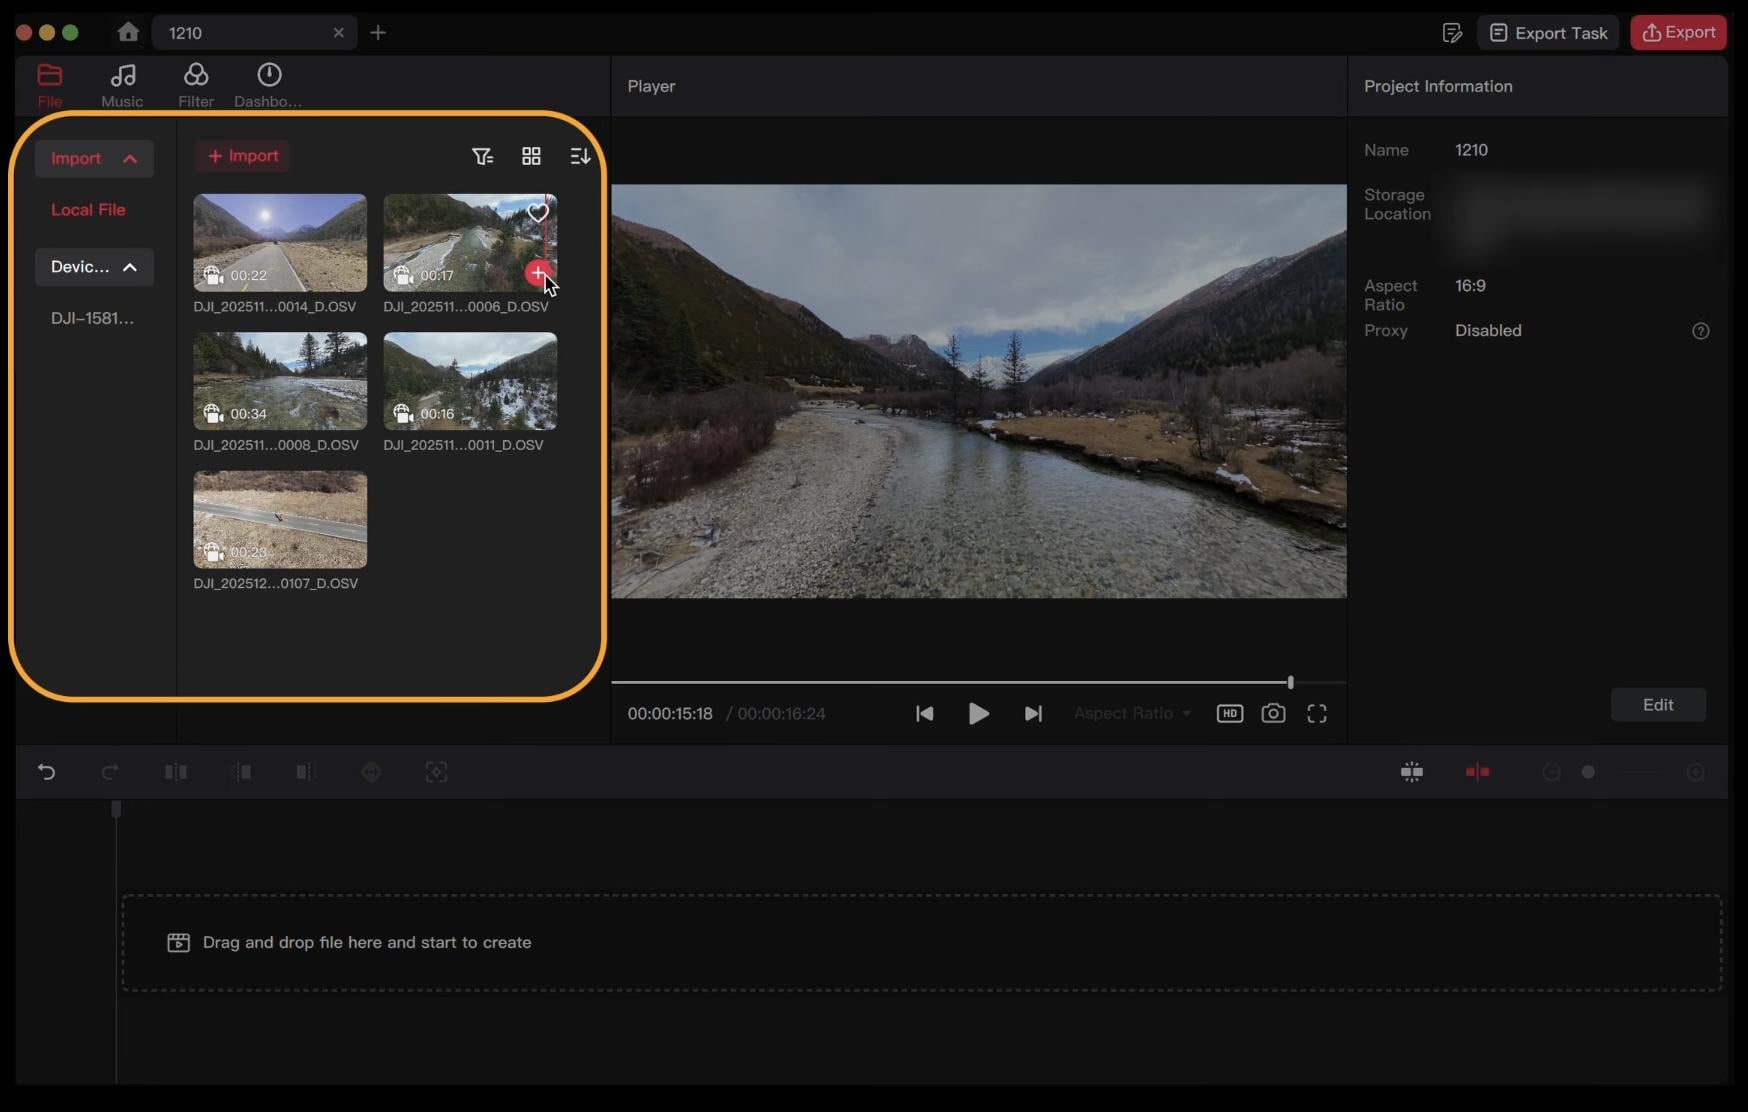
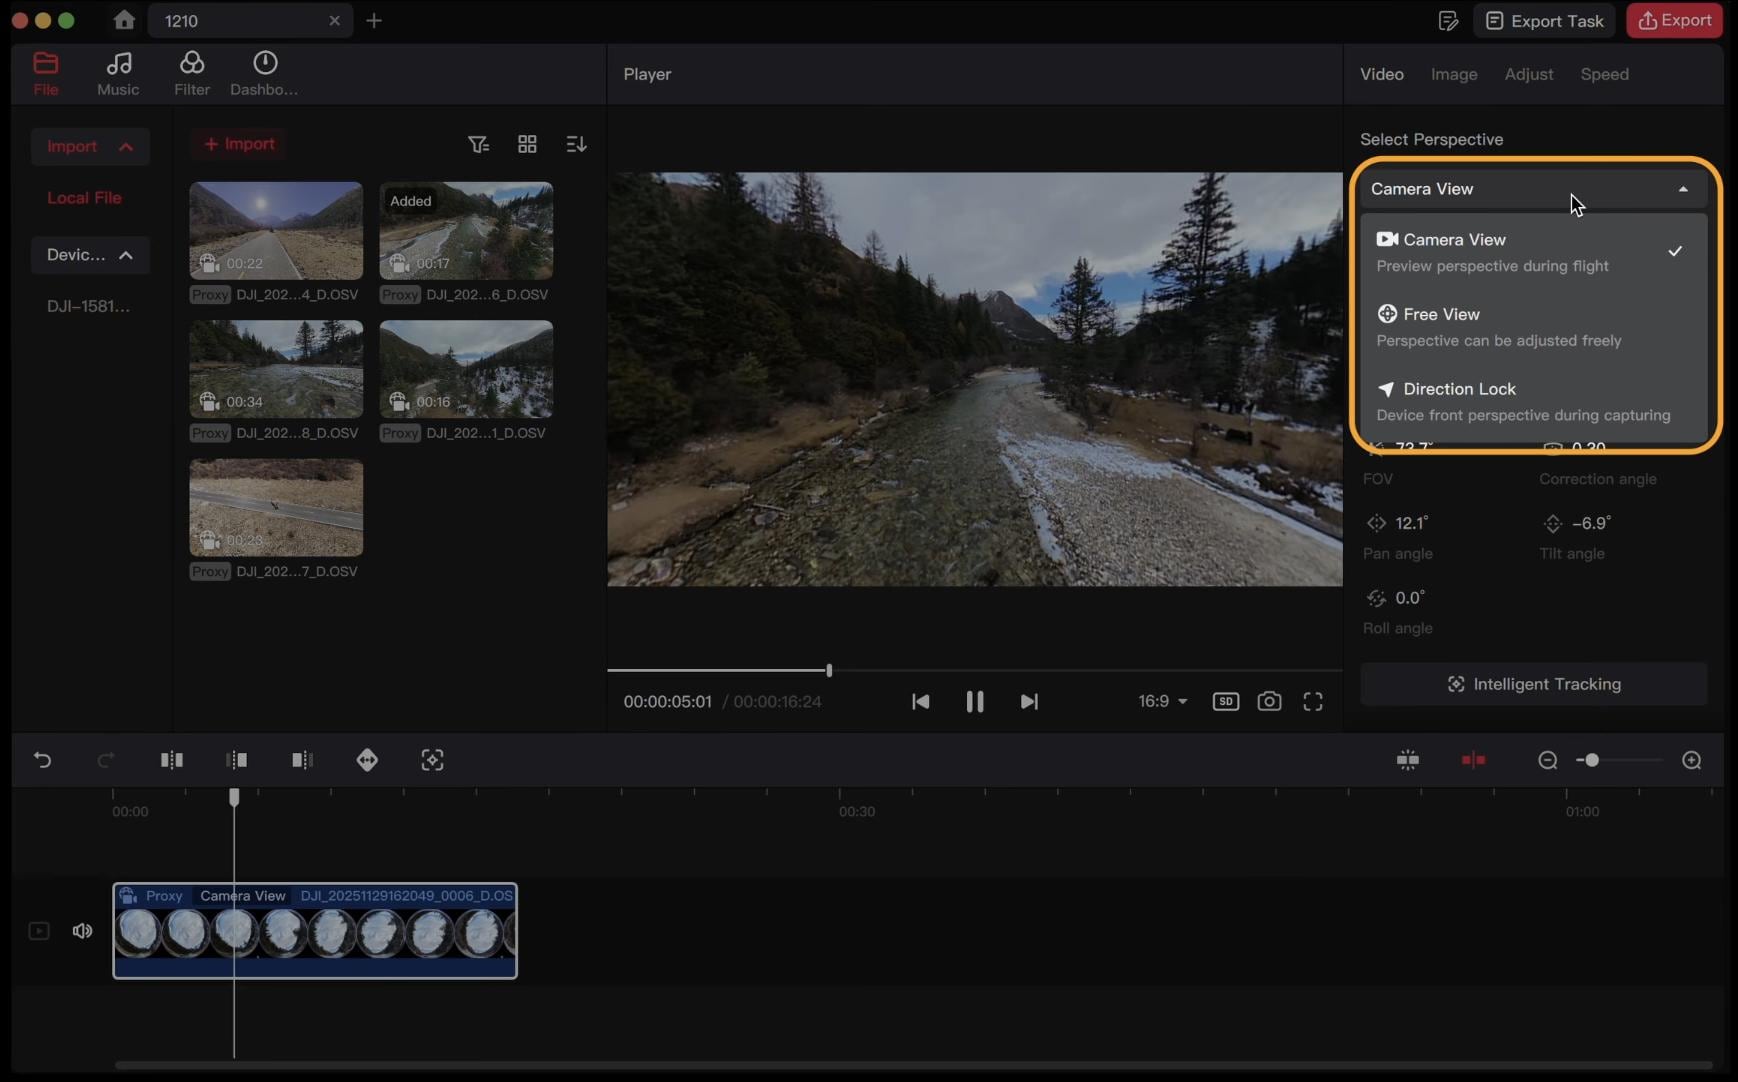
If you’re looking for a quick DJI Studio tutorial, the steps below show you how to use DJI Studio from start to finish.
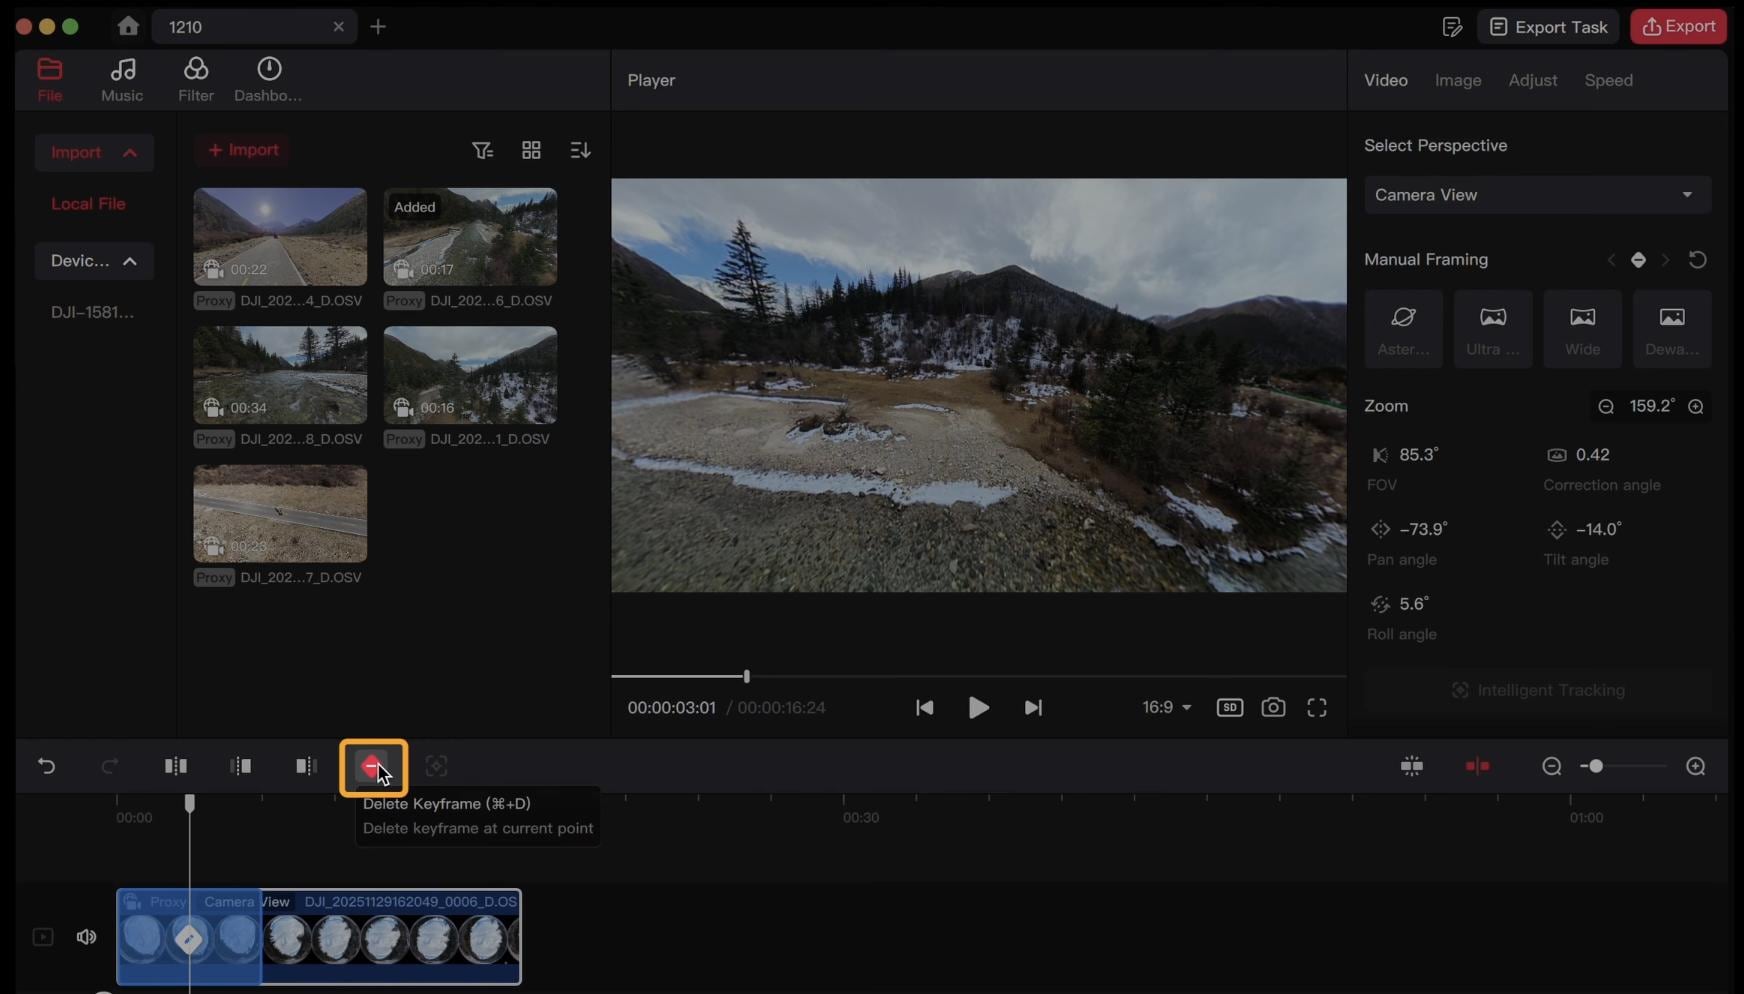
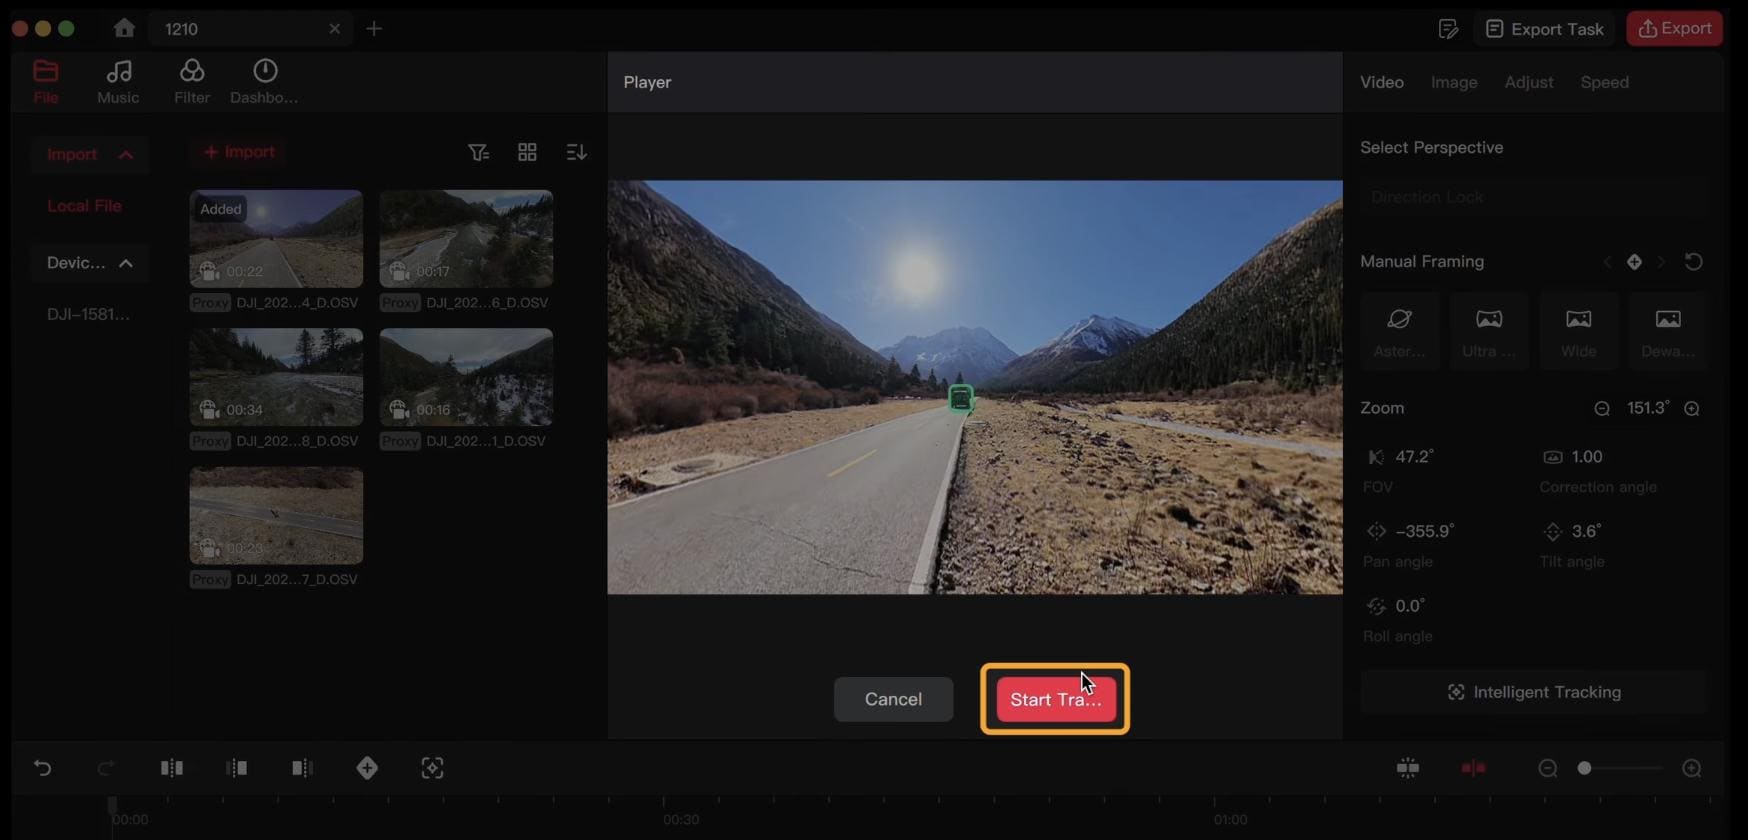
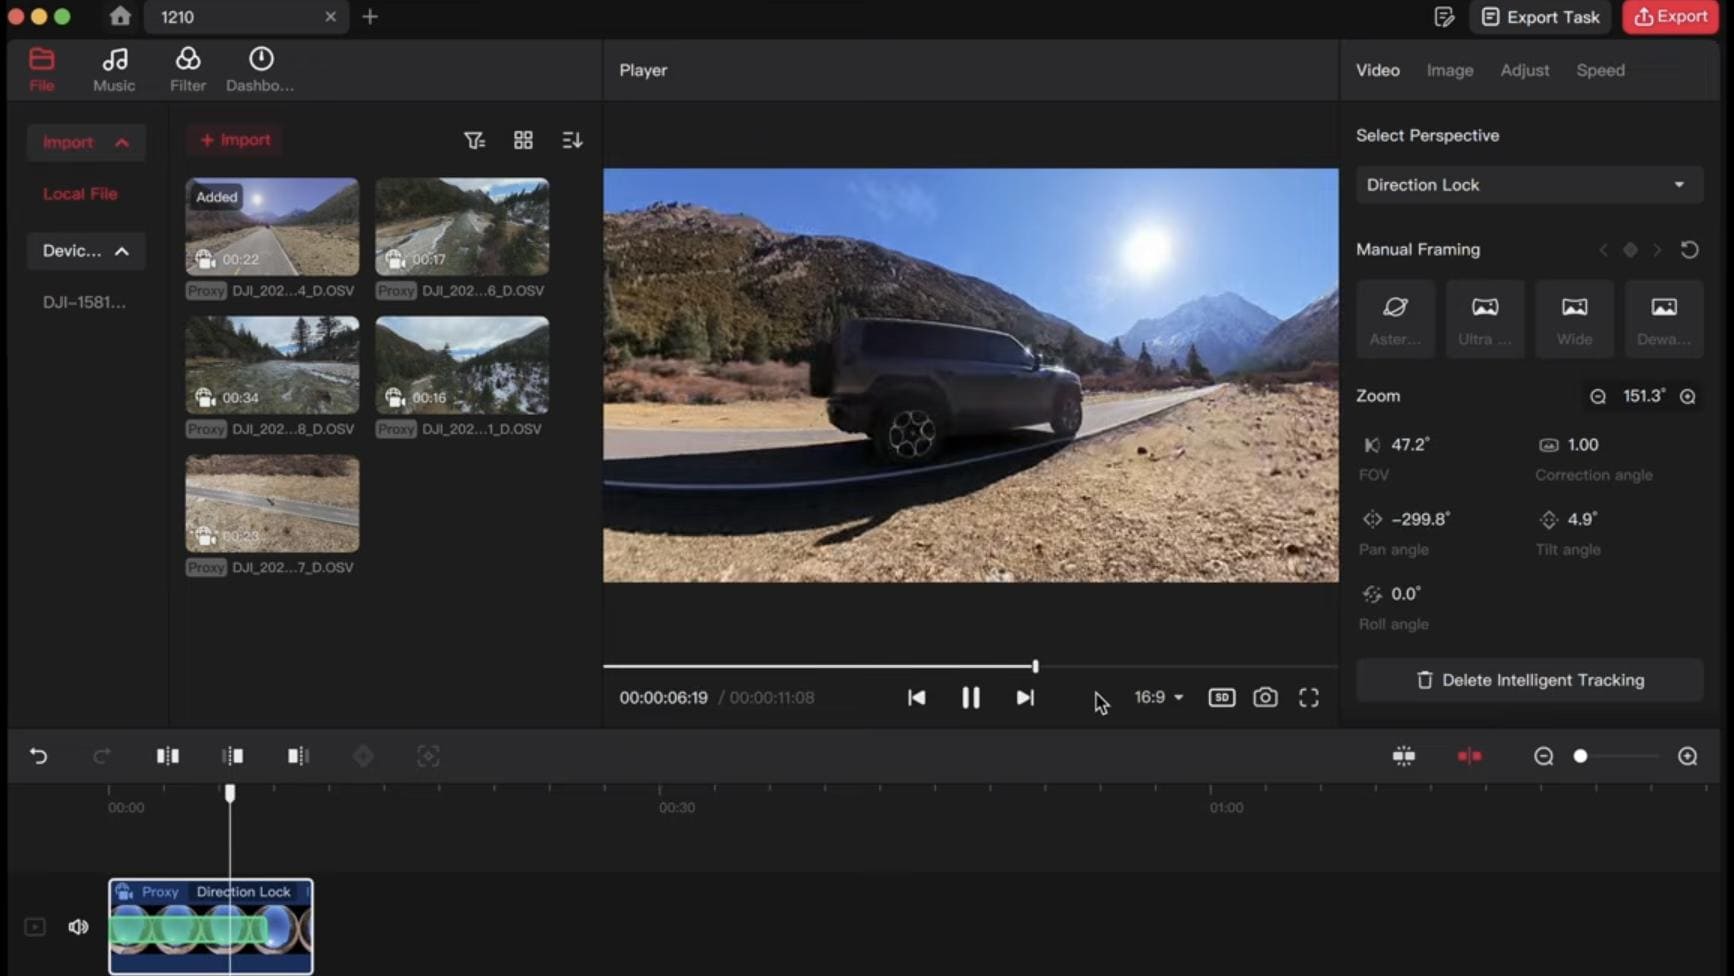
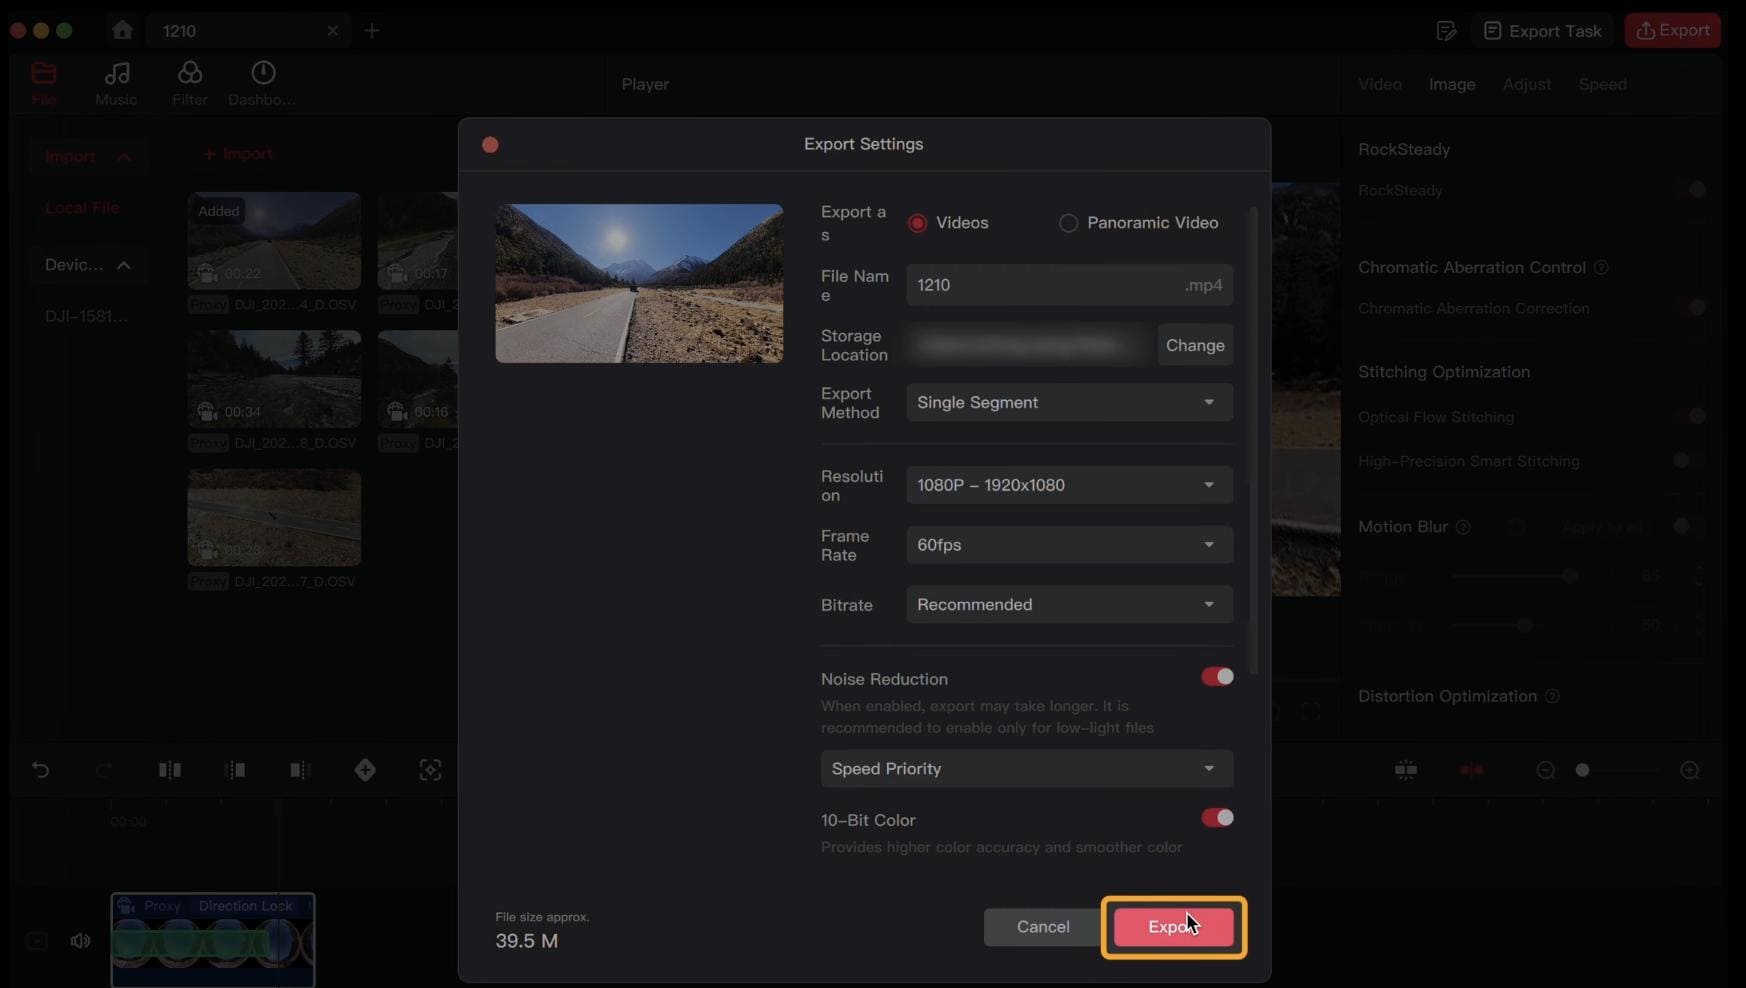
Part 4. Verdict: Pros and Cons of Using DJI Studio
Based on user feedback, DJI Studio handles 360° reframing, keyframes, subject tracking, and basic editing well. The desktop interface also gives you more space to work with panoramic footage.
Performance is the main concern. Some users on Reddit have reported lag, crashes, playback issues, and keyframe problems, especially on Windows and when processing high-resolution footage. Another review also noted limited timeline and audio controls. See the pros and cons of using DJI Studio below.
- Free to use for supported DJI workflows
- 360° reframing with viewing direction, perspective, and field-of-view controls
- Keyframes for pans, rotations, and viewpoint changes
- Subject tracking to keep moving subjects in frame
- Basic editing tools including trimming, transitions, filters, effects, and music
- Mac and Windows support for desktop editing
- High-resolution footage can be demanding, especially 8K video
- Some users report crashes, lag, and playback issues, mainly on Windows
- Limited advanced editing controls for audio, effects, and timeline work
- Less flexible than professional editors for complex projects
- Performance may vary by system and software version
Part 5. Best DJI Studio Alternative for Editing 360° Video: Filmora
If DJI Studio covers the 360° reframing you need but feels limited for the rest of your edit, Wondershare Filmora gives you a broader timeline while keeping 360° editing inside the same project.
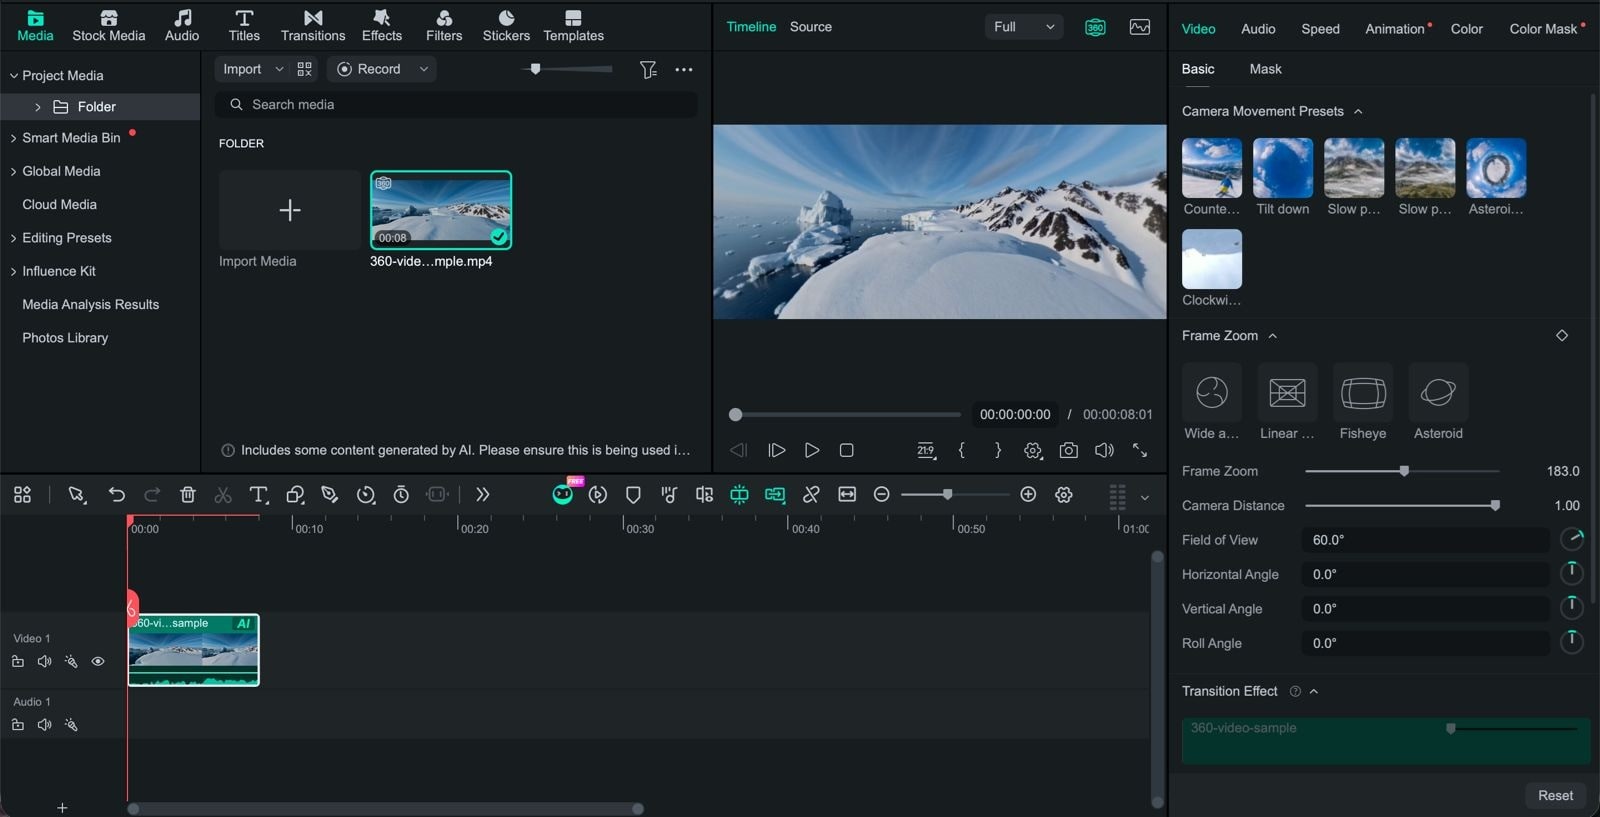
With the latest version, Filmora now supports native 360° video editing, so you can import supported 360° footage, choose your viewing angle in the interactive player, and reframe it into a standard 2D video. Key controls include:
- Field of View (FoV) to zoom the view in or out
- Horizontal Angle to change the viewing direction from left to right
- Vertical Angle to adjust the viewing direction up or down
- Roll Angle to level or rotate the horizon
- Camera Distance to adjust the perspective and apparent distance from the scene
- Frame Zoom to fine-tune the framing of the shot
Filmora also includes one-click perspective presets such as Tiny Planet, Fisheye, Wide Angle, and Linear Perspective, plus movement presets for effects such as Slow Push/Pull, Orbit/Pan, Tiny Planet Unfold, Down Pitch, and Sky Flip.
What Filmora Adds Beyond 360° Reframing
After you reframe the 360° clip, you can continue editing it on Filmora's regular timeline just like any other video project. The 360° tools are built into the same editing environment, so you can move straight from reframing to:
- Basic video editing (trim, split, and cut clips)
- Playback speed adjustments
- Transitions and VFX
- Text, titles, and captions
- Audio editing
- Color adjustments
- Multi-track editing
- Keyframes and other Filmora editing tools
With Filmora, you can reframe the 360° footage, edit the video, and export a standard 16:9 or 9:16 video for platforms such as YouTube, TikTok, and Instagram without moving the project between different apps.
Note: Filmora focuses on reframing 360° footage into flat 2D video. It doesn’t currently export interactive 360° VR playback files.
 Secure Download
Part 6. DJI Studio vs Filmora: Which One to Use?
Both DJI Studio and Filmora can handle 360° footage, but they suit slightly different editing needs. DJI Studio is a more DJI-focused desktop editor, while Filmora combines 360° reframing features with a more comprehensive set of editing tools.
| Feature | DJI Studio | Filmora |
| 360° reframing | Yes, with viewpoint and FOV controls | Yes, with FOV, horizontal/vertical angle, roll, and camera distance |
| Keyframe movement | Available for changing viewpoints | Available, plus movement presets for 360° footage |
| Features | Basic 360° viewing and reframing tools | Trim, split, speed ramping, transitions, VFX, text, audio, color, and multi-track editing |
| Best suited for | DJI users focused on 360° and panoramic footage | Creators who want 360° editing plus broader video production tools |
| Cost | Free | Paid editor with a free version |
|
Show More
Show Less
|
||
Key Takeaways:
- DJI Studio is a better fit for a DJI-focused 360° workflow, especially when reframing and panoramic editing are the priority.
- Filmora is a better fit if you want 360° reframing plus a wider set of video editing tools in the same timeline.
Secure DownloadConclusion
DJI Studio is a capable desktop editor for DJI users working with 360° footage. Its reframing, keyframes, subject tracking, and basic editing tools cover the main steps from panoramic footage to a finished video. However, large 8K projects can be demanding, and its timeline and audio controls may feel limited for more detailed edits.
If your projects need more advanced editing after reframing, Filmora is worth considering. Its 360° tools work alongside a wider set of editing features, giving you more flexibility to finish the entire video in one timeline.
FAQs
-
Is DJI Studio free?
Yes. DJI Studio is free to download and use on supported Windows and Mac computers. You can download the latest version from DJI’s official website. -
Is DJI Studio good for beginners?
For basic 360° editing, yes. The main tools are fairly easy to understand, including reframing, keyframes, subject tracking, and simple timeline edits. For more complex projects, you may need a more advanced video editor. -
Can I download DJI Studio for Android?
No. DJI Studio is a desktop application for Windows and macOS. If you want to edit Osmo 360 footage on a phone, you can use DJI Mimo. The app lets you sync, edit, and share panoramic videos directly from your smartphone. -
Can I use DJI Studio to edit regular footage?
Yes, DJI Studio can handle supported DJI footage beyond 360° video, with tools for trimming, transitions, filters, effects, and music. However, its strongest use case is DJI's panoramic and 360° editing workflow, so creators who are looking for a more full-featured general video editor might prefer software like Filmora.
