
 100% Security Verified | No Subscription Required | No Malware


 ChatGPT
 Perplexity
 Gemini
 Claude
 Grok
Grok
Have you ever uploaded a video to YouTube, only to find it's sideways and you desperately need to rotate YouTube video? Or perhaps you're trying to watch a video that's stuck in the wrong orientation. It’s a common and frustrating problem, but the solutions are straightforward—if you know where to look.
This guide provides clear, up-to-date instructions for both creators who need to fix their own videos and viewers who just want to watch comfortably.
Table of Contents
Part 1: The Quick Answer: How to Rotate a YouTube Video
Vertical Video Syndrome (VVS) has the potential to make videos appear uncomfortable and difficult to watch. Generally, a rotation request arises from a phone video recording turned wrong side up, a clip that has been scanned, or some downloaded footage that is not properly aligned. Fortunately, fixing this is straightforward, but the solution to rotating YouTube videos differs for creators and viewers.
- For Creators: You cannot rotate a video directly in YouTube Studio anymore. The feature was removed. You MUST rotate the video file on your PC or Mac before you upload it. The best way is to use a video editor like Wondershare Filmora.
- For Viewers: To fix a video you're watching, simply rotate your mobile device or, on a PC, use a browser extension.
Continue reading to learn the detailed steps for rotating YouTube videos.


Part 2: For YouTube Creators: How to Permanently Rotate YouTube Videos
As a creator, ensuring your video is correctly oriented is essential for professionalism and viewer experience. Here is the definitive workflow.
2.1 The Golden Rule: Rotate Your Video Before You Upload
Years ago, you could rotate a video in YouTube Editor. This feature has been removed from YouTube Studio. It is no longer possible to fix a video's orientation after it has been uploaded.
The only correct way to fix a sideways video is to rotate it on your computer or mobile device using a professional video editor and then upload it to YouTube.
Wondershare Filmora: The Best Tool for Rotating and Editing YouTube Videos
If you want a professional viewer experience, having the right orientation is the first thing that you need to consider while uploading a YouTube video. Wondershare Filmora ranks among the most dependable and professional tools for a particular purpose. The user-friendly interface attracts beginners, while the technical features grab the attention of advanced users.
Working with videos is a simple matter of rotating them by 90°, 180°, 270°, or any other angle that you think appropriate, with just one click on the rotate function. Additionally, Filmora is equipped with export presets that are compatible with YouTube. This means that when a video is properly oriented, exporting can be done in the best format and resolution for YouTube without compromising quality.
In addition to just turning, Filmora also offers a complete set of editing tools that can be helpful to users. The platform's users could be empowered by giving as well as taking text overlays, applying transitions and visual effects, merging and trimming clips, and allowing the use of background music or voiceovers.
Ready to fix your video orientation and elevate your YouTube content? Download Wondershare Filmora today and start creating flawless, professional videos in minutes!
Key features of Wondershare Filmora:
- User-friendly interface: The design is for creators of all skill levels, from the skills of a newbie to the proficiency of a pro.
- One-click rotation: In a very short time, turn your videos either in a standard or a custom angle to solve orientation issues.
- YouTube-ready export presets: Make the output of your video in the most appropriate format directly for YouTube.
- Comprehensive editing tools: Besides trim, cut, and merge, you can also write, add transitions, effects, and music to the video.
- AI-powered enhancements: Just like Smart Short Clips, Auto Reframe, and AI Video Enhancer, the simplifying of the process goes hand in hand with the upgrading of the visual quality.
How to rotate a YouTube video in Wondershare Filmora
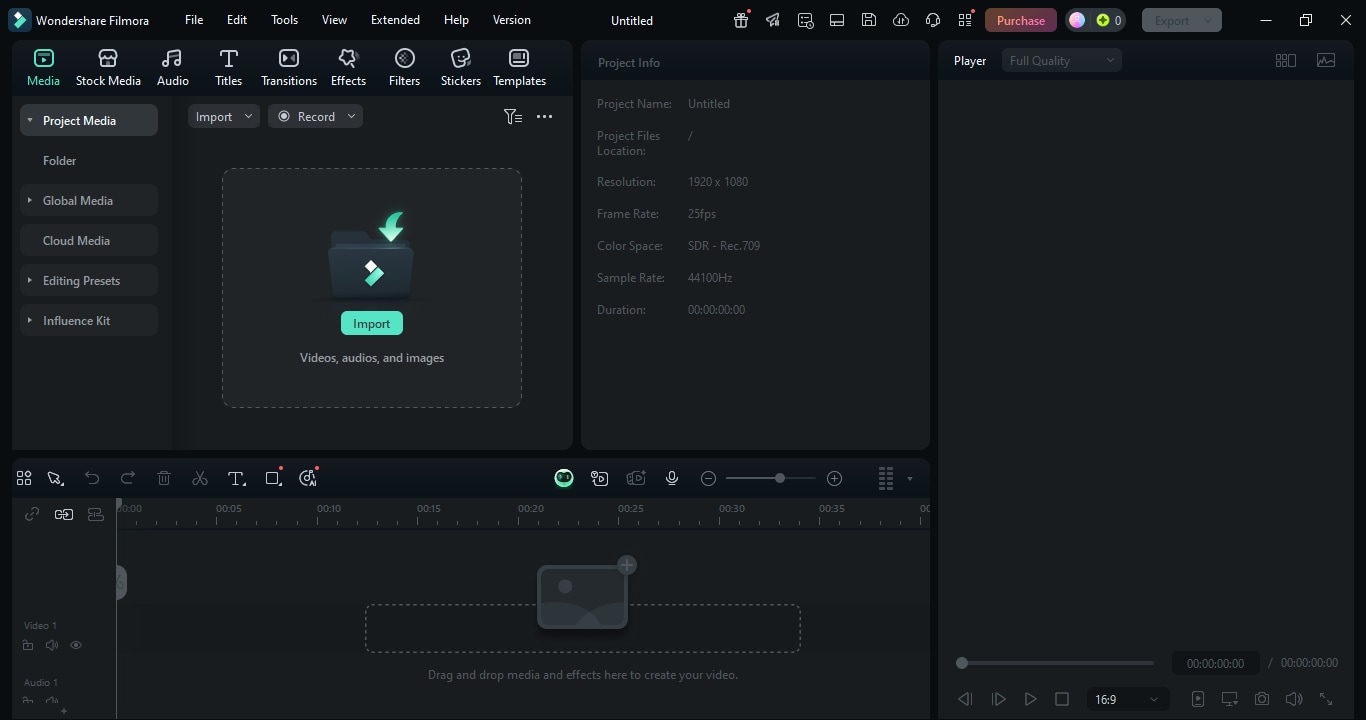
Step 1Import your video
Open Filmora on your PC or mobile and tap Import. Adding a YouTube video that you want to rotate can be done in several ways, such as directly dragging and dropping the file into the media library or using the Import button to locate it on the device.
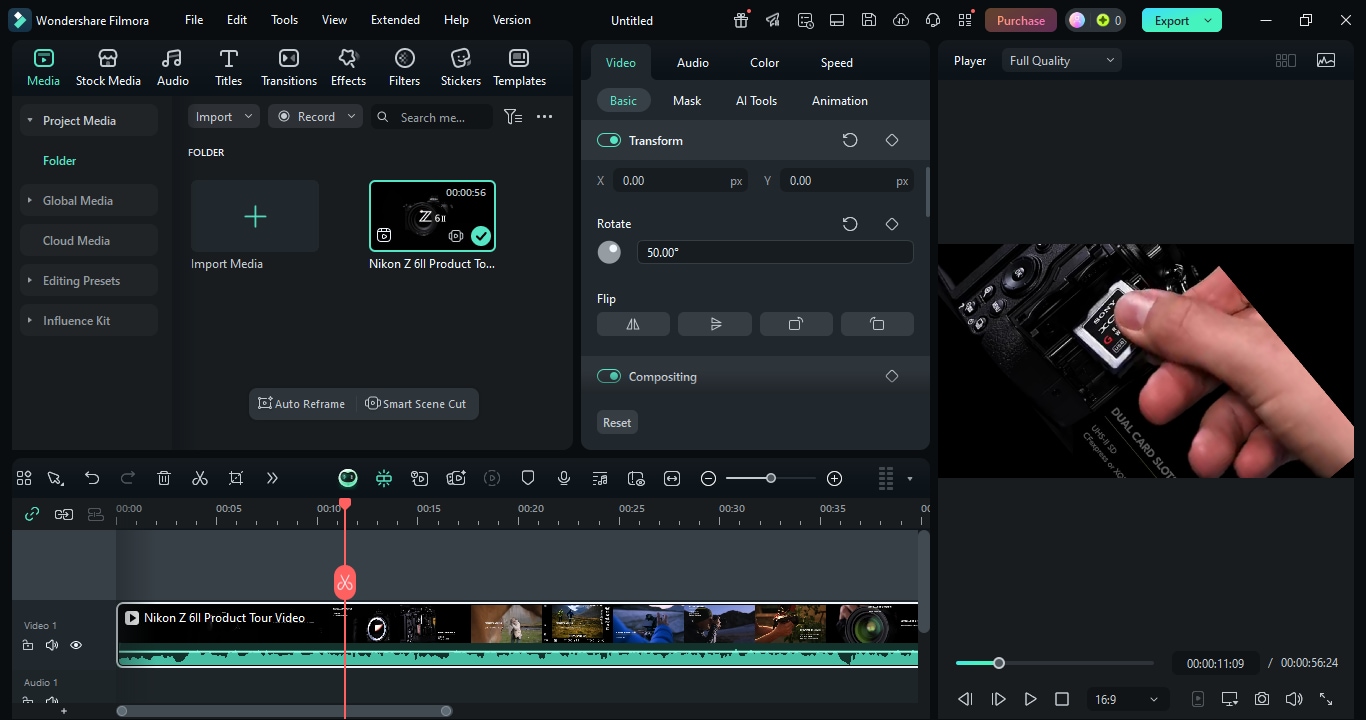
Step 2Rotate the video
After that, put your video on the timeline using drag and drop. In the Basic section, choose the Video section. Find the Rotate feature and type the angle you want—90°, 180°, 270°, or any other angle you want. The change will be reflected in the video preview instantaneously.
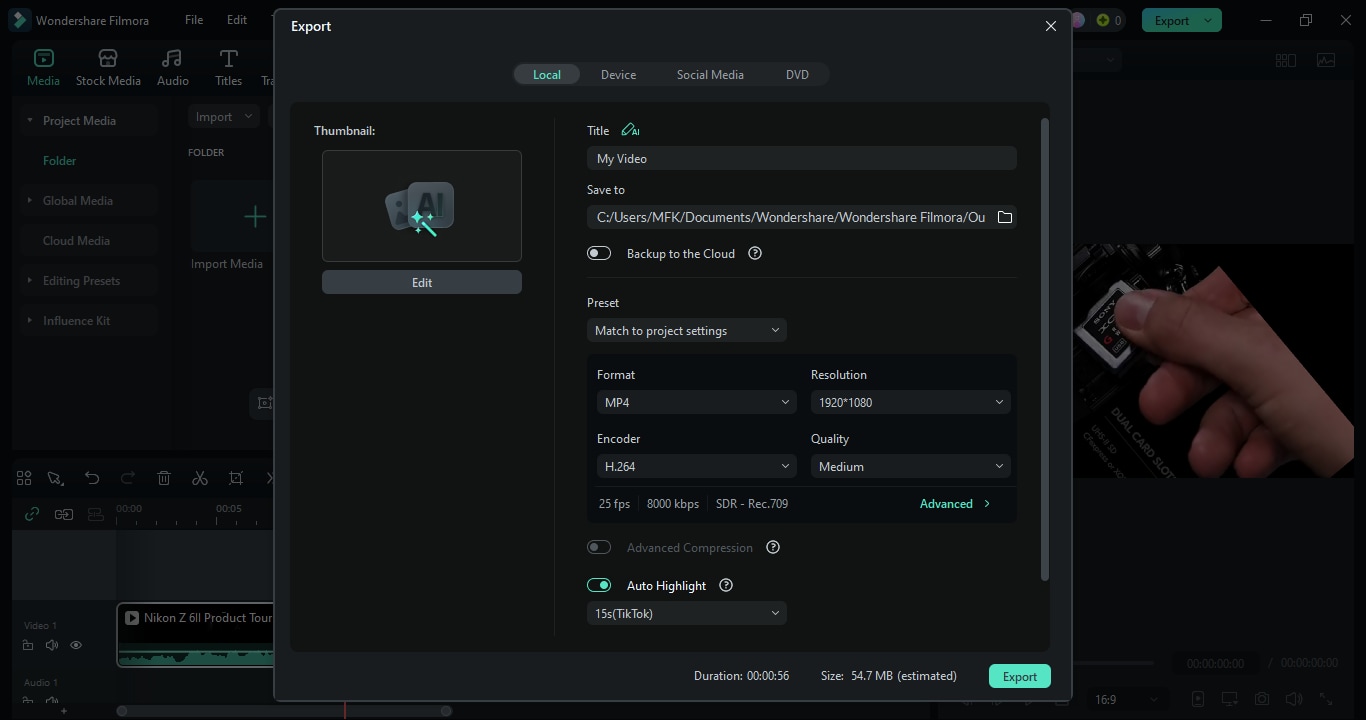
Step 3Export the video
Finally, when the video is correctly rotated and you have also completed other editing, click the Export button. Setting the format, resolution, and preinstalled settings (Filmora has presets ready for YouTube) and then saving the file to your device will be the next steps. The video is now in the right direction for uploading to YouTube.
2.2 The Emergency Fix: If You Already Uploaded (How to Rotate Uploaded YouTube Videos)
On some occasions, a YouTube video may be uploaded in the wrong direction due to an error, causing the video to be turned sideways, upside down, or at a slight angle. YouTube Studio has removed its internal rotating functionality, so the only way to rectify it is by editing the video offline and uploading it again. This way, you would be displaying your professionalism on your channel and not irritating the users.
Correct the uploaded video in the following ways:
- 1. Remove the incorrect version
Firstly, take out the video, which is not in the right orientation, from your YouTube channel. This step is imperative to prevent confusion, negative reactions, and ensure that users only access the right-formatted content. Be careful if your video is already highly engaged; in that case, unlisting it temporarily might be a better choice rather than deleting it.
- 2. Offline rotating with the help of editing software
Wondershare Filmora, iMovie, or Adobe Premiere Pro are some of the video editing tools you can use to rotate your video to the correct angle. Along with rotation, these programs give you the option for the additional part of the video to be trimmed, text, or audio to be added, etc. So, it's also a good moment for you to update your video.
- 3. Upload again the fixed version
After the rotation is done right and the video editing is complete, the video should be uploaded to your YouTube channel. Keeping in mind the previous upload, if there is any, go ahead and use the same title, tags, and description to save the search engine-friendly attributes. Additionally, it is possible to reschedule it to get in line with your channel's lecture time.
- 4. Update the video description and links
If the initial video you created was distributed on social media, used as an embed on other websites, or part of playlists, then it is necessary to update all references to the fixed version. If needed, include a change log in the video description that provides an updated version, allowing your viewers to understand the change and avoid confusion easily.
Part 3: For Viewers: How to Temporarily Rotate a Video You're Watching
If you're just watching a video that's displayed incorrectly, here are some quick fixes.
3.1 Rotate YouTube Video on Mobile
Sometimes when you watch a video on your iPhone or Android device, it is rotated sideways or upside down. You can make a quick fix of this without the need to download the video:
1. Enable auto-rotation on your device:
- iPhone: The Control Center is opened by swiping down (or up), and you should check that Rotation Lock is turned off.
- Android: Pull down the notification bar from the top of the screen and tap the Auto-rotate icon to turn on the feature.
2. Rotate your phone physically: Just rotate your device to the orientation of the video, and the YouTube app should get the change automatically to a proper fit of the screen.
3. Use third-party apps or video players (optional): If the video still doesn't rotate properly, you may temporarily rotate the downloaded video using apps like MX Player, VLC for Mobile, or certain mobile browsers.
Note: By this method, only the orientation of the video on your device is changed. The original video remains in its original orientation for other viewers.
3.2 Rotate YouTube Video on PC
If you are watching a video on YouTube that is turned sideways or upside down on a computer, it is not possible to rotate it on YouTube. However, there are several ways to change the orientation while viewing. Using browser extensions, enabling the screen rotation feature on your monitor, or playing the video in third-party media players after downloading. These methods allow you to view the video correctly.
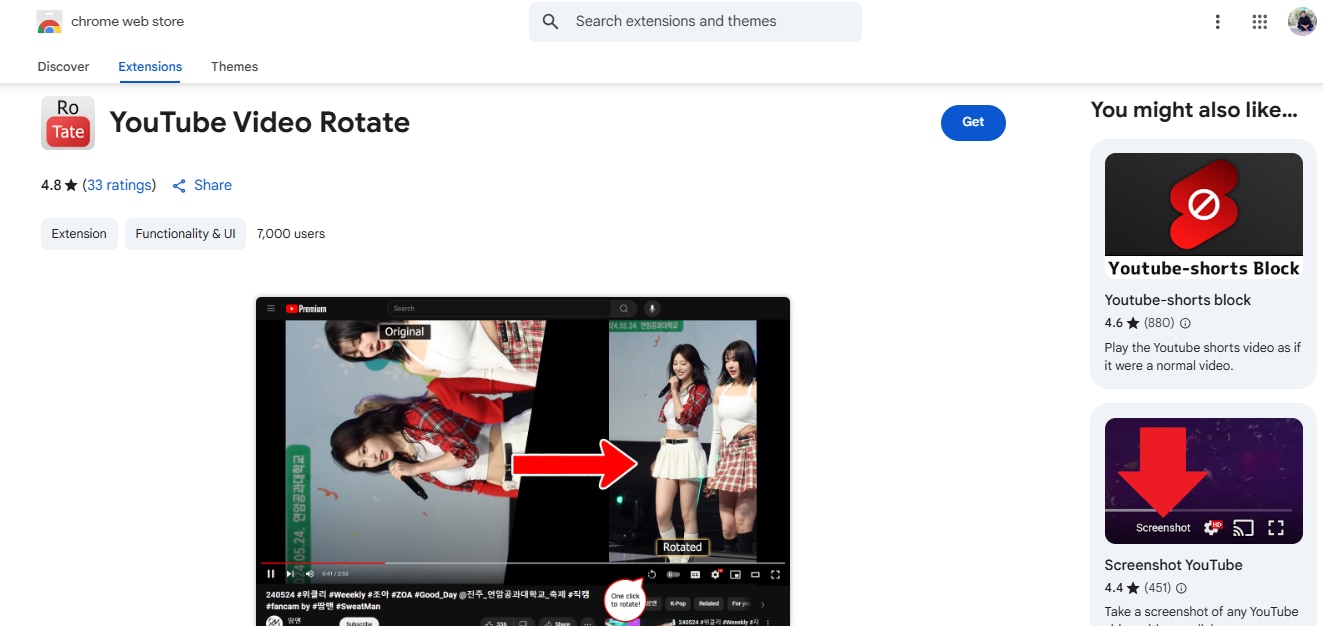
The YouTube Video Rotate Chrome extension is probably the most common way to deal with such a problem. To rotate a video no matter what the YouTube player is, this simple tool is the most user-friendly method directly, thus it is enough to have good viewing experience of the turned or vertical videos.
Key features of YouTube Video Rotate:
- One-click rotation: A single click is all it takes to change the orientation of your video instantly.
- Quick shortcut: You can rotate the video by hitting 'R' without the playback being stopped.
- Great for vertical videos: View YouTube Shorts and TikTok-like videos in full-screen mode, and it is comfortable.
- Safe and small: The extension is only 15.96KiB in size, and the developers do not collect or sell your data.
How to use the YouTube Video Rotate extension on a Windows PC
Step 1Get the extension
Navigate to the YouTube Video Rotate listing in the Chrome Web Store, then click on the Get button. Follow the instructions on the screen to complete the installation. Since the extension is small and safe, it will be available to use in just a few seconds.
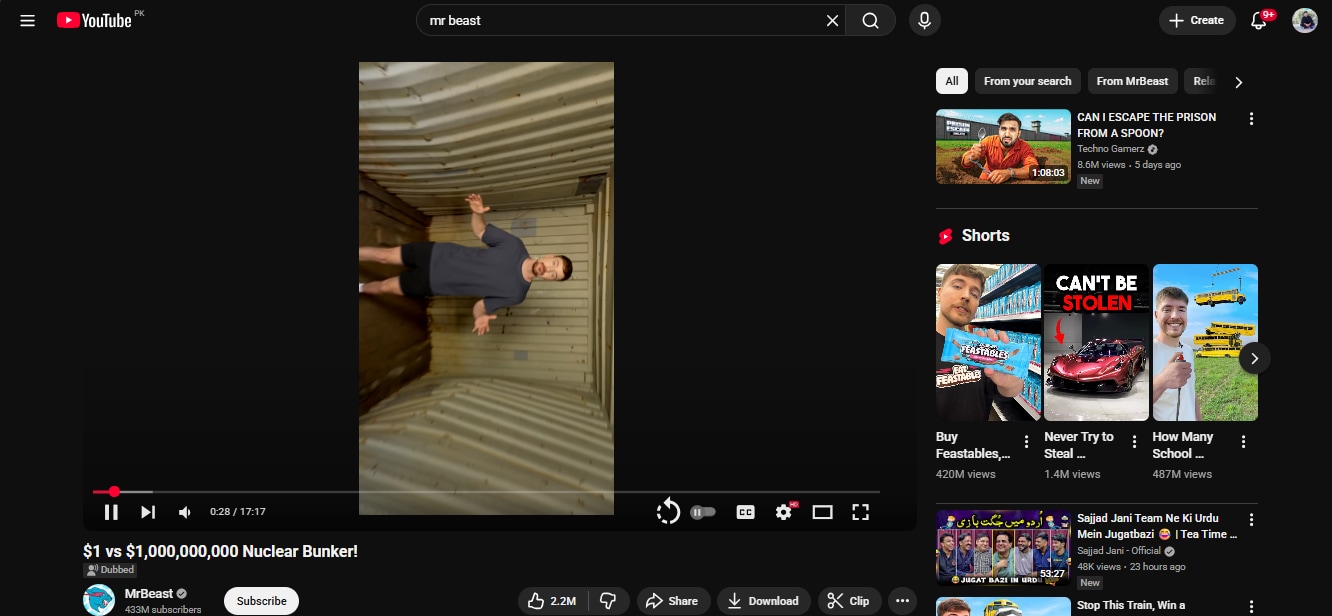
Step 2Go to a YouTube video
Look for a YouTube video. The Rotate Video button will be visible at the bottom of the video player, where it is conveniently placed for easy access without interfering with other functions.
Step 3Change the position of the video
The video will be rotated by 90 degrees. The video can be set to 90°, 180°, or 270°, depending on the desired orientation.
Part 4: Troubleshooting Common Rotation Issues
Even if you have the top equipment at your disposal, it is still possible that rotating a YouTube video may result in some problems that you haven't expected. Ensuring that you are up to speed with these issues, as well as the solutions to them is what guarantees that your video is of high quality and that it is correctly displayed.
4.1 Addressing quality and aspect ratio problems
- Black bars and stretching distortions: In some cases, a video may rotate suddenly, black bars may be seen on the sides of the display, or the picture may be stretched if the aspect ratio is not kept. You should verify that your editing software maintains the original aspect ratio, or use trimming tools to adjust the frame fitting so as not to have such a condition.
- Quality preservation during rotation: Occasionally, the quality of the video can be compromised during the rotation or export process in certain editing tools. So, the advice will be to always set the exports in high quality and, if possible, use the original video file instead of a compressed one.
- Export settings optimization: Pick a proper format and quality for a YouTube video that will be visually and technically acceptable as MP4 with an H.264 codec.
4.2 When rotation doesn't work as expected
- Codec compatibility problems: The reason why some videos do not rotate correctly is that they are encoded with codecs that are not supported. The most effective way to fix this issue is to first change the format of the video into a commonly used format like MP4 and then proceed with the rotation.
- Metadata conflicts and solutions: The reason why rotation changes cannot be implemented is that the metadata is wrong or corrupted. When you use editing software that updates the metadata automatically upon exporting, then the rotation is the one that counts.
- Browser extension conflicts: If you have installed extensions such as YouTube Video Rotate, there might be other extensions or even browser settings that could be the reason for your problem. To troubleshoot, you should disable the conflicting extensions or try a different browser for the rotation.
Ignoring these issues and employing the appropriate rotation process, one can uphold the quality, transparency, and user experience of their YouTube videos, thereby making their content appear professional on any device.
Conclusion
Rotating a YouTube video is one of the necessary things that should be done to give a professional and easy viewing experience. The viewers can use mobile autorotation, screen rotation, or browser extensions like YouTube Video Rotate to change the orientation of the video, whereas the creators should use video editing software like Wondershare Filmora to rotate videos before uploading them. In the case of videos that have been uploaded with the wrong orientation, the most suitable method is to edit offline, rotate correctly, and re-upload while also changing the descriptions and links to prevent any misunderstandings.
By taking care of aspect ratio, video quality, codec compatibility, and export settings, you can make sure that your content looks appealing and professional.
