
 100% Security Verified | No Subscription Required | No Malware


 ChatGPT
 Perplexity
 Gemini
 Claude
 Grok
Grok
If your footage looks wobbly or bends strangely, especially after filming quick pans, what you're seeing is most likely a rolling shutter problem. It's a common issue in cameras that use CMOS (Complementary Metal-Oxide-Semiconductor) sensors.
Though it can be annoying to look at, this kind of distortion can be fixed with Premiere Pro's rolling shutter repair. The process is pretty straightforward since it's already built into the software. But before we walk you through how to fix it, let's get into more detail about the problem you are currently grappling with and why it happened in the first place.
In this article
Part 1. What is Rolling Shutter and What Caused It?
If your camera has a CMOS sensor, it means it captures your footage by scanning the image from top to bottom, line by line, instead of all at once. It's similar to how a scanner machine moves a light bar across a page.
Now, imagine if the camera or the subject moves quickly. Since the sensor can't capture everything in a single instant, different parts of the frame are recorded at slightly different times, which then causes the rolling shutter effect.
The rolling shutter effect is a visual distortion that happens because of the slight delay in how the sensor scans the image. It makes straight lines tilt, fast-moving objects stretch, and the whole image appear to wobble, while it actually doesn't in real life.
Video: Video Editing With Tyler White (YouTube)
Fast camera or subject movement isn't the only thing that causes the rolling shutter effect. Several other factors can also lead to this issue, such as:
- High zoom levels, which make even small shakes look more dramatic.
- Poor stabilization, especially in handheld shots.
CMOS sensors are found in most modern digital cameras, including DSLRs, mirrorless models, and even the smartphones you are using, which is why this rolling shutter issue shows up more often than you'd like. When it happens, you can fix the rolling shutter in Premiere Pro.
Part 2. How to Fix Rolling Shutter in Premiere Pro
Professional video editing software, Premiere Pro, includes a built-in effect called Rolling Shutter Repair that can help you correct rolling shutter distortion. The tool is available in the Effects panel and works by analyzing your clip to counteract the bending and wobbling caused by the camera's sensor.
For a detailed guide on how to use the rolling shutter repair in Premiere Pro, you can follow these simple steps below.
Step 1: Add your clip to the timeline
Import your footage and place the problem shot in a sequence that matches its settings.
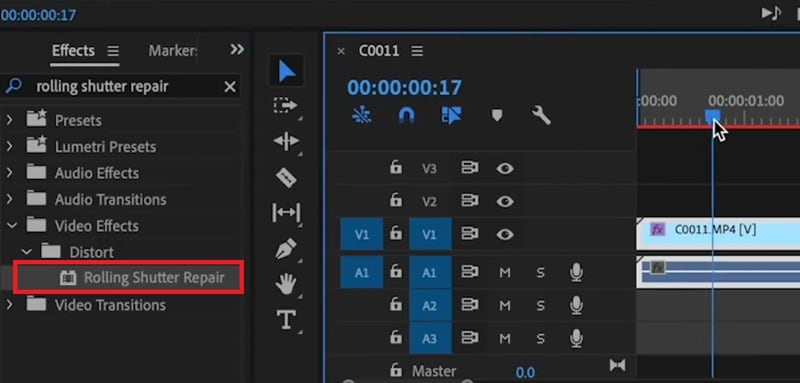
Step 2: Open the Effects panel
Go to the Effects panel and search for Rolling Shutter Repair under Video Effects > Distort. Drag Rolling Shutter Repair onto the clip.
Step 3: Adjust the repair settings
After applying the Premiere Pro Rolling Shutter Repair effect, you can adjust its settings to get the best result for your footage.
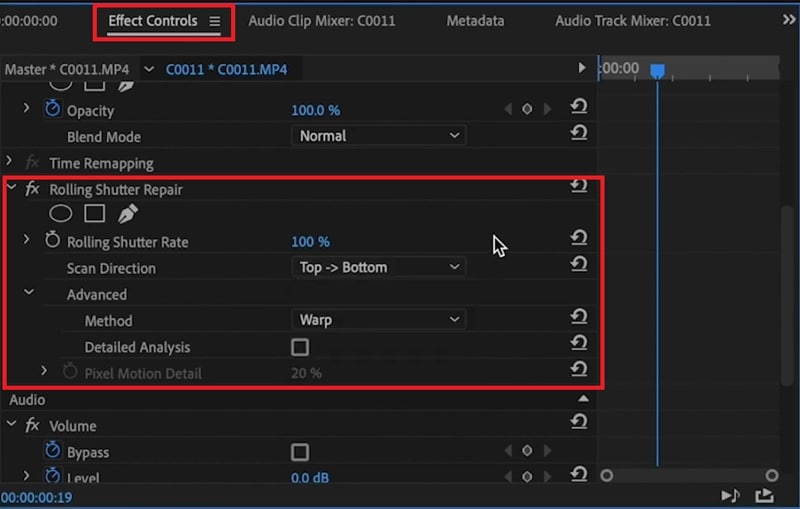
Head to the Effect Controls panel, and you'll find several options:
- Rolling Shutter Rate: Controls how much of the frame rate is used for scanning. Most DSLRs fall between 50–70%, while smartphones can reach 100%.
- Scan Direction: Defines the direction in which the sensor scans the image. Most cameras read from top to bottom, but depending on how your footage was shot, you may need to change this to bottom-to-top or side-to-side for better correction.
Advanced Options:
- Method: Determines how the footage is corrected. Pixel Motion gives you smoother, more precise results using optical flow; meanwhile, Warp gives you faster, simpler point-based correction.
- Detailed Analysis: Enables a deeper, more accurate point analysis when using the Warp method. This takes longer but can improve complex shots.
- Pixel Motion Detail: Adjusts how precisely Premiere analyzes pixel movement when using the Pixel Motion method. Higher detail improves accuracy but may increase render time.
When you're done fixing the rolling shutter in Premiere Pro, you can go ahead and export your video to save it. If there are still slight warps or bending lines even after you've applied the effect, you can try another method, which we are going to cover next.
Part 3. How to Fix Rolling Shutter Without Premiere Pro's Repair Effect
Because rolling shutter creates visible warping and wobbles, you can also rely on Mocha tools to reduce or remove those artifacts. Mocha uses advanced planar tracking to analyze how different parts of the image move, which you can use to correct distortions that happen because of the rolling shutter issue.
If you prefer a simpler workflow, Wondershare Filmora includes Mocha tracking technology directly inside the editor. You don't have to switch between different software or deal with complex setups again.
 secure download

While it might not be as direct as Premiere Pro's Rolling Shutter Repair, Mocha inside Filmora can be a practical alternative for cleaning up those unwanted bends and shakes often caused by rolling shutter.
Accessing the Mocha Filmora
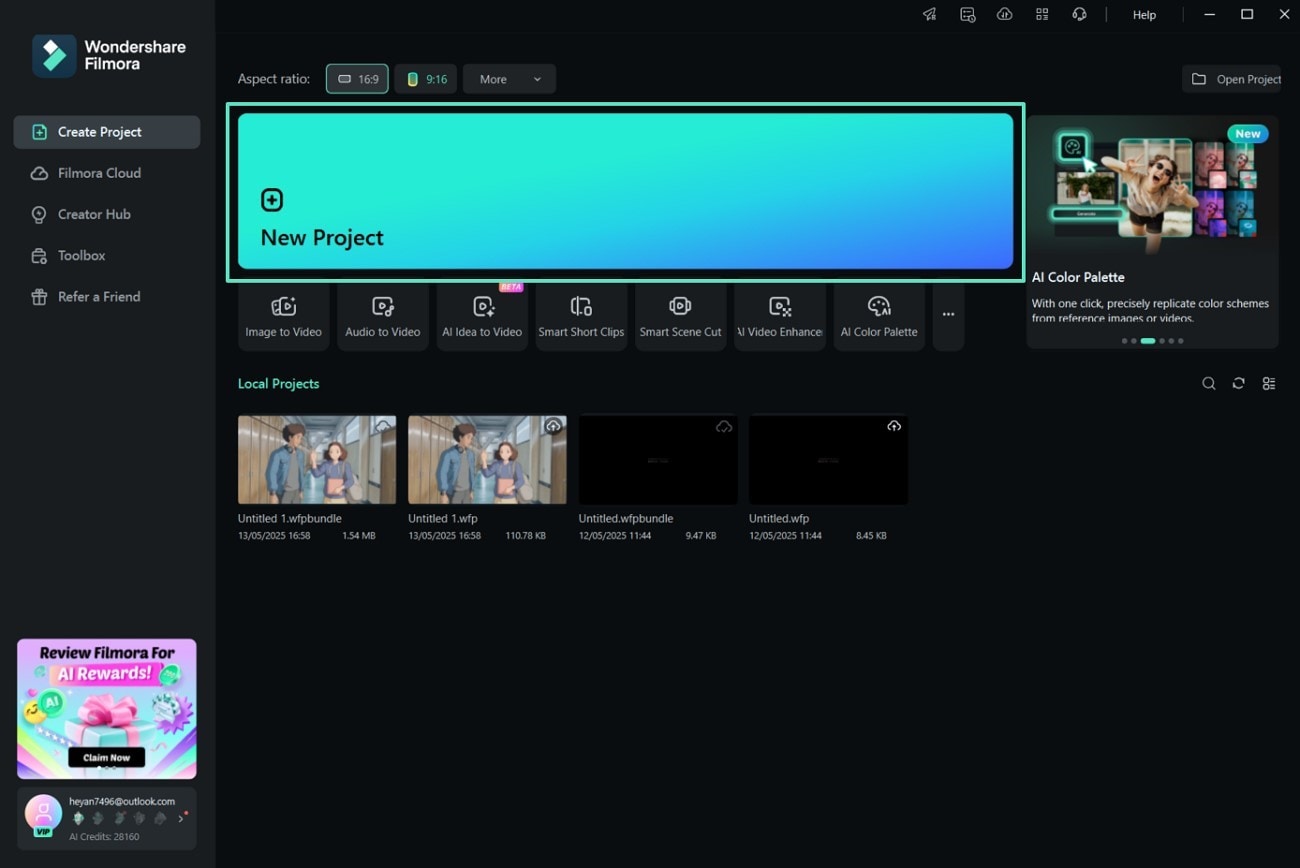
Step 1. Start a New Project in Filmora
Open Filmora on your computer and choose "New Project" from the home screen. Then, import your video file into the media library and drag it onto the timeline to begin editing.
 secure download
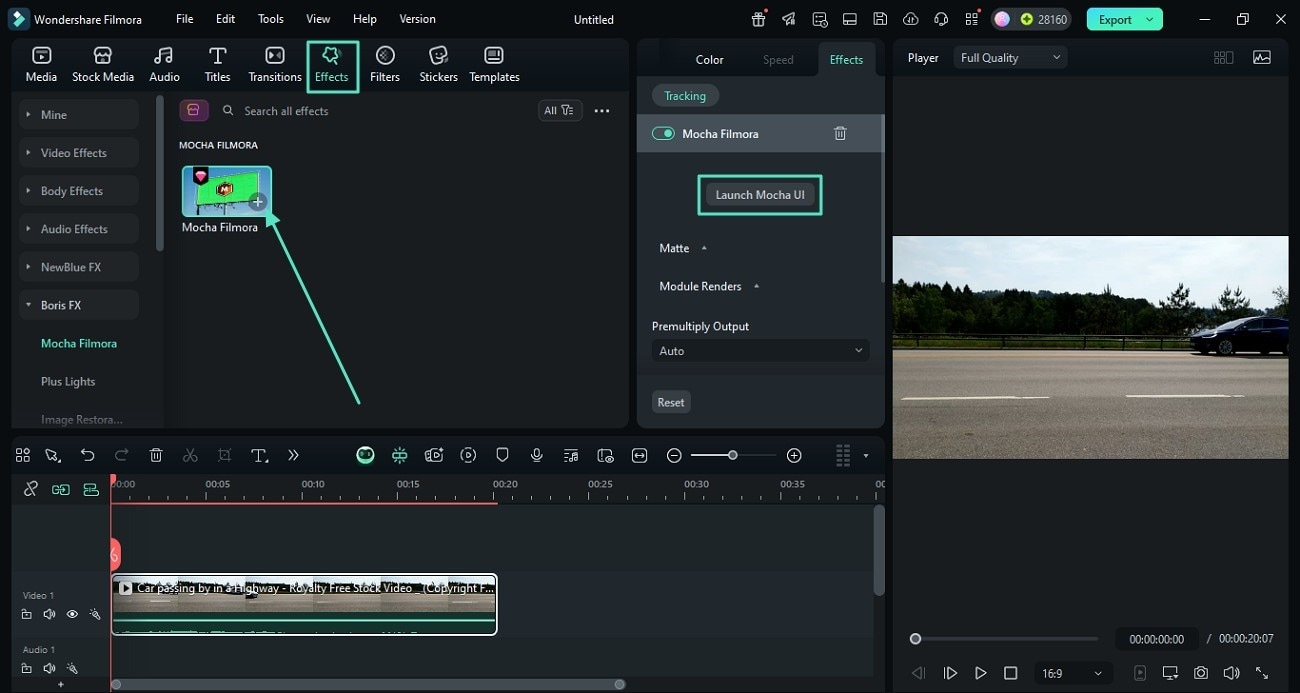
Step 2. Access Mocha Filmora from the Effects Tab
After adding your video:
- Go to the Effects tab and expand the Boris FX category on the left panel.
- Search for Mocha Filmora and drag the effect onto your clip to activate it.
- Open the Effects panel and select Launch Mocha UI to enter Mocha's interface, where you can perform advanced visual tracking and masking operations.
Fixing the Camera Distortion
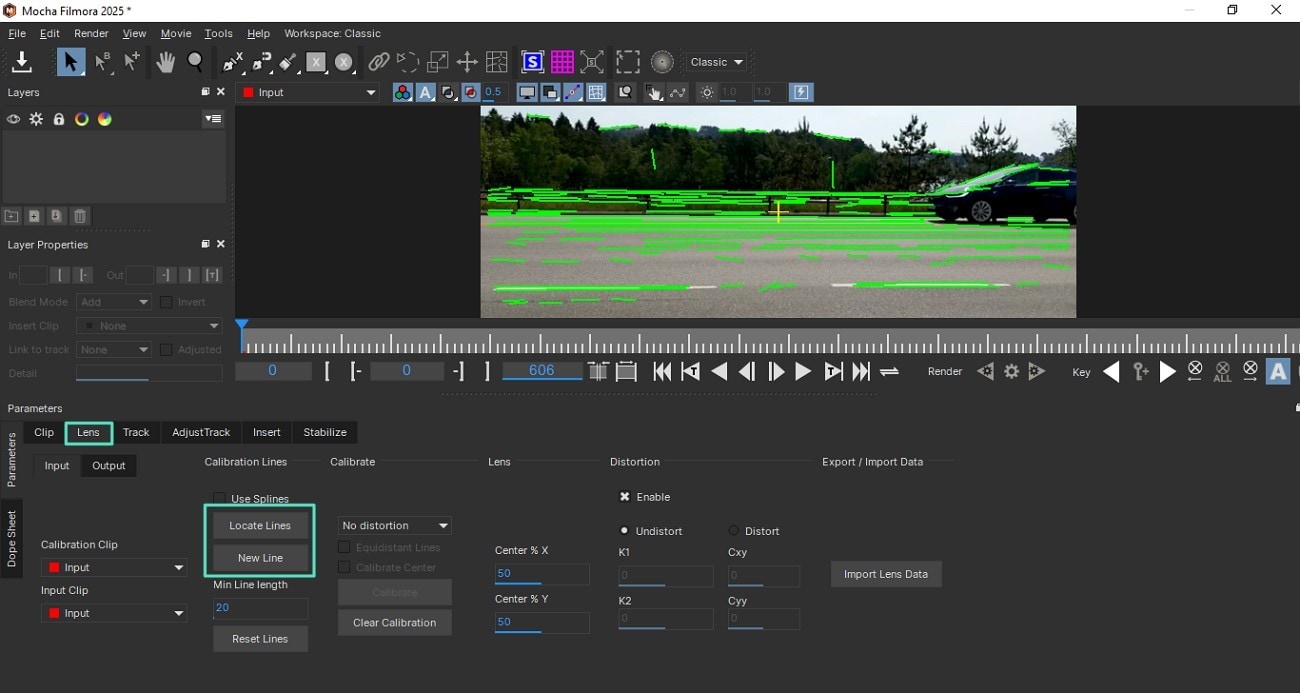
Step 1. Identify Calibration Lines
After opening the Mocha workspace, select the Lens section at the bottom. From here, you can:
- Click Locate Lines to allow the tool to automatically detect distorted or uneven lines in your footage.
- Select New Lines to manually draw the lines you'd like to correct, if needed.
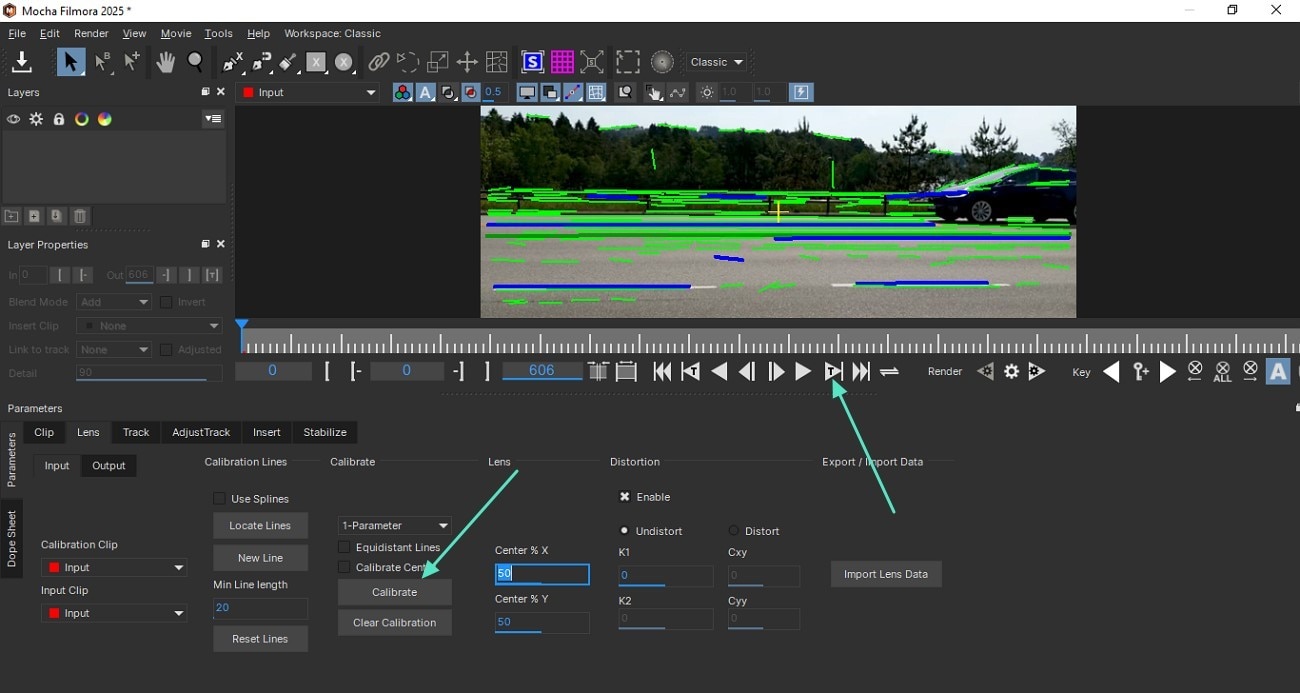
Step 2. Calibrate and Track the Footage
Next, click the Calibrate button to adjust the detected lines. Then, select Track Forward to begin the process. Preview your clip and make sure it appears smooth and free of distortions.
Part 4. How to Avoid Rolling Shutter Issues
While you've learned how to fix rolling shutter problems in Premiere Pro, it's always better to prevent and minimize the issue during shooting. There are a few simple techniques and tips you can try to reduce the chances of getting those wobbly or "jello-like" distortions in your footage.
1. Use a camera with a global shutter or faster sensor readout

Since rolling shutter occurs in cameras with CMOS sensors, you can avoid this issue by using a camera that captures the entire frame at once, like one with a global shutter. Unlike CMOS sensors, a global shutter records every pixel simultaneously, which prevents the delay that causes bending or wobbling.
Or, you can also opt for a camera with a faster sensor readout. Many newer mirrorless and cinema cameras are now equipped with improved readout speeds that greatly reduce rolling shutter distortion.
2. Stabilize your shots
Even small handheld vibrations can exaggerate the "jello effect." But if your camera is steady, it can minimize the shaking and uneven motion that makes rolling shutter more obvious. To maintain stability during filming, you can use a tripod, gimbal, or shoulder rig.
3. Avoid rapid pans or jerky movements
Since quick camera pans or sudden movements cause the most noticeable rolling shutter distortion, try moving the camera slowly and smoothly. If you need to follow action quickly, use shorter focal lengths. Wide-angle lenses make movement appear smoother and reduce any visible skew.
4. Increase shutter speed when filming action

Aside from stabilization, faster shutter speed also helps make the rolling shutter effect less noticeable. When shooting fast-moving subjects or handheld scenes, try increasing your shutter speed to 1/250 or higher. The sharper motion frames help disguise the warping, so your footage can end up looking more stable.
Just be careful not to push it too far, though. An excessively high shutter speed can introduce unwanted motion blur.
Conclusion
Using Premiere Pro's Rolling Shutter Repair to fix wobbly distortion is simple once you understand how the effect works and how to adjust its settings. After following the steps above, you can have your footage looking smooth and natural again without the bends or jitters.
Even if you are not satisfied with how the result turns out, you can also try Filmora Mocha as another method to fix rolling shutter issues and make your footage look more balanced. It works by tracking movement and smoothing out distortions, so your clip can appear steadier and pleasant to watch when shared and posted anywhere you need it.
secure download
