CapCut, with its seamless integration with TikTok, has become a popular video editing tool, boasting 500 million active monthly users. One standout feature is motion tracking in CapCut, which allows users to create dynamic, engaging content by tracking and applying effects to moving objects in videos. This powerful feature makes motion tracking in CapCut a favorite among creators, especially for TikTok videos.
However, with concerns over TikTok's potential ban in the U.S., many wonder if CapCut could face similar restrictions. While it's uncertain, alternative motion tracking software like Filmora are worth exploring. If you're interested in learning more about these video editing options, keep reading!
In this article
Part 1. An Easier Way to Use Motion Tracking: Filmora as a CapCut Alternative
Suppose you're experiencing issues with CapCut, whether due to the potential CapCut not working or simply encountering technical problems with the app, it might be time to explore a CapCut alternative. Wondershare Filmora offers a great solution for users who need reliable video editing tools, including an impressive motion-tracking feature.
You can track any object—a person, a car, or a soccer ball—and choose from thousands of effects, animations, and text styles. There is much to explore to enrich the storytelling in your videos! The best part is that you can even track multiple objects simultaneously!
How to Create Motion Tracking Effect in Filmora
Motion tracking with Filmora is fun and exciting! Download and install Filmora on your Windows or Mac device. Then, follow the steps below to get started.
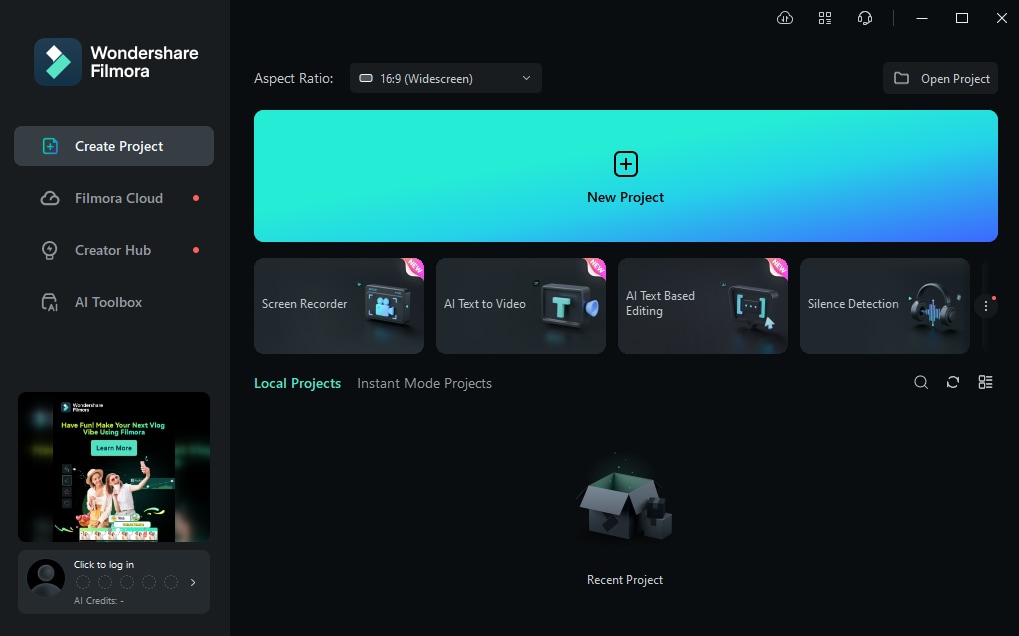
Step 1 Launch Wondershare Filmora and click "New Project" from the main interface to create an editing project.
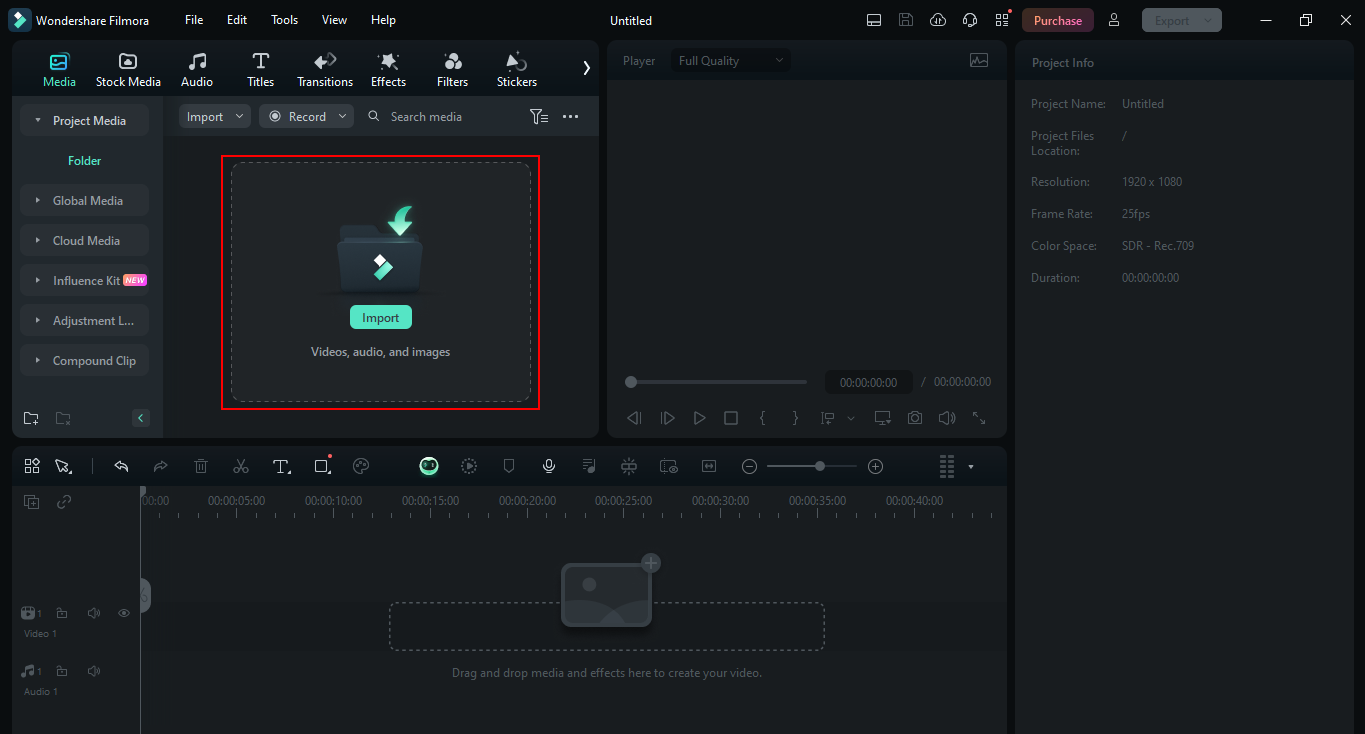
Step 2 Go to "Media" on the top left. Click "Import" to add video clips for motion tracking. Then, drag and drop the file to the timeline to start editing.
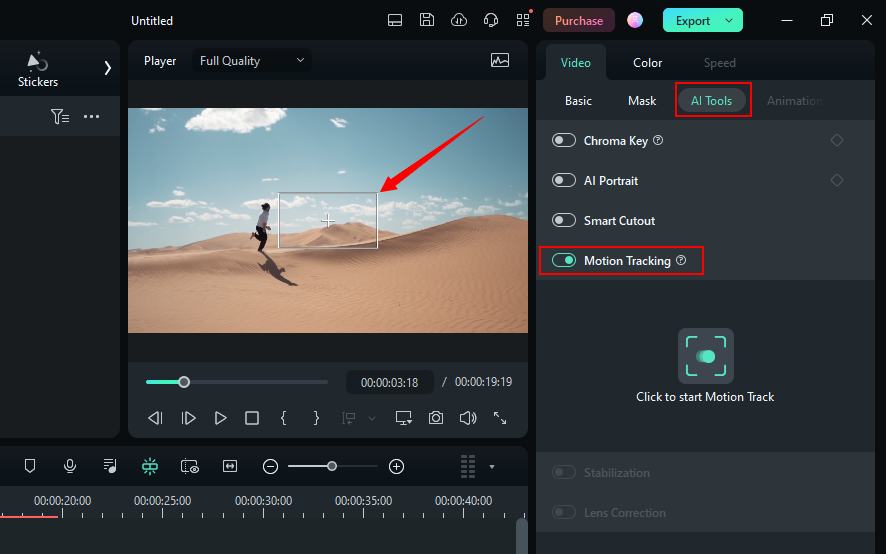
Step 3 Click on the video in the timeline to open an editing panel on the right. Then, go to the "Video" menu and choose the "AI Tools" tab.
Step 4 Turn on the toggle for "Motion Tracking" under the AI Tools. This will add a tracking box over the video preview.
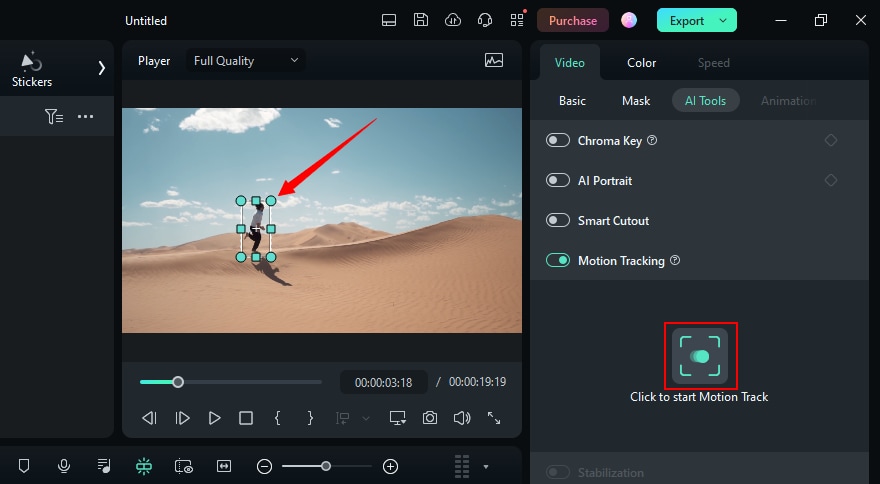
Step 5 Click and drag the tracking box to position it over the object you want to track. Then hit the button with the "Click to start Motion Track" label.
Step 6 Once the video is rendered, go to the "Titles" tab on the top left. Select your desired text and drag it to the timeline above the video.
Step 7 Click and drag the edges of the title track to adjust how long it appears in the video.
Step 8 Select the "Titles" tab from the right panel. Click the text box and write your desired text. Then customize its font, size, color, etc.
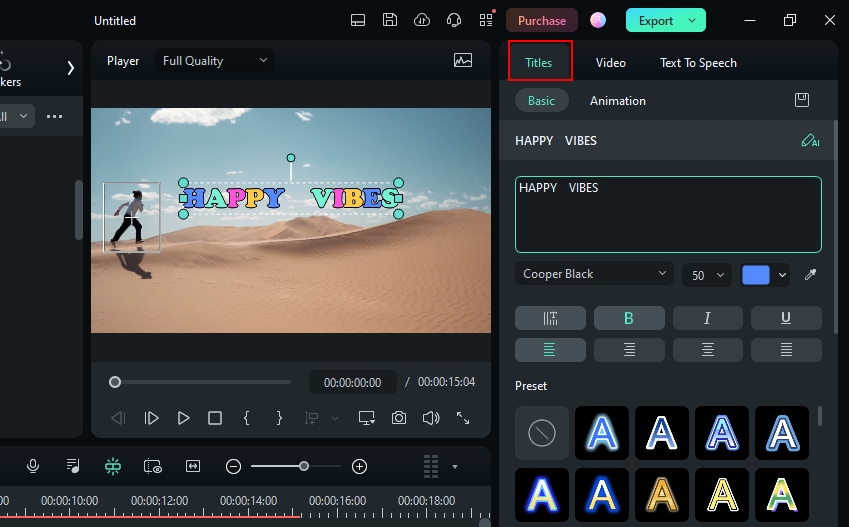
Step 9 Select the video clip in the timeline to re-open the motion tracking panel. Click the "Link Element" dropdown and select your text's name from the list.
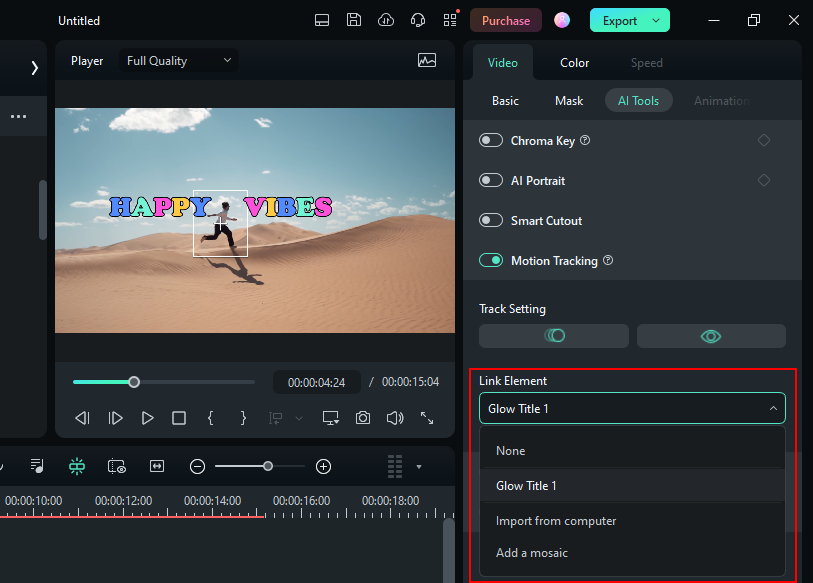
That's it! The text will automatically follow the selected object throughout the video. If needed, you can drag it to adjust its position further.
Apart from text, you can also track objects with stickers, effects, and images!
How To Use Motion Tracking With Filmora Mobile
As we all know, motion tracking is a complicated video editing skill requiring a desktop. However, these days, mobile apps are equipped with features to do it. This means that you can create advanced-level video editing procedures on the go. This is an excellent development because most videos are taken from a mobile phone. You might as well edit them using the device, right?
Filmora is one of those tools that offer this fantastic feature. To access it, follow the steps below:
Step 1: Download Filmora on your mobile phone (Android and iOS).
Step 2: Make a New Project, then import your video.
Tip: Using videos with a green screen is a more effective way to use motion tracking.
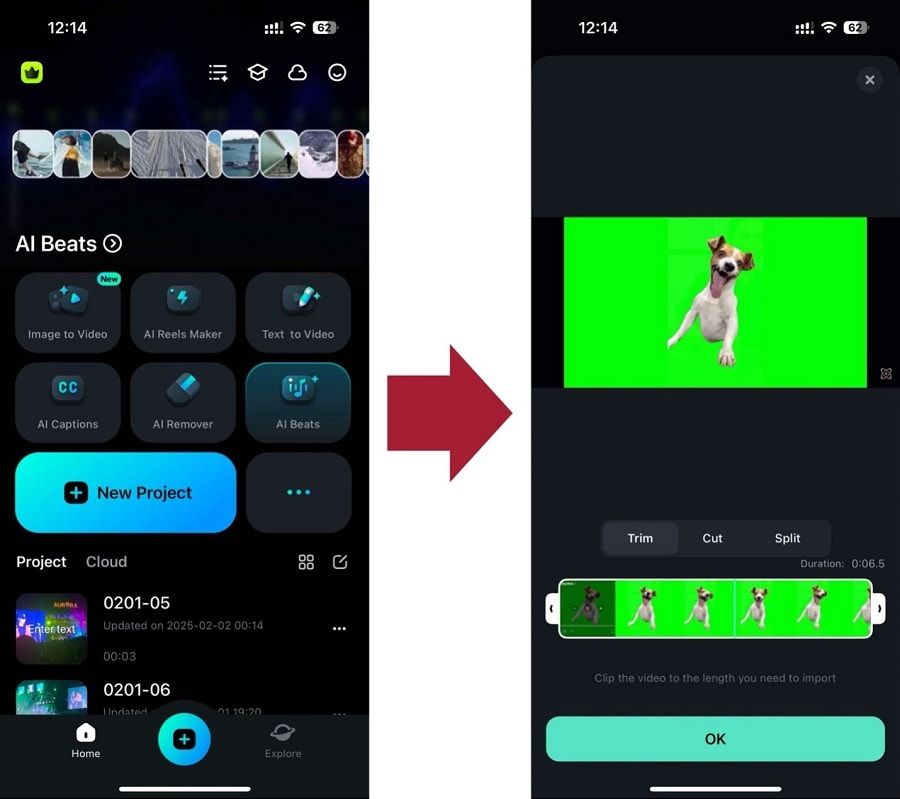
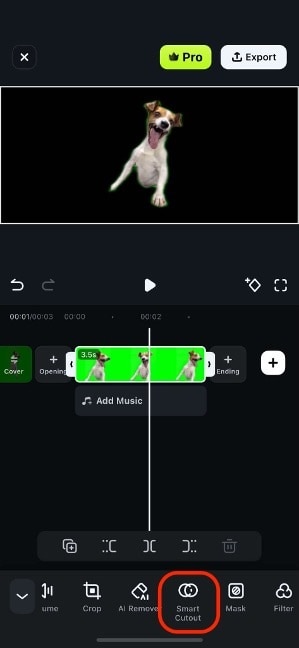
Step 3 (Optional): If you're using a green screen video, use the Smart Cutout feature first to remove the background.
Step 4: Now, add an Effect to the video.
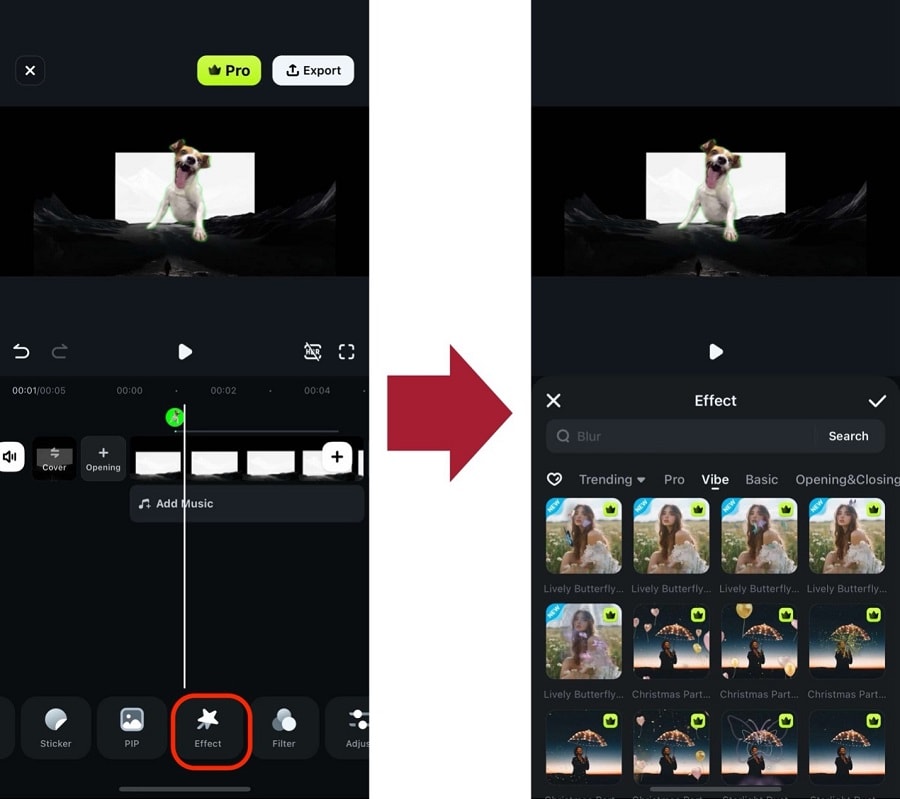
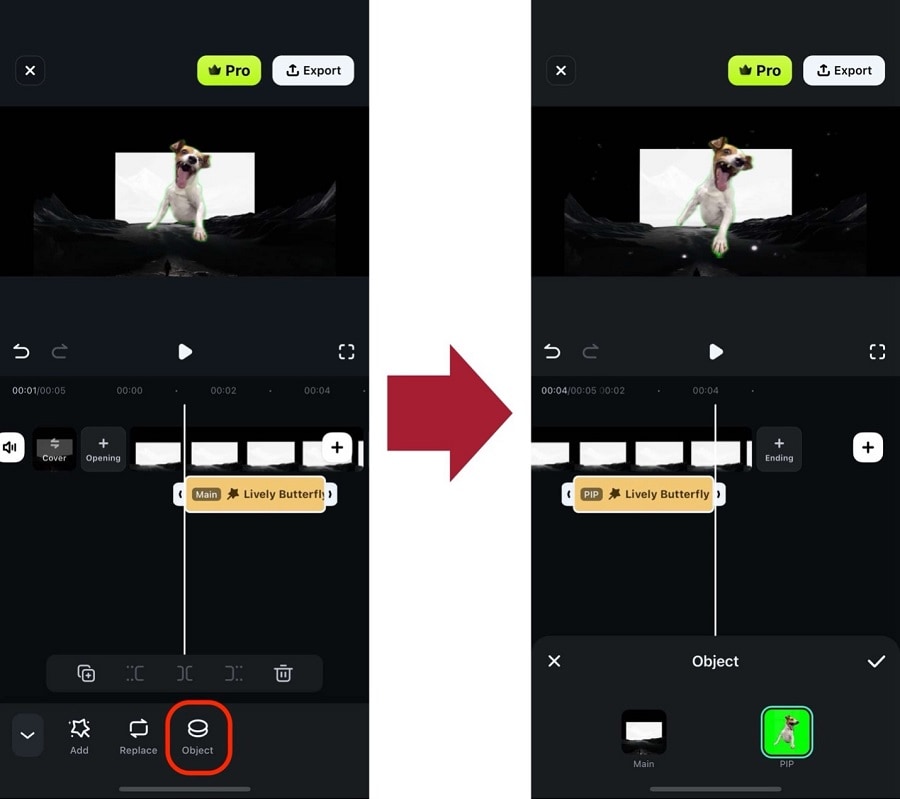
Step 5: Once the effect is applied, select the clip again. Then, go to Object and select the object you want to motion track. This will use the effect as the object moves.
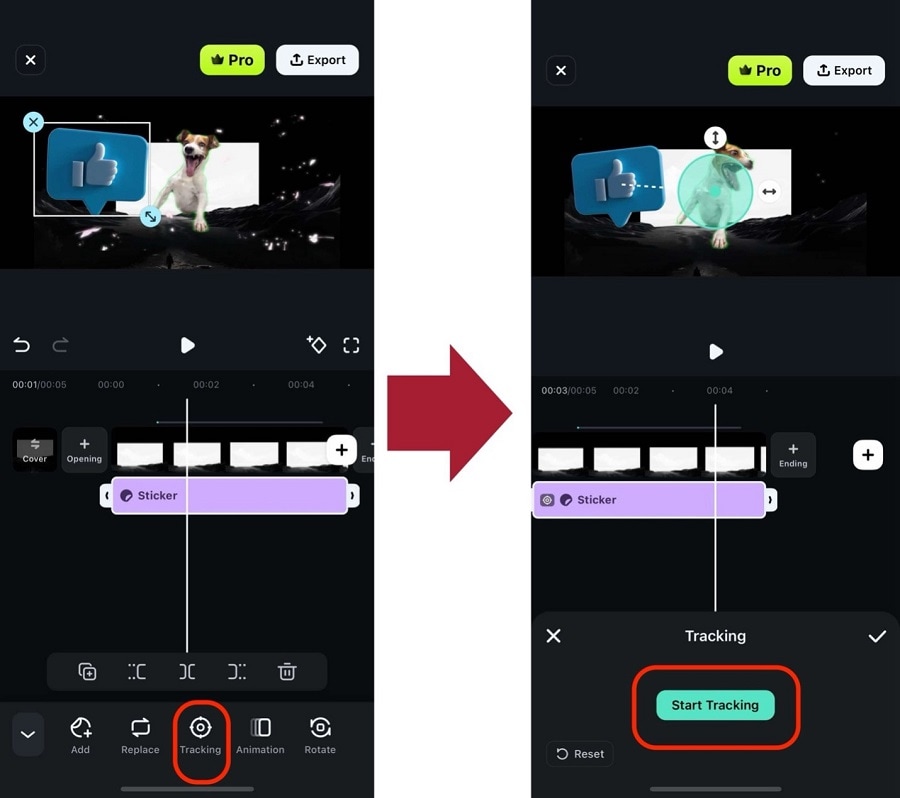
Step 6: You can also do the same on stickers or text. Select the object (Sticker or text) you've added, then go to Tracking > Start Tracking.
With the methods provided above, you've now unlocked the skill of motion tracking without using Blender on your phone. These advanced functions are made possible by Filmora, so try it out today!
- Learn how to track moving objects with precision.
- Add text, images, or effects that follow the action seamlessly.
- Enhance storytelling by keeping elements in focus.

Comparing Motion Tracking in Capcut and Filmora
So, how does Capcut's motion tracking compare with Filmora? Here's a detailed comparison of their standout features.
| Aspect | Capcut | Filmora |
| Ease of use | User-friendly, intuitive interface | Simple and beginner-friendly |
| Process | Straightforward, Automatic camera tracking | Streamlined, precise editing control |
| Tracking Speed | Moderate | Fast processing |
| Tracking Output | May cause jittery motion | Smooth and accurate tracking |
| Customization | limited options | Extensive with Keyframing Panel |
| Advanced Features | AI movements, face, body, and hand tracking | Automatic linking of texts, stickers, effects |
| Free or paid | Paid motion tracking | Free motion tracking with watermark |
Reduces the time and effort required to create videos from images, enhancing productivity for video projects.

Besides motion tracking, you can use more tracking effects with Filmora! Let's explore it more in the following section.
Part 2. Combine Other Tracking Effects to Take Your Video to the Next Level
Motion tracking is just the beginning of creating captivating video edits in Filmora. You can combine various tracking effects to enhance your videos even further.
Motion and planar tracking are among the various types of video tracking. Filmora offers both for your video editing needs!
Motion Tracking:
Filmora's motion tracking lets you follow the movements of a specific point in the video. You can attach visual elements like effects, stickers, and text to show your video's narrative and highlight essential actions.
Planar Tracking:
Unlike motion tracking, planar tracking follows surfaces and planes that move in perspective. You can use planar tracking to insert an image or a video into a flat area like a TV screen, table, or billboard.
How to Create Dramatic Planar Tracking Effect
Wondering how to enhance your videos with planar tracking. Here's a simple guide to get you started.
Step 1 Select the clip in the timeline. Then go to the right panel and select the "Video" menu.
Step 2 Click the "AI Tools" tab and turn on the toggle for "Planar Tracking." This will open the tracking portal.
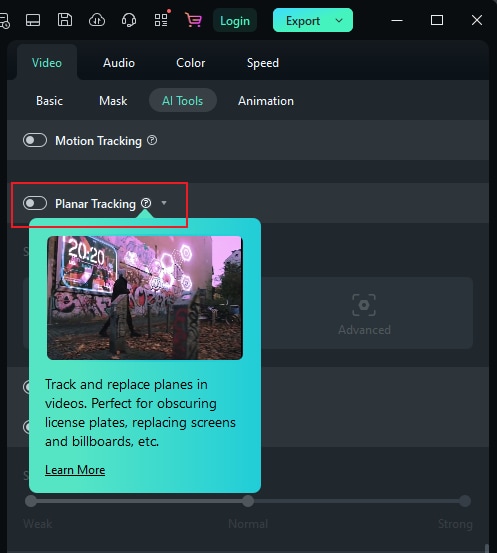
Step 3 You'll see a grid overlay on your video. Click and drag it over the flat surface you want to track. Drag the corners precisely to the outline of the surface.
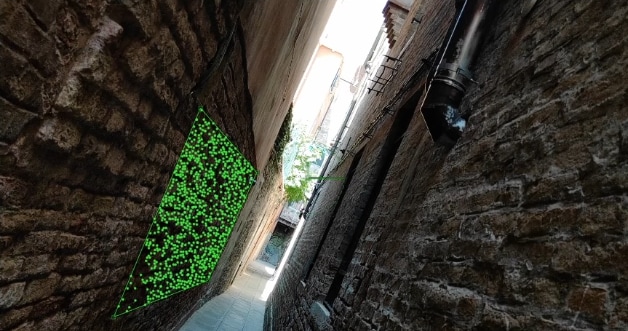
Step 4 Play the video to track the plane's movements forward and backward.
Step 5 Once satisfied with your selection, click the Track button. Filmora will analyze the movement of the selected surface throughout the video frames.
Step 6 Add text to the timeline and customize its properties as needed. You can also attach images, stickers, and effects.
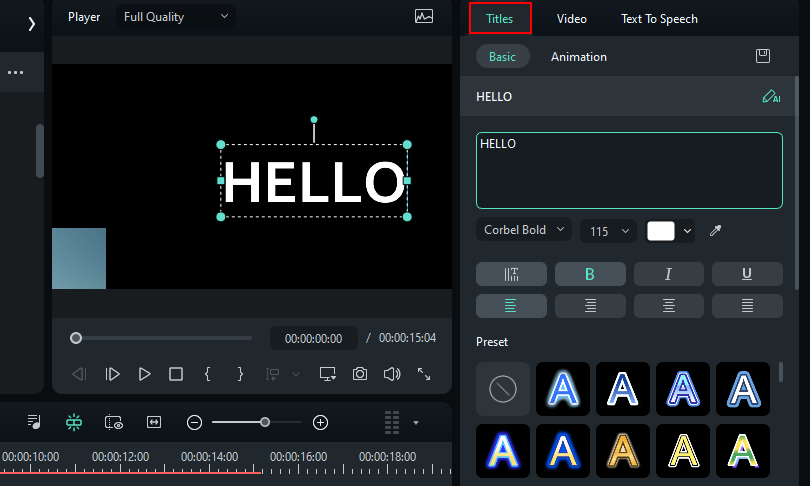
Step 7 Select the video clip again and tap the link element dropdown to automatically align the element to the motion and perspective of the selected area.
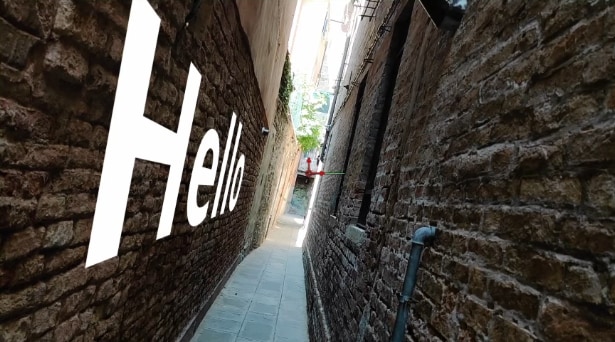
That's it! You can preview the video, and if you're happy with the results, go ahead and export it. Your video is now ready to be published and viewed!
Part 3. What is Motion Tracking in Capcut?
Motion tracking in Capcut is a feature that tracks the movement of an object across selected frames. Capcut delivers two types of motion tracking: camera and effects tracking.
- Camera tracking lets you center the footage around the movement of an object.
- Effects tracking seamlessly attaches elements like text, stickers, and effects to align with an object's movement.
But what's the deal with motion tracking? Why is it so important?
It's the secret recipe for enhancing a video's dynamic quality, even when shot from a static camera! It clearly shows the video's narrative while adding depth that engages and retains the audience.
Common Uses of Motion Tracking in Capcut
Capcut's motion tracking can effortlessly upgrade any video! Here's where to use it for the most impact.
- Adding Text: You can attach text to a moving object, like a person or a car. This lets you create moving captions and titles that stay relevant to the action on the screen.
- Inserting Graphics: You can add graphic elements that follow an object's movement. These can be stickers or a brand's logo in a promotional video.
- Applying Visual Effects: You can add effects that move with the object, such as a blur effect to a fast-moving object.
- Highlight Specific Points: Motion tracking lets you draw attention to specific video parts. For example, you can track a soccer ball and add a trail effect to complement its movement.
In light of these uses, Capcut has many advantages to offer. Let's explore them below.
Part 4. Benefits of Using Capcut to Create Motion Tracking
Capcut is a versatile video editing tool with advanced motion-tracking capabilities. It offers various benefits that make it a popular tool among content creators.
Let's break these down below.
- Automatic Camera Tracking:
Camera tracking presets for face, body, and hand movements for automatic motion tracking. You don't need to lock the camera manually!
- AI-driven Movements:
Choose from four AI movements, like dynamic, zoom, and shake! With smart AI algorithms, these deliver accurate motion tracking in a single click!
- Easy Customization
You can lock the object size, fit or blur the canvas, and adjust the shake intensity. This makes it easy to personalize the effects to your needs.
- Precise Keyframing Control:
Want to create your own motion-tracking effect? You can keyframe properties like scale and distance for precise control over editing.
- Cross-platform Solution
Capcut is available on desktop, mobile, and online. It offers a seamless video editing solution across platforms, saving you the hassle of juggling multiple editing tools.
Ready to use motion tracking in Capcut? Let's explore how to use it.
Part 5. How Do You Make Motion Tracking in Capcut on Mobile?
Capcut's mobile app lets you track the movements of both the camera and effects. You can also create a motion-tracking effect manually using keyframes.
Let's see how it works.
Steps to Motion Track Camera Movement
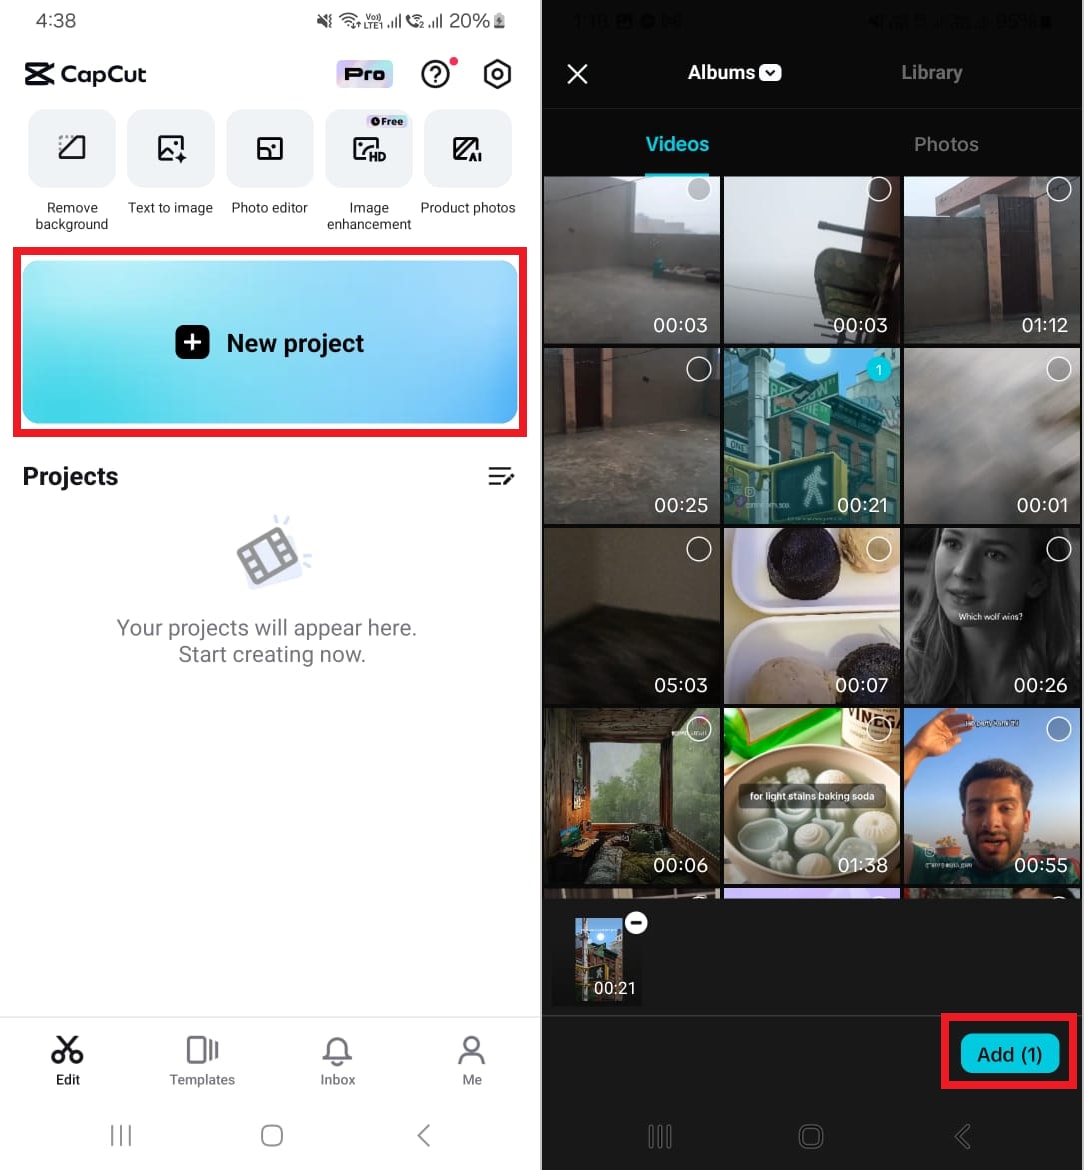
Step 1 Open the Capcut app on your phone. Tap "New project" > and select a video to edit. Then tap "Add" to import it to the timeline.
Step 2 Tap the clip in the timeline and slide the bottom toolbar to the left. Find the "Camera tracking" option and tap on it.
Step 3 Select "Camera tracking" again and select whether you want to track the Face, Body, or Hands. Then, select "Custom" to manually select an action in the video.
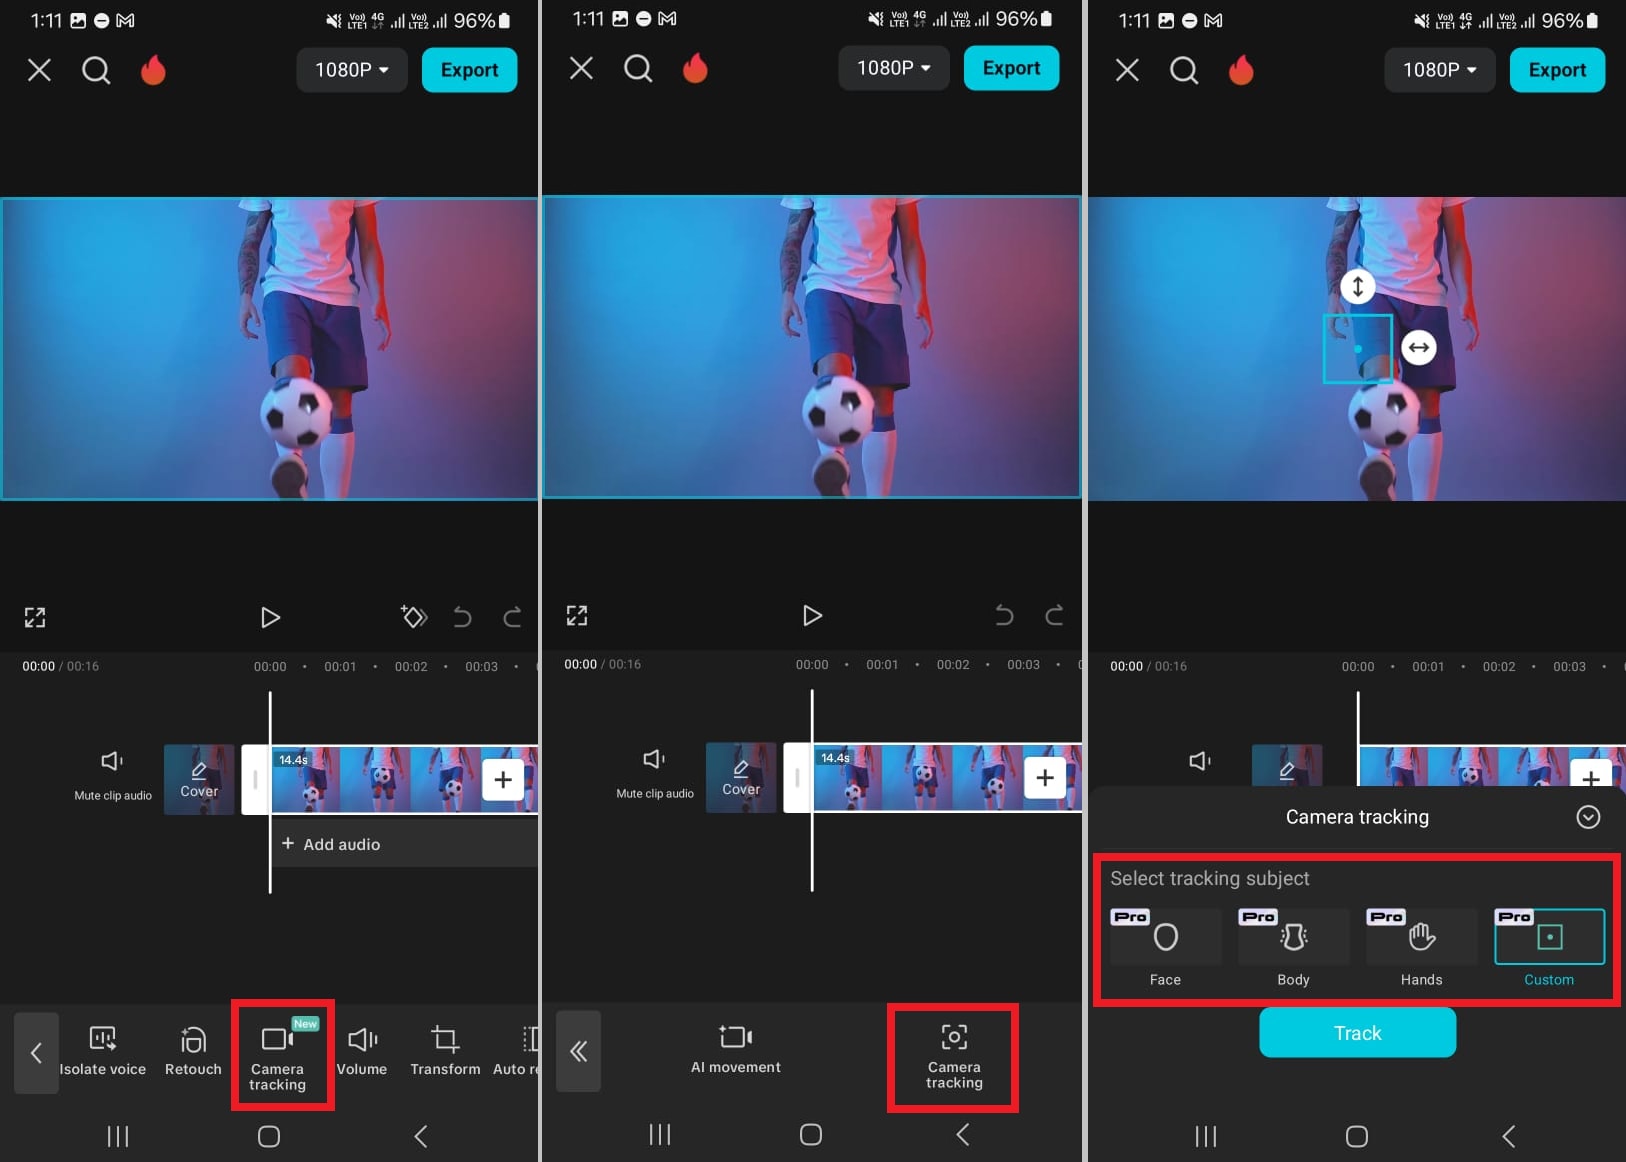
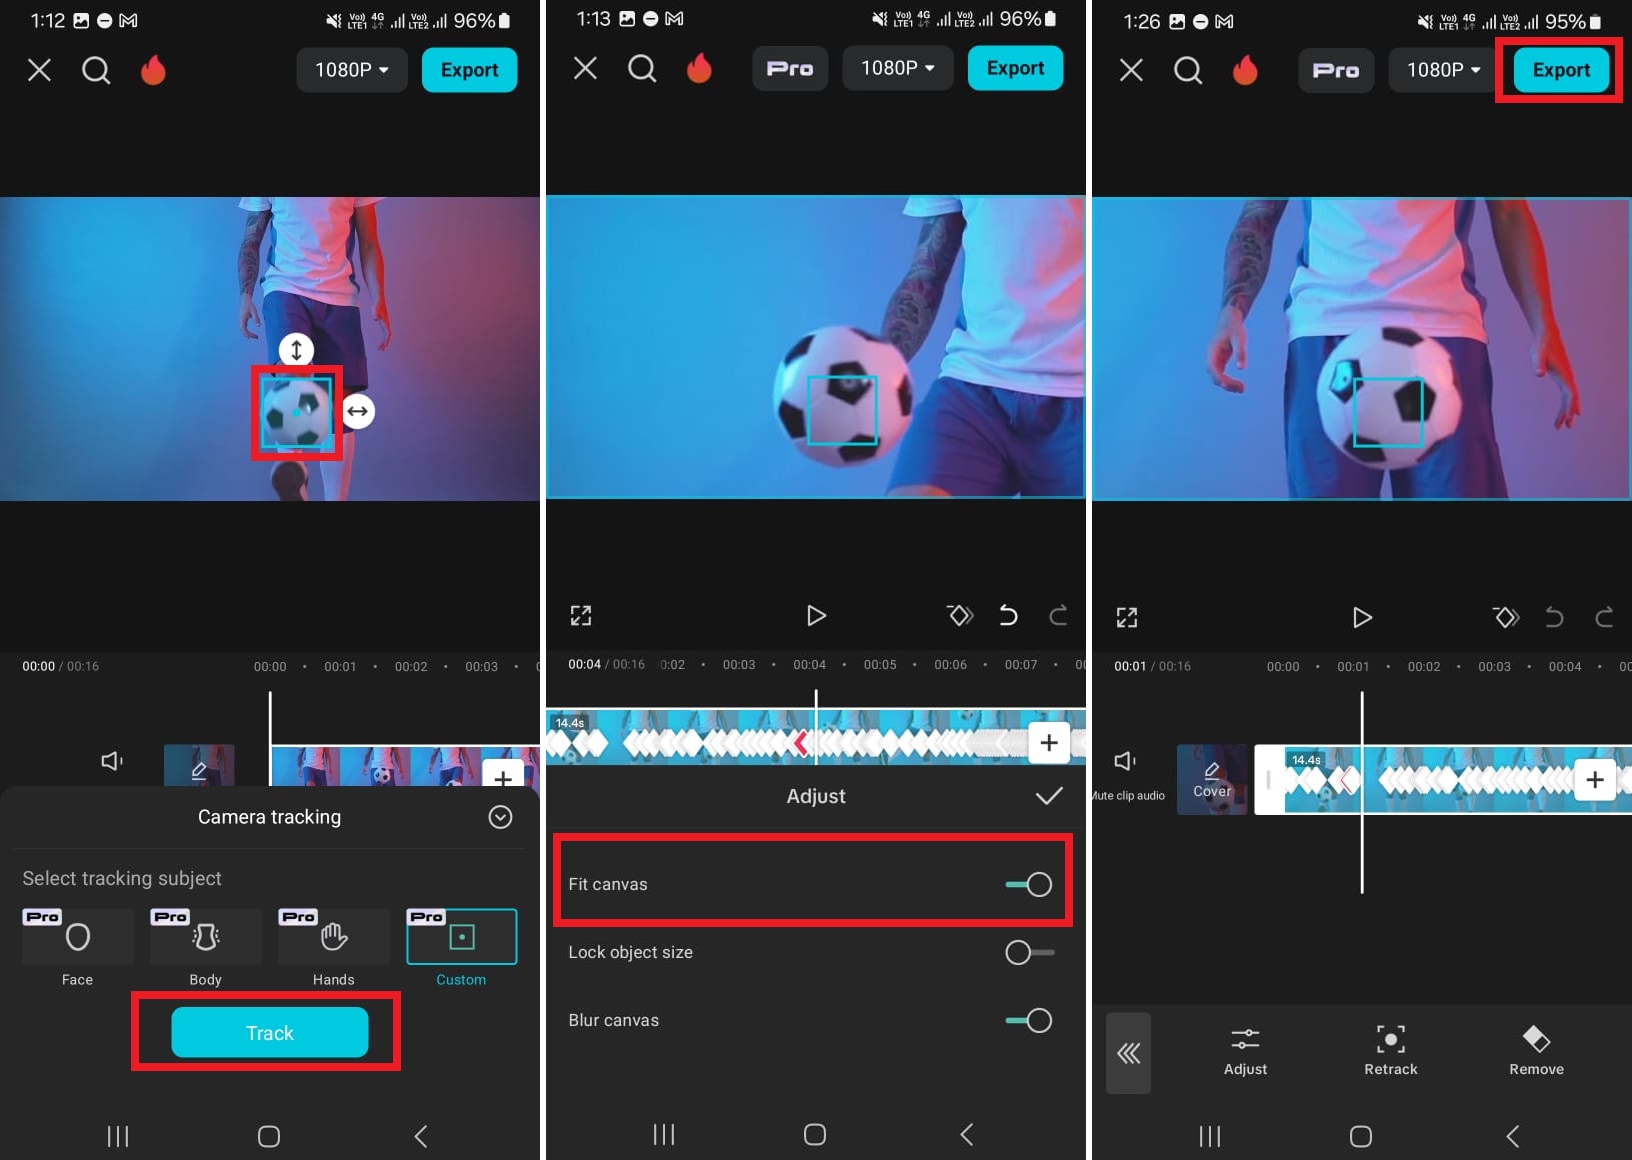
Step 4 Once you select "Custom," a squire selection tool will appear on the video. Drag it over the object you want to focus on and hit the "Track" button.
Step 5 Capcut will start tracking the object throughout the video. Once done, tap the play button to see the effect in action.
Step 6 Turn on the "Fit canvas" from the Adjust menu to ensure no video borders are visible with the movement. You can also lock object size and blur canvas.
Step 7 Once satisfied with the results, tap the "tick mark" and press "Export" to save the video to your device.
That was quick, right? Now, let's explore how to align motion with text.
Steps to Track Motion with Text
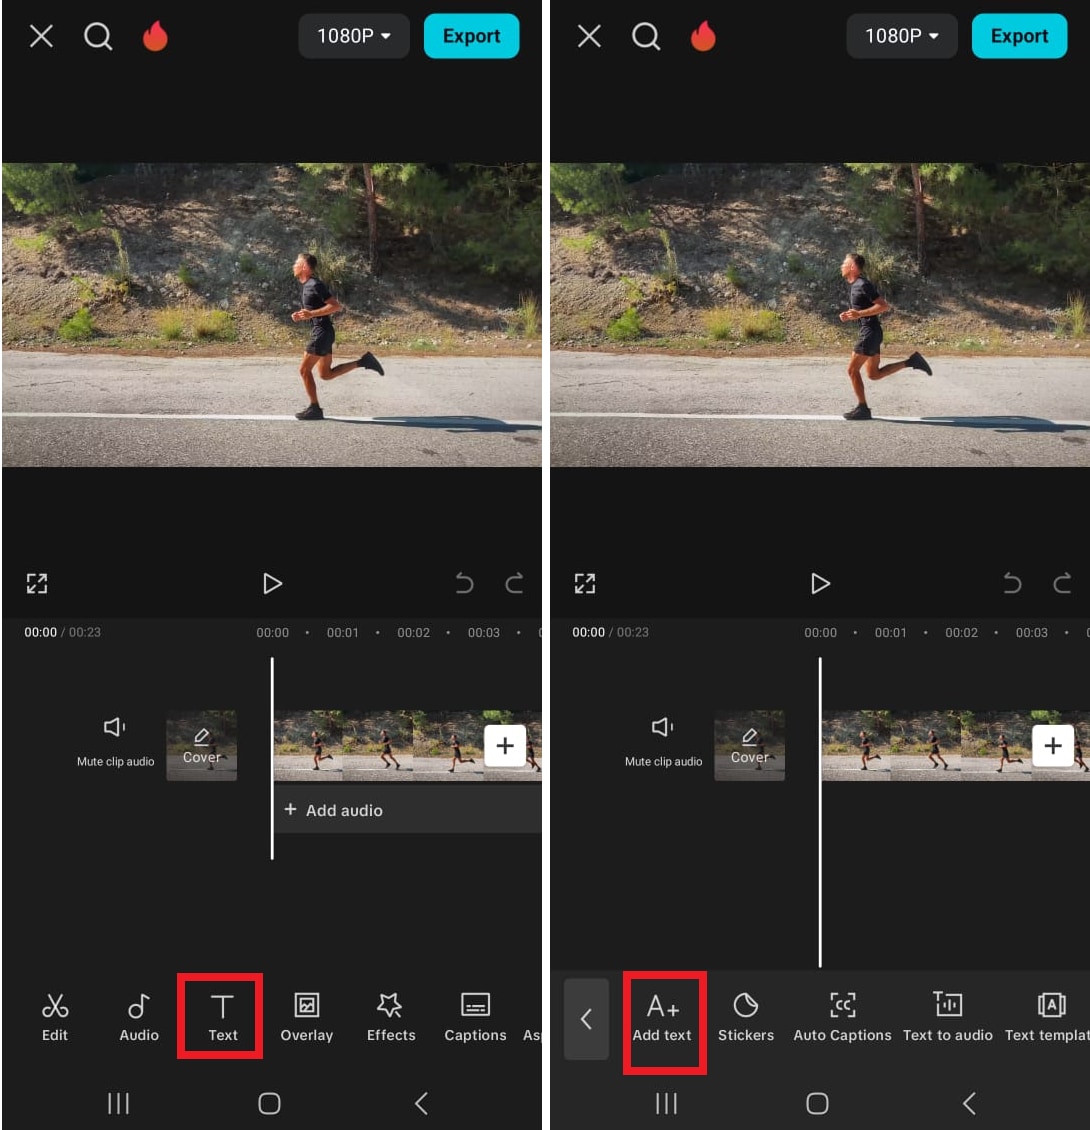
Step 1 Once you've imported your video to Capcut, click "Text" from the bottom toolbar.
Step 2 Choose "Add text" from the next screen. Type in your desired text and tap the check mark to apply it.
Step 3 Drag the edges of the text clip to adjust how long the text should appear.
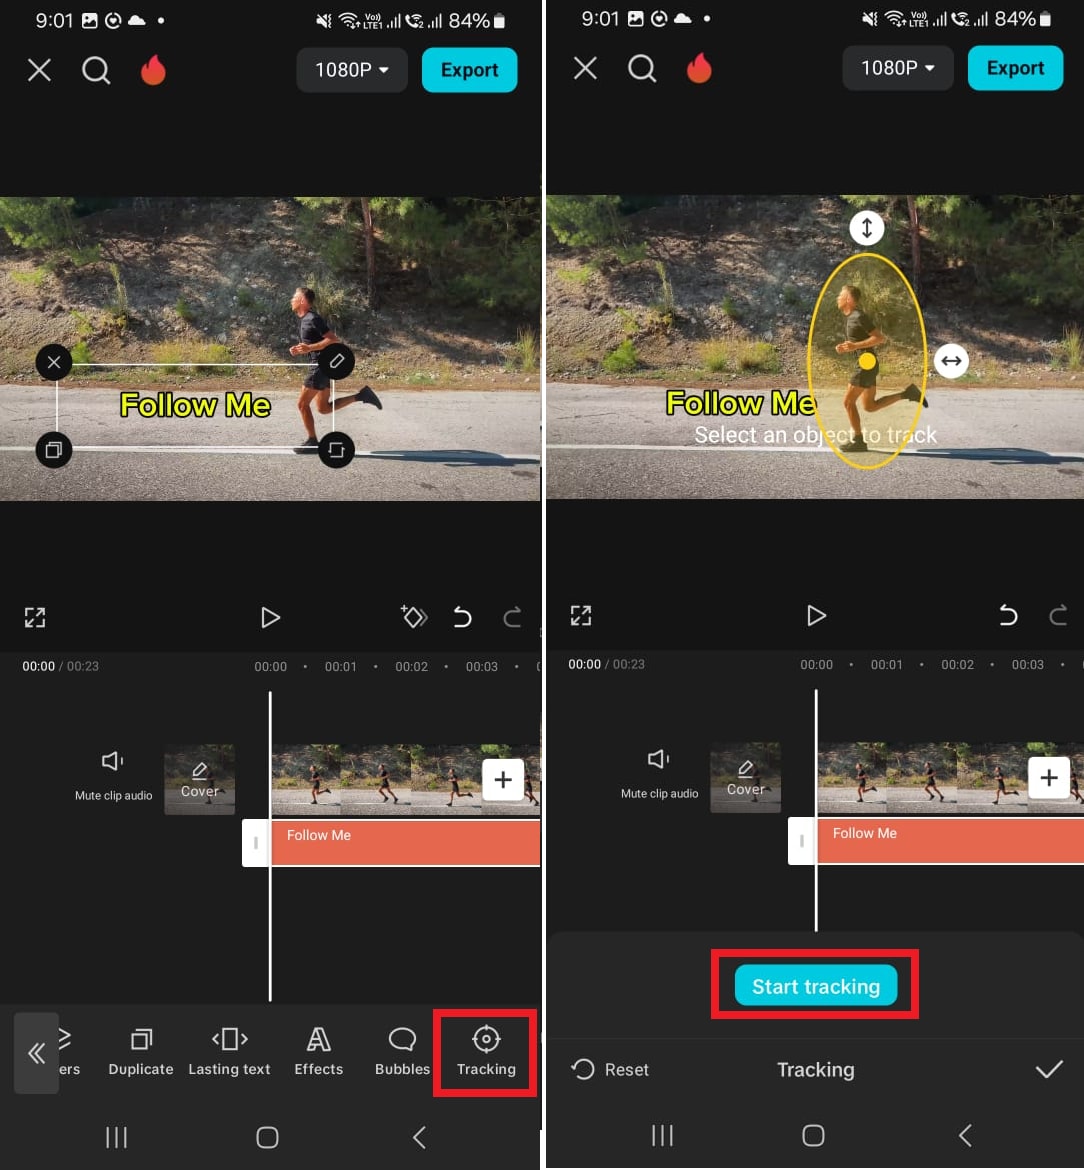
Step 4 Click on the text clip and tap the "Tracking" menu. This will add a tracking circle over the video.
Step 5 Drag to adjust its position and resize it. Then press "Track" to process the video. The text will follow the motion of the selected object automatically.
Now, let's see how motion tracking in Capcut for PC works.
Part 6. Step-by-Step: Using Motion Camera Tracking Effects in Capcut on Your PC
Capcut's PC software offers an easy motion-tracking solution similar to its mobile app. To track specific movements, you can use a premium camera tracking tool or keyframing.
Let's see how to use its camera tracking tool.
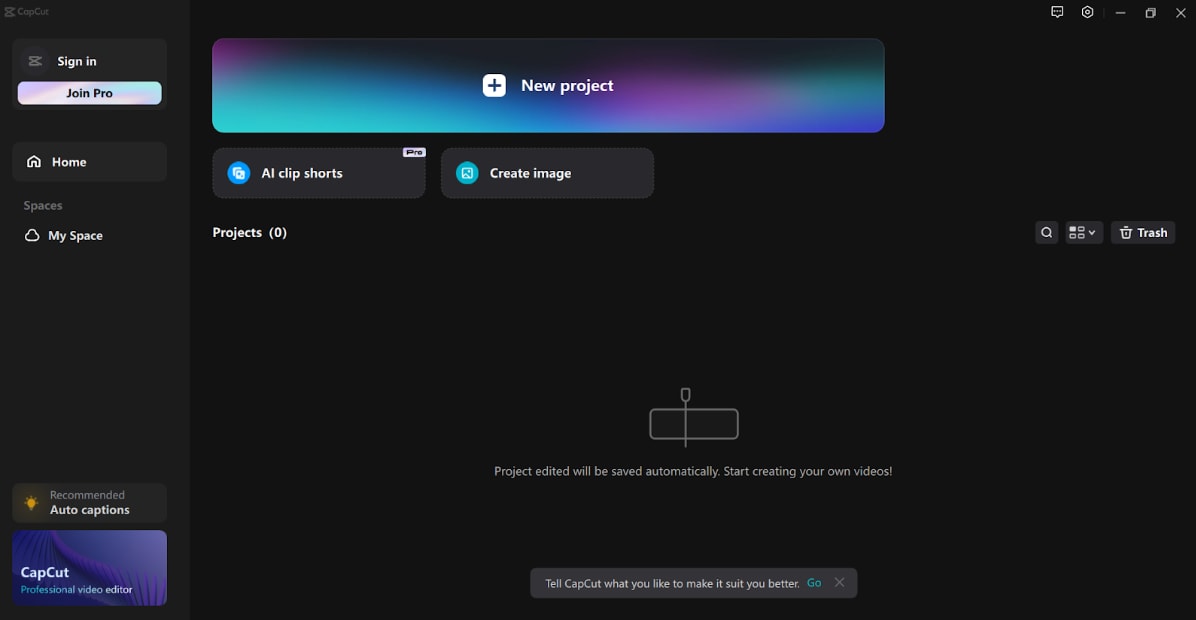
Step 1 Launch Capcut on your PC. Click "New project" from the main interface to start editing.
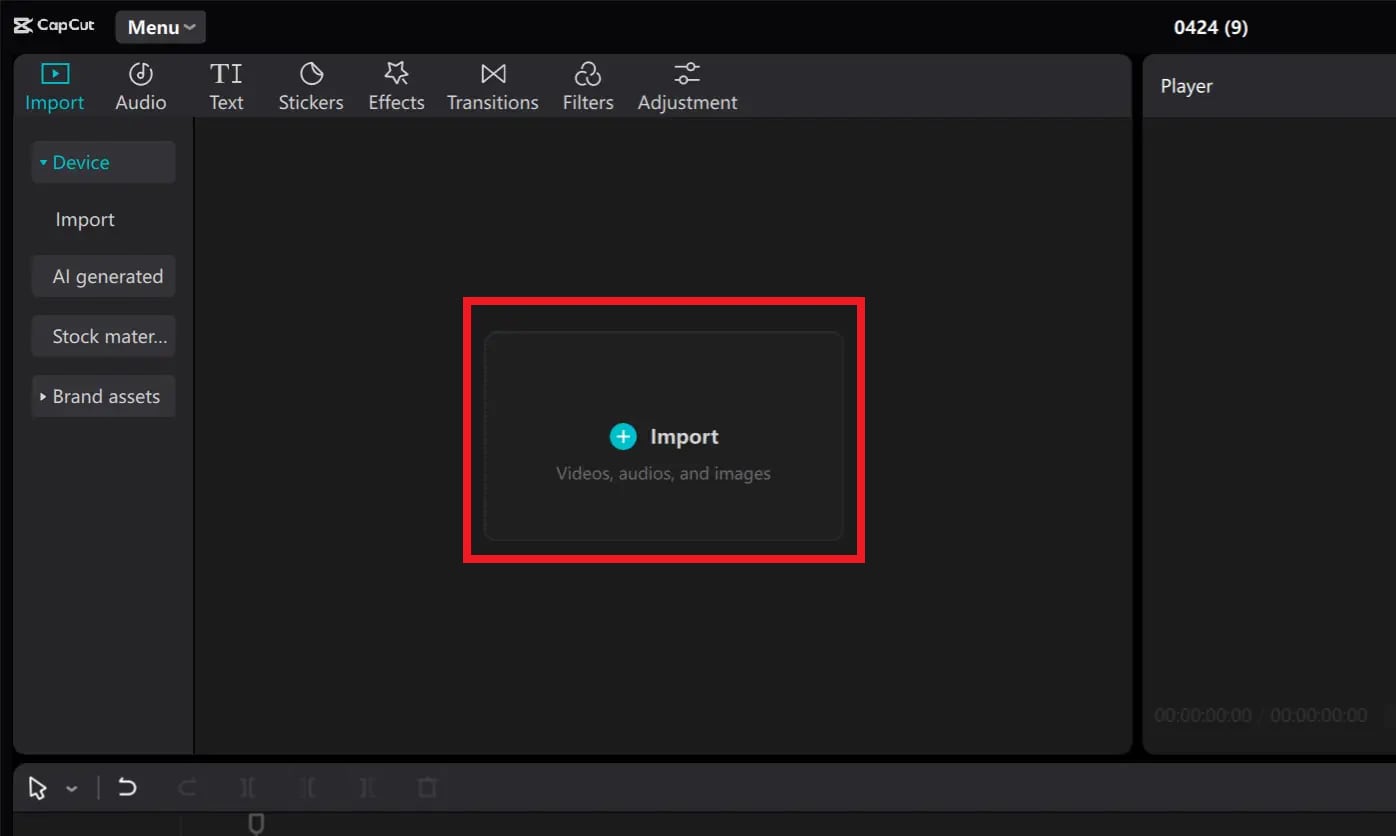
Step 2 Click the "Import" button at the top right panel to add video clips. You can also drag/drop the clips to the interface.
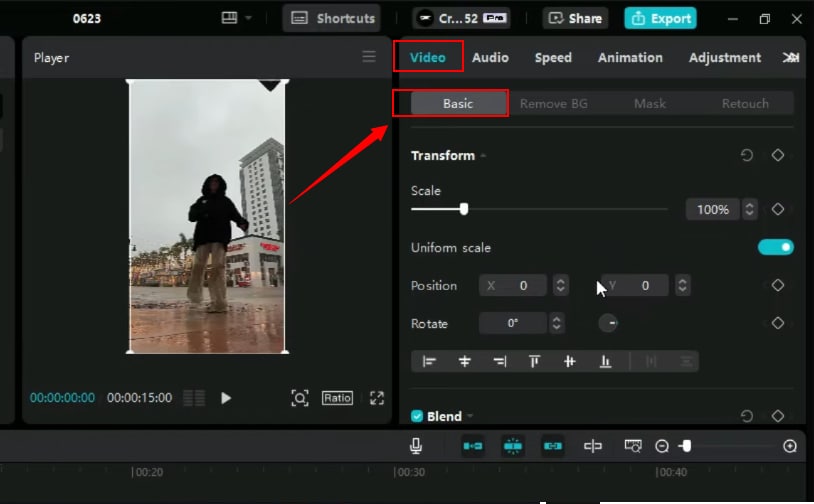
Step 3 Drag the video to the timeline. Select the clip and go to the editing panel on the right. Select the "Basic" tab under the "Video" menu.
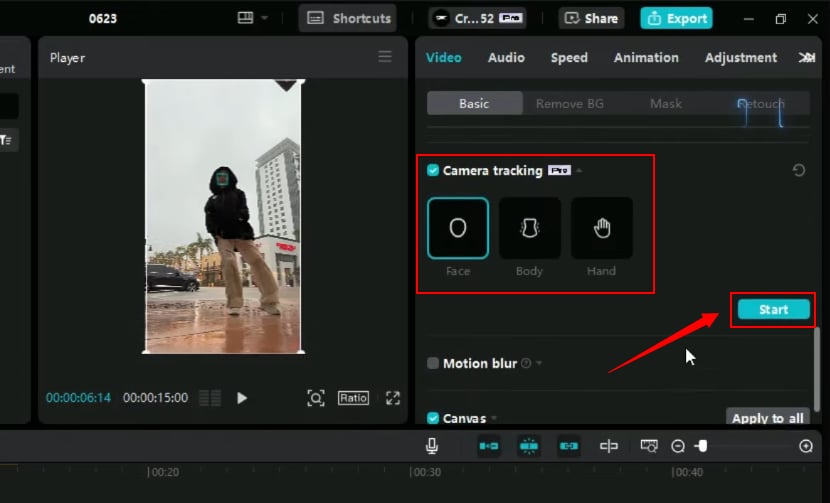
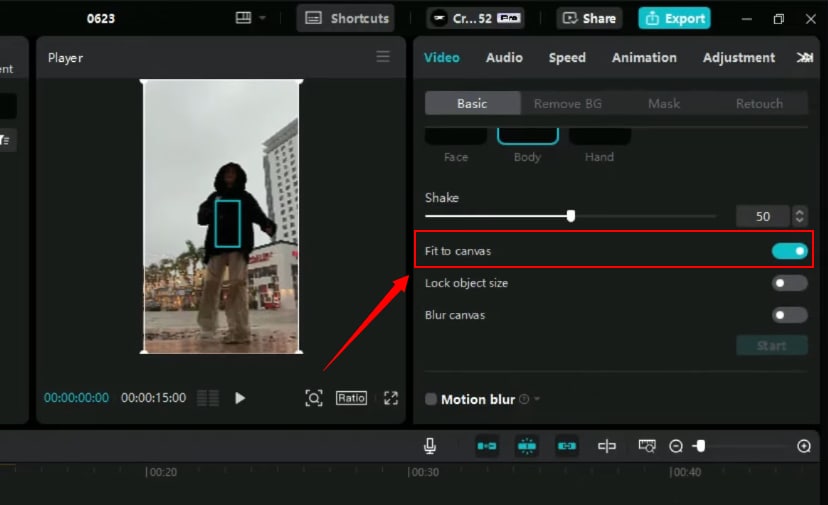
Step 4 Scroll down and checkmark the box for the "Camera tracking" option. You can see three tracking options.
- Face: detects a person's face in the video for tracking.
- Body: Focuses on the body movements
- Hands: Tracks the motion of the selected hand
Step 5 Select the effect you want to use and click the "Start" button to apply it to the video. Once done, preview the video.
Step 6 Turn on the "Fit to canvas" option under the Camera tracking section in the right panel. This will zoom the video so that no video edges are visible.
CapCut, remains a popular choice for video editing due to its intuitive interface and basic motion tracking capabilities. However, for those seeking more advanced features, exploring alternatives is essential.
Part 7. Advanced Tips for Capcut Motion Tracking
Do you want your motion tracking effect to look neat and professional? Here are some pro tips that can help!
1. Accurately Position the Tracking Points
Accuracy is key to a high-quality output. When using the automatic motion tracking in Capcut, always choose areas with high contrast. These are easier to follow for Capcut.
2. Know When to Use Keyframing
If the movements are too fast, it can be challenging to achieve smoother results. You can adjust the points frame by frame until the motion feels natural.
3. Combine Motion Tracking with Other Effects
Pair motion tracking with other effects to make your edits more appealing! You can link effects, text, or stickers to the tracked object to enrich the storytelling.
4. Troubleshooting Common Issues in Motion Tracking
Motion tracking is not always perfect. Here are some issues you may face and how to handle them.
- Losing Track of the Object: Split the tracking into shorter segments to maintain accuracy, especially during fast movements.
- Jittery or Unstable Motion: Smooth keyframes manually and use a higher frame rate to achieve a seamless result.
- Failing to Follow Complex Motions: Slow down the clip to handle rapid direction changes and ensure more precise tracking.
- Low-Resolution Outputs: Start with a high-quality video with HD resolution to avoid blurry details caused by scaling in motion tracking.
Conclusion
That's a wrap on the motion tracking in Capcut and Filmora! We have shared a complete guide with easy steps to simplify the process. You can use Capcut's premium camera tracking to track objects across video frames.
But if you want an accessible solution with advanced customization, Filmora is an excellent option. With its accurate motion-tracking capabilities, you can create professional-quality videos within minutes!


