
 100% Security Verified | No Subscription Required | No Malware


 ChatGPT
 Perplexity
 Gemini
 Claude
 Grok
Grok
Many people think that the complex process of color correction is just for aesthetics. To a certain extent, we can probably say that it is partially true. The video color is corrected to give the footage a stunning and perfect look. However, that's not the entirety of it. Color correction also has a functional value in the creation process. It's a special step that transforms a bland scene into an exhilarating mood and a simple clip into a masterpiece. That's why you should take this into consideration when creating video content. You may use the Premiere Pro Color Correction features to get started. It is equipped with a potent suite of color correction tools that you can definitely put to good use.
In this article, we will delve into the primary features of Adobe Premiere Pro color correction. We will also introduce some AI tools of Wondershare Filmora in case you wish to explore some alternatives. Lastly, we will provide some tips and guides that can help you get started in a snap. Continue reading below to learn more.
In this article
Understanding Color Correction in Adobe Premiere Pro
Color correction in Adobe Premiere Pro reflects the traditional approach to the process. It provides various tools you can use to make simple and advanced adjustments to the video color. Just access the Lumetri Color panel on the platform. Everything you need is there. Are you planning to give this software a try? That's great. To help you make the most of it, check out the details below. Familiarize yourself with their functions and take advantage of the benefits they offer.
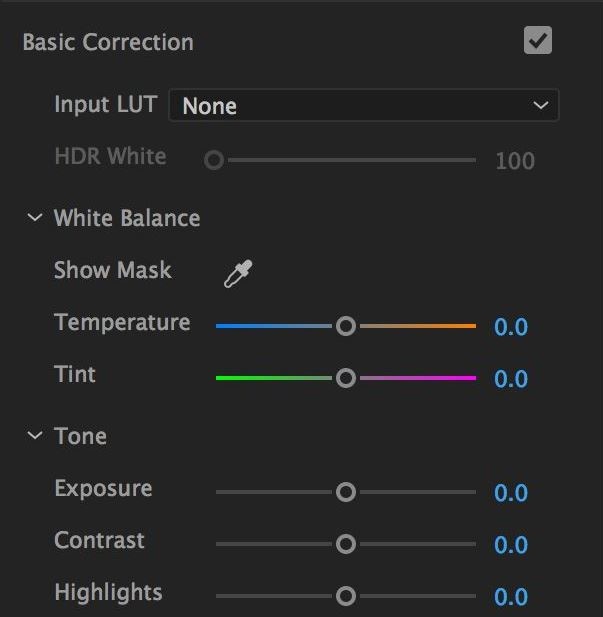
Basic Color Adjustments
The Adobe Premiere Pro color correction features can assist you in making simple color modifications. Let's say you just need to fix the poor lighting or the messy quality of your video clips. If that's the case, then the Premiere Pro color correction tools are there to help you. Generally, you can start the procedure by reconfiguring the default white balance settings. It is the main tool you can use to remove unnatural hues and tones from your videos. Once calibrated, you may proceed with the exposure and contrast settings to fix the video lighting and other display components.
Advanced Color Correction
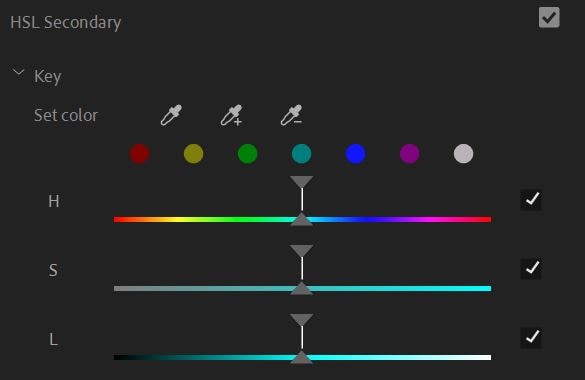
At some point, you may need to make complex configurations to achieve a certain look for your video content. Don't worry. Wondershare Filmora has secondary color correction tools that allow you to edit specific color details or elements. In this regard, you can use the HSL panel of Adobe Premiere color correction. Adjust the Hue, Saturation, and Luminance to create your desired effect and apply it to a targeted video portion.
As for precision, Premiere Pro offers built-in mask and tracking tools. You can use them to define static and moving video components that need corrections. In the same way, the Premiere Pro color correction panel also has default waveform monitors and vectorscopes. You can use these video scopes to track the color and luminance levels of the video while making adjustments.
Lastly, take advantage of Premiere Pro's batch correction feature and video color presets. The former enables you to configure one clip and apply the same settings to all the available video clips. Meanwhile, you can use a preset to add a pre-designed color effect to the video project. One way or another, these features will help you maintain a consistent look for your videos.
Common Challenges When Using Premiere Pro Color Correction
While Premiere Pro color correction is capable of doing a lot, it's still far from perfect. Some users still face some challenges when using this software for video color correction. Do you want to know what those are? If so, then check out the list below.
- When not fixed properly, the inconsistent lighting of the clips yields color mismatches between the footage.
- Excessive color adjustments ruin the integrity and quality of the video clips.
- Inaccurate configurations are often made if the video editor reads the video scopes improperly.
- Video editors who are not fully familiar with Wondershare Filmora might have a hard time building an efficient workflow.
The Limits of Manual Color Correction
There is no doubt that Adobe Premiere color correction is one of the most powerful tools out there. Its Lumetri Color panel can absolutely help you produce different types of video color modifications in a snap. However, we cannot deny that Premiere Pro color correction is not for everyone. Some users, especially beginners, may find it overwhelming to navigate this platform and tweak the controls. Sure. You can learn its functions one by one until you get familiar with each of them. But definitely, it will take some time. Having said that, many video editors are exploring other alternatives that are more convenient to use. In this regard, the AI Color tools of Wondershare Filmora are indeed worthy of consideration. Unlike Premiere Pro color correction, which requires manual input, Filmora automates almost everything, from reference analysis to the actual application.
Filmora's AI-Powered Color Revolution
Many video editors around the world are still opting for Adobe Premiere color correction. Of course. It remains the leading choice, especially when it comes to tasks related to video color modifications. If you're already familiar with this tool, then continue using it going forward. On the one hand, you can try Wondershare Filmora if you're currently exploring other potential alternatives. As indicated earlier, it has a powerful AI Color Palette feature that automates the intricate process of video color correction. Do you want to learn more about this tool and somehow give it a try afterward? If so, then continue reading below.
 secure download

Core Features
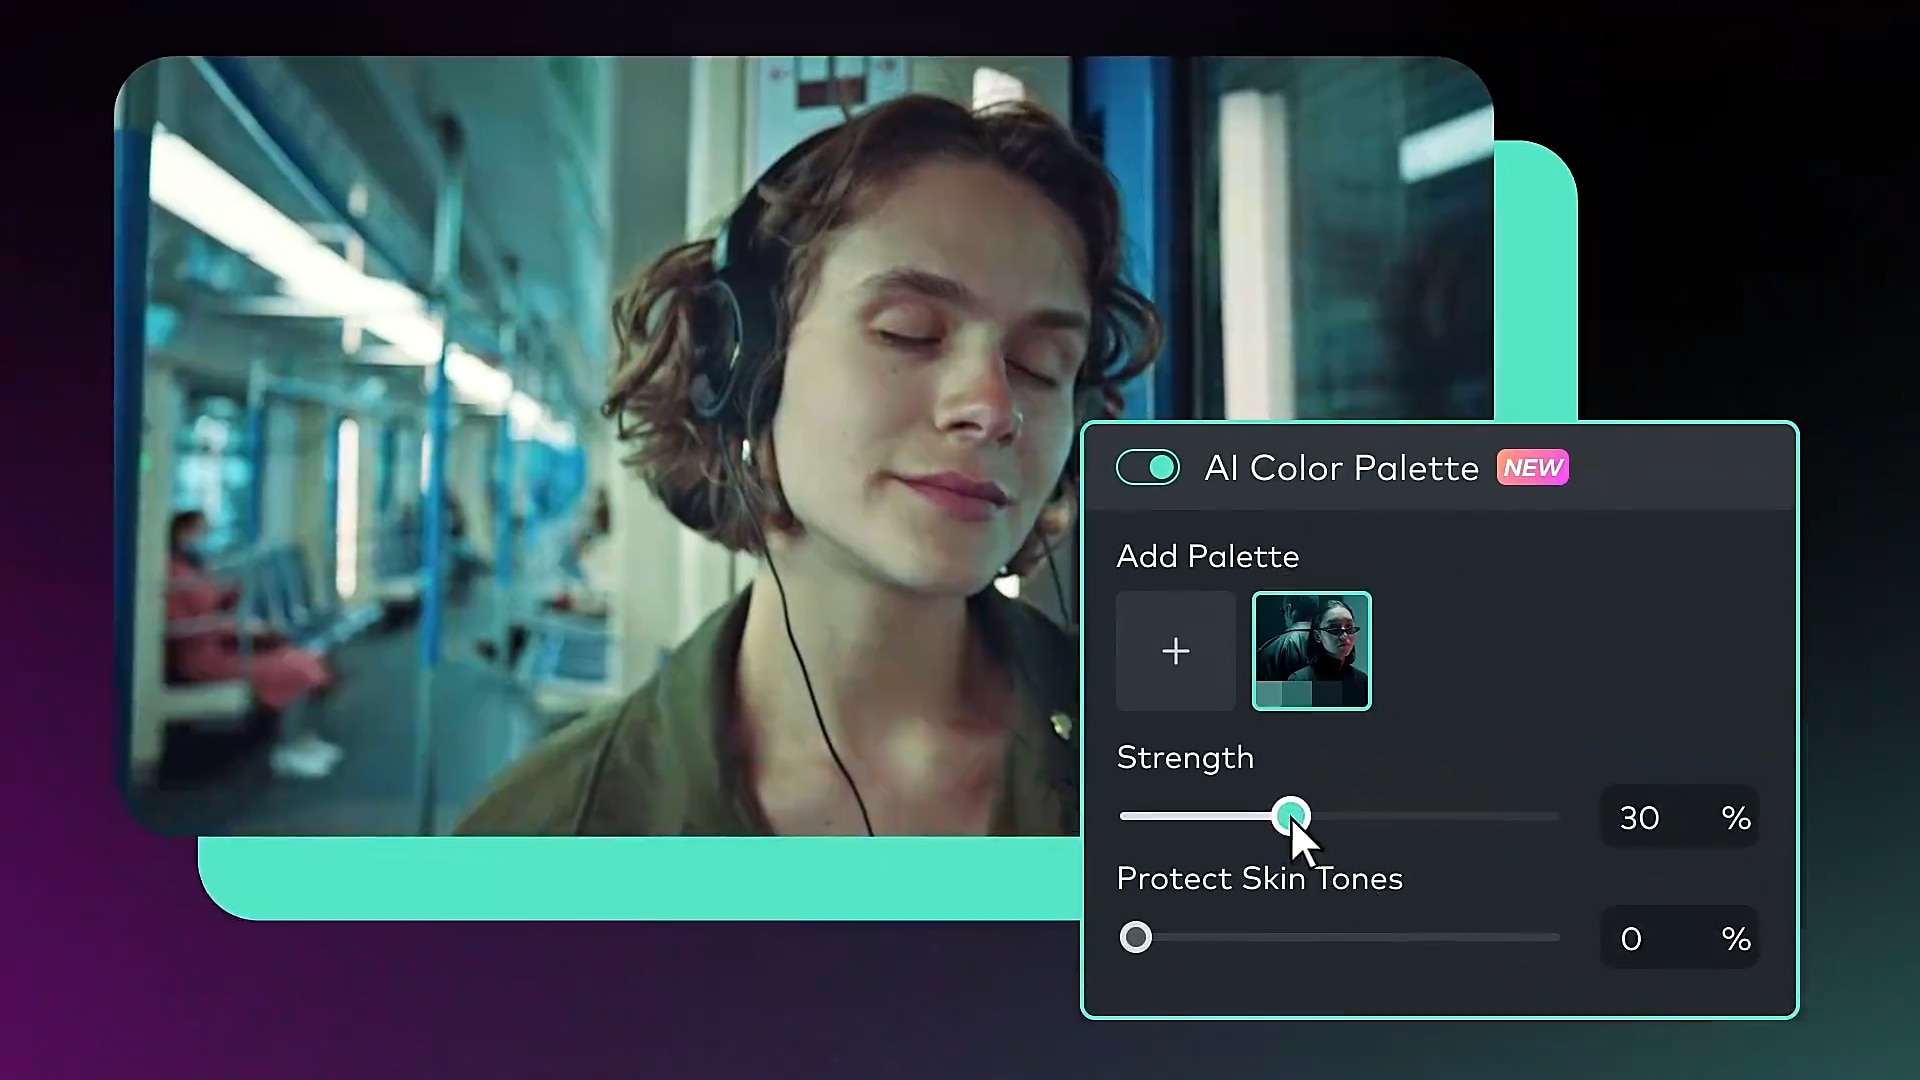
In a specific way, we can say that Filmora's AI Color Palette is quite similar to Premiere Pro color correction. Both tools aim to help users improve the display quality of the video content. However, we cannot deny that the former is much easier to use in this regard. Why so? Simply because it utilizes artificial intelligence to automate the color correction process. Yes. Basically, all you have to do on your end is provide a reference clip. After that, the rest of the work will be done by the tool itself. No more manual intervention if not necessary. Should you give it a shot? Of course! Learn more about AI Color Palette. Check out the list of its features below.
- It automatically analyzes the reference input, extracts the important color details, and applies them to your video project.
- It gives you the option to adjust the intensity of the AI-generated color palette when applied to the clips.
- It allows you to protect the skin tones of the human subject while applying the color correction effect.
- Lastly, it is integrated with the main video color settings of Wondershare Filmora. If a simple or major adjustment is needed, you won't have a hard time applying one.
Step-By-Step Guide
Let's say you have finally decided to give AI Color Palette a shot. That's great. Now, it's time to proceed and take the first step. Don't worry. It's a piece of cake. To get started, check out the tutorial written below and follow the indicated steps accordingly.
secure download Step 1: Inside Filmora's workspace, access the Elements Panel tab and click Import under the Media tab. Select all the files you are going to include in this project and upload them to the platform. Once the assets are ready, drag them one by one to the Editor Timeline.
Step 2: Select the video clip you want to edit. Immediately, a new panel will open on the right-side corner. From there, click the Color tab to get started.
Step 3: Access the Basic tab and find the AI Color Palette option. Switch on the toggle button beside it to proceed. Following that, click Add Palette and then provide your preferred reference clip that displays the color profile you want to apply to your video content.
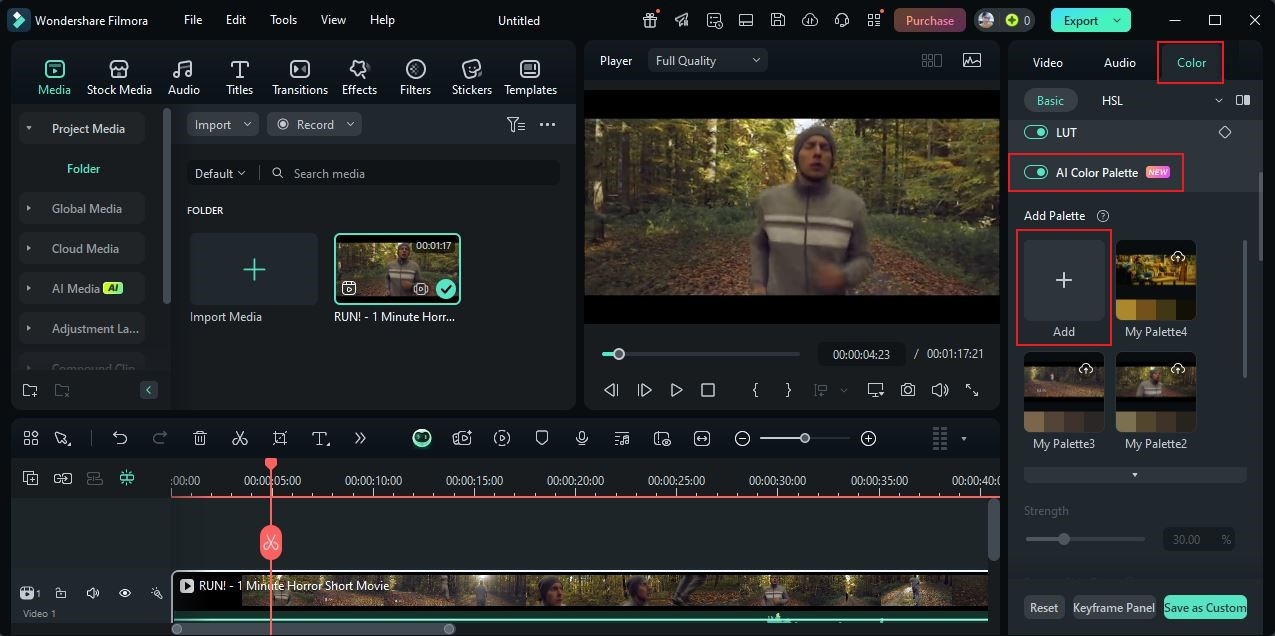
Step 4: Head over to the Preview Panel afterwards, then choose Timeline or Local File . For the former, simply move the play head to a specific timestamp that contains the color correction profile you want to copy. Once done, tap Generate. Check the color palette and its visual effect. If you're satisfied, click Save and Apply. Meanwhile, click the Local File tab if you wish to upload a separate file as your reference clip. Just repeat the same series of steps to proceed.
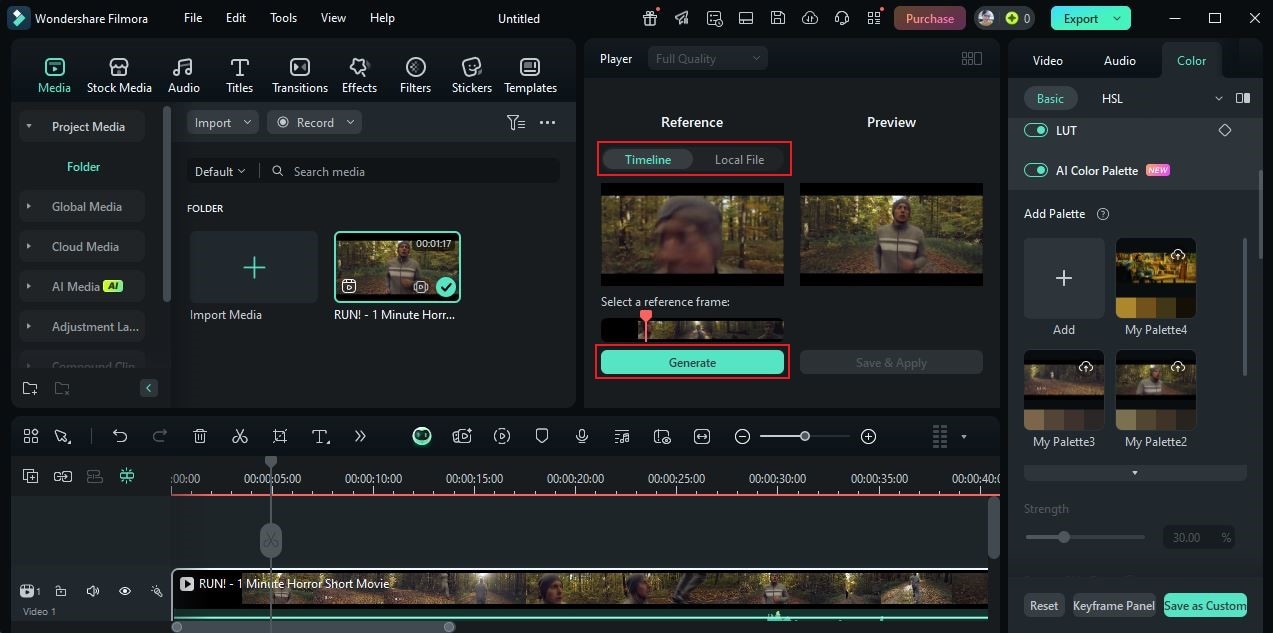
Step 5: Finally, the color correction will be applied to the chosen video clip.
The AI-generated color palette is stored in your Wondershare Filmora workspace. That means you can reapply the same effect to other video projects. Just enable this feature and pick the recently generated color palette you want to use.
Filmora AI Vs. Premiere Pro Color Correction: Which One is For You?
You can be sure that both Wondershare Filmora and Premiere Pro have something special to offer. The former highlights convenience, while the latter pushes for comprehensive support. Now, the choice is yours to make. Evaluate your specific needs and compare them against the features of the two apps. To help you arrive at a wise and sound decision, read the summarized discussion below.
| Feature | Filmora | Premiere Pro |
| Ease of Use | Intuitive design, simple adjustments. | Traditional approach, precise control. |
| Core Color Tool | AI Color Palette, reference clips. | Lumetri Color panel, HSL. |
| Advanced Control | Skin tone protection, intensity adjust. | Masks, tracking, video scopes. |
| Workflow Efficiency | Automates process, instant results. | Batch correction, consistent look. |
secure download Adobe Premiere Pro color correction is renowned for its advanced and all-encompassing capabilities. It's an ideal choice if you're working on a professional video content project with highly complex requirements. While this software is fully capable in this regard, don't forget that it is not the best choice for beginners. Unless you're extremely familiar with the platform, you might struggle to find your way around it. That's why you should familiarize yourself with its dashboard and controls before you go ahead. In the same way, you may also explore some alternatives, like Filmora AI and try them on your end.
Wondershare Filmora, on the one hand, is another software you may consider in this regard. It somehow functions the same as Premiere Pro color correction. You can use this app to enhance the color quality of your videos and make vital adjustments in a snap. But that's not the entirety of it. As indicated earlier, Wondershare Filmora has a built-in AI Color Palette tool that generally automates the process for you. Once the reference input has been provided, manual adjustments are no longer required unless necessary. The tool will do the rest of the work. You can just sit back and wait for the results. Convenient? Of course, it is. If you value this kind of ease and comfort, then Filmora AI is the best option for you.
Once again, keep in mind that there is no right or wrong answer in this regard. You can go for Adobe Premiere color correction or Filmora's AI Color Palette. It's up to you to decide. However, make sure that you evaluate the choices very well. Consider the complexity of your project, the level of your expertise, and time constraints.
Conclusion
Truly, Adobe Premiere Pro color correction deserves the recognition and spotlight. It has been helpful to many video editors out there. However, we cannot deny that the world today has become extremely progressive. Many people nowadays prefer the ease and comfort brought by modern technology. Having said that, the AI features of Wondershare Filmora are making rounds in the world of video editing. Whether you're an amateur or seasoned video editor, the AI Color Palette can truly bring a positive different to you. Embrace the power of high-end and speedy color correction, simplicity, and creativity. Ready to transform your workflow? Explore Wondershare Filmora today!
secure download 