The need to turn spoken words into text has never been greater. From businesses wanting quick meeting summaries to students capturing every detail of a lecture, and even content creators speeding up their workflow—everyone’s looking for faster, smarter ways to transcribe speech to text. Typing things out manually just doesn’t cut it anymore.
Luckily, there are plenty of tools out there that make voice transcription a breeze, no matter what device you’re using. In this guide, we’ll walk you through the best options for PC, mobile, and online platforms to help you find the perfect fit.
In this article
Part 1. Top Tool for Transcribing Speech to Text on PC
When it comes to transcribing speech to text on your PC, Wondershare Filmora is one of the best tools you can rely on. Filmora makes voice transcription easy, whether you're a vlogger, teacher, podcaster, journalist, or business professional. It can seamlessly convert your audio into text, saving you time and effort while keeping your content organized and accessible.
If you wonder why you need Filmora to transcribe speech to text, here are examples of use cases:
- Teachers can transcribe lessons and embed them into videos for students.
- Podcasters can transcribe their audio content to provide text versions for their audience.
- Business professionals can transcribe meeting discussions into text, ensuring precise records and easier collaboration.
No matter your field, Filmora has got you covered.
How to Transcribe Speech to Text with Filmora on PC
Step 1. Open Your Project
Import your audio or video files into the timeline where the speech is located.
Step 2. Select the Audio Asset
Highlight the audio track you want to transcribe from the timeline.
Step 3. Choose the Transcription Model
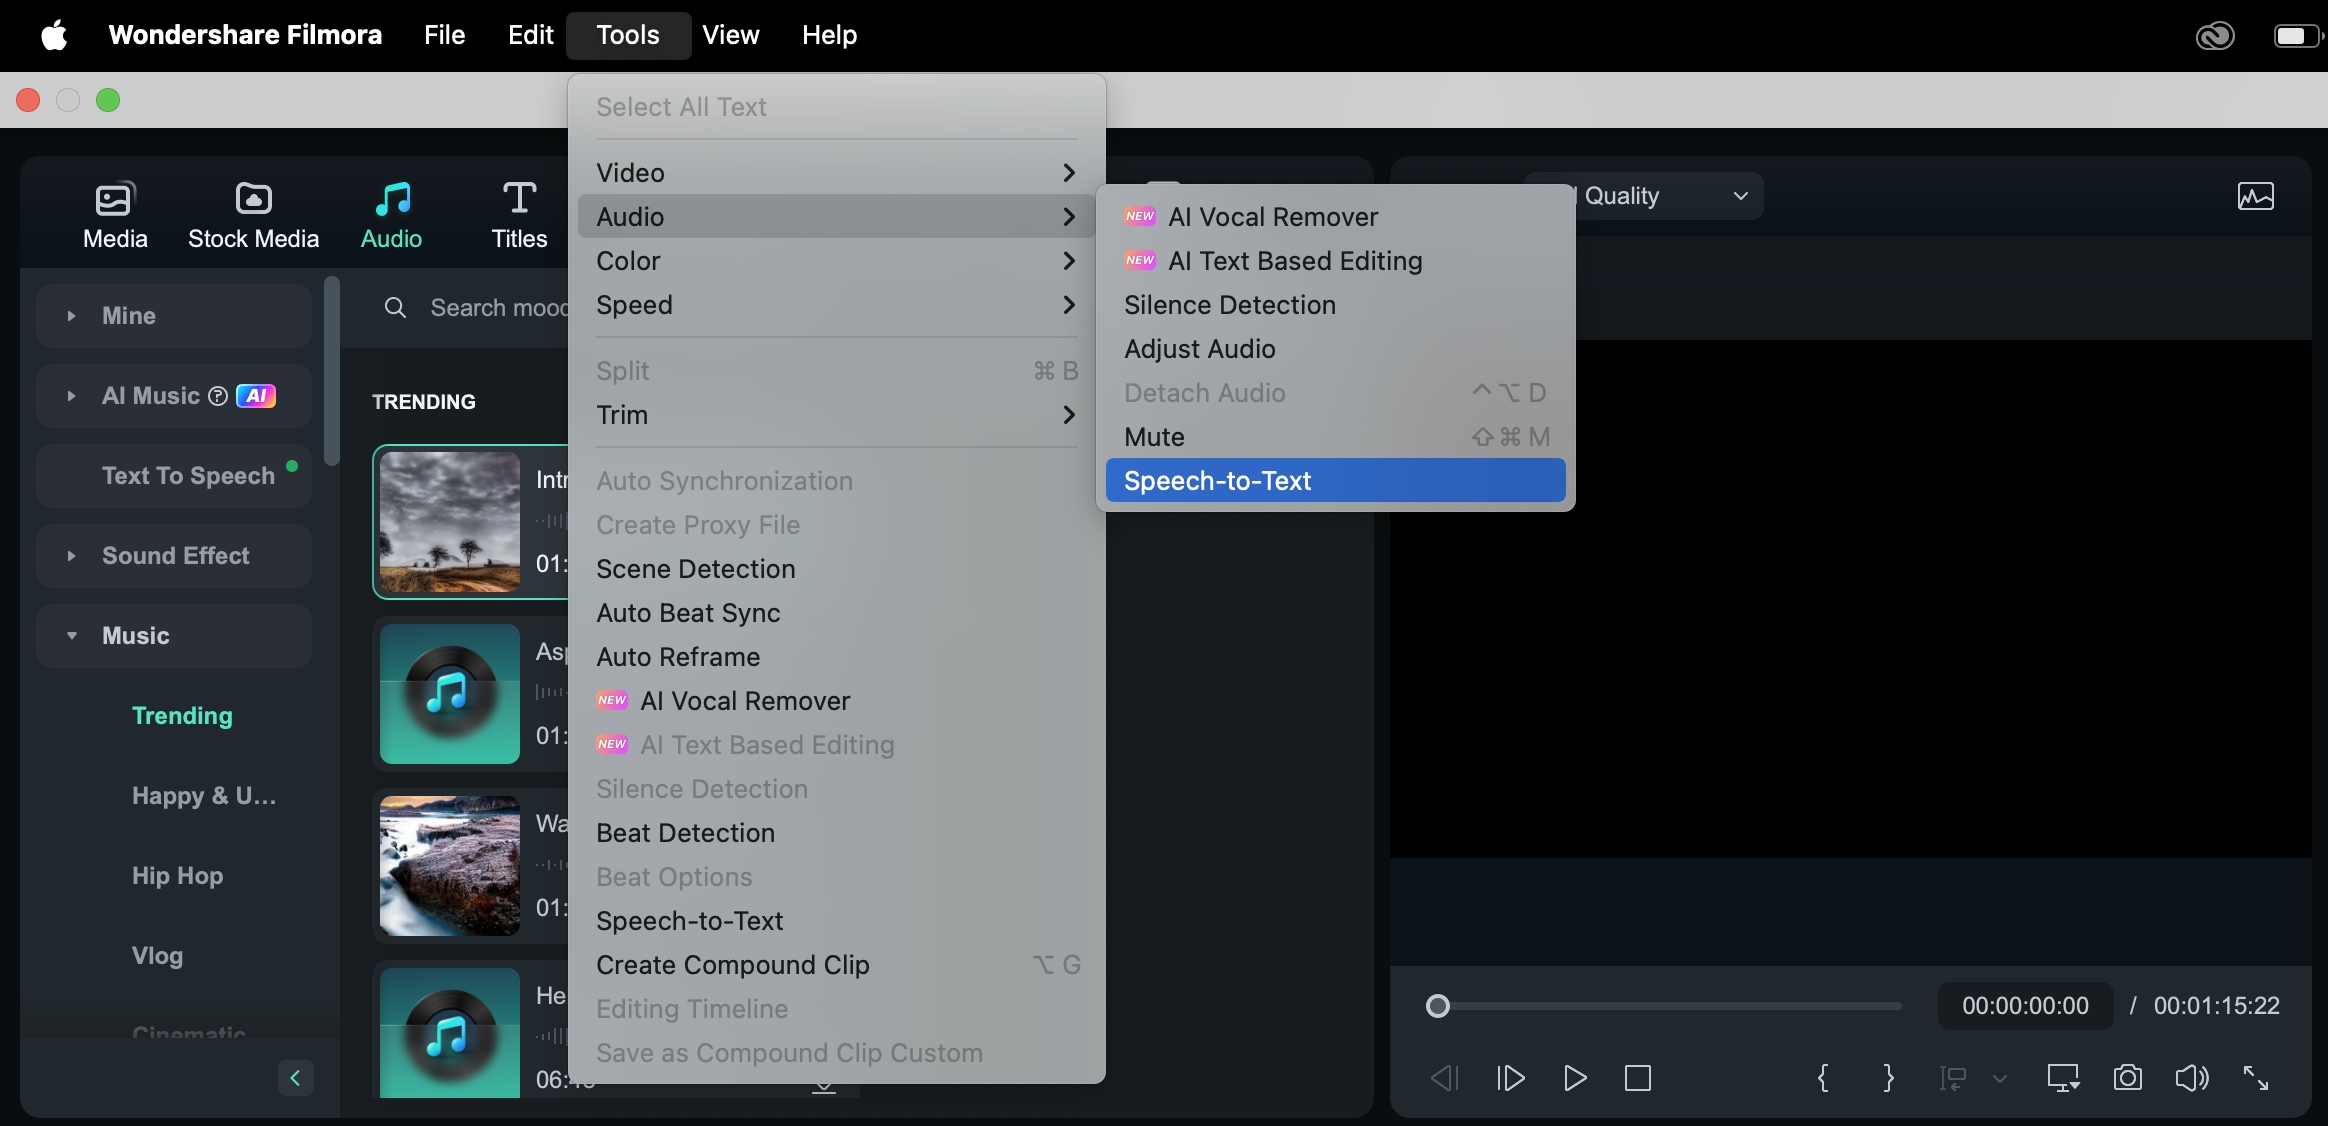
Method 1: Go to the Tools menu at the top, click on Audio, then select Speech to Text.
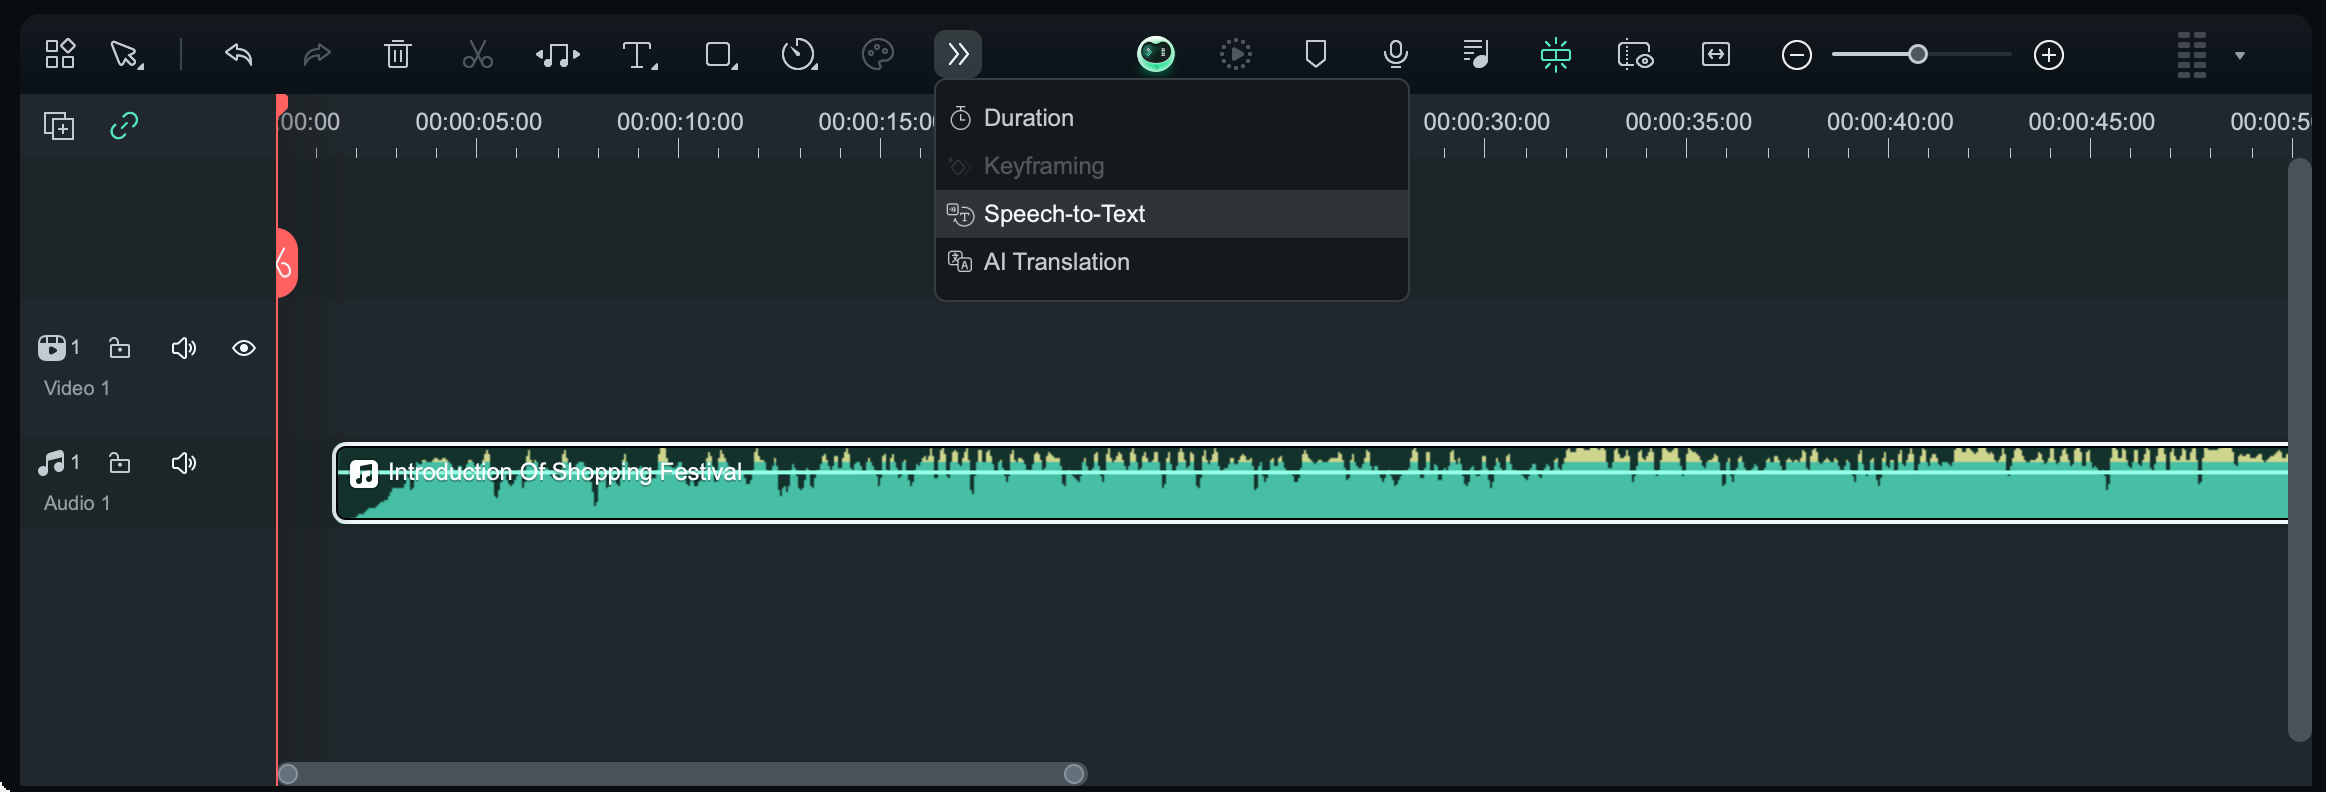
Method 2: On the toolbar, click the Speech to Text icon. If the file type isn’t supported, the icon will not appear.
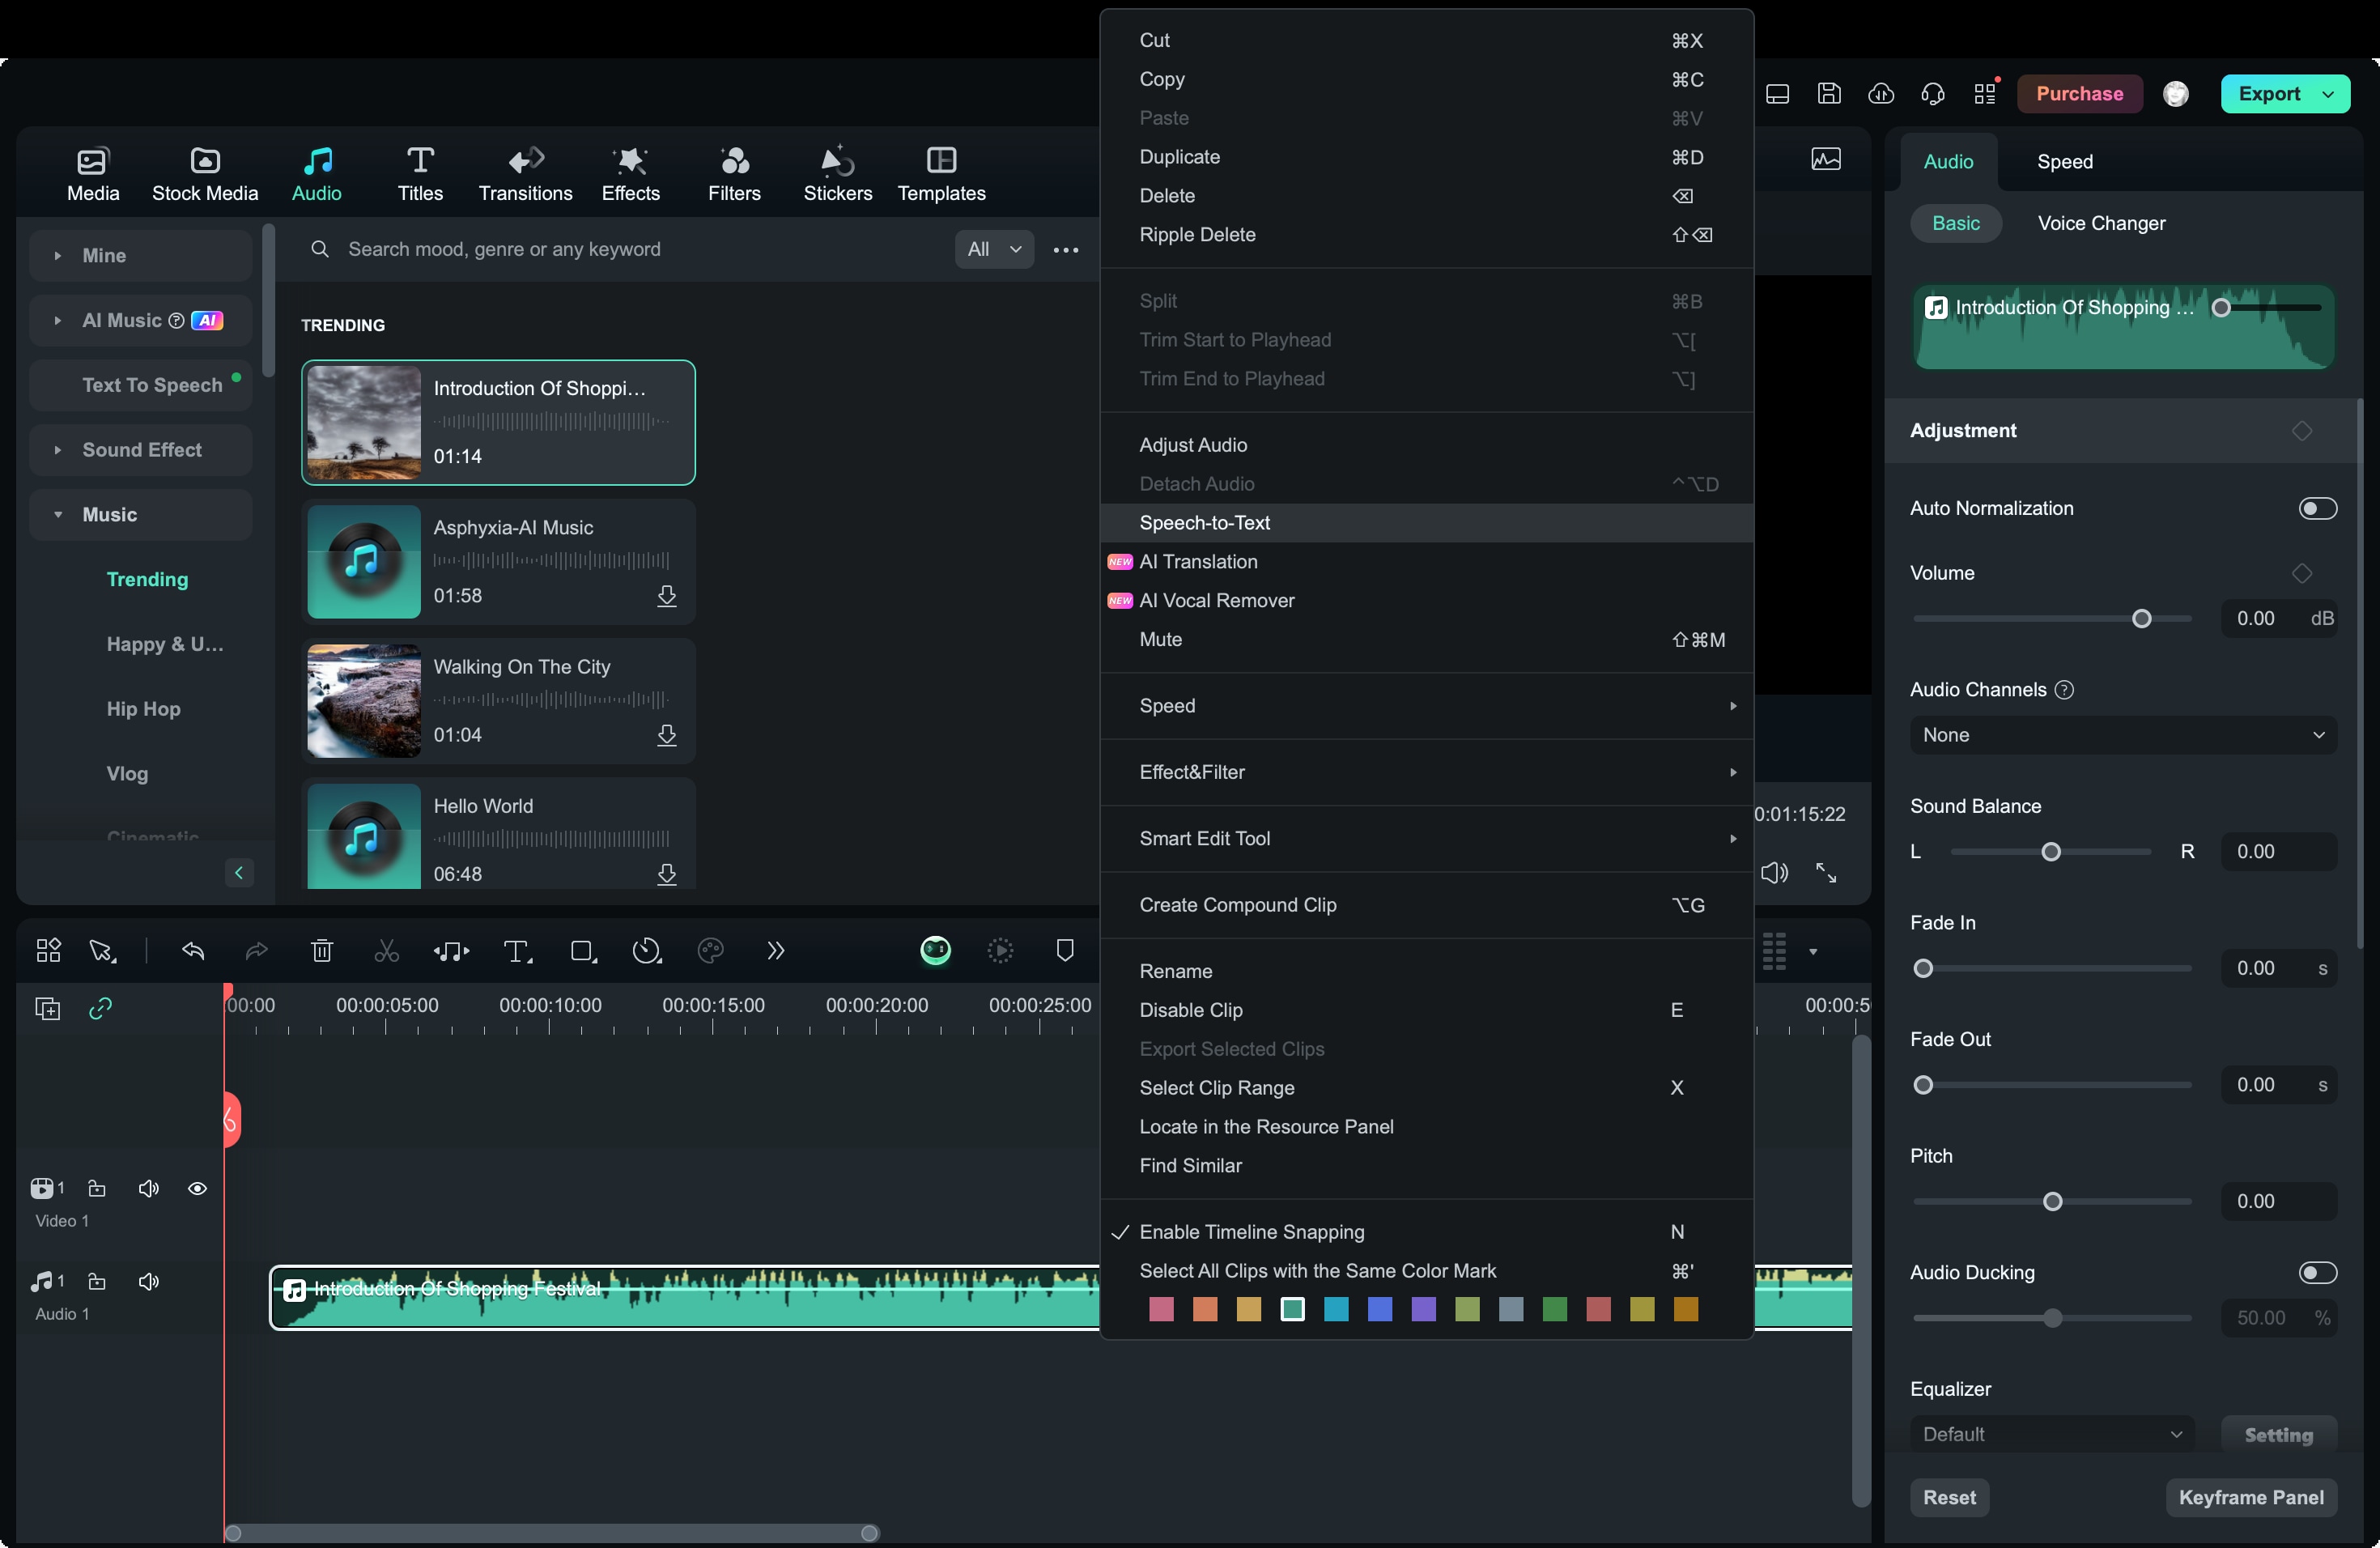
Method 3: Right-click on the audio asset in the timeline, then choose Speech to Text.
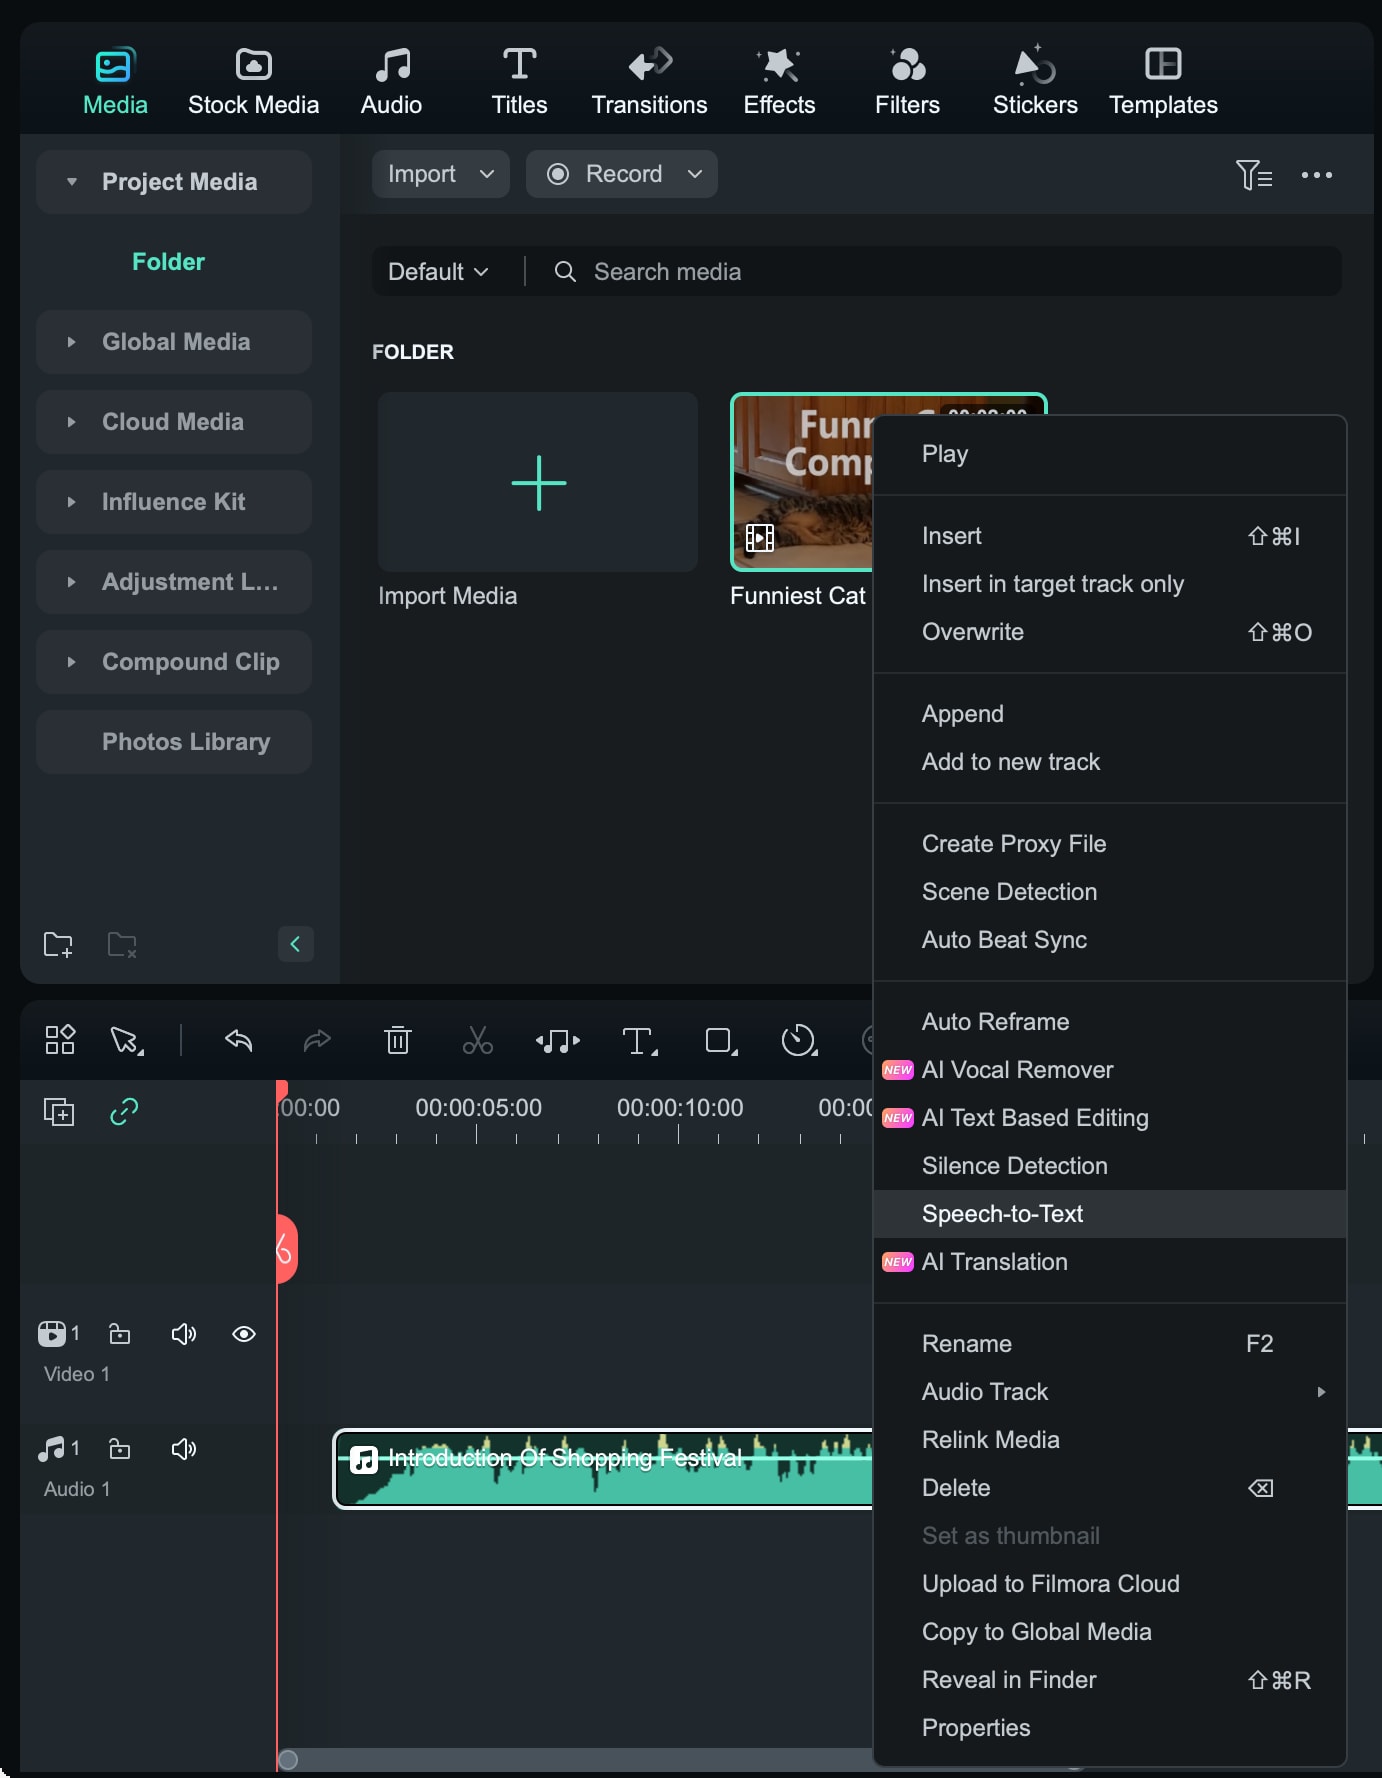
Method 4: If your audio file is in the project media, right-click and select Speech to Text.
Method 5: You can also select the audio asset in project media, click Titles at the top, then choose AI Captions and select Speech to Text.
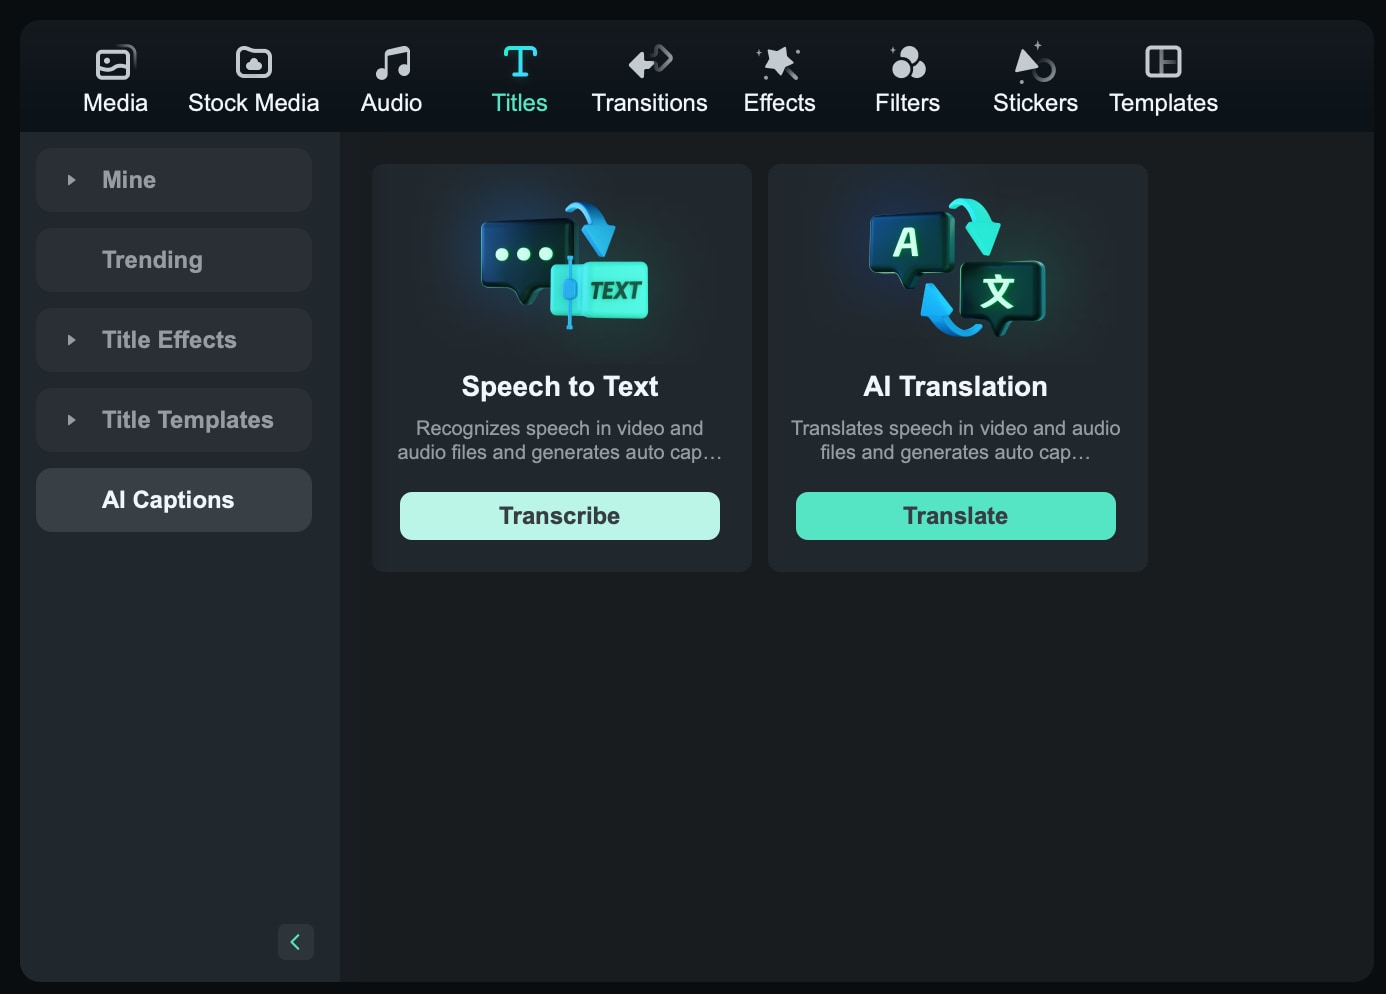
Step 4. Set Transcription Parameters
In the Speech to Text settings window, choose the language of the audio file and check the option to automatically match the text to the timeline. Filmora also supports bilingual subtitle transcription, which can be useful for multilingual projects.
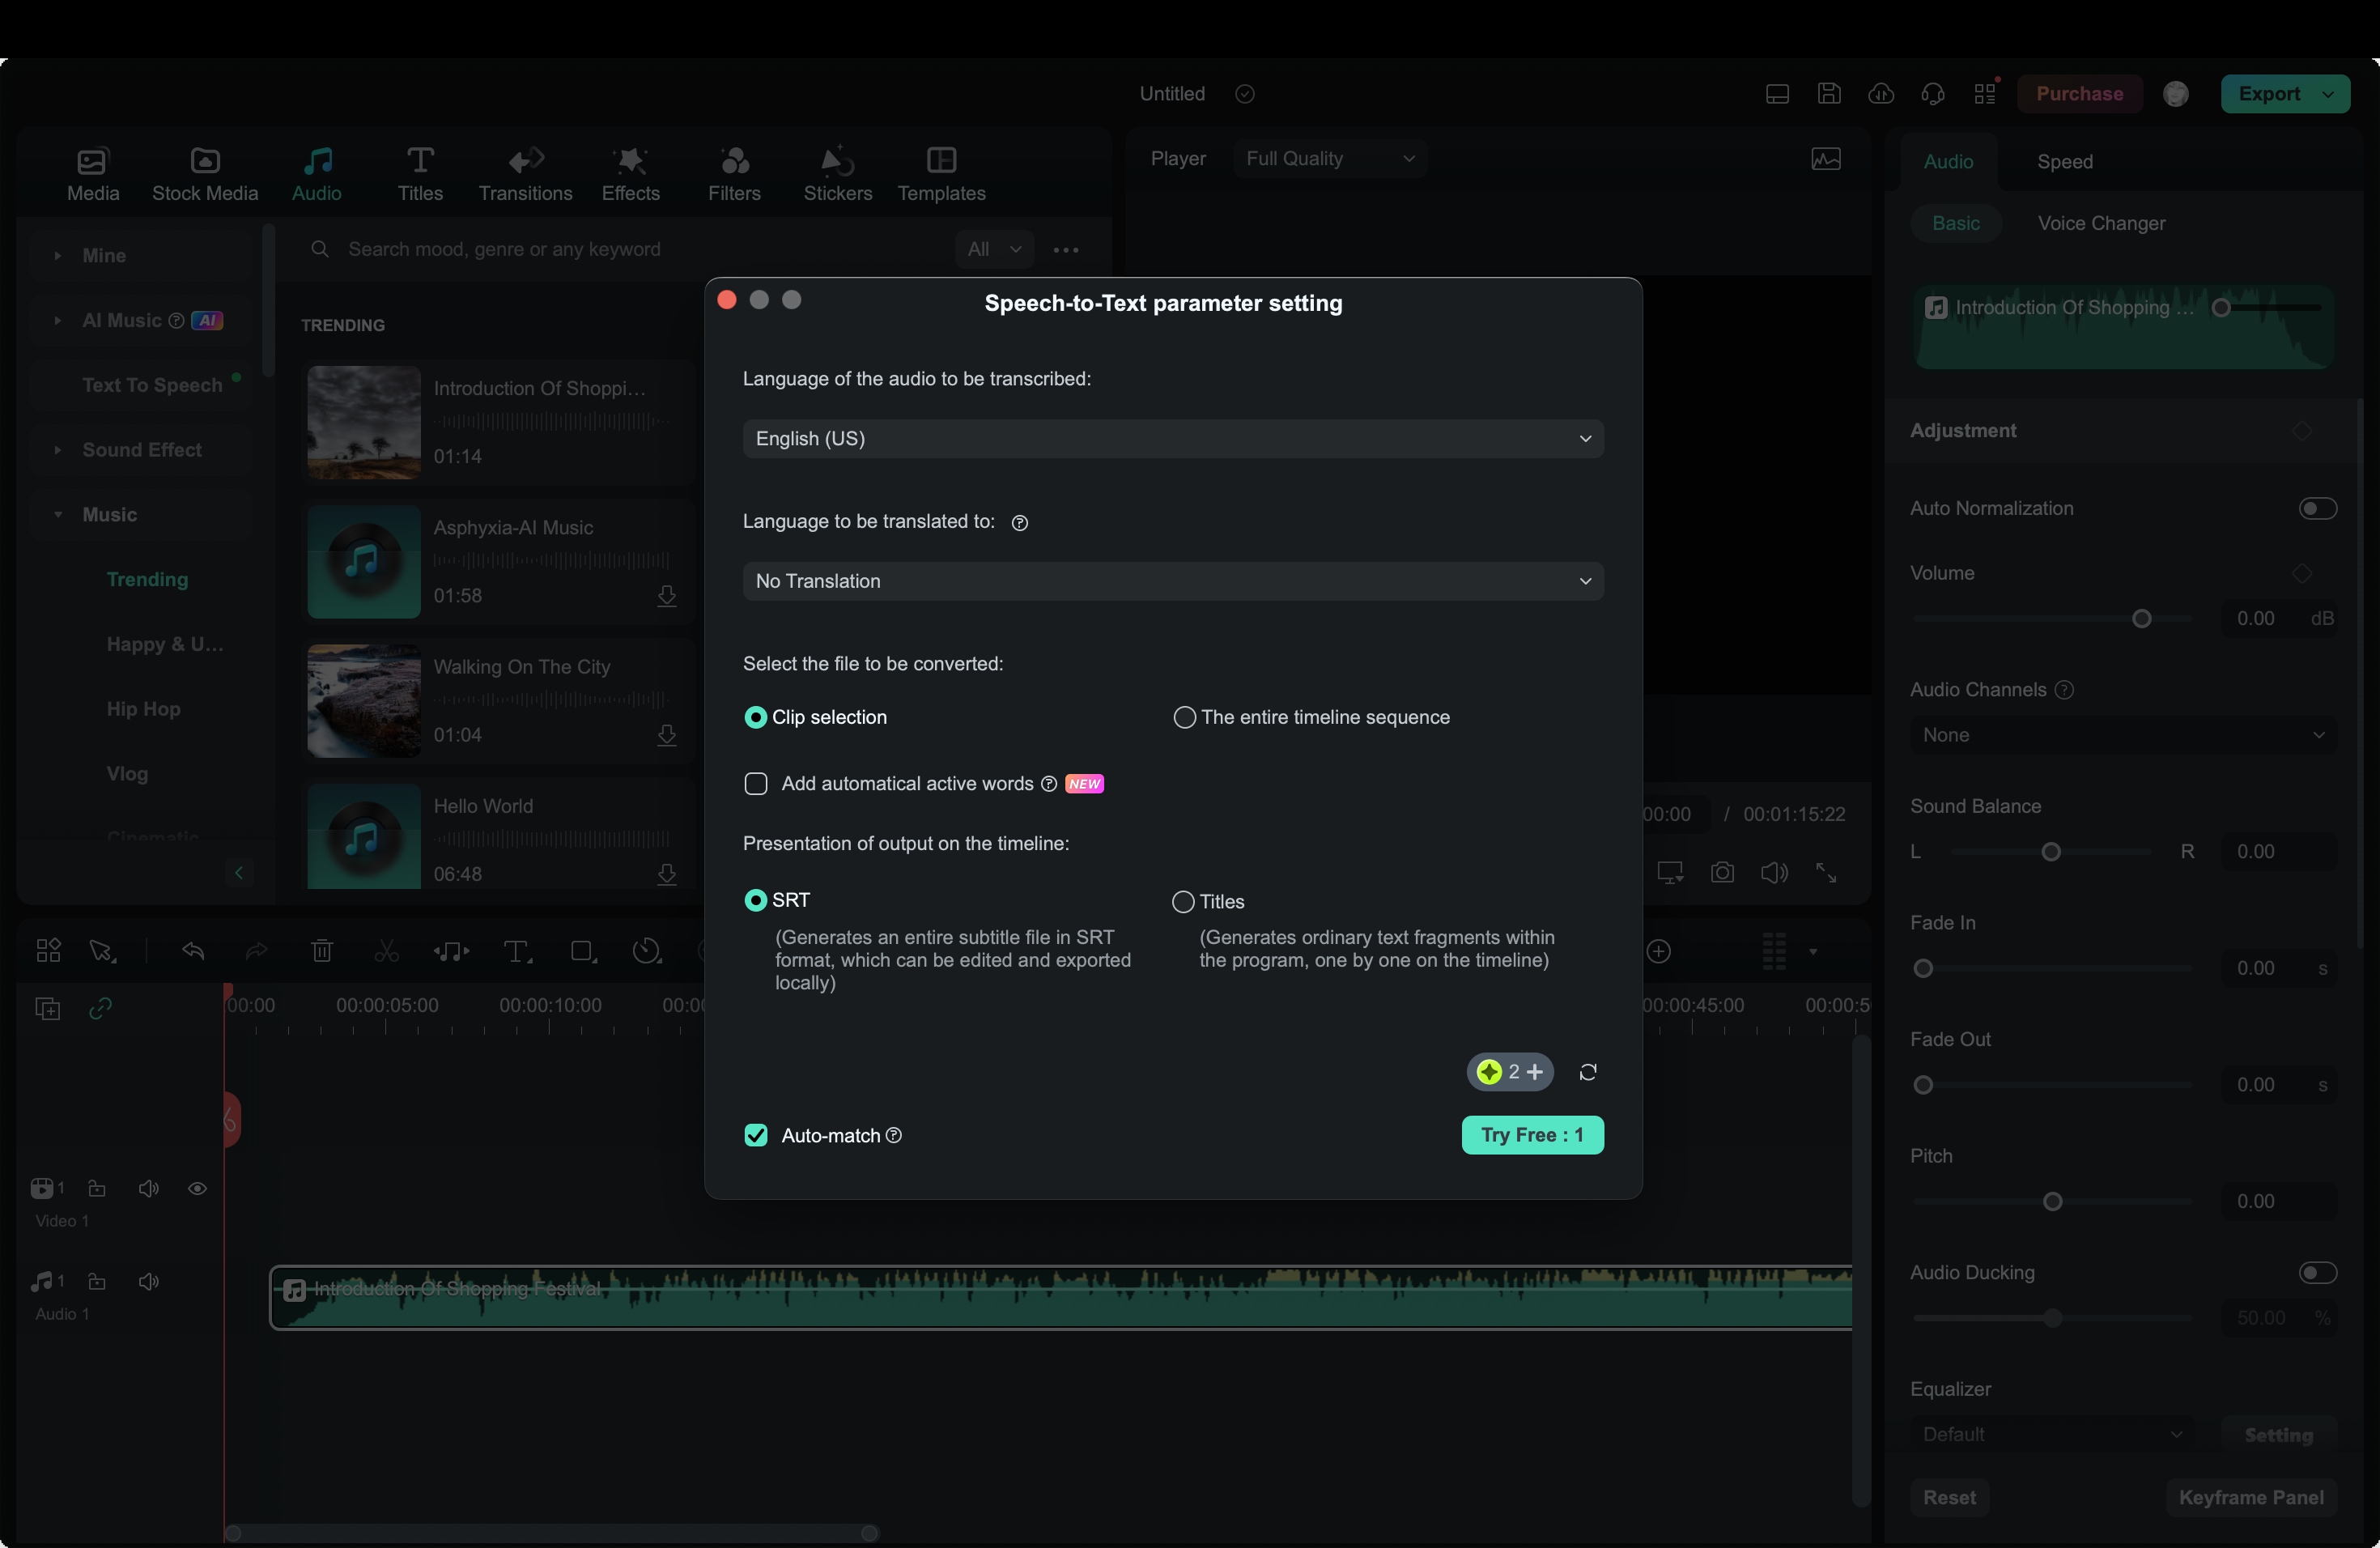
Step 5. Check the Task List
The task list shows the status of the transcription. Files are displayed in order of import, with the first imported file listed at the top. You can scroll through this list to monitor progress.
Step 6. Save the Transcribed File
Once completed, the transcription will be saved in SRT format, making it easy to use as captions or subtitles in your project.
Part 2. Best Mobile App for Transcribing Voice to Text
Filmora isn’t just for desktop users; it’s also available on mobile for both iOS and Android, allowing you to take its powerful speech-to-text features on the go. Filmora’s mobile app makes the process quick and easy with AI-powered transcription, whether you're captioning videos or converting voiceovers to text.
Filmora for Mobile’s Speech-to-Text feature, often referred to as captioning, is designed to convert audio tracks or voiceovers into text, perfect for generating captions or subtitles. The app is ideal for:
- Vloggers who want to add captions to their clips right from their phones.
- Journalists who want to transcribe interviews into text for quotes and references.
- Social media creators who want to quickly add subtitles to enhance viewer engagement.
How to Transcribe Voice to Text in Filmora for Mobile
Using AI Speech-to-Text Tool from the Startup Screen
Step 1. Launch the App
Open Filmora for Mobile and tap the Captions button on the startup screen.
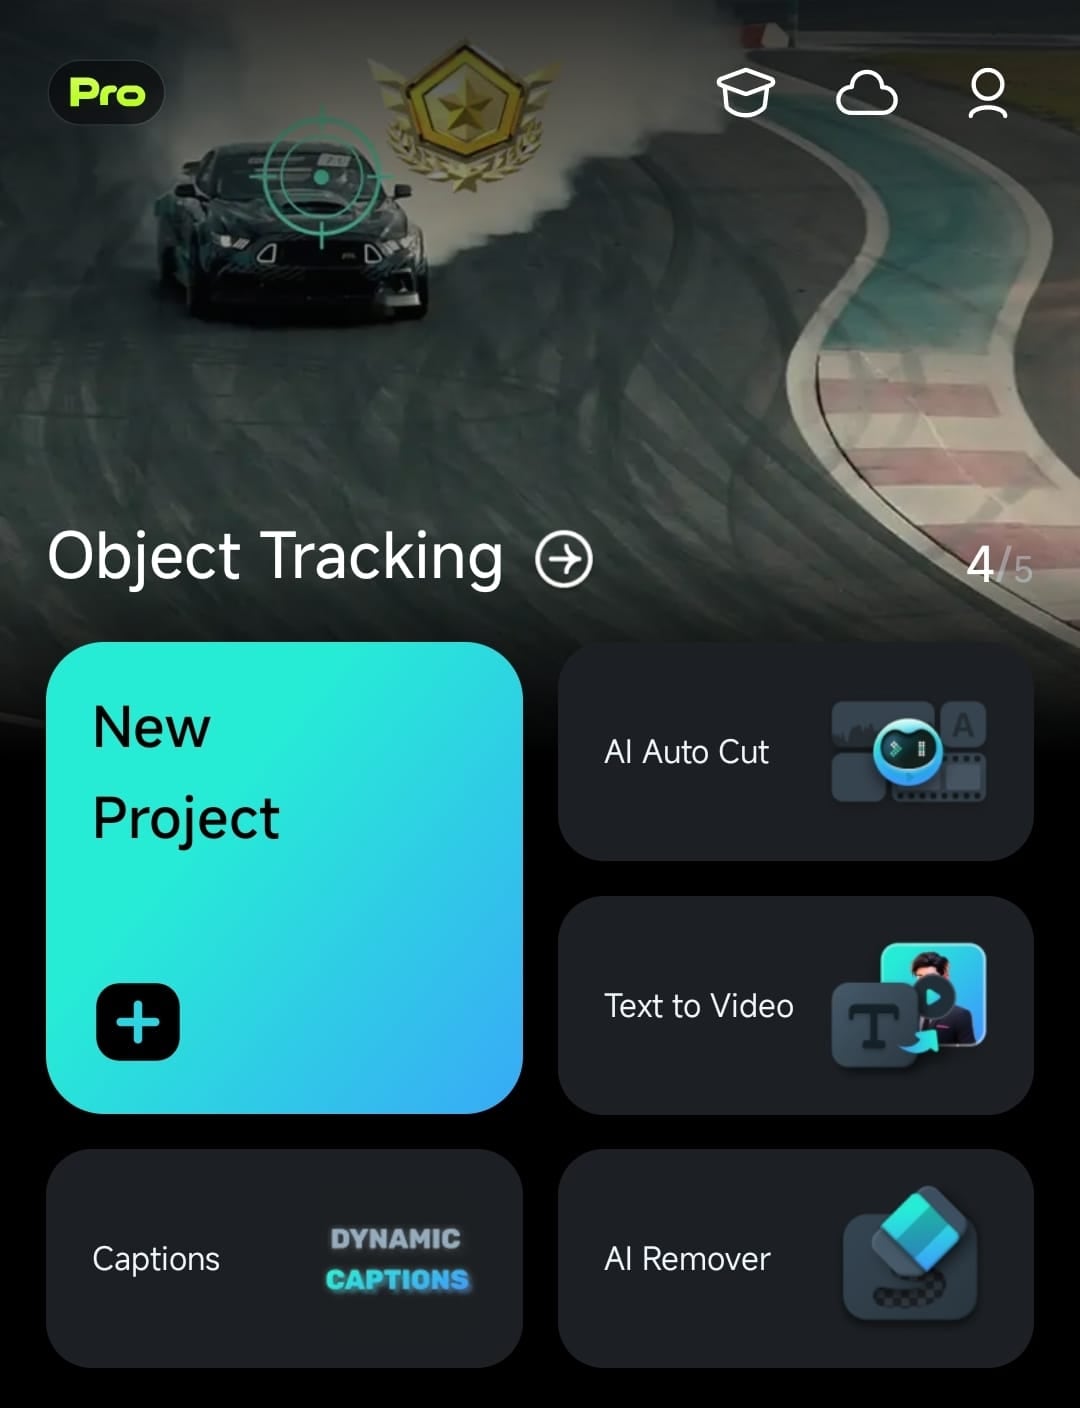
Step 2. Import Your Video
Select a video that contains an audio track, and tap the Import button at the bottom of the screen.
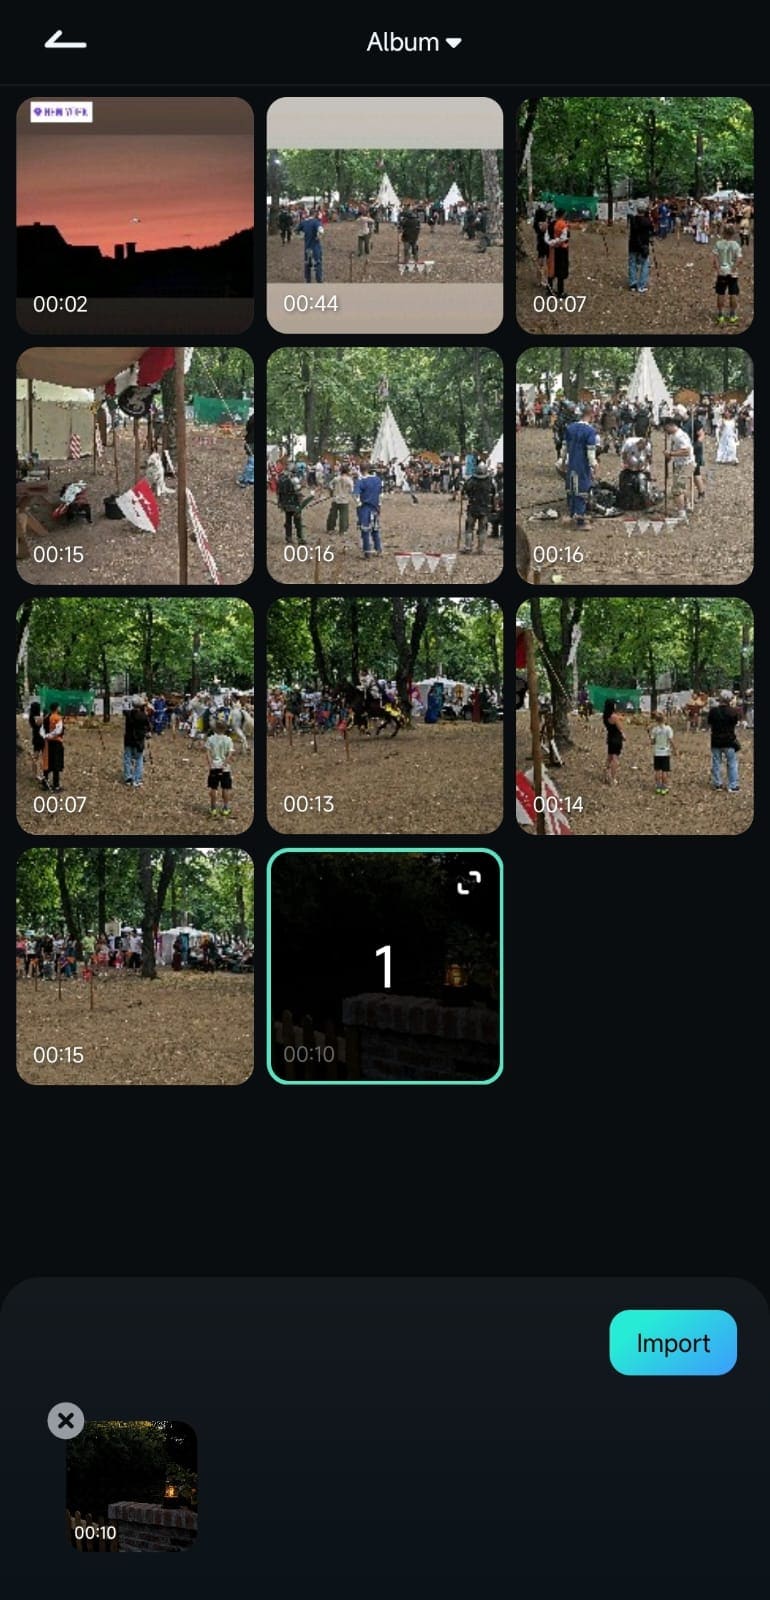
Step 3. Select Language and Add Captions
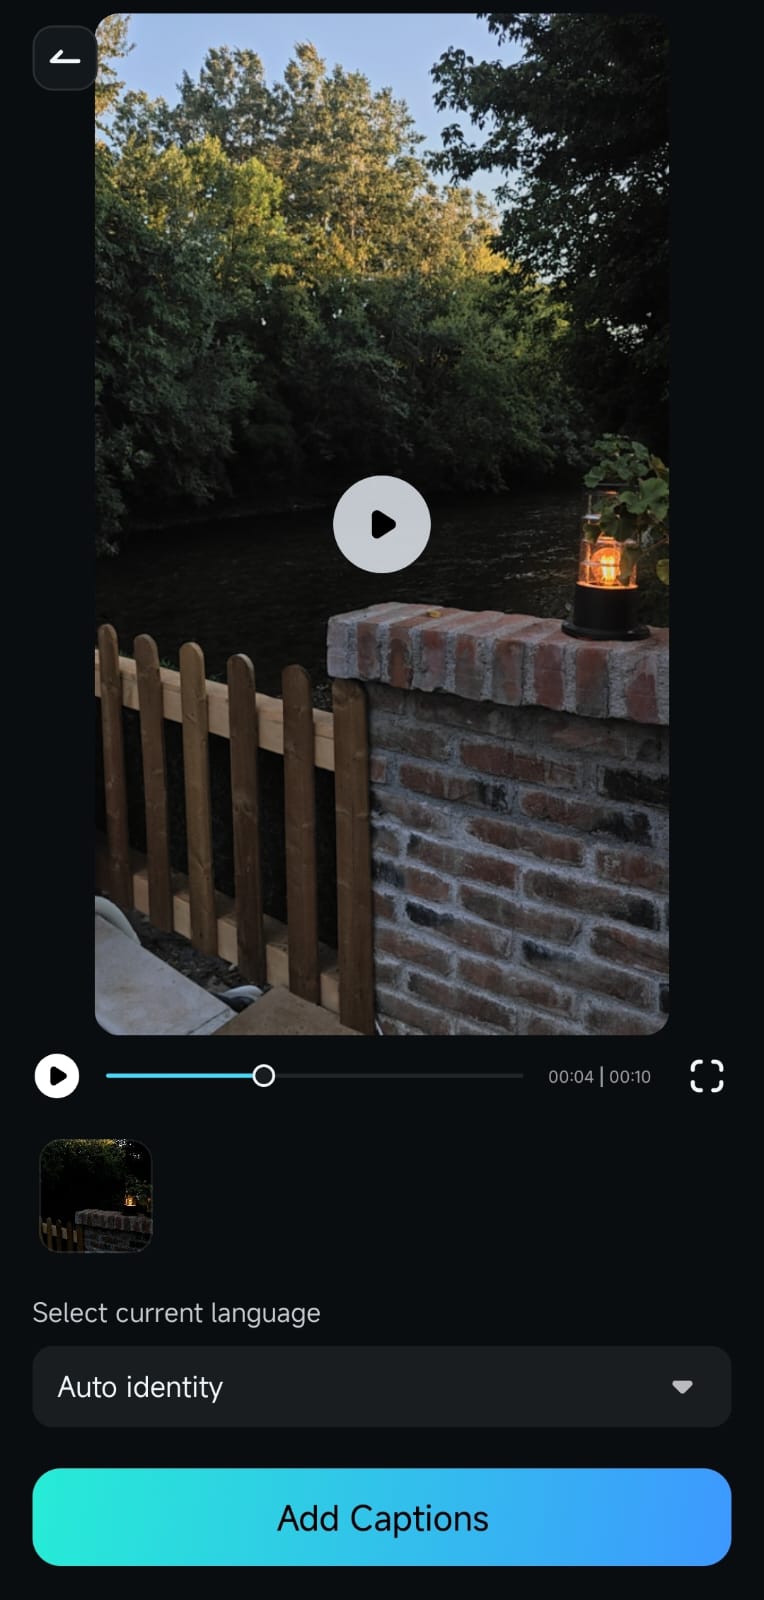
Choose the language of the audio, then hit the Add Captions button. Filmora will automatically generate text from the video’s audio track.
Using Speech-to-Text in the Work Area
Step 1. Import Your Video
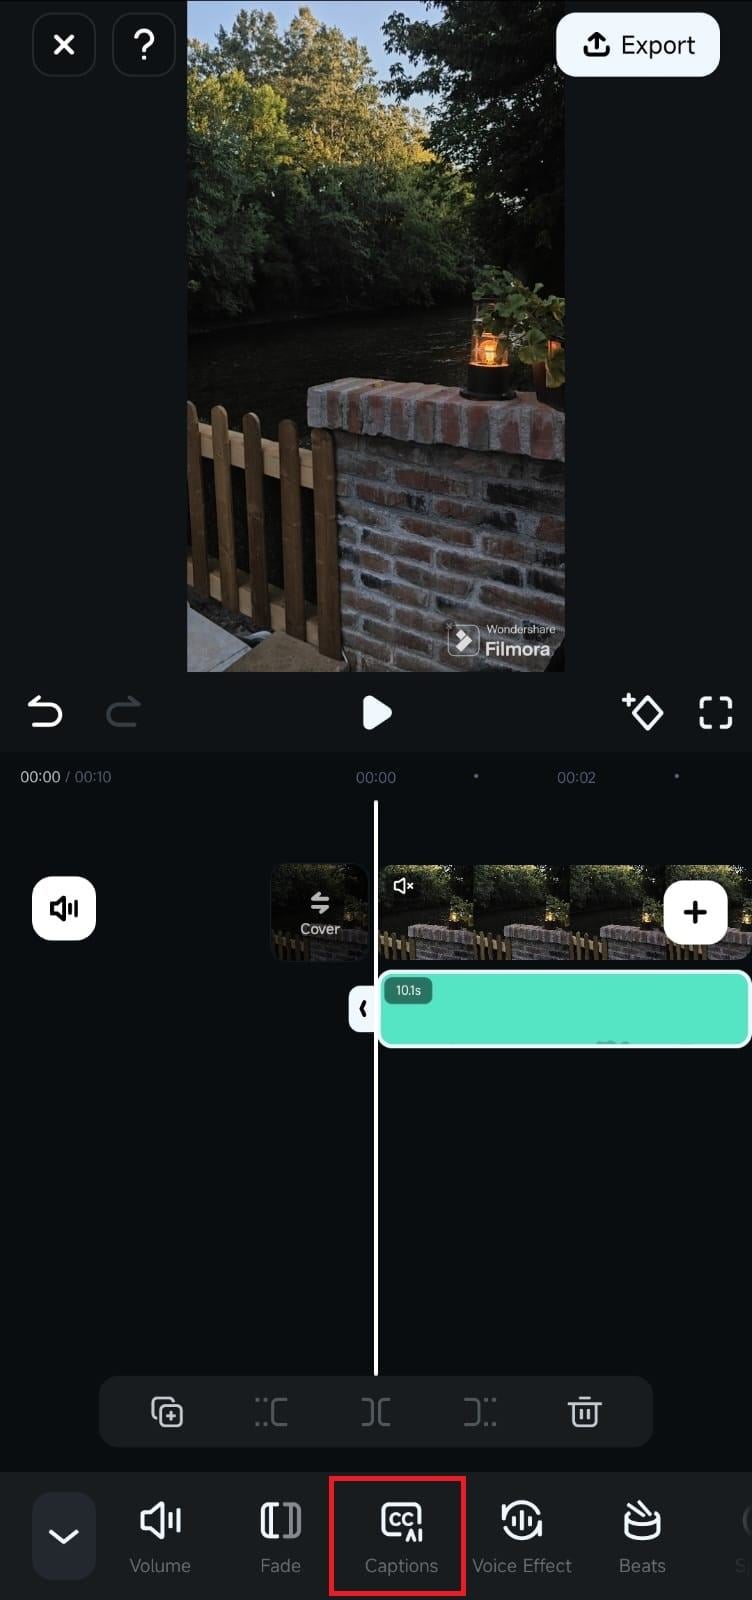
Once your video is imported into the app, navigate to the Work Area and select the audio track in the timeline.
Step 2. Enable Speech-to-Text
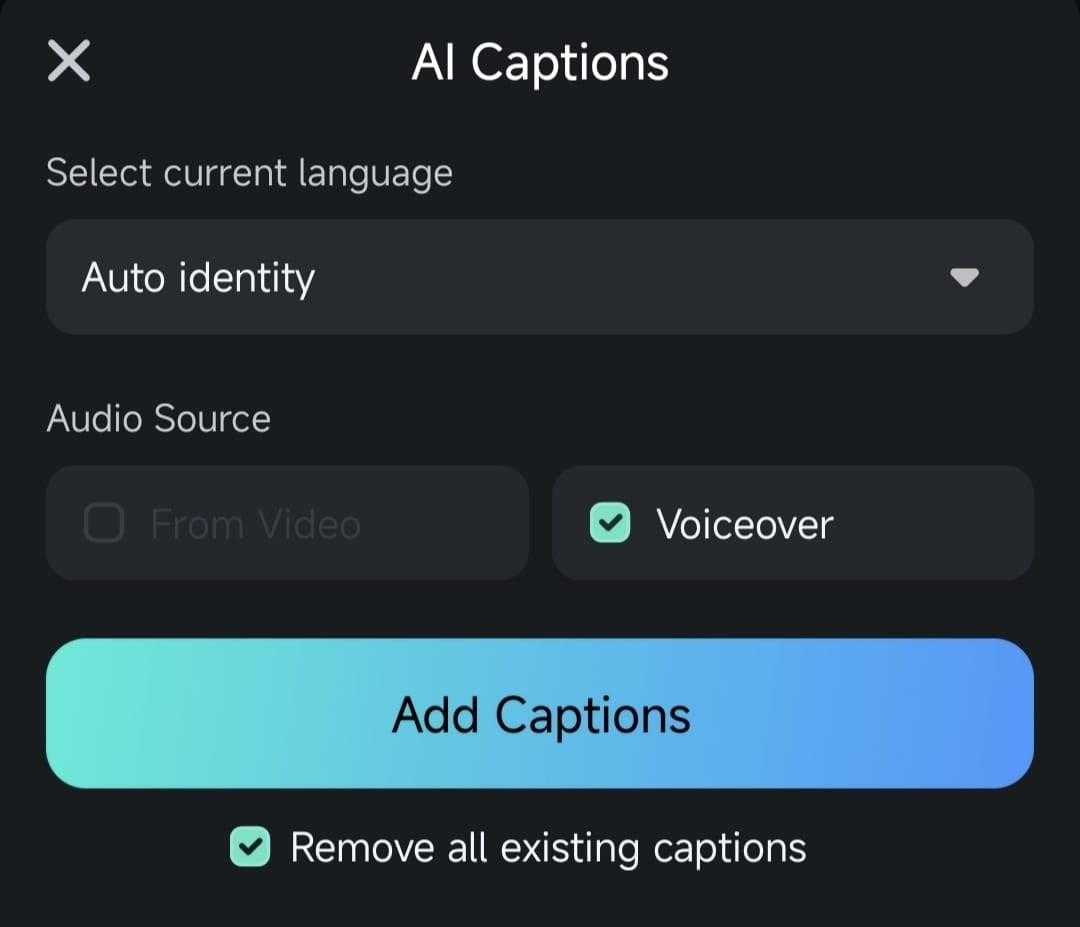
After selecting the audio track, the toolbar at the bottom will update. Tap the Captions button to enable the Speech-to-Text feature.
Step 4. Review the Captions
A popup will appear while the app generates the text. Once the transcription is complete, play the video in the Preview Window to check the AI-generated captions.
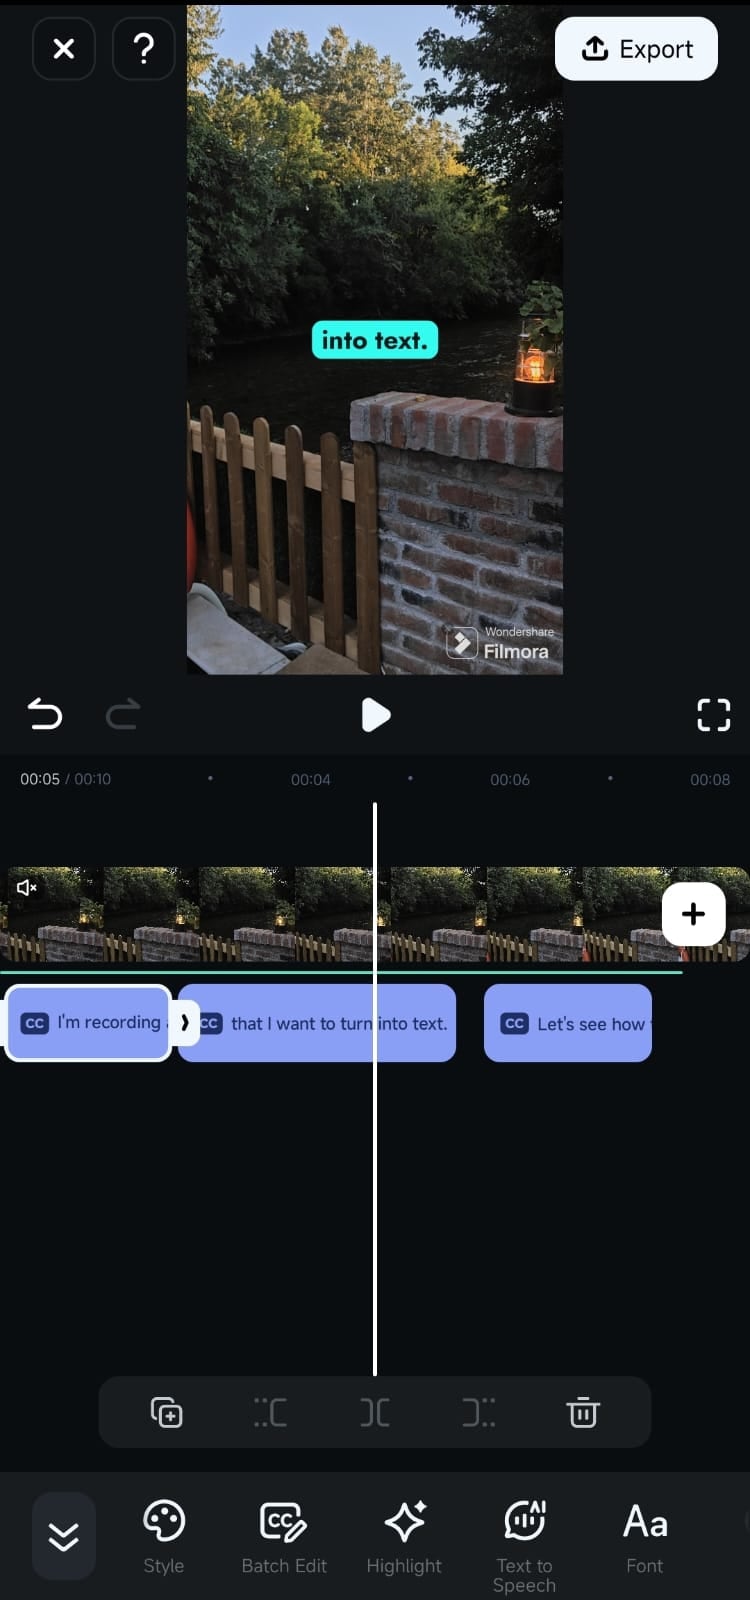
Step 5. Edit if Necessary
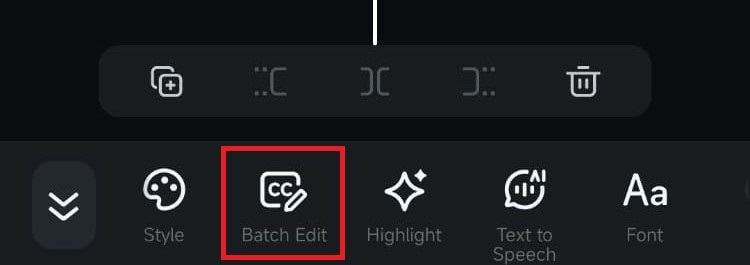
If there are any mistakes in the transcription, tap the Batch Edit button in the toolbar to make quick corrections.
Part 3. Free Online Tools for Voice Transcription
You might also look for free online tools for voice-to-text transcription, Google Docs Voice Typing is one of the most accessible and user-friendly options out there. It’s built right into Google Docs, so there’s no need to download any extra software. As long as you have a Google account and a microphone, you’re good to go.
Google Docs Voice Typing is perfect for anyone looking to transcribe speech to text without spending a dime. Whether you're taking notes during a meeting, writing out ideas, or even drafting an entire article, this tool can handle it. Plus, since it works directly in your browser, you can use it on any device with internet access—no fuss is required. It’s a handy option for students, writers, and professionals who need quick, on-the-go transcription.
How to Use Google Docs Voice Typing
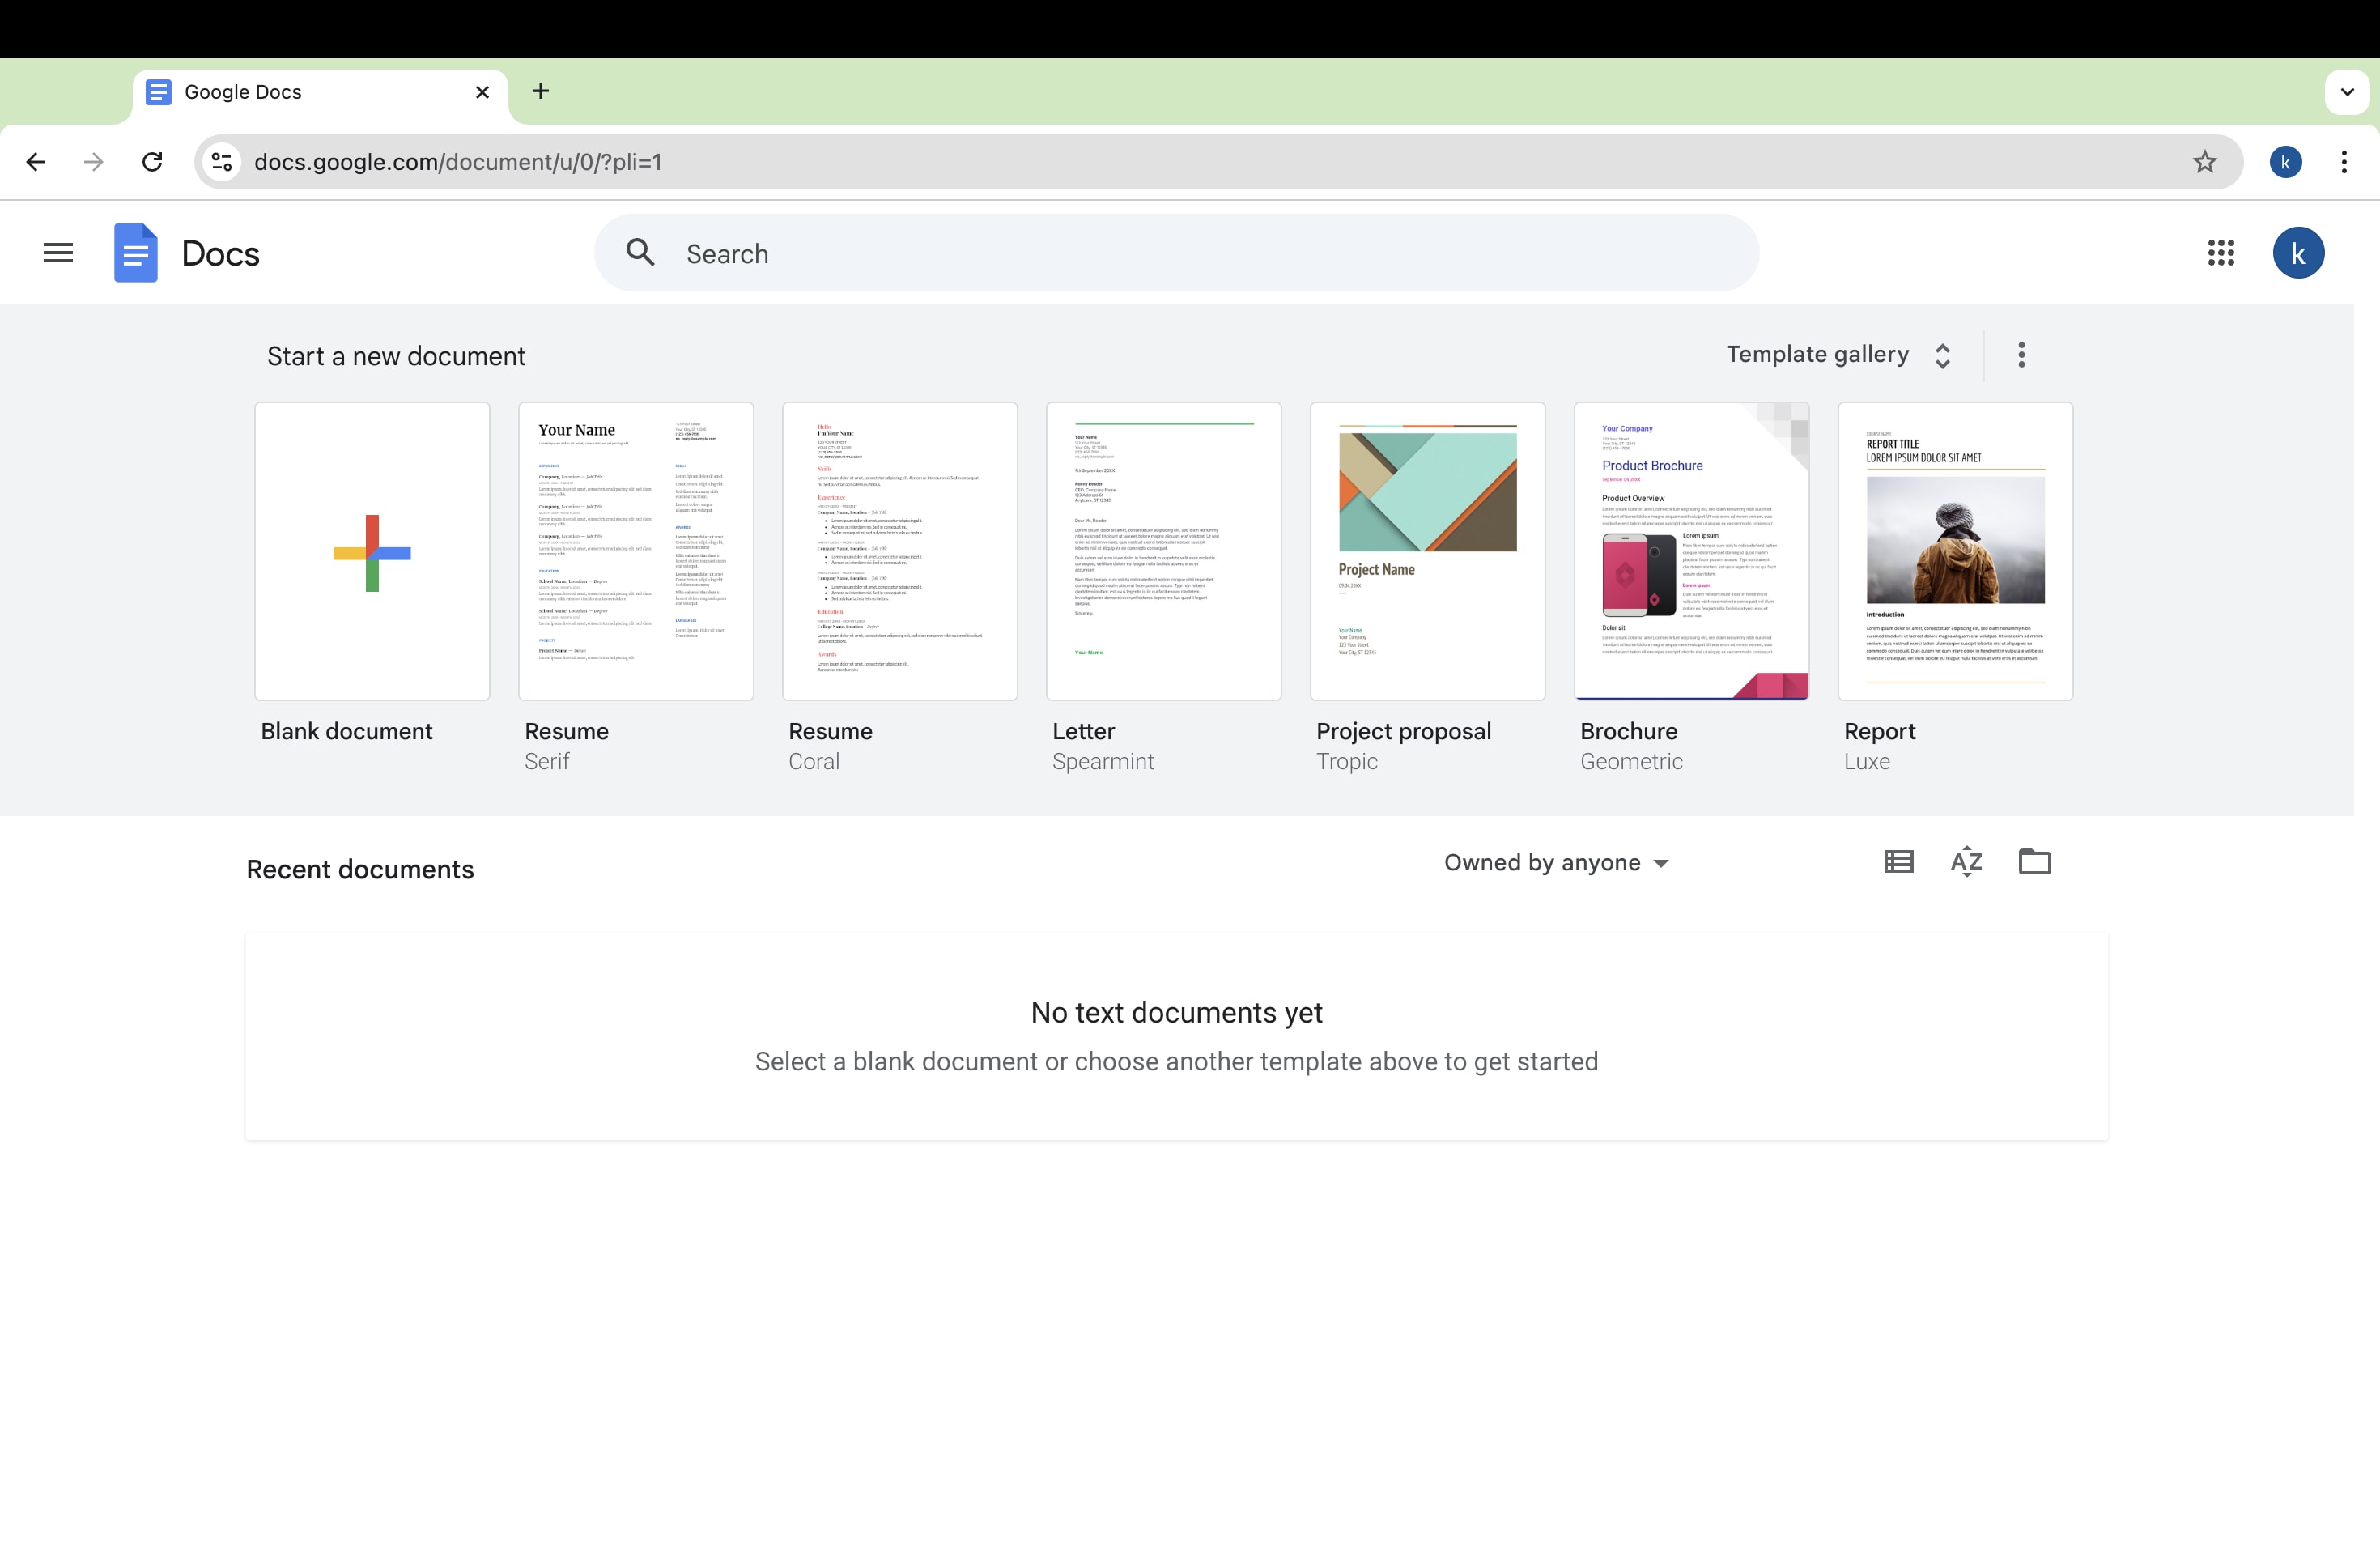
Step 1. Open Google Docs
Go to Google Docs on your browser and create a new document (or open an existing one).
Step 2. Go To “Tools”
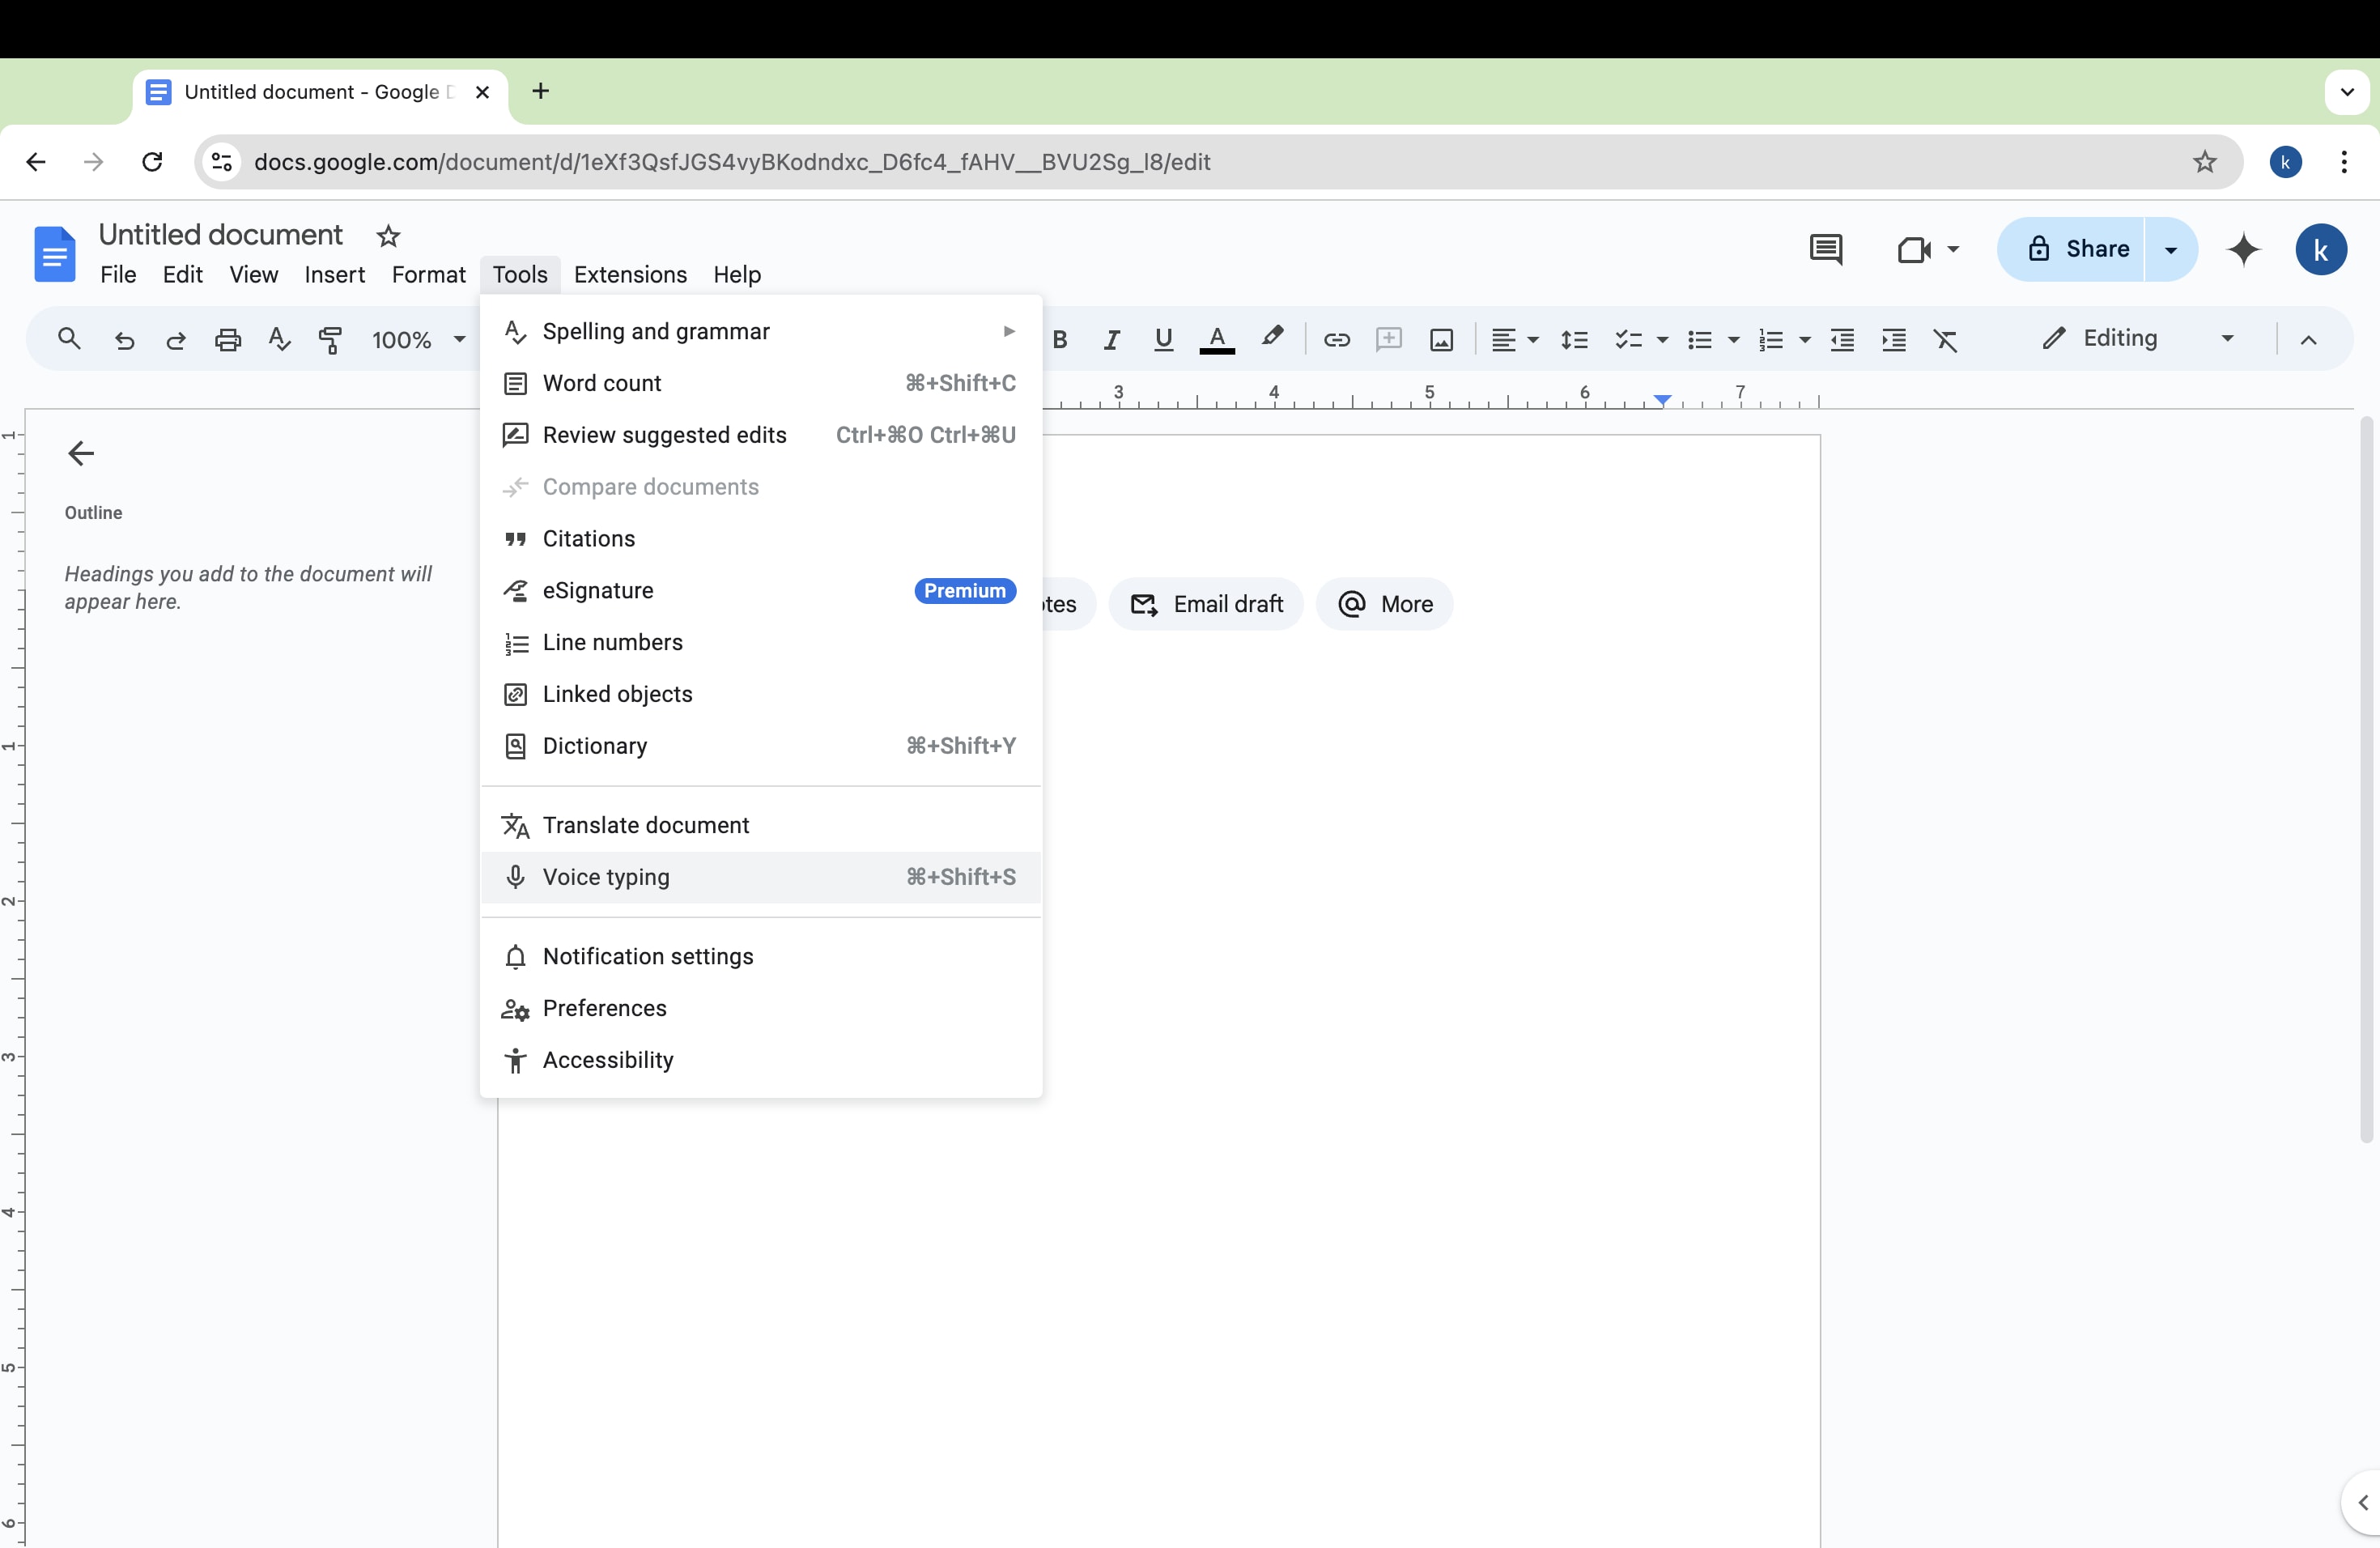
Click on the “Tools” menu at the top.
Step 3. Start Voice Transcription
Select “Voice typing” from the dropdown. A microphone icon will appear—click it and start speaking. Make sure your mic is enabled and working, then Google will automatically transcribe your speech as you talk.
Part 4. Challenges in Transcribing Speech-to-Text
While transcribing speech to text can be a huge time-saver, it’s not always a flawless process. There are a few challenges that you might encounter, but the good news is, there are ways to tackle them effectively.
- Accuracy
Automated transcription tools sometimes struggle with accents, background noise, or multiple speakers talking at once. This can lead to errors in the transcription, requiring manual corrections. To improve accuracy, it’s recommended to record audio in a quiet environment and speak clearly.
- Flexibility and customization
If you’re using a mobile device or online tool, you may find it lacks certain features that would make your life easier, like editing shortcuts, specialized formatting, or better control over transcription speed. This is where transcribing on a PC really shines. Most desktop transcription tools offer more flexibility, allowing you to customize your settings, easily correct mistakes, and format text to fit your needs.
- Language and jargon
Many transcription tools might not recognize industry-specific terms or names, resulting in inaccurate transcriptions. In this case, reviewing the text after transcription is important to ensure everything is correct.
Conclusion
Transcribing speech to text is now a vital part of many industries, from business meetings to content creation. With so many tools available, you can easily convert voice to text on any device, whether it’s a PC, mobile, or an online platform. If you looking for free online tools to transcribe voice-to-text, you can choose Google Docs with its Voice Typing features.
However, if you want more advanced tools, Wondershare Filmora is the best option. It has a powerful Speech-to-Text feature that excellent choice for both PC and mobile users. With Filmora, you can quickly transcribe voice-to-text with high accuracy and customizable options. While challenges like accuracy and customization exist, choosing the right tool like Filmora can significantly enhance your transcription experience and save you time.


 100% Security Verified | No Subscription Required | No Malware

