Imagine editing a challenging video when you discover scene edit detection premiere pro not showing properly. This feature is essential for cutting down long videos into individual scenes, which saves hours of manual labor. Video editors struggle to separate their content without it, causing delays, annoyance, and poor output.
This article may assist Premiere Pro users with Scene Edit Detection issues. We'll examine various causes, such as incorrect settings or incompatible video formats, and provide troubleshooting tips to improve this tool for smooth, accurate editing. In addition, we'll discuss Filmora as a possible option for individuals looking for a simpler, more cost-effective scene detection system. Keep reading to know more!

In this article
Understanding Scene Edit Detection in Premiere Pro
Premiere Pro Scene Edit Detection is a sophisticated feature that automates dividing video footage into discrete scenes based on transitions and changes in the material. This function is extremely handy for editing long-form media like films, advertisements, or multi-scene projects, where manually recognizing and dividing sequences may take time.
Scene detection premier is based on artificial intelligence and machine learning techniques. Premiere Pro uses visual and aural clues, including color, brightness, motion, and audio patterns, to recognize when one scene transitions to another. The program examines the movie frame by frame to identify these shifts and cuts, allowing editors to divide the film into digestible portions automatically.
Key Features of Scene Edit Detection:
- Detects cuts or scene changes in pre-edited video material, saving time and work.
- Uses AI to assess visual and auditory cues, such as illumination changes and transitions, to recognize scene alterations properly.
- Provides extensive frame analysis, ensuring that even minor scene changes are identified.
- Once scenes are identified, the film is separated into individual clips on the timeline to facilitate editing.
Advantages of Scene Edit Detection:
- Automating the scene recognition procedure dramatically decreases the time spent manually trimming and sorting film.
- By dividing films into different scenes, editors may concentrate on creative features such as color grading, transitions, and effects rather than mundane jobs.
- AI-based detection guarantees exact cuts, reducing the danger of missing critical transitions or incorrectly separating scenes.
- Scene recognition helps organize video material by breaking it down into smaller, more manageable chunks, making editing easier and more effective.
Premiere Pro Scene Edit Detection allows editors to easily manage complicated projects, increasing productivity and editing accuracy.

Common Issues with Scene Edit Detection
Scene Edit Detection in Premiere Pro is efficient, although typical difficulties might disturb it. Configuration mistakes, program settings, and mismatched video formats might cause these issues. Here are some important concerns and solutions:
1.Disabled or Missing Feature:
Right click the video thumbnail to confirm "Scene Edit Detection" option. Since this function is only accessible in certain Premiere Pro editions, ensure you have the latest version. Update software if required.

2.Incorrect Settings:
Incorrect frame rates, resolution mismatches, and invalid codecs might affect Scene Edit Detection. Keep your project parameters consistent with the source video for seamless scene recognition. Ensure your codec works with Premiere Pro by checking frame rate and resolution in project settings.
3.Incompatible Video Formats
Scene Edit Detection may not work in certain video formats. Premiere Pro favors MP4, MOV, and AVI. Before doing scene recognition with less popular formats, use Adobe Media Encoder to transcode the video.
4.Corrupted Damaged footage:
Damaged video files might cause scene recognition errors. Diagnose and fix corrupt footage. Premiere Pro's built-in restoration tools or third-party programs may restore film integrity for accurate scene recognition.
Troubleshooting Scene Edit Detection Issues
If you have difficulties with Scene Edit Detection in Premiere Pro, troubleshooting is the best approach to resolve them and keep your workflow running smoothly. Begin with simple actions and progress to sophisticated approaches if the issue continues.
Basic troubleshooting steps:
- Check for updates: Make sure you're using the latest version of Premiere Pro. Adobe releases updates with bug fixes and improvements to Scene Edit Detection. To verify, go to ""Help" " > "Updates".
- Restart Premiere Pro: Sometimes, restarting the program will resolve minor issues. Save your work, exit Premiere Pro, and reopen the project.
- Verify project settings: Incorrect settings may interfere with Scene Edit Detection. Check that your project's frame rate, resolution, and codec settings match the footage you're working on. These options may be accessed by selecting ""File" " > " "Project Settings.""

Advance Troubleshooting Techniques:
- Analyze media files: If the problem persists, examine media files for corruption or formatting. Adobe Media Encoder can restore corrupted files or convert videos to MP4.
- Test with different footage: Use Scene Edit Detection on several video clips to see whether the issue is tied to any particular file. This may assist in determining if the problem is with the film or the Premiere Pro settings.
- Consult Adobe Support: If none of these measures address the problem, contact Adobe support staff or visit their official forums. They may provide specialized advice or assist with troubleshooting more complicated software issues.
These methods will likely address most Scene Edit Detection difficulties and improve your video editing experience.
Optimizing Scene Edit Detection Performance
After resolving typical Scene Edit Detection difficulties, the next step is to improve speed for smoother, more accurate results. Here's how to fine-tune this function in Premiere Pro.
1.Improving video quality.
High-quality footage improves the accuracy of Scene Edit Detection. For improved results:
- Increase resolution: To boost detection accuracy, ensure your film is of better quality. Low-quality film may confound the detecting algorithm, making it difficult to distinguish between situations.
- Stabilize Footage: If your video is unsteady or noisy, try stabilizing it or using simple color correction to enhance overall clarity. This may improve Premiere Pro's ability to discern discrete scene transitions.
Adjusting the settings.
Fine-tuning Premiere Pro settings may enhance the feature's performance:
- Codec Selection: Use a codec (such as H. 264 or ProRes) that Premiere Pro supports and optimizes for editing.
- Frame Rate: If your film has an uneven frame rate, changing it to a constant frame rate may increase detection accuracy.
- Adjust the detection thresholds: If available, adjust the scene detection sensitivity to better suit the video you're working with.
Using third-party plugins.
If Premiere Pro's built-in capability does not provide the required results, you may utilize third-party plugins such as Boris FX and FilmImpact. These plugins often provide improved detection algorithms, customizable features, and greater flexibility for processing complicated video.
Filmora Advanced Scene Detection: A Worthy Alternative
Wondershare Filmora is a powerful video editing program that caters to a broad spectrum of users, from beginners to seasoned experts. It's a perfect alternative to Premiere Pro. It is well-known for its user-friendly interface and entire editing suite, which includes sophisticated AI-driven tools that make hard operations like video editing, cutting, and scene spotting easier.One of its most notable features is scene detection, which allows users to break recordings into digestible chunks and improve their editing process.
Scene Detection Features in Filmora.
- Automatic Detection: Filmora's scene detection technology analyzes your video and recognizes unique scene changes, saving you time and work. There is no need to edit the film frame by frame manually.
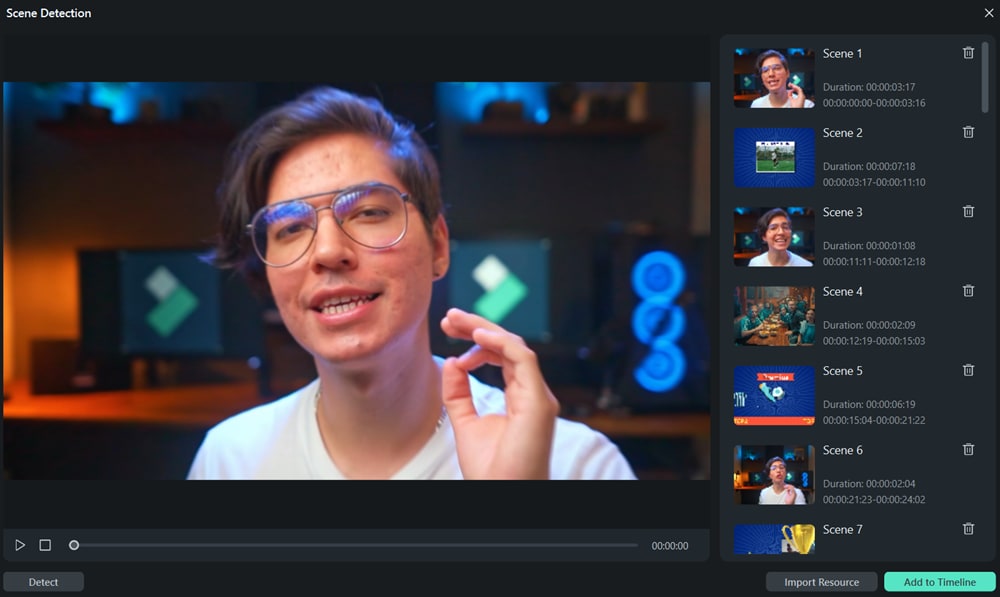
- Clip Preview: Filmora lets viewers see each identified clip after recognizing scene changes. This allows you to inspect the cuts before adding them to the timeline.
- Adding to Timeline: Once you're pleased with the preview, you can rapidly add all or selected clips to the timeline for further editing, creating a smooth transition between the detection process and final editing.
Benefits for Premiere Pro users
Filmora may serve as a feasible option for consumers encountering issues with Premiere Pro's scene identification technology, giving the following advantages:
- Simpler User UI: Filmora's UI is more user-friendly than Premiere Pro's. This makes it excellent for those who want a less sophisticated and more intuitive scene identification platform.
- Faster Workflow: Compared to Premiere Pro's debugging, Filmora allows you to locate and modify sequences quickly. With automated identification and easy tools, users can immediately segment their movies and begin editing, speeding the total process.
- Cost-Effective Solution: Filmora offers free and premium editions, making it affordable for consumers who find Adobe Creative Cloud memberships too pricey. Depending on your desired features, you may choose the best plan for your budget.
Filmora is a viable solution for individuals looking for an effective method to handle scene transitions and edit movies due to its simplicity of use, quicker scene detection, and cost flexibility. Those who aren't familiar with Premiere Pro may find it particularly useful.
Follow the steps below to edit scene detection of Filmora Wondershare:
Step 1. Launch “Filmora” and import the video you want to edit. You can drag and drop media files onto the workspace or click ""Import"" to choose them from your computer.
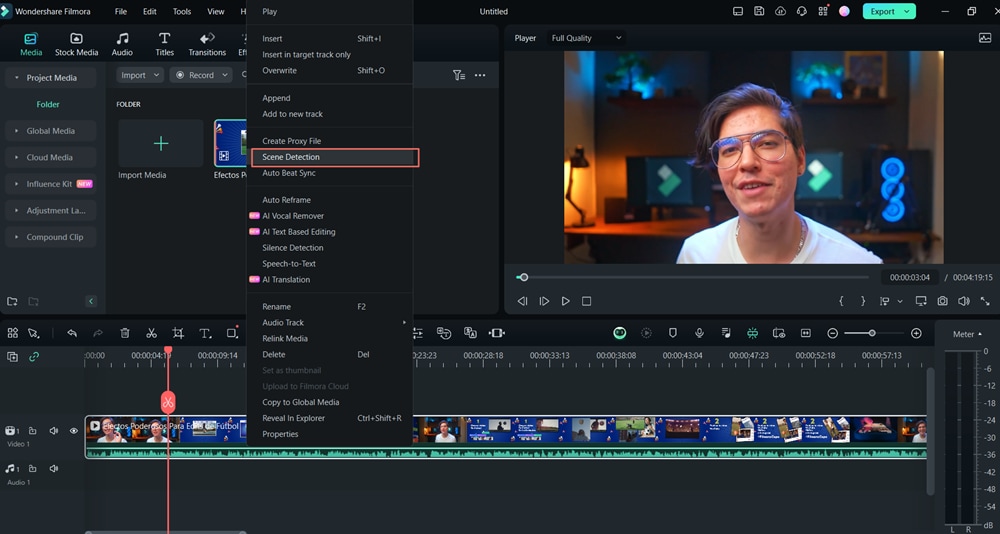
Step 2. Right-click the imported video in the media library. The context menu offers "Scene Detection". The scene detection window may also be opened by highlighting the video and clicking Tools > Scene Detection from the top menu bar.

Step 3. Click ""Detect"" in Scene Detection. Filmora automatically breaks up videos depending on scene changes. The program segments videos in seconds.
Step 4. After detection, double-click clips to preview. This lets you verify scene cuts before continuing.
Step 5. When scene splits are correct, click ""Add to Timeline."" All segmented clips will be added to the timeline's video track for editing, trimming, and effects.

Conclusion
Scene Edit Detection Premiere Pro automates scene transition detection, streamlining video editing procedures. Incompatible video formats, inappropriate settings, and damaged footage might affect detection accuracy. Users may enhance Premiere Pro scene edit detection by checking for program updates, evaluating media files, and altering project parameters.
Filmora delivers powerful scene identification for a simpler, more intuitive option. Its user-friendly interface, automated detection, and affordable price solve scene edit detection Premiere Pro not showing. For a smoother scene detection experience, try Filmora. It may improve your productivity and video editing.


 100% Security Verified | No Subscription Required | No Malware

