Formerly known as RTX Voice, the new Nvidia’s Noise Removal feature performs quite well when removing unwanted background noise and sounds for your internal and external PC audio. The Nvidia noise cancellation function was officially limited to RTX graphics cards.
However, the latest Nvidia update has made the new AI-powered noise removal feature available to anyone with a Quadro, Titan, or GeForce GPU. RTX Voice packs powerful AI capabilities that allow you to remove all background sounds and noisy distractions from your video calls, conferences, and streams.
Today, we’ll discuss everything you should know about Nvidia Noise Suppression, including system requirements, supported apps, setup guidelines, and more.
In this article
What Is RTX Voice and Nvidia Noise Removal?
Nvidia launched the Nvidia RTX Voice in support of its hardware sales. RTX Voice is an AI-enabled noise cancellation plugin compatible with RTX graphics cards. Nvidia noise reduction is a new version of RTX Voice. It is available in the Nvidia Broadcast application.
The new plugin uses the AI capabilities of Nvidia RTX GPUs to facilitate reliable background noise removal, allowing you to eliminate noise distractions from your video conferences, online meetings, voice chats, and broadcasts.
Nvidia Noise Removal eliminates, reduces, and suppresses background sounds from noisy environments, allowing you to capture video recordings with crystal-clear audio. Thanks to that, you can enhance your video calls, voice chats, and live streams using Nvidia’s AI-enabled features, such as auto frame, virtual background, and noise removal.
- Remove background noise precisely with AI.
- Clean audio based on noise type.
- Edit audio separately after noise removal.
- Remove wind, reverb, hum, and hiss easily.
- Reduce noise for clear sound.

System Requirements of Nvidia Noise Cancelling
Nvidia noise canceling operates as a standalone noise-cancellation app compatible with many audio/video recorders, streaming, and conferencing software tools. Once you install it on your operating system, the app creates a virtual interface for the microphone and speakers on your computer.
You can configure the app’s interface when you launch a recording, streaming, or conferencing app. However, the app must recognize the interface to permit virtual device selection and audio settings adjustments.
Here’s a brief overview of software/hardware requirements, memory usage, and CPU load of Nvidia Noise Removal:
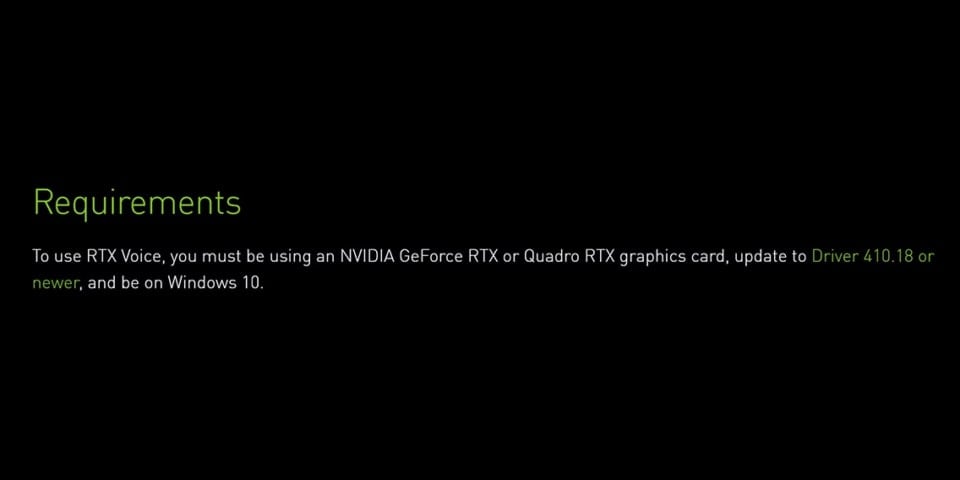
- Supported operating system – Windows 10 only.
- Software and hardware requirements – NVIDIA RTX Voice is compatible with Windows 10 computers with Quadro RTX or Nvidia GeForce RTX graphics cards.
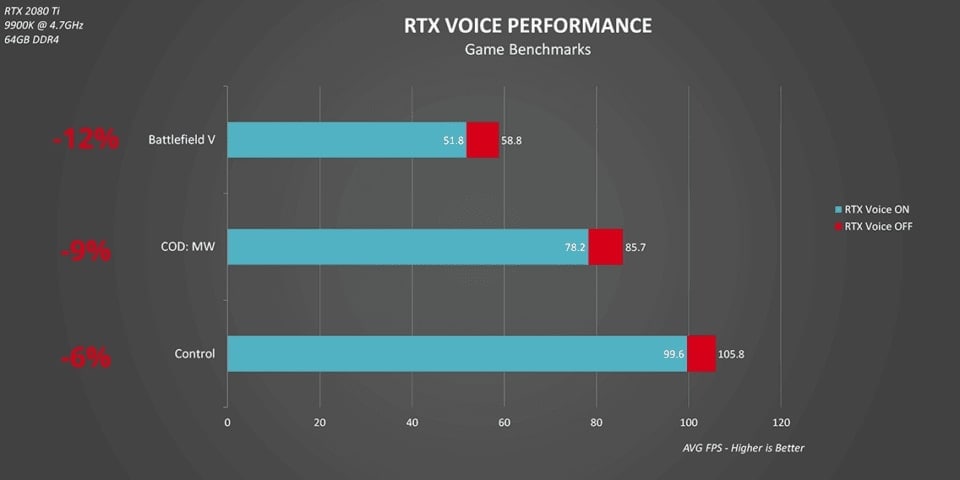
- Memory usage and CPU load – Nvidia Noise Removal is resource-intensive, requiring extensive Nvidia RTX GPU resources.
For Titan RTX, Quadro RTX 3000, Nvidia GeForce RTX 2060, or higher, Nvidia Noise Removal requires NVIDIA Display Driver version 456.38 or higher. To use the new Noise Removal version of RTX Voice, you need a Windows 10 computer with an Nvidia RTX or GTX graphics card and an update to Driver 410.18 or newer.
Nvidia Noise Cancellation - Supported Apps
As previously mentioned, Nvidia Noise Removal creates a virtual microphone and speakers interface on your machine. Once you launch your favorite video conferencing, gaming, or live streaming app, you can access the interface and select it as a default setting.
The list of the supported apps includes:
- Steam Chat
- Teams
- Slack
- OBS Studio
- Streamlabs
- Zoom
- Skype
- WebEx
- XSplit Broadcaster
- XSplit Gamecaster
- Battle.net Chat
- Google Chrome
- Discord
- Twitch Studio
How to Setup RTX Voice With Nvidia Noise Removal
Once you download and install RTX Voice on your computer, configure the app to denoise background noise from specific apps only and not your system audio, such as your game audio, music player, YouTube, etc. Follow the steps below to set up RTX Voice quickly and easily.
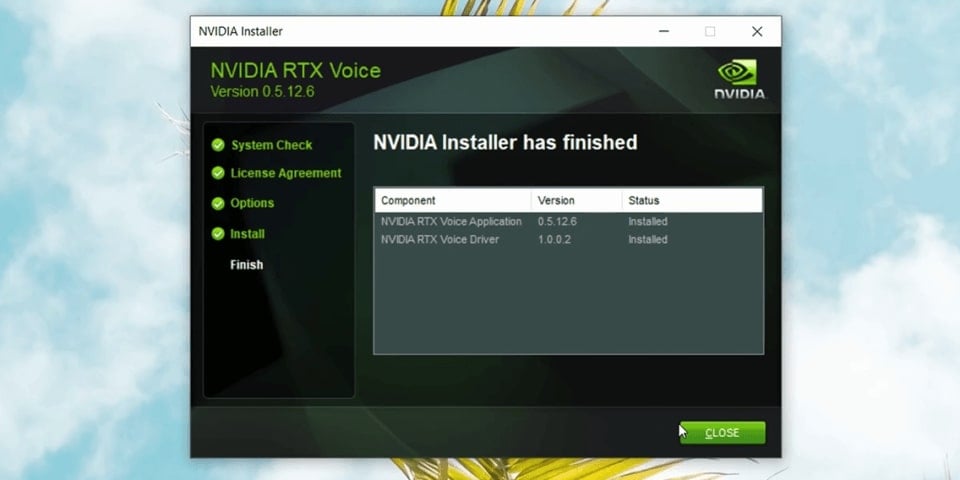
Step 1: Download and install the Nvidia RTX Voice app on your computer.
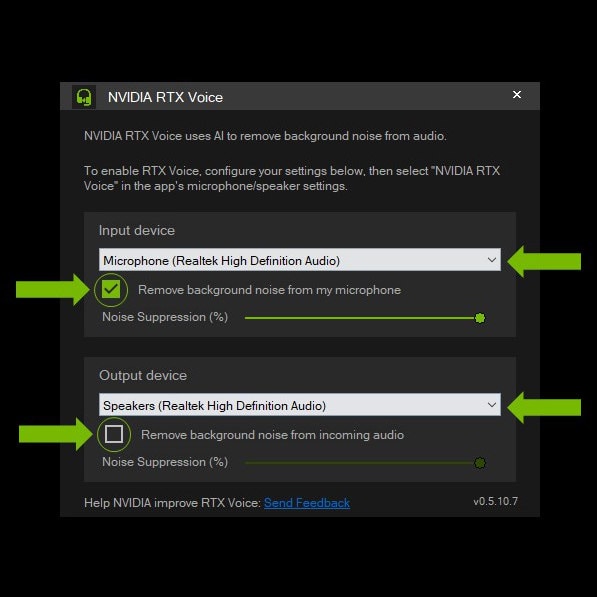
Step 2: Launch the app and configure the Input and Output device settings.
Step 3: In the Input device section, select the microphone you wish to use.
Step 4: In the Output device section, select the speakers you want to use.
Step 5: Check the Remove background noise from incoming audio box to enable noise removal.
Step 6: Use the Noise Suppression option to adjust the desired level of noise removal.
How to Test Nvidia Noise Removal
Here are the steps to help you test the Nvidia Noise Removal feature.
Step 1: Set up and configure RTX Voice (instructions are listed above).
Step 2: Navigate to the Speakers app, right-click the icon, and select Open Sound settings.
Step 3: In the Sound Settings window, set RTX Voice (Speakers) as your default setting.
Step 4: Open an audio or video file with background noise and turn the background noise removal on and off in RTX Voice (Speaker path). Do this a couple of times and listen to the differences in the audio.
You can now listen to your music, play your videos, etc. We recommend using noise removal only in your voice, chatting, and conferencing apps and not in Windows to avoid filtering system audio.
Can Nvidia Remove Noise From an Existing File?
Yes, the Nvidia Broadcast app can remove noise from your existing audio and video clips. You can also resave them in WAV format for further editing across your non-streaming projects.
Simply play the file, launch the Broadcast app, navigate to the Speakers section, select the sound device you’re listening to, and toggle on the Noise removal feature.
Then, navigate to your Speakers icon, launch Sound Settings, and select Speakers Nvidia Broadcast in the Output device menu. Next, play the audio/video clip and it should have the noise removed.
How to Remove Noise From Audio/Video in Post-production
Whether it’s a product review video, short clip, or social media reel, background noises can hinder the overall quality of your footage. Thankfully, you can quickly remove all unwanted sounds from your audio/video clips using a professional AI-powered audio/video editing software like Wondershare Filmora.
Filmora provides an extensive range of AI-enabled audio and video editing features. It has advanced audio transitions, peak metering, volume keyframing, sound waveforms, and audio track height adjustments, allowing you to edit your audio and video clips with surgical precision.
More importantly, Filmora’s adjustable audio denoise feature lets you remove background noise from your files with a single click. You can use three audio denoising levels (Weak, Mid, or Strong) to adjust noise reduction according to your needs.
Download and install Filmora on your computer, then follow the steps below to remove noise from your audio/video file.
Step 1: Launch Filmora on your computer and navigate to Create Project > New Project.
Step 2: Import your video with noisy audio in Filmora and drag it to the timeline.
Step 3: Right-click the video and pick Audio > Detach Audio to separate the audio track from the video.
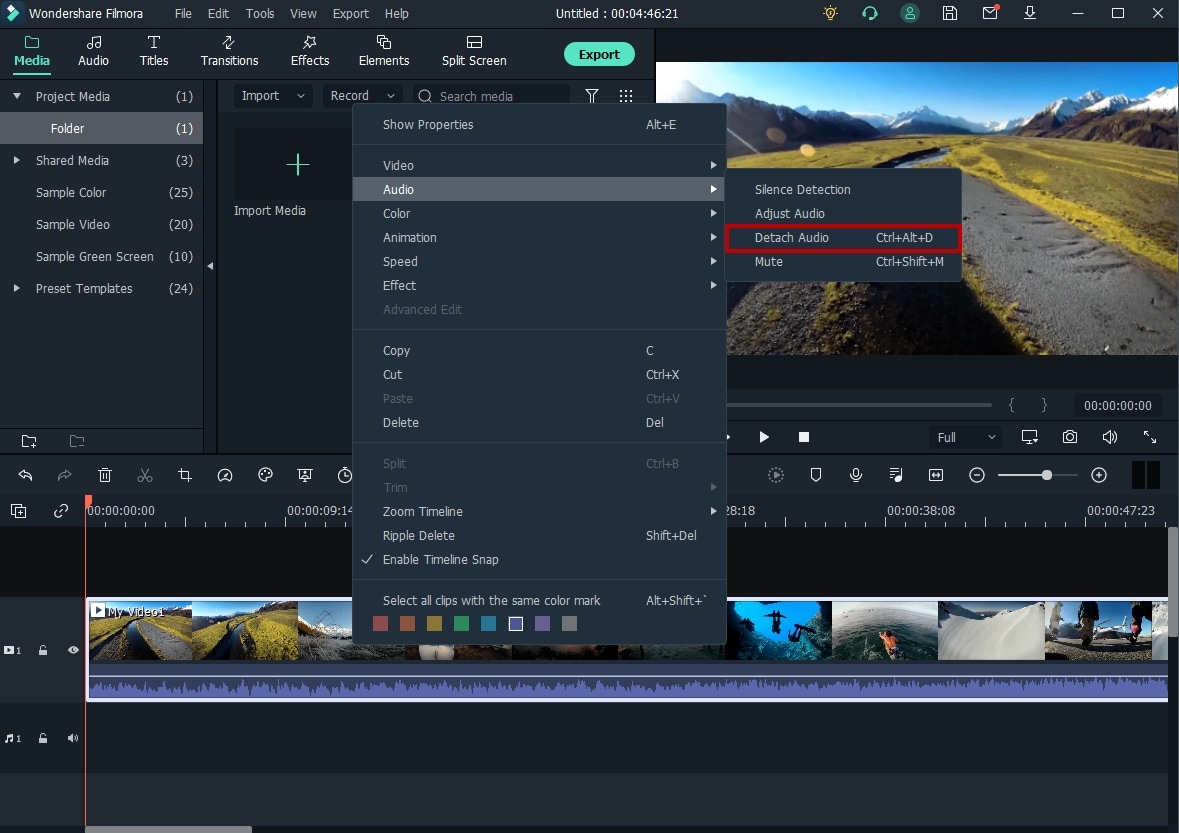
Step 4: Double-click the isolated audio track in the timeline to open the Editing panel.
Step 5: Click the Audio tab and go to the Denoise section.
Step 6: Check the Remove background noise box to denoise your audio.
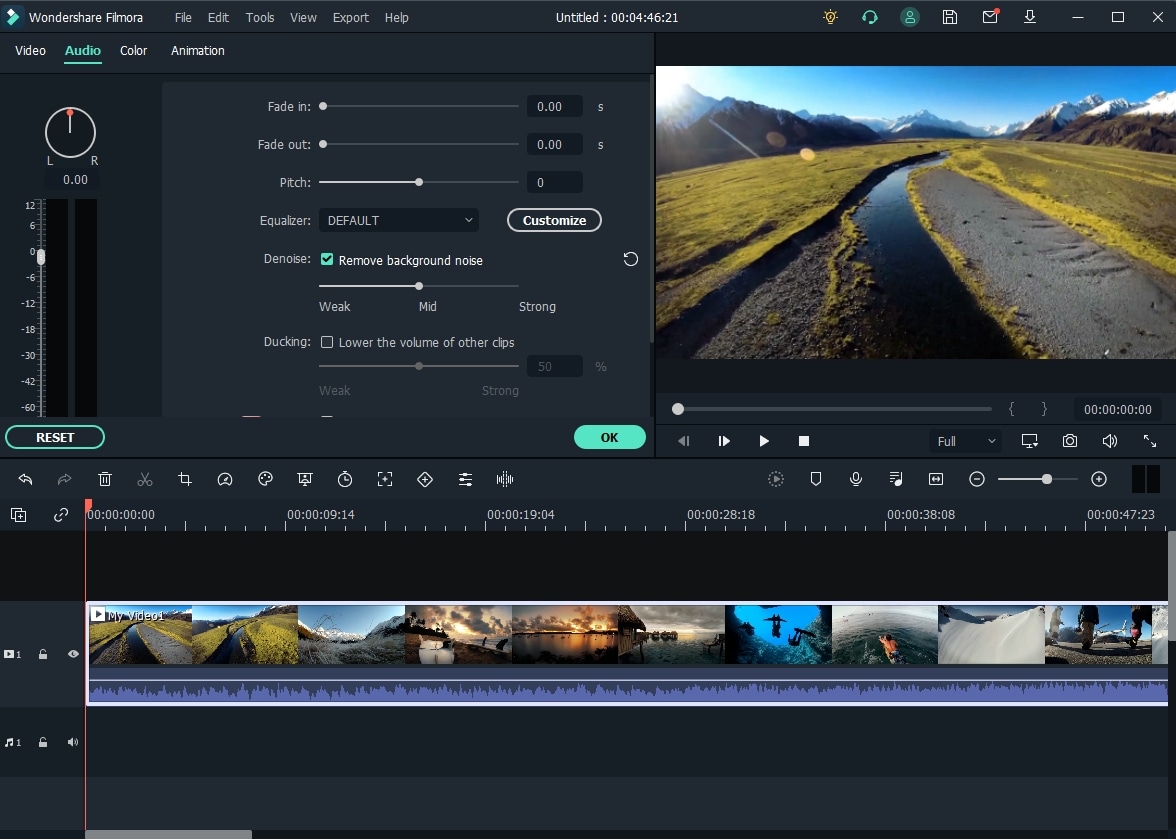
Step 7: Fine-tune the audio noise removal effect by moving the slider from Weak to Strong.
Step 8: Click the Customize option and use the Customize Equalizer to adjust the audio before exporting.
You can also Denoise your video using Filmora’s AI Video Denoise option:
Step 1: Launch Filmora, import your noisy video, and drag it to the timeline.
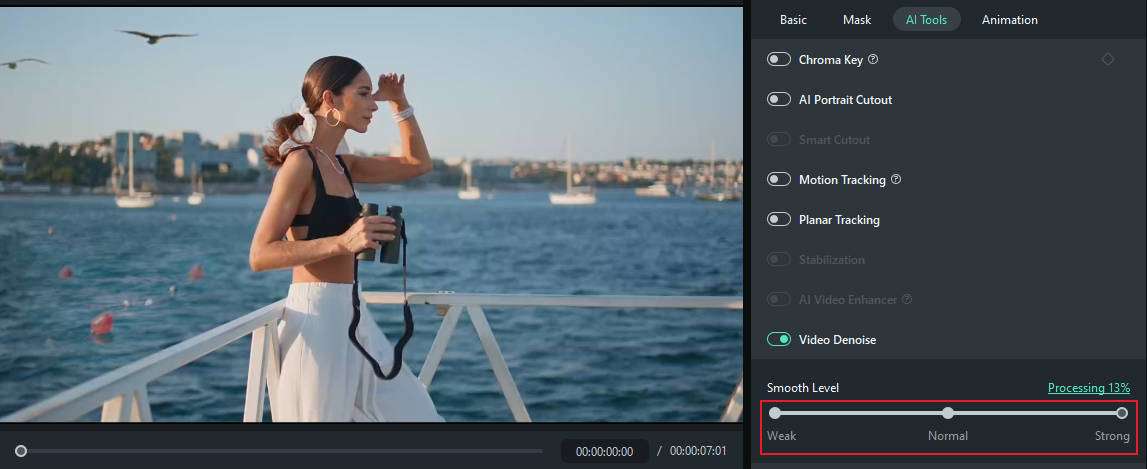
Step 2: Click the clip to select it and navigate to Video > AI Tools > Video Denoise . Switch on the Video Denoise feature and move the Smooth Level slider to customize the Denoise effect from weak to strong, depending on your needs.
Conclusion
Nvidia Noise Removal is a genuine game-changer, allowing you to enhance the audio quality of your digital communications using the power of AI. The background noise reduction and suppression is an outstanding feature and a fantastic effect you can apply to any audio or video clip with a few clicks.
If you wish to remove background noise from your local audio and video files, we recommend using a professional audio/video editor like Wondershare Filmora. This AI-powered post-production studio is loaded with basic, advanced, and AI-enabled audio and video editing features.
Aside from removing all background noises from your files, Filmora also packs a vast collection of customization options to help you enhance your audio and video clips with effects, transitions, stickers, filters, animations, and templates.
FAQ on Nvidia Noise Cancelling
-
What is Nvidia broadcast noise removal?
Nvidia Broadcast Noise Removal is Nvidia’s AI-powered feature that helps Windows users filter out unwanted sounds and background noises from voice chats, video calls, conferences, online meetings, and audio/video files. The feature utilizes AI algorithms to reduce unwanted background noise like clicking, humming, etc. -
Which graphics cards support Nvidia noise removal RTX voice?
Nvidia RTX Voice requires Windows 10 and an Nvidia RTX or GTX graphics card. You must update the Display Driver to the 410.18 or newer version. RTX Voice also works with any Titan, Quadro, or Nvidia GeForce GPU. -
What are the benefits of using Nvidia noise removal?
Some of the benefits of using Nvidia noise removal include:
Versatile applications – you can use noise removal across various applications and scenarios, including social media content creation, live streaming, conferencing, gaming, etc.
AI-powered background noise removal and suppression – uses powerful AI algorithms to facilitate instant noise removal and suppression while maintaining the highest audio quality.
Audio quality enhancement – can improve the quality of your audio by eliminating awkward sounds and noises.
More enjoyable listening experience – thanks to noise removal and audio quality elevation, you can enjoy a more professional audio experience.
Extensive integration options – supports an extensive range of video conferencing, gaming, and live streaming apps, including Steam Chat, Discord, Skype, Zoom, Slack, Teams, Twitch, etc.


