
 100% Security Verified | No Subscription Required | No Malware


 ChatGPT
 Perplexity
 Gemini
 Claude
 Grok
Grok
Shaky video clips can instantly ruin great content. Its message loses impact and value if the frame jitters and wobbles consistently. That's why you should not hesitate to stabilize your footage very well. In this respect, one of the most popular tools you can use is CapCut. It is everyone's most preferred option, especially when it comes to basic stabilization. You can try the video stabilizer in CapCut. For sure, it has a lot to offer you. In the event that you need a more advanced stabilization tool, Wondershare Filmora is here to save the day. It's a complete video editing solution for content creators of all types.
In this article, we will delve into the highlights and benefits of the CapCut stabilizer. We will provide some tips and tutorials related to it. Continue reading below to learn more.
In this article
What is CapCut Video Stabilizer?
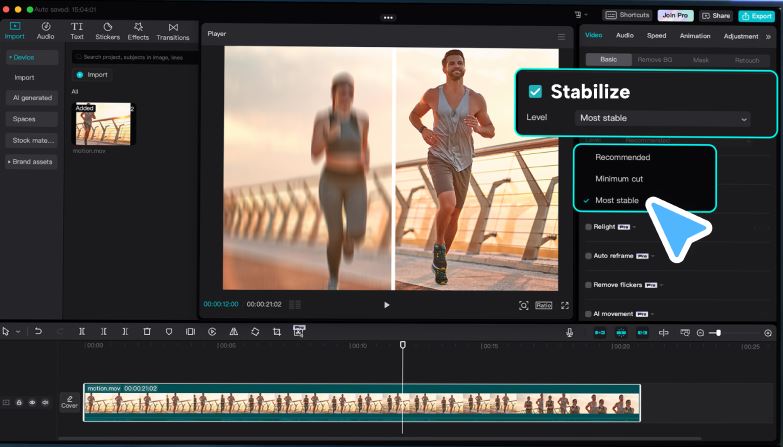
At present, there is no denying that CapCut is indeed a must-have content creation tool. Aside from ease of use, people also enjoy the complete video-editing solution accessible within the platform. Of course. Among them is the CapCut video stabilizer that allows you to fix shaky footage in a snap. Should you give it a shot? The short answer is yes. For quick fixes and fundamental adjustments, CapCut will be of great help to you. Check out the list below to learn more about its amazing features.
Wondershare Filmora: Perfect Alternative For CapCut Video Stabilizer
If you're working on a far more complicated project, the CapCut video stabilizer may not be enough. You'll need another video editing software equipped with advanced stabilization features. Don't worry. In this regard, Wondershare Filmora can be a worthwhile choice. It has a Mocha-powered planar tracking feature that allows you to analyze flat objects and enhance the frame effects. Of course. This tool can be very helpful whenever you need to stabilize video content. Do you want to know more about this amazing feature? Check out the discussions below and find out why Wondershare Filmora is a great alternative to the CapCut video stabilizer.
Beginner-Friendly Stabilization
Here are some features that first-time users can explore and apply to their video projects.
-
One-Click Stabilization: Powered by artificial intelligence, it has a potent camera shake corrector that applies the enhancement instantly.
-
Customization: It gives you the option to specify your preferred level of enhancement.
-
Ease of Use: You can conveniently navigate around the platform and implement your desired adjustments in a snap.
Professional Stabilization
Here are the more advanced stabilization features you can access from Wondershare Filmora.
-
Surface-based Tracking: It enables you to track the flat surfaces in the video and make the necessary changes easily.
-
Custom Motion Paths: It gives you the option to select the areas that need to be stabilized and enhanced.
-
Frame Preservation: It reduces too much cropping and zooming to keep the visual integrity of the video.
-
Smooth Motion: It stabilizes different movements very smoothly. From rotations and zooms to walking and running motions, this tool can surely stabilize the frame very well.
 secure download

CapCut Vs. Filmora: Which One is For You?
It's important to take note that Wondershare Filmora offers a different set of tools stabilization. Depending on your preferences and needs, one may be a better choice than the other. Having said that, you should assess the features of both tools very well. Acknowledge the strengths and weaknesses of each to come up with a sound decision. To help you out, read the key comparison pointers written below and evaluate them accordingly.
Quality Preservation
When you use CapCut to stabilize video content, the frame is excessively cropped sometimes. It might affect the visual integrity and general quality of your material. If you don't want to run into such issues, Wondershare Filmora is a better alternative. Instead of cropping the frames, it utilizes advanced tracking methods through its Mocha feature.
Motion Handling
The CapCut video stabilizer is powered by basic stabilization algorithms that fix minor jitters and small camera shakes. On the one hand, Wondershare Filmora is equipped with a Mocha planar tracking feature that suits complex stabilization procedures. The latter is capable of stabilizing certain sections precisely, even with erratic movements.
Video Resolution
You can stabilize a video using the CapCut mobile app and export it to 1080P resolution. That's already enough. However, you might need to switch to Wondershare Filmora if you prefer to set a higher video resolution. This tool can handle up to 8K export without flinching.
Developing New Skills
Both tools are very easy to use. You can surely stabilize a video with CapCut or Wondershare Filmora in just a snap. However, the latter is a way better choice if you wish to learn and adapt new stabilization techniques. Its Mocha-powered planar tracking feature gives you the option to explore and produce stunning output at the same time.
How to Use Wondershare Filmora to Stabilize Videos Instantly?
Truly, the CapCut stabilizer on PC or mobile is really helpful. It works perfectly if you're working on video content with minor jitters. But as mentioned earlier, Wondershare Filmora is here to assist you with projects that need more complex configurations. Don't worry. The stabilization features of this video editing software are designed for beginners and pros. Do you want to give it a shot? If so, check out the tutorials provided below.
For Beginners
Are you a beginner wanting to fix small stabilization glitches in your video? Read this tutorial and follow the steps in order.
Step 1: On the main workspace of Wondershare Filmora, head over to the Elements Panel and click Import under the Media tab. Select all the files you wish to edit and upload them to the platform. Once the assets are ready, grab and drag them onto the Editor Timeline for further customization.
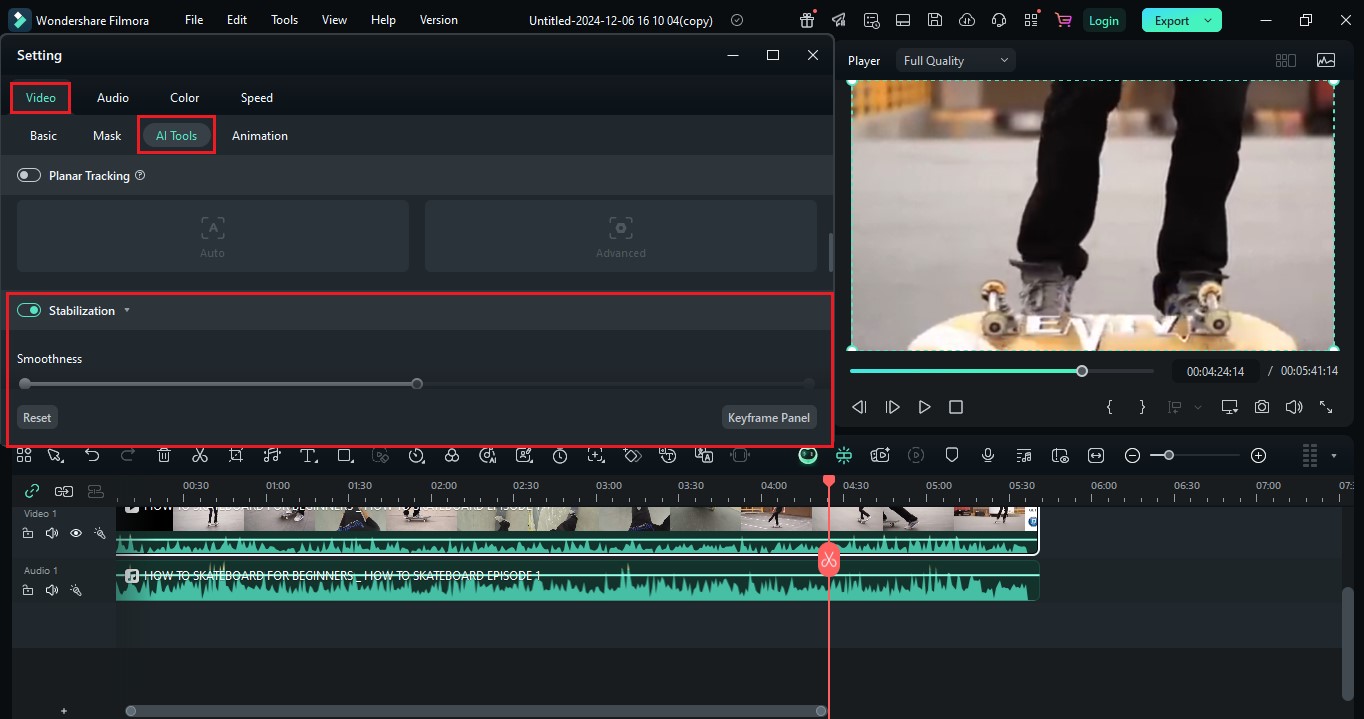
secure download Step 2: Tap the clip you want to edit in the Editor Timeline. A new panel will then open on the Elements Panel. From there, tap the Video tab and select AI Tools.
Step 3: After that, find Stabilization from the list of options and switch on the toggle button beside it.
Step 4: Drag the slider to your preferred smoothness level. You can select Weak, Normal, or Strong.
Step 5: Once done, play and preview the output. If you're satisfied with the result, click Export to render and save a copy. Otherwise, continue making adjustments until you achieve a desirable outcome.
For Experts
If you're in need of advanced configurations for video stabilization, follow these steps instead.
Step 1: Go to the Elements Panel and tap Import to upload the files you are going to use. Drag the assets afterwards onto the Editor Timeline and arrange them accordingly.
secure download Step 2: Following that, click the footage you want to enhance in the Editor Timeline. A new panel will then be displayed on the Elements Panel tab. From there, tap Video and select AI Tools.
Step 3: Browse the given options and locate Planar Tracking. Hit the toggle button beside it to enable this feature.
Step 4: Specify your preferred mode. Just choose Auto or Advanced to proceed.
Step 5: After that, go to the Preview Panel and choose the specific object you want to track. Drag the four tracking points accordingly to make the selection. Of course. Choose the area that needs to be stabilized.
Step 6: In the event that you select Advanced Mode, don't forget to configure the required settings. In this regard, specify your preferred Accuracy level. At the same time, tap the Link Element option if you wish to replace the selected object with the media file of your choice.
Step 7: Once done, click Start to process your input. Tap Export if you're happy with the result. Otherwise, continue making changes until you're fully satisfied.
Conclusion
If you're working on simple and quick social media videos, the CapCut video stabilizer is already enough. You can certainly do a lot using this video editing software, especially in terms of adjustments and stabilization. Just put its user-friendly interface and responsive functions to good use. Meanwhile, download Wondershare Filmora if you're aiming to achieve professional-grade results. It uses the power of artificial intelligence for ease and Mocha planar tracking for accuracy. Combine these tools together, and you'll surely produce stunning video content without a camera shake. Try Wondershare Filmora today and transform your unsteady shots into cinematic footage.
secure download 