- Precise chromatic aberration adjustment with minimal distortion.
- Vast video/audio effects and creative assets.
- Powerful AI for effortless content creation.
- Intuitive, professional yet beginner-friendly.
- Works on Mac and Windows.
Taking photos or recording videos can be exhausting, and despite the best technology, occasional less-than-ideal shots are normal. One common irregularity is chromatic aberration. This guide will explain what chromatic aberration is, its causes, and how to remove it in Lightroom, a popular tool for editing and removing such issues.
Before diving into the correction process in Lightroom, let’s first understand what chromatic aberration is.
In this article
What Is Chromatic Aberration?
Chromatic aberration, or color fringing, represents distorted color that creates a “frame” of unwanted color around videos or photographs. It usually forms along metallic objects or with a high contrast between dark and light objects.
For example, a black wall in front of a bright sky can often lead to chromatic aberration. Different types of aberration cause different colors to appear on the edges of an object. The camera fails to focus and capture white light wavelengths, resulting in magenta-purple, red-green, or blue-yellow aberration.
Naturally, no videographer or photographer wants these imperfections in their content. You won’t see chromatic aberration in every shot, but when it does happen, it can be frustrating, and you need to learn how to get rid of it. Luckily, there are various editing tools you can use, including Lightroom.
How to Recognize Chromatic Aberration in Lightroom

The first sign of chromatic aberration is color fringing around the edges. You can notice them around sharp contrast. Chromatic aberration can also make the edges look less sharp and blurry. Look for chromatic aberration in areas with shadows and bright lighting.

Some common examples include high-contrast text, bright sky combined with architecture, backlit subjects, etc. Chromatic aberration can sometimes be noticeable, but it might be challenging to detect in some cases.
To ensure chromatic aberration is the problem, we recommend zooming in your images by 100% to inspect all the edges. Learning to recognize chromatic aberration might take some time, but it will become natural with a bit of practice. Remember, the first step to removing chromatic aberration is to recognize it.


How to Remove Chromatic Aberration in Lightroom
This section includes all the steps for removing chromatic aberration in Lightroom. You will get similar results regardless of the file type. However, you should ideally use RAW images to remove chromatic aberration.
Here are the steps:
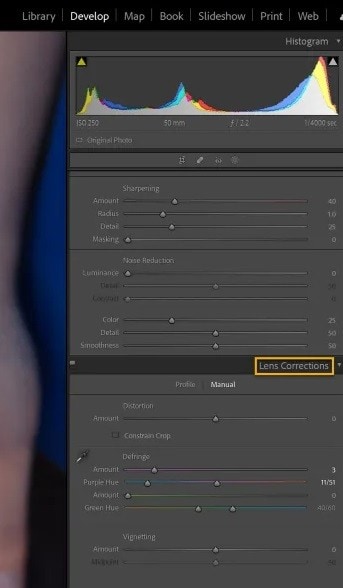
Step 1: Select the Develop module next to the Library. Scroll down and select Lens Corrections.
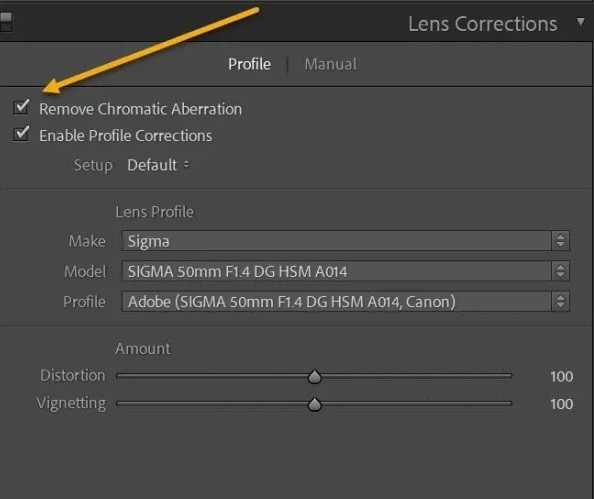
Step 2: Select Profile and enable the Remove Chromatic Aberration feature. Lightroom’s automatic chromatic aberration removal doesn’t always work, so zoom in on the areas to see if all the imperfections are gone. Otherwise, follow the next step.
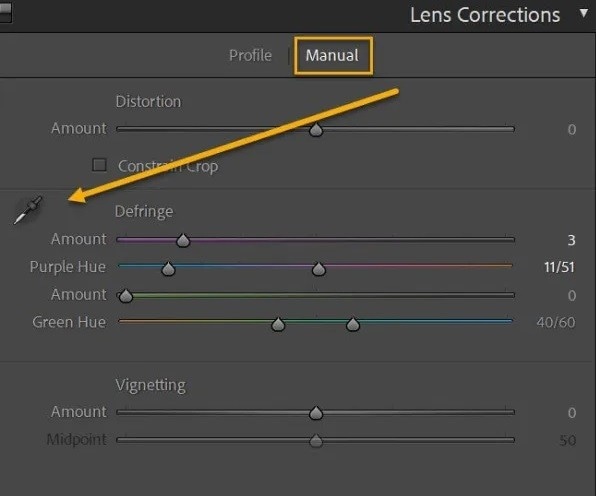
Step 3: Switch to the Manual window. Then, zoom in on your image by 100% and select the Eyedropper.
Step 4: Select the area with the Eyedropper.
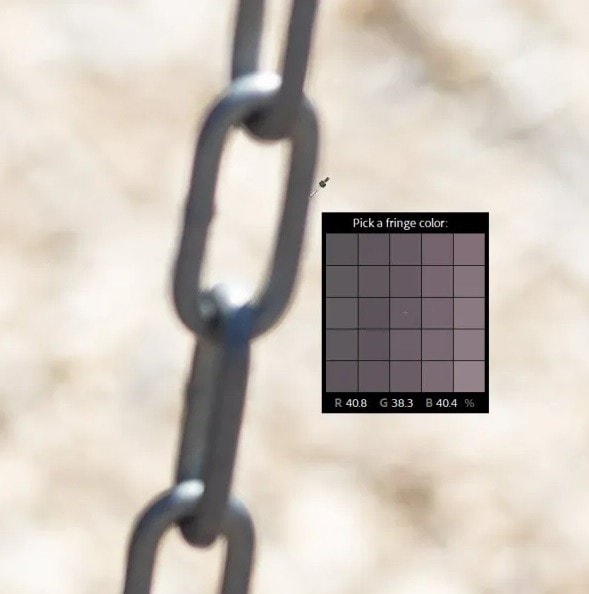
Step 5: Lightroom will identify the colors, and you will see the Purple Hue and Amount sliders in the Lens Corrections window. Move the sliders to remove all the remaining fringing. Remember that hitting the sweet spot and getting the desired results might take some time. Furthermore, the settings will be different for each area you select.
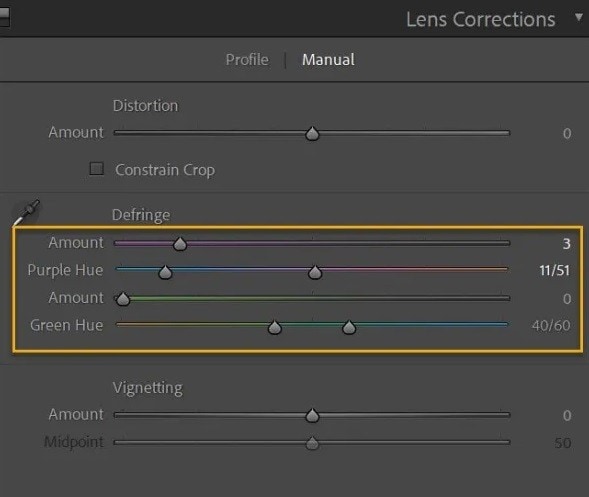
Step 6: Once you finish with one area, use the Eyedropper on another and fix it manually.
This process can take some time, but you must be patient and ensure you fix one area at a time. It can be challenging for people who don’t have experience recognizing color distortion and working manually in a video editing tool.
In addition, In Lightroom, removing chromatic aberration is primarily used for photos, but there is another tool that can be used to correct chromatic aberration in both videos and images. Read on to find out more about Filmora.
An Alternative to Consider: Wondershare Filmora
Wondershare Filmora is a video and image editing tool for beginners and semi-professionals. It has a smooth and intuitive interface with simple workflows and features. It can handle advanced editing tasks while keeping the steps straightforward.
It’s just as capable as Adobe Lightroom but much simpler to use. Therefore, download Filmora, install it on your computer, and follow these steps to remove chromatic aberration in your videos and images quickly:
Step 1: Start a new project and click Import Media. Then, select the media you want to edit and drag and drop it onto the timeline.

Step 2: Double-click the video on the timeline and go to Color adjustments. Adjust the settings by clicking Auto or the eyedropper tool to eliminate color distortion.
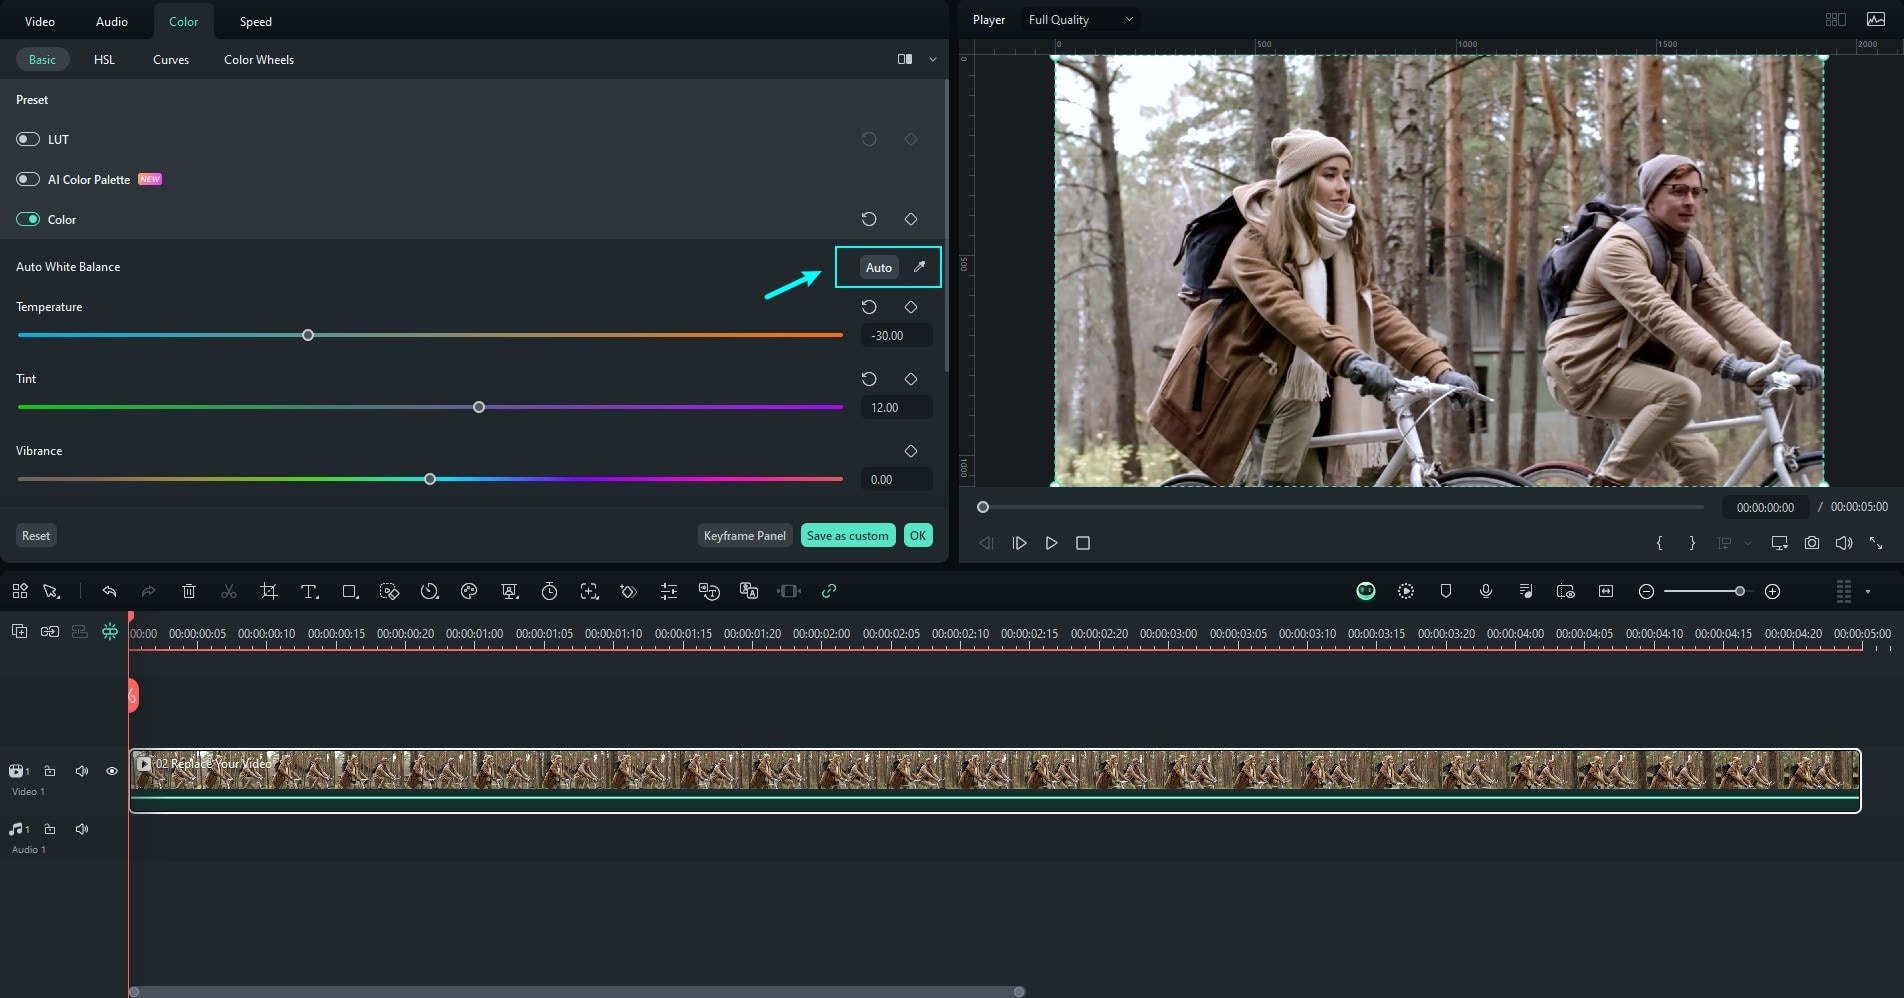
Filmora automatically fixes all colors and adjusts the whole image or video. There’s no need to work on one area at a time. However, it also has an eyedropper tool to edit specific areas.
How To Avoid Chromatic Aberration

You can remove chromatic aberrations with video editing tools like Filmora or Lightroom. However, you should find ways to avoid them in your videos or images. Here are some tips for preventing chromatic aberration.
Center the Subject
You will have minimum chromatic aberration if your subject is the lens’s center and focal point. Take the time to recompose shots and try different angles while keeping the subject in the center.
Adjust Focal Length Accordingly
When using thinner lenses, you will generally have less chromatic aberration. You can also use wide-angle prime lenses to get fewer imperfections. Ideally, many achromatic lenses should be used to prevent light refraction and spherical aberration.
Avoid Capturing High-Contrast Scenery
High-contrast scenery is generally the leading cause of chromatic aberration. If possible, avoid it and try to recompose the frame; however, avoiding these kinds of shots is almost impossible if you take studio photos with a white background.
Capture in RAW
Not only are RAW images easier to edit, but they also generally have less chromatic aberration. Even if imperfections are in your images, removing them and getting a natural look will be easier.
Conclusion
Congratulations! You’ve learned how to remove chromatic aberration in Lightroom. If you find the software too complex, we recommend using a more intuitive alternative like Filmora, which can also do a brilliant job. Hopefully, you will start fixing chromatic aberration right away.
Try different settings and see how they affect the overall image quality. Remember to prevent color distortion while capturing your images so you don’t have to spend much time fixing it later.


