
 100% Security Verified | No Subscription Required | No Malware
There is no doubt that filters have become a salient part of modern content creation. As we all know, such effects are applied for the purpose of improving the footage's aesthetic and technical function. However, take note that these visual enhancements can be applied not only in post-production but also during the actual shoot. Yes. That is right. You can definitely brighten dark lighting or boost contrast in real time by applying such filters. Convenient, right? Indeed, these filters for video recording and post-production are truly helpful nowadays. They can help you grab attention and leave a long-lasting impression. Thus, don't hesitate to apply one to your vlogs, live-stream sessions, social media videos, and other similar video projects.
In this article, we will discuss further the benefits and highlights of these visual effects. We will also provide some tips on how to choose and use the perfect camera recording filter. Continue reading to learn more.
In this article
Common Limitations of Filters for Video Recording
While the camera recording filter has done a great job so far, we cannot deny that they have drawbacks, too. Don't worry. That's normal. Each type of video project has a different set of standards and requirements. However, it's important to understand these limitations and find a suitable workaround. To help you out, go over the list below and keep the written items in your mind.
- Most of the time, the filters for video recording are not that extensive in terms of choices. You can find a couple of options or a few more. However, they might not be enough if you're working on professional projects.
- Since the filter has been applied already, it gives you a little room for adjustments during post-production.
- Consider the camera recording filter permanent. Once applied, the effects stay in the footage forever.
- When a filter is applied during the shoot, the footage's quality is sometimes reduced and compromised.
Wondershare Filmora: The Perfect Alternative for the Camera Recording Filter
Video recording with filters is indeed beneficial under certain circumstances. If you're a content creator on the move or simply someone who needs instant results, it can be very helpful. However, don't hesitate to explore other alternatives or try adding post-production enhancements if necessary. In this regard, Wondershare Filmora has a lot to offer. This powerful video editing software provides not only advanced tools but also high-quality resources. Yes. Video filters are included on the list. Let's say you decide not to opt for video recording with filters. The post-production using this very app will certainly be of great help. Do you want to give it a shot? If so, then check out the discussions below to learn further.
Core Features
When talking about video filters, Wondershare Filmora is there as a great option for a reason. Browse the list of its filter features below and make the most of them.
- You have over 100 video filters that suit different themes and styles. Of course. You can definitely customize them according to your liking.
- It offers specific selections of beauty filters that can enhance the appearance of the human subjects in the video. Try Skin Smoother or Blemish Remover.
- For color correction, it has several video filters that apply the same configuration. You can balance the highlight settings or brighten dim footage through these filters. Try Low Light Boost or HDR Effect.
- It is packed with artistic video filters you can use in various creative projects. For instance, you can add some cinematic flair or aesthetic overlay to your videos using these filters. Try Vintage Film or Cinematic LUTs to achieve such results.
- Lastly, Wondershare Filmora updates its resources from time to time. Therefore, you can easily find and apply similar video filters from trending content. Try TikTok Glow or VHS Retro to get started.
Key Advantages
Video recording with filters is a standard procedure. There is nothing wrong with that. However, applying video filters right after the shoot has some amazing benefits, especially if you use Wondershare Filmora. Do you want to know what those are? If that is so, then check out the list below.
- Video filters offered by Wondershare Filmora are non-destructive. Meaning to say, the original video clips remain pristine. It's just that the effect is put over the footage. If you want to remove the filter for some reason, you can definitely do it in just a snap.
- Customization is allowed. If you wish to adjust the intensity, Wondershare Filmora gives you the option to do that. Another thing, this platform enables you to add multiple filters to a single clip. Just choose the right combination and blend them well.
- Compared to the camera recording filter, Wondershare Filmora filters are indeed changeable. You can easily replace one filter with another if you wish to make such an adjustment.
- You can also go the extra mile or even create your own video filter. Wondershare Filmora has a professional set of color-grading tools that you can use in this regard. For instance, it offers tone curve adjustments, HSL, LUT support, and more.


How to Apply Video Filters in 3 Easy Steps?
You have finally decided to ditch the camera recording filter and apply one during post-production instead. Well, that's great. Wondershare Filmora is there to assist very well. To do that, you only need to follow three simple steps. Nothing more, nothing less. Do you want to give it a shot? If so, then check out the tutorial below. Read the instructions very well and follow the indicated steps accordingly.
Step 1: On the main workspace of Wondershare Filmora, head over to the Elements Panel and click Import under the Media tab. Choose all the files you are going to use and upload them to the platform. Once the assets are ready, grab and drag them one by one onto the Editor Timeline.
 secure download

Step 2: Go back to the Elements Panel and switch the tab from Media to Filters. Choose a specific category and go over the available choices, or search for a specific theme. If you wish to preview them, simply double-click on the asset and review the effects from the Preview Panel. Choose one afterwards and tap its corresponding Download button.
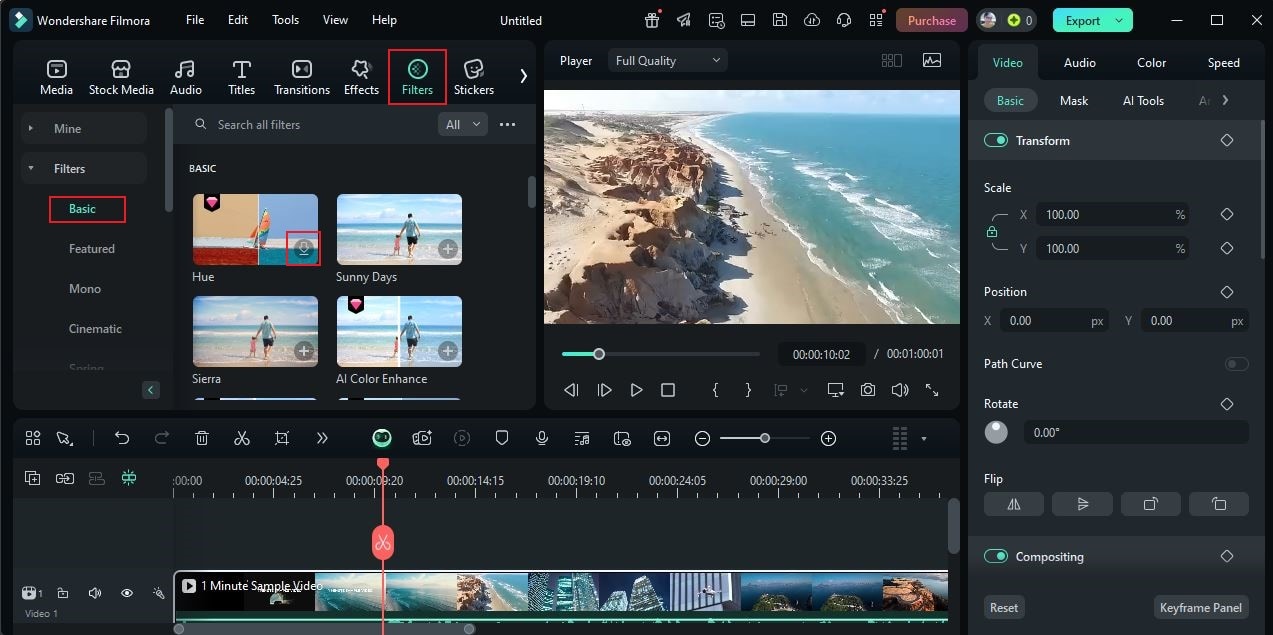
Step 3: Finally, grab and drag the newly downloaded filter asset onto the Editor Timeline. You drop the effect to a specific clip or place it right above the video track for wider coverage. Once done, tap the filter asset attached to the video clip and wait until a new panel appears on the right side of the screen. From there, you can make a few adjustments to blend the filter well with the footage. Simply drag the Opacity slider to your desired level or enter a specific input into the field next to it.

Conclusion
Video recording with filters is truly a gift of the modern world. It provides a convenient and effective solution for many content creators out there. Imagine shooting videos with filters on and uploading them right away. That's indeed an advancement to another level. However, it doesn't always work out for all people. Sometimes, opting for this technique does more good than bad, especially if your project requires customization and flexibility. Are you working on one with the same demand? If so, then it's your sign to check out Wondershare Filmora. Apart from ready-made filters for every theme, it also offers different tools that can help you produce stunning outputs. There goes the professional color correction feature, AI generation tools, and many others. Try Wondershare Filmora's free trial today and transform your video footage to another level.
secure download 
