
 100% Security Verified | No Subscription Required | No Malware


 ChatGPT
 Perplexity
 Gemini
 Claude
 Grok
Grok
Imagine this: you finally finish your screen recording, but when you play it back, the screen recording has no sound. It's frustrating, right? Unfortunately, it's a common issue, especially if your screen recorder audio is not working the way it should.
As you can see, dealing with screen recording not recording audio can be super annoying, especially when everything else looks fine. So, how do you fix this? Well, that's why we're here! In this guide, we’ll go over the real reasons why your audio on screen recording is not working properly and how to fix it fast.
Part 1. How to Fix Screen Recording No Sound on iPhone
Screen recording is built right into the iPhone, which makes it super handy for capturing apps, tutorials, or anything on your screen. But with how easy it is to use, more people are running into the same issue: "My iPhone screen recording has no sound" has become a common complaint, and it usually shows up at the worst time.
Why Does My iPhone Screen Record Have No Sound?
If your iPhone screen record has no sound, there’s usually a simple reason behind it. Here are some of the most common causes that lead to screen recording no sound on iPhone:
- Microphone audio is turned off.
- iPhone is muted.
- System volume is too low.
- Screen recording restrictions or Focus Mode.
- Bug or outdated iOSApp permissions are limited.
How to Fix Screen Recording with No Sound on iPhone
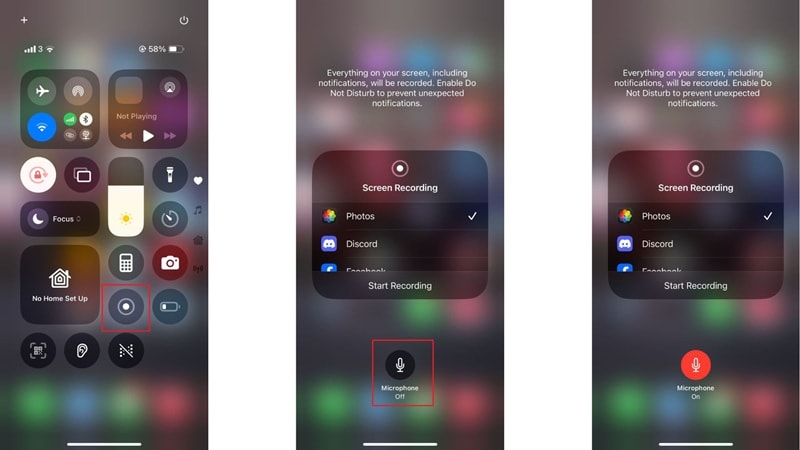
Fix 1: Turn On the Microphone Audio
The built-in screen recorder won’t capture your voice unless the mic is on. To fix that, follow these steps:
- Step 1: Slide down to open the Control Center.
- Step 2: Long-press the Screen Recording button.
- Step 3: Tap the Mic icon until it turns red.
- Step 4: Tap "Start Recording".
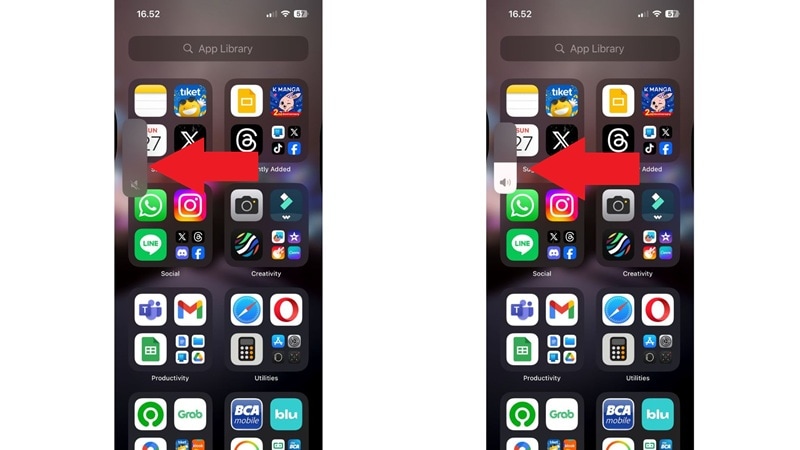
Fix 2: Unmute System Volume
Silent mode can block your audio from being recorded. This is actually one of the most common reasons why your screen record on iPhone has no sound. Follow these steps:
If you're facing this issue, you just need to flip the mute switch (above volume buttons) to turn sound back on. Next, turn up your volume using the side buttons.
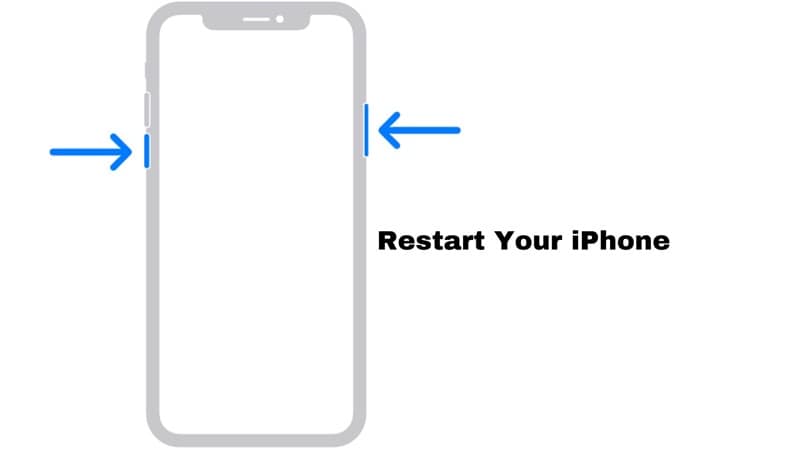
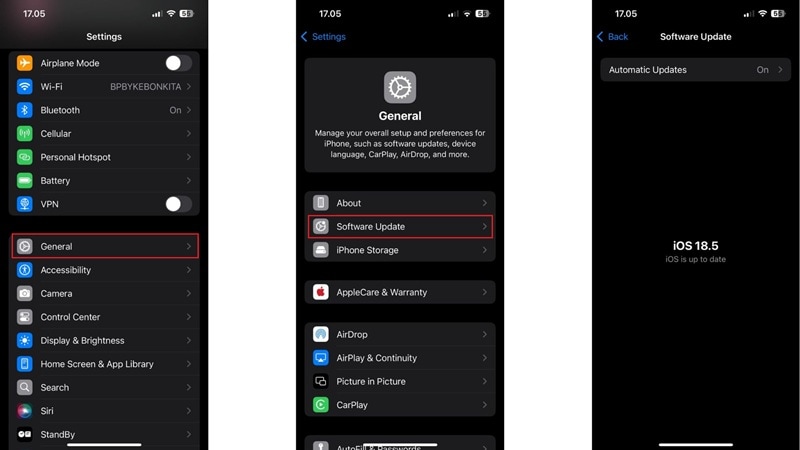
Fix 3: Restart iPhone or Update iOS
If the screen record has no audio on your iPhone, it might just be a small glitch. In that case, a quick refresh can often fix the problem. Here are two ways to do it:
Method 1: Restart your iPhone the usual way. Press and hold either volume button and the side button until the power-off slider appears.
Method 2: Head to Settings > General > Software Update to check for the latest iOS version.
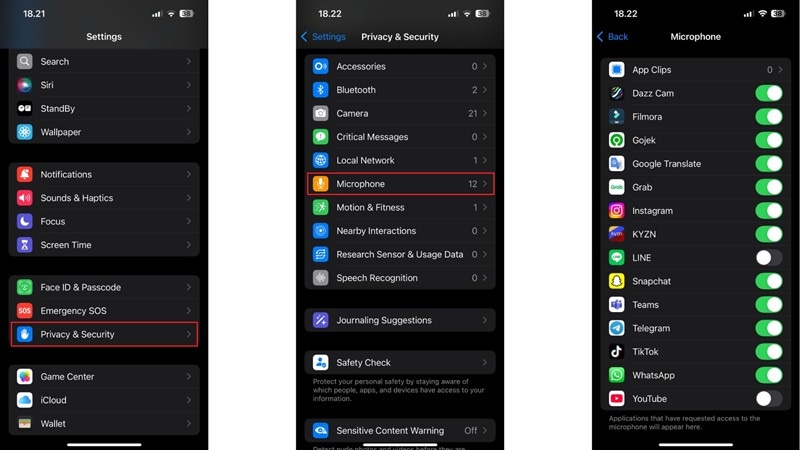
Fix 4: Check App Permissions
Some apps block audio if they don’t have the right permissions. This could be the reason there’s no sound on your iPhone screen recording. Here’s how you can sort it out in a few quick taps:
- Step 1: Go to Settings > Privacy & Security > Microphone.
- Step 2: Make sure the app you’re recording from is allowed.
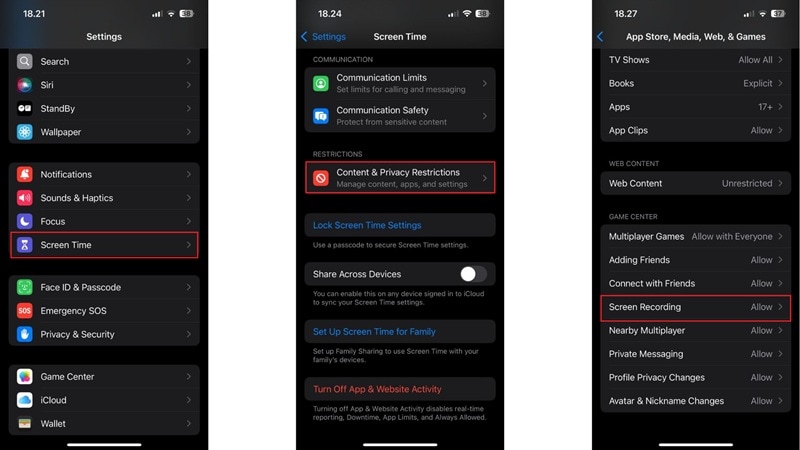
Fix 5: Check Content Restrictions
Another common reason why your iPhone screen recording has no audio is that certain settings might be blocking it without you realizing. These quick steps should help you sort it out:
- Step 1: Go to Settings > Screen Time > Content & Privacy Restrictions.
- Step 2: Make sure Screen Recording is allowed.
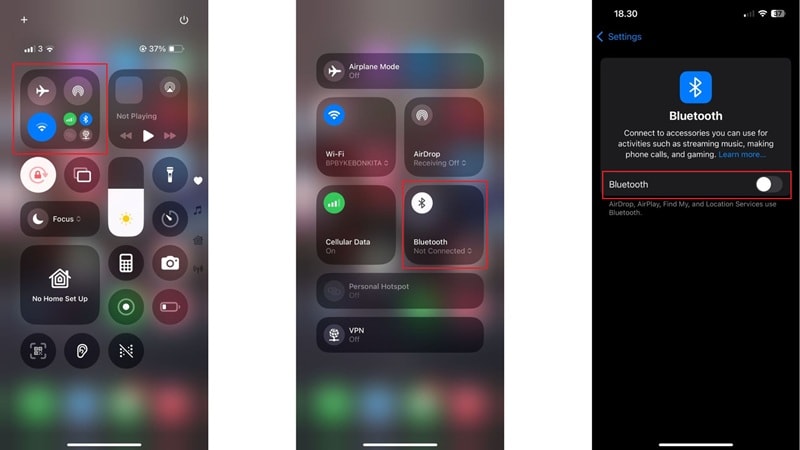
Fix 6: Disconnect Bluetooth Devices
If you’ve got Bluetooth headphones connected, audio might get routed away. This could also be the reason why you have no audio on screen recording. Here’s what you can try to solve it fast:
- Step 1: Turn off Bluetooth from Control Center or Settings > Bluetooth.
- Step 2: Try recording again.
Fix 7: Close Other Apps That Use Audio
Apps like calls, voice recorders, or even music streaming platforms can block your screen recorder from getting sound. If that's the problem, then you'll need to swipe up and close apps that might be using the mic or speaker.

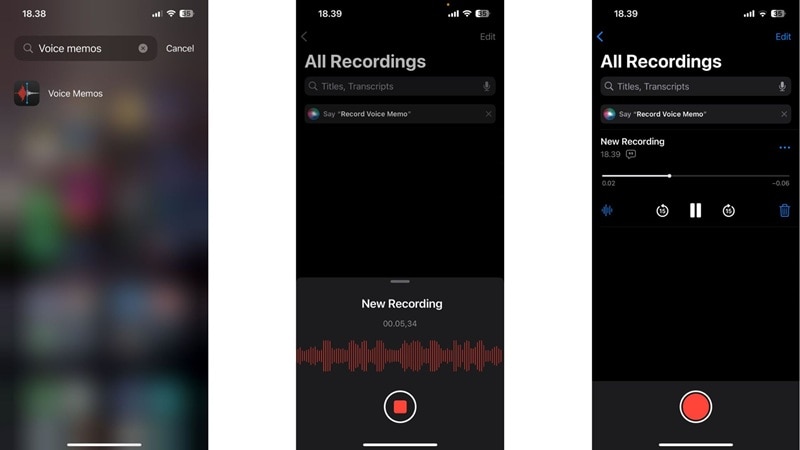
Fix 8: Use Voice Memos to Test Your Microphone
If the screen record on iPhone has no sound, a quick mic test can help you figure out if it’s a hardware problem. Here’s what usually helps in this situation:
- Step 1: Open the Voice Memos app.
- Step 2: Record something and play it back.
- Step 3: If you hear the audio, your mic is working fine. If not, you should try the other fixes on this list.
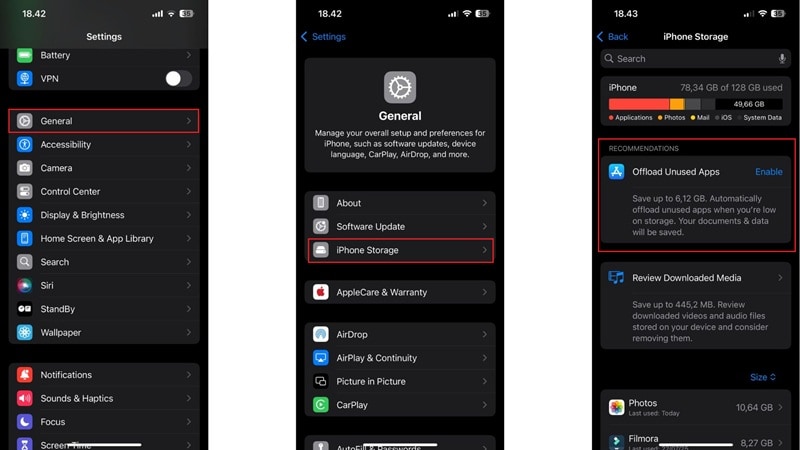
Fix 9: Free Up Storage Space
If you’ve been thinking, “Why is my screen recording having no sound?”, storage could be the reason. Low space on your iPhone can mess with recording quality or even block audio completely. Here’s how to take care of it quickly:
- Step 1: Go to Settings > General > iPhone Storage.
- Step 2: Delete unused apps or big media files.
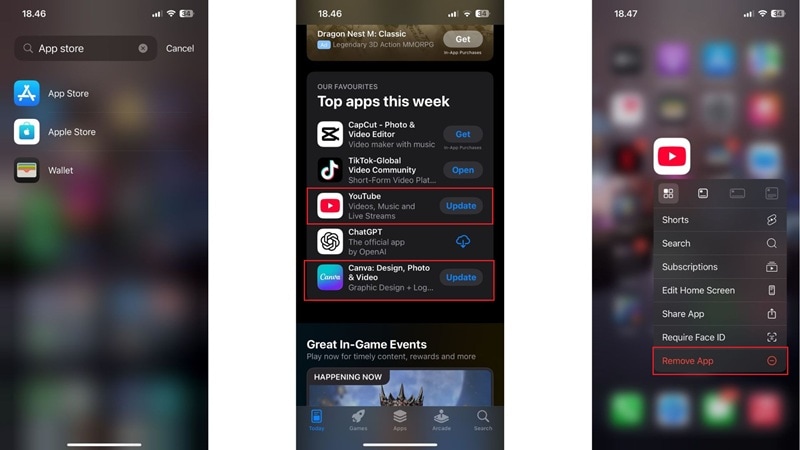
Fix 10: Update or Reinstall Problematic Apps
If your screen recording doesn’t have sound, it might not be your iPhone causing the issue, but the app you’re trying to record. Try these fixes and see if the audio returns:
- Step 1: Visit the App Store to check for updates.
- Step 2: If that doesn't work, delete and reinstall the app to fix hidden bugs.
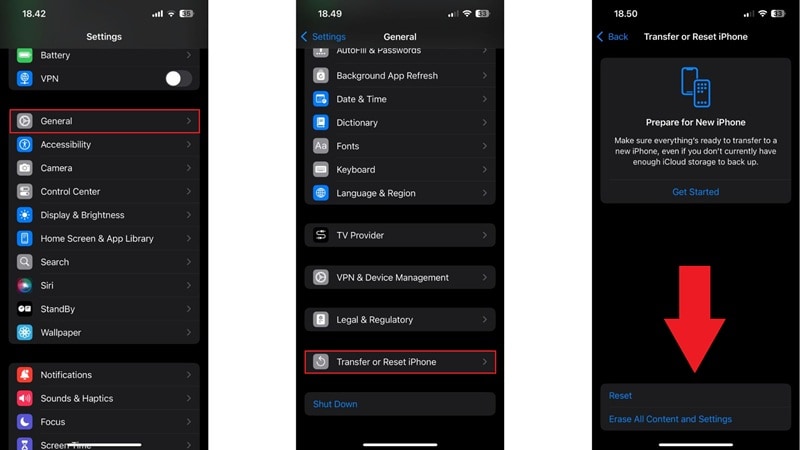
Last Resort: If screen recording still has no sound after trying everything else, resetting all settings might help clear things up. This won’t delete your photos or apps, just reset system stuff like Wi-Fi, notifications, and display preferences. It’s a clean way to refresh your iPhone without losing your data. Go through these steps, and you should be all set:
- Step 1: Go to Settings > General.
- Step 2: Scroll down and tap Transfer or Reset iPhone.
- Step 3: Tap Reset > Reset All Settings.
- Step 4: Enter your passcode if asked. Confirm the reset.
Part 2. How to Fix Screen Recording No Sound on Android
Screen recording on Android works differently depending on your phone brand, but sound issues are just as common. Sometimes it’s just muted media, other times it’s mic permissions getting in the way. Anyhow, if your screen recording is not recording sound on Android, a few quick changes can usually fix it.
We’ll use Samsung as an example here since it’s one of the most popular. Even if you’re using a different device, the steps should feel familiar and help you get your audio working again.
How to Fix Screen Recording with No Sound on Android:
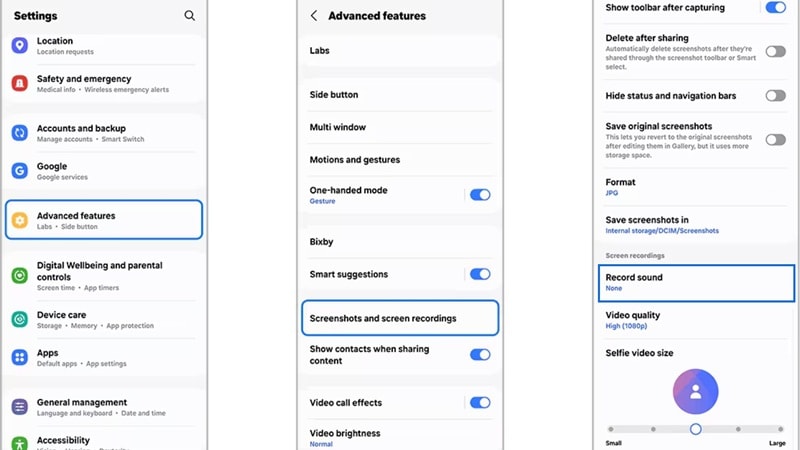
1. Check Screen Recording Settings
More often than not, many people make screen recordings with no sound because they haven't checked the settings properly. You can follow this to sort the issue out:
- Step 1: Open your Settings and go to Advanced Features.
- Step 2: Tap on Screenshots and screen recorder.
- Step 3: Turn on the Record sound option.
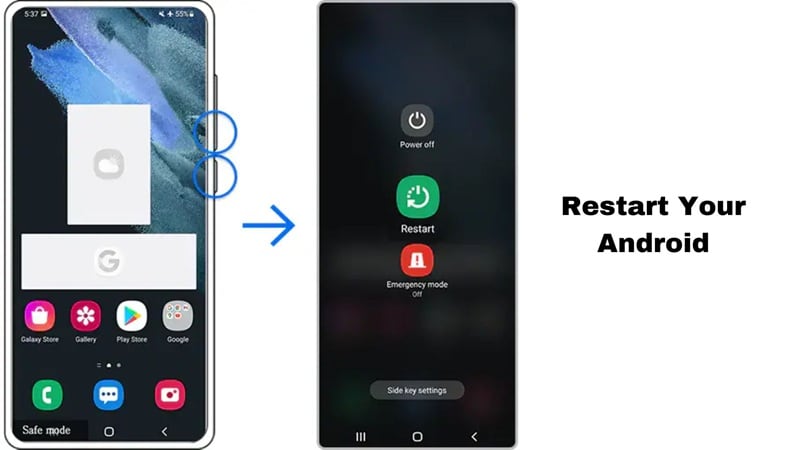
2. Restart Your Device
Just like on iPhone, you might experience no sound on screen recording due to minor glitches or background issues. In that case, a quick restart can often fix things up. Just follow these steps and you’ll be good to go.
- Step 1: Hold down the Power and Volume Down buttons at the same time for about 7 seconds.
- Step 2: When the menu appears, tap Restart and let your phone reboot.
- Step 3: Once it’s back on, try using screen recording again.
3. Check App Permissions
Another reason your screen recorder audio is not working on Android could be that the app hasn’t been granted microphone permission yet. Do this next to fix the sound issue:
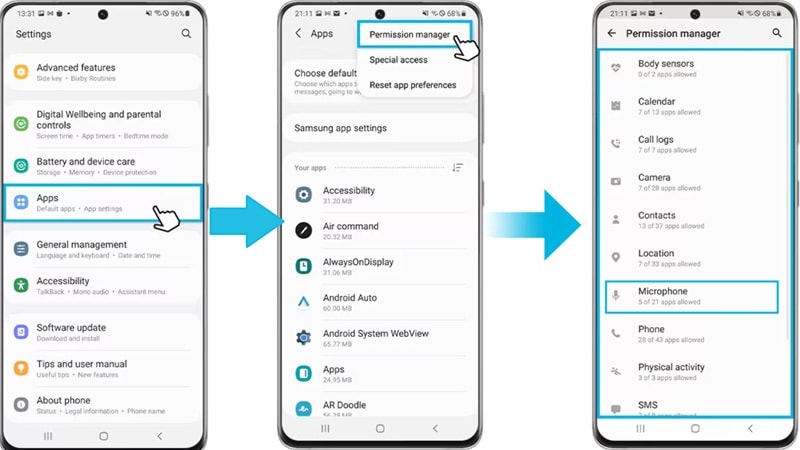
- Step 1: Open Settings, then go to the Apps section.
- Step 2: Tap the three-dot icon in the top corner to open more options. Select Permission Manager from the list.
- Step 3: Find and tap Microphone, then make sure your screen recorder app is set to Allow.
4. Update Software
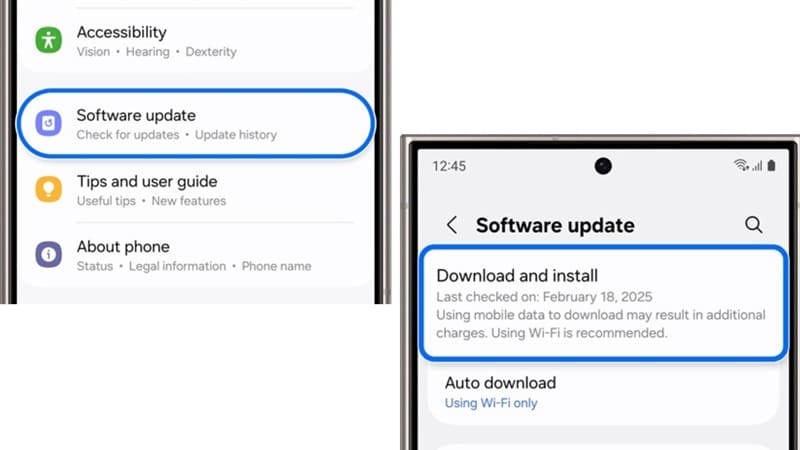
If the screen record has no audio on your Android, it could be because your software is outdated. Just follow these steps to get it sorted:
- Step 1: Swipe down your phone and tap the Settings icon.
- Step 2: Scroll down and tap Software update.
- Step 3: Tap Download and install.
- Step 4: If an update is available, it will start downloading. Once done, just follow the steps on screen to install the update.
5. Use Third-Party Screen Recording Apps
If nothing else works, the issue might be with the screen recording app itself. In that case, it’s a good idea to try a trusted third-party app from the Google Play Store, like AZ Screen Recorder, XRecorder, or Mobizen. Just install one and use it to record with sound smoothly.

Part 3. Screen Recording Has No Sound on Windows
Running into screen recording with no sound on Windows is more common than you’d expect. Whether you’re using the built-in Snipping Tool or another screen recorder, the problem usually comes down to simple settings or audio conflicts. So, let's go over the most useful solutions.
How to Fix Screen Recording No Audio Problem on Windows
1. Use Windows Audio Troubleshooter
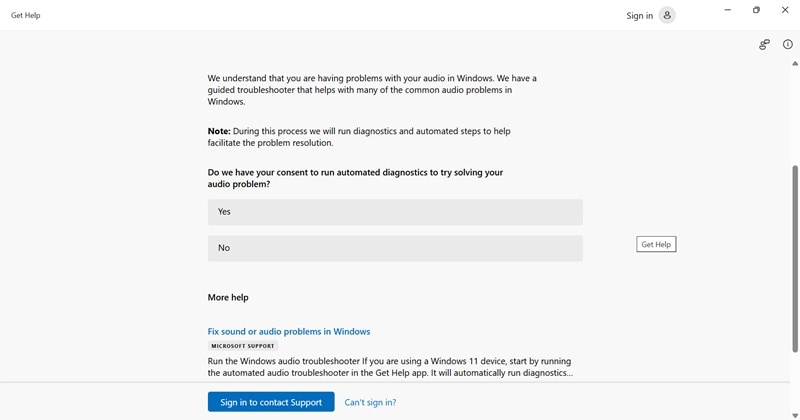
Sometimes, the easiest way to fix the screen recorder audio not working is to let Windows handle it for you. You can follow these steps to fix that:
- Step 1: Open Settings > System > Sound.
- Step 2: Scroll down and tap Troubleshoot under the Output or Input section.
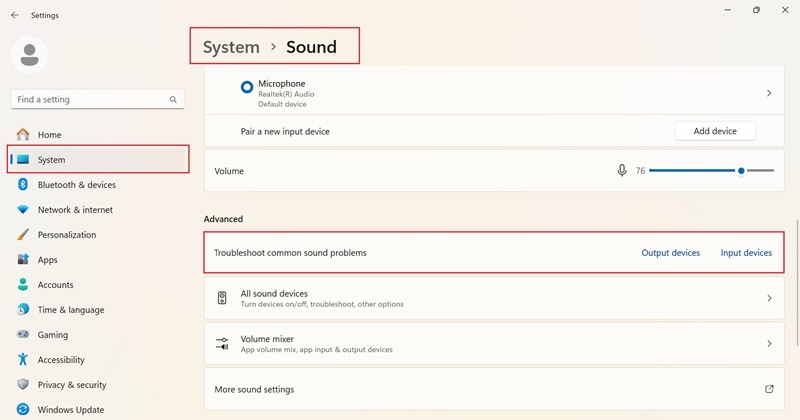
- Step 3: Follow the on-screen prompts and let Windows check for audio issues.
- Step 4: Restart your screen recorder and test the sound.
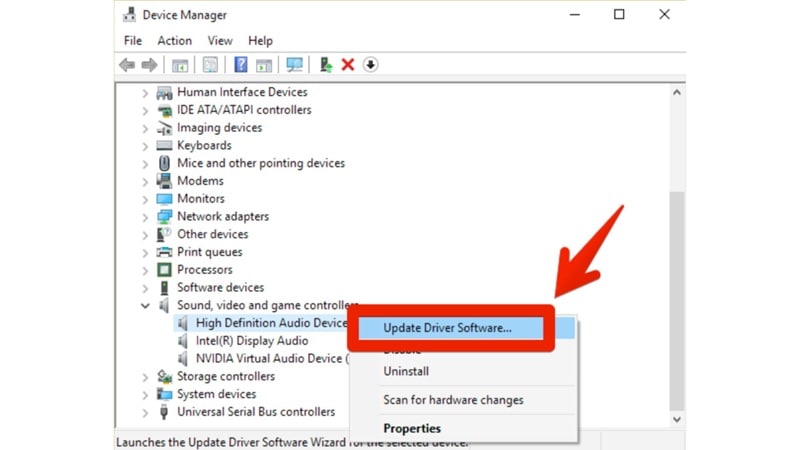
2. Update Sound Drivers
Outdated or buggy drivers can cause problems like screen recording not recording sound. If your sound drivers are old or missing important patches, updating them might be the solution. This simple process should take care of it:
- Step 1: Open the Start menu and search for Device Manager.
- Step 2: Expand Sound, video and game controllers.
- Step 3: Right-click your sound device and choose Update driver.
- Step 4: Once finished, restart your computer and try recording again.
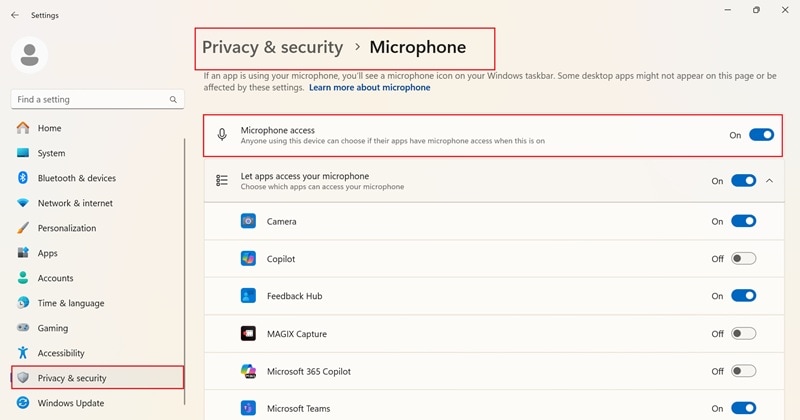
3. Check Microphone Permissions
If your screen recording has no sound on Windows, your microphone might be blocked from working with certain apps. Just go through these steps to fix the issue:
- Step 1: Go to Settings > Privacy & Security > Microphone.
- Step 2: Make sure the Microphone access is turned on for your device.
- Step 3: Scroll down and check if your screen recording app is allowed to use the mic. If it’s turned off, switch it on and try recording again.
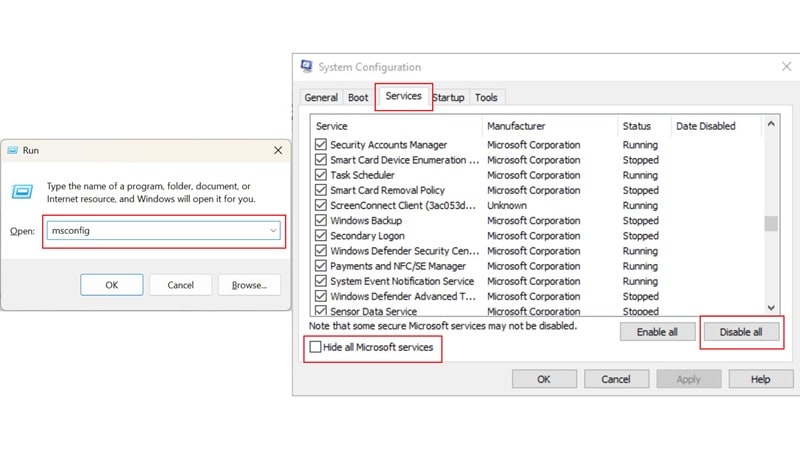
4. Perform a Clean Boot
Sometimes, apps running in the background can interfere with screen recording audio. In that case, doing a clean boot helps you find out if other programs are causing the problem. Walk through these steps and check the result:
- Step 1: Press Windows + R, type msconfig, then press Enter.
- Step 2: Under the Services tab, check Hide all Microsoft services.
- Step 3: Click Disable all, restart your PC, and try screen recording with sound again.
Part 4. Screen Recording Has No Sound on Mac
For Apple users, Mac devices handle system audio a bit differently, so fixing screen recorder audio not working might take an extra step or two. However, these solutions below can help bring your sound back.
How to Fix Screen Recording No Audio Problem on Mac
1. Create an Audio Source
Mac doesn’t capture internal audio by default, so you’ll need to install a tool that can route the sound properly. Try these steps to sort it out:
- Step 1: Download and install an app like BlackHole or Loopback Audio.
- Step 2: Set it up as your system audio output.
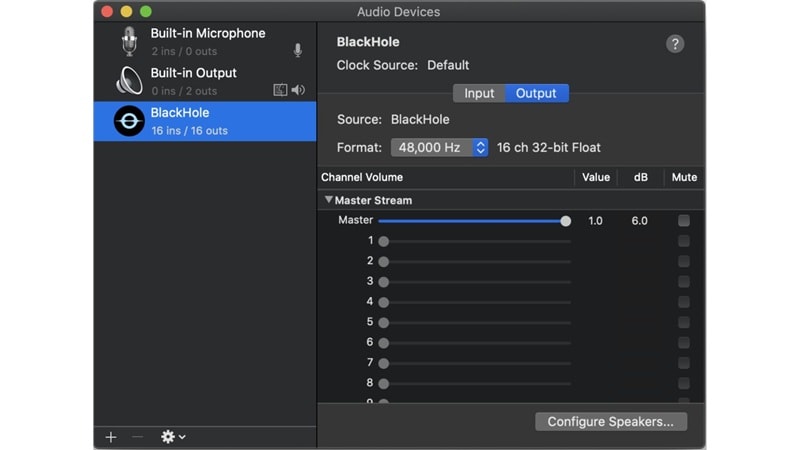
- Step 3: Open your screen recorder and select the new audio source.
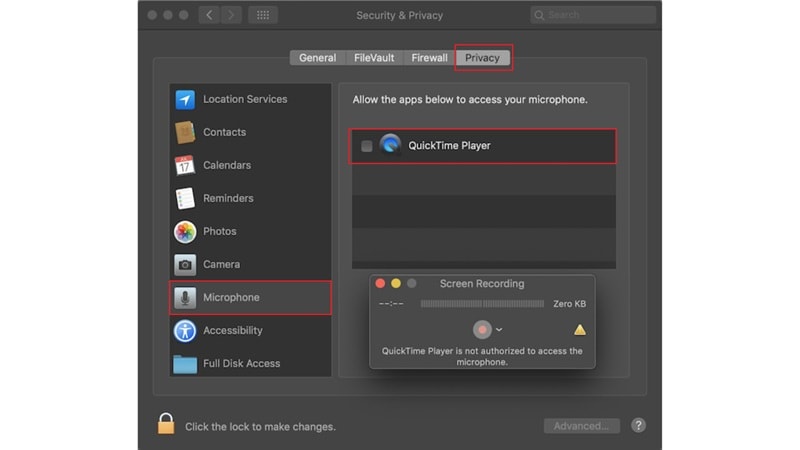
2. Check Microphone Settings
Another reason for screen recording doesn’t have sound on Mac is that microphone access might be blocked. Follow this guide and see the difference:
- Step 1: Open System Settings > Privacy & Security > Microphone.
- Step 2: Make sure QuickTime Player or your screen recorder is enabled.
- Step 3: Restart the app so the change takes effect.
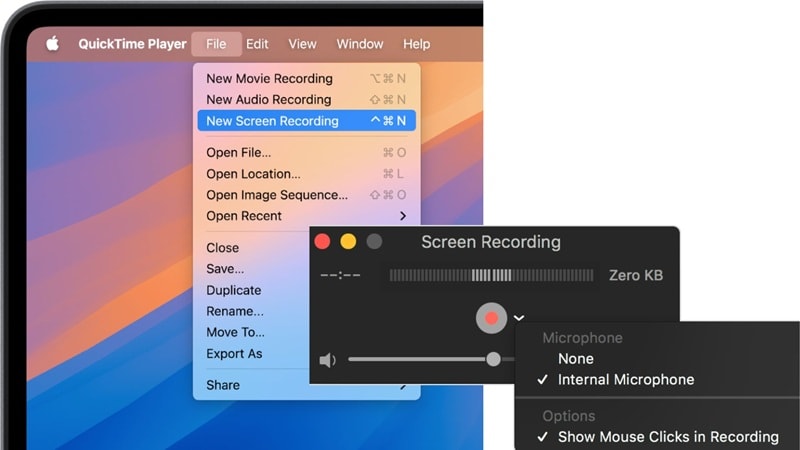
3. Modify QuickTime Settings
QuickTime doesn’t automatically pick up audio. If you don’t choose the mic manually before recording, your screen recording video will have no sound. Follow these steps, and the problem should be gone:
- Step 1: Open QuickTime Player. Select File > New Screen Recording.
- Step 2: Click the small arrow next to the record button.
- Step 3: Choose your Microphone input (like “Internal Microphone” or your external mic).
4. Check & Modify Sound Input Settings
Sometimes, the audio input in macOS is set to the wrong device or is too low to capture anything. Here’s what you can do to solve it:
- Step 1: Go to System Settings > Sound > Input.
- Step 2: Choose the correct input device (like “MacBook Microphone” or external mic).
- Step 3: Speak into it and make sure the input level reacts.

5. Update QuickTime Player
If your version of QuickTime is outdated, it might be missing important fixes for audio support. That can lead to the screen recorder audio not working even when the settings look fine. To update your QuickTime Player to the latest version, check out this video by BeAppSavvy on YouTube:
Part 5. The Ultimate Fix for Screen Recording Has No Sound on Windows or Mac
Fixing screen recording with no sound issues on Windows or Mac can feel like chasing your tail, especially when all you want is a simple video with working audio. Jumping through settings, tweaking audio inputs, restarting apps, after a while, it can feel like more of a hassle than it’s worth.
So instead of fighting with system tools that barely get the job done, it might be time to level up. In that case, Wondershare Filmora can be the perfect solution for you. This all-in-one video editor comes with a built-in screen recorder feature that’s steady, clear, and doesn’t miss the audio. Just hit records and get clean, smooth footage every time.
Here's why using Filmora is the smarter way to screen record:
- Flexible Recording Modes for Every Scenario: Filmora lets you choose between Area, Full Screen, and Window recording before you start, making it easier to capture exactly what you need. With built-in beginner guidance, even first-time users can get started quickly and confidently.
- Faster Recording with Smarter Selection: Customize your recording area with simple click-and-drag controls, and Filmora will remember your last selection size and position for next time. For full-screen capture, highlighted overlays help you choose the right display at a glance, while the new Window mode makes it easy to lock onto a specific app window.
- More Control, Less Distraction: Keep your recordings clean by hiding the control bar during capture whenever you want. If needed, you can easily bring it back from the taskbar, giving you a smoother workflow without blocking your screen.
- Quick Exit and Smoother Operation: Filmora now supports fast Esc exit, so you can leave the current recording mode and return to the editing page instantly. It’s a small upgrade that makes trying, adjusting, and restarting recordings much more convenient.
- Record and Edit in One Place: Filmora is more than a screen recorder. After recording, you can trim clips, add text, insert music, and polish your content without switching to another app, keeping your whole workflow simple and efficient.
- Works Smoothly on Windows and Mac: No need to worry about compatibility. Filmora delivers a consistent screen recording experience across


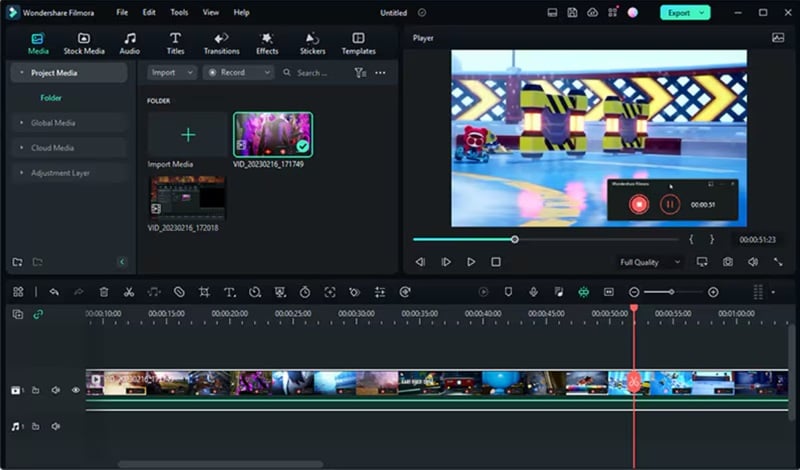
Record on a Desktop (Win/Mac) Using Filmora
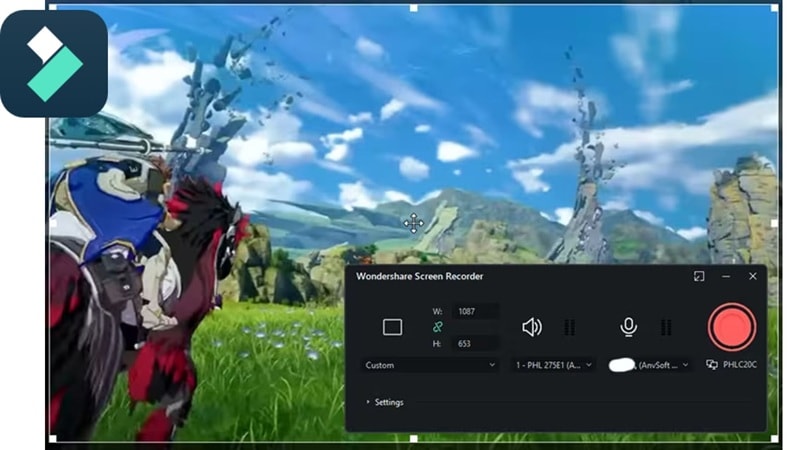
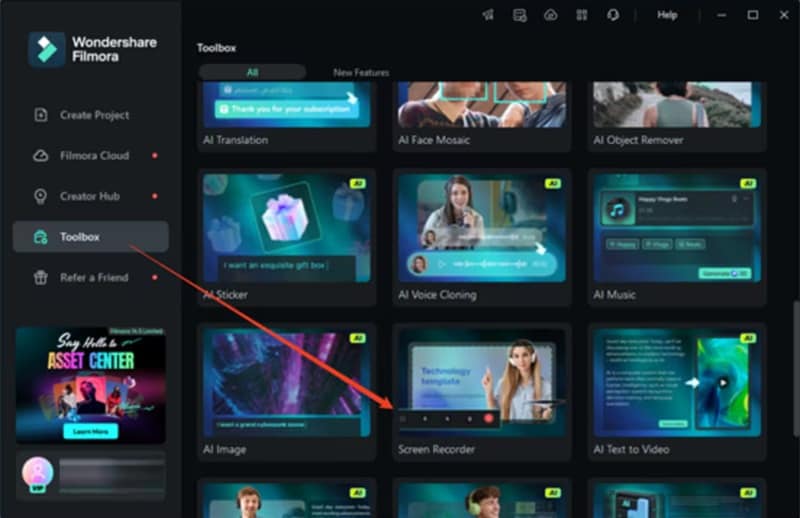
Step1Open the Screen Recorder in Filmora
After you’ve installed the latest version of Filmora, launch the app. On the main screen, go to the “Toolbox” section and click on “Screen Recorder” to get started.
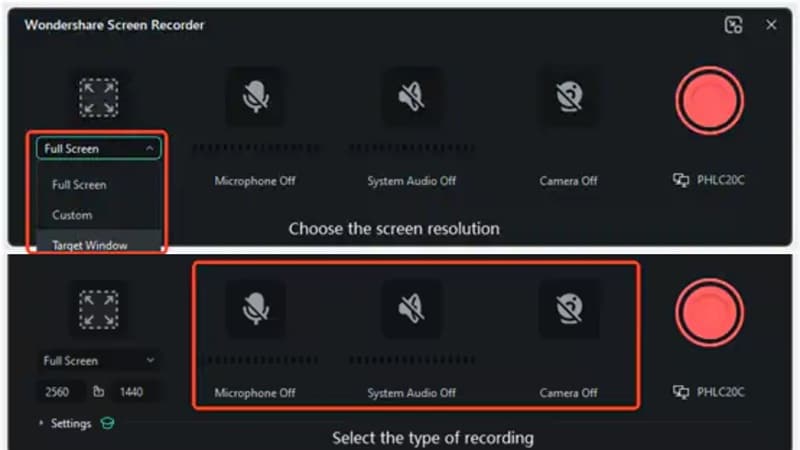
Step2Modify settings for recording
Click the Square icon, then choose from Full Screen, Custom, or Target Window. You can also drag to resize the area or type in the exact width and height if you want more control. Also, turn on the Microphone if you want to capture your voice. You can also switch the System Audio and Camera on or off, depending on what you need.
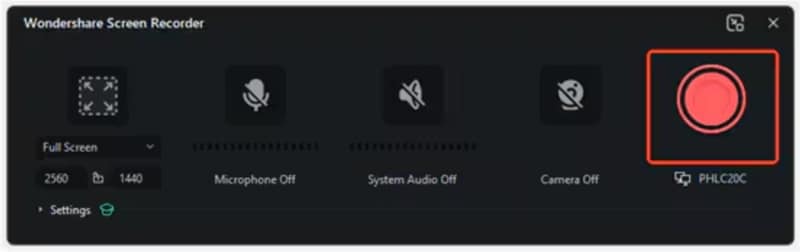
Step3Hit Record and start capturing
Click the big red button to begin. You’ll see a countdown, but you can skip it by tapping Start Directly. While recording, use the controls below to Pause, Stop, or Re-record whenever you need to.
Step4Edit and save your recording
Once you finish recording, your video will show up right in Filmora’s editor. Just drag it to the timeline, make your edits with the built-in tools, and then export it when you're ready.
Want the newest Screen Recording workflow? Filmora 15.6 adds a Teleprompter and in-recording Markers. Update to 15.6 and check the updated tutorial: Optimized Screen Recording in Filmora
Part 6. How to Make Sure Your Screen Recording Has Sound Next Time

As you can see, screen recording with Filmora is super easy, especially when everything just works right out of the box. After running through all the common issues and how to fix them, it’s clear that small steps make a big difference. So, let’s go over what you should always check to avoid dealing with screen recorder audio not working again:
- Always do a quick sound check before recording.
- Use a reliable screen recorder like Filmora.
- Avoid recording during calls or protected media apps.
- Keep your system and apps updated.
- Double-check microphone and audio permissions.
- Make sure there’s enough storage space on your device.
Conclusion
No audio on screen recording is actually a pretty common issue, and it happens more often than people expect. That’s why this guide walks through how to fix no sound on screen recording across iPhone, Android, Mac, and Windows.
Most of the time, screen recording not recording sound comes down to just a few things like wrong settings, missing permissions, or outdated apps. Instead of going through the same troubleshooting loop every time, it makes sense to switch to a tool that’s built to handle it all.
With Wondershare Filmora, you get more than just clean audio. You get a full setup that captures screen, sound, and even lets you edit everything in one smooth workflow. It’s the kind of recorder that makes the whole process easier and actually fun to use.
