
 100% Security Verified | No Subscription Required | No Malware

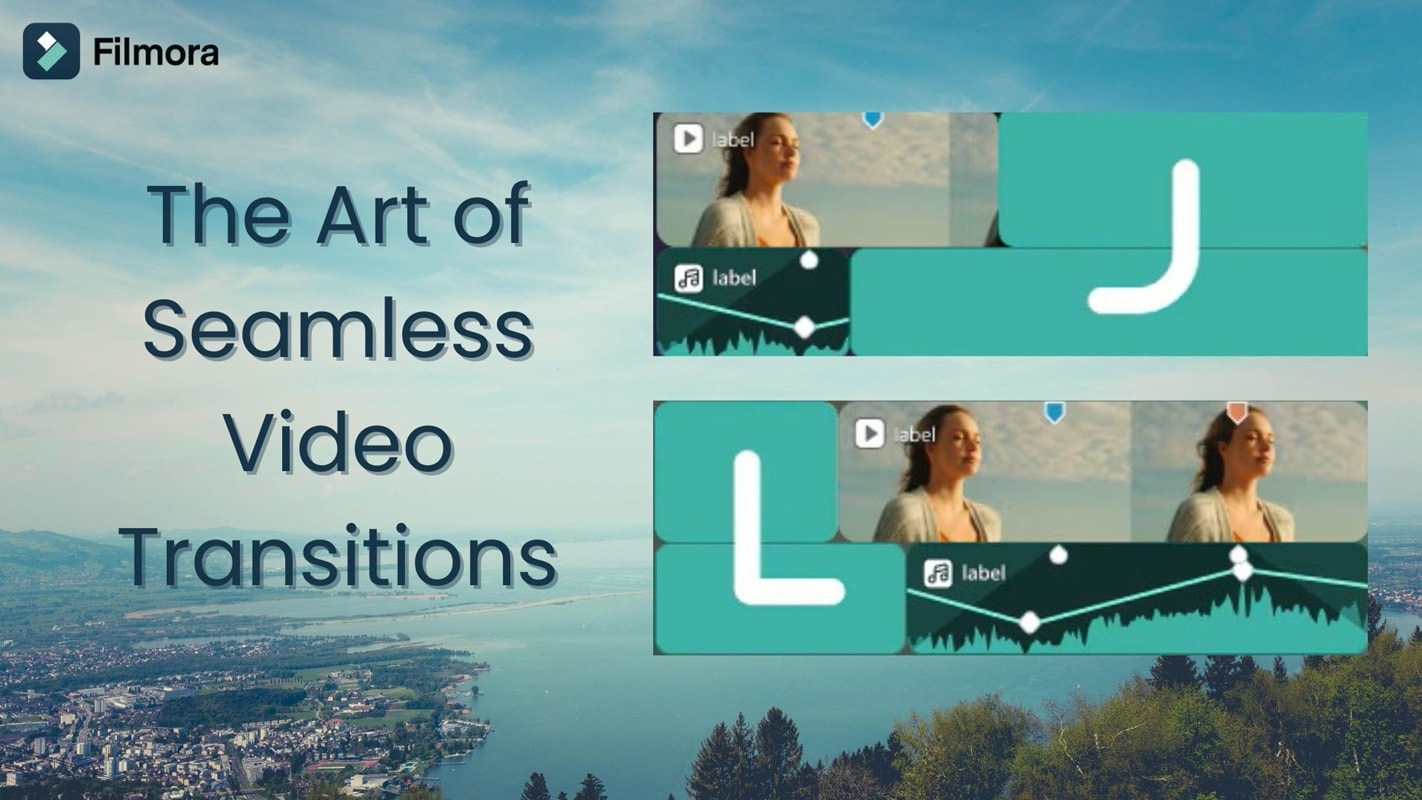
Have you ever watched a video where each scene flows smoothly into the next without any sudden jumps? That's the power of a smooth cut transition.
Smooth transitions are crucial as they help maintain the rhythm of your video and keep your narrative engaging. Without distracting viewers with harsh cuts, smooth transitions maintain the emotional connection and visual flow of your cinematic vlogs, tutorials, or short social media reels.
Today, you'll learn how to create smooth cut transitions using Filmora on desktop and mobile, along with practical techniques such as match cuts, J-cuts, and L-cuts that make every edit look seamless and well-planned.
In this article
Part 1. The Art of Seamless Video Transitions
Behind the power of video editing lies the ability to make every transition feel natural. Smooth cuts help to seamlessly connect two clips, while hard cuts instantly transition from one scene to another.
Hard cuts may work for quick edits or dramatic changes, but too many hard cuts can make the video seem unnatural. Smooth cuts, on the other hand, guide the viewer's attention and maintain the flow of the story.
To achieve this smooth flowing feeling, editors frequently use a few tried and tested techniques:
- Match Cut: Matching the movement, shape, or composition of two scenes so that the transition feels continuous and aesthetically pleasing.
- J-Cut: Starting the audio from the next scene before the video appears, which helps the audience naturally anticipate the transition.
- L-Cut: Carrying audio from the previous scene into the next scene, creating a smooth flow that connects the two clips emotionally and rhythmically.
Video with no audio? Something is definitely missing. Audio plays an important part in creating smooth transitions. Fading out background music or dialogue, matching background sounds, and maintaining consistent audio levels can hide even the most noticeable cuts.
When the sound flows smoothly, the visual transitions also feel smoother, to make the video as a whole feel cohesive and professional.
 secure download

Part 2. Easy Smooth Cuts on Your Computer
We've covered the basics of smooth transitions; now it's time to put them into practice. One tool that makes it easy to do this is Wondershare Filmora. Smooth cut transition effect in Filmora produces natural and flowing edits.
Before moving on to the step-by-step guide, you can download the software from the website and launch it on your Windows and Mac devices.
Step-by-Step Guide on how to create smooth cut transitions using Filmora:
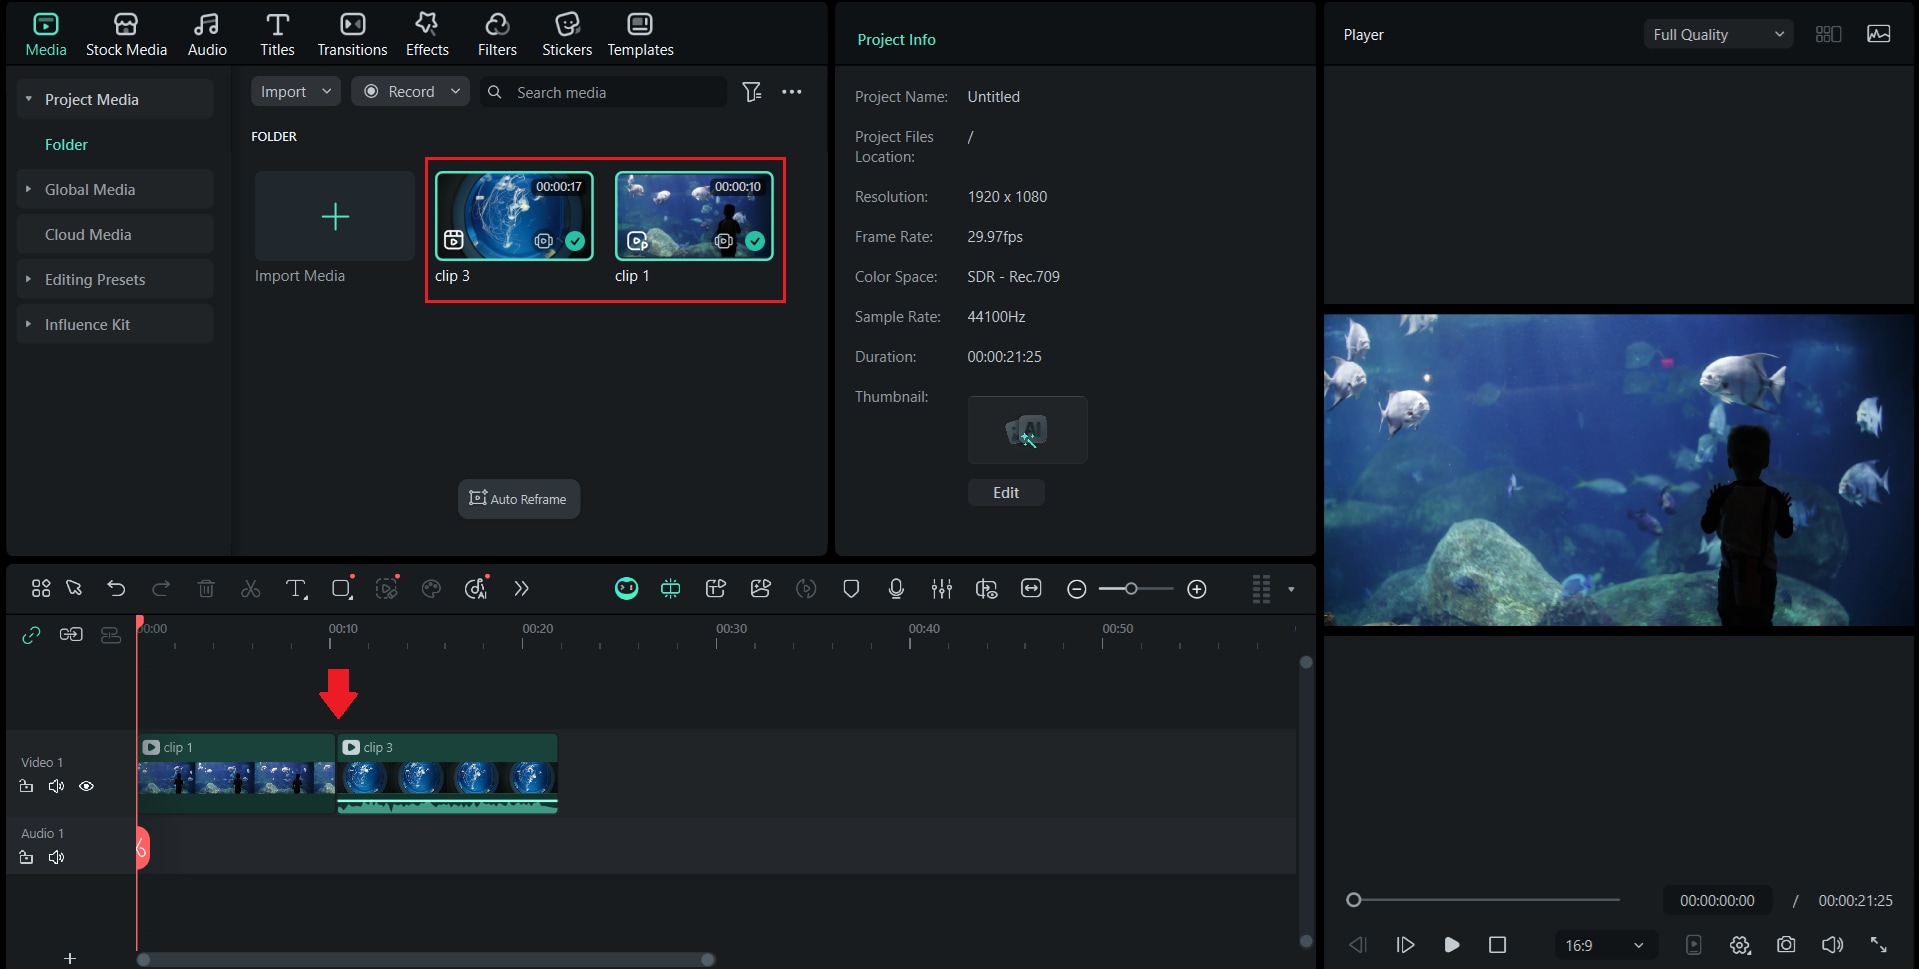
- Import Your Clips
Open Filmora on your computer and import all your video clips into the Media Panel. Drag them onto the timeline in the correct order.
 secure download
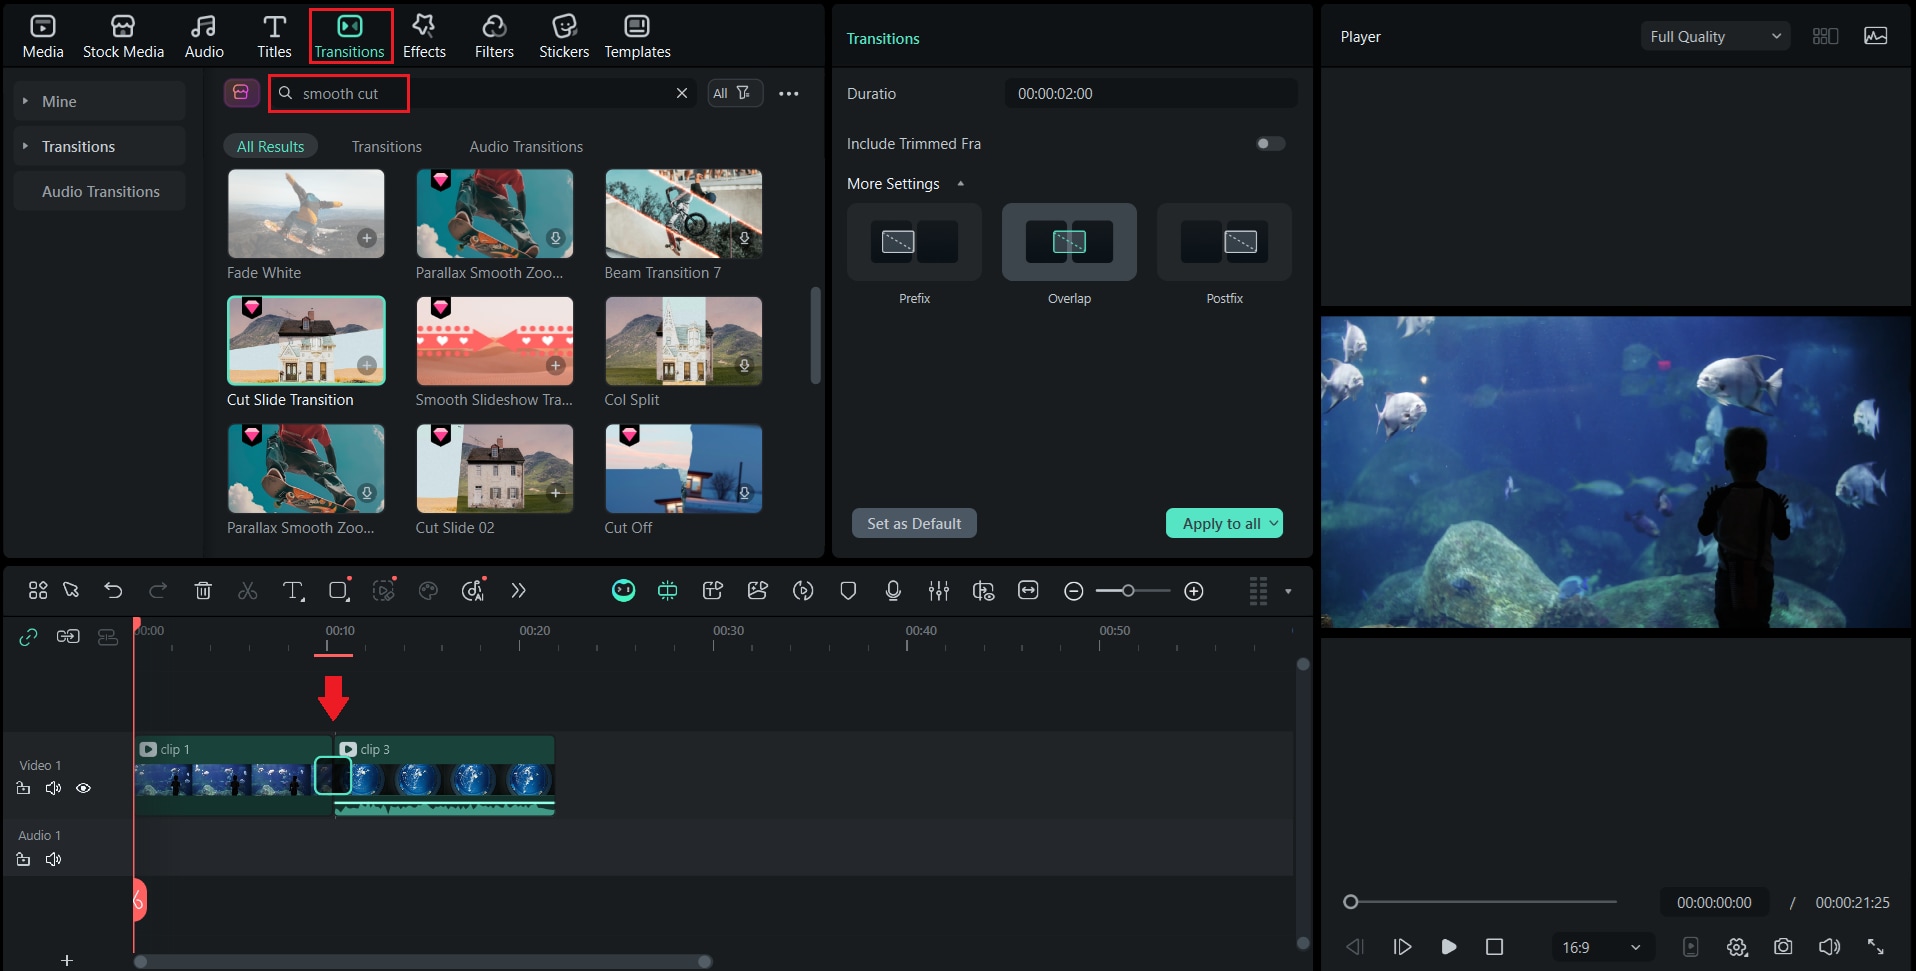
- Apply the Smooth Cut Transition
Go to the Transitions tab, type Smooth Cut in the search bar, and drag the effect between two clips. Filmora will automatically blend them for a smooth result.
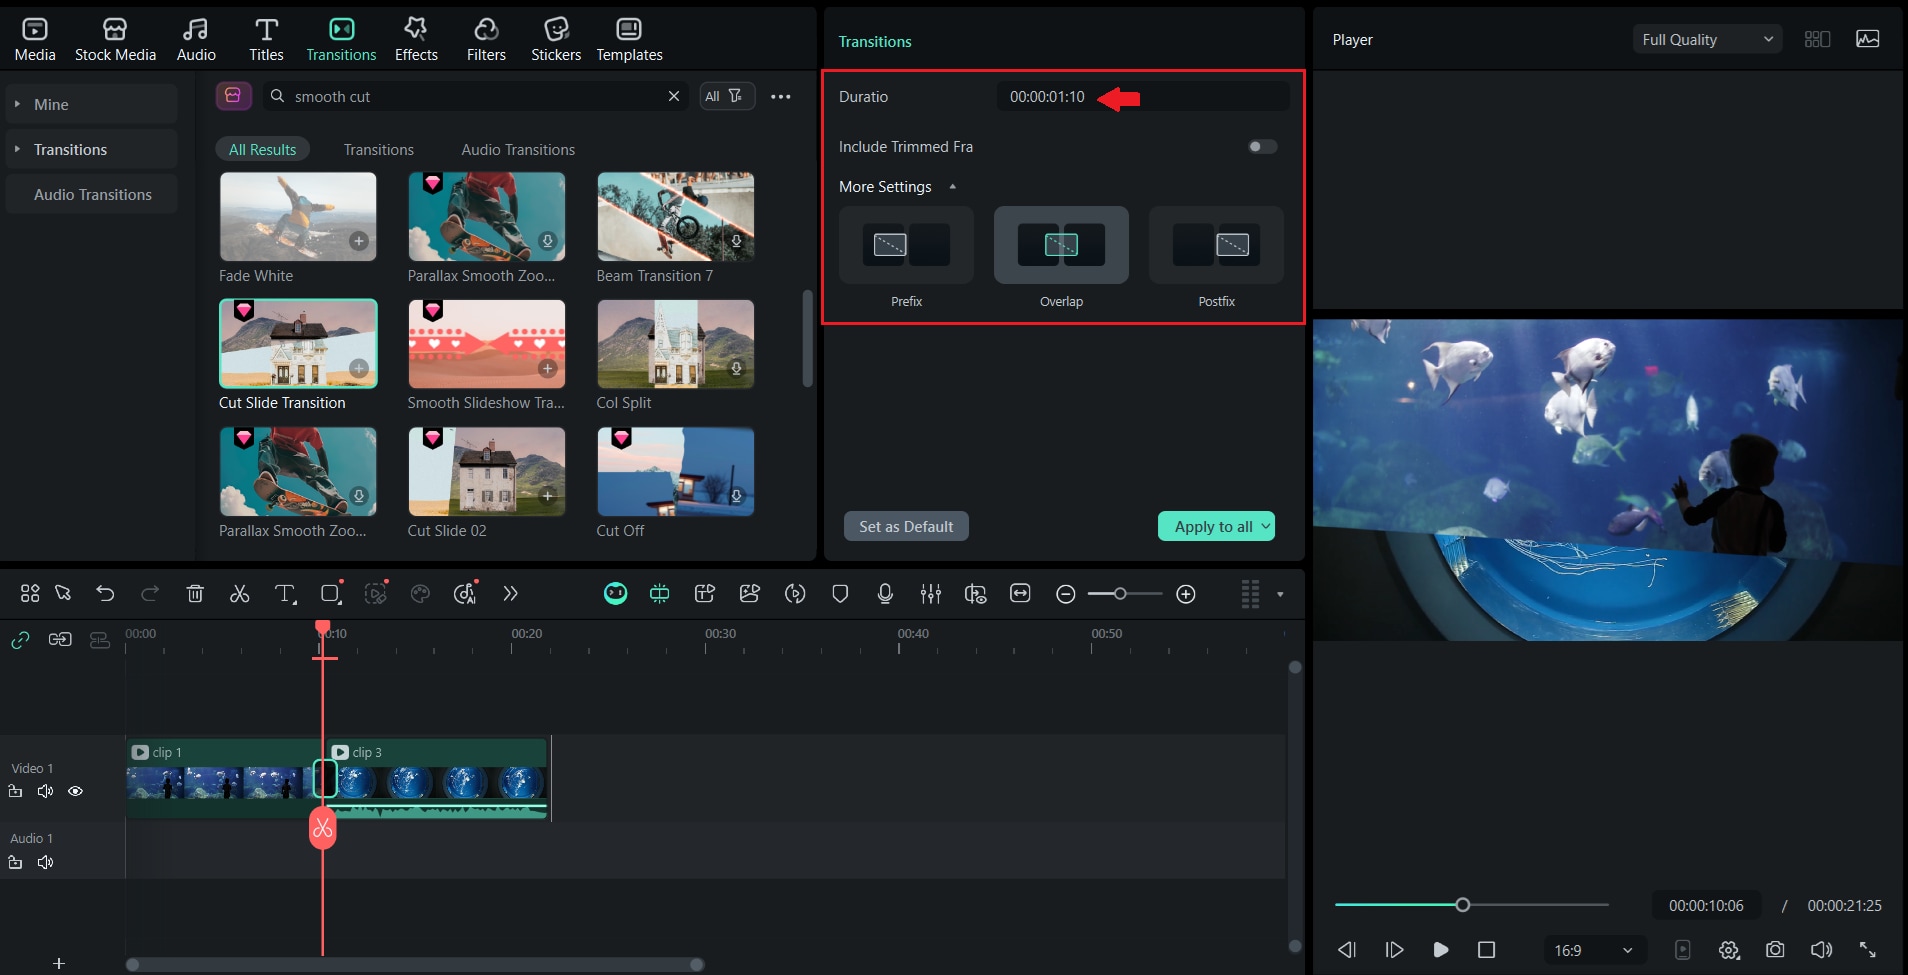
- Adjust the Sensitivity and Duration
Select the transition and click the settings icon to customize it. You can adjust the duration to control how gradual or quick the blend is.
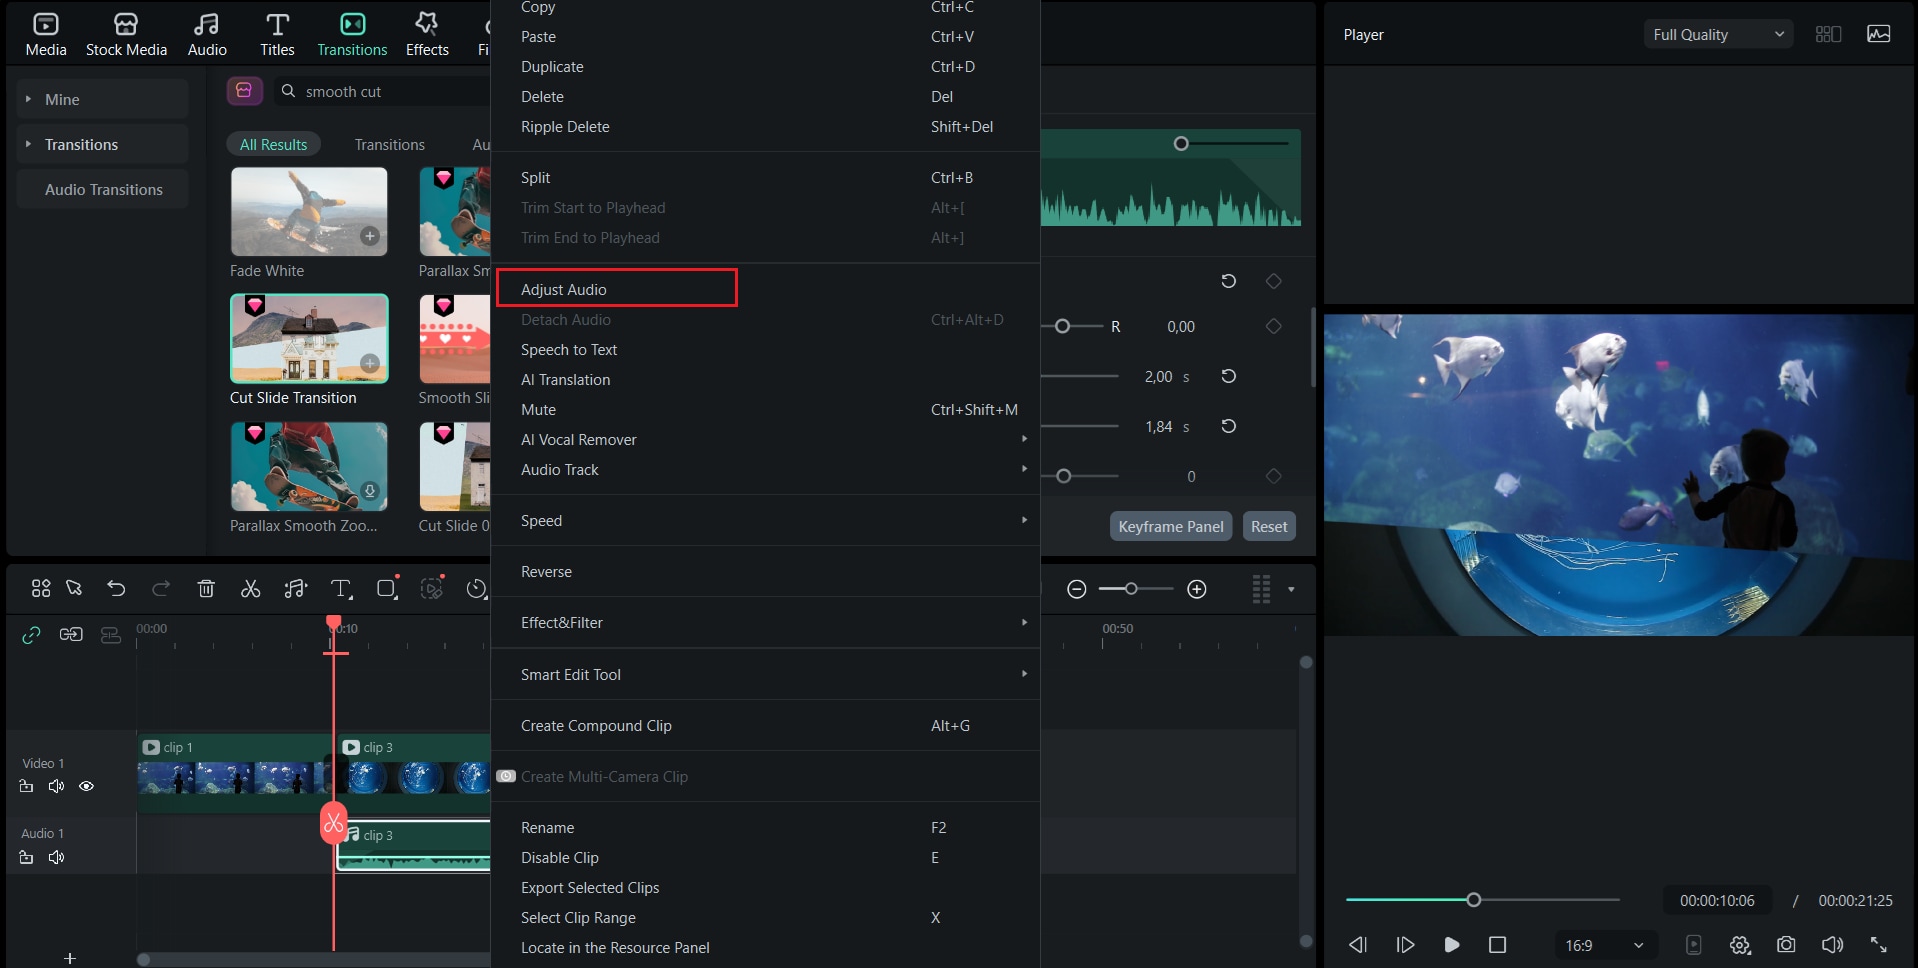
- Refine with Audio Fades
To make the transition feel smoother, use Filmora’s Audio Fade In/Out option. Right-click the audio track, choose Adjust Audio, and adjust the Fade In/Out settings to match the sound to your clip's movement.
Quick Workflow for Efficiently Editing Multiple Clips
When editing multiple clips, you can apply Smooth Cut in batches for faster results.
Go to the transition settings, then click “Apply to all” to apply it to all your clips without having to set it manually one by one.
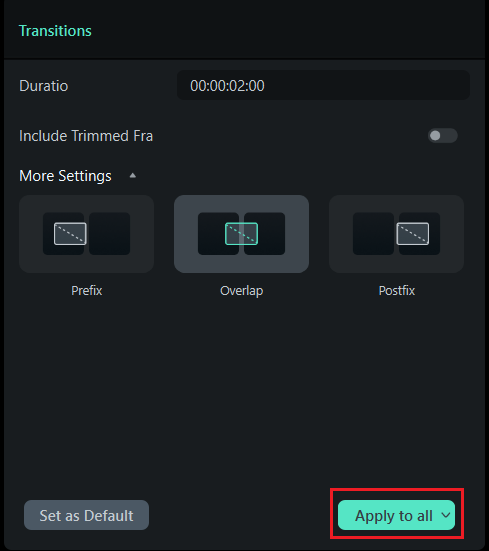
Filmora will automatically apply the effect between each pair of clips, which saves you time while maintaining the overall visual consistency of your video.
Part 3. Create Seamless Cuts on Your Phone with Filmora Mobile
If you prefer editing on the go, Filmora Mobile (available for iOS and Android) gives you the same capabilities to create smooth cut transitions directly from your phone. This app is a perfect fit for quick edits, social media content, or vlog videos that require a professional look without needing to use a computer.
Below is the step-by-step guide:
Step 1. Open the Filmora Mobile app and tap New Project.
Import your clips from your phone gallery and arrange them in the order you want.
secure download
Step 2. Trim and Align Your Footage
Tap each clip and use the Trim tool to remove unnecessary parts. Adjust the scenes so that the movement or subject continues naturally between scenes, which makes the transition smoother.
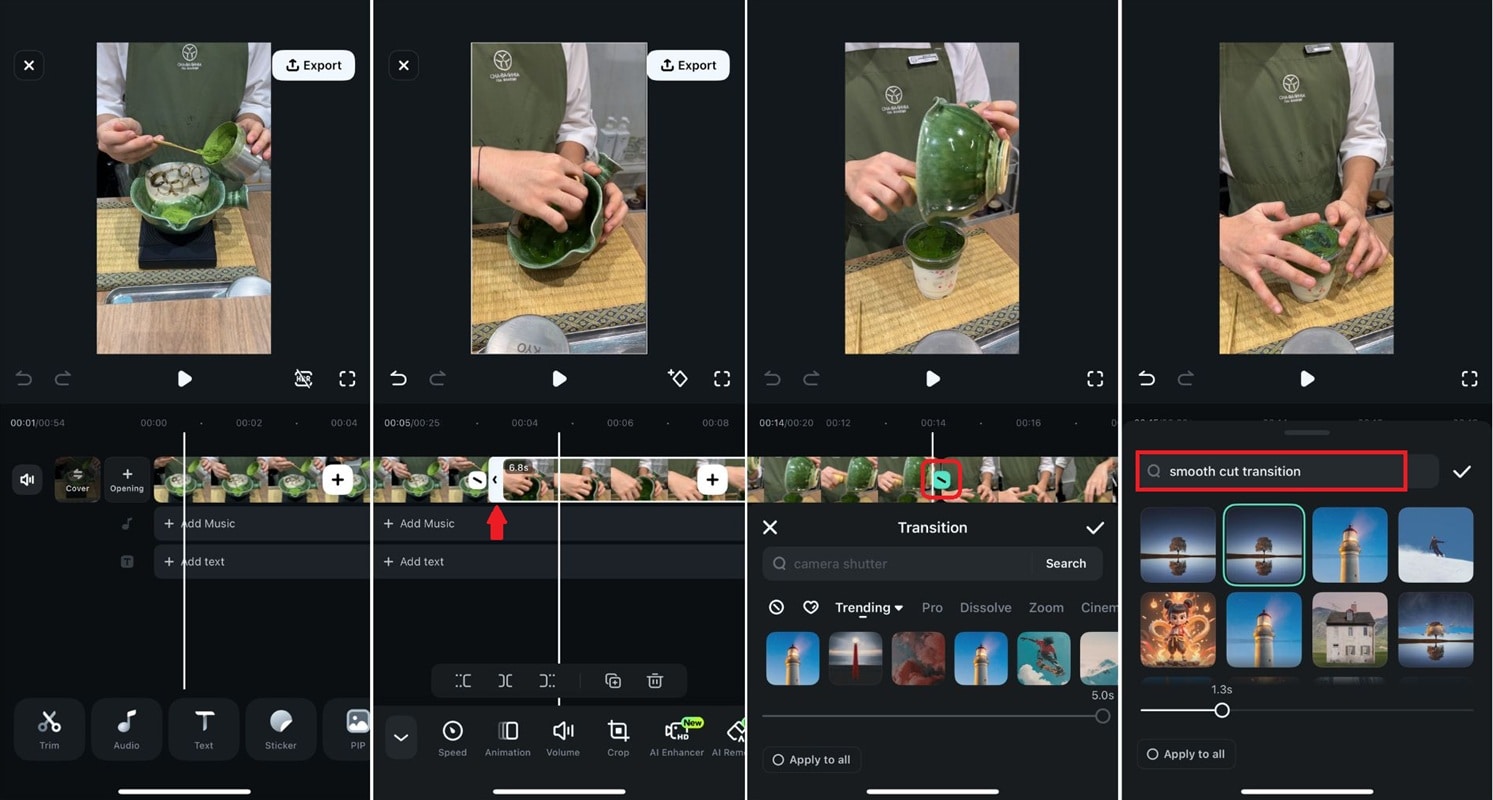
Step 3. Add the Smooth Cut Transition
Tap the Transition icon between two clips and scroll through the options until you find Smooth Cut. Select it, then adjust the duration by dragging the transition bar.
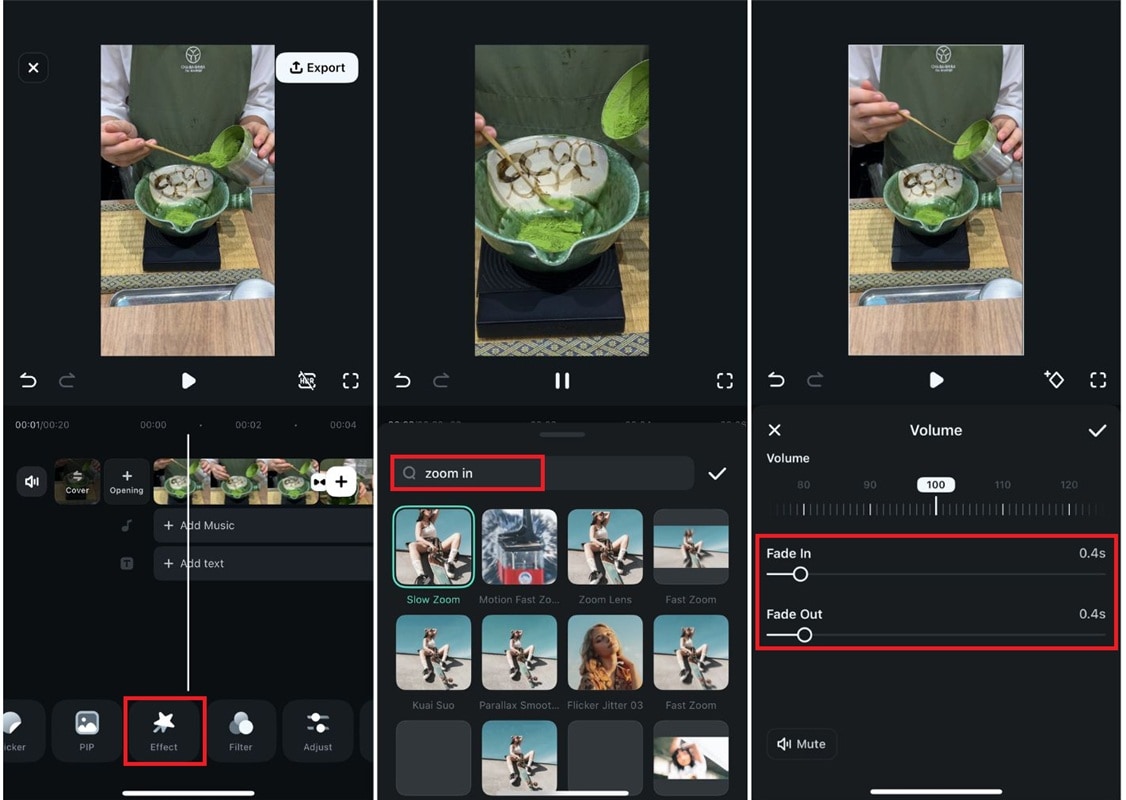
Step 4. Smooth with Effects and Motion
To make the transition more dynamic, go to the Effects tab and apply soft blur or motion effects. You can also use the Zoom or Pan transition to smoothly direct the viewer's eyes from one scene to the next.
Step 5. Adjust Audio for a Natural Blend
Tap the Audio tab and add fade-in and fade-out effects. Smooth audio transitions help connect your scenes and prevent sudden changes in sound between clips.
Step 6. Preview and Fine-Tune
Play the sequence and check how the transition feels. If it looks too sudden, slightly increase the transition duration or add a subtle motion effect for better flow.
Quick Tips for Social Media Content Creators
If you're creating Reels, Shorts, or TikTok videos, use the smooth cut transition together with Auto Beat Sync in Filmora Mobile. This feature automatically syncs your video transitions with the rhythm of the background music.
Part 4. Practical Tips for Seamless Editing
A smooth transition begins long before you press the edit button, even with powerful tools like Filmora. You can achieve excellent editing depending on thoughtful planning, clean footage, and the use of smooth sounds and movements.
Below are some practical techniques to make your cuts feel more natural and cinematic.

Planning Your Shots
Smooth cuts begin during pre-production. Before shooting, think about how each scene will connect to the next.
- Plan your camera movements so that the motion continues in the same direction between clips.
- Use action cuts, where the next scene begins right as the first action ends, to keep the momentum flowing.
- Maintain consistent lighting and composition to help transitions feel smooth and less unsettling.
Audio Considerations
Sound is just as important as visuals in creating smooth transitions. Here are some tips you might want to try to achieve smooth cut transitions that look professional.
- Use audio fade effects to eliminate sudden changes in sound between clips.
- Use short layers of ambient or background sound to fill gaps and mask edits.
- Experiment with J-cuts and L-cuts, where the sound from one clip overlaps into the next clip.
Visual Effects
Along with planning your shot and audio considerations, adding visual effects can also enhance the illusion of continuous motion.
- Add blur transitions or motion effects to soften sudden visual jumps.
- Use the Ken Burns effect on static images to create smooth camera movement and zooming to give a sense of flow to static scenes.
- Try Filmora's camera movement presets to introduce controlled movement that makes transitions feel natural.
Part 5. Common Mistakes in Editing and How to Fix Them
Even experienced editors may face problems that make transitions feel forced or distracting. Therefore, it's just as important to know what to avoid as it is to learn the right techniques. Here are some common editing mistakes and how to fix them:
Overusing Transitions
One common mistake is using too many transitions. Although it may be tempting to use a new effect for each clip, excessive use of transitions can distract viewers and make the video feel messy. The goal of smooth cuts is to make transitions invisible; viewers should not notice them at all.
How to Fix It:
- Use transitions purposefully (only when the story or rhythm demands it.
- Stick to simple and consistent effects such as Smooth Cut, Fade, or Cross Dissolve.
- Focus on cutting on action or visual movement rather than relying on effects to hide rough cuts.
Technical Issues
The best edits can be ruined if technical issues interfere with playback. Frame drops, lag, or audio synchronization issues can make transitions appear choppy and messy. These issues are often caused by system performance or incompatible clip settings.
How to fix it:
- Adjust the frame rate and resolution before importing clips to avoid playback delays.
- If playback stutters, enable proxy editing in Filmora to create lighter preview files for smoother performance.
- For audio synchronization issues, use the “Detach Audio” option, adjust manually, and reconnect after cutting.
- Always preview your project at full resolution before exporting to ensure smooth transitions.
Conclusion
Creating smooth cut transitions is not just about combining two clips, but more about creating a visual rhythm that feels natural to the audience. You can turn simple footage into clips with a smooth narrative with proper planning, smooth cuts, and smart use of tools such as Filmora's smooth cut transition.
Either can do both by editing on your desktop or mobile device. Combine smooth motion, consistent audio, and clean transitions. The goal is not to create a big impression with effects, but to keep the audience fully engaged from one moment to the next.
