Joining a Discord server is one thing that can quickly bring you closer to communities that share your passions and interests, but creating your own Discord server is a chance to shape a community around your unique vision and values.
With your own Discord server, you can introduce fun activities, host live events, or even conduct learning sessions depending on what fires up your group. If you're not sure where to start, don't worry! We'll guide you through how to make a Discord server and make the most of it.

In this article
Part 1. Types of Servers You Can Create on Discord
Everyone needs a place where they can chat, share, and collaborate on what they love, and Discord is the perfect spot for just that. Thanks to its user-friendly setup and flexible features, Discord has become a favorite place to build different types of communities.
So, before learning how to create a Discord server, you must decide what kind of community you want to build. For reference, here are some types of Discord servers you can create:
- Gaming
- School Club
- Study Group
- Friends Group Chat
- Fan Community
- Artists and Creators
Discord even offers server templates for these popular types to help you get started quickly. These templates come with pre-configured channels and settings tailored to the specific needs of each community type.
Part 2. How to Make a Server on Discord
Next, you can start learning how to make a server on Discord. Whether you're using the mobile app, web interface, or desktop application, the process for creating a Discord server is pretty similar across all platforms. Follow the steps below.
How to Make a Server on Discord
Step 1: Open Discord and Create Server
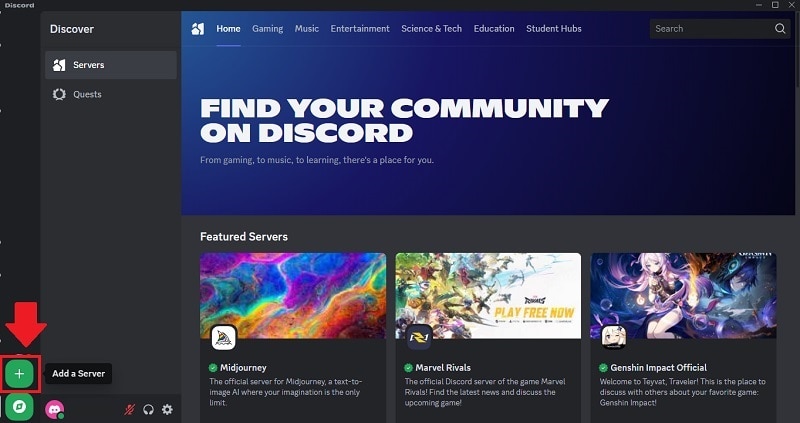
Log into your Discord account and look for the ""+" " icon on the left sidebar, which is usually found at the bottom of your server list. Click on it to create a new server.
Step 2: Choose the Server Type
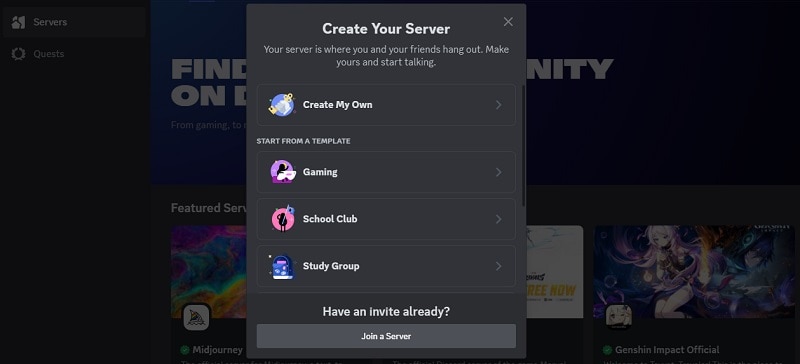
You can start from scratch by selecting "Create My Own" for customization, or select from the template if you have a specific type of community in mind.
Step 3: Name Your Server
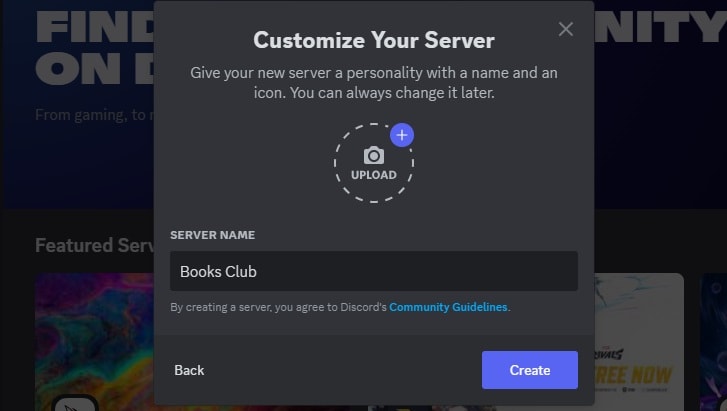
Give your server a cool name that reflects the theme or purpose of your community. You can also upload an image that will serve as the server icon. Once done, click "Create" to create your Discord server.
How to Make a Private Server on Discord
If you want to keep your server exclusive and limit access, you can also make a private server on Discord. In a private server, new members won't be able to participate in any channels until you assign them a specific role. Here's how you can set it up:
Step 1: Create a New Role
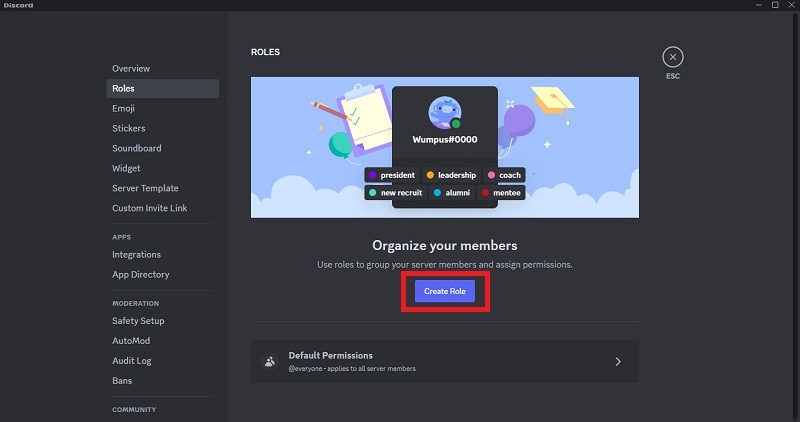
Open the Discord server's settings and go to the ''Roles' tab. Click ‘Create Role' to add a new role.
Step 2: Customize and Set Permissions for the New Role
Name the role and choose a color for it. This role will define what allowed members can do on the server.
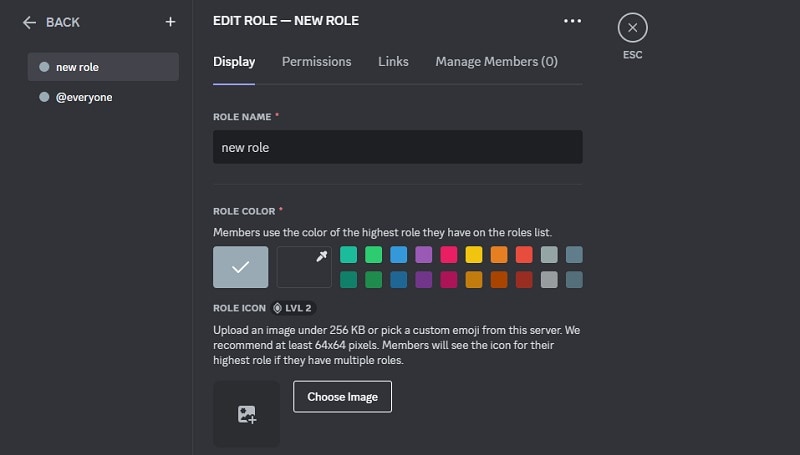
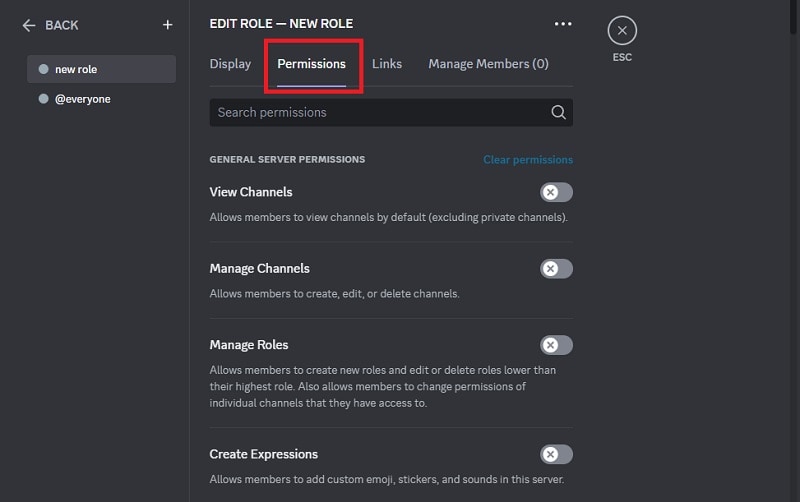
Then, select which permissions to enable by checking the appropriate boxes. Ensure you review all available permissions to tailor the role's capabilities exactly as needed. Save your changes once done.
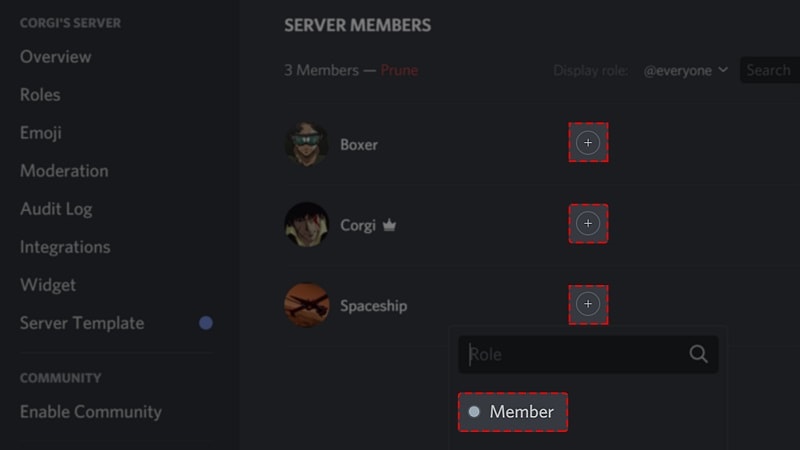
Step 3: Assign Roles to Members
Go to the ''Members' tab within your Server Settings. Here, you can assign a new role to specific members by clicking the '+' next to their names and selecting the role from the list.
How to Invite Members to Discord Server
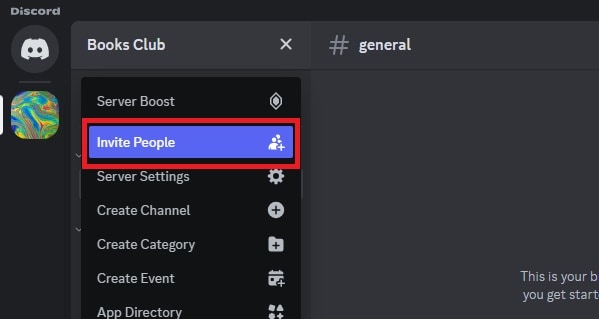
Once your Discord server is up and running, you can invite members by clicking on your server name at the top of the screen, then ''Invite People.' You can send direct invites via email or share the invite link on other platforms.
Part 3. How to Customize Your Discord Server
There are many customizations you can make to your Discord server, and these tweaks are important for creating a space that's both fun and functional for your community. Let's see what you can do below.
1. Create a Welcome Video for Your Discord Server
Creating a Discord server is easy, but running it can get a bit overwhelming at some points, especially as your community starts to grow. To keep things organized, you can share a welcoming message along with information about rules, roles, and how things work through a video.
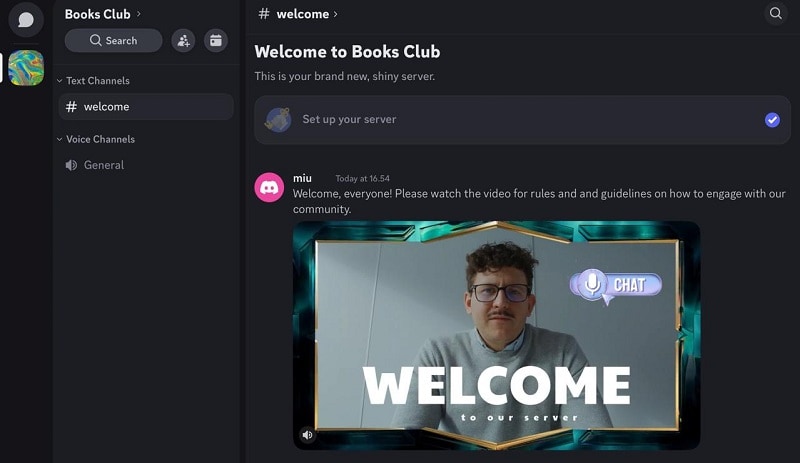
To create a video for your Discord server, we recommend using an easy yet feature-rich video editor like Wondershare Filmora. Filmora is available on mobile and desktop for greater flexibility. It's packed with features like:
- Auto Caption: Save time by automatically generating captions for your video, making it more accessible to your audience.
- Video Templates: Choose from various ready-made templates to create high-quality videos for your Discord server with minimal effort.
- Titles and Texts: Add stylish titles and text overlays to highlight important information, like server rules or channel features.
- Animated Stickers: Use fun, animated stickers to help you point out important details or highlight key parts of your video.
- Built-in Recorder (Desktop only): Easily record your screen or voice directly within the app, perfect for showcasing your server layout or providing a voiceover.
After creating your video, you can make a welcome channel on your server and use it to share your video with new members. The welcome channel is the first place new members will visit. Then, pin the video in the channel so it's easy to find, or use a bot to automatically send the video to members when they join.
Filmora for Mobile Filmora for Mobile Filmora for Mobile Filmora for Mobile Filmora for Mobile
Find More Dynamic Stickers in Filmora
- • Powerful Brand New AI Features.
- • User-friendly video editing for beginners.
- • Full-featured video editing for professional.
2. Maximize Discord Features in Servers
One of the best things about Discord is how many features it offers to make your server fun and organized. Some of Discord features that you can use in your server are:
- Roles and Permissions
Roles lets you assign specific responsibilities, such as moderation or event coordination, and grant access to exclusive channels or features. They also help identify members by their skills or contributions
- Categorize Chats and Voice Channels
Discord includes Text and Voice Channels. To organize them, you can create categories by topics, like "General Chat," "Events," or "Help."
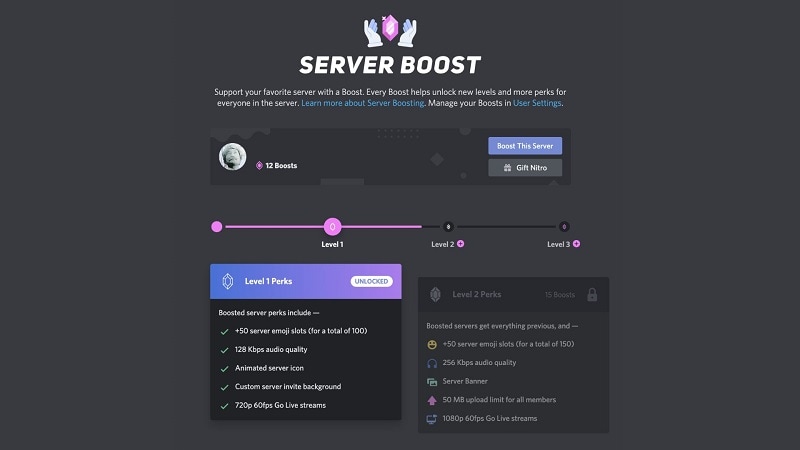
- Server Boosts and Enhancements
Server boosts are contributions from members that elevate your server to different levels with unique perks. These perks include higher-quality voice channels, more upload space for sharing large files, additional emoji slots for custom reactions, and more.
Part 4. Fun Things to Do on a Discord Server
Now that you have learned how to make a Discord server, there are many fun things you can do on your own Discord server. Discord isn't just a place for chatting, you can try these activities to grow your community:
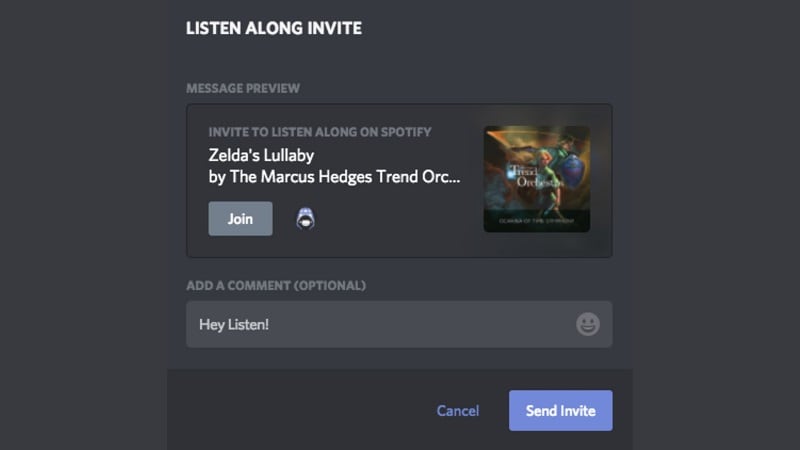
1. Music Listening Parties
Turn your server into a music lounge by hosting listening parties! Use a music bot to play tracks while members chat and share their favorite songs. It's perfect for discovering new songs and bonding over shared tastes.
2. Host Q&A Sessions
If your Discord server is centered around a specific topic, you can host a Q&A session and invite an expert, influencer, or community leader. Set up a dedicated text or voice channel for the session and let members ask their burning questions.

3. Stream Live Events
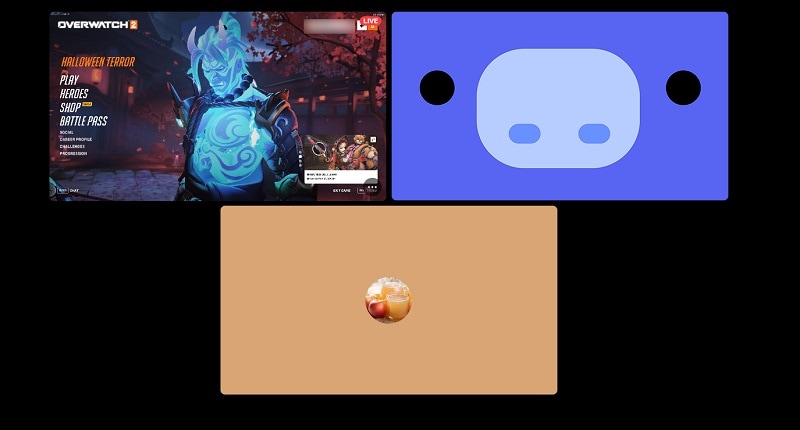
Take advantage of Discord's screen-sharing and live streaming features to broadcast live events, like gaming sessions, webinars, or even group discussions. If you'd like to save these live streams for future use or share them with members who couldn't join live, continue to the next section to learn how to record and save your live streams easily.
Bonus: How to Screen Record Discord Stream on Your Server
Since you've created your own Discord server, you can now live stream with your server members. However, Discord does not have a built-in option to record these streams. If you want to capture and save your livestreams, you'll need to use a screen recording tool.
One of the best options to record Discord streams on your server is Filmora. You might already know about Filmora from how it can help you create a welcoming video for your server, but you can still use the same software for capturing your Discord live streams.
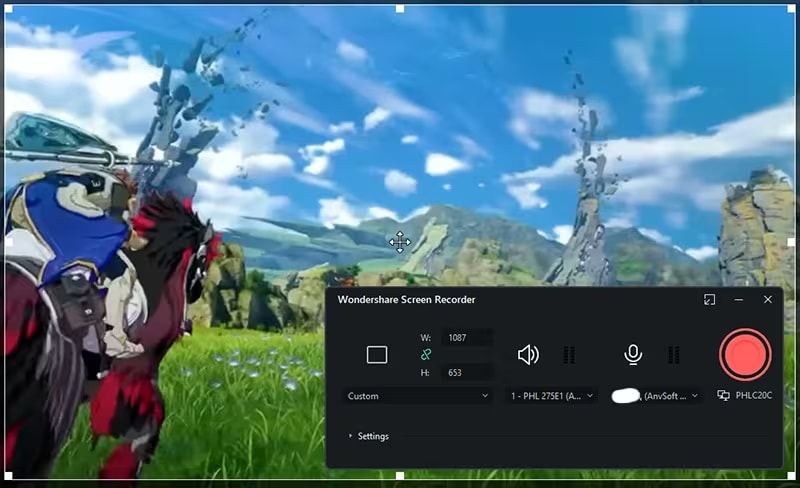
With Filmora, you can record your streams, edit them, and even share them with the members. Filmora's Screen Recorder feature has some advantages, such as:
- High-Quality Recording: Filmora allows you to record your screen in HD, ensuring your live streams are captured with crystal-clear video and audio.
- Customizable Recording Area: Select specific parts of your screen to record, so you can focus solely on the Discord stream without capturing unnecessary elements.
- Built-In Editing Tool: Once your recording is complete, Filmora lets you edit the footage directly within the app. Add annotations, transitions, or trim unwanted sections.
- Multi-Source Recording: Filmora supports simultaneous recording of your screen, webcam, and microphone, which is perfect for creating tutorials, presentations, or commentary videos alongside your Discord stream.
- Multiple Output Options: Export your recorded stream in a variety of formats, ensuring compatibility with different platforms for sharing or uploading.
To screen record your Discord stream using Filmora, you can watch the tutorial here or follow the steps outlined in the guide.
Conclusion
We've covered everything about how to create your own Discord server and make it uniquely yours. Now, it's your turn to take the reins! Customize it, fill it with exciting activities, and share your passions with every member in your server.
If you need help with creating welcome video for your Discord members, you can use Filmora. This comprehensive video editing software is perfect for creating high-quality videos and even screen recording activities in your server.


 100% Security Verified | No Subscription Required | No Malware


