Adobe Captivate is a popular Adobe video recording software in the market and you might be wondering how to use the software. If you're a newbie to this screen recorder then you are in the right place.
This article will give you a detailed guide on how to use Adobe Captivate to record screens. We will also cover a suitable alternative to recording your screen anywhere anytime.
In this article
Adobe Captivate Software Features
Adobe Captivate screen recorder as the name suggests is a powerful screen recorder for free download on Windows and Mac. This software, although originally designed to create e-learning content, provides built-in screen recording features that suit different user needs.
- It allows you to record full screen or specific areas of the screen. You can adjust the area by dragging the edges.
- It can capture screen actions like mouse movements and keyboard activity.
- This tool allows you to record voice or system audio. You can enable or disable these options as you record your screen based on your needs.
- It provides some editing features including overlays, animations, and several other interactive elements.
- It provides standards like SCORM and XAPI that make it easier to integrate your content with most learning management systems.
How to Use Adobe Captivate to Record Screens?
The following steps show you how to screen record with Adobe Captivate.
- First, download it from the official download page and follow the on-screen instructions to install it.
- Run it and head to the "File" menu. From the options given, choose the "Record Video Demo" option.

- Select the "Screen Area" to record a certain screen section, "Custom Size" to customize the section of the screen you want to record, and the "Full Screen" option to record an entire screen.

- Now, you can proceed to choose your desired recording preferences. If you want to record mouse motions, click the "Panning" option and select the respective option. Additionally, you can decide to enable or disable the system audio and microphone based on your needs.

Step 4. Now that you are satisfied with your recording preferences, it is time to start screen recording. Simply click the "Record" button and the process should start right away.

Step 5. When you are done recording your screen, press the "End" key on your keyboard or F10 to stop recording. Your recorded file will be available in the editing suite and you can trim, add transitions, and use other interactive elements to enhance the appearance of your recorded video. You can then export or publish the video!
Best Adobe Captivate Screen Recording Alternative
Adobe Captivate Screen Recorder is a useful tool but as you've seen, it does have some limitations as it has a steep learning curve and limited editing features.
You can thus explore a good Adobe Captivate screen recording alternative like Wondershare Filmora. It is easy to use and provides many features and customizations that make it easier to personalize screen recordings and share them in the best quality. With this tool, you can record anywhere and any size of your screen. You can add voice, generate background music with AI, or add your image alongside the screen recording depending on your needs.
Comparison between Adobe Captivate Screen Recorder and Wondershare Filmora
| Features | Adobe Captivate Screen Recorder | Wondershare Filmora |
| Editing Features | Provides some editing features, you may need to pay for Adobe Video Editor to further edit your screen recordings. | Provides extensive editing features(basic +advanced + AI-powered) |
| Ease of use | Steep learning curve. Not suitable for newbies. | Intuitive and easy-to-use interface. Suitable for newbies. |
| Pricing | Rigid and pricey subscription packages. | Affordable cross-platform subscription plans |
| Schedule to End Recording | Not supported | Supported |
Key Features:
- Multiple recording modes- Record webcam, screens, system sounds, and voiceover at the same time.
- Mouse clicks - Show mouse clicks in different colors to highlight the important things.
- Customize screen Size- Record any area and size of your screen. Whether you want to go full screen, specific area, or custom area.
- Powerful post-recording editing features - Plenty of audio and video editing features such as enhancing speeches, removing background noise, and generating background music automatically according to your content.
- Export videos up to 4. Enhancing screen recordings up to 4k quality and customizing the FPS and resolution.
How to Record Screen with Wondershare Filmora
The following steps show how to seamlessly screen record on Windows or Mac with Wondershare Filmora on your computer.
- Download and install Wondershare Filmora on your computer.
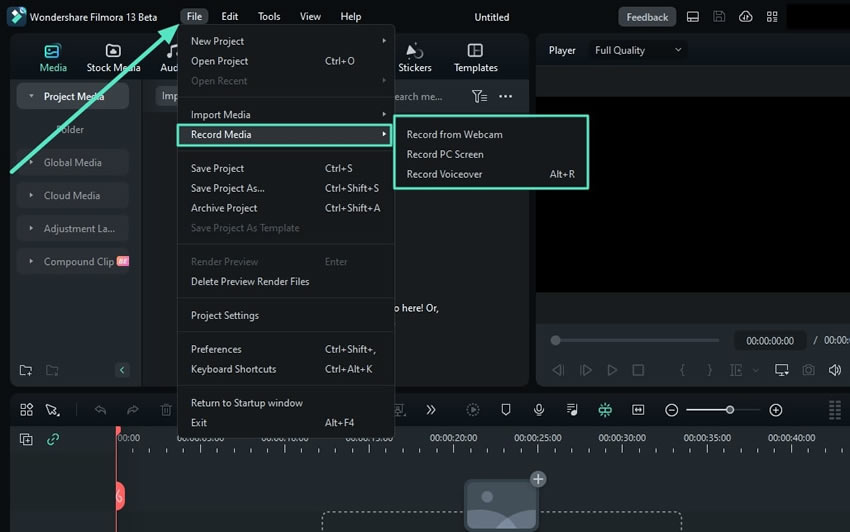
- Then, go to the "File" menu and choose the "Record Media" option. From the options displayed on your right, choose "Record PC Screen".

- Choose your desired screen size/area and enable or disable the microphone, system audio, or camera. Also, expand the "Settings" tab and choose your preferred screen recording options.

- Click the red record button to get started.

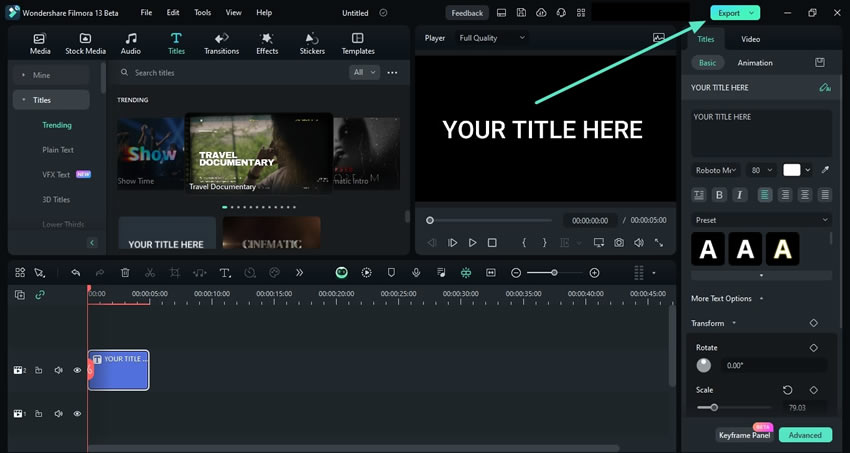
- Press F9 to stop recording if you use the default hotkeys, then click the "Export" button and choose your preferred output options.

Conclusion
Adobe Captivate screen recorder is a wonderful screen recording tool you can use for a variety of applications. However, it lacks extensive screen recording options and can limit you to educational or low-frame rate screen recording needs. This is where alternatives like Wondershare Filmora can come in handy to give you the best screen recording experience and more! It's another wonderful tool with an array of recording and editing features that make it a perfect screen recorder for virtually any use case.
FAQs
-
What is Adobe Captivate best used for?
Adobe Captivate is good for screen recordings that do not necessarily require high frame rates. It is often used to create educational or tutorial content. This is also due to its ability to easily integrate with most learning management systems. -
Is Adobe Captivate free?
Adobe Captivate is not free. This is a subscription-based tool with several subscription models for different needs including individuals, teams & Enterprises, and education. And the individual monthly plan costs $33.99 per month, which is quite expensive. -
Which is better, Captivate or Camtasia?
While Captivate and Camtasia are both video editors and screen recorders, their varying individual capabilities mean one is better than the other in some aspects. Captivate for example has more features and is best for creating interactive demos. Camtasia on the other hand has limited features to set up interactive demos. However, Camtasia is good if you need quick videos.


