"What is the best screen recording software for Windows 7?" - Quora
Although Microsoft ended support for Windows 7 for a long time, many old Windows 7 users still exist. If you are among vintage tech enthusiasts who don't want to say goodbye to Windows 7 but still want to record the screen, you are in the right place!
Keep reading and explore top screen recording software for Windows 7 and learn how to use them to record on Windows 7 step-by-step.
Looking for screen recorders for Windows 10?
In this article
How to Pick the Right Screen Recorder for Windows 7?
Choosing the right screen recorder for your Windows 7 is a process and you should go through it step by step, so you can be sure that the final choice is effective and gets you a result like any other operating system.
- Determinate the Purpose: The start point would be why you need to record your screen. Is it for tutorials, gameplay, or business?
- List the Features: List the features you'll need for this action. Decide you need to record the screen, and audio, or also need to record with a facecam?
- Explore the Options: Quickly research and find software that supports Windows 7 and look into them.
- Check System Requirements: Make sure your PC meets the software requirements (CPU, RAM, storage), and try to find a tool that won't overload your system.
- Explore the Software: Look into the software and how well you can navigate it, especially if you are a beginner. Explore features, test video quality, and see if everything is working on all fronts.
- Explore Editing Capabilities: If you need them for this task, it's good to have at least basic video editing options in the screen recorder.
- Review Additional Aspects: Check for FAQs and the support system of the chosen solution. Explore online tutorials and forums for more insights, and don't forget to check reviews and ratings and maybe some helpful articles.
- Pricing Plans: Check the price plans and your budget.
- Make a Final Decision: After a thorough investigation, based on what you have, make a final decision, start recording your screen, and unlock the power of your old Windows.
Best Screen Recorders for Windows 7
Let's start with the most secure screen recording software on Windows 7.
Wondershare Filmora
Started in the early 2000s, Wondershare Filmora is one of the most renowned video editing software in the market. It also offers powerful screen recording features and is compatible with Windows (from Windows 7 to Windows 11 or later) and Mac.
You can capture any area of your screen with the audio option to catch audio from both the microphone and the system, and you can use RecordTimer, in case you are not near your device to finish recording. Also, it doesn't limit the screen recording time and videos you have recorded.
In addition to being a free screen recorder for Windows 7, it has plenty of video editing features, whether you want to enhance voice recordings, trim recorded videos, or convert speeches to texts.
As software is installed on your Windows 7, you can be safe and sure that your screen recordings are protected and of high quality.
How to Screen Record on Windows 7?
- Download and install Wondershare Filmora on your computer.
- Launch Filmora and choose the Screen Recorder on the start menu.

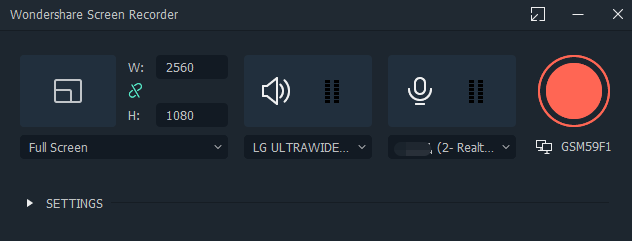
- You will see Filmora Screen Recorder with adjustable settings, and there you can choose screening area options – Full Screen, Custom, and Target Window. You can also adjust the microphone and audio settings from there.

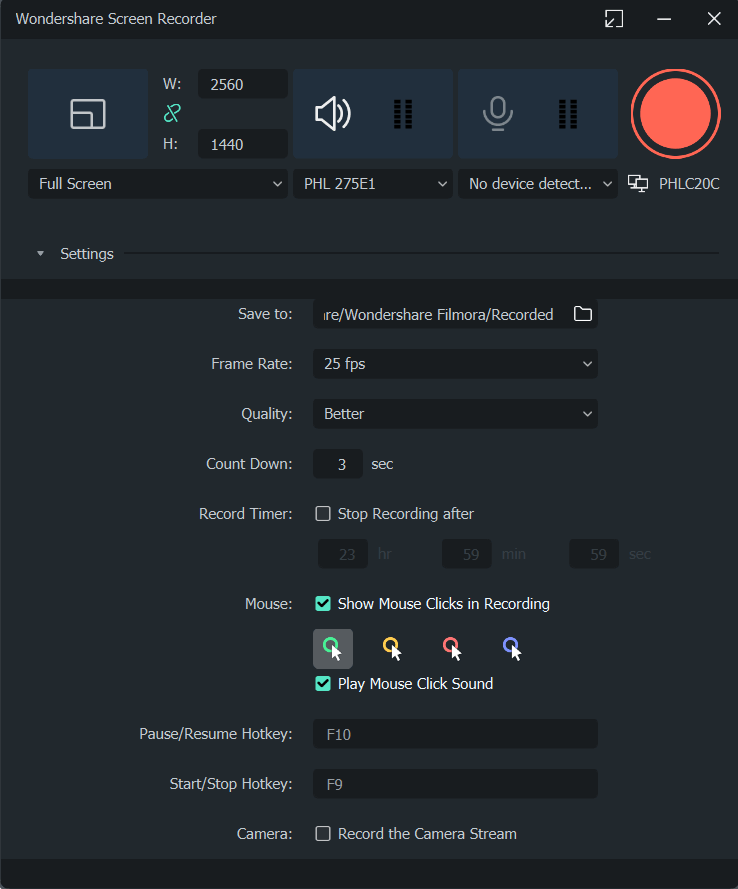
- When you select the Settings icon in the lower right corner, you can adjust the additional settings, like Frame Rate, Count Down, Record Timer if needed, and Mouse settings. And voila, you can start capturing your screen!

Powerpoint
PowerPoint has a built-in screen recorder functionality that you can use to record your screen on Windows 7. This screen recording option is unbelievably easy, and you probably were unaware of its existence so far. Perfect solution for tutorial creation in PowerPoint for educators and more traditional businesses.
How to Screen Record on Windows 7 with PowerPoint?
- Launch your PowerPoint and create a new presentation. Then click on the Insert tab and choose the Screen Recording option. You can also use a keyboard shortcut: Windows Key + Shift + A. Then your mouse pointer will change into crosshair too, so you can use it to select the area of the screen you want to record.
 Note:Be aware that the screen recording function records both audio and mouse pointer by default, so you will have to turn them off by simply deselecting Audio and Record Pointer.
- If you are done adjusting settings, click the Record button and start recording. You can also use a shortcut Windows key + Shift + R. Once you are done with screen recording, click the Stop button or press the shortcut Windows Key + Shift + Q, and save the recording by right-clicking on the shot, then select Save Media As, choose the name for your recording and the file location, and hit Save.

Best Screen Recorders for Windows 7 Online Free
Online screen recorders are always a good option for computers with old versions like Windows 7. We have picked 2 solutions for you. Let's dive in.
RecordCast
RecordCast is an easy-to-use online screen recorder for Windows 7, perfect for video call recording, presentations, tutorials, webinars, and gameplays. It has three recording modes and is considered a safe online screen recording solution.
How to Screen Record on Windows 7 with RecordCast?
- Go to the RecrodCast website and choose the Record Free Now option. Choose a recording mode from the three options, and click Next Step.

- Select the recording area and click on Start Recording to proceed with screen capturing.

- The next stop is the RecordCast built-in video editor where you can apply quick basic edits to your capture.

- It's time for you to download your screen capture, but before you do, give a Video Name and choose the Video Quality.

123apps Online Screen Recorder
123apps online screen recorder is an easy and free-to-use screen recorder for Windows 7. It can be used to record webcam, screen, and audio at the same time.
As a powerful online toolbox, it can not only record screens but also make further video edits on the same website.
How to Record Screen on Windows 7 with 123apps?
- First, go to the 123apps website and click the Start Recording button.

- From there, you can choose recording options; when you do that, click the Next button.

- Press the Record button to start recording your screen.

Best Screen Recorders for Windows 7 on Chrome Extension
Choosing a Chrome extension to record on Windows 7 is also a good option, which is light and won't overload the computers.
Awesome Screenshot
Awesome Screenshot is a Chrome extension that can record videos and take screenshots simultaneously. It's a simple and convenient tool for Windows 7 users, especially if you like to take screenshots during the recording and save them as a note for later use.
You can easily zoom in and out, capture, mark up, and save selected areas in a second.
How to Screen Record on Windows 7 with Awesome Screenshot?
- Add the Awesome Screenshot extension to your Chrome and select it from the Extensions tab.
- Follow the instructions to install it to the chrome successfully and click Try Recording Now.

- Screen recording options will pop up, and you can choose the one that suits you. From there, just click Start Recording. Additionally, next to the Record tab on the left side, you can see the Capture tab, where you can adjust screenshot options.

- After you start a recording, you will be able to select what you want to share from your screen, and after that, your screen recording process will start.

- Click the button to stop recording.

Screencastify
Screencastify is a popular Chrome extension that works perfectly on Windows 7. It's a fantastic tool for educators and teachers with various interactive features, including an annotation tool.
With this extension, you can easily record a screen, webcam, or both simultaneously, and it is perfect for creating interactive questions or analytics.
How to Screen Record on Windows 7 with Screencastify?
- Add the Screencastify extension to your Chrome and start by clicking on it. You will open a small window with recording settings. After you adjust the, simply click the Start Recording button.

- During the recording, in the bottom left corner of your screen, you can add annotation, pause or stop recording, etc.

- After you finish the recording, you can edit the captured video directly from your browser.
Conclusion
In this article, we've discussed several screen recording software for Windows 7 and we also provide step-by-step guidance to teach how to use them. We suggest you first try Wondershare Filmora as it has wide compatibility and doesn't limit the screen recording time.
If you don't want to install third-party software, there are also many online screen recorders you can choose from.


