You might've come across the idea of adding some personal pictures to your heartfelt audio message to your loved one. When this comes up, it is important that you have the right tool that will make the process run smoothly whilst it still gives the best quality.
The process to add photos to audio makes not only the file presentation interesting but also enables the delivery of more emotion and context to the user. This article will show you how to add photos to audio files, what options to choose and what to consider to get professional effect.
In this article
Part 1. Factors to Consider as You Add Photos to Audio
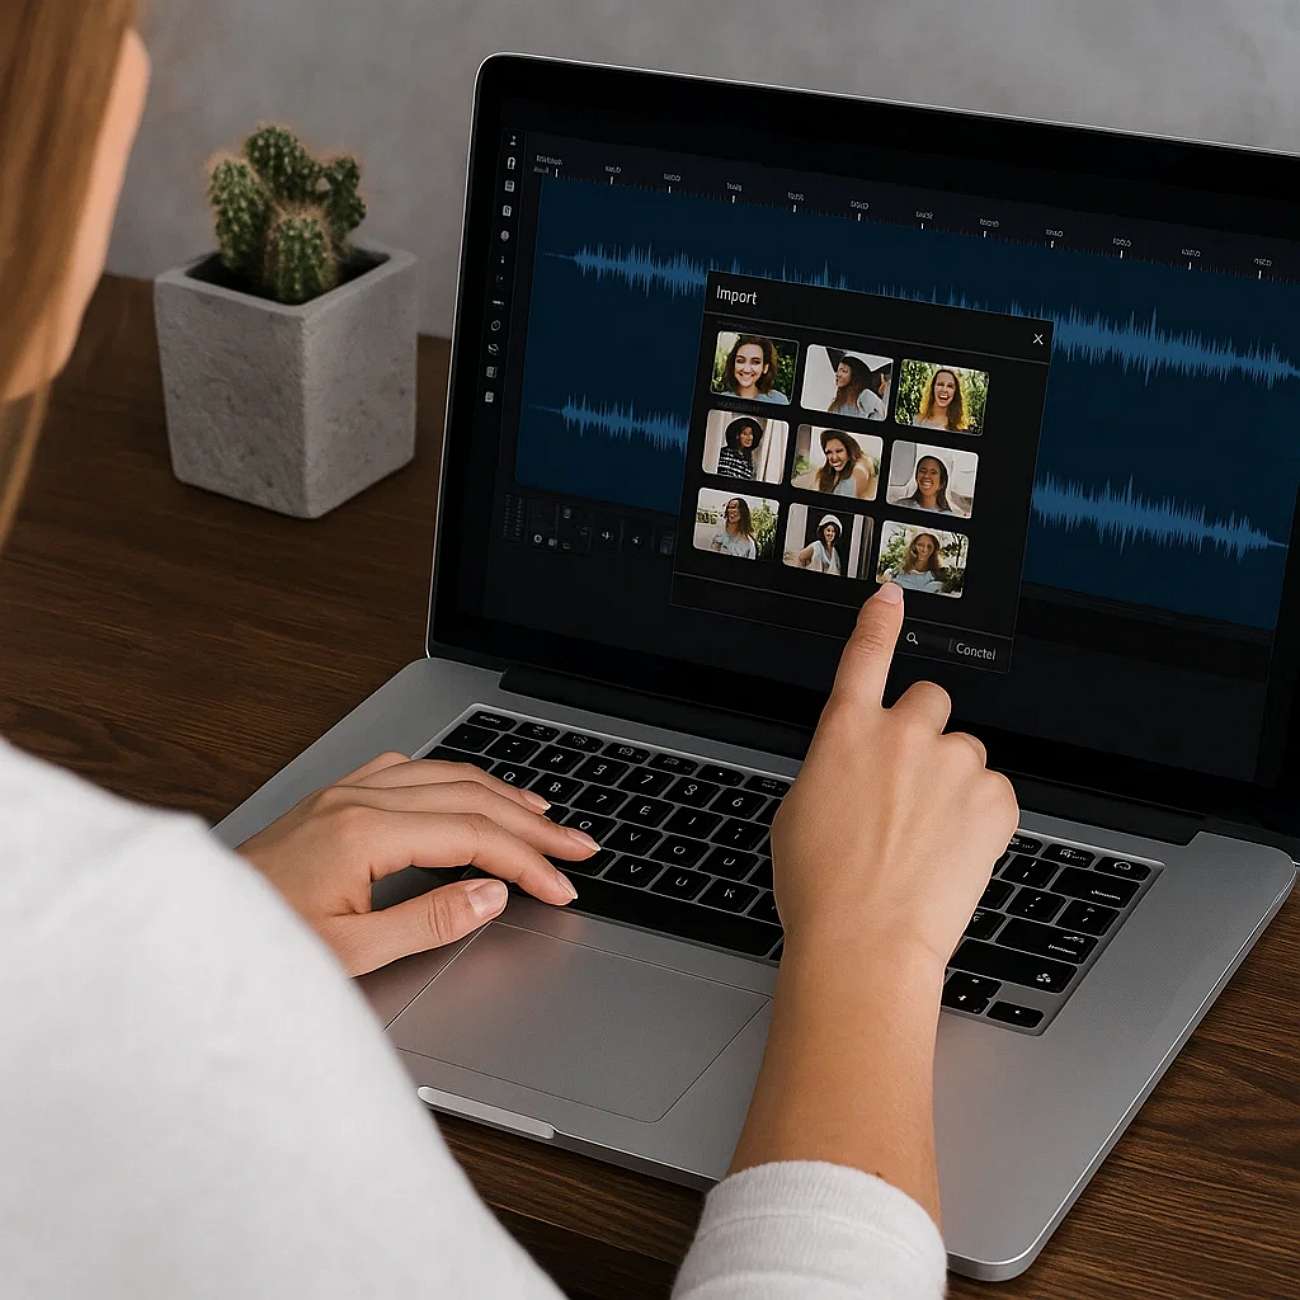
Before we dive into how to add photo to a voice recording or other audio files, you must consider the factors to consider before you perform the procedure. Here are some of the top factors you need to keep in mind as you start adding images to audio files:
1. Audio Theme to Match Image
Ensure the picture you choose will fit the mood, theme, or the branding of your audio to ensure it becomes a stable storytelling process. The wrong picture could attract the attention of the listeners and break up the emotional appeal present in your speech.
2. Align Duration of Audio and Image
Match the time of the photo and the duration of your audio to make your viewers feel an uninterrupted performance. When multiple images are used, they should be changed according to the audio changes or significant moments.
3. Keep the Right Aspect Ratio
Maintain your image in common aspect ratios such as 16:9 or 1:1 to get it to appear in a proper manner on any platform. Other images are distorted or cropped, which minimizes the quality and participation.
4. Use High-Resolution Formats
Use the best quality format, like JPG or PNG, to maintain quality and clarity of visuals. Images of low resolution are at risk of being pixelated, particularly when viewed on large displays or in HD video.
5. Add Overlays or Text
Add overlays, subtitles, or captions to give additional context, such as the name of speakers, lyrics, or episode titles. This will be valuable to viewers and can be instrumental in making the contents interesting.
6. Sharing Optimization
Save your final file with platform specific settings, resolution, bitrate, and format (e.g. MP4 on most video sharing sites). It will make your content professional-looking and do well in the intended platform.
Part 2. Top Desktop and Mobile Tools to Add Photos to Audio Files
Now that you are aware of the factors, here is a list of tools you can consider to figure out how to add a picture to an audio file:
Flixier
Flixier is a web-based solution where uploading images to audio files is an easy task. The timeline features drag-and-drop capability that allows you to organize the audios, videos, and images. Your projects will be rendered in minutes with its cloud processing, making it great for casual and professional users. In addition to adding photos to audio, Flixier provides capabilities to add transitions, motion effects, and others to make your visuals better.

Key Features
- It supports multiple file formats when it comes to both images and audio files.
- Users can crop, rotate, and apply filters to the image and audio media content they create while using Flixier.
- Before adding images to the audio file, manage the audio file's properties, such as its volume, fade-in, or fade-out.
Kapwing
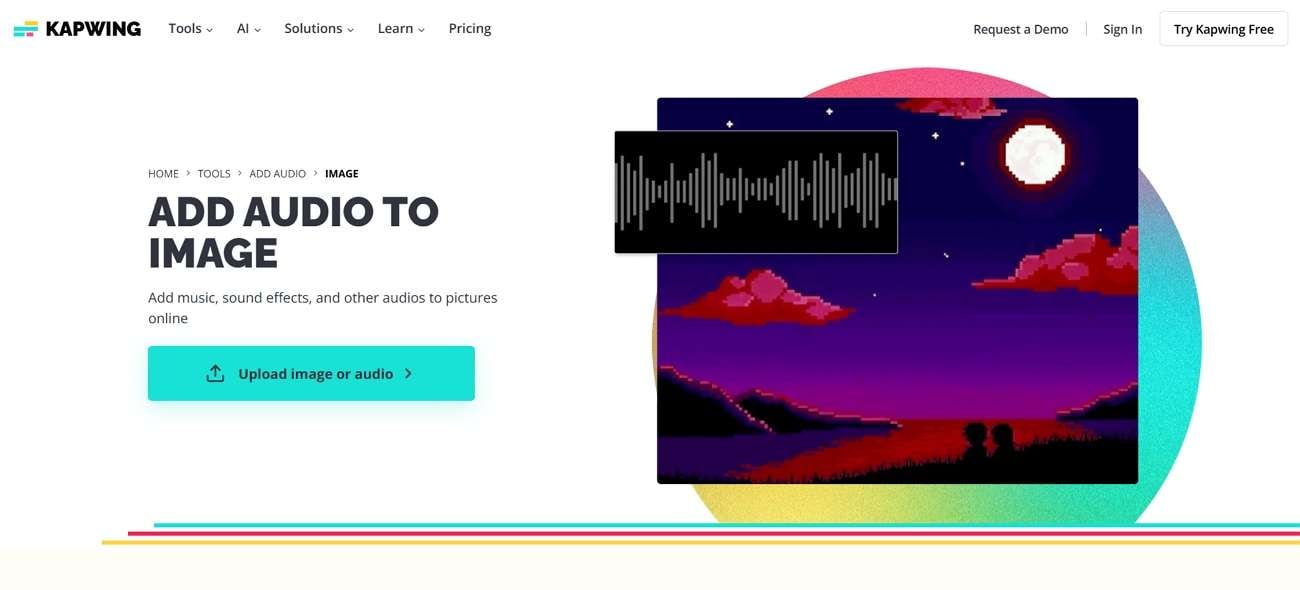
With this tool, upload your chosen audio track, add your images, and adjust the duration so the image stays perfectly in sync with the audio. Its real-time preview feature helps you fine-tune the alignment of addingphotos to audio files before exporting. Kapwing also provides creative options like adding multiple photos, animations, and custom text to make your audio visually appealing.
Key Features
- Its integrated cloud-based system allows users to upload and combine audio and image files quickly.
- The user has the option of using the supplied library of royalty free music or sounds effect while making their creations.
- You have the ability to export directly to your social media platforms.
echowave.io
The platform is easy to use, and users with no editing experience can make an excellent-looking media content in several minutes. Among its highlights, it has the option of adding animated waveforms to your picture giving the end result a more dynamic feel to it. Echowave.io is useful to podcasters and musicians who wish to provide their audio with a powerful visual component by figuring out how to add pictures to a voice recording.

Key Features
- You can utilize the built-in audio trimming feature to manage the length based on the images you are using.
- Users have the ability to manage the properties of the audio files, like their volume, fade-in, or fade-out feature.
- Echowave allows you to add in-text overlays to your audio and image files.
Picture Audio Maker [Android]
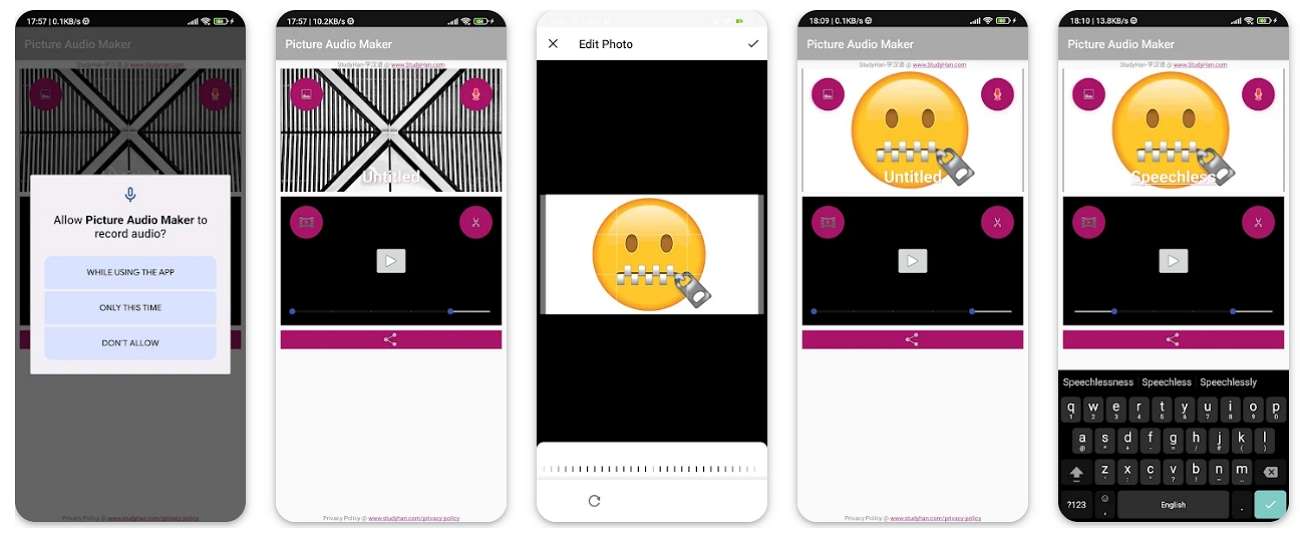
Picture Audio Maker is a lightweight Android app dedicated to adding a photo to audio in a few simple steps. You can quickly import a photo from your gallery, choose an audio file, and merge them into a single video file for sharing. It also supports basic customization, like adjusting image duration to match audio length and selecting different output resolutions.
Key Features
- You can record your audio directly into the app and pair it with your chosen image.
- Users are given the ability to crop and adjust the image they picked before they add it to the pairing.
- It allows you to share your creation with different cloud-based systems to avoid data loss.
Add Audio to Video & Photo [Android]
The app has several output formats and output resolutions where the content can be easily prepared to suit various platforms. If you only want a mobile-friendly app to simply add a photo to audio, this is fast, quick, and efficient enough not to overload you with more functions. In addition, it is possible to cut audio or move times around to make them synchronize with your picture.
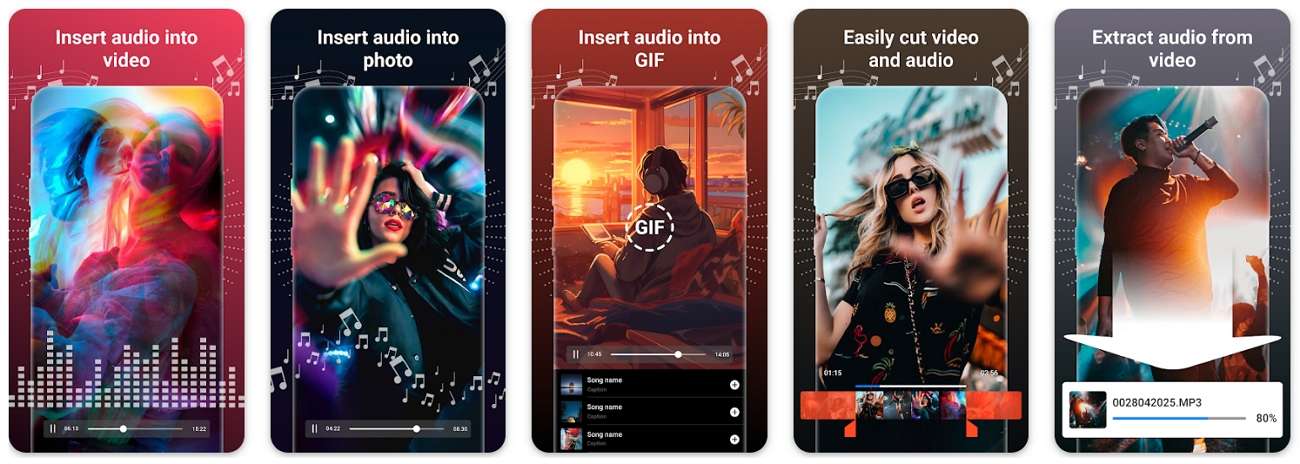
Key Features
- Users get the ability to merge, trim, and extract audio files from existing video files.
- It does not restrict you to adding static images; you can also add GIFs or animated content.
- Once you are done editing, the tool allows you to get a quick preview of your work.
CapCut [Android/iOS]
CapCut allows users to upload videos and then extract the audio from them to add images to the extracted audio file. It has developed editing features to change length, use filters and transitions. This enables you to turn a plain picture and audio file into a professional-looking video. Once you know how to add pictures to audio files with the help of CapCut, you can embed your work on a number of platforms.

Key Features
- The integrated AI-powered audio denoise feature allows you to enhance the audio quality before adding images to it.
- Provides users with a huge asset library, giving them the freedom to take control over the media files.
- To further enhance the audio and image file, utilize the auto-captions feature to improve the viewing experience.
Part 3. Advanced Method to Add Photos to Audio Using Wondershare Filmora
Going through these tools, you might have come to the realization that most of them do not provide you with a smooth process for adding photos to audio files. Therefore, this section will introduce you to Wondershare Filmora, which allows users to work on individual audio files and add images to them while performing advanced editing features. Its audio-to-video feature will enable you to utilize the integrated AI technology to get a head start with your creation.
Its compatibility with all mobile and desktop devices makes it an even more effective tool, whether you're editing on the go or using your PC. You can extract audio from video files and use them individually, which allows you to enhance the audio files through AI tools as well. In short, Filmora leaves you satisfied with a clear set of audio and image files.
Using Filmora Desktop
Let us dive into the methods you can perform using the Filmora software on your PC to add photo to audio media files:
Method 1. Manual Process
The initial method is to perform it manually by importing an audio file, thus, read the steps below for a better understanding:
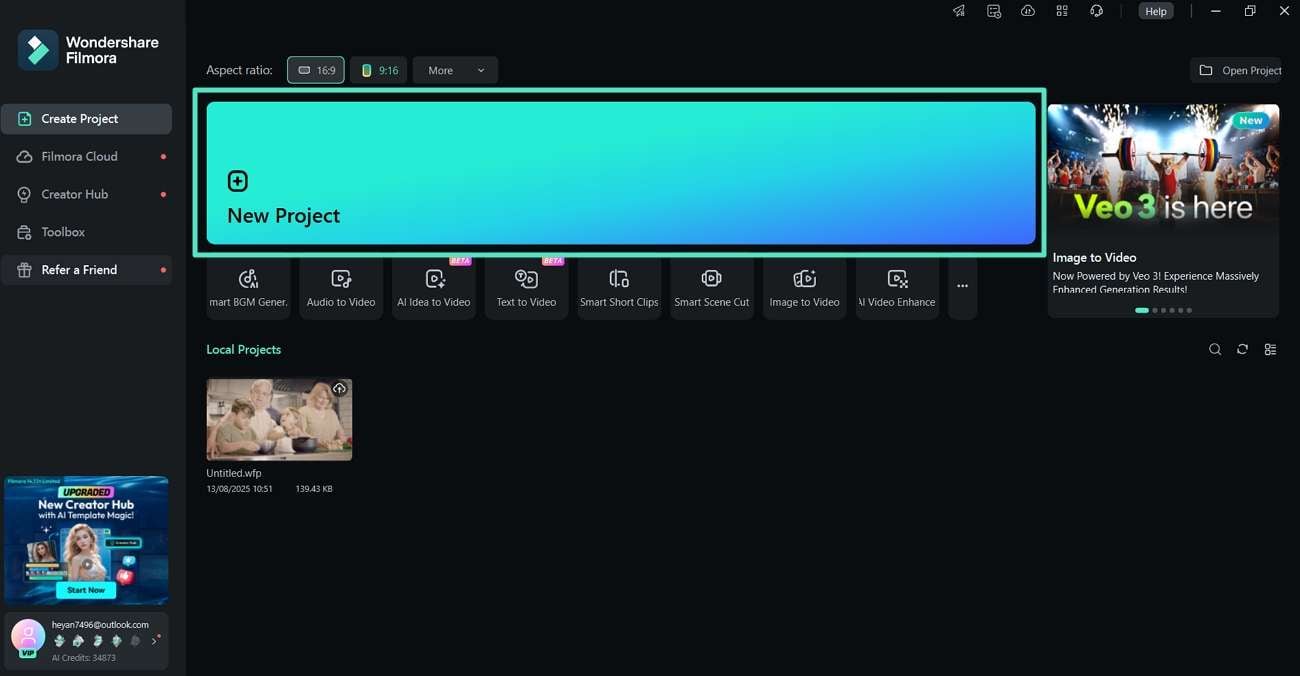
Step1Create New Filmora Project.
Initiate the process by launching Filmora on your PC and clicking on the "New Project" to import the audio file.
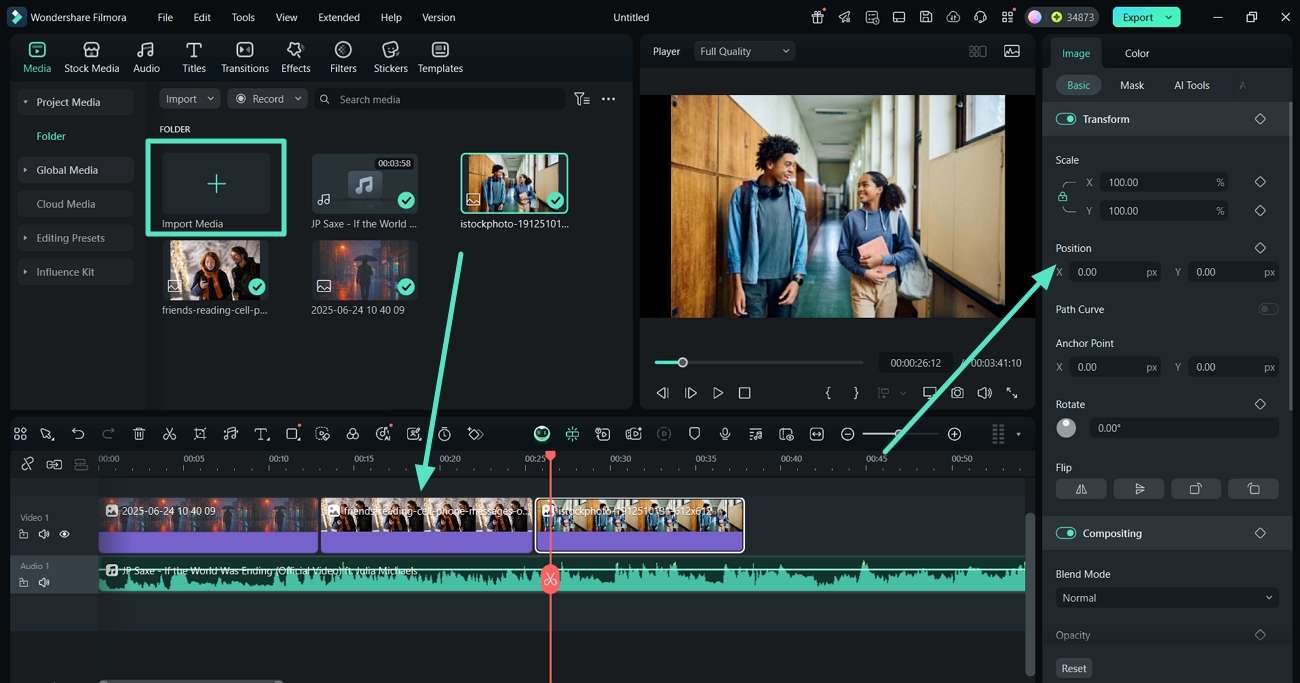
Step2Click Import Media to Add Images to the Audio.
At the editing interface, click on "Import Media" under the "Media" section to add the images you want to use. Edit the properties of the media files in the right panel once you drag them to the timeline.
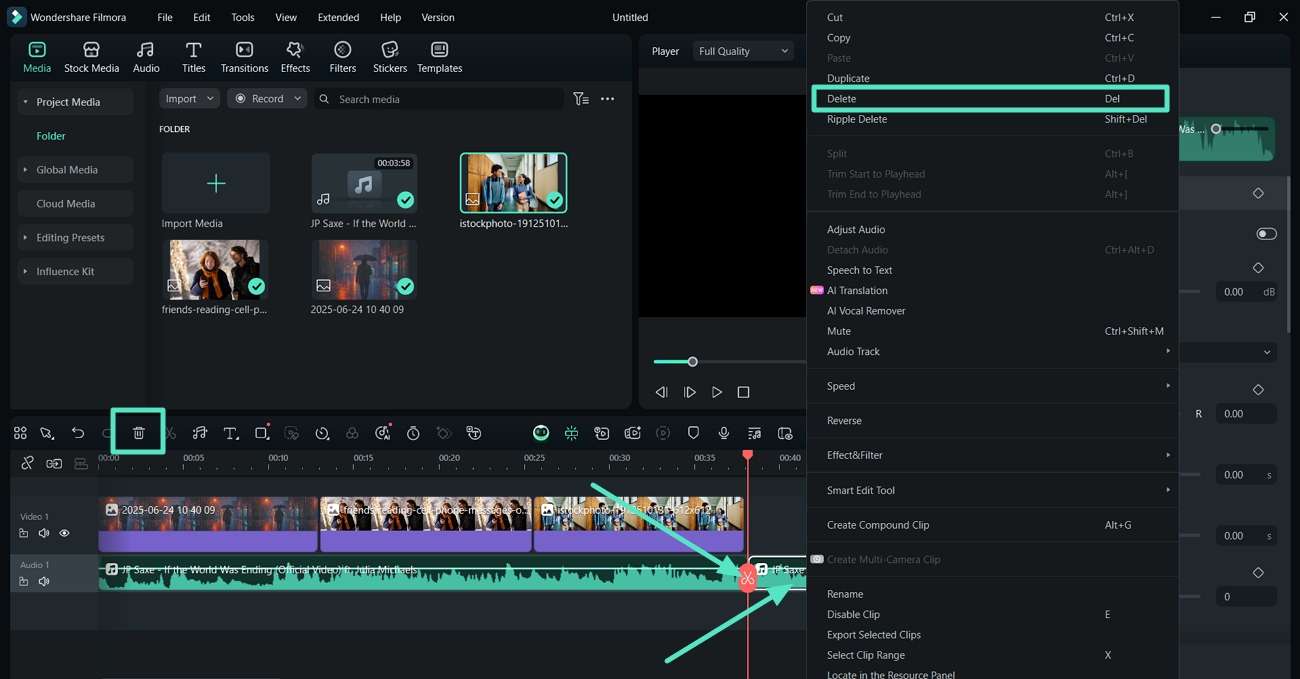
Step3Adjust the Position and Manually Trim Extra Audio Section.
Moving on, adjust the position and set the "red keyframe" on the point of the audio you want gone and hit the "Scissor" icon. Next, right-click on the unnecessary audio and choose the "Delete" button from the drop-down menu or simply hit the "Trash" icon in the toolbar above the timeline.
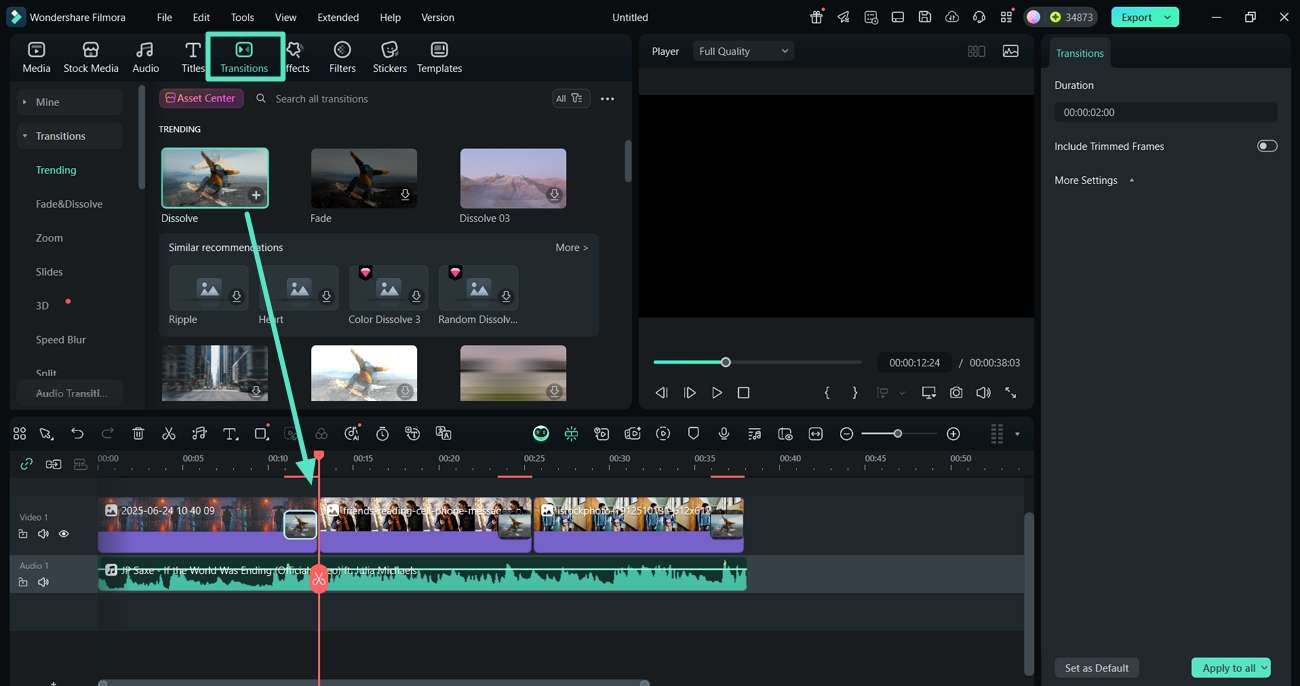
Step4Insert Transitions Between Each Image for a Smooth Flow.
Shift to the "Transitions" section to pick a choice and apply it next to each image.
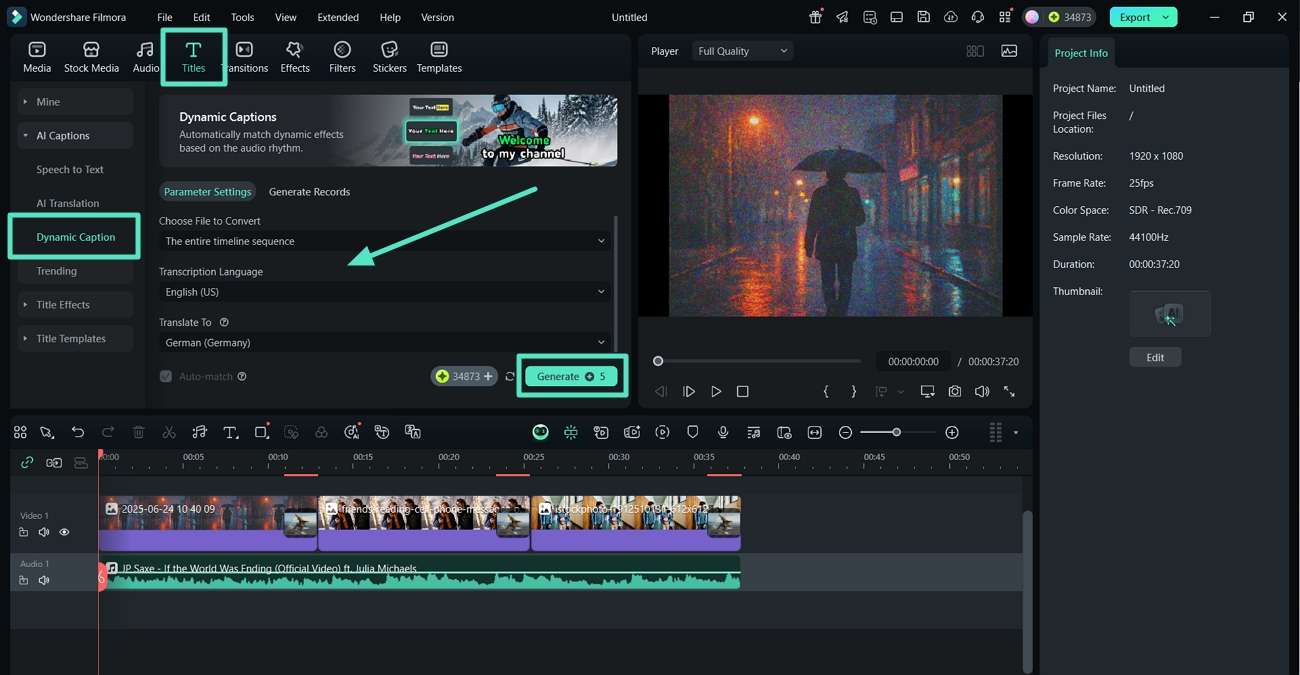
Step5Generate Dynamic Captions for the Audio and Image Media.
Now, jump to the "Titles" section, choose "Dynamic Caption" and hit "Generate" once you enter the details.
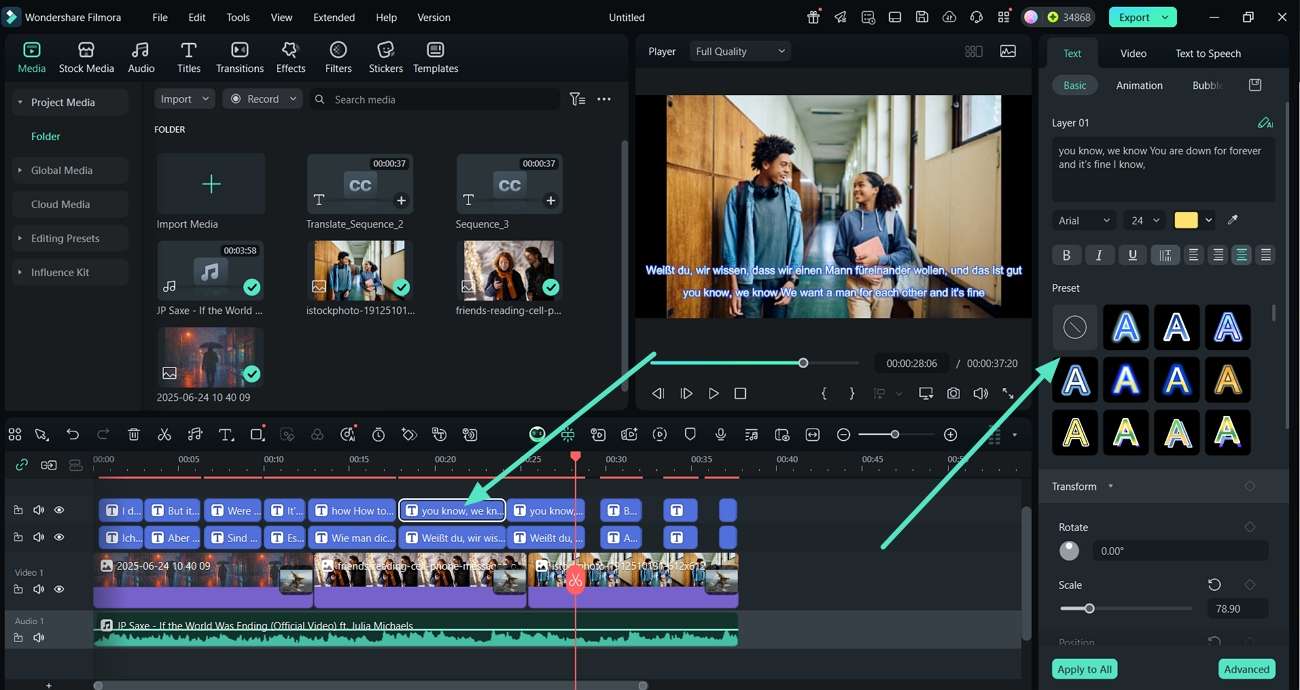
Step6Edit Dynamic Captions Text Properties.
Once the captions are generated, click on them in the timeline and start editing their properties in the right "Text" panel.
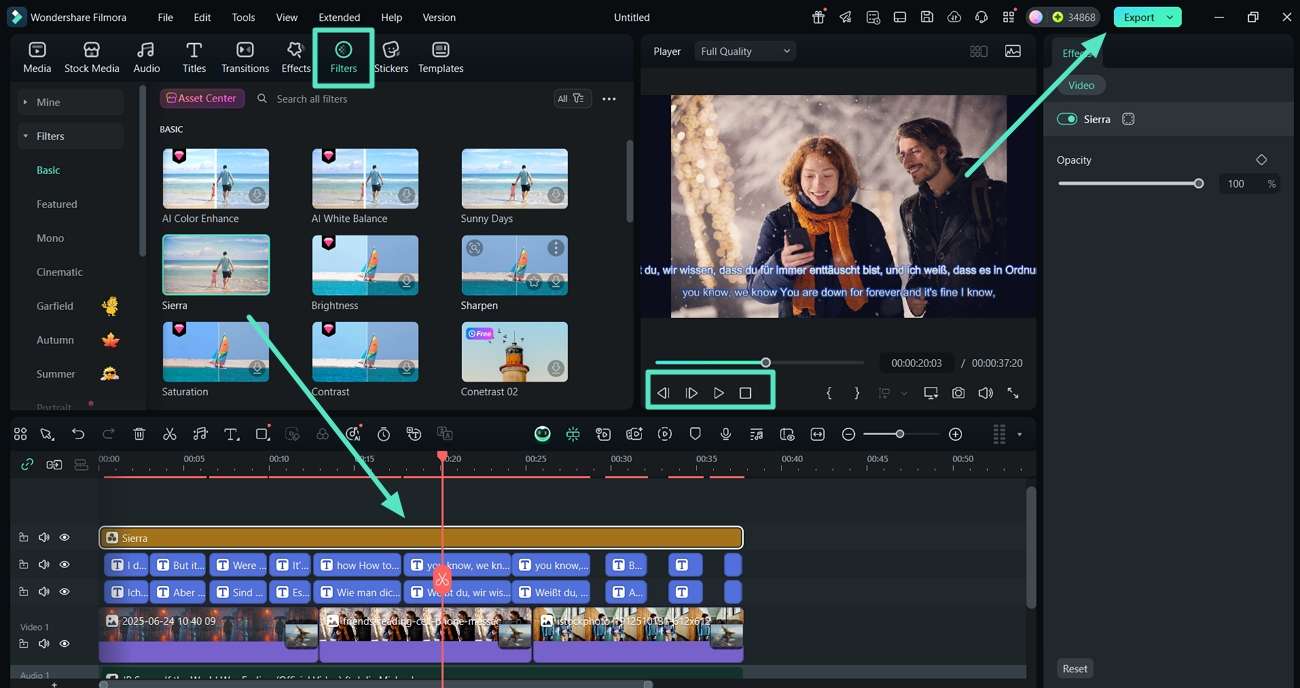
Step7Enhance the Overall Visual of the Video and Export it.
Coming towards the end, to smooth out the entire video, leaving it with a similar theme, apply a filter from the "Filters" section. Finally, "Preview" the video and tap on the "Export" tab at the top right corner to download the Audio and Image video results.
Method 2. Using Audio-to-Video Process
Another method to add images to an audio file is through the Audio to Video feature in Filmora. Read into the straightforward instructions below to understand the process better:
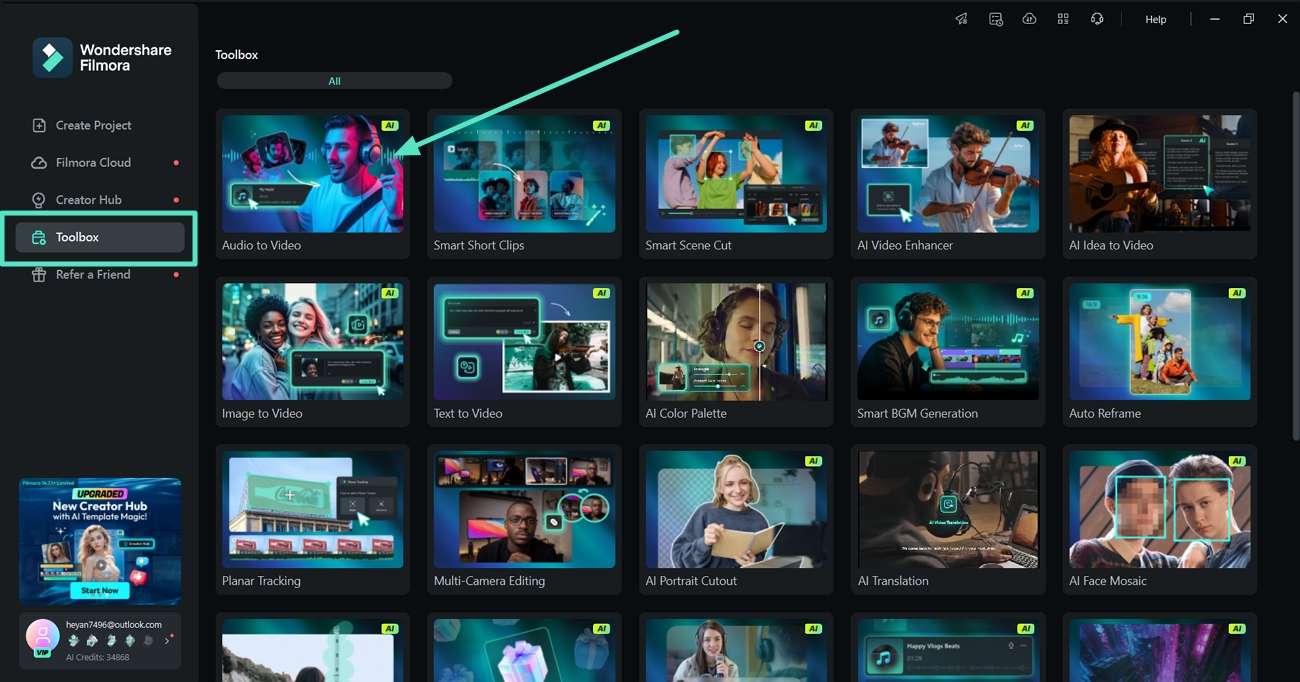
Step1Locate the Audio to Video from Filmora Toolbox.
Upon launching the tool, shift to the "Toolbox" tab and pick the "Audio to Video" tool to start the process.
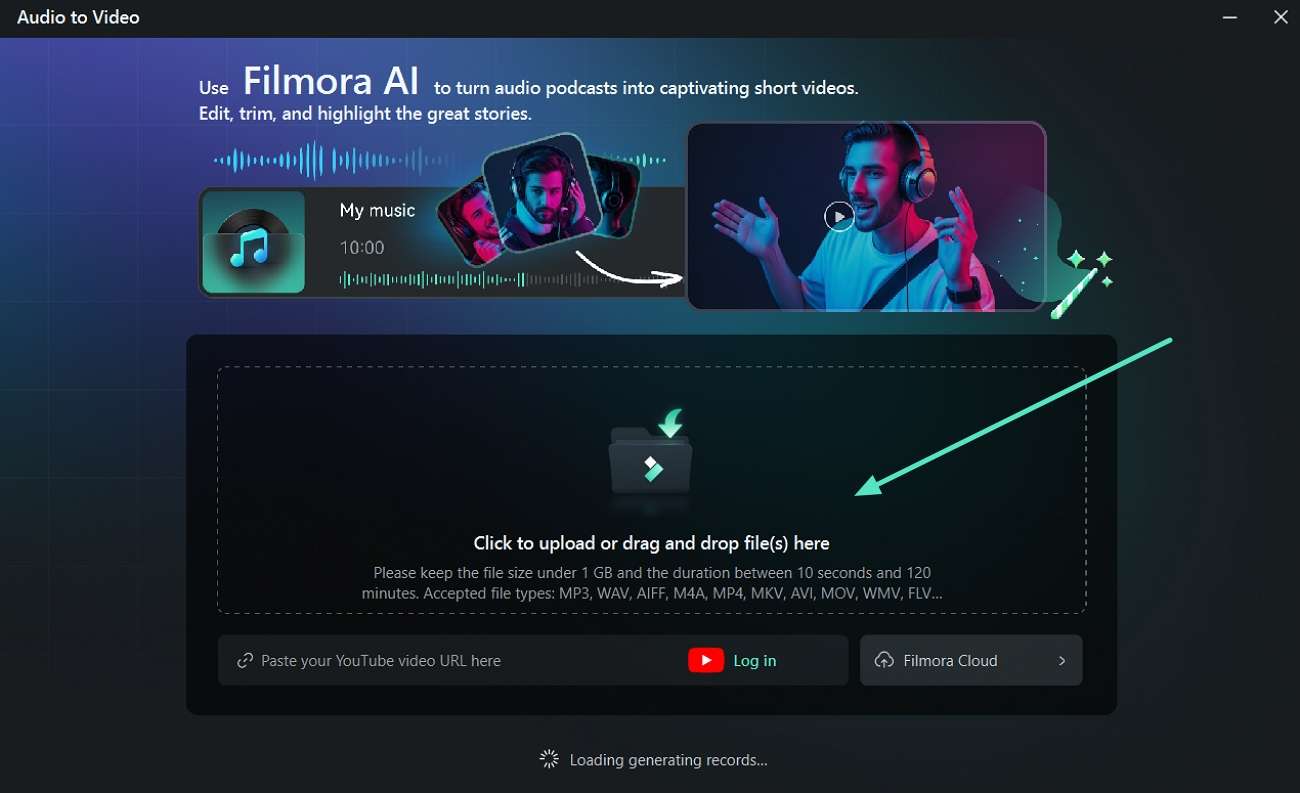
Step2Upload Audio File or Add URL.
At the Audio to Video pop-up box, drag and add the audio file to the "Upload Section" or add a URL of the audio file you want to use.
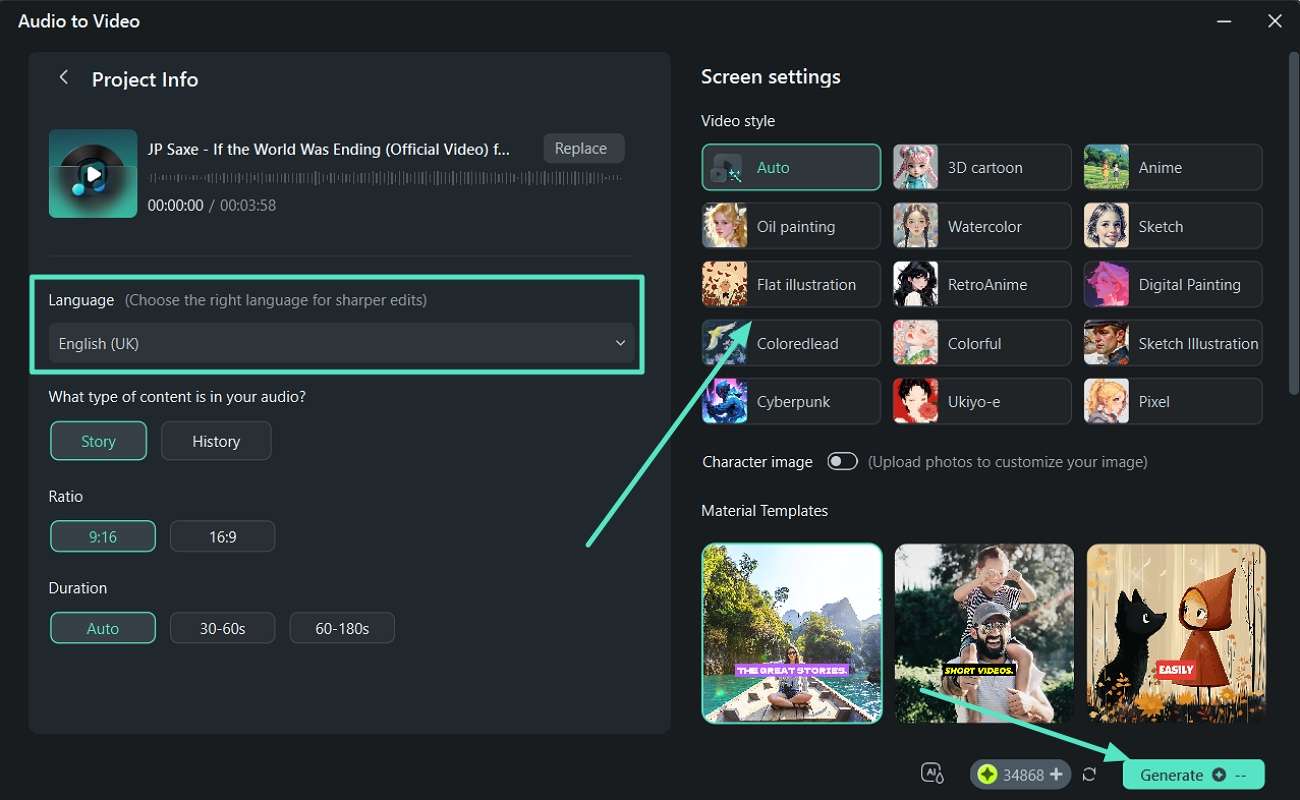
Step3Choose the Language Preferences and other Properties to Hit Generate.
Once the audio file is uploaded, click the "Language" tab to choose the language spoken in the audio. Next, set the "Video Style" and hit the "Generate" button to start the process.
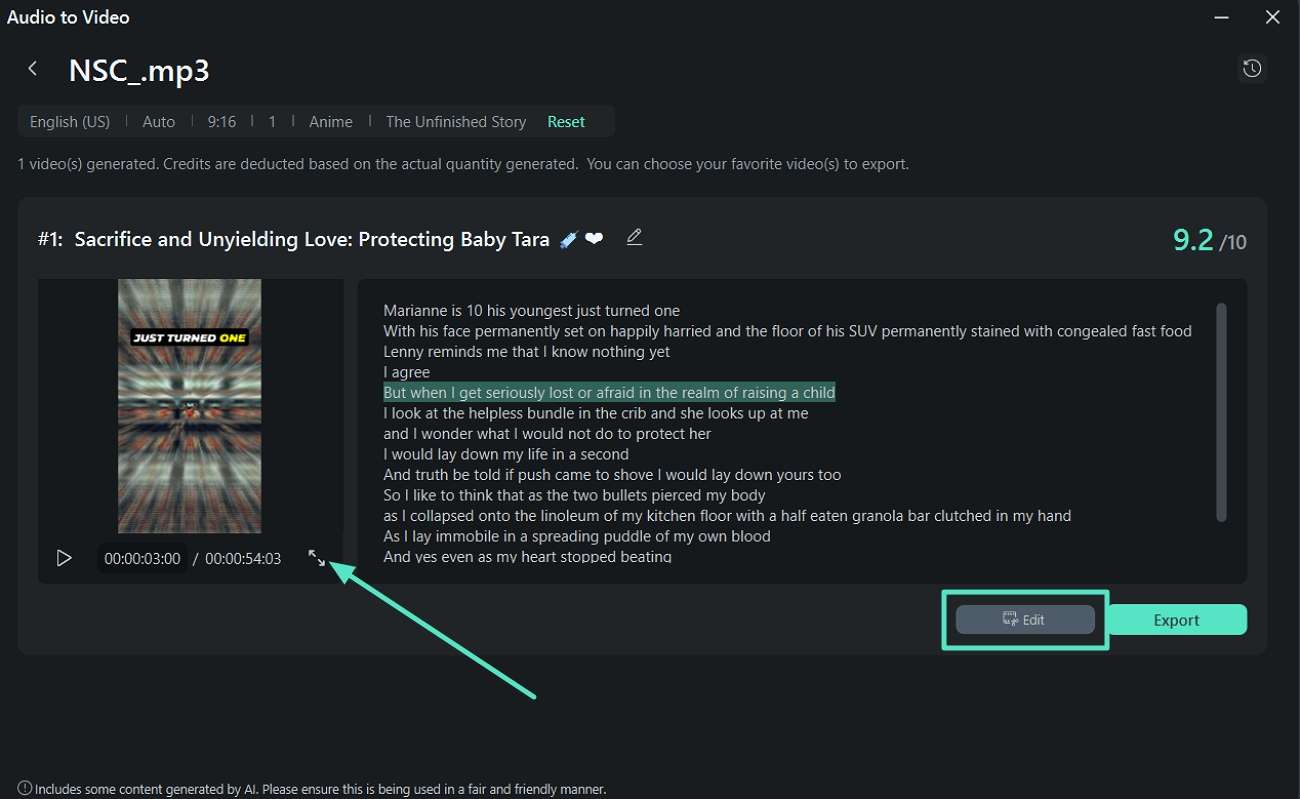
Step4Move the AI-Generated Video with Images to the Editing Interface.
Moving on, "Preview" the video generated and hit the "Edit" button to perform further changes.
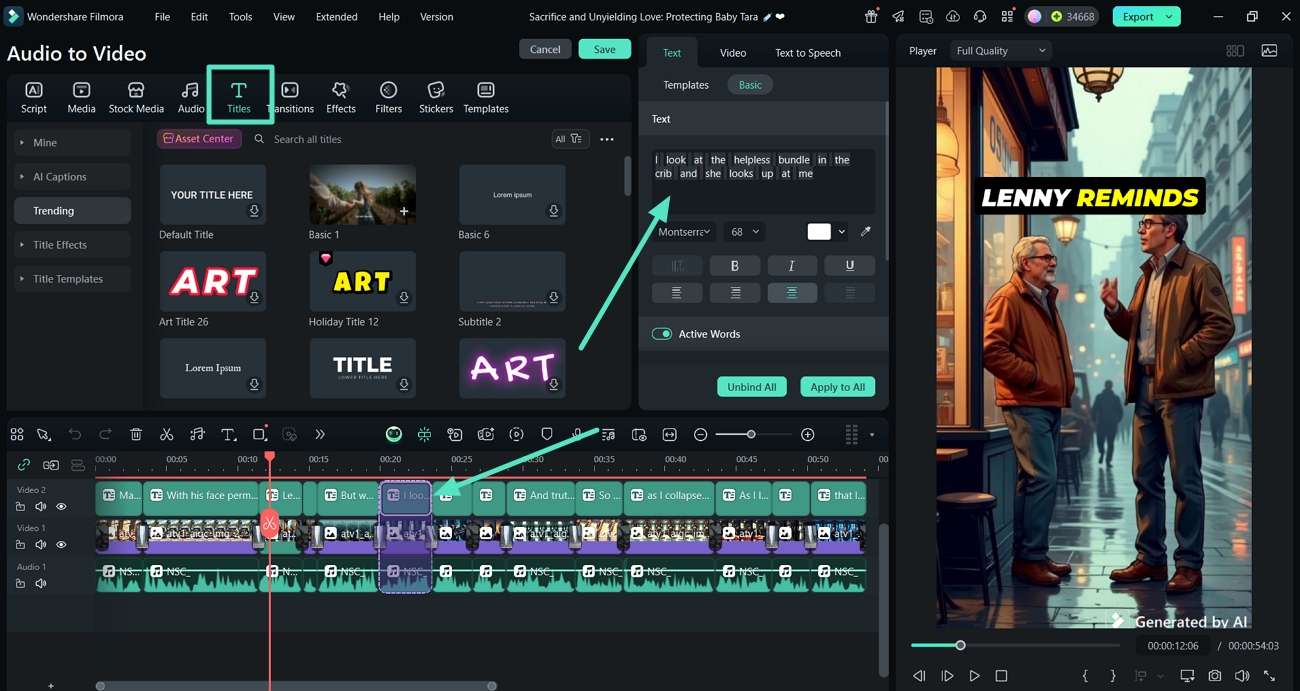
Step5Select the Text and Alter its Properties.
Now, click on the "Text" in the timeline and shift to the left panel to edit the text properties.
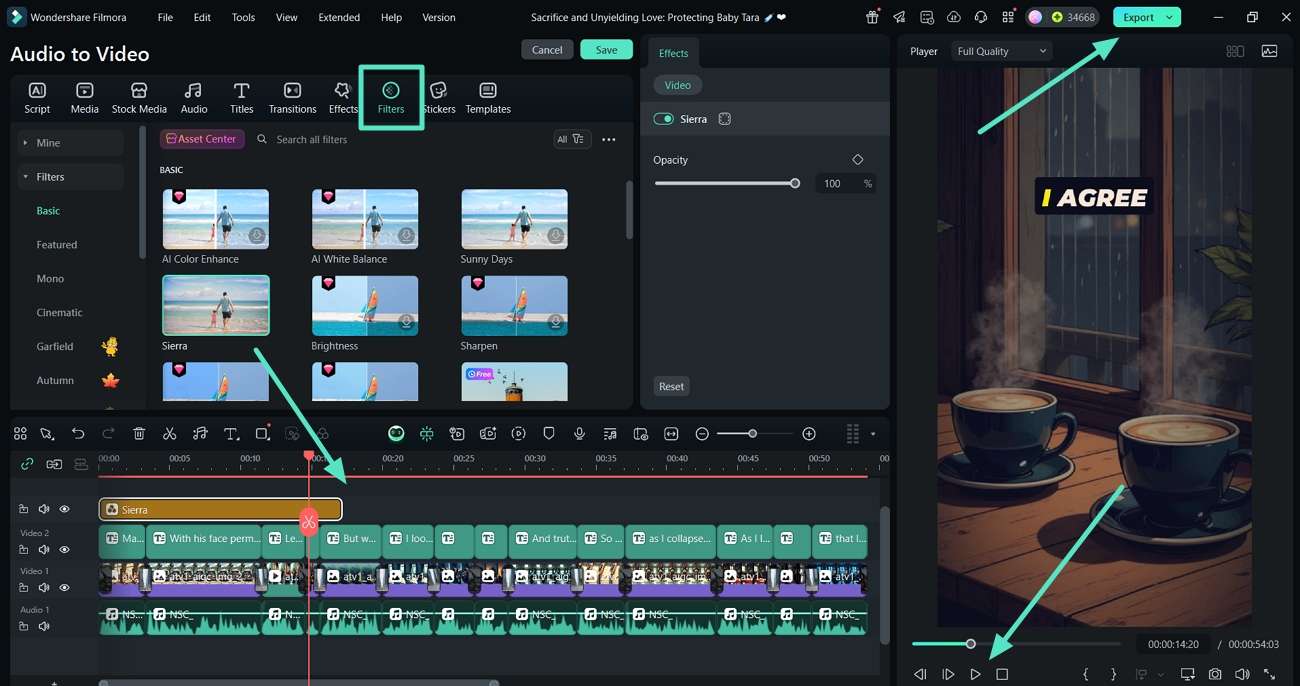
Step6Apply Filters to Improve Video Outlook.
Shift to the "Filters" tab, hit the "+" icon on the filter that best suits your needs. Next, "Preview" the video and click on the "Export" tab at the top right corner of the window.
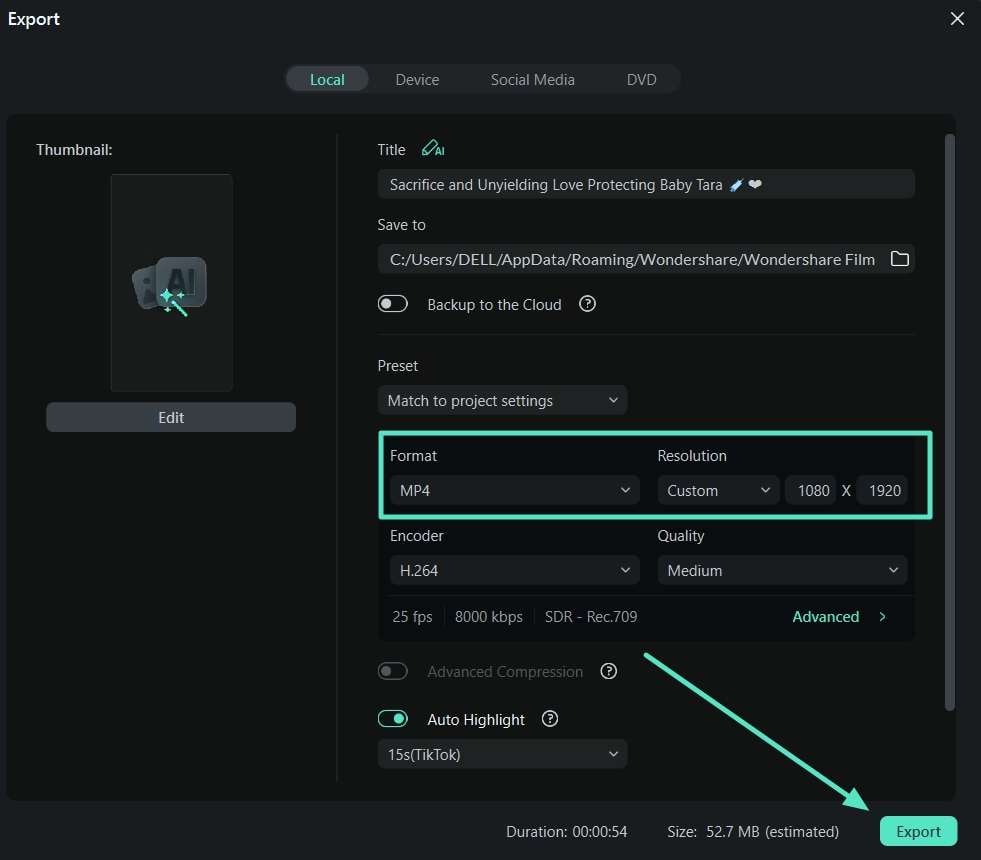
Step7Choose File Format and Resolution Before Exporting.
Finally, choose the "Format" and the "Resolution" from the export window and hit the "Export" button to download the audio with images file.
Using Filmora App [iOS/Android]
If you are looking for a method of adding photos to audio files on your mobile phone, Filmora App is the answer to it. Dive into the basic steps we have given below to help you perform the process on the go through an advanced yet easy-to-use app:
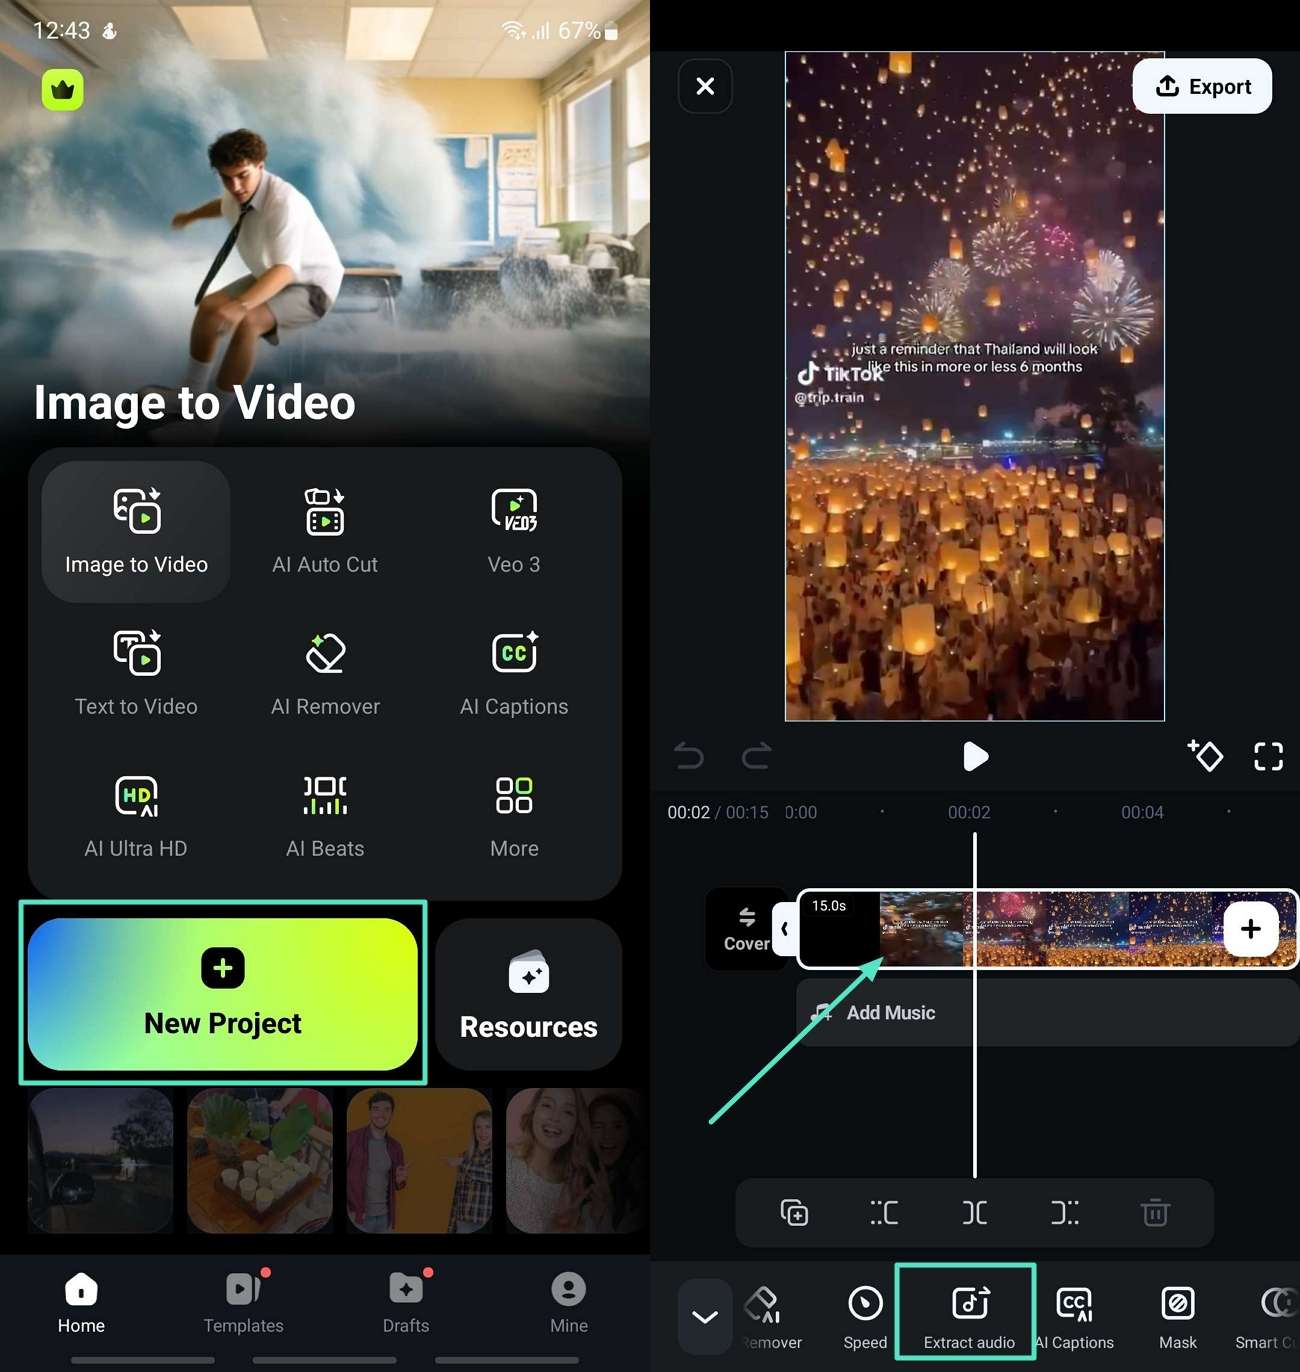
Step1Access Filmora App and Extract Audio from Video.
Start the process by choosing the "New Project" button on the main screen. Tap on the video in the timeline you just imported and choose the "Extract Audio" option from the bottom menu bar.
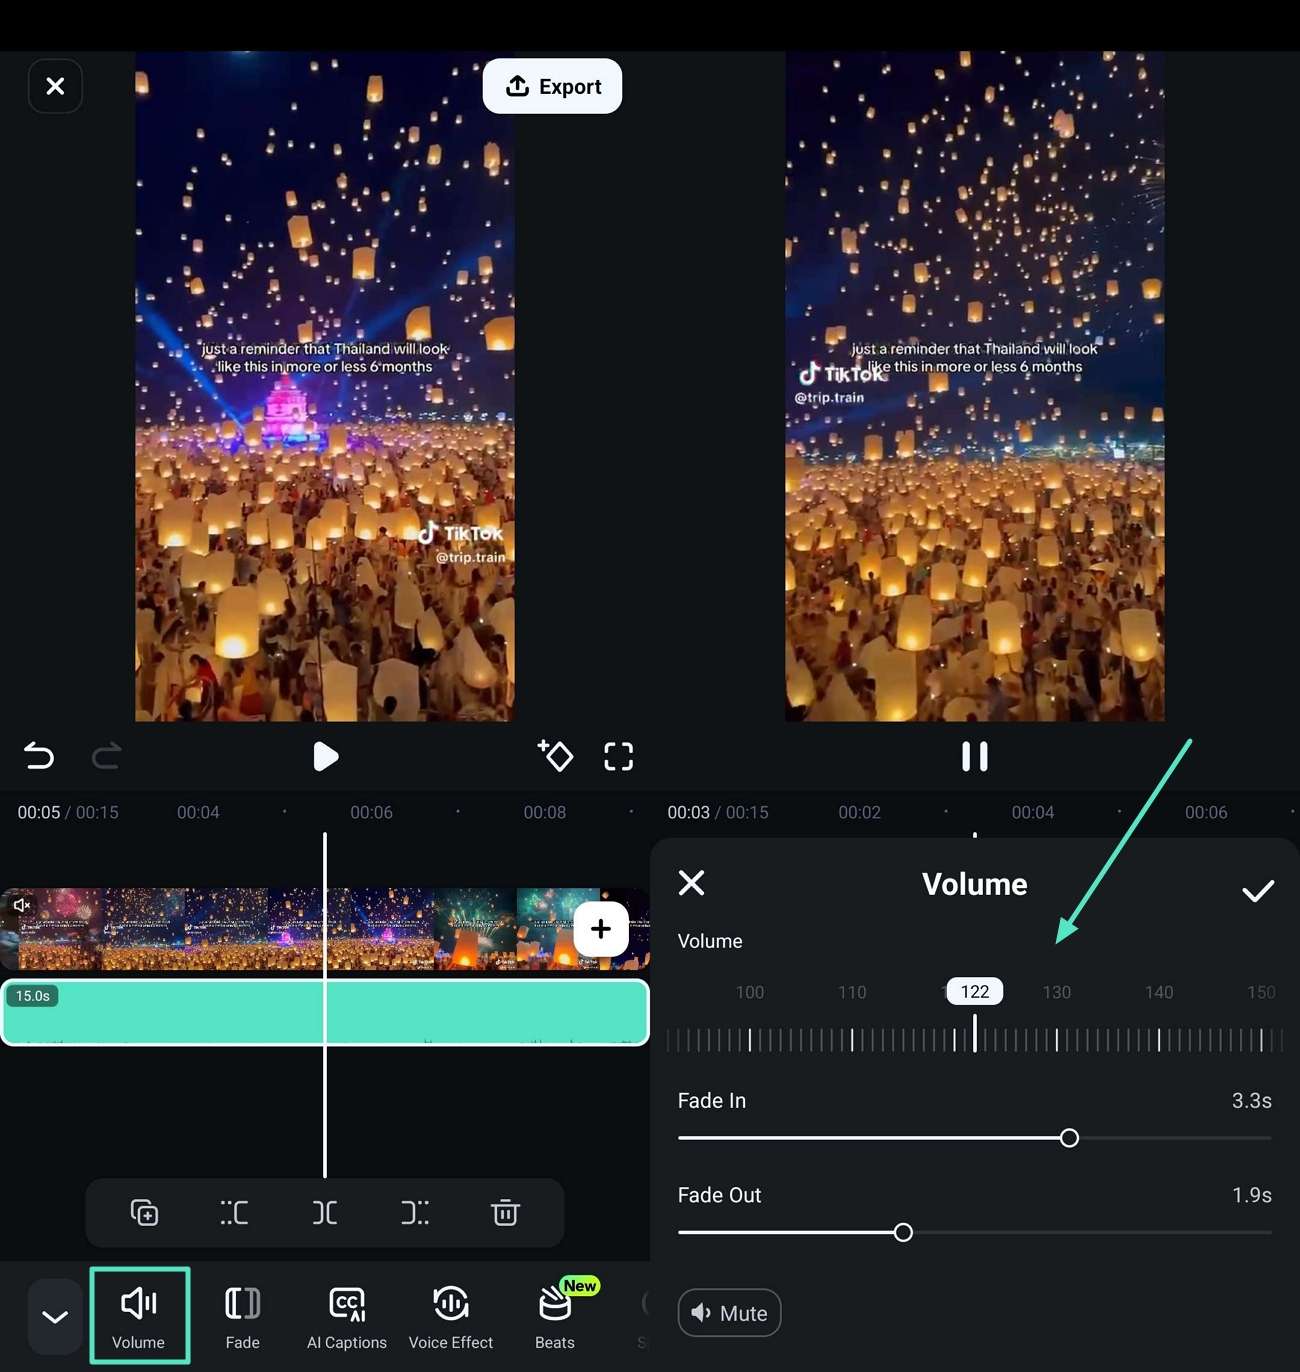
Step2Adjust Volume Properties of Extracted Audio.
Moving on, tap on the extracted audio in the timeline and tap on the "Volume" option at the bottom to adjust its sliders in the next screen.
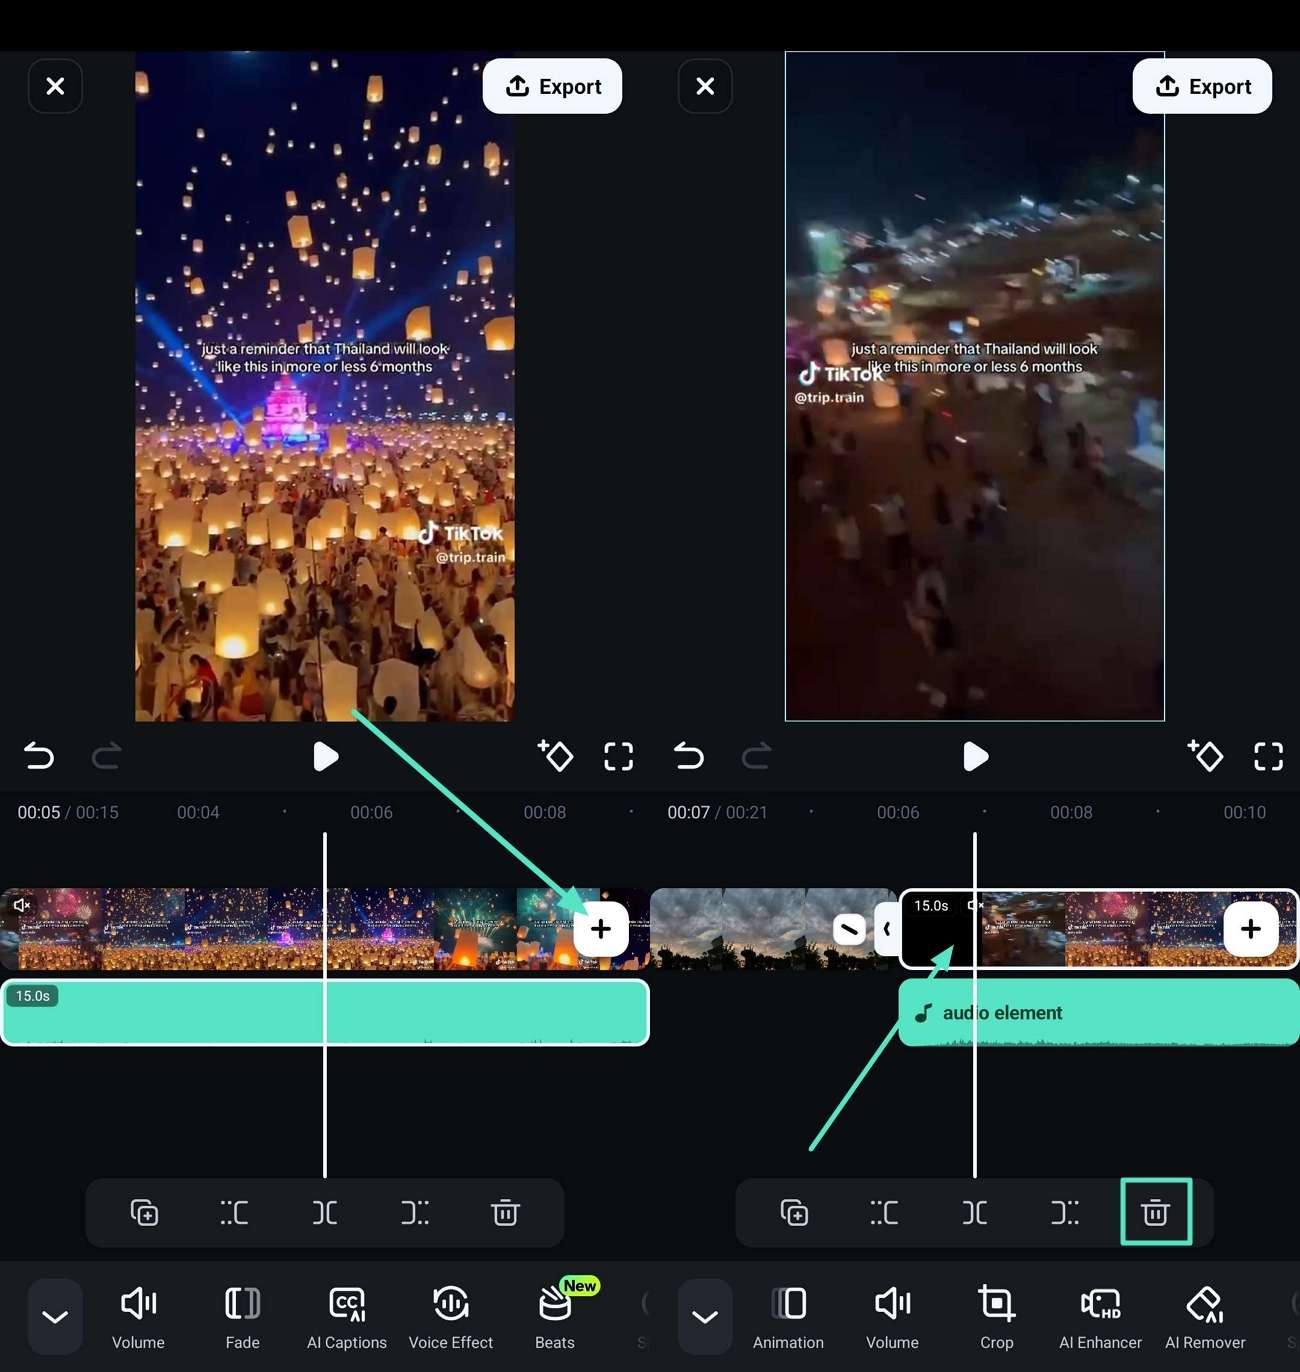
Step3Insert Images from Gallery and Deleted Original Video.
Next, tap on the "+" icon on the timeline and import the images you want to use. Now, tap on the "Original Video" in the timeline and tap on the "Trash" icon to delete it from the project.
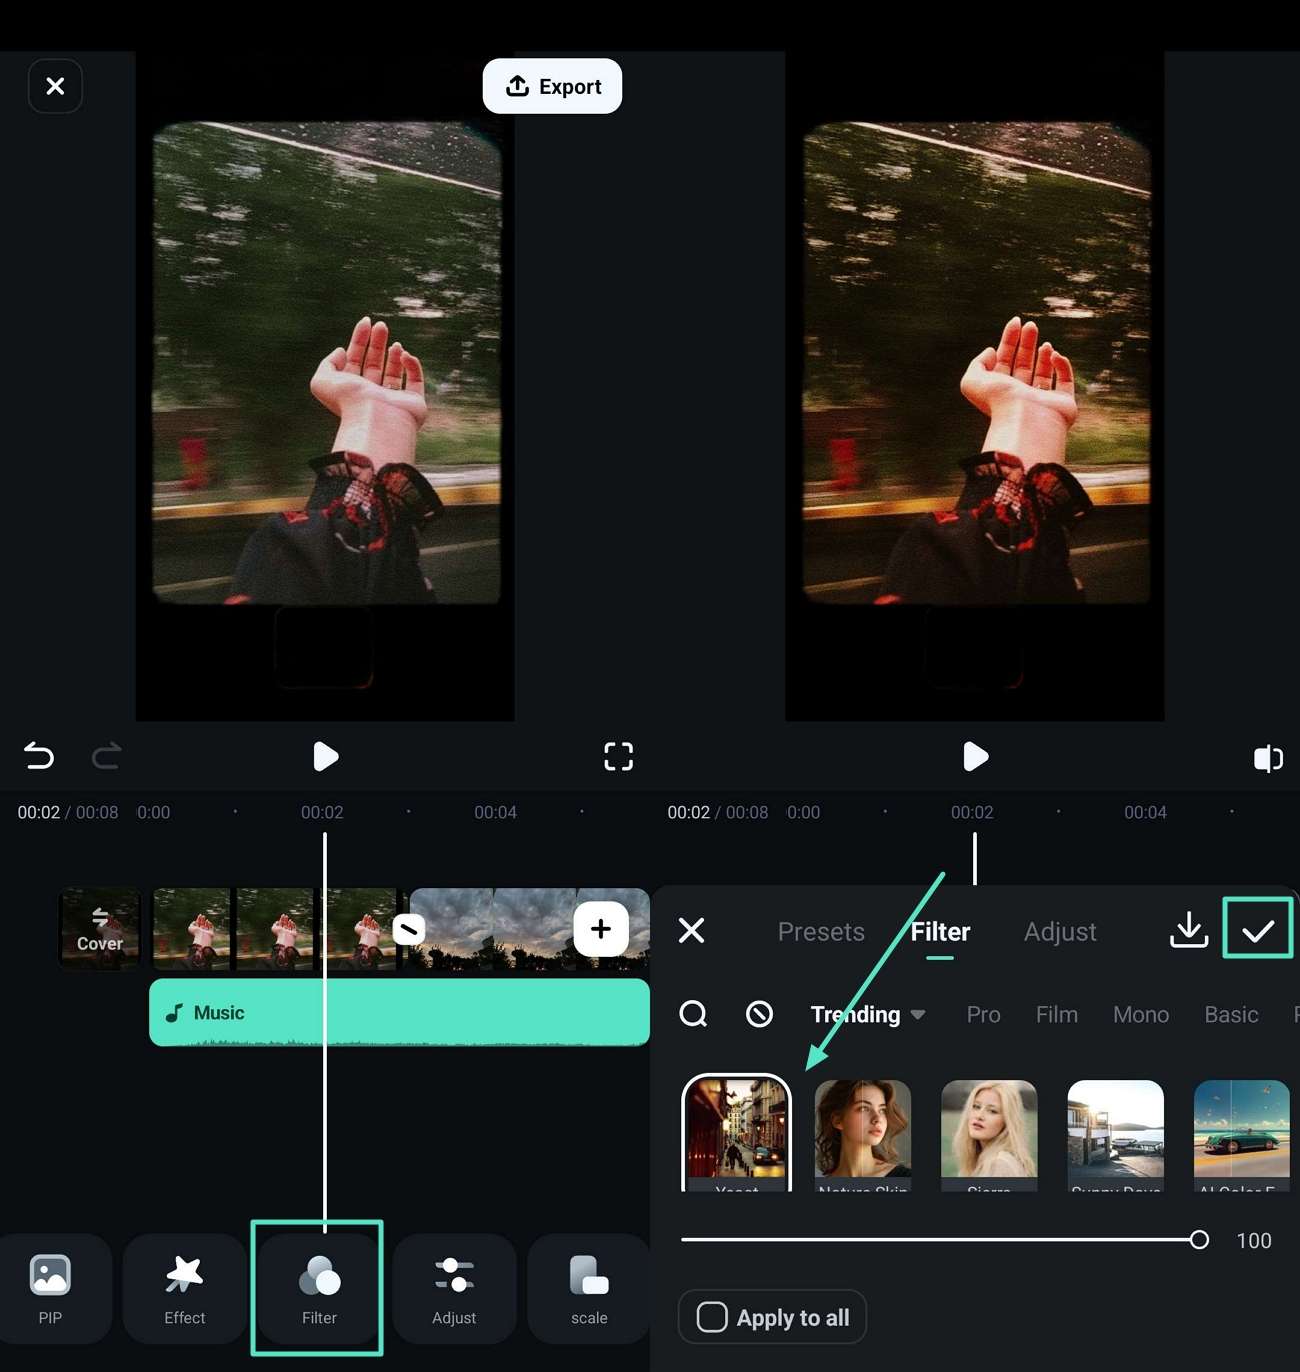
Step4Sync the Audio and Images and Apply a Filter.
Then, adjust the audio and images so that they match each other on the timeline itself. Tap the "Filter" button to apply it to the video, then tap the "Tick" icon to save the changes.
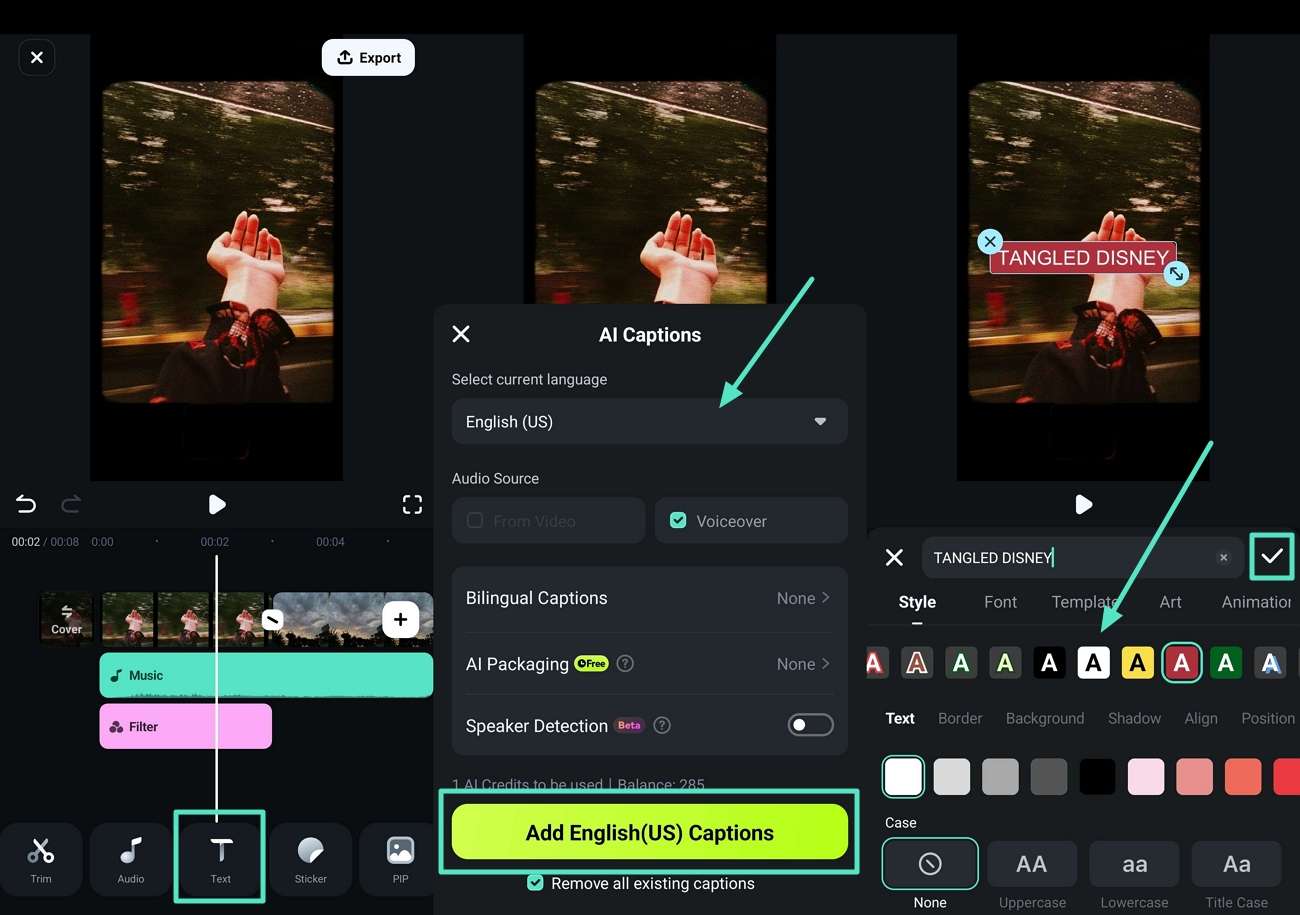
Step5Generate AI Captions for the Audio and Image Video.
Once done, tap on the "Text" button to choose "AI Caption" and hit the "Add English (US) Captions" button. Now, edit the properties of the text entered and hit the "Tick" icon to save it.
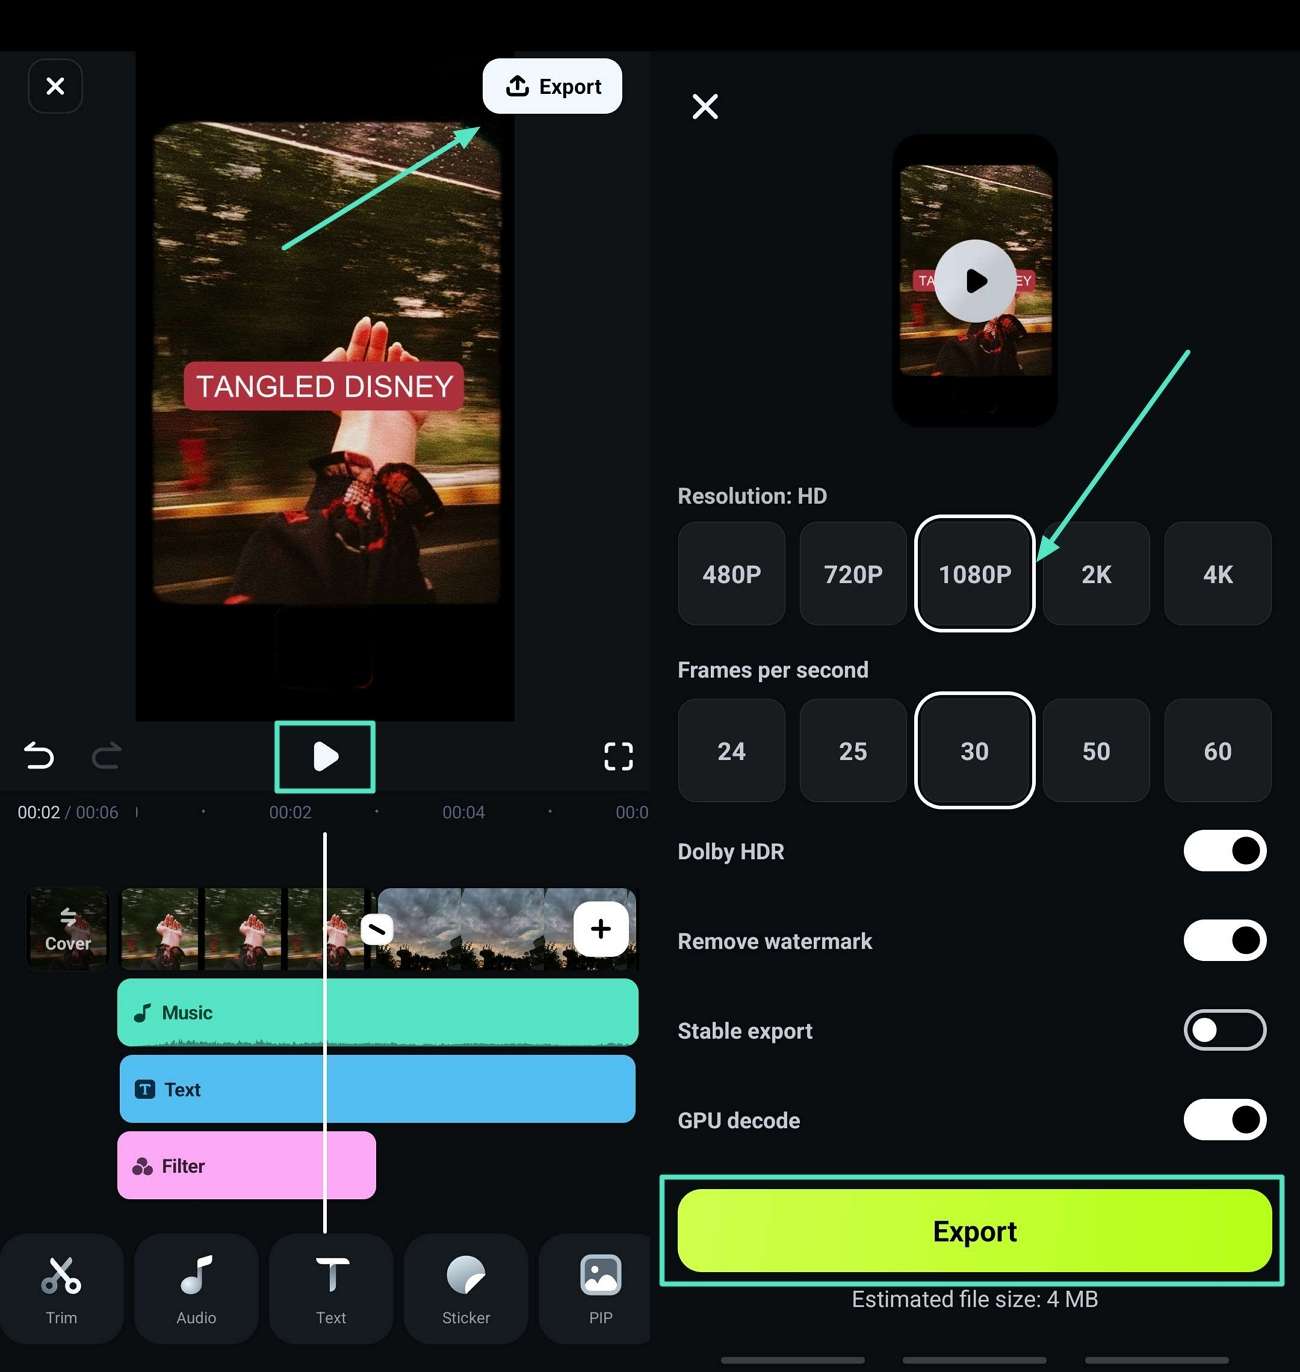
Step6Preview and Export the Images in the Audio File.
Lastly, tap on the "Play" icon to preview the final outlook. Hit the "Export" tab to set the "Resolution" in the next screen, and then the "Export" button to save the video.
Conclusion
In conclusion, this article has looked into the factors you need to keep in mind before you start the procedure to add photos to audio. We looked into the top 6 most used desktop and mobile tools you can use to enhance audio files with images. Apart from this, we provided you with the best alternative, which is Filmora, to improve the overall quality of your media files from start to finish.


 100% Security Verified | No Subscription Required | No Malware


