Videos on LinkedIn are more than just a trend—In fact, LinkedIn videos get 5 times more engagement than other types of content. Whether you're sharing a quick tutorial, a product launch, or even a company update, video posts can help you stand out in the professional environment. But here's the catch: if your video isn't optimized with the right LinkedIn video sizes and LinkedIn video specs, it might not perform as well as you'd like.
Thankfully, you're clicking on the right article! In this guide, we’ll walk you through the essential details like video dimensions, size ratios, and best practices to ensure your videos are crisp, clear, and ready to make an impact on LinkedIn. Let’s dive in and get your videos optimized for success!
In this article
Part 1. LinkedIn Video Formats and Specs in 2024
Before jumping into the LinkedIn video specifications guide you need to know in 2024, it’s good to know how videos work on the platform. Any video uploaded directly to LinkedIn is considered a native video, and you can do this on both the website and the mobile app.
You have a couple of options for where to upload: you can post on a Company Page, where businesses share updates and connect with followers, or create Ads videos, which are paid promotions that show up in users' feeds to reach a wider audience. Each option has different requirements, so let’s break them down!
Accepted Formats
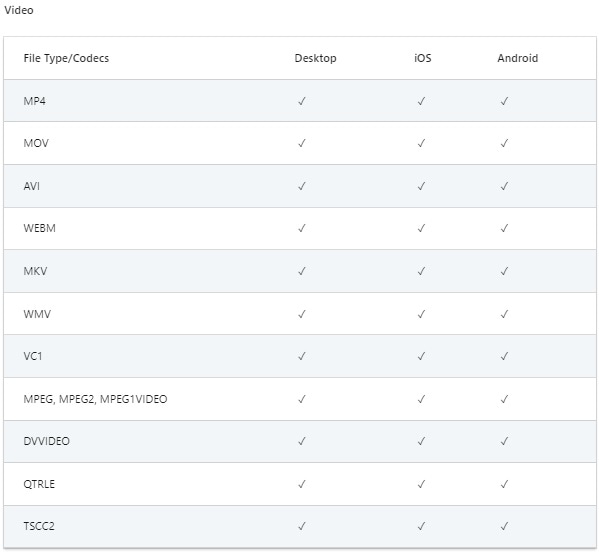
According to LinkedIn’s Official Page, LinkedIn supports several video formats for uploads, including MP4, MOV, AVI, WEBM, MKV, and WMV. However, we recommend using MP4 especially for video ads because they are the most common and work well on most devices. Sticking to these formats keeps things simple and effective for your videos!
Ideal Length
When it comes to duration, your LinkedIn video can range from 3 seconds to 10 minutes. However, these days, people aren’t keen on watching long videos, especially ones that are 7 to 10 minutes long. It’s better to keep your videos short and engaging, around 1 to 3 minutes is ideal.
Size Limits
The maximum video size on LinkedIn can be a bit confusing since it varies by video type. Check out the simple table below for the limits. If your video file is too large, don’t forget to compress it to make sure it fits within these limits!
| Video Type | Maximum Size Limits |
| Native Videos | 5GB |
| Ads | 200MB |
| Company Page Videos | 200MB |
Ideal LinkedIn Video Dimensions
When it comes to LinkedIn video dimensions, you have a few standard options: 16:9 for widescreen, 1:1 for a square format, and 9:16 for mobile. The best choice depends on the type of video you’re making. The same goes for video resolutions. To help you get a better grasp of these options, check out this simple guide!
| Video Type | Recommended Aspect Ratio | Recommended Resolutions |
| Native Videos | Desktop → 16:9 Mobile → 4:5 |
1920x1080 Pixels 1080x1350 Pixels |
| Ads | Widescreen → 16:9 Square → 1:1 Vertical Mobile → 9:16 |
1920x1080 Pixels 1920x1920 Pixels 1080x1920 Pixels |
| Company Page Videos | Square 1:1 | 1080x1080 Pixels |
Part 2. How to Optimize Your LinkedIn Videos Using Top Video Editing Software
As you can see, understanding LinkedIn video specs and sizes can be a bit confusing. Meaning, to create an optimized video for your LinkedIn post, you need reliable video editing software. Luckily, you don’t have to search far— Wondershare Filmora is the perfect solution for you! It has all the tools you need to ensure your videos meet LinkedIn’s requirements while looking great.
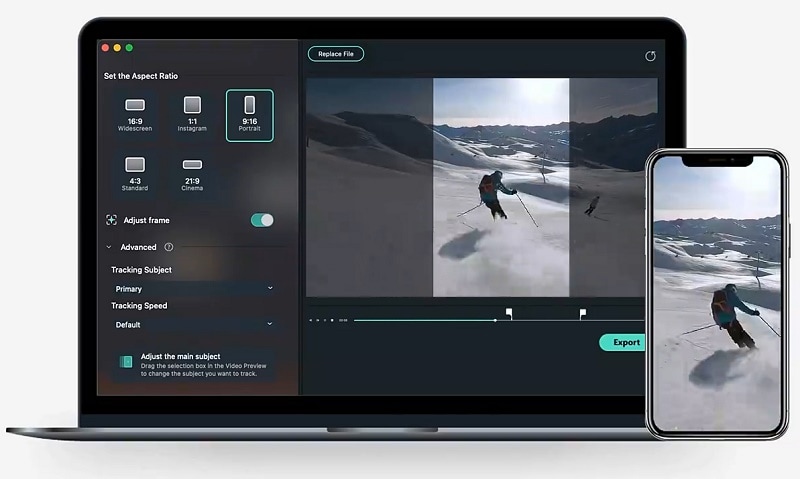
Key Features:
- Auto Reframe Feature: Automatically adjust your video’s aspect ratio for different platforms.
- Other Methods to Change Aspect Ratio: Easily tweak dimensions to fit LinkedIn's requirements.
- Advanced Compression Feature: Reduces file size without sacrificing quality, perfect for faster uploads.
- All-in-One Video Tool: Offers various features to enhance your videos before posting, ensuring they look their best!
Not to mention, Filmora is super accessible since it's available on Windows, macOS, and mobile devices like Android and iOS, so you can edit anytime, anywhere. It’s also very affordable! They even offer a free trial, so you can give it a shot before fully committing to a purchase.
- Auto reframe video in 16:9, 1:1, 9:16, 4:3 or 21:9.
- Offers cool video effects and filters to make your video become professional.
- Cross-platform supported - (Windows, Mac, iOS, Android)
- Resize Your Videos Without Quality Lose

As we mentioned earlier, Filmora offers several easy ways to change the aspect ratio to meet LinkedIn’s standards. So, let's give it a real shot and learn how to adjust your video to fit LinkedIn's size and aspect ratio requirements! Just follow this simple guide to get started:
Method 1: Using Auto Reframe
Step1pen Filmora and access the Auto Reframe feature
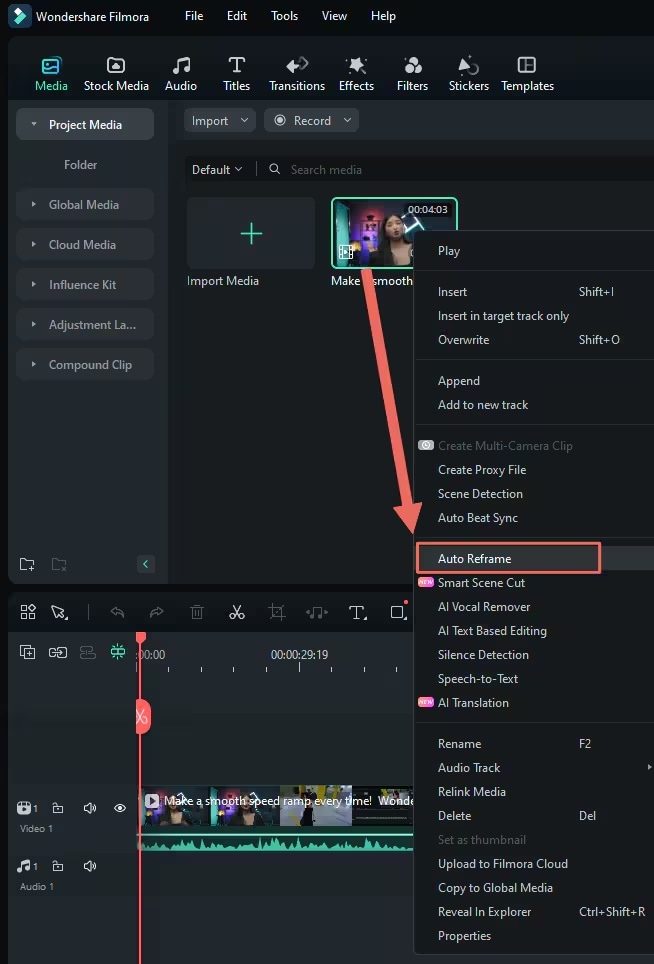
If you haven't downloaded Wondershare Filmora yet, you can upgrade to version 14 or above on the official website. After installing it, double-click the icon to open the program. Once Filmora is up and running, look for the “Toolbox" menu on the left side, you'll see the “Auto Reframe" option. Click on it to access the reframing feature directly.
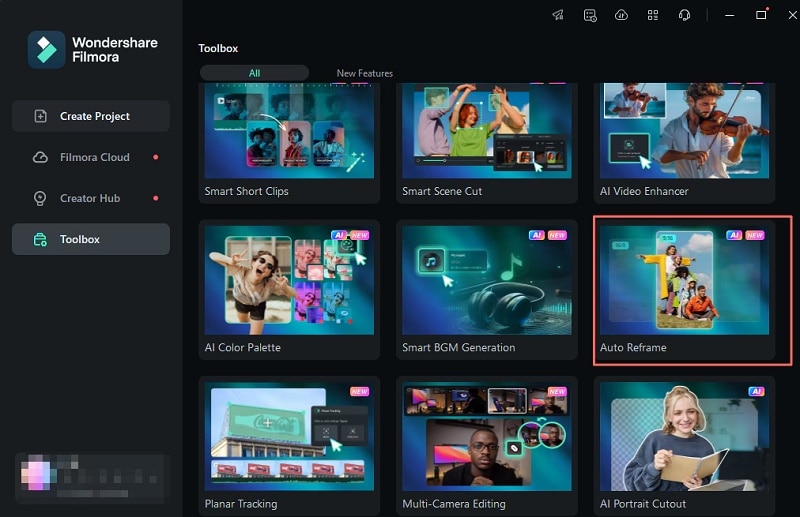
Alternatively, you can access the Auto Reframe feature by first creating a new project. After that, upload your video by going to "Media" and selecting "Import". Once your video is uploaded, right-click on it and choose the "Auto Reframe" option.
Step2Adjust the aspect ratio and auto-reframe the video
A new dialogue box will pop up. You’ll find various aspect ratio templates, including square (1:1), vertical (9:16, 4:5), standard (4:3), widescreen (16:9), and cinema (21:9). Pick the aspect ratio that suits your needs based on where you’ll upload the video. For widescreen LinkedIn ads videos, 16:9 is the best choice, so go with that!
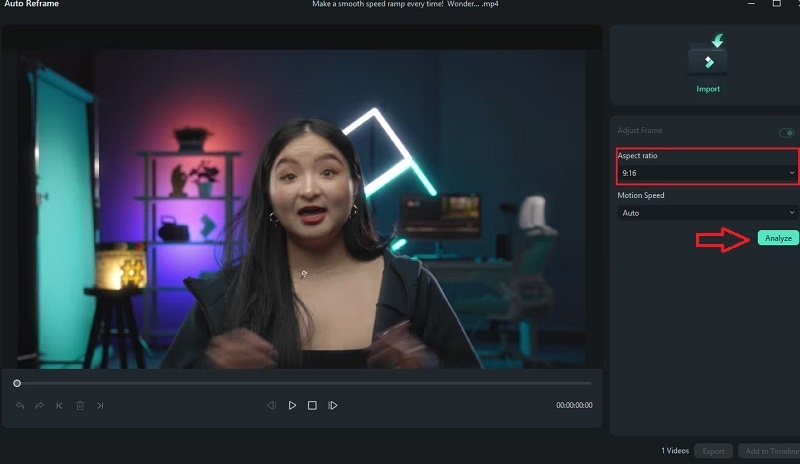
You can adjust the speed of your video in a few ways: leave it on Auto, or choose Fast or Slow. After you set the speed, click on the “Analysis” option. Filmora will take a few seconds to analyze your video.
Step3Preview the video
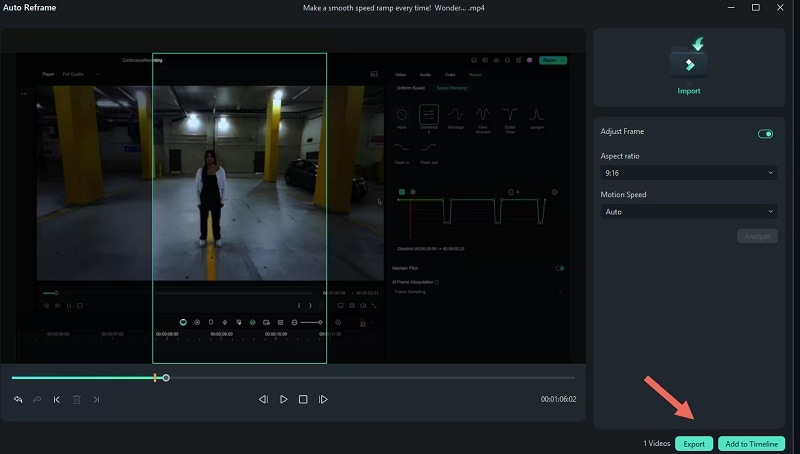
After you've finished setting everything up and reframing your video, take a moment to preview it. If you need to make more adjustments, you can pause and play the video to reposition the frame. Just drag the framing box to where you want it. Repeat this as needed throughout the video.
Once you're happy with how it looks, click on “Export” or “Add to Timeline” to finalize your changes.
Method 2: Change Aspect Ratio Directly
If you prefer a simpler way to change the aspect ratio, you can do that easily. After importing your video into Filmora, click the Settings button next to the camera icon in the preview window and select "Change Project Aspect Ratio".
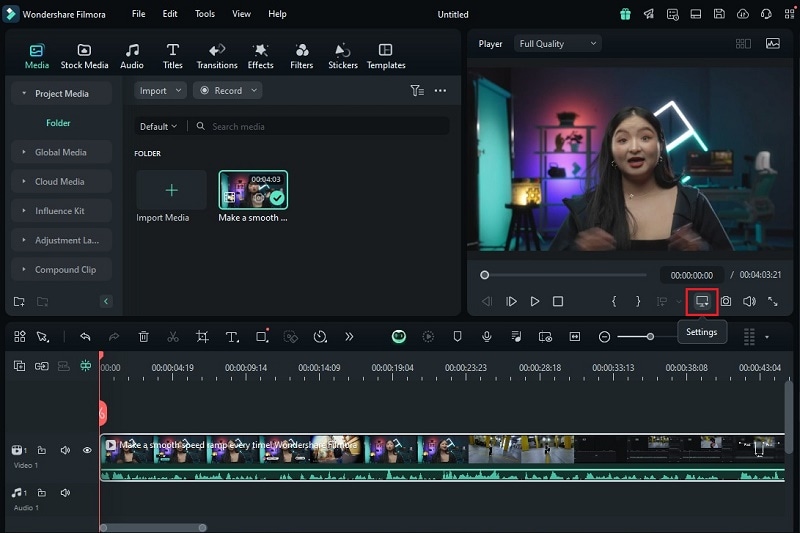
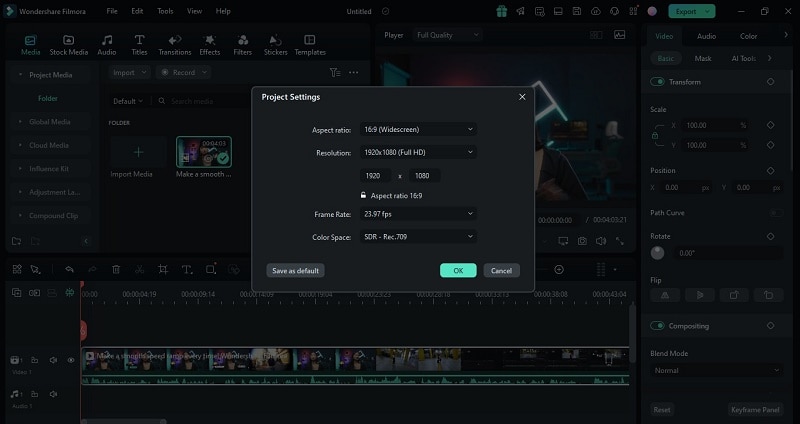
This will let you change the aspect ratio, resolution, and frame rate. However, keep in mind that this method is different from using the auto-reframe feature because it changes the entire project’s aspect ratio instead of adjusting the framing of your video content. So, use the method that fits your needs best!
Method 3: Using the Crop Tool
Step1Access the crop tool
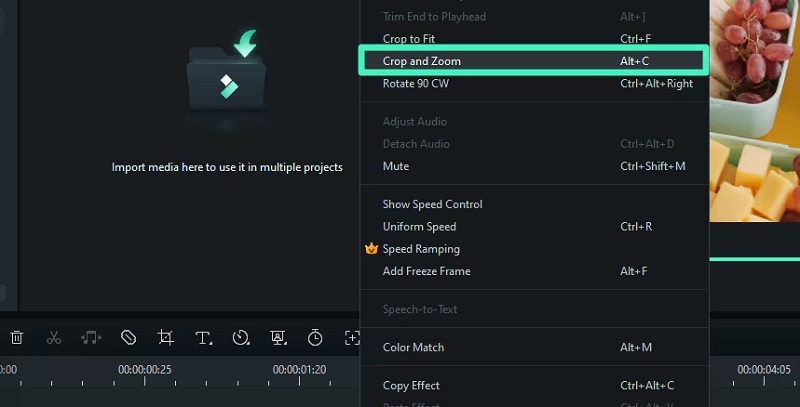
You can easily adjust your video’s aspect ratio to fit LinkedIn’s requirements using the crop tool. Just right-click on the video in the timeline, then select the "Crop and Zoom" option to tweak the video dimensions.
Step2Choose aspect ratio
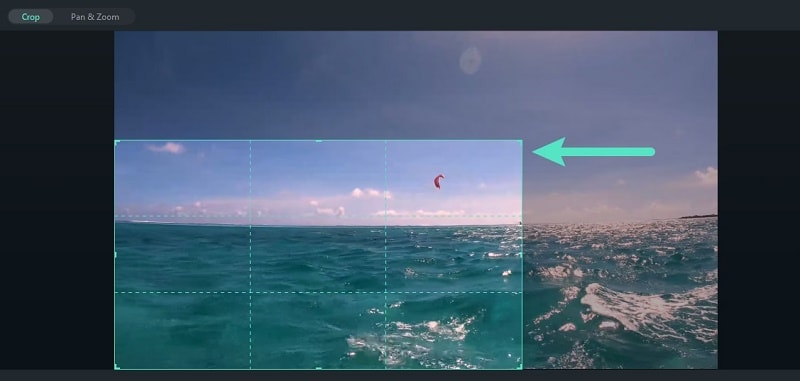
In the Crop and Zoom panel, you can easily adjust the crop area by selecting one of the ratio presets. As previously mentioned, for widescreen LinkedIn ad videos, 16:9 is your best bet, so go ahead and choose that!

Step3Crop the video
To resize and position your video, just drag the crop box to select the part you want to keep. This helps resize your video and reduces the file size so it stays within LinkedIn’s limits. Once you’re satisfied, click "Apply" to save your changes.
Step4Enhance your video
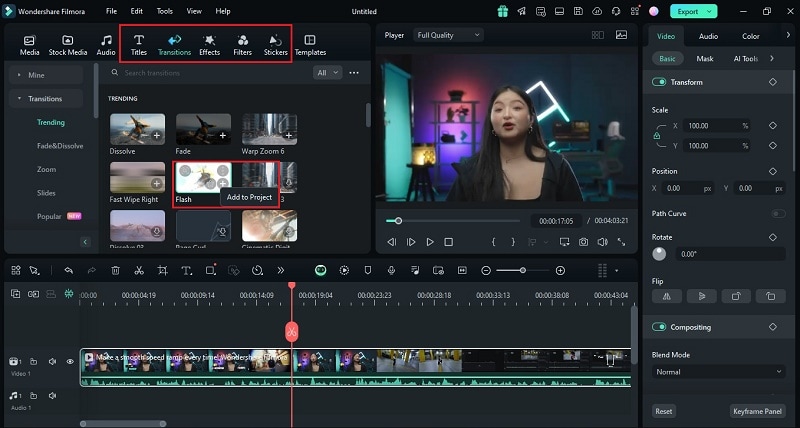
Spice up your video by adding transitions, filters, and effects, and customize them to your liking! For instance, go to the “Transitions” tab, choose your favorites, and drag them between clips for a smoother flow.
Don’t forget to check out Filmora’s advanced features like the AI Color Palette and Automatic Captions to make your visuals pop even more. For more information on how to use these features, take a look at Filmora’s guides, such as the AI Color Palette Guide and Auto Caption Guide.
You can also watch helpful video tutorials provided by the Filmora team, like the AI Color Palette Tutorial and the Auto Caption Tutorial. Below is the tutorial video for automatic subtitles.
Method 4: Using Advanced Video Compressor
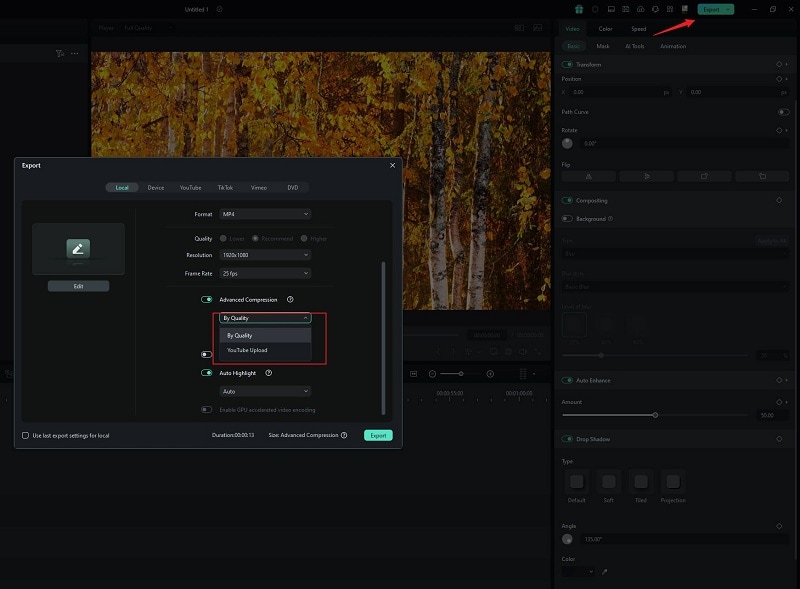
Step1Enable the advanced compression feature
Another way to optimize your video for LinkedIn’s size requirements is by using the video compressor. It makes it incredibly easy to reduce file size without any loss of quality while ensuring that your videos meet the size requirements for social media uploads. Once your video is ready, click “Export” in the top right corner. In the Export pop-up window, scroll down and enable the Advanced Compression feature. Filmora offers two ways to compress your video without losing quality: "By Quality" and "YouTube Upload".
Step2Adjust file size by percentage
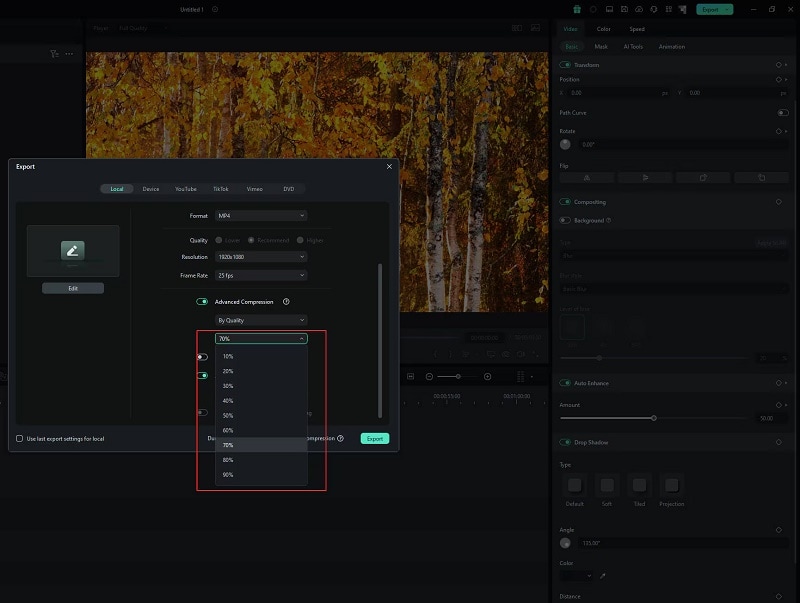
Since this video is for LinkedIn, choose the “By Quality” option from the dropdown menu to set the auto compression percentage. You can select a quality level that adjusts the file size, with options ranging from 10% to 90%. This allows you to find the right balance between quality and file size for your video.
Step3Export your video
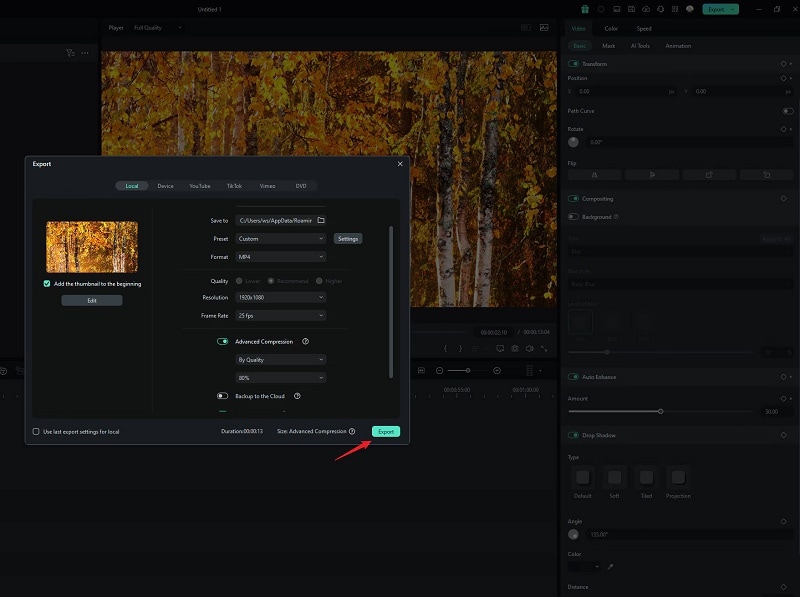
Finally, click "Export" in the pop-up window to download the compressed video with the smaller file size to your computer.
Part 3. Best Practices for Optimizing LinkedIn Video Posts
Now that you know how to use Filmora to make your LinkedIn videos fit the recommended file size and dimensions, let’s explore how to improve them even more! There are a few tips you can follow to optimize your LinkedIn videos. Here are some helpful suggestions:
- Upload Videos Natively: Compared to sharing links from YouTube or Vimeo, posting videos directly to LinkedIn gives you better visibility and engagement. So, make sure to take advantage of this feature by uploading your videos natively.
- Ensure High Resolution and Quality: No one wants to watch a low-quality video, so aim for clear, high-resolution videos. Go for resolutions like 720p, 1080p, or even 4K to give your videos a professional look.
- Choose the Right Frame Rate: Pick the right frame rate for smooth playback. For most videos, 30fps works best. If your video has a lot of action or movement, using 60fps will make it look even better!
- Ideal Video Length for Different Purposes: For quick updates or promotions, keep it under 1 minute, while tutorials can be longer, around 3-5 minutes.
- Optimize Video Thumbnails: Thumbnails are the first thing people see in their feeds, so make sure yours catches their eye! In this case, you can use tools like Filmora’s AI Thumbnail Creator to make eye-catching thumbnails.

- Use Captions and Subtitles: Adding captions to your videos makes them easier for everyone to understand and helps boost engagement. You can use tools like Filmora's Automatic Captions feature to make this process simple and effective!

Conclusion
Posting videos on LinkedIn can really help you stand out in the professional world. But if your video isn't optimized for LinkedIn's video sizes and specs, it might not get the attention you want. So, this article is here to help you with LinkedIn video specifications guide from accepted formats, and file size limits, to ideal length and dimensions.
To optimize your videos, you'll want to use the best video editing software, and that's where Wondershare Filmora comes in. With its Auto Reframe Feature, you can easily adjust your video's aspect ratio, and its Video Compressor helps reduce file sizes without sacrificing quality. By using Filmora and the tips in this article, you can make your LinkedIn videos a success!


