


 100% Security Verified | No Subscription Required | No Malware

After-effects color correction ensures precision, while after-effects color grading elicits passion in your video editing process after compiling all your footage. Both processes, often used interchangeably, are distinct parts of video editing. Color correction precedes color grading, laying the groundwork by maintaining color cohesion between each of your video clips. Color grading incorporates a visual tone and conveys your emotions to your audiences.
In this article, you will discover the significance of after-effects color correction and color grading. You will learn the best techniques to ensure seamless color correction in your video footage. Further reading, you will discover the difference between color correction and grading in the video editing process. Lastly, you will also discover how to color-correct footage with Filmora.
In this article
What is After-Effects Color Correction?
After-effects color correction suggests balancing color and adjusting its contrast and combination in post-production. It keenly assesses the mid-tones and highlights, mapping the lightest and darkest pixels in your project, allowing you to ensure proper translation of emotions and storytelling through your video project.
With a sweeping range of color effects, you can let your creativity flow, generate perspicacious ideas, and imbue immaculate colors in your creation. The color correction allows you to use your imagination, ensures that your design is coherent with your visual goal, and revives the appearance of your design.
Best After Effects Color Correction Techniques
After-effects color correction in video editing lets you modify the overall contrast and fix imbalances in your footage. Color correction involves adjusting brightness, contrast, saturation, and the white balance to match the color and lighting conditions throughout the video.
Here are a few promising effects of color grading and color correction techniques that allow you to carry over a specific appearance and mood in your video:
Ensure Properly Exposed Footage
An effective color correction will stem from well-exposed footage. In cases where footage is over- or under-exposed, it complicates the color correction process and interferes with its accuracy. Therefore, while shooting your video, ensure proper exposure and capture of a wide range of colors and details.

Establish White Balance Accurately
Proper white balance is necessary when seeking accurate colors for your video project. Most cameras present you with preset options for various lighting conditions. However, it is best to opt for manual adjustment, as it gives you more control. You can use a gray card or a neutral object to adjust your camera’s white balance.
Leverage Histograms for Reference
Histograms determine the tones in your footage and help you identify overexposed or underexposed areas in your footage. During after-effects color correction, keep a keen eye on the histogram to ensure your adjustments are in coherence with the distribution of tones.
Keep the Right Tools Handy
To ensure precision in color correction, you must have the right tools to facilitate professionalism and passion in video editing software. Sought-after color correction tools, including color wheels, curves, and scopes, will help you with color correction and color grading.
Employ Waveform & Vectorscope
Learning how to read video scopes can greatly facilitate your color correction process. Waveform and vectorscope are essential implements for after-effects color correction. The waveform will check the luminance in your footage, helping you adjust exposure, while the vectorscope provides insights into the color saturation and hue of your footage.
Maintain Consistency in Shots
Now, if your video project consists of multiple shots, it becomes necessary for you to ensure consistency. You can ensure that all your footage is cohesive in color temperature and style through meticulous color correction.
Adjust Skin Tones
Adjusting the skin tones while working with color correction should be one of your primary concerns. Overly warm or cool skin tones can make your footage look far from reality. By using color wheels or curves and adjusting the hue and saturation of the skin tones, you can ensure that your footage appears real and easier on the eye.
Assess Shadows and Highlights
Striking a balance in shadows and highlights helps obtain comprehensive footage. Dark shadows can lead to haziness in details, while overly blown-out highlights can result in a loss of information. With tools like a three-way color corrector, you can target and adjust shadows to highlights seamlessly and accurately.
Work with After Effect Color Grading
While color correction emphasizes accuracy and cohesiveness in footage, color grading opens doorways for creative flow. You must experiment with various grading effects to achieve your video's desired emotion or style. You imbue cinematic, vintage, or vibrant feeling through color grading in your footage.

After-Effect Color Correction Vs. After-Effect Color Grading
Color correction and color grading are discrete and indispensable steps in video editing. While color correction is a technical step, it makes footage appear real. Color grading is also a technical and creative process that augments the mood and ambiance in shots, making it seem unreal. Read the table below to understand the difference between the two processes properly:
| Color Correction | Color Grading |
| Color correction suggests adjusting white and black levels, exposure, contrast, and white balance to give you an image with accurate and seamless colors. | Color grading suggests stylizing the color palette of your footage. After-effect color grading can imbue vibrancy or subtleness to set the mood of the footage. |
| Color correction establishes true levels and color balances. | The color grading process aims at stylizing the colors and enlivening footage. |
| The process allows for precision and ineffective adjustments. | The process evokes specific emotions from your audiences. |
| Through color correction, you can create visual consistency throughout the video project. | Through after-effect color grading, you can transform the creative outcome immensely. |
How to do Color Correction with Filmora?
Filmora’s video editing software facilitates color correction by seamlessly adjusting brightness, saturation, contrast, tint, temperature, and white balance and applying 3D LUT in your footage. With Filmora, your color correction process becomes automated, and AI-powered color tools fix the imperfections in your raw footage. Here is a step-by-step guidance on how to color-correct your footage with Filmora:
Step 1: Import the file & Start Color Correction
Once you have imported your video file into the Filmora media library, you can drag and drop it into Filmora's timeline. Additionally, you can double-click it to start a color correction.
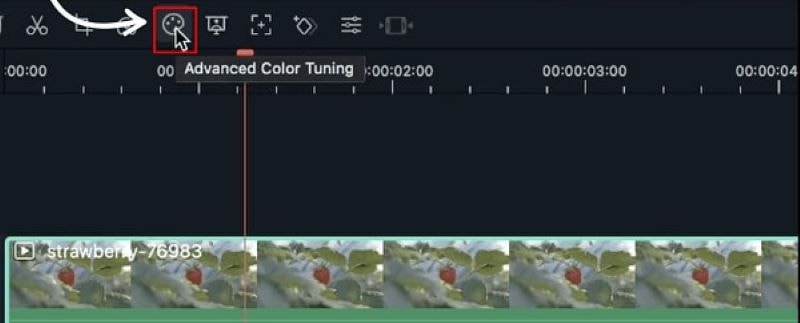
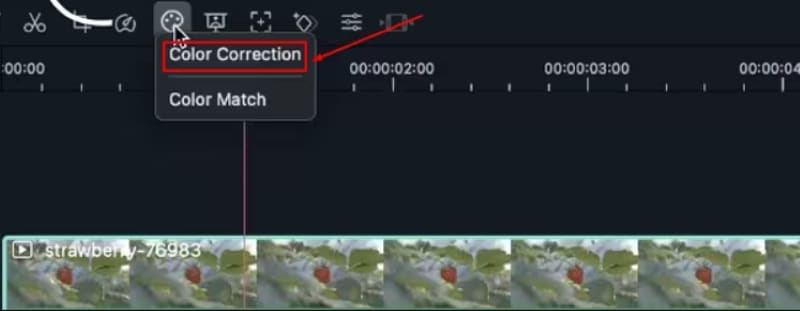
Step 2: Start with Advanced Color Correction
To start with advanced color correction in your footage, locate the “Advanced Color Tuning” option, shown by the color tuning icon. Once you locate the button, click it and head over to the “Advanced Color Correction” window.
Step 3: Compare Before & After
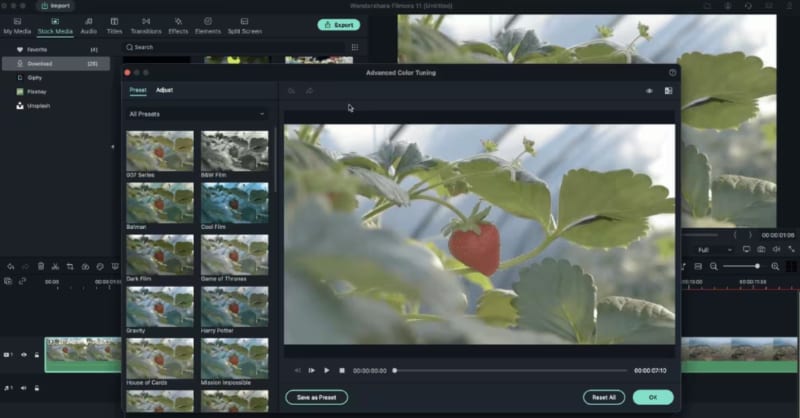
After completing the color correction process, proceed by finding and clicking on the “A/B icon.” By clicking this option, you will obtain a side-by-side view of the before-and-after video clip. Alternatively, you can view the before-and-after effects by clicking on the “Eyeball” icon.
Conclusion
After-effects color correction aims to ensure parity in your creative expression, and color grading aims to ensure intensity in your expression. They are both crucial aspects of the post-production process in your visual content creation. Orderliness and attentiveness in executing the two processes are important to ensure you make good headway in the video editing project.
Filmora is a well-built software equipped with a comprehensive range of video editing tools that allow you to ensure precision throughout the process. It offers an easy-to-use interface that is quick to learn and offers an expansive and exquisite variety of templates, filters, and effects to augment the appeal of your videos and empower their projection.
