As you get into video editing with CapCut, you may have encountered the term "Compound Clip". But what exactly is a compound clip in CapCut, and why does it matter for your videos?
Understanding what a compound clip is can be super helpful. This tool makes editing much simpler and faster, helps you keep your timeline neat, and gives you more control over your video. By using compound clips, you can make your videos look better and more creative without all the hassle.
In this guide, we’ll break down the concept of compound clips in CapCut and show you how to use them effectively and make your editing work smoother and more fun.
In this article
Part 1. What is a Compound Clip in CapCut?
To put it simply, the compound clip feature allows you to group multiple clips, effects and transitions into a single, easy-to-manage clip. In other words, creating a compound clip in CapCut means combining one or more clips, images, or effects into a single unit. Think of it like putting several items into one folder to keep things organized.
Using compound clips in CapCut is really helpful, and here are some reasons why:
- It keeps your timeline clean and tidy by reducing clutter.
- You can group different parts of your video, like clips, images, text, and effects, into a single clip.
- You can quickly make changes to the whole group, like changing the playback speed, adding color effects, or applying other edits all at once.
- It gives you more control over your edits, helping you create more polished and creative videos.
Part 2. How to Use the Compound Clip Feature in CapCut
Now that you understand what a compound clip is in CapCut and why it’s so useful, it's time to learn how to use this feature. Knowing how to create and manage compound clips will help you keep your editing neat and make your videos look great.
We’ll go through the simple steps to create a compound clip in CapCut and show you how to use it in your video projects. To do that, follow this simple guide:
Step 1. Open your project in CapCut
Start by opening the CapCut app on your computer. If you don't have it yet, you can download the PC version by clicking the downloading button below. Follow the installation process, open the program, and create a new project.
Step 2. Import clips and effects
Upload the clips, effects, and text that you want to combine into a compound clip. You can pick items from one or multiple tracks in your timeline.
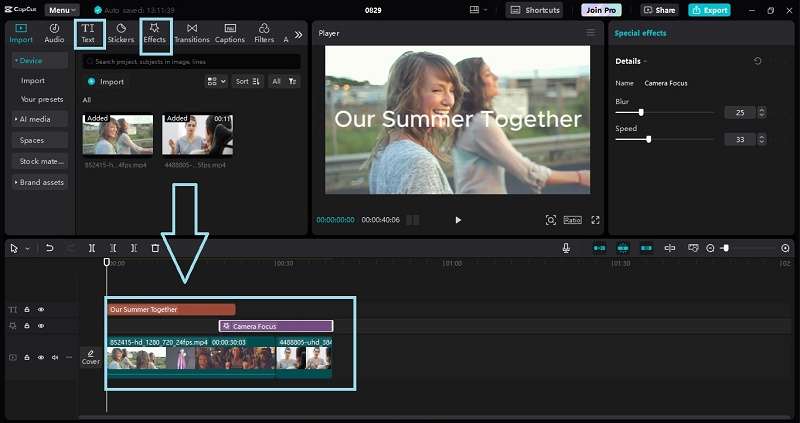
Step 3. Create the compound clip
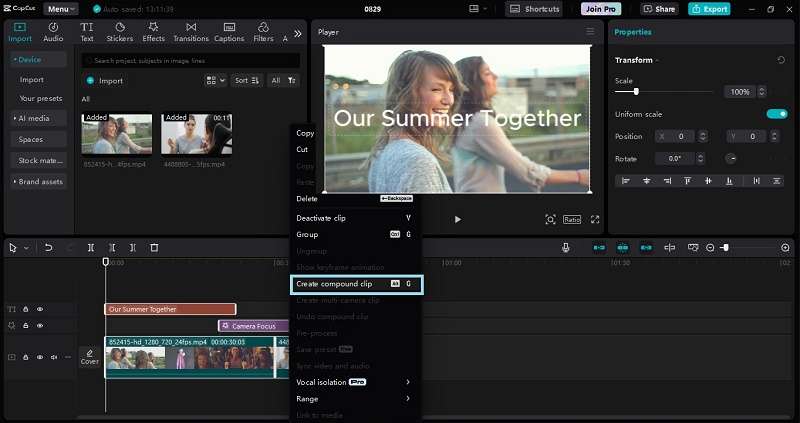
Click "Ctrl" on your keyboard and select all clips and effects until they are highlighted. Then, right-click on the clips and choose the "Create compound clip" option. Alternatively, you can also click "Alt + G" to create a compound clip in CapCut.
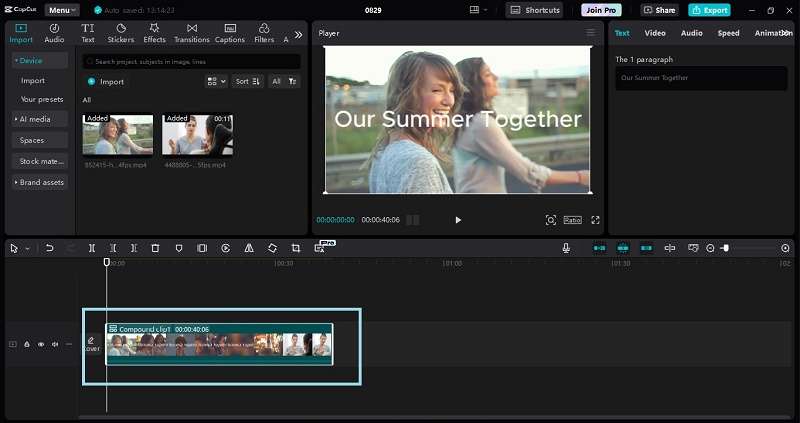
Step 4. Adjust the compound clip
CapCut will bundle them into a single compound clip. This new clip will appear as one item on your timeline. Now you can make changes to the whole clip at once, such as adjusting the speed, adding effects, or changing colors.
Step 5. Edit the compound clip and save it
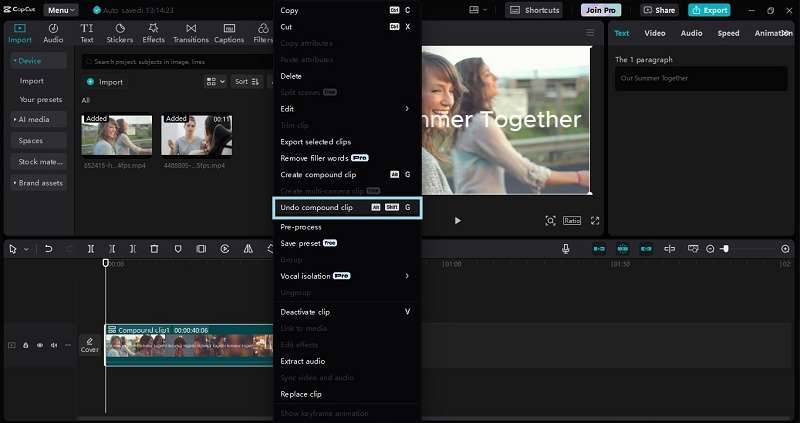
If you need to edit the clips inside the compound clip, double-tap or open it to make changes to the individual items inside. Or if you want to undo the compound clip, simply right-click on the clips and choose the "Undo compound clip" option.
Once you’re happy with your edits, make sure to save your project by clicking "Export" so you don’t lose any changes.
Part 3. Alternative to Using Compound Clip: Wondershare Filmora
If you're looking for another option to create compound clips besides CapCut, Wondershare Filmora is a great choice. Filmora offers similar features, including the ability to create compound clips, but it also has some additional tools that might be helpful for your editing needs.

One of the standout features in Filmora is Adjustment Layers. These layers let you apply changes like color corrections, effects, or filters to multiple clips at once. This can be especially useful if you want to make consistent edits across your entire video without having to adjust each clip individually.
Other Key Features:
- AI Smart Masking: Automatically highlights objects or people for easy effects.
- Motion Tracking: Adds text or images that follow moving objects in your video.
- Speed Ramping: Adjusts clip speed to create slow-motion or fast-motion effects.
- Split Screen: Shows multiple videos at the same time for comparisons or different views.
- Color Correction: Easy tools to change colors and lighting for a polished look.
Moreover, Filmora is affordable and offers different pricing plans. You can even test it out for free with a trial version.
Here’s a step-by-step guide on how to use Filmora’s Compound Clip feature:
Step 1. Access Filmora and import your clips
If you still need to install Wondershare Filmora, you can get the latest version. Once downloaded, follow the installation instructions and open the program. Create a new project and import your video file. To begin editing, just drag and drop the video onto the timeline.
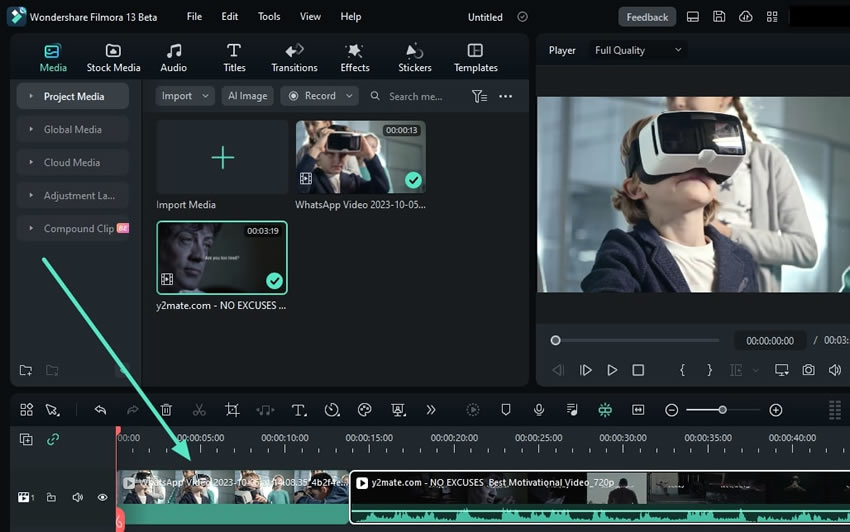
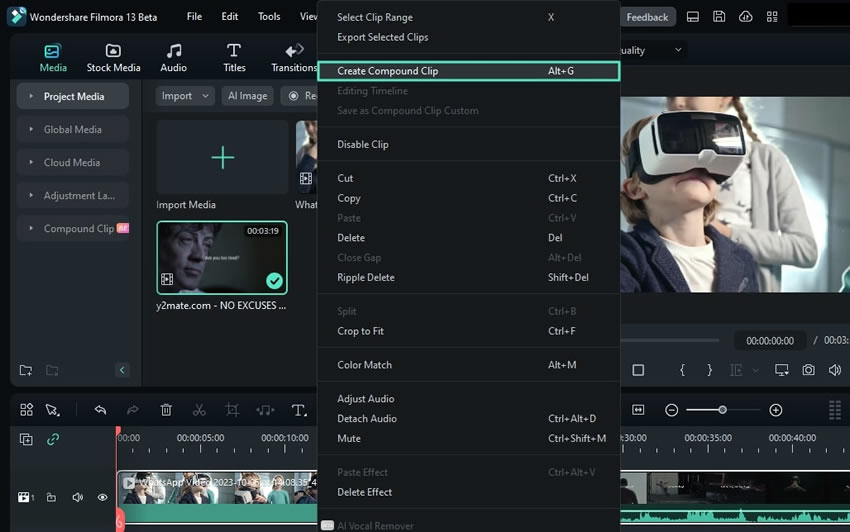
Step 2. Create compound clip
After dragging your clips onto the timeline, select the clip and right-click on it. In the menu that appears, choose "Create Compound Clip". Then, give your clip a name and click "OK".
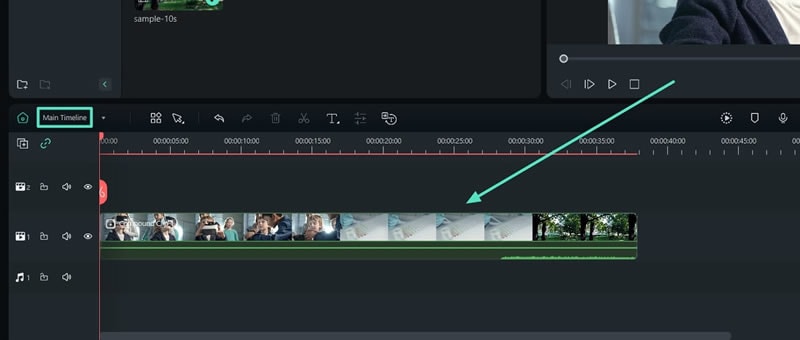
Once you create them, you’ll notice the timeline toolbar shows how the clips are layered. In the "Main Timeline" layer, you can see all your clips combined into one compound clip. You can now adjust the entire clip at once, like changing the speed, adding effects, or altering the colors.
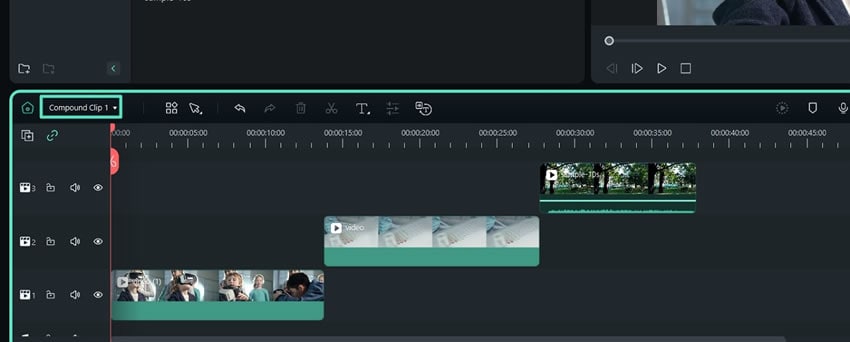
Step 3. Edit compound clips
If you want to edit the clips inside a compound clip, change the "Main Timeline" to "Compound Clip 1". When you switch to the compound clip from the dropdown menu, you’ll see the clips inside it just as you combined them. This makes it easy to go through your video edits and make big changes quickly.
When you're satisfied with your edits, click "Export" to save your project and keep all your changes.
Step 4. Use the Adjustment Layer as an alternative
Besides Compound Clips, Filmora has another cool feature called Adjustment Layers. It lets you add effects to multiple clips or the whole timeline. To use it, just go to Media > Adjustment Layer, then click “Preset” to make a new adjustment layer.
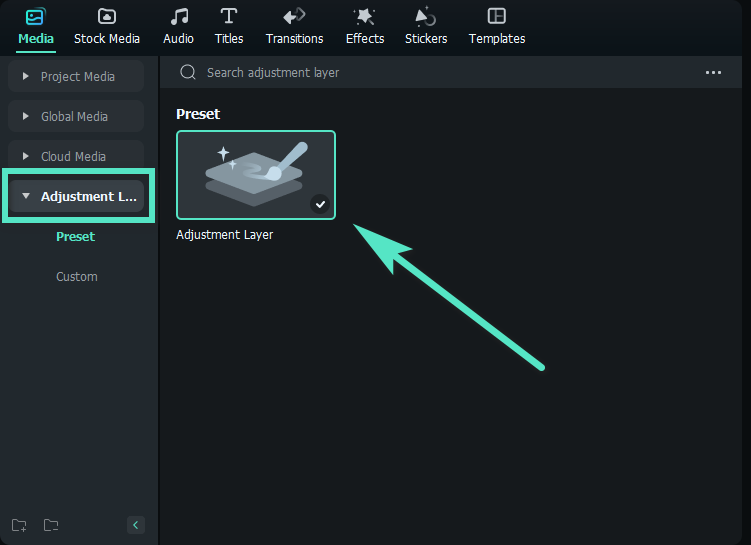
Drag the “Adjustment Layer" along the timeline to cover parts of your video. Then, click on the “Adjustment Layer" to open its settings. You’ll see the settings window pop up on the right side of the screen.

Step 5. Change the settings
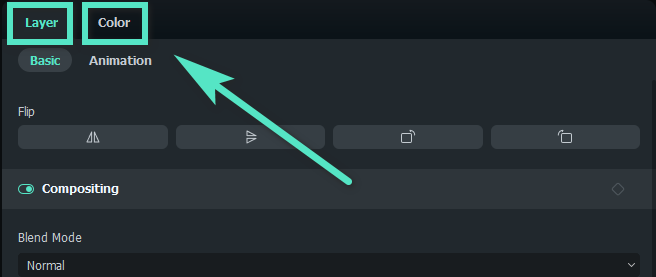
You can change the layer in two main ways: “Layer” and “Color”.
- Layer: Here you can adjust things like how your layer moves, scales, flips, and rotates. You can also change how it blends with other layers and its opacity.
- Color: You can tweak the colors using Basic, HSL, or Curves settings.
When you are done, click "Save as Custom".
Step 6. Add effects and save your video
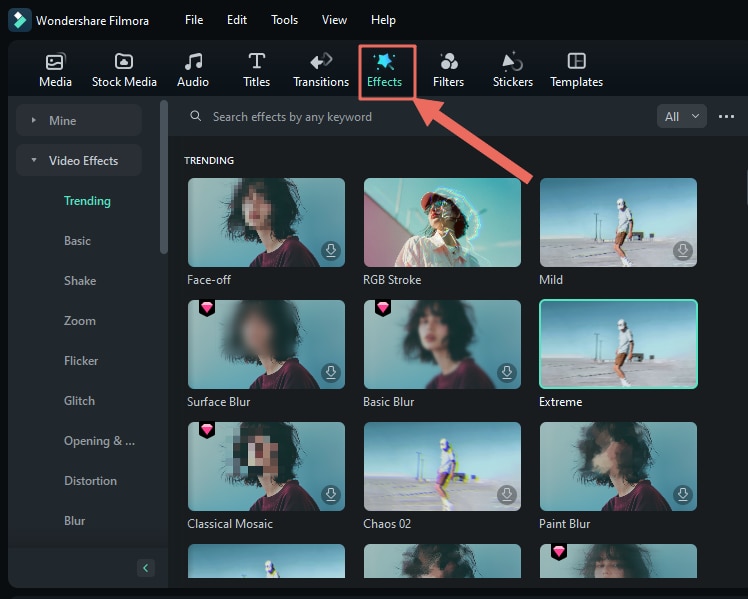
Click on “Effects” in the top left corner. Look through the options in Filmora to find something you like. You can choose from your downloads or find one online. Then, drag the effect onto the “Adjustment Layer” in the timeline.
When you’re happy with your edits, click “Export” to save your project.
Conclusion
Using compound clips in CapCut helps you organize your video by putting clips, images, and effects into one neat package. This makes editing easier and your timeline cleaner. And throughout the article, we’ve shown you how to use compound clips in CapCut to make your edits smoother.
If you want another option, Wondershare Filmora is a great choice too. It lets you create compound clips and has extra tools like Adjustment Layers to help with editing. Plus, Filmora is affordable, so it’s a good option for everyone.


 100% Security Verified | No Subscription Required | No Malware

