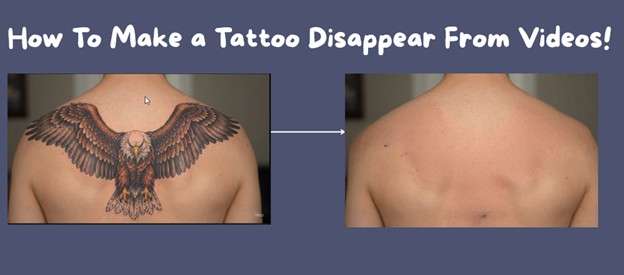
Tattoos are a timeless form of self-expression. They tell stories, show personality, and sometimes spark curiosity. But there are moments when you’d rather keep them hidden. Maybe you want a clean look for a professional video, or perhaps you’re just having fun trying to surprise your friends. While people often turn to makeup or clothing in real life, editing offers an easier way to hide tattoos in videos.
Thanks to modern video tools, it’s possible to remove tattoos from video. You can do it straight from your laptop when you send or upload a video. This article will explain practical ways to remove tattoos from videos quickly and effectively.
In this article
How To Remove Tattoos From Videos With the Help of Filmora
Removing tattoos from a video might sound complicated, but tools like Wondershare Filmora make it much easier. Filmora is a popular video editing software known for its simple interface and rich features. It helps beginners and experienced editors create professional-looking videos without spending hours figuring things out.
Filmora stands out because of its balance between power and simplicity. Here are some of its key features that make tattoo removal possible:
- Masking and blending tools: These help you cover tattoos by layering parts of the image.
- Color correction and grading: Adjust brightness, temperature, and saturation so the edited parts match the surrounding skin.
- AI tools: Newer versions come with AI-powered tools like AI Object Remover, which makes the process faster.
- Drag-and-drop interface: Editing feels less technical and more creative.
- Built-in effects and filters: Help refine the final look, so edits don’t look obvious.
This program also provided multiple templates that can effectively generate outstanding videos within one click!


Using Filmora, you can manually edit tattoos or use AI to do it with just a few clicks.
How To Remove Tattoos By Manual Editing
First, here’s a step-by-step guide to manually editing tattoos out of your video using Filmora:
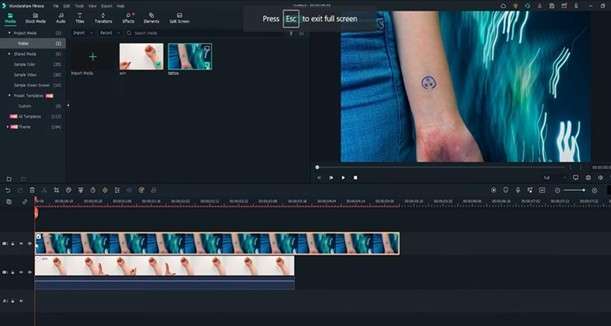
Step 1: Drag and drop the video clip onto the first video track. Then, place the tattoo picture on the second video track.
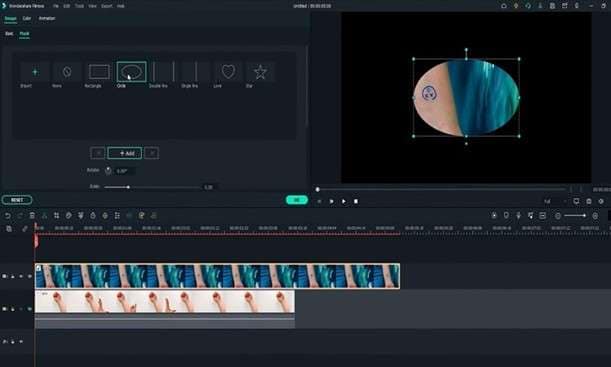
Step 2: Add a mask around the tattoo part of the picture. To do this, hide the first video track to see the mask. Double-click the image on the timeline to open the settings window at the top left. In the Mask section, choose the circle shape. You’ll see the mask applied.
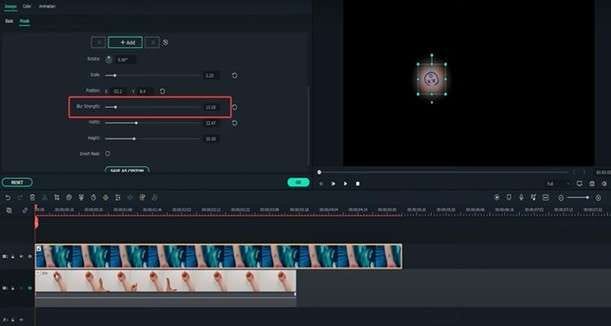
Step 3: Adjust the mask’s size and position to cover only the tattoo part you want to edit. Now, you’ll learn how to blur tattoos in a video. Do this by increasing the Blur Strength to soften the edges of the mask, which helps it blend better.
Step 4: Unhide the first video track with the arm video once the mask looks right. Move and resize the tattoo layer to fit naturally over the original tattoo on the arm clip.
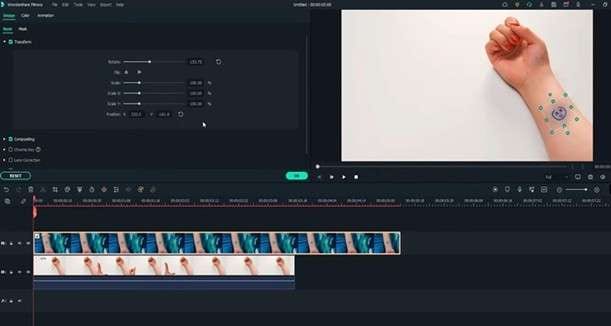
Step 5: Use color correction tools to make the new tattoo layer look natural. Double-click the tattoo on the timeline to open the settings again. Find the Color section and open the Tone menu. Adjust the brightness until it looks close to the surrounding skin.
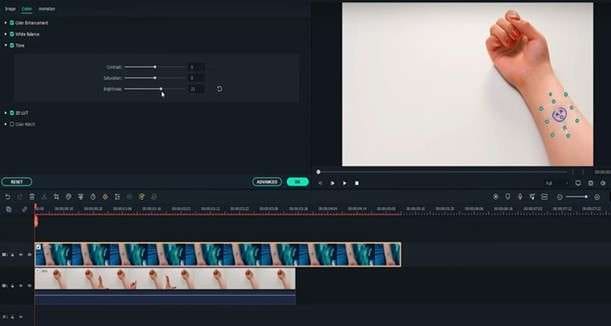
Step 6: Open the White Balance menu and tweak the temperature. You can also change contrast and saturation if needed. When it matches, click OK. The tattoo should now blend smoothly into the arm video.
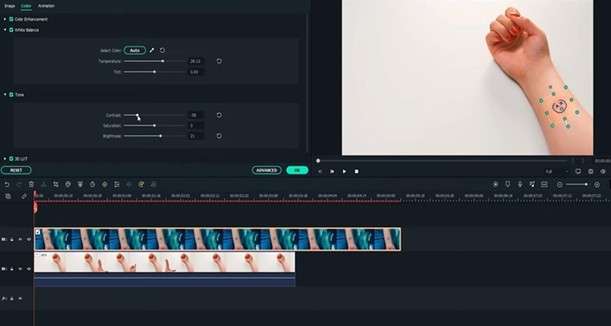
This method works best when the tattoo isn’t moving around too much or the video has a stable background.
How To Remove Tattoos From Videos With AI
As mentioned earlier, there’s also a quicker way to do this, which is through the AI Object Remover. Here’s how you can use it for free AI tattoo removal (on your first time):
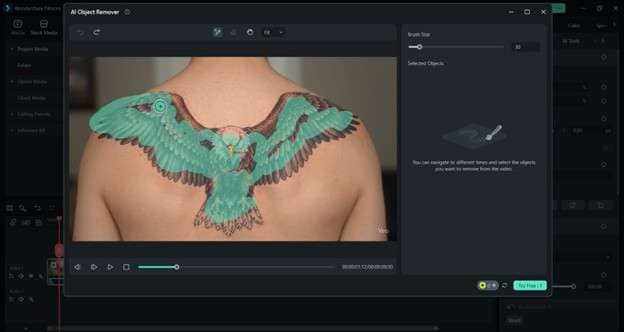
Step 1: Look for the AI Object Remover Tool on the toolbar after importing your videos.
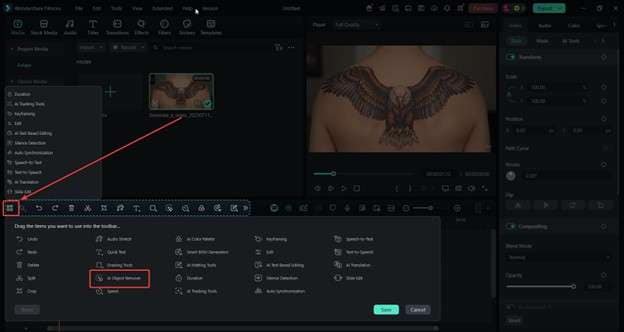
Step 2: Use the Brush across the tattoo to remove it. Once done, click Try Free (if you’re using free AI credits) or Done.
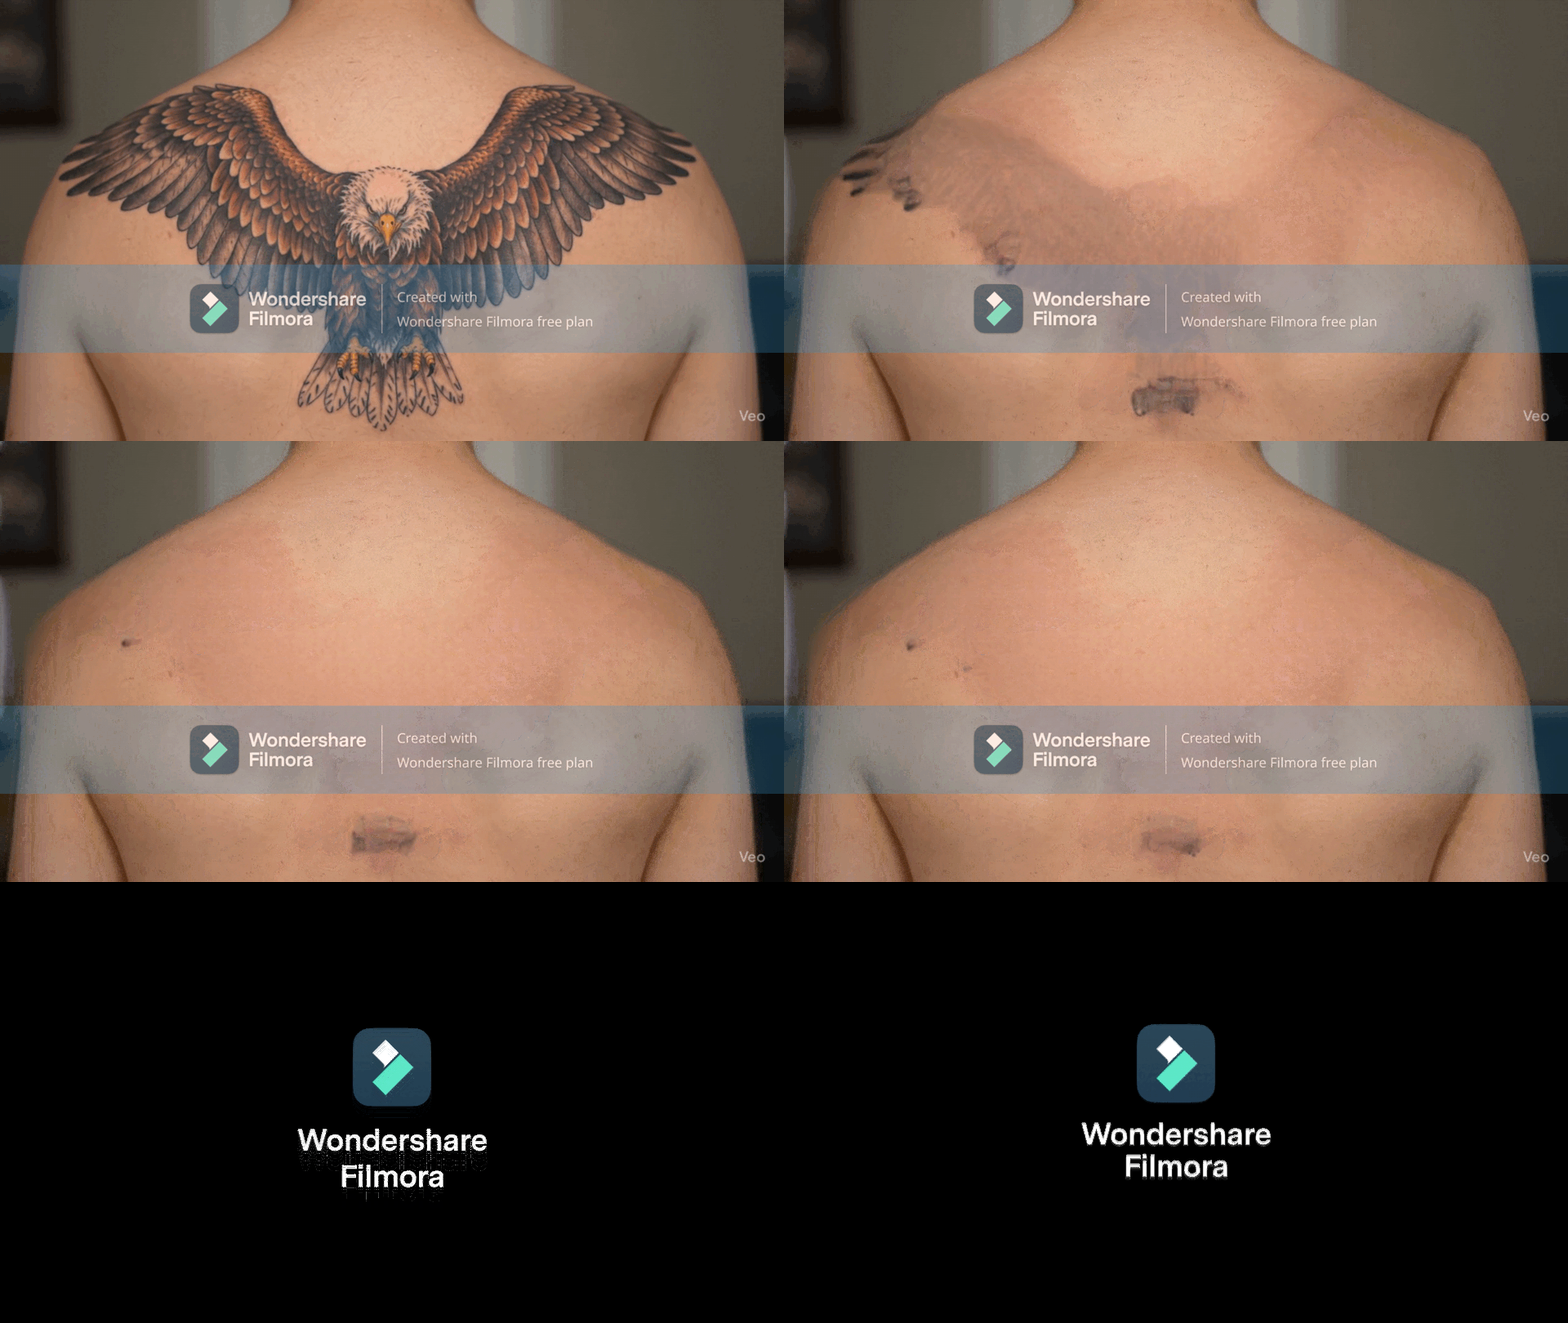
By the end, you should get something like this (make sure to refine it further):
Remove Tattoos From a Video Like a Magic Trick (Sample Editing Workflow)
Want to amaze your followers by making it seem as if the tattoo vanishes on screen? This sample workflow is a fun way to create a magic-like effect, perfect for short videos or social media content. Using Filmora, you can remove tattoos from a video in a fun way.
After learning the technical skills from the previous example, here’s an idea you can follow. First, follow the steps in the previous manual removal of tattoos section. Then, use the guide here:
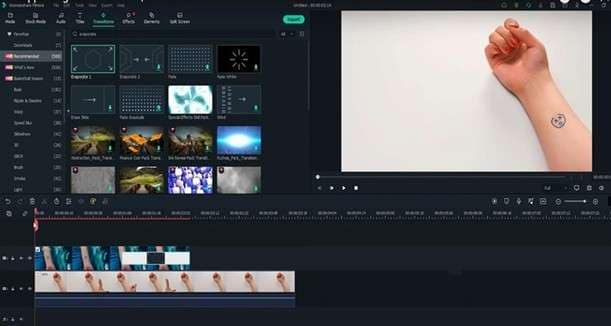
Step 1: Move the playhead to where you want the tattoo to vanish. Trim the tattoo picture clip so it ends there.
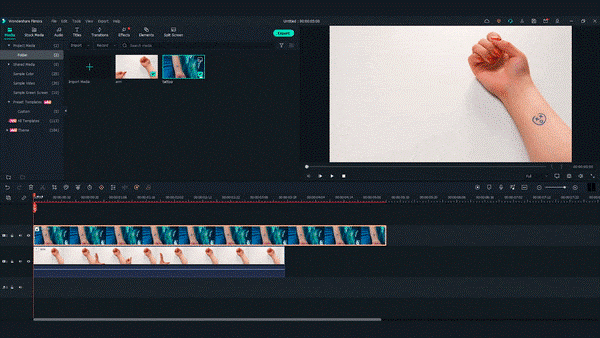
Step 2: Go to the Transitions window. Find “Evaporate 1” and drag it to the end of the tattoo clip.
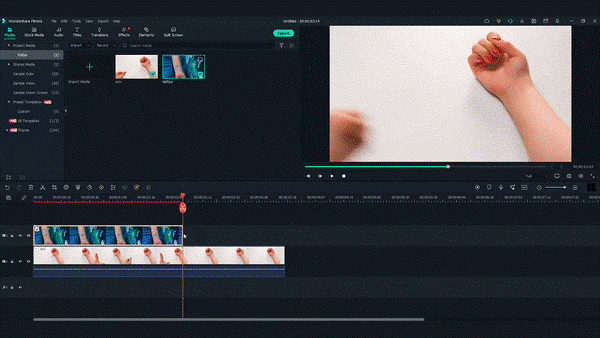
Step 3: Adjust the length of the transition if needed. Play back your video to see the tattoo fade out smoothly like magic.
Conclusion
Tattoos can be meaningful, but sometimes you might want to hide them in videos. Maybe it’s for work, a creative project, or to surprise your friends. As we covered, you can do this manually by masking and color correction, or by removing tattoos from videos with AI.
You can even add fun effects to make a tattoo vanish like magic. Among editing tools, Wondershare Filmora stands out for being both powerful and easy to use. It helps anyone create smooth, professional-looking videos without complicated steps. Give it a try and see how editing becomes simpler.
FAQ
-
Can you remove tattoos from a video?
Yes, you can. With video editing tools, it’s possible to hide or erase tattoos frame by frame. Editors use masking, color correction, and blending to cover tattoos naturally. Some tools even offer AI-powered object removal, making the process faster and easier. While results depend on video quality and movement, it’s doable, as seen throughout this article. Yes, you can. With video editing tools, it’s possible to hide or erase tattoos frame by frame. Editors use masking, color correction, and blending to cover tattoos naturally. Some tools even offer AI-powered object removal, making the process faster and easier. While results depend on video quality and movement, it’s doable, as seen throughout this article. Is there an app that removes tattoos? -
Is there an app that removes tattoos?
Yes, there are several apps and desktop programs that can help. Wondershare Filmora, for example, lets you remove tattoos manually or with AI. Mobile apps also exist, but might not have the same professional finish. Yes, there are several apps and desktop programs that can help. Wondershare Filmora, for example, lets you remove tattoos manually or with AI. Mobile apps also exist, but might not have the same professional finish. Is tattoo removal with AI free? -
Is tattoo removal with AI free?
Some AI tools offer free trials or limited versions, but most full-featured AI object removers are paid. Filmora’s AI Object Remover is included in its paid plans. Free tools might help for quick edits, but they often add watermarks or limit export quality. Some AI tools offer free trials or limited versions, but most full-featured AI object removers are paid. Filmora’s AI Object Remover is included in its paid plans. Free tools might help for quick edits, but they often add watermarks or limit export quality. Editing tattoos from a video might sound tricky, but it’s more common than you think. Many creators do it for social media, professional projects, or to keep a clean look on screen. Below are some common questions about removing tattoos from videos and what you can do. -
Can you remove tattoos from a video?
Yes, you can. With video editing tools, it’s possible to hide or erase tattoos frame by frame. Editors use masking, color correction, and blending to cover tattoos naturally. Some tools even offer AI-powered object removal, making the process faster and easier. While results depend on video quality and movement, it’s doable, as seen throughout this article. Yes, you can. With video editing tools, it’s possible to hide or erase tattoos frame by frame. Editors use masking, color correction, and blending to cover tattoos naturally. Some tools even offer AI-powered object removal, making the process faster and easier. While results depend on video quality and movement, it’s doable, as seen throughout this article. Is there an app that removes tattoos? -
Is there an app that removes tattoos?
Yes, there are several apps and desktop programs that can help. Wondershare Filmora, for example, lets you remove tattoos manually or with AI. Mobile apps also exist, but might not have the same professional finish. Yes, there are several apps and desktop programs that can help. Wondershare Filmora, for example, lets you remove tattoos manually or with AI. Mobile apps also exist, but might not have the same professional finish. Is tattoo removal with AI free? -
Is tattoo removal with AI free?
Some AI tools offer free trials or limited versions, but most full-featured AI object removers are paid. Filmora’s AI Object Remover is included in its paid plans. Free tools might help for quick edits, but they often add watermarks or limit export quality. Some AI tools offer free trials or limited versions, but most full-featured AI object removers are paid. Filmora’s AI Object Remover is included in its paid plans. Free tools might help for quick edits, but they often add watermarks or limit export quality.


 100% Security Verified | No Subscription Required | No Malware


