Video content is more popular than ever, and finding new ways to create creative projects is a must for content creators. And because of that, tools like sound-to-video converters, including AI-powered options, are transforming how we create content.
So, if you’re looking to turn your audio into stunning visuals, a voice-to-video converter is exactly what you need. But if you’re new to all this, picking the best converter can feel a bit overwhelming.
Don’t worry, though—we’ve got you covered! Let’s explore the top 6 tools to convert audio files to video, ranked by features, usability, and quality.
In this article
Part 1. Creative Ways to Use Audio-to-Video Converters
Before you dig deeper into the top tools to convert audio files into videos, it’s important to understand just how useful audio-to-video converters can be. By knowing their full potential, you’ll have a better idea of how to use them effectively and what features to look for. This will make it so much easier to narrow down your options and choose the voice-to-video converter that’s perfect for your project.

Here are some fun and practical ways to use audio-to-video converters:
- Storytelling Videos: Tell engaging stories by combining voiceovers with simple illustrations or animated scenes.
- Lyric Videos: Create music videos by pairing audio with creative text animations.
- Audiobook Snippets: Create promotional videos for audiobooks with images and captions.
- Educational Content: Add visuals to audio lectures or tutorials to make your lessons more engaging and easier to follow.
- Social Media Marketing: Use these tools to craft short, shareable audio-driven content that grabs attention and boosts engagement.
Part 2. Best Audio-to-Video Converters Ranked
Now that you’ve got a good idea of how audio-to-video converters can take your projects to the next level, let’s check out the best tools available. To ensure each tool on this list is reliable, we tested them all by using the same audio file to convert it into a video. We’ll walk you through their standout features, pros, and cons so you can pick the perfect one for your needs.
Here's our list of top audio-to-video converters, ranked by usability, features, and overall quality:
1. Wondershare Filmora
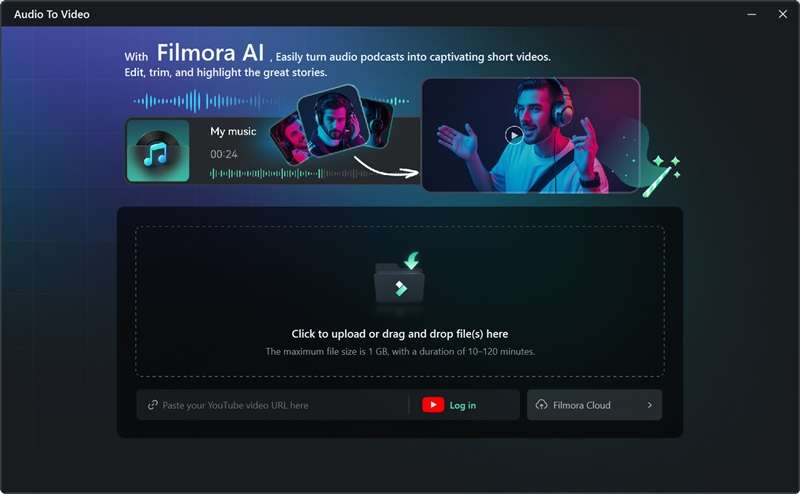
Wondershare Filmora takes the top spot on our list, and for good reason. This all-in-one video editor is packed with AI-powered tools, including an impressive audio-to-video converter feature that can quickly turn your audio files into stunning videos.
If you’re in a hurry, you can use its creative templates to make engaging videos in no time. And if you want to add your personal touch, Filmora’s AI editing tools give you plenty of options to customize and make your videos even more stand out.
Standout Features You’ll Love:
- Advanced Audio-to-Video Converter: Filmora's AI Audio-to-Video feature can turn imported audio into video using smart AI technology.
- Auto-Trim Highlights: Automatically picks the best parts of your audio and creates engaging clips.
- Smart Summaries & Voice Cloning: Summarizes audio and uses AI to mimic your voice for a seamless match.
- Versatile Styles: Choose from formats like Chinese painting, 3D cartoon, anime, oil painting, and more.
- Creative Templates: Access a wide variety of templates for quick, professional results.
- Complete Editing Toolkit: Once your video is generated, you can use Filmora’s powerful editing tools to customize it and make it stand out even more.
- Easy Sharing: Publish your videos directly to platforms like YouTube and short-video apps.
As you can see, Filmora helps convert your audio into a video in a simple way yet delivers amazing results! Plus, it’s affordable, and there’s even a free trial so you can try it out before deciding to buy.
To help you get a better understanding of how Filmora’s audio-to-video converter works, just follow this simple guide:
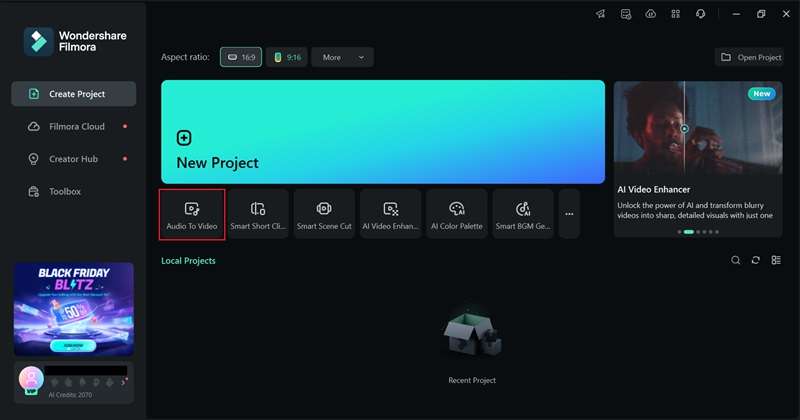
Step 1. Launch Filmora and access the Audio-to-Video feature
Download the latest version of Filmora if you haven’t already. Then, follow the installation steps and open the program. Once you’re in there, select the “Audio-to-Video” option below “New Project”.
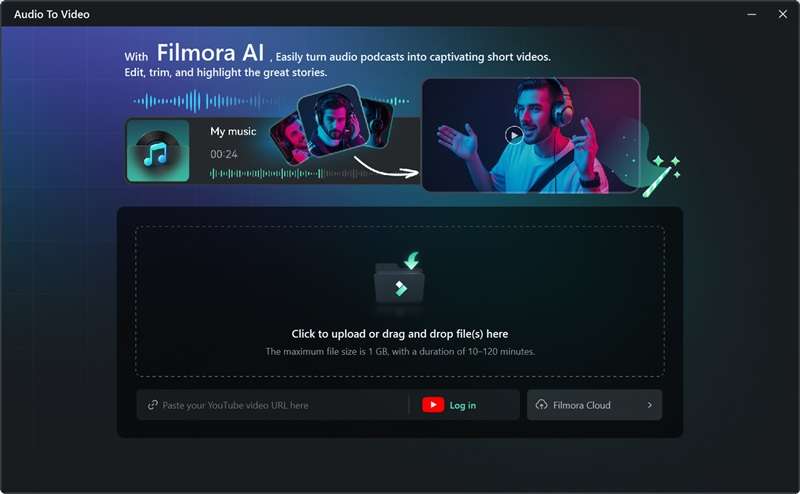
Step 2. Import audio file
Next, upload your audio by clicking the Filmora logo, or simply paste the YouTube URL link (you’ll need to log in to your account first). Just keep in mind that the audio file should be between 10 and 120 minutes long and under 1 GB.
Step 3. Change settings to your liking
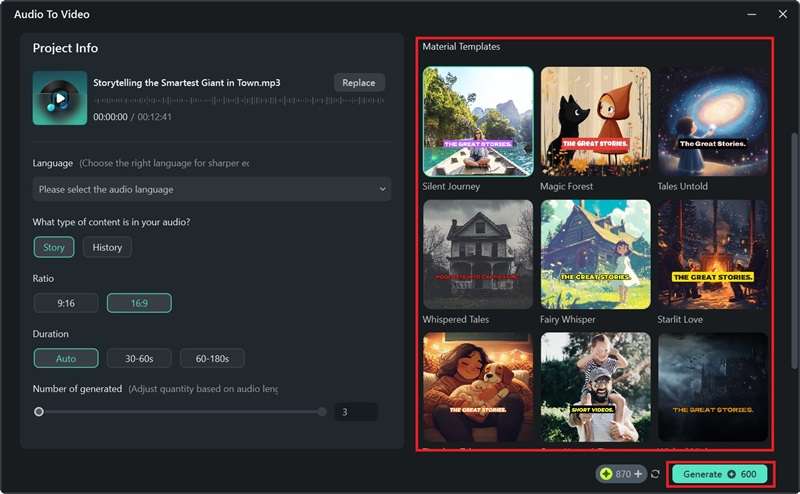
Before converting your audio file into a video, adjust the settings to match your needs. Start by selecting the language used in your audio, then choose the type of video you want to create—whether it’s a storytelling video or a historical retelling.
Next, set the “Ratio” and “Duration” for your video. You can also pick a “Picture Style” or upload your own image to customize the final video.
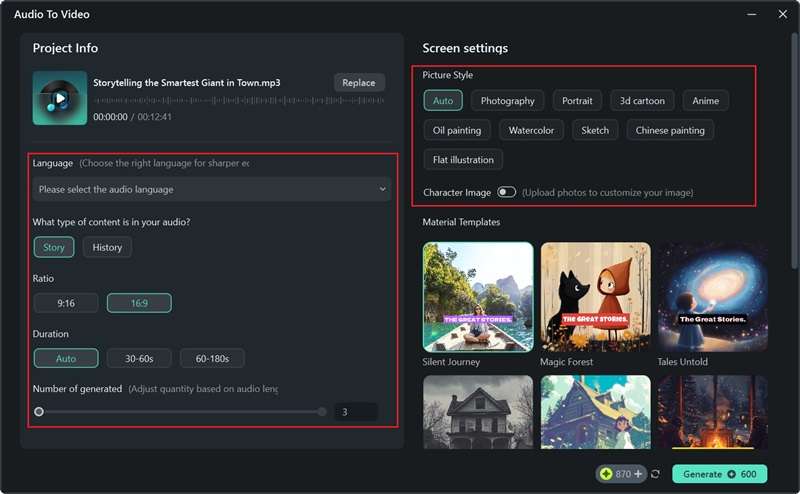
If you scroll down, you’ll find a variety of templates from Filmora. If one matches your vision, just click on it. Once everything looks good, hit the “Generate” button, and wait a few minutes for Filmora to generate your video.
Step 4. Preview resulted video and further edits if needed
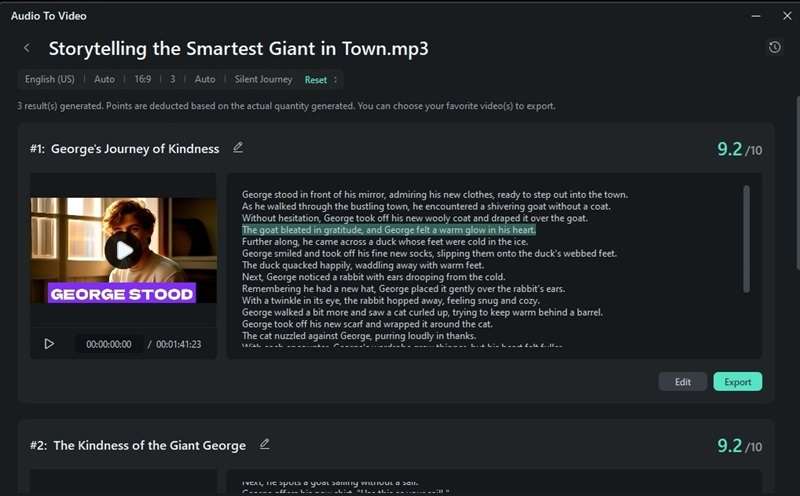
Once your video is ready, you’ll see 1-3 AI-generated video options along with their ratings. Just hit the play button to preview how they turned out. If you’re satisfied, you can export your video right away. But if you want to make other adjustments, click "Edit" and you'll be taken to Filmora’s main editing timeline.
Step 5. Customize your video
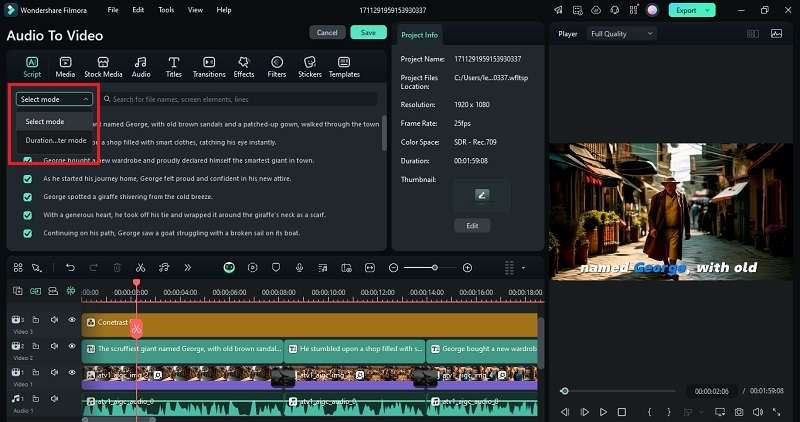
In the main timeline, you can choose to view the script in either Select mode or Duration Filter mode. Select mode lets you hide or display specific sections of the script as needed. On the other hand, Duration Filter mode allows you to organize and filter content by its timecode.
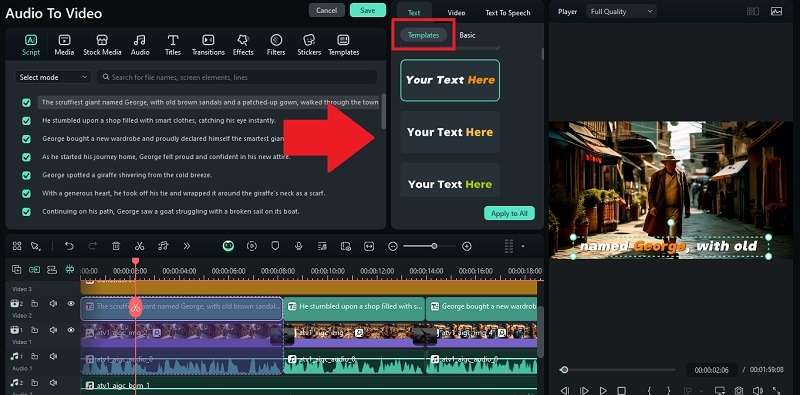
When you select the script or text in the preview window, the property panel will open. Select "Template" to customize and adjust the dynamic caption. Choose the template you prefer, and click "Apply to All" to use it for all captions in your project.
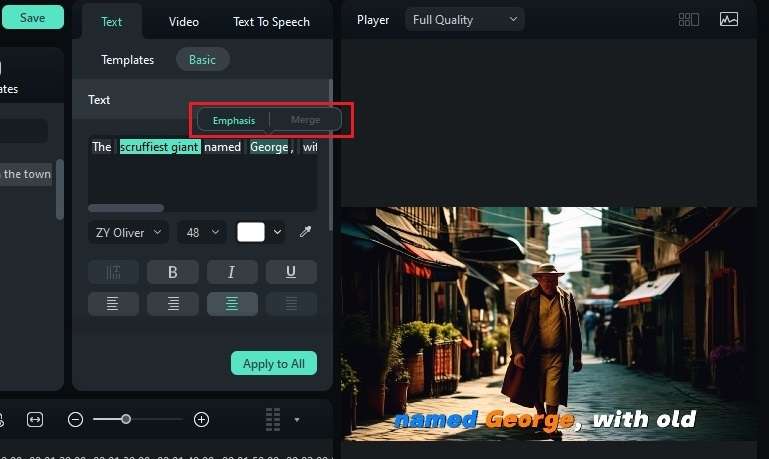
To edit the script, go to the Text > Basic tab in the property panel. Here, you can edit the script and highlight specific words for emphasis or merge them to ensure a smoother flow.
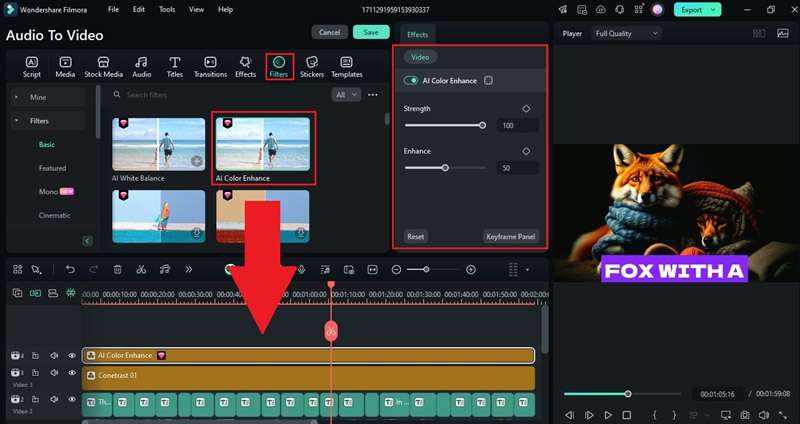
To give your video that extra edge, you can add filters to enhance its appearance. Simply head to the “Filter” tab, choose your favorites, and apply them to your video. In the property panel, you can further adjust the intensity or fine-tune the filter for an even better effect.
You can also make your video more accessible for international viewers by adding subtitles with translations. Filmora’s Text-to-Speech feature makes this super easy. To learn more about this feature, check out Filmora’s official guide on this feature: Filmora’s Text-to-Speech Official Guide.
Step 5. Save and share your video
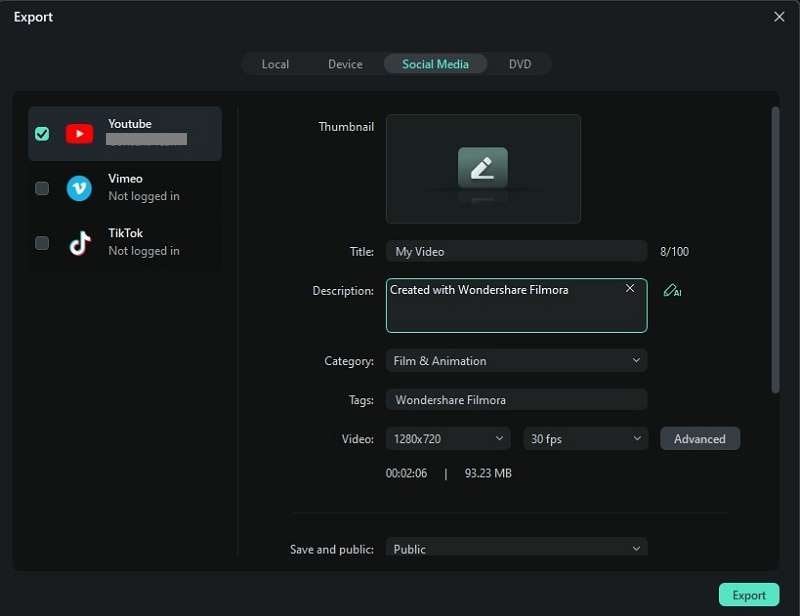
When you’re happy with your video, click “Export” in the top-right corner. If you want to share it straight to your favorite social media platforms, choose the “Social Media” option. If you’d rather save it to your device, select “Local". You can also customize the title, description, category, resolution, and other details to make sure everything is exactly how you want it!
And just like that, you’re done! Once you try it yourself, it’s clear why Filmora stands out as the best choice for converting audio to video. Its AI Audio-to-Video converter makes the process super simple and delivers amazing results. Plus, with its powerful editing tools, you can easily customize your video to make it truly unique.
But if you’re still curious about other options, no problem! Below, we’ll dive into more top audio-to-video converters you can check out.
2. Revid.AI
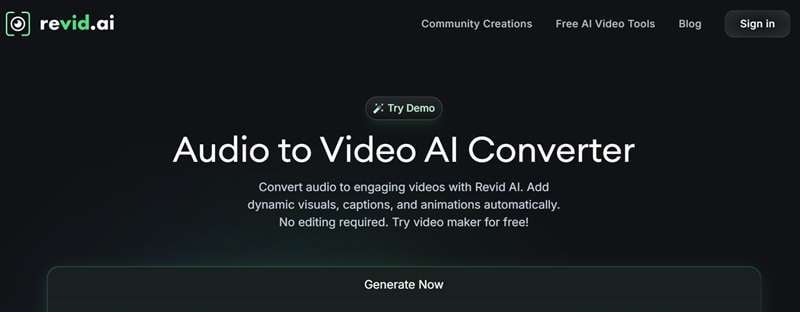
Continuing down our list of top audio-to-video converters, we have Revid.AI. It automatically adds dynamic visuals, captions, and animations, making it easy to create eye-catching content. Plus, you can customize various settings to match your style and project needs. Just note that you’ll need to log in, and the final video will be sent to your email.
Standout Features You’ll Love:
- Automatically finds the most interesting parts of your audio and adds engaging subtitles and visuals.
- Offers presets like Anime, Realist, Pixar, and more to match your preferred style.
- Supports three screen ratios: 9:16, 16:9, and 1:1.
- Lets you use stock images, moving AI images, AI videos, or your own media for the video.
3. Convert2video
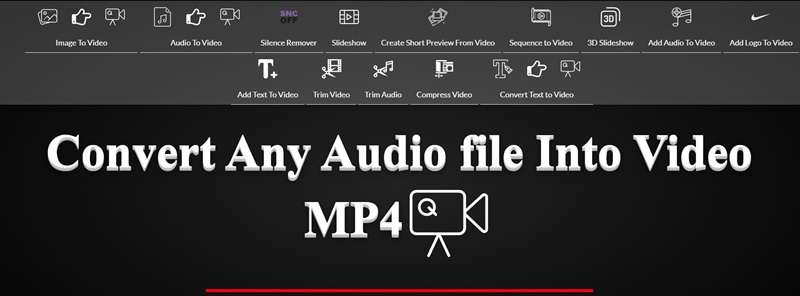
Next on our list of top audio-to-video converters is Convert2video. This online tool can convert any audio file into an MP4 video in just a few steps. Simply upload your audio, pick a background image, and let it work its magic. However, since the process can take some time, it’s best suited for shorter projects, like Instagram Reels or YouTube Shorts.
Standout Features You’ll Love:
- Choose from various background images or upload your own for a personalized touch.
- Supports video formats optimized for three popular platforms: YouTube, Instagram, and TikTok.
- Add your logo to the video to boost your branding.
- Beyond audio-to-video conversion, you can also trim videos, add text, or include extra audio.
4. Audio to Video Converter
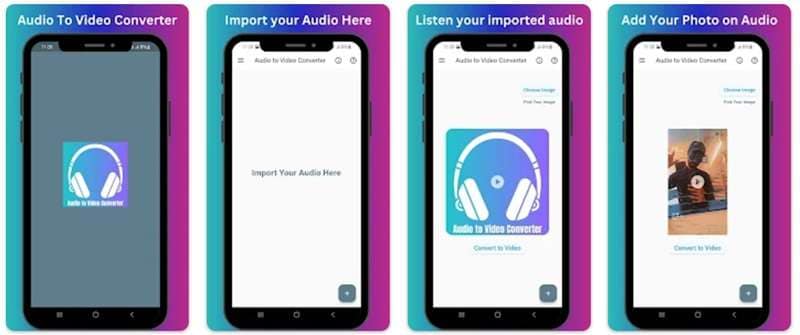
Audio-to-Video Converter is another great option for those looking to convert their audio file to video on your phone. Available for Android and iPhone users, this app lets you turn your audio files into videos by adding photos for a personalized touch. While the free version includes ads, they’re not overly intrusive, so the app remains perfectly usable.
Standout Features You’ll Love:
- Add a photo to your audio file to create a video.
- Professional, user-friendly interface that’s easy to navigate.
- Works with voice recorder files to create videos.
- No usage limits—convert as many files as you want.
5. Clideo
Lastly, another great option for converting audio files to video is Clideo. This online tool is super easy to use and supports a variety of popular formats for both audio and video. However, unlike some other tools, Clideo doesn’t generate visuals based on your audio—it simply creates a video file with a black screen and your audio playing in the background.

Standout Features You’ll Love:
- Offers conversion settings to adjust formats, frame rates, audio frequency, or channels.
- Supports video output in MP4, AVI, MOV, WEBM, and other popular formats.
- Allows conversion between common audio formats like MP3, WAV, OGG, and M4A.
- No software or codec installation is needed since it’s web-based.
🤩 Posts You Might Be Interested In: 5 Ways To Transfer Files To Your Computer >>
Conclusion
Audio-to-video converters have completely changed the game for creating dynamic content. They make it super easy to create storytelling videos, lyric videos, educational content, and more. So, we’ve rounded up the top 5 tools for converting audio into video: Filmora, Revid.AI, Convert2Video, Audio to Video Converter, and Clideo.
After diving into their features and testing each one, it’s clear that Filmora stands out as the best overall option. Its AI Audio-to-Video converter feature offers multiple styles and templates, making it easy to create unique videos for any project. Plus, it comes with a full editing toolkit and advanced features, so you can customize your video and make it truly shine.


 100% Security Verified | No Subscription Required | No Malware

