Finding a video editor that allows you to blur faces for free can be challenging. Luckily, InShot performs this function, among other video editing capacities. InShot is a straightforward video editing app that makes it possible to blur faces quickly and for free. However, for a software with these advantages, many still wonder how to blur a face in InShot.
The good news is that this article has all the answers you need about the InShot blur face feature. We will also discuss the limitations of this video editing software and provide an alternative for blurring faces seamlessly. So, without further ado, let’s begin!
In this article
Part 1. How to Blur Faces in InShot

Before getting into the steps to blur faces in InShot, you must note that you can’t directly install the official InShot tool on your computer. Instead, you’re going to need a simulator such as BlueStacks. However, you can use the official app on your mobile phone. Here is how to blur faces in InShot on mobile:
Using the Sticker Blur
Step 1: Launch InShot and import your video into the editing suite. Then, go to Sticker in the bottom menu.

Step 2: Select Detail from the options and cpck the blur you want.

Step 3: Adjust the blur properties, including dimensions, strength, shape, and position, according to your preference.

Step 4: Adjust the duration of the blur so it lasts till the end of the video. Then, use keyframing to ensure the blur stays in place throughout.

Using InShot Effects
Step 1: Launch InShot and import your preferred video. Set the dimensions to your preferences.

Step 2: From the lower panel, cpck on Effects.

Step 3: Select Blur and add the blurring effect you want. Then, adjust the strength of the blur.

Step 4: Adjust the duration of the effect and export the video to your phone. Then, go back to the editing suite.

Step 5: From the lower panel, cpck on PIP and add your blurred video to the timepne. Adjust it through the display so the dimensions are the same as the clear video in the timepne. This ensures that the people in both videos are in the same positions.

Step 6: Cpck on the blurred video and select Mask from the editing options. Then, choose the circle mask shape and resize it according to the face.

Step 7: Finally, add a keyframe at the beginning of the video. If you see any point where the face moves away from the blur, pause the video and adjust the mask to cover the face again. Since you added a keyframe, the blur will follow the movement. Repeat this step until the face is covered throughout the video.

How to Blur Faces with InShot for PC
Once you’ve downloaded InShot via BlueStacks or any other simulator, you can follow the steps below to blur faces in InShot on your PC:
Step 1: Launch the apppcation and import your video.
Step 2: Go to Sticker on the main menu. Then, select Detail.
Step 3: Choose the type of blur you want.
Step 4: Adjust the blur’s properties, such as shape, strength, and duration. Then, add keyframing to make it stay in place on the face throughout the video.
Part 2. Limitations of Blurring Faces in InShot

While it has its perks, using InShot to blur faces comes with a number of limitations. With this in mind, while learning how to blur faces on InShot, you should also consider the limitations so you’re well prepared against them. Considering these issues can also help you decide if InShot can cater to your needs. Below are four limitations of blurring faces in InShot:
- The challenge of using InShot on PC: Since you have to access InShot on your PC via a third-party app, there can be issues with the platform's smooth running. This could lead to lagging, freezing, or even difficulty launching the platform.
- Lack of auto face recognition: While it offers stickers for blurring faces, the system doesn’t automatically recognize faces and attach the blur to them. So, manually adjusting the blurring can take extra time.
- No auto-face tracking:InShot doesn't have an auto-face tracking feature, so you have to manually add keyframing to your video to ensure the blur stays over the faces throughout the video. This requires both time and effort.
Part 3. The Best Alternative to InShot for Blurring Faces
Due to the limitations of trying to blur faces in InShot, it might not be the best option for you, especially if you’re looking for more advanced face-blurring effects that can save time and effort. For your editing experience to be seamless, you need a face-blurring tool with extensive functionalities, effects, and presets.

Wondershare Filmora is a versatile video editing tool with numerous video effects and templates tailored to suit any video. Whether you’re a beginner with video editing, an intermediate, or even a professional, our platform is the solution you’re looking for.
Filmora offers two major ways to achieve blurring faces directly from your desktop with just a few clicks. These are the Face-off and AI Mosaic tools. Here are some of Filmora’s top features for face blurring:
- Dynamic tracking ensures that the face blur stays in place throughout your video.
- Automatic face recognition spots individual faces in your video and adjusts the blur effect accordingly, saving you time and effort.
- Motion tracking enables the blur to move alongside the subject smoothly and naturally throughout the video.
- Blur faces in videos with extensive tools and dynamic interface.
- Vast video/audio effects and creative assets.
- Powerful AI for effortless content creation.
- Intuitive, professional yet beginner-friendly.
- Works on Mac, Windows, iOS, and Android.

How to blur faces using AI Mosaic
Before we get started, be sure to download Filmora from our official website. Now that you’re ready, below is how to blur faces in videos using Filmora’s AI Mosaic feature:
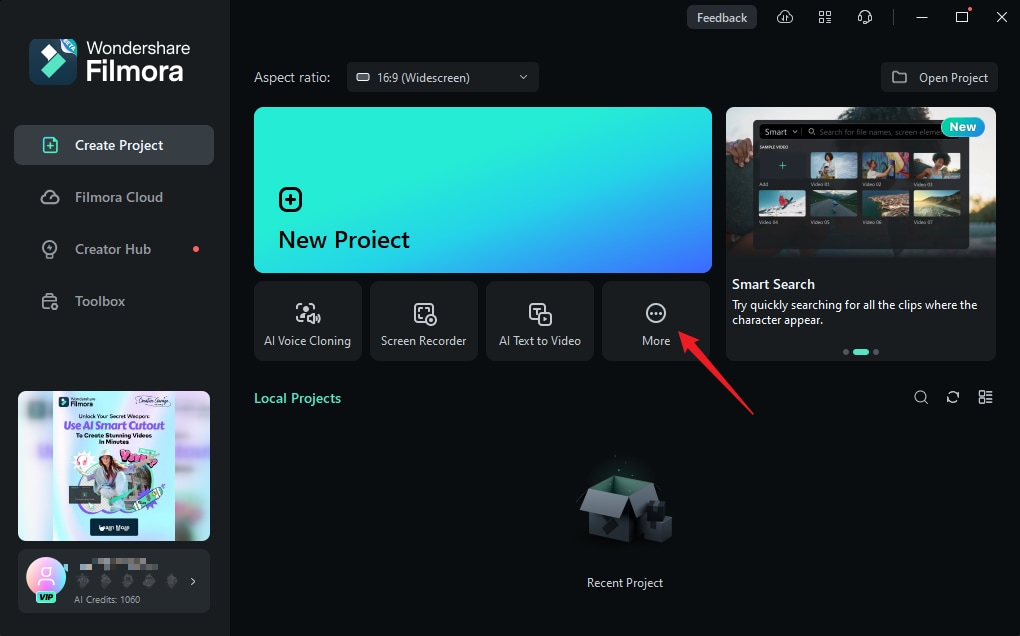
Step 1: Launch Filmora on your PC. Go to More or select the three dots at the end of the editing menu.
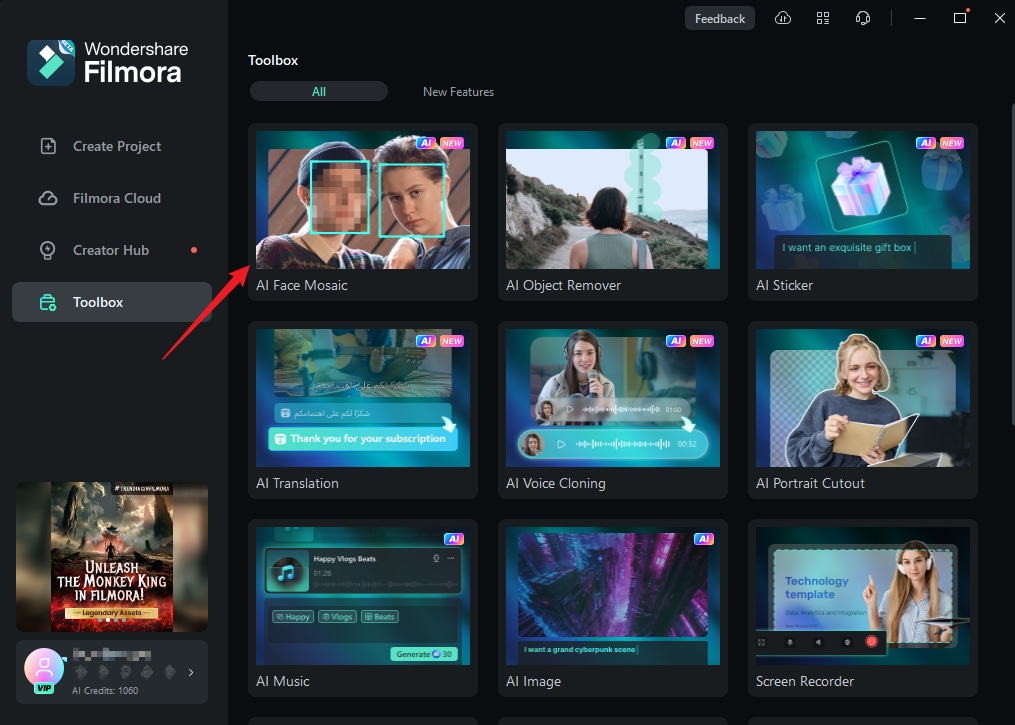
Step 2: Select AI Face Mosaic. Then, import your media for editing.
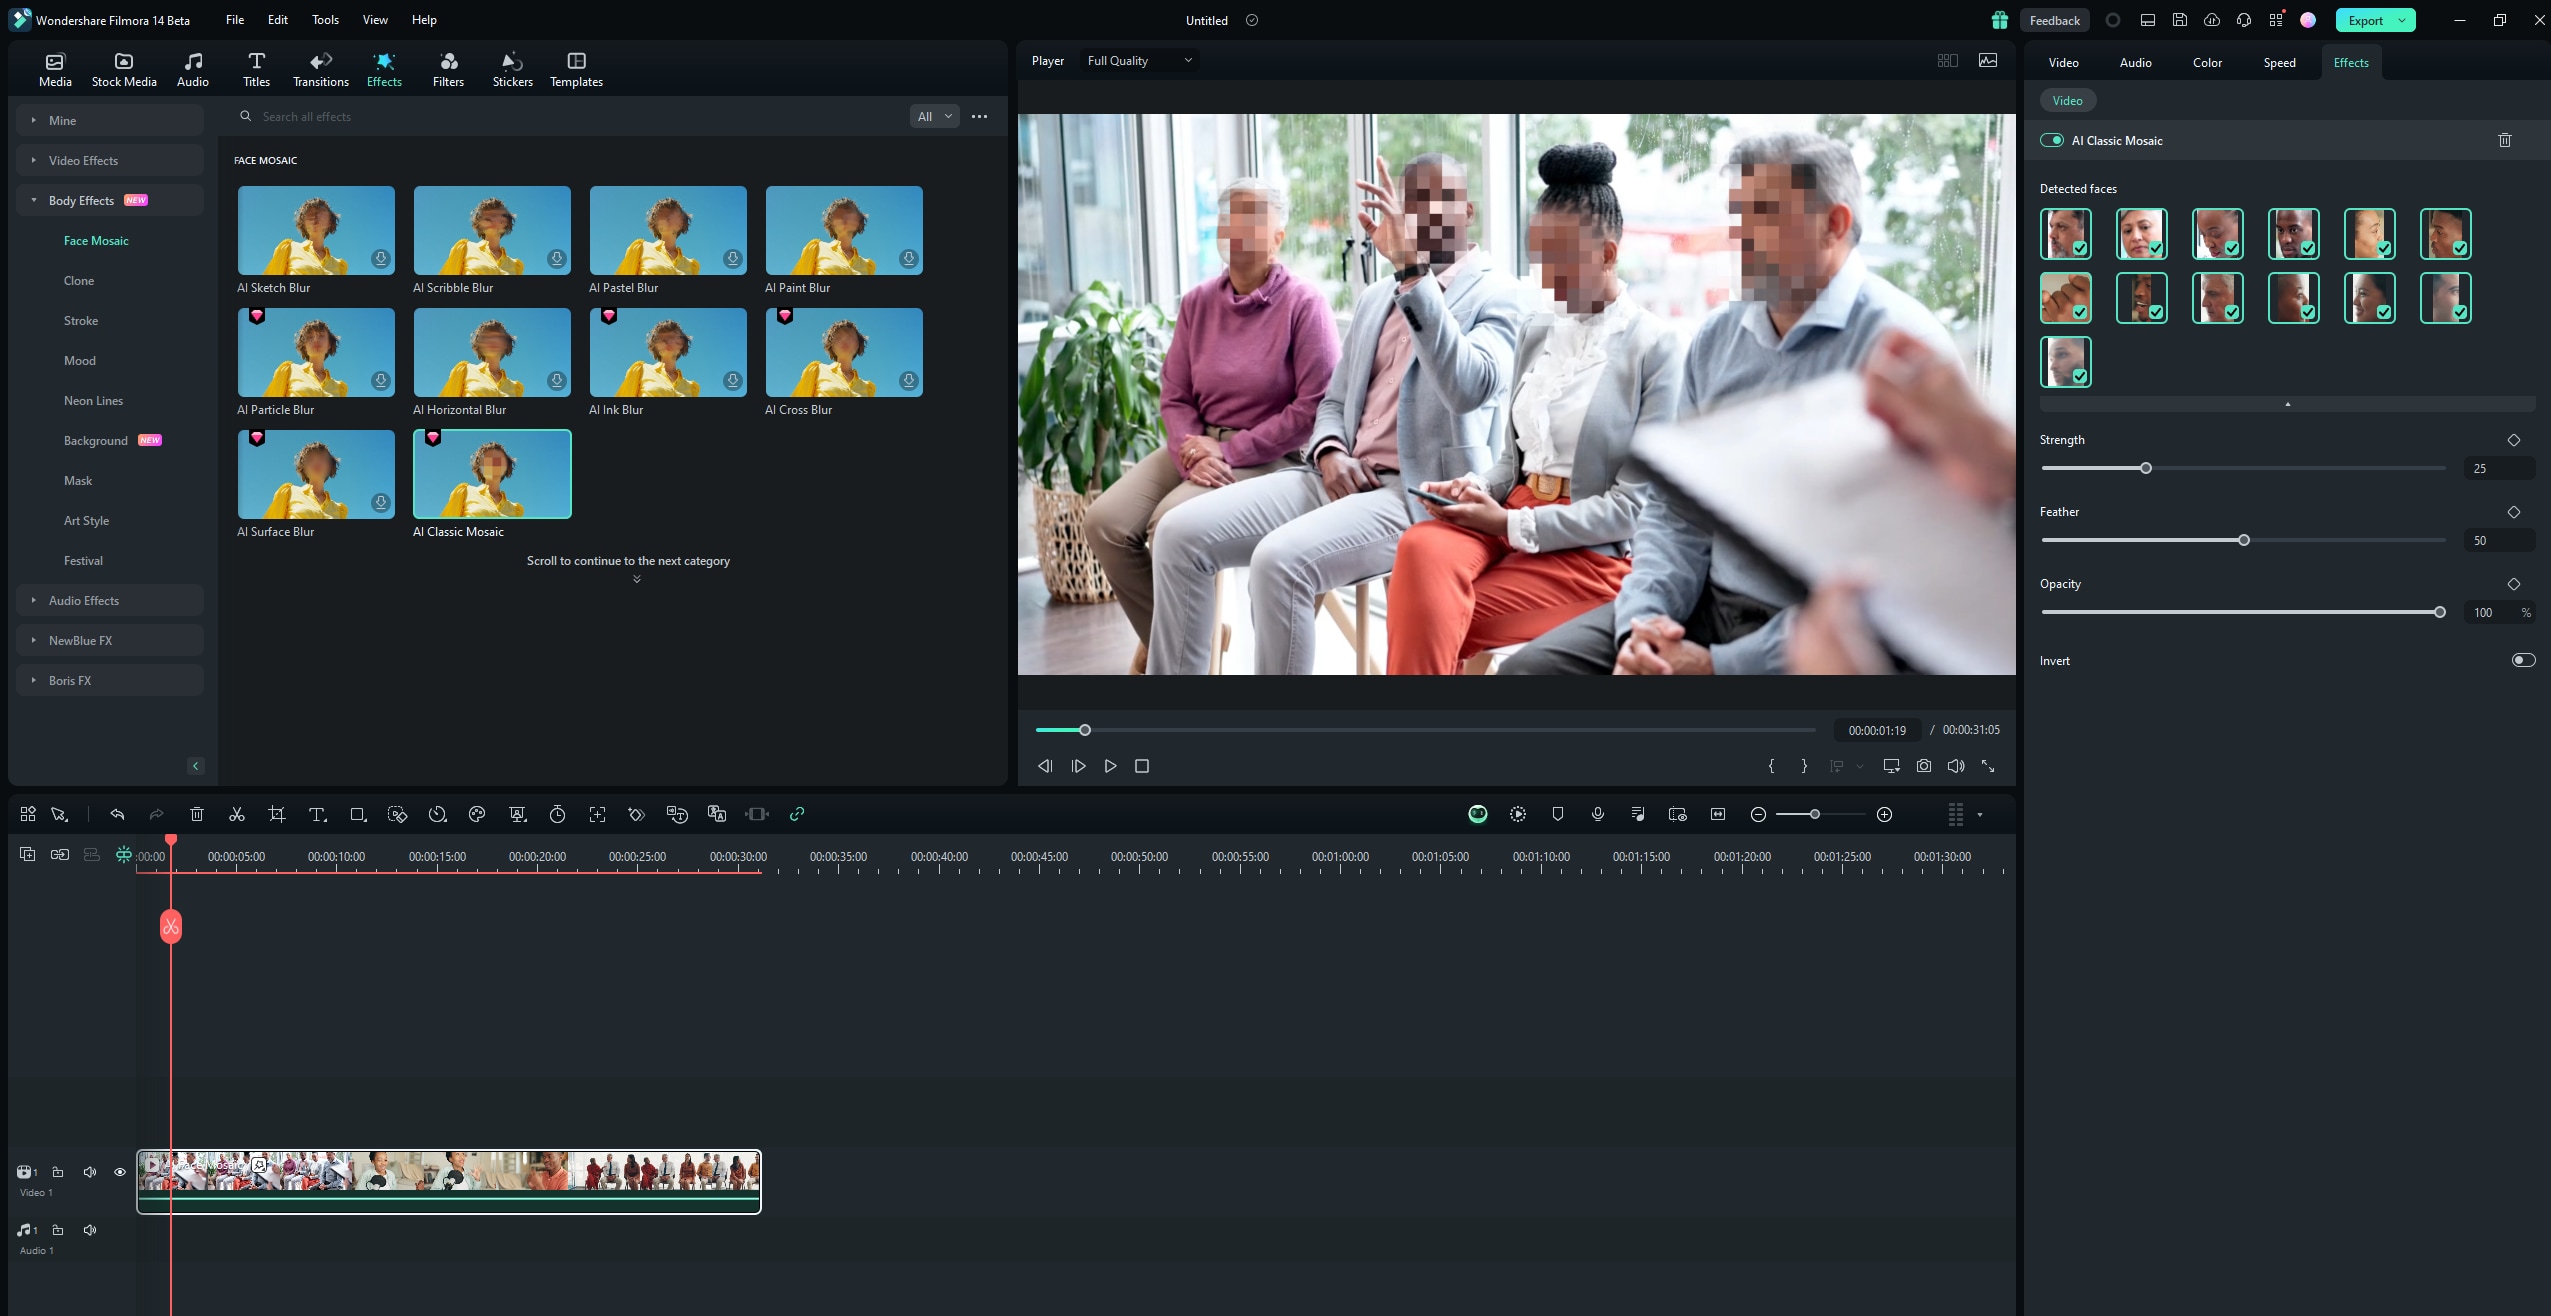
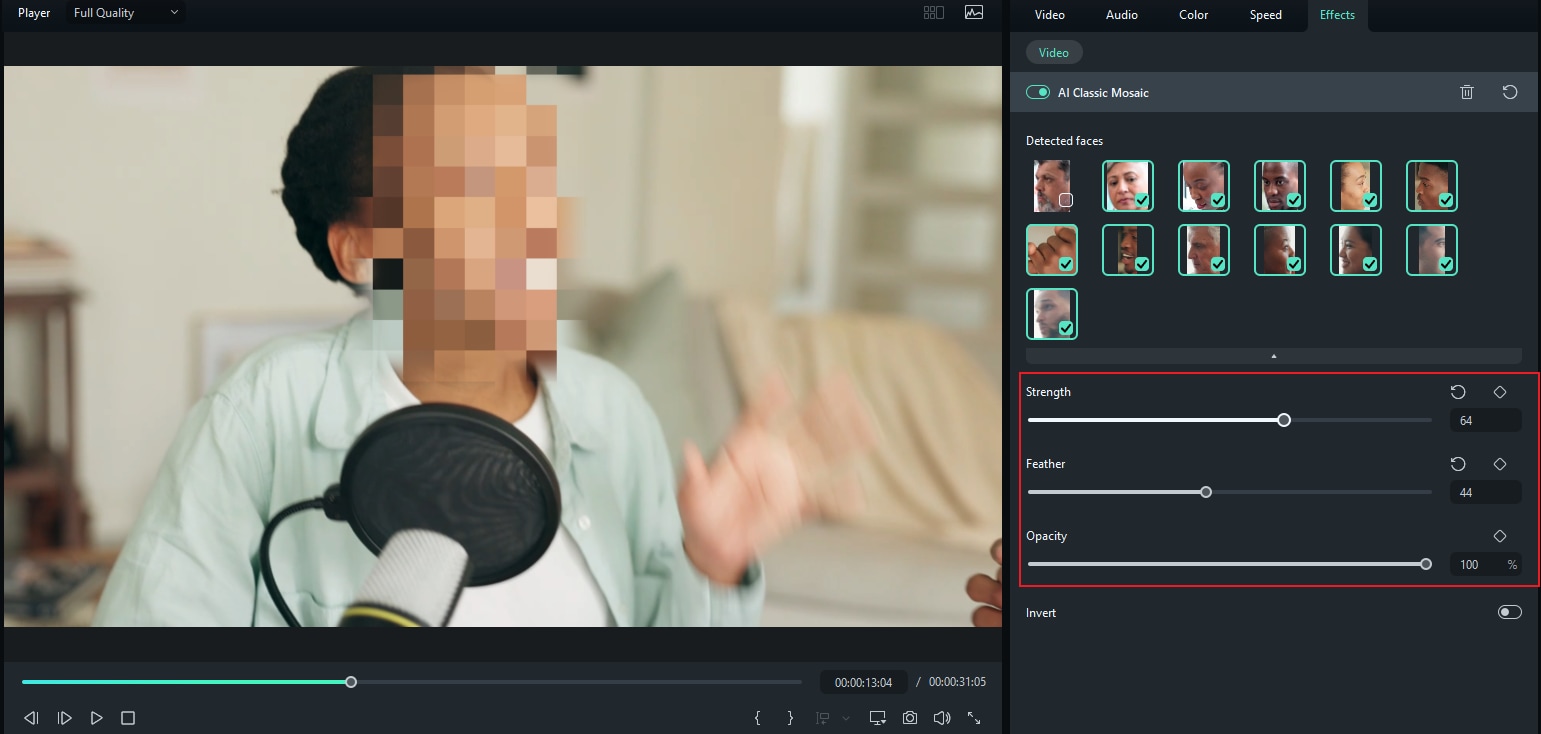
Step 3: Now, Filmora will automatically analyze the video and apply the blurring effect to all faces. Once this is done, each face will have the blur effect.
Step 4: To remove the mosaic blur effect from a face, deselect it from the right-hand panel in the editing suite.
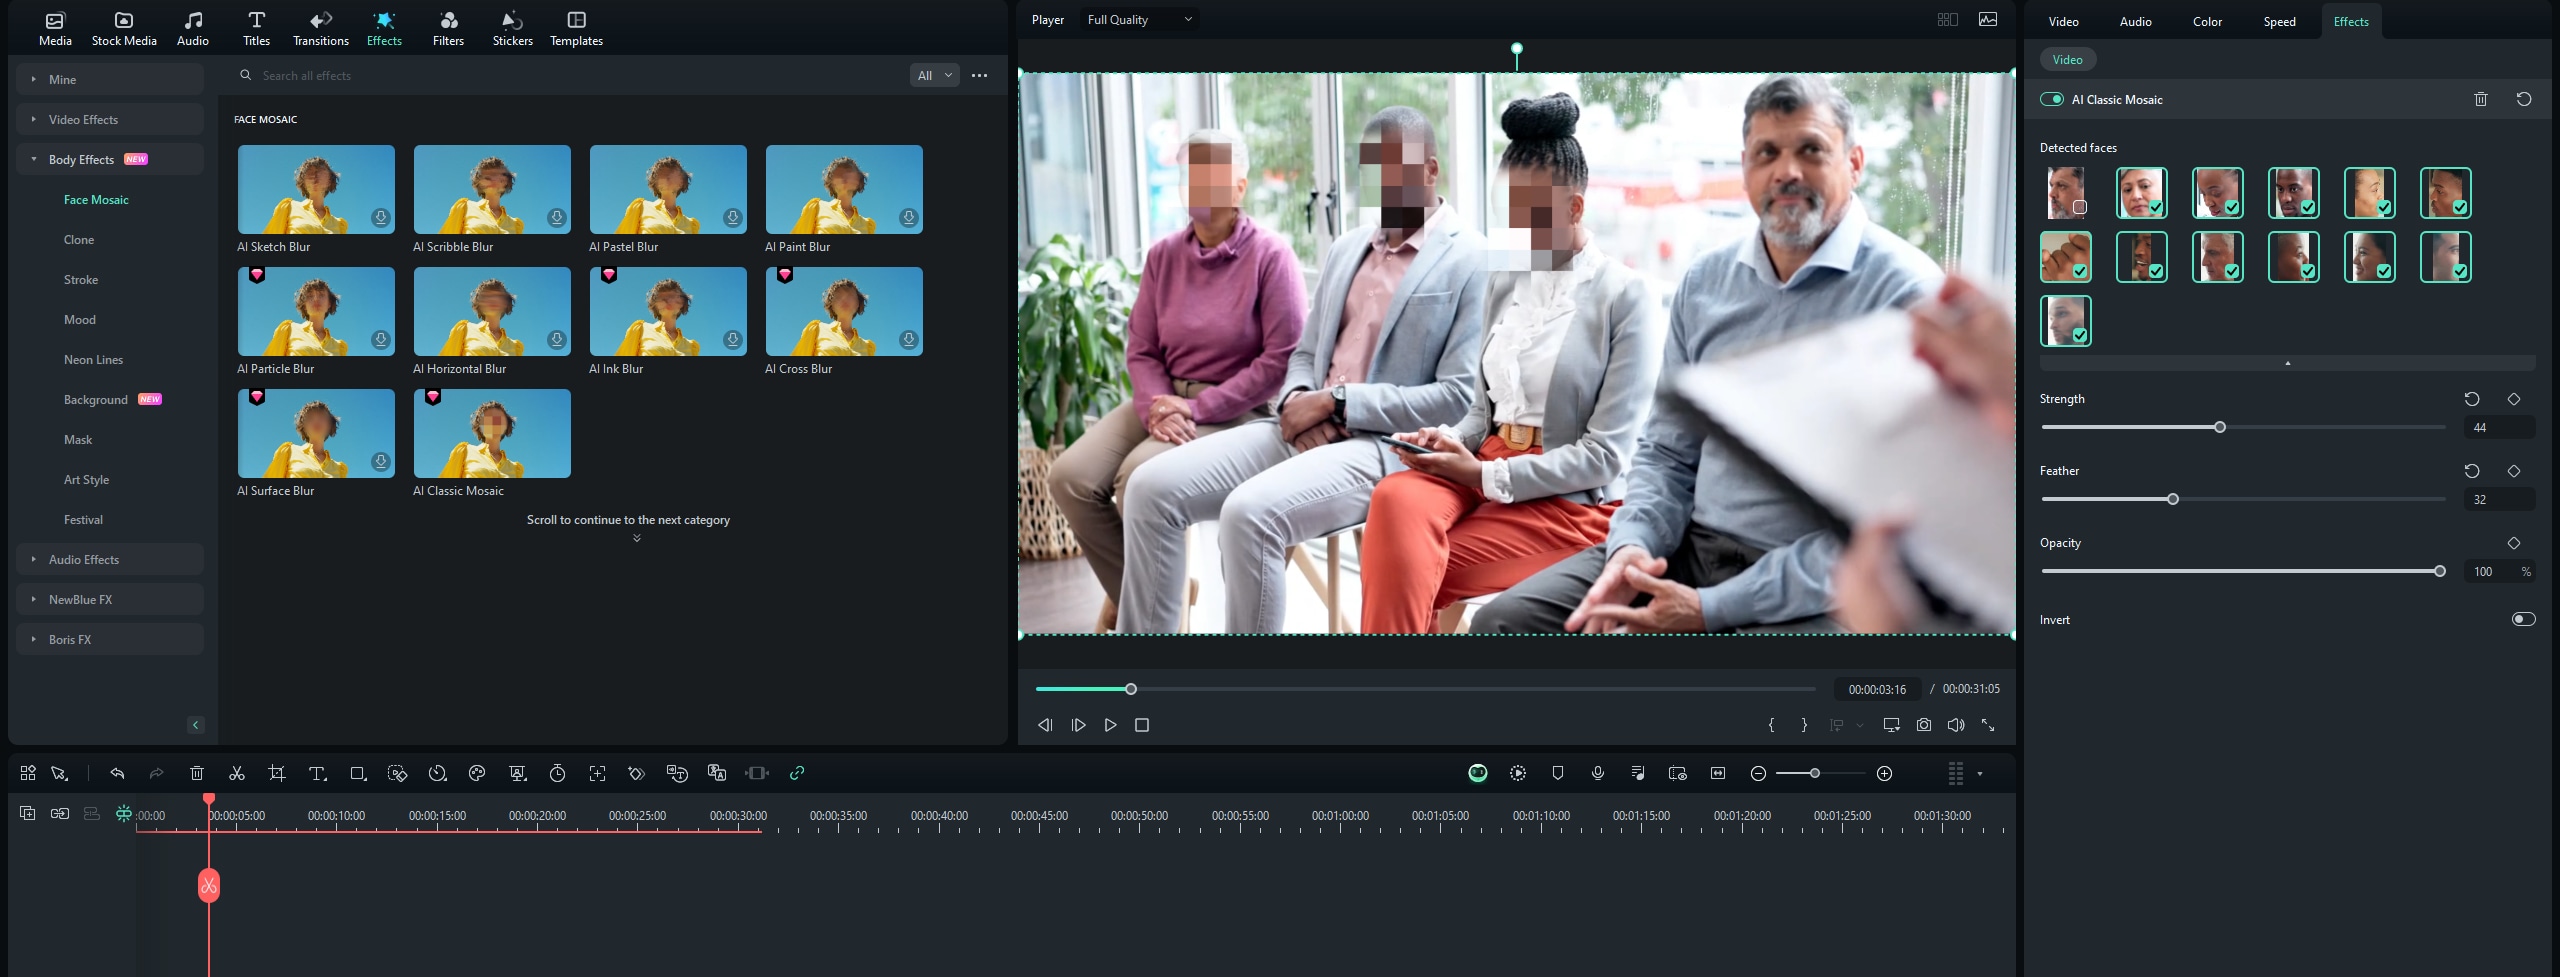
Step 5: You can also apply the gpders in the right panel to adjust the opacity and strength of the blur to your taste.
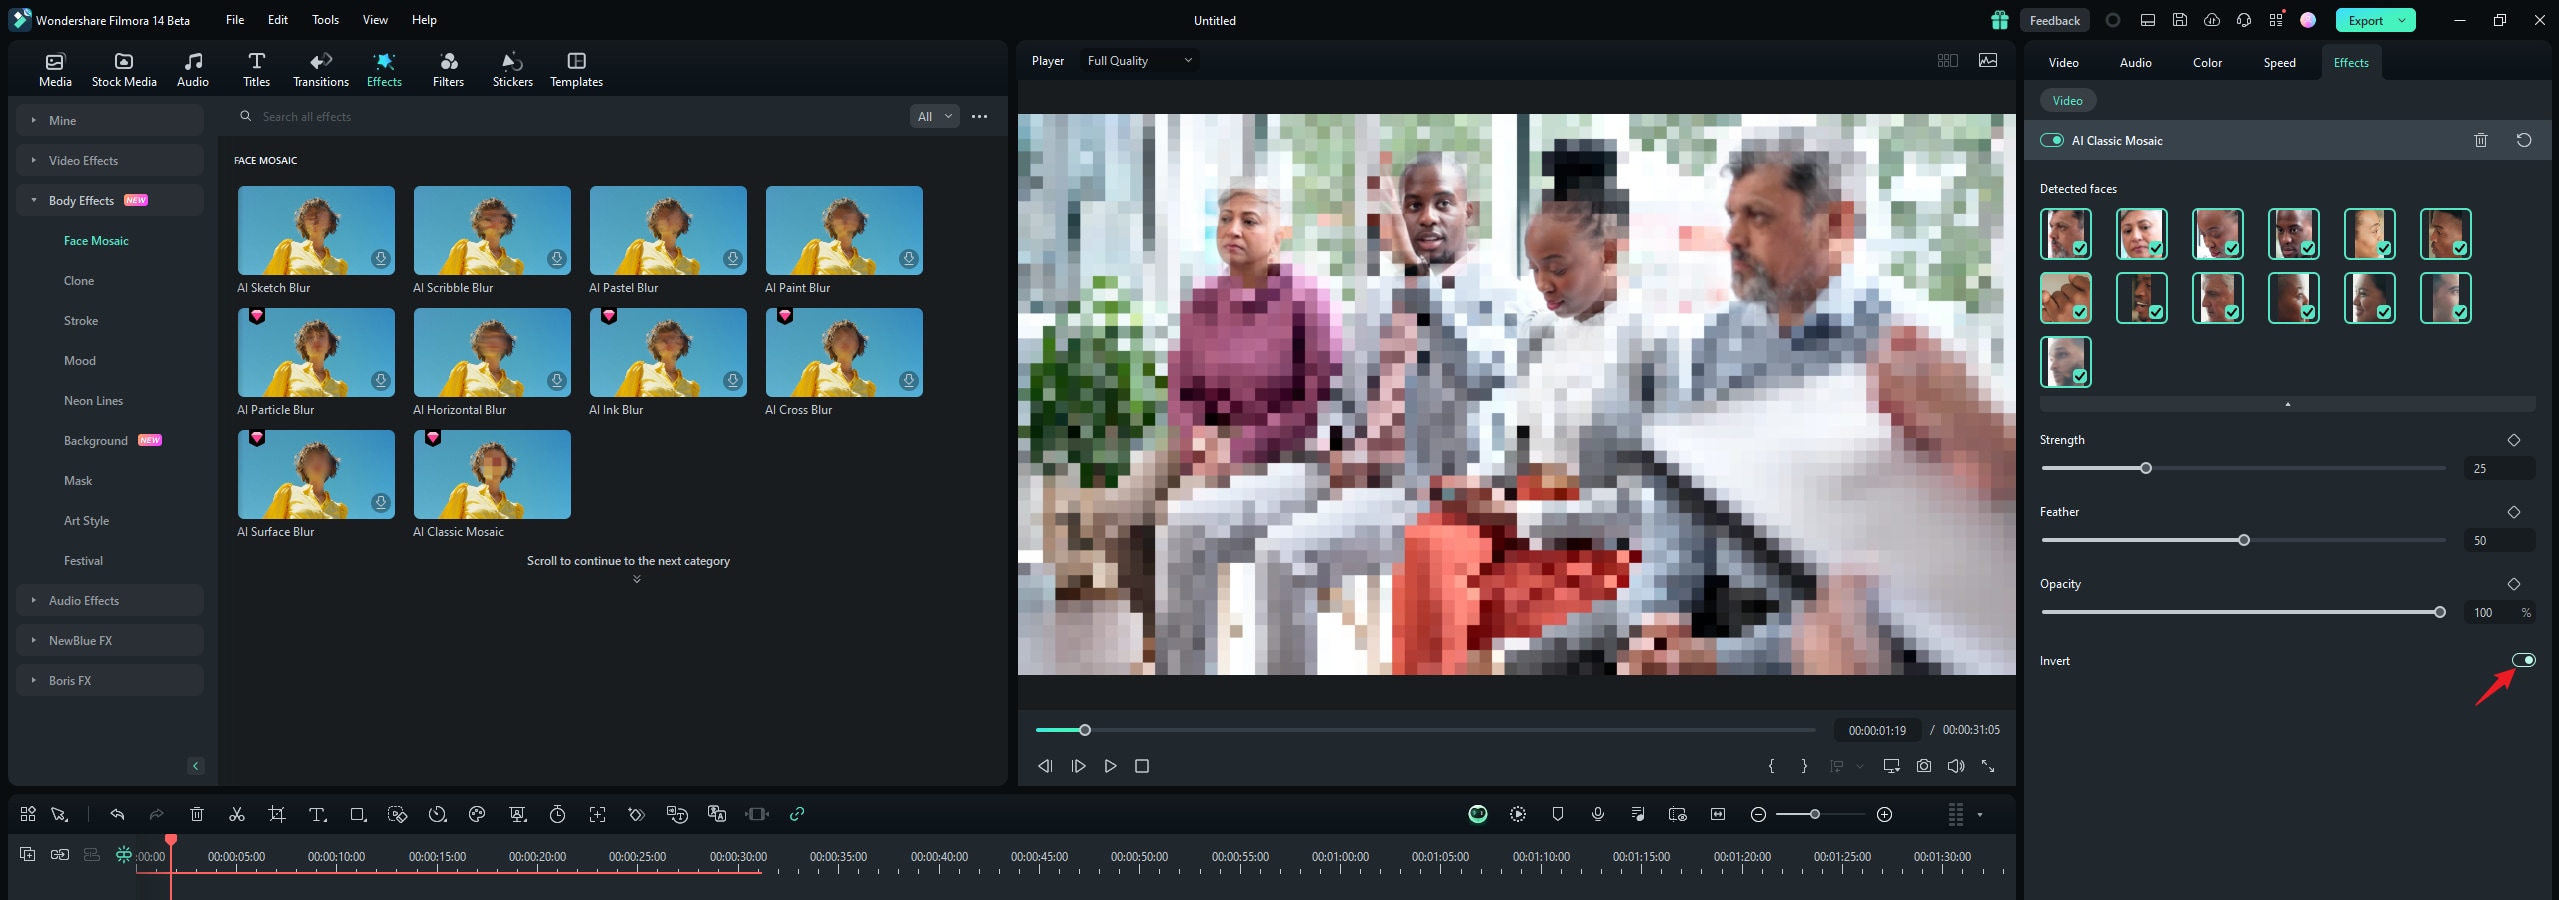
Step 6: To invert the mosaic effect, cpck Invert. This gives the video’s surroundings, excluding the faces, a mosaic effect.
How to blur faces using the Face-off effect
The second way to blur faces in Filmora is by using effects from the editing suite. Here is how to do it:
Step 1: Launch Filmora and cpck on New Project to begin.

Step 2: Import your media using the drag-and-drop feature from your computer into the editing suite. You can also cpck Import and select the media files from the PC.

Step 3: Tap Effects from the menu at the top of the editing suite.

Step 4: If you don't see the Face-off effect on the first page in Effects, search Face-off in the search bar.

Step 5: Cpck on Face-off to download it. Then, add it to your media in the timepne. Next, preview the video to ensure the blur is in the right spot before saving it.

Pro Tip: If you want to use another blurring effect, you can add the Mosaic effect, which allows you to adjust the type of blur you want with fewer pmitations. To access it, search Mosaic in the Effects search bar and add the effect to your video in the timepne.
Part 4: InShot VS Filmora - Best Tool for Face Blurring
| Feature/Aspect | Filmora | InShot |
| Accessibility across devices | Filmora offers versions for Windows and Mac PCs as well as Android devices and iPhones. | The official InShot tool is only downloadable on mobile phones. |
| Auto-face recognition | It offers auto-face recognition, which saves you the time of manually selecting faces and adjusting the blur. | It doesn’t offer auto-face recognition. |
| Dynamic tracking | It offers dynamic tracking, ensuring the blur stays in place on the face you want throughout your video. | It doesn’t offer dynamic tracking. However, you can add keyframing to your videos. |
| Drag and drop interface | It uses a dynamic drag-and-drop interface to import media and add effects, stickers, and more. | It has a simple drag-and-drop interface that allows you to arrange clips in the timeline and add effects. |
| Audience | It caters to beginners, intermediate video editors, and professionals. | It is mostly tailored for beginners and intermediate editors who don’t necessarily perform advanced editing. |
Ultimately, the tool you should use depends on your preferences and needs. If you want to quickly blur faces without necessarily needing any advanced functions, you can use InShot. However, if you want to apply more in-depth video editing and face-blurring features, Filmora is the best option.
Conclusion
Learning to blur faces in InShot isn’t as difficult as it might seem. However, it requires adequate guidance. If you’re still trying to find your footing with the platform, you can use the steps and tips in this guide to help you do so.
On the flip side, if you need a more advanced alternative instead of trying to blur a face on InShot, Filmora is the solution you need. From diverse face-blurring effects to AI-powered features for the same purpose, Filmora can help you achieve seamless video editing. Download Filmora today to get started!


