You just finished recording a video or soundtrack you’re proud of, but it’s entirely ruined by strangers talking and other random noises from the street. Has this ever happened to you?
If your answer is yes, you’ll be happy to hear that not all is lost. There’s a simple way to remove unwanted sounds from your recording – and stop making the same mistake in the future.
Before we tell you what that is, let’s talk briefly about the different types of background noises that get picked up by the microphone and why you should get rid of them. Then, we will introduce you to the best practices for background noise removal from the microphone while recording.
Finally, we will tell you how to eliminate background noise on your mic from the existing audio.
In this article
How to Reduce Background Noise on Your Mic While Recording
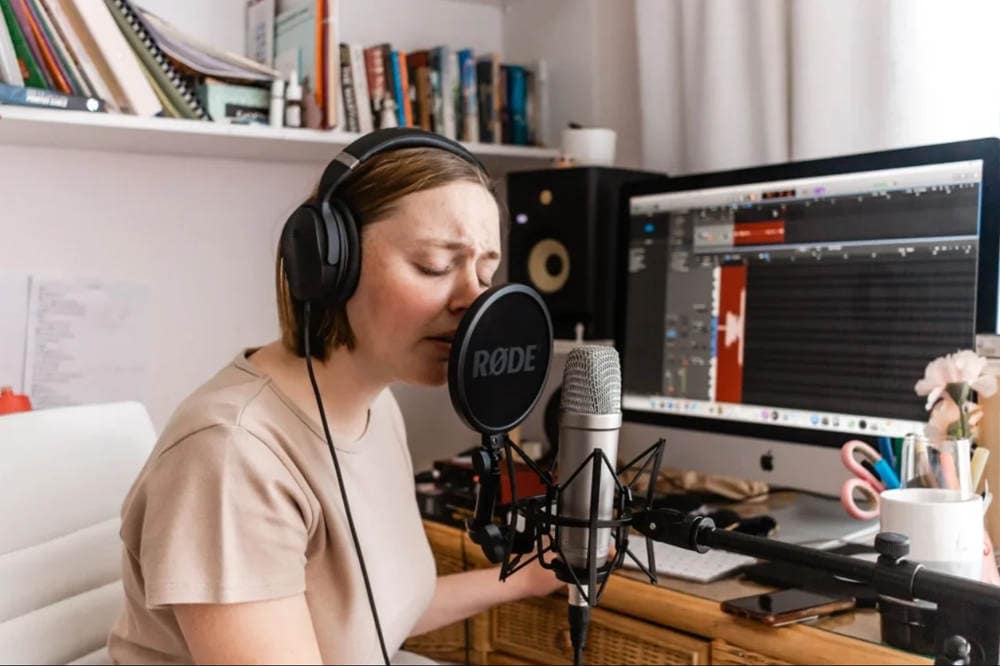
Now that you know why you need to remove mic noise, let’s show you how to cancel the background noise on a microphone.
Adjust Gain Levels
Nearly all microphones used for professional content creation include a gain-level setting that lets the user adjust the mic’s sensitivity to sound.
The microphone picks up the tiniest clicks and rustles when the gain is set too high. Inside, it can register noises coming from another room or somebody’s loud breathing. Outside, it can record distant voices, wind rustles, car honks, etc.
Depending on your microphone type, you should be able to adjust gain levels on the mic’s interface from your computer. Just look for “Gain” or “Sound Sensitivity”.
There isn’t an ideal gain level setting, but the general rule of thumb is to set it as low as possible without lowering the sound of your voice. That way, you won’t have to turn up the volume and clear the audio in post.
Use a Dynamic Microphone
Another way to avoid mic sensitivity is to use a dynamic microphone. These microphones are made for loud environments with many different sound sources, which makes them an excellent choice for field recording. Using a magnetic field to generate an electrical signal, a dynamic mic has a limited frequency response compared to a more sensitive condenser microphone.
Consequently, this type of mic records sound from a smaller area, picking up sound sources directly in front of it. The result is an organically reduced or eliminated background noise, depending on the recording conditions.
Dynamic microphones are also better for beginners because they are cheaper, more durable, and require less optimization.
Record in a Quiet Setting
Musicians sometimes like to perform in vast, empty spaces such as church halls and write songs in tiled bathrooms because of their acoustic properties. However, empty rooms with hard, reflective surfaces such as tiles or wooden floors are unsuitable for recording sound. Environments like these create an echo, which could be hard to avoid or erase in post-production.
When recording sound, you should ideally opt for a quiet, rectangular room with a moderate size. Sound insulation is crucial, as it prevents random noises from entering the room, but soft materials and furnishings like curtains and carpets can also help achieve crystal-clear audio.
They soak up unwanted noises and stop soundwaves from bouncing off of walls.
Use a Pop Filter
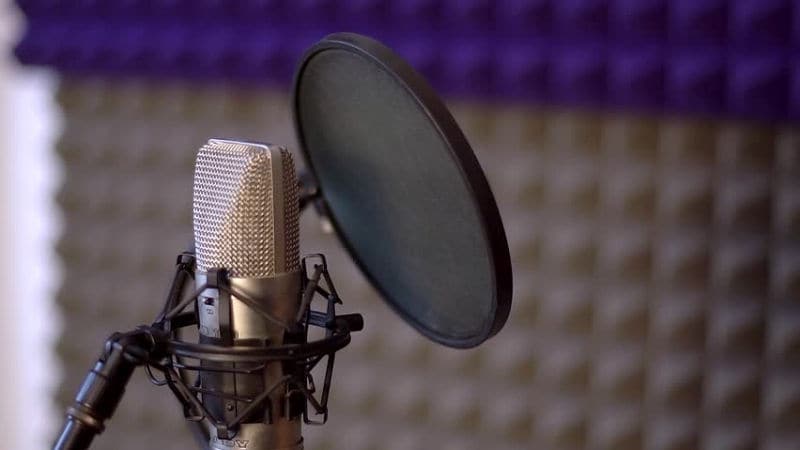
Letters P, T, K, B, D, and G are called plausives because the release of air pressure involved in their production resembles a tiny explosion.
If you’re not careful, these sound explosions can render your recording unpleasant to listeners. You’ve undoubtedly heard or made a sound recording mistake like this before and wondered how to avoid it. There’s a simple solution: a pop filter.
A pop filter, also called a pop shield or pop screen, is a mash screen that comes between the speaker and the microphone to soften the air explosions created with plosives. It removes the air bursts that create an unpleasant distortion in recordings, making the speaker’s voice sound softer and cleaner. A professional pop screen can be replaced with pantyhose or nylon material.
Get Closer to Your Mic
Sometimes, microphone noise removal is much simpler than you expect. If you have good equipment in a suitable recording setting, maintaining a proper physical distance from the microphone makes all the difference.
That way, background noises are muffled or completely blocked by your physical presence, allowing the mic to focus on your voice and omit ambient sounds.
So, what is the proper distance between a speaker and the mic? In most settings, your mic should be 2–6 inches from your mouth when using a dynamic microphone and 6–12 inches if you’re speaking (or singing) into a condenser mic.
Also, the distance may vary depending on your voice: the lower, deeper, and louder it is, the further away you should stand.
Use a Good Microphone Stand
Having a good microphone stand does not only help the speaker feel more comfortable. That’s also important because sturdy stands help keep the mic in a fixed position, thus preventing the need for frequent adjustments.
When the speaker constantly touches the microphone to move it closer or further away, that creates the so-called “equipment handling” noises like thuds. Another reason to use a quality microphone stand is to isolate the mic from the vibrations on the desk or floor. Mic stands with shock absorption features are especially effective for this.
They help ensure a stable recording setup immune to accidental movements and external vibrations. Remember that different types of stands are used for voice and instruments.
Use the Built-in Noise Reduction Feature in Windows
We have been talking about recording sound in optimal conditions all this time. However, not everyone has access to a professional sound recording studio, nor does everyone need it.
What if you need to record an interview on Skype or an online meeting on Zoom or Microsoft Teams? In this case, you can rely on a built-in noise reduction feature on your Windows computer.
To enable this option, you must go to the Control Panel > Sound > Recording tab. Select your microphone and click Properties. Look under the Enhancements tab – here, you’ll find the Noise Suppression or Noise Reduction option.
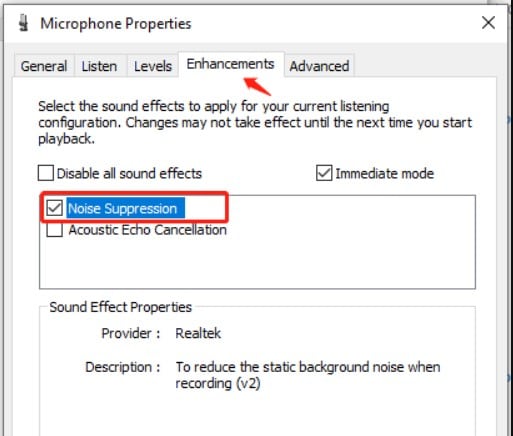
Enable it to automatically cancel the background noise from the microphone. The results won’t be perfect, but your voice will be clearer.
How to Reduce Background Noise From Your Mic After Recording With Filmora
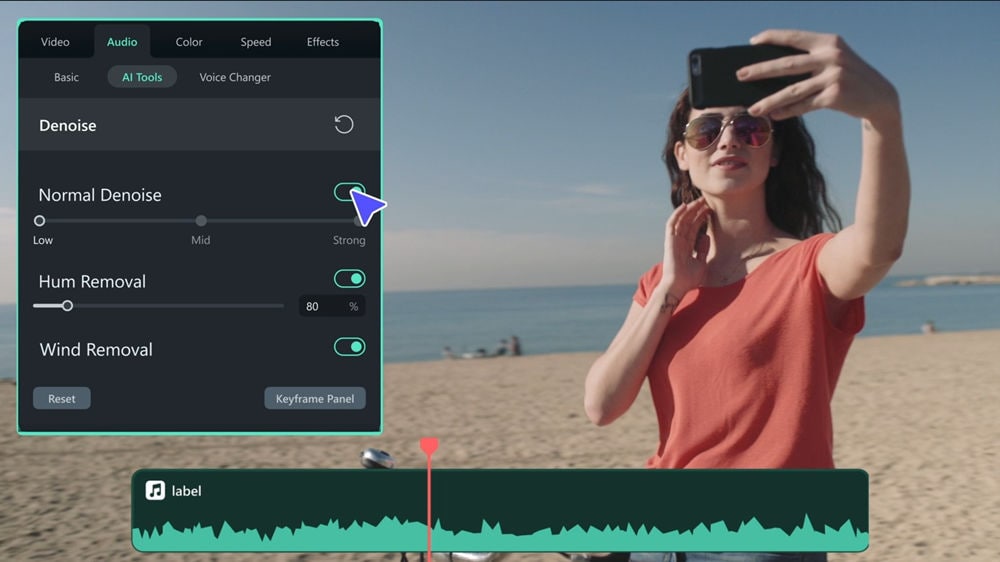
When it comes to impeccable sound, you don’t have to be a content creator to aim for perfection. Having clear audio without any distortion, background noise, and interference allows the listener to easily understand speech or music but also to enjoy it. Even high-quality recording equipment can’t achieve this without help from an audio enhancement tool like Filmora.
Wondershare Filmora is a complete video editing solution. As such, it has everything you need to remove mic noise and polish sound on your multimedia and audio recordings.
Filmora’s Denoise tool includes a single-click Wind Removal and adjustable Hiss and Hum Removal. All you need to do is enable Denoise and Filmora will identify and suppress background sound.
Here’s how to reduce background noise on a mic using Filmora Denoise:
Step 1: Download, install, and launch Filmora for PC or MacOS.
Step 2: Decide what you want to do first. If you want to improve the audio quality of an existing recording, click on New Project. To record your screen with sound for an interview, video meeting, online tutorial, etc, go to Toolbox and choose Screen Recorder.
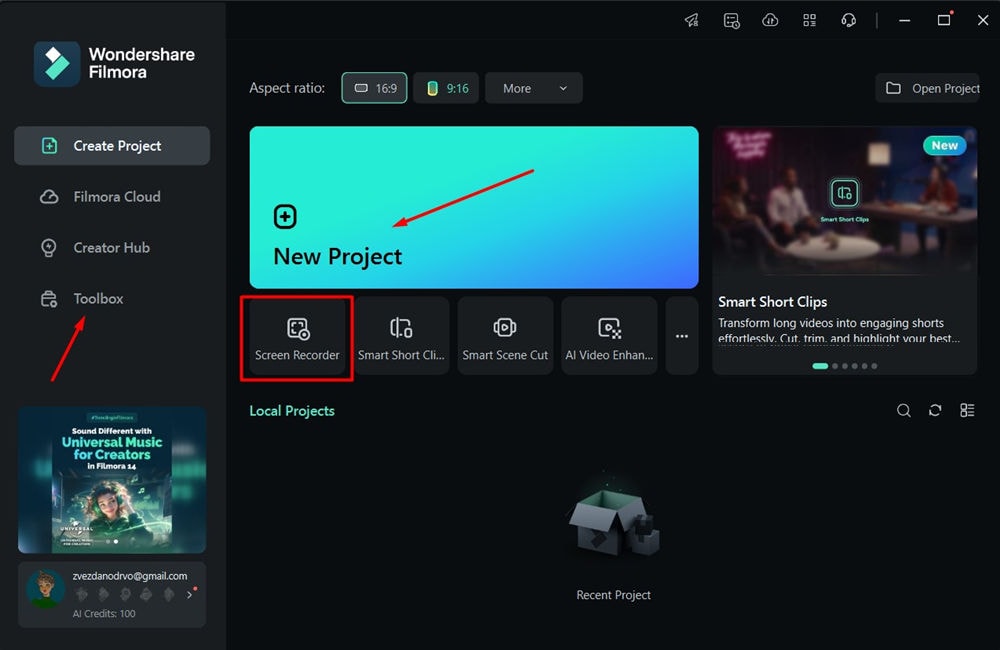
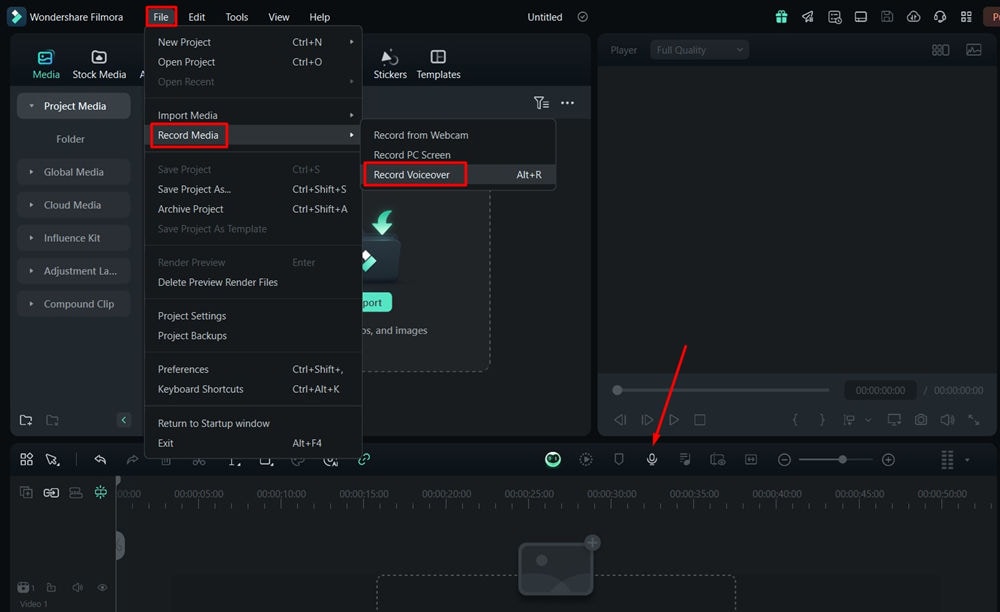
Step 3: If you want to record sound without your screen, click on New Project and navigate to File on the top left. Select Record Media and then click Record Voiceover. You can also click the Microphone icon above the timeline or press Alt+R on your keyboard.
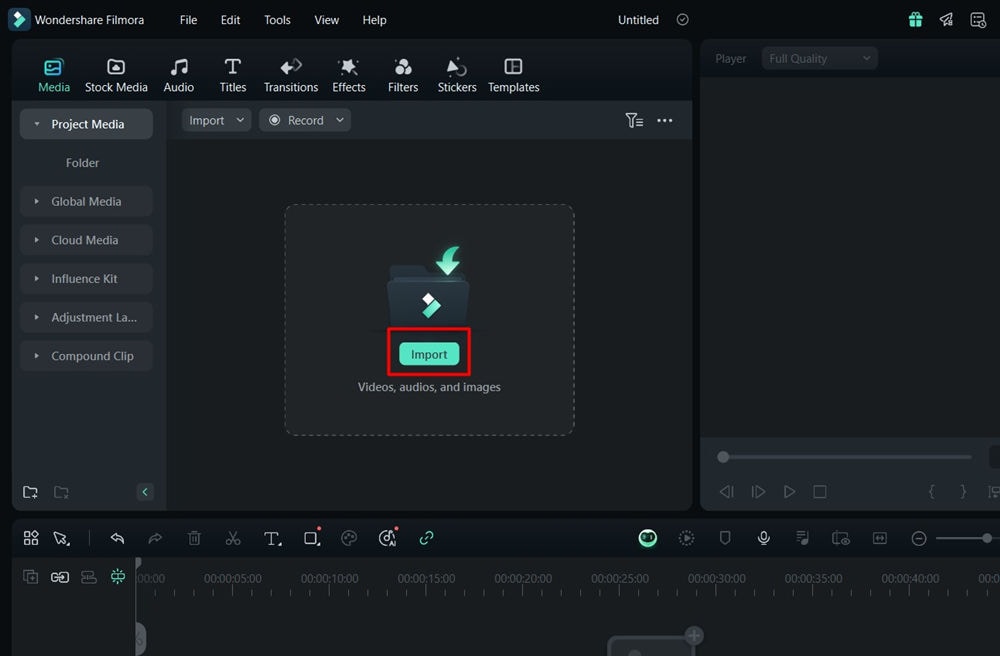
Step 4: To use background noise removal for the microphone on an existing file from your computer, click on the Import button or drag and drop the file to Filmora’s Library.
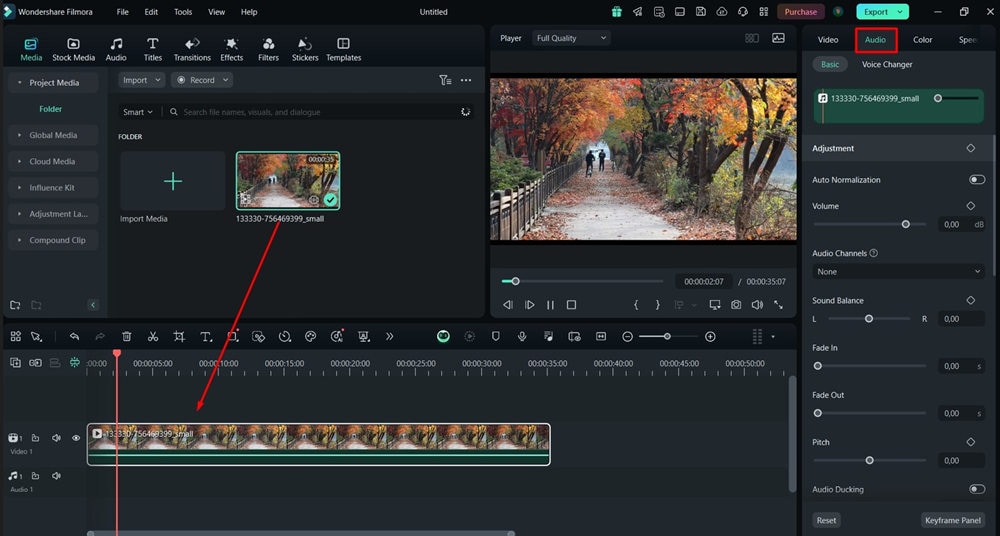
Step 5: Once the file is in the Library, drag and drop it to the timeline below. Next, look to your right. The Audio toolkit is just below the Export button.
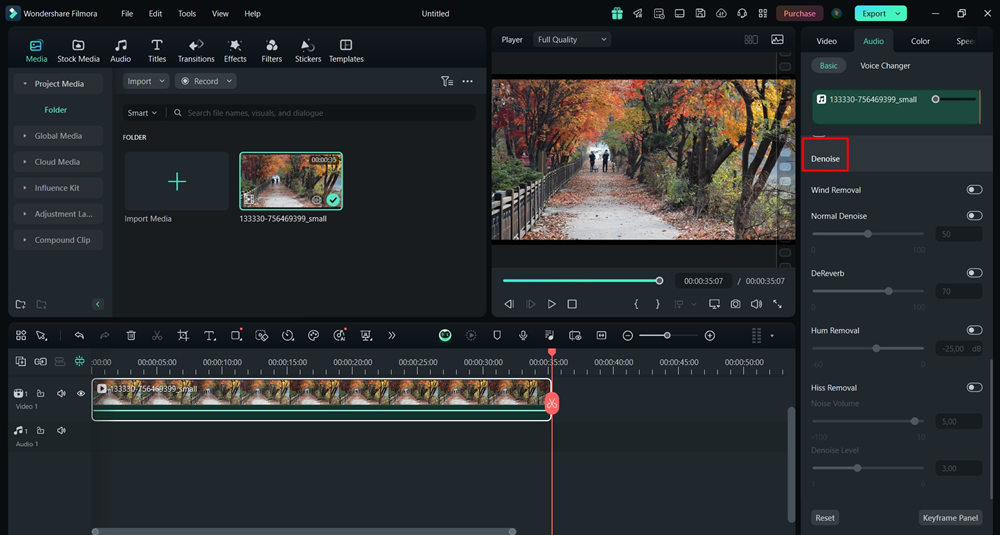
Step 6: Scroll down to reveal the Denoise option. Click to enable Wind Removal, DeReverb, Hum Removal, and Hiss Removal. Use the slider to adjust the volume.
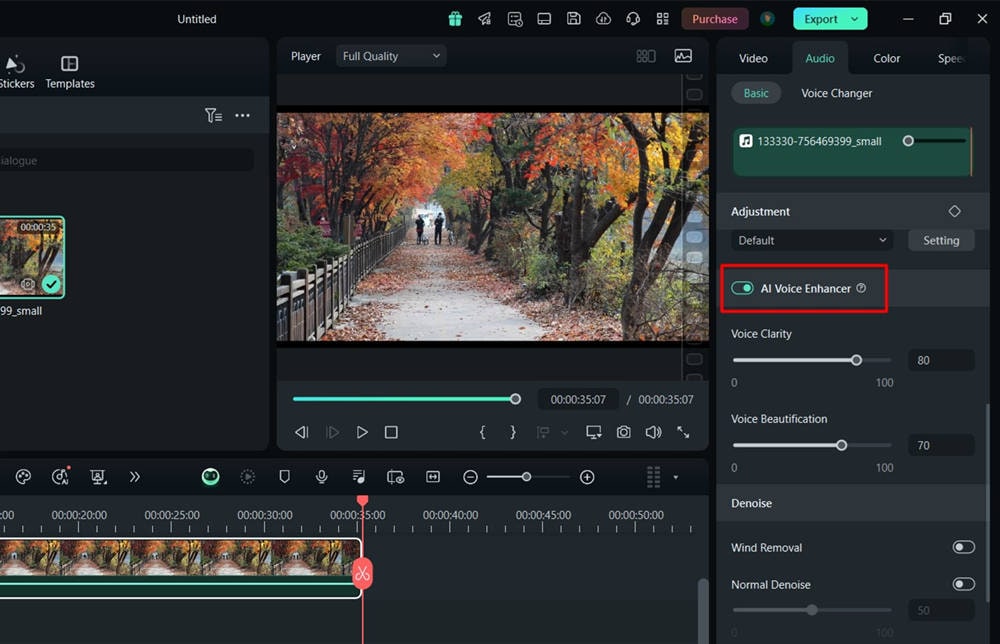
Step 7: Filmora also has an AI-powered Voice Enhancer tool that improves the quality of your voice. You can adjust Voice Clarity and use Voice Beautification to make it sound more pleasing to the ear.
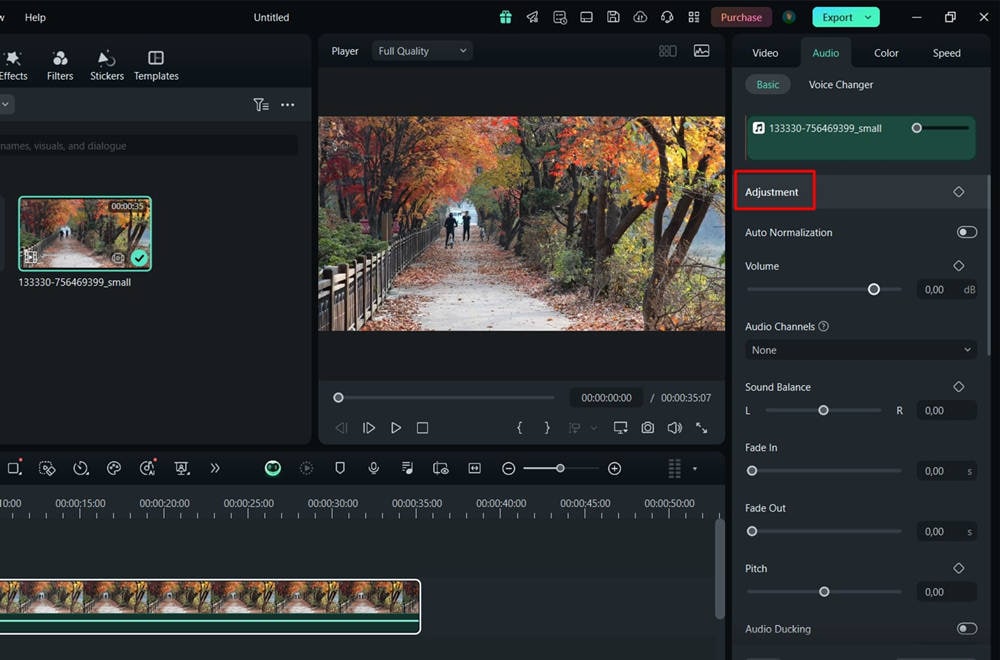
Step 8: Manual sound enhancement tools are just above AI Voice Enhancer and under Adjustment. Here, you can fine-tune the Volume, Audio Channels, Sound Balance, Audio Ducking, and more.
In addition to noise removal, Filmora also has a built-in equalizer that allows you to adjust audio frequencies and enhance the clarity of your voice.
The Audio Ducking feature is also handy, as it automatically lowers background music when dialogue begins. If you want to make a video with multiple soundtracks, keyframing can help you achieve smooth transitions.
The most significant advantage of using Filmora is that it makes professional-grade audio enhancement tools available to beginners. You don’t need technical knowledge or sound engineering skills to achieve excellent sound, making Filmora perfect for podcasters, vloggers, and other content creators.
However, professionals can also use it to record meetings, feedback, etc.
Types of Microphone Background Noises and Why They Need to Be Removed

Many different noises can stand between your mic and a crystal-clear recording. If you don’t remove them in post, they can significantly lower the quality of your content.
Whether you are recording an interview, podcast, or video, the audience won’t take you seriously without a crisp sound – or worse, they might get frustrated if your audio is unintelligible due to random sounds.
Some common types of background noises that can get picked up by a mic are:
- Environmental noises – almost impossible to avoid, especially when recording outside. That includes noises like wind, traffic, and human-made cacophony.
- Equipment handling – always caught by sensitive microphones. It refers to thuds and sounds made by touching the mic, mic stand, and other equipment.
- Electrical interference – typically a static sound or loud buzzing coming from recording equipment. It often happens with cheap microphones and cables.
- White noise and echo – the consequence of poor sound insulation and low-frequency electronic devices such as AC or fan, as well as overheated computers.
You must eliminate these noises if you’re hoping to achieve a professional sound. It’s paramount for content creators, in particular. Random sounds can distract and overwhelm the listener, while mic noise removal improves the listener experience, allowing the ear to focus on the content.
In addition, clear sound makes it easier for both humans and AI to transcribe the audio.
You May Also Like
Best Noise Gate Plugin VSTs for Cleaner Audio in Video Editing
10 Best Noise Reduction Plugins in 2025 to Fix Your Audio Fast
Conclusion
Whether you’re creating video content for podcasts and YouTube or frequently recording your Zoom meetings and sending voice notes to your teammates, good audio quality matters. Background noises can stifle the message you want to send and make your recordings sound unprofessional. A properly set environment and quality sound equipment can help avoid all this.
If you were wondering how to get rid of background noise on a mic after recording a video or soundtrack, Filmora offers an effective and user-friendly solution.
On top of a single-click denoise function, it offers a comprehensive audio editing panel with easy-to-use tools for voice manipulation and sound enhancement. Achieving professional sound has never been easier.


