


 100% Security Verified | No Subscription Required | No Malware

Want to bring a creative flair to your Google Slides presentations by curving text? Curved text turns typical slides into attractive visuals by enhancing the flow of your slides to grab attention. Unfortunately, there is no built-in feature to curve text in Google Slides. A great alternative is Filmora, which has a user-friendly interface and many customization options.
But there’s more! We will discuss other simple yet effective methods to curve text in Google Slides. Get ready to make your presentations stand out with stunning curved text!
In this article
Part 1: Why Should You Curve Text in Your Presentations?
Before diving into ways to curve text in Google Slides, let’s first highlight the benefits it will reap.
Curved text can make your presentation visually engaging for the audience. It will also make your presentation stand out amongst those with typical designs. To guide the readers' eyes more naturally, you can use various shapes of curved text. This will make the flow of content easy to follow.
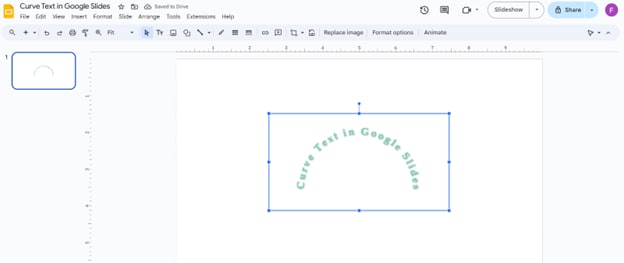
Below is a simple example of how you can add flair to your slides instead of using typical font designs:
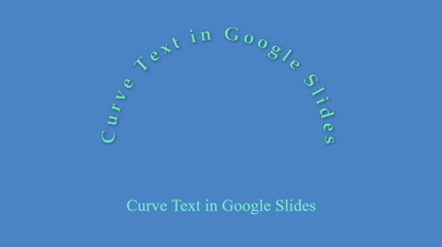
Curved text can catch readers' attention longer and effectively convey the intended message. Moreover, presenting information like this will help the audience understand the topic better.
Now, we will highlight some ways to curve text in Google Slides. Let’s begin!
Part 2: How To Curve Text in Google Slides?
Unfortunately, there is no built-in option for a curve text tool in Google Slides. But don’t worry! You can still make eye-catching Google Slides with this unique design feature. This detailed guide will provide four simple ways to curve text in Google Slides. Let’s dive in!
1. Curve Text in Google Slides using App Script
In Google Slides, you can add an App Script code to achieve any function not already built-in, such as the curve text feature. This is convenient for all users because no other tool or website will be needed once the app script is added.
Here are a few easy steps to implement this solution:
Step 1: Download the zip file for the App Script code made by PsdDude: Download Link. Extract the file contents in a folder. Open the “Code.gs” file.

Step 2: Copy the contents of the file.
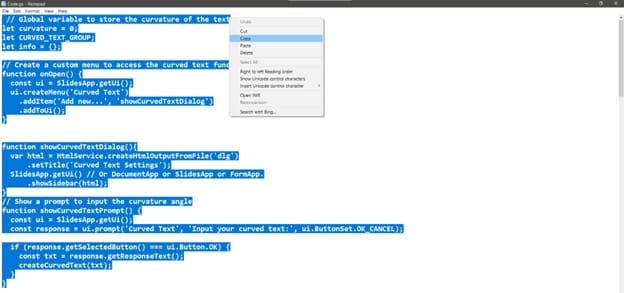
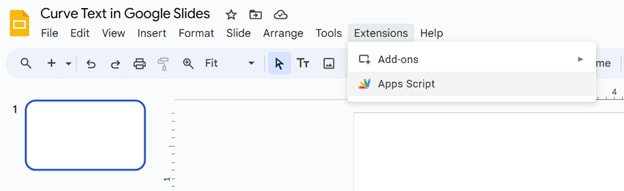
Step 3: Open your Google Slides presentation. In the toolbar, go to “Extensions” and then “Apps Script.”
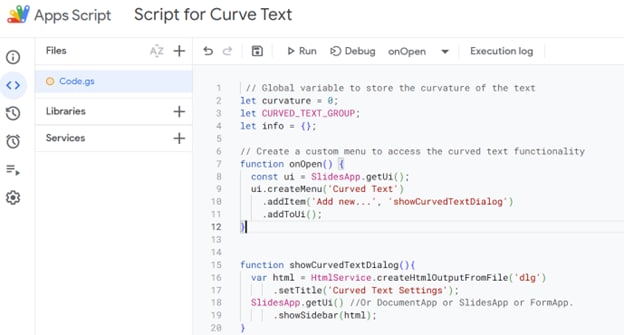
Step 4: Paste the copied contents in the “Code.gs” file on the new webpage.
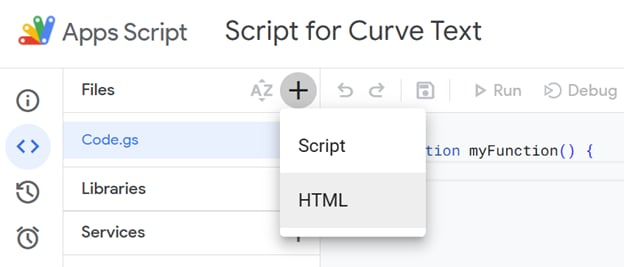
Step 5: Click the “+” icon on the new webpage. Click “HTML.” Then type in “dlg” to save the file as dlg.html.
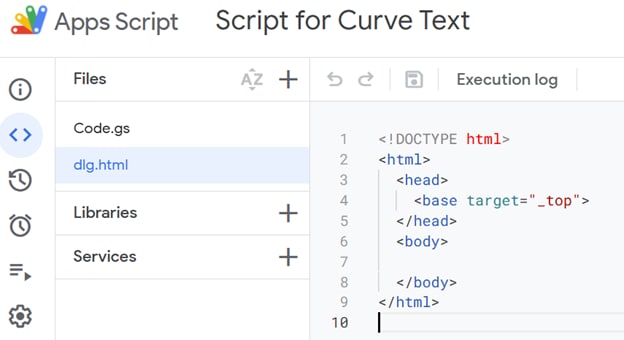
Step 6: Open the “dlg.html” file from your folder and copy its contents. Then, paste the contents into the “dlg.html” file on the webpage.
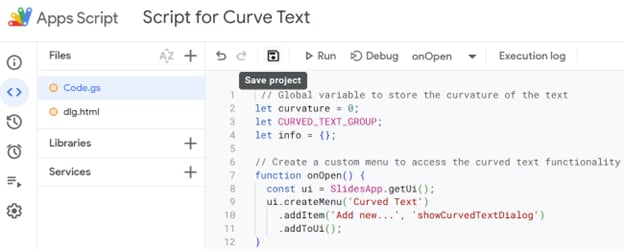
Step 7: Open “Code.gs” on the webpage and click on the floppy disk icon to save the project. Then, click on “Run.”
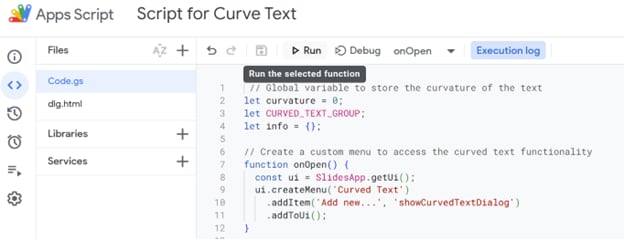
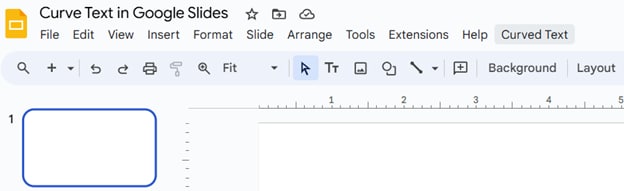
Step 8: As the App Script is being run for the first time, it will ask for authorization. Google will ask you to grant the permissions and access required for the script to run successfully. So, carefully authorize and trust the script developer to run it. After authorizing, return to your Google Slides presentation. Click the new “Curved Text” button in the toolbar.
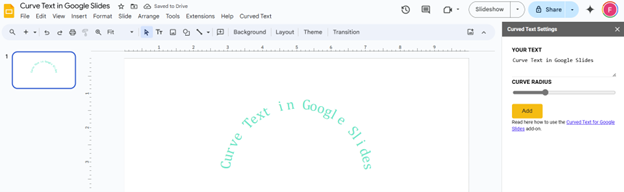
Step 9: On the right, enter any text you want and set its curve radius. Then, click “Add” and edit its font type, size, color, etc., as you wish.
You can now curve text in Google Slides without leaving the webpage! But remember, if you want to add curved text in some other Google Slides presentation, you must repeat these steps. Another option is creating a copy of a presentation with the script already installed.
Next, let’s walk through other ways to curve text with more customization options.
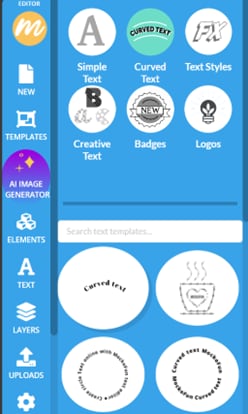
2. Curve Text in Google Slides using MockoFUN
MockoFUN is an easy-to-use online tool for curved text. It offers many options, including circular, heart-shaped, or star-shaped curves. Let’s find out how!
Step 1: Open MockoFUN and create a new account for free.

Step 2: Click “Text” from the left toolbar.

Step 3: Click on “Curved Text.”
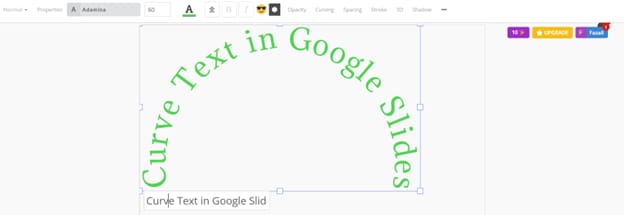
Step 4: Choose any curved text design from the options.
Step 5: Enter the text you want and customize its font type, size, color, alignment, curving, shadow, and more.
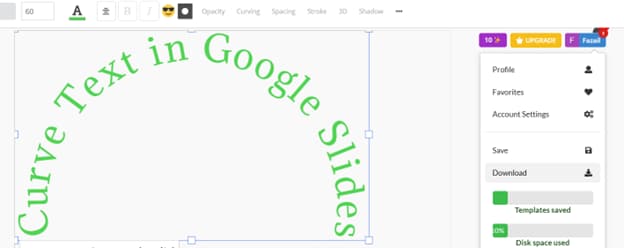
Step 6: Click on your proImage name on the top right and then click “Download” to save the design on your computer.
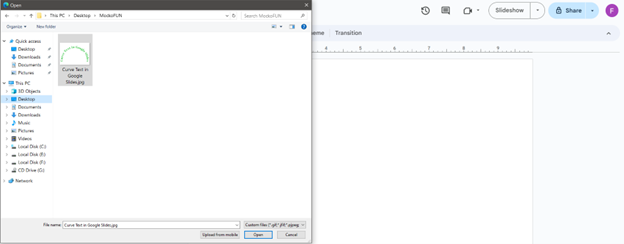
Step 7: Open your Google Slides presentation. Click “Insert” in the toolbar. Then, navigate to “Image,” then “Upload from computer.”

Step 8: Double-click on the downloaded image, or select it and click “Open” to insert it.
Step 9: You can edit and animate the image using the “Format options” or “Animate” buttons. You have successfully added curved text in Google Slides using MockoFUN!

3. Curve Text in Google Slides using Canva
Curving text using Canva is easy, even for new users! The steps below will guide you on how to curve text online, fast and free:
Step 1: Open Canva, click the “Create a design” button, or open any in-progress design.

Step 2: Select the “Text” section in the toolbar on the left. Then, click “Add a text box.”.
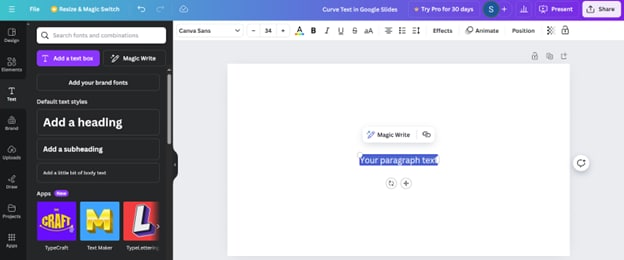
Step 3: Type in your text. Edit its properties (font type, size, color, alignment, etc.) using the toolbar on top. Then, while selecting the text box, click “Effects” on the toolbar.
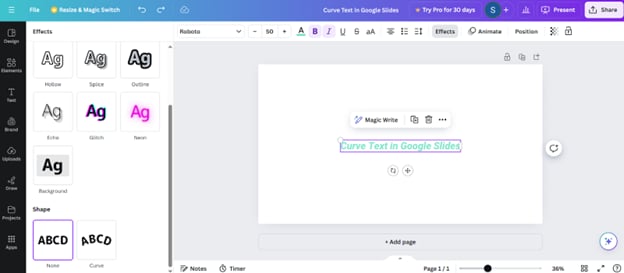
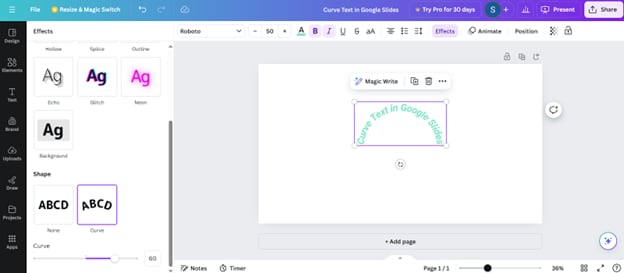
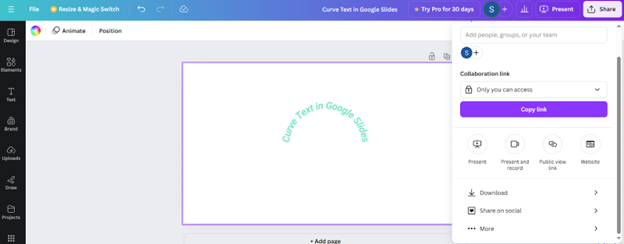
Step 4: Locate and click “Curve” in the effects options. Adjust the curve angle using the slider or a numeric value. After finalizing, click “Share” on the top right.
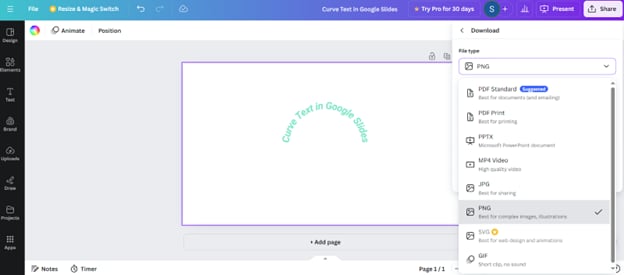
Step 5: Click “Download.”
Step 6: Choose the “PNG” file type from the dropdown. Click “Download” to download the image on your device.
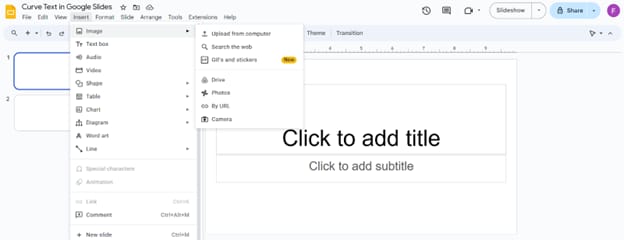
Step 7: Open your Google Slides presentation. Click “Insert” in the toolbar. Then, navigate to “Image,” then “Upload from computer.”
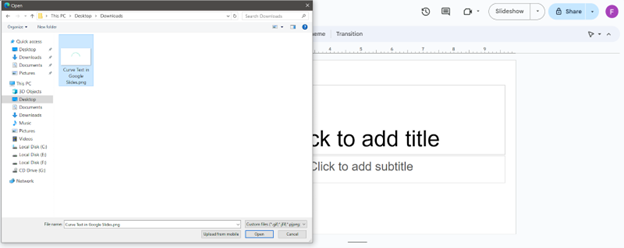
Step 8: Locate the downloaded image. Double click, or select it and click “Open” to insert it.
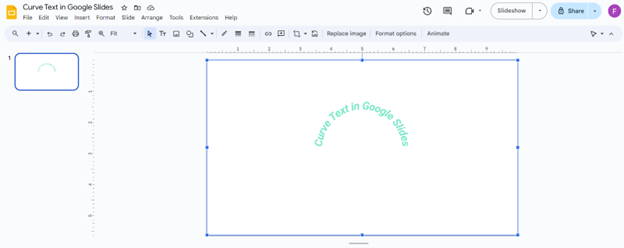
Step 9: Click on the “Format options” or “Animate” to edit or add animations. You have successfully used Canva to add curved text in Google Slides!
Part 3: Make Your Presentation Stand Out Using Filmora’s Text Effects
It is vital to use the right tools when enhancing the visual appeal of presentations. Though the methods above work well, we have another alternative for you to curve text: Wondershare Filmora!
Expand your creativity with a fully-equipped video editing suite powered by AI.

Wondershare Flmora is a dynamic video editing software with an intuitive interface. It is perfect for all users to bring their creative visions to life using customization options. Users can create appealing visuals by adding lively text effects such as curved text, 3D text, animations, and masks.
Next, let’s discuss the unique features of Filmora’s text effects and then learn how to curve text using it.
Key Features of Filmora Text Effects
Let’s see why text effects in Filmora stand out:
- Different effects, such as slide, fade-in, and fade-out, can be applied.
- Pre-designed animations such as Typewriter can be applied.
- Custom animations can be added.
- Font type, size, color, shadows, outlines, masks, etc. can be customized.
Now, let’s highlight the editable properties of curved text in addition to the features above:
- Curve shapes such as upper semi-circle, lower semi-circle, circle
- Curve strength
- Curve anchor points
Steps to Curve Text in Google Slides Using Filmora
Let’s see how to curve text using Filmora in simple steps!
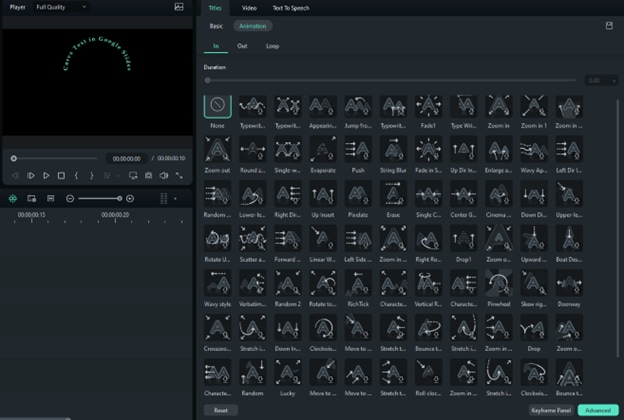
Step 1: Open or create a new Filmora project. Click the “Titles” tab from the top toolbar and add your favorite text preset onto the timeline.
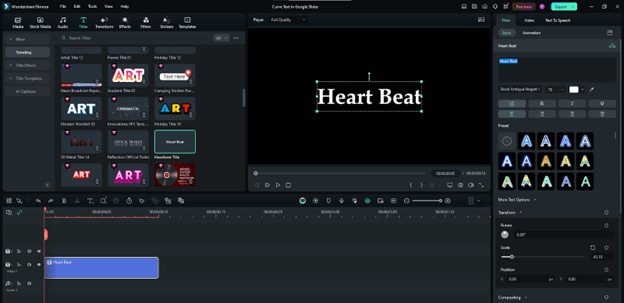
Step 2: Type in the text you want.
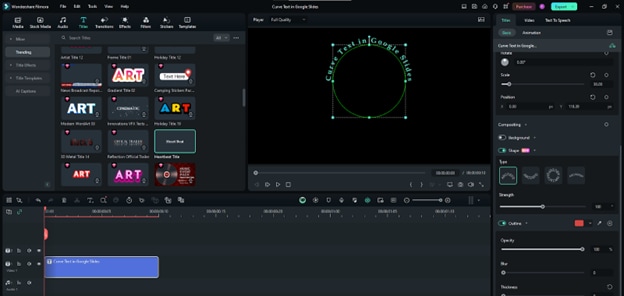
- Expand the settings on the right using “More Text Options.”
- Click the “Shape” toggle in the “Basic” section.
- Select the curved text design you want and change its “Strength” to control the curvature. In this example, we will choose the “Upper Semi Circle Text.”
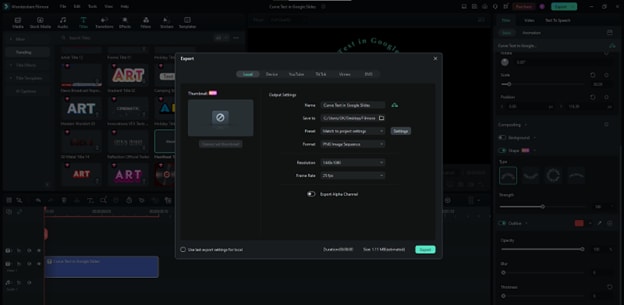
- Click on “Export” on the top right.
Step 3: Choose a destination and set the format to “PNG Image Sequence.” Click “Export.”
Step 4: Open your Google Slides presentation. Click “Insert” in the toolbar. Then, navigate to “Image,” then “Upload from computer.”

Step 5: Locate the exported image. Select it and click “Open,” or double-click to insert it.

Step 6: Select the image and format or animate it as you wish.
You have successfully learned how to use Filmora to curve text in Google Slides! Very simple, right?
Final Words
So, what if Google Slides does not have a built-in tool for curved text? This comprehensive guide offers many ways to curve text quickly. To meet your creative vision, you can add an App Script, though it provides less customization. Online tools MockoFUN and Canva are easy to use and have various text editing options.
Due to its customizing power, Filmora is the most reliable option to curve text in Google Slides. Follow our step-by-step guide to learn how to make your presentations more compelling now!
