Texts editing are powerful in video editing. It can come in handy to convey information, show the mood, and tell a story.
Whether you're creating eye-catching titles, adding informative captions, or stylish lower thirds, knowing how to customize text is quite important. Therefore, in this guide, we will discuss 3 ways on how to change text color in Premiere Pro.
So, let’s get straight to it!
In this article
How to Change Text Color in Premiere Pro in 3 Ways
In this section, we have listed 3 ways how to change colour of text in Premiere Pro:
Method 1: Change Text Color Adobe Premiere Pro Using Effects
The first method that we are going to discuss on how to change text colour in Premiere Pro is via the Effects panel. This feature is usually used to add effects to your text; however, you can also change the color using it.
Here are the steps for it:
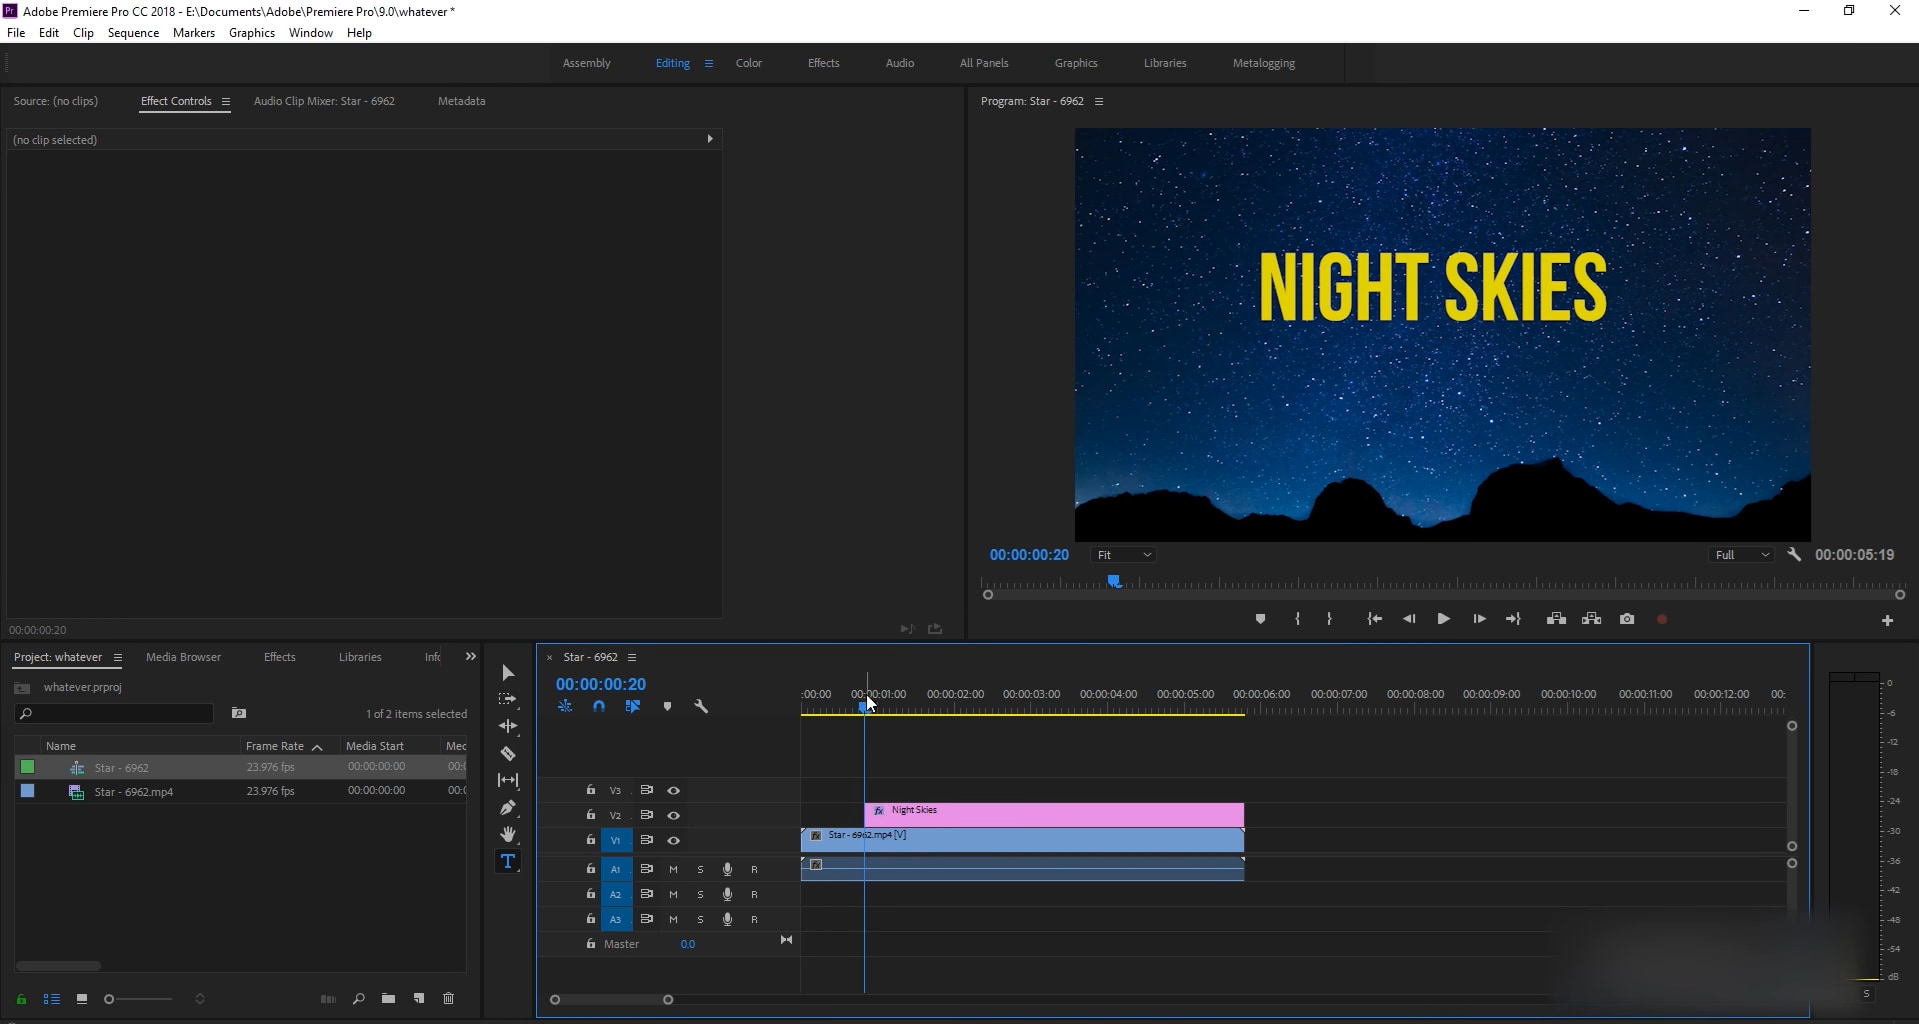
Step 1. Once you have your video in place on the timeline, click on the “Text Tool” indicated by a “T” on the left of the timeline.
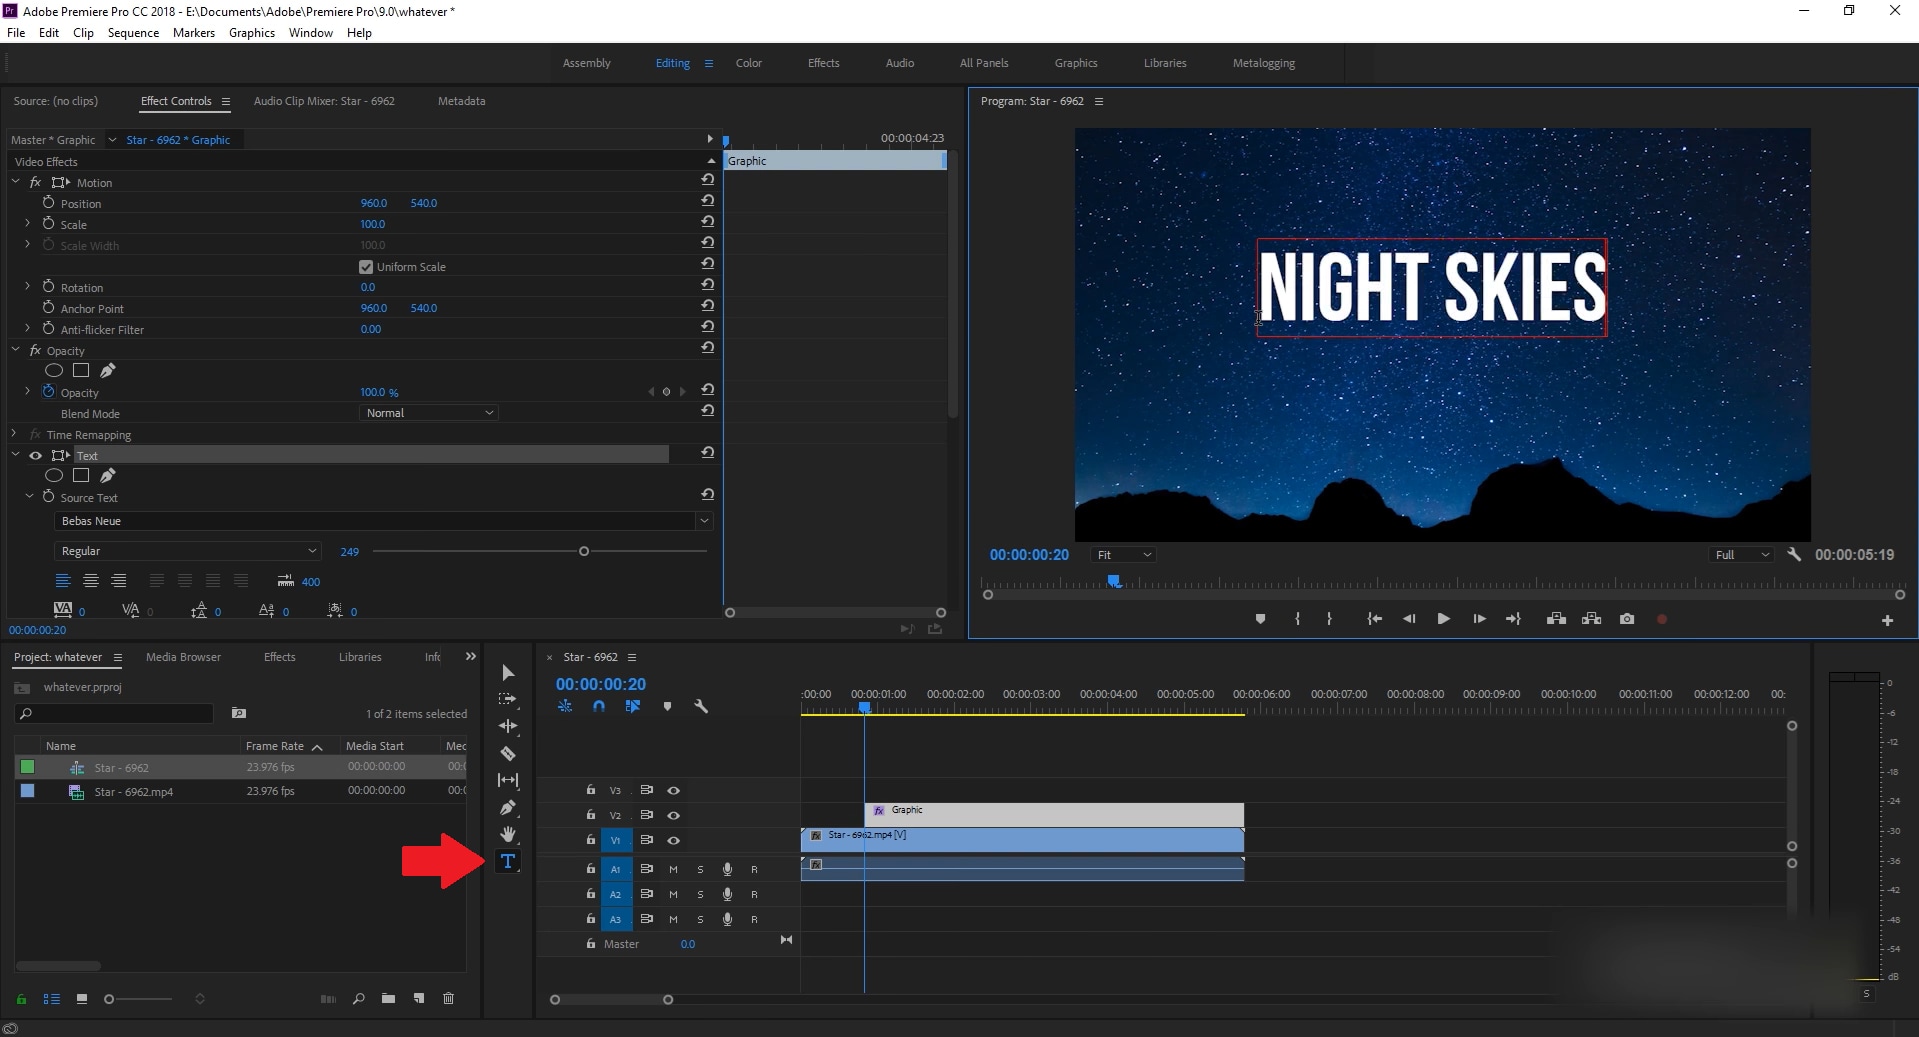
Step 2. Now, type in the text in your video and highlight it by clicking and dragging the mouse over it.
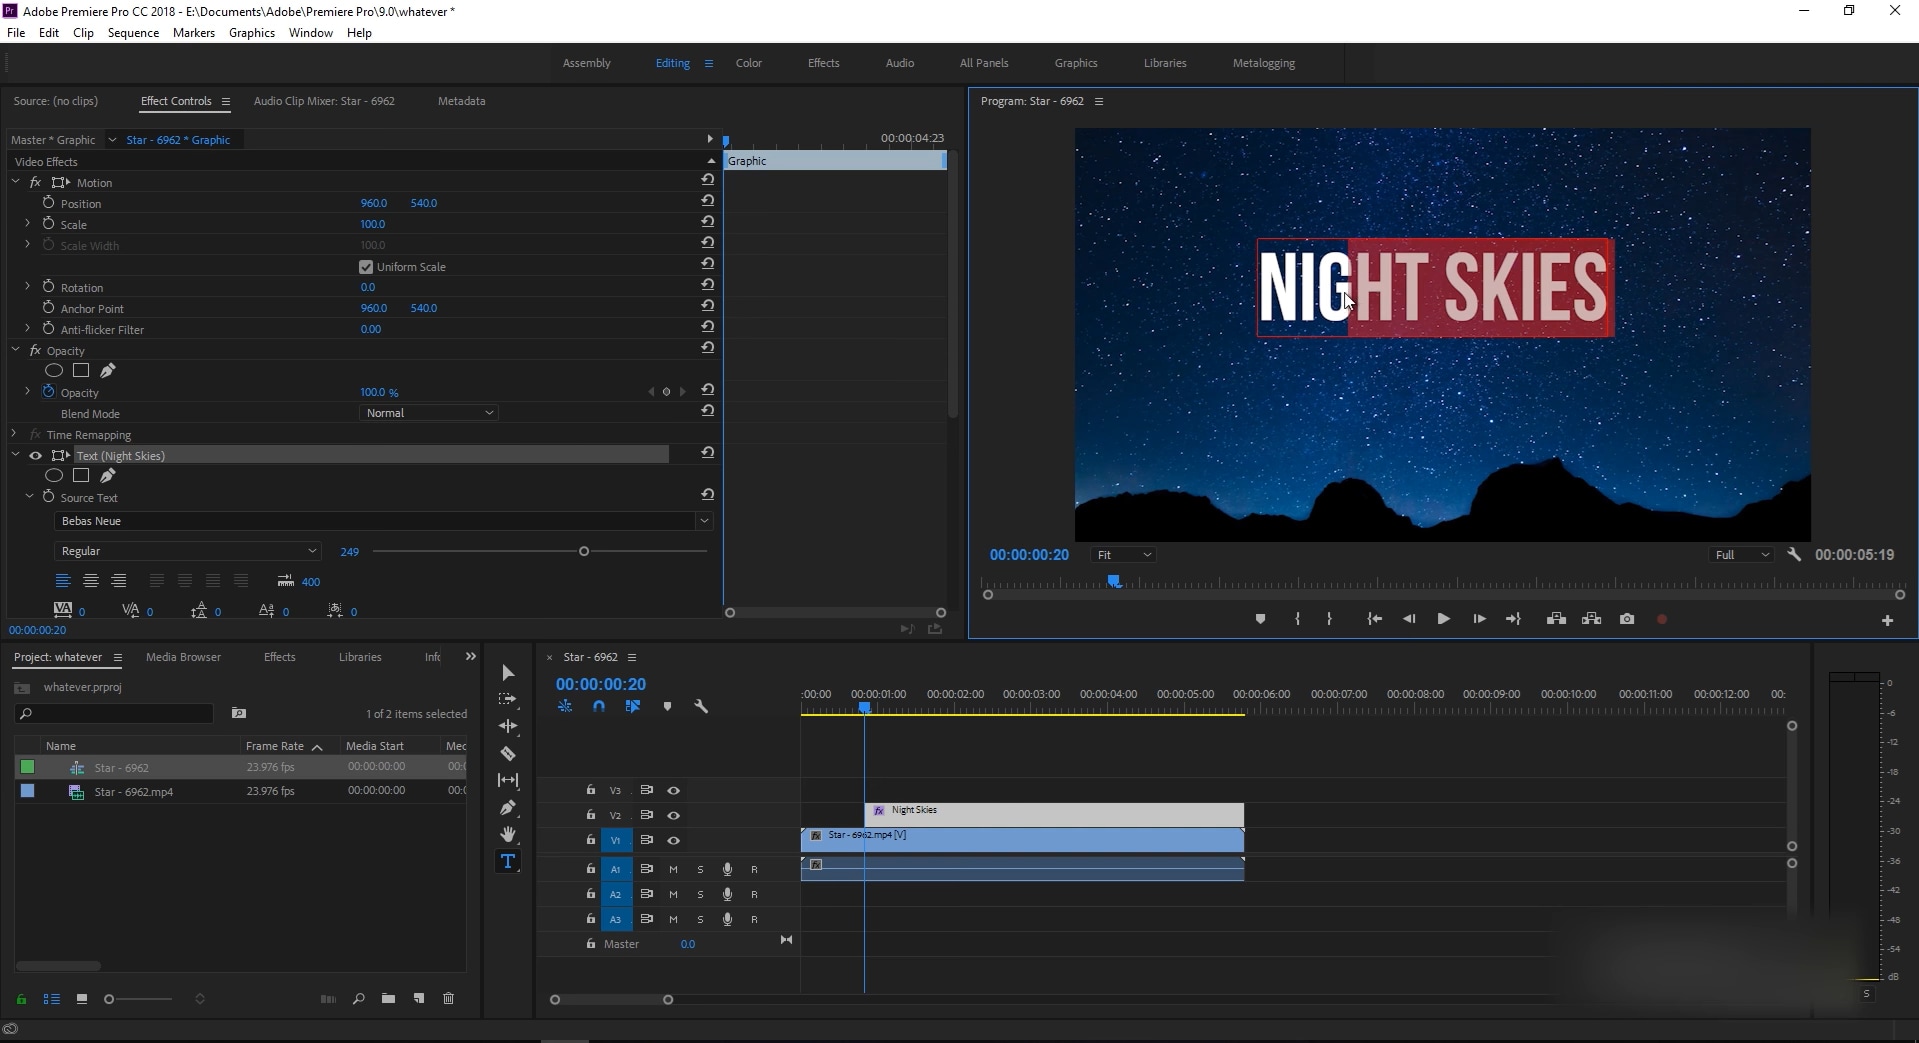
Step 3. Click on “Effect Controls” at the top left, and scroll down to the “Fill” option.
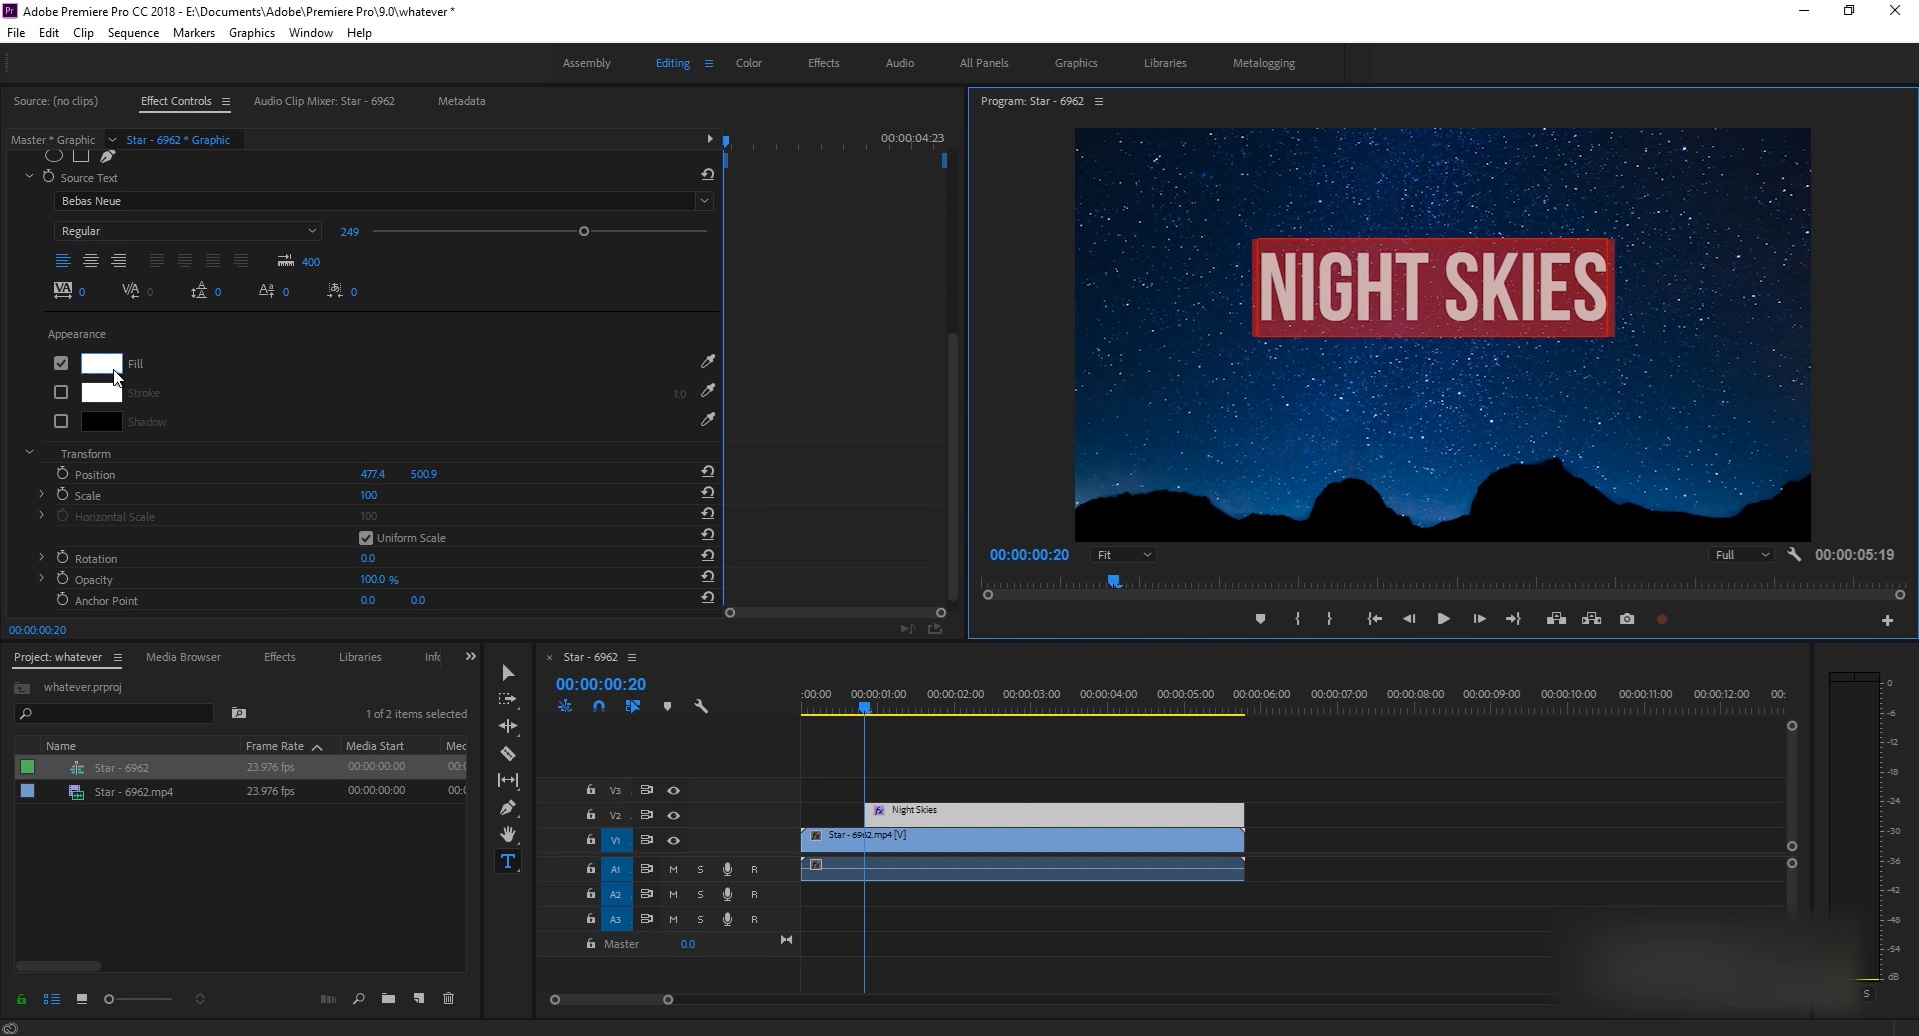
Step 4. Click on the color box next to the “Fill” option, choose your desired color, and click “Ok.”
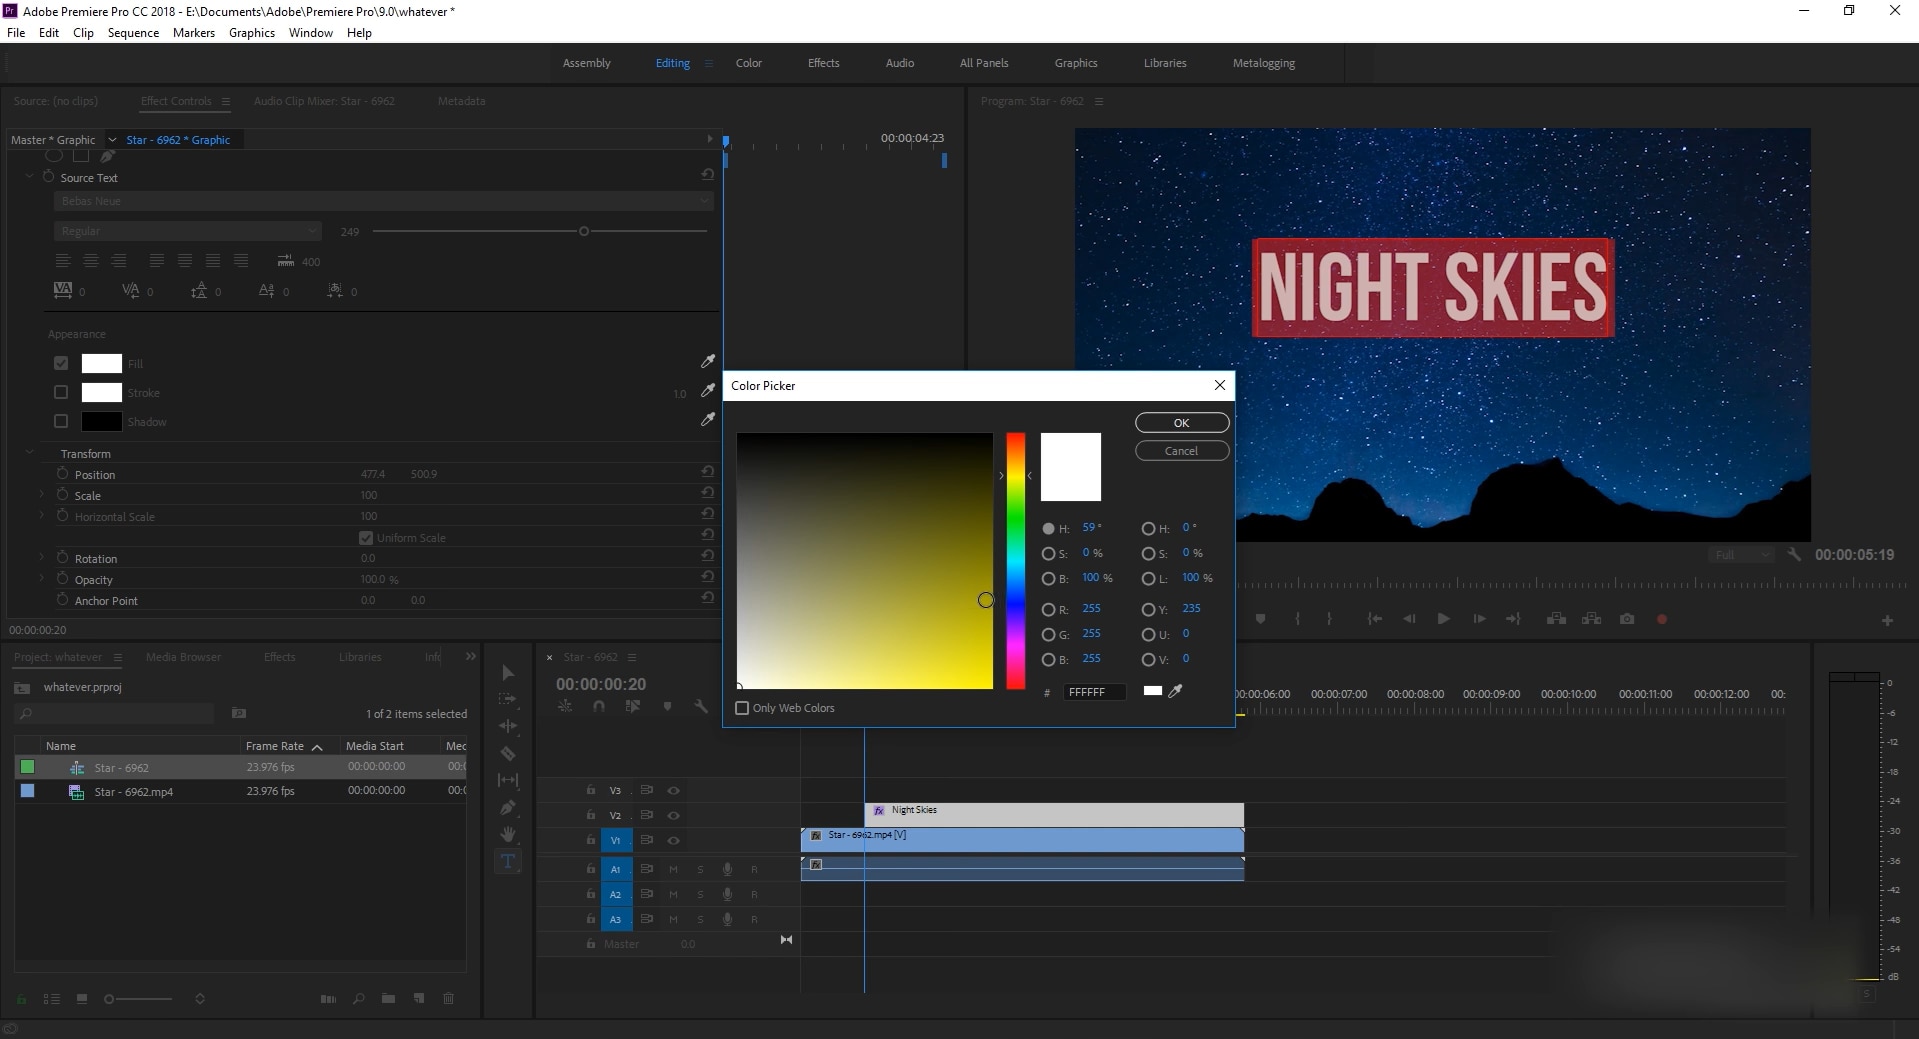
Step 5. This will change the color of your text. You can repeat the process to change text color in Premiere Pro for other texts.
Now, let’s check out the next method for Premiere Pro change text color.
Method 2: Change Text Color Adobe Premiere Pro Using the Essential Graphics Panel
The next method on how to change color of text in Premiere Pro is by using the Essential Graphics panel.
Here are the steps for it:
Step 1. Add text to your video using the “Text” tool or by adding a text layer to your timeline.
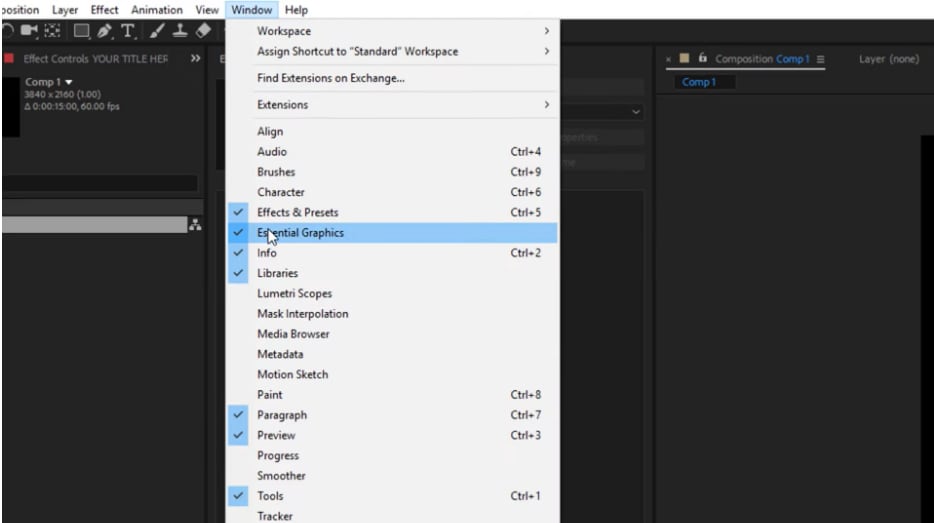
Step 2. Open the Essential Graphics panel by clicking on “Window > Essential Graphics” from the top menu bar.
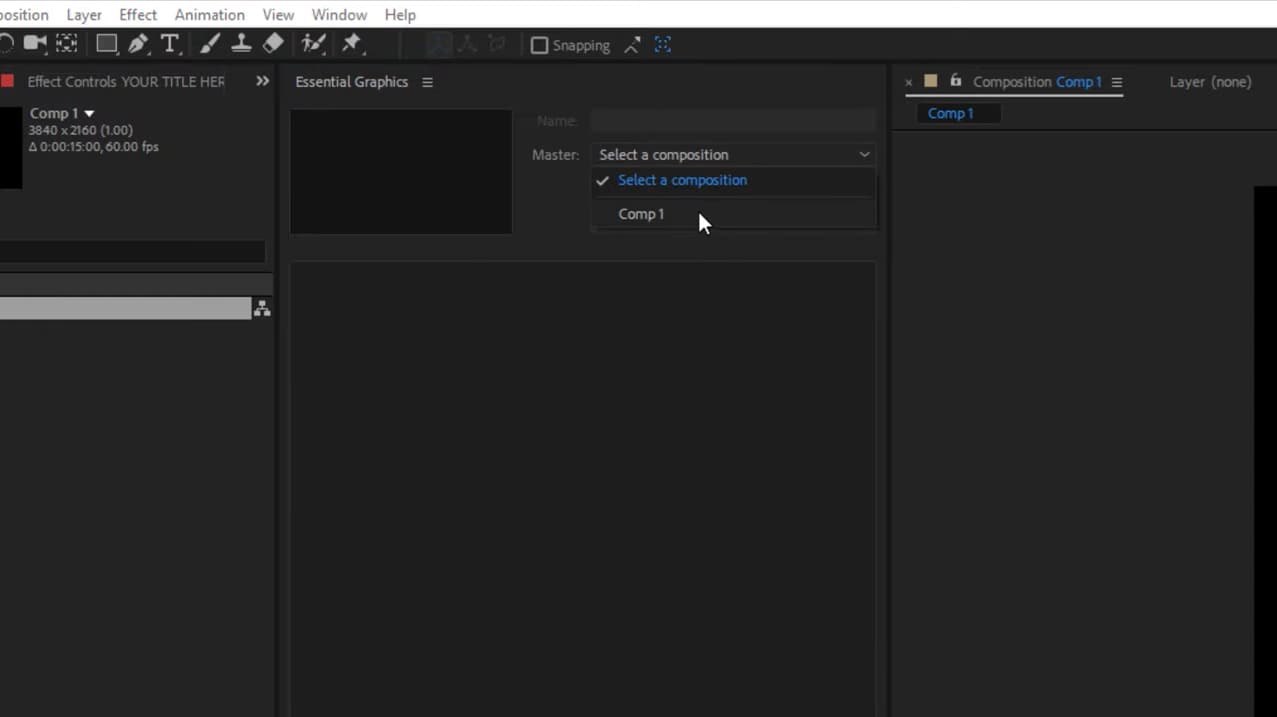
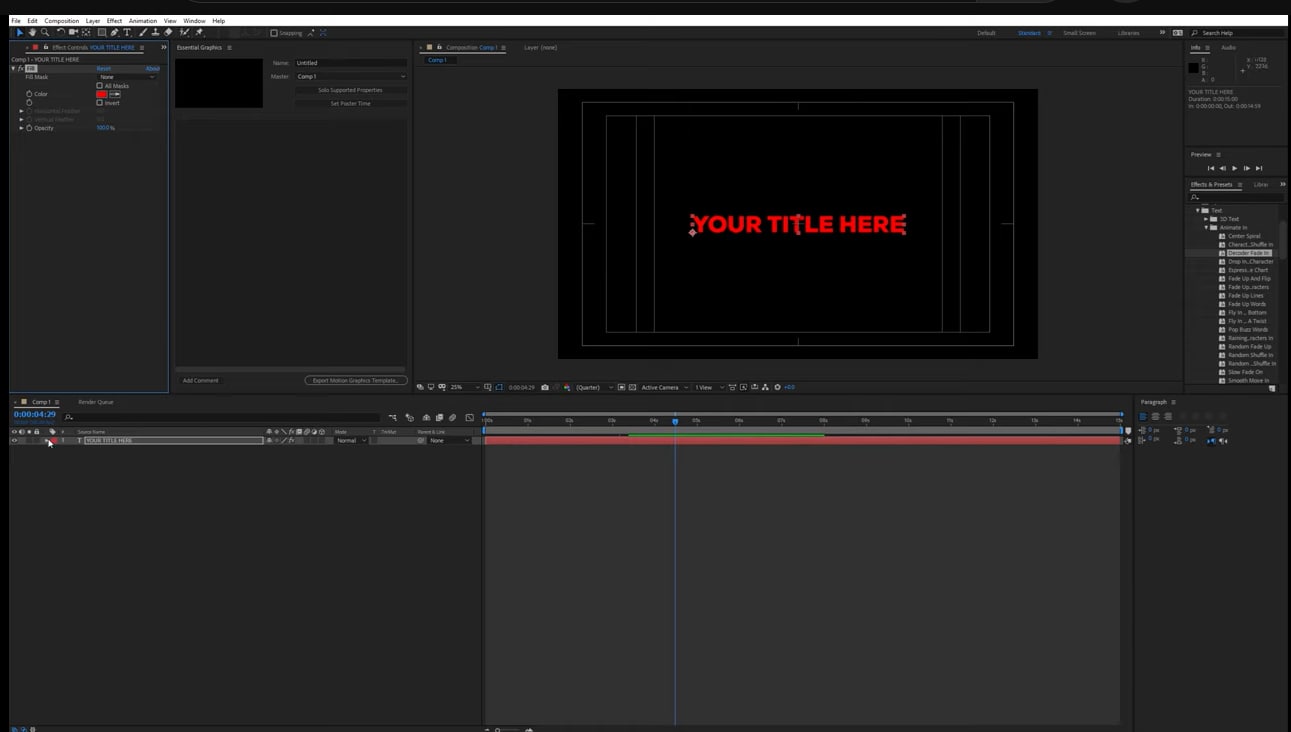
Step 3. In the Essential Graphics panel, select the composition you’re working with, as shown in the image.
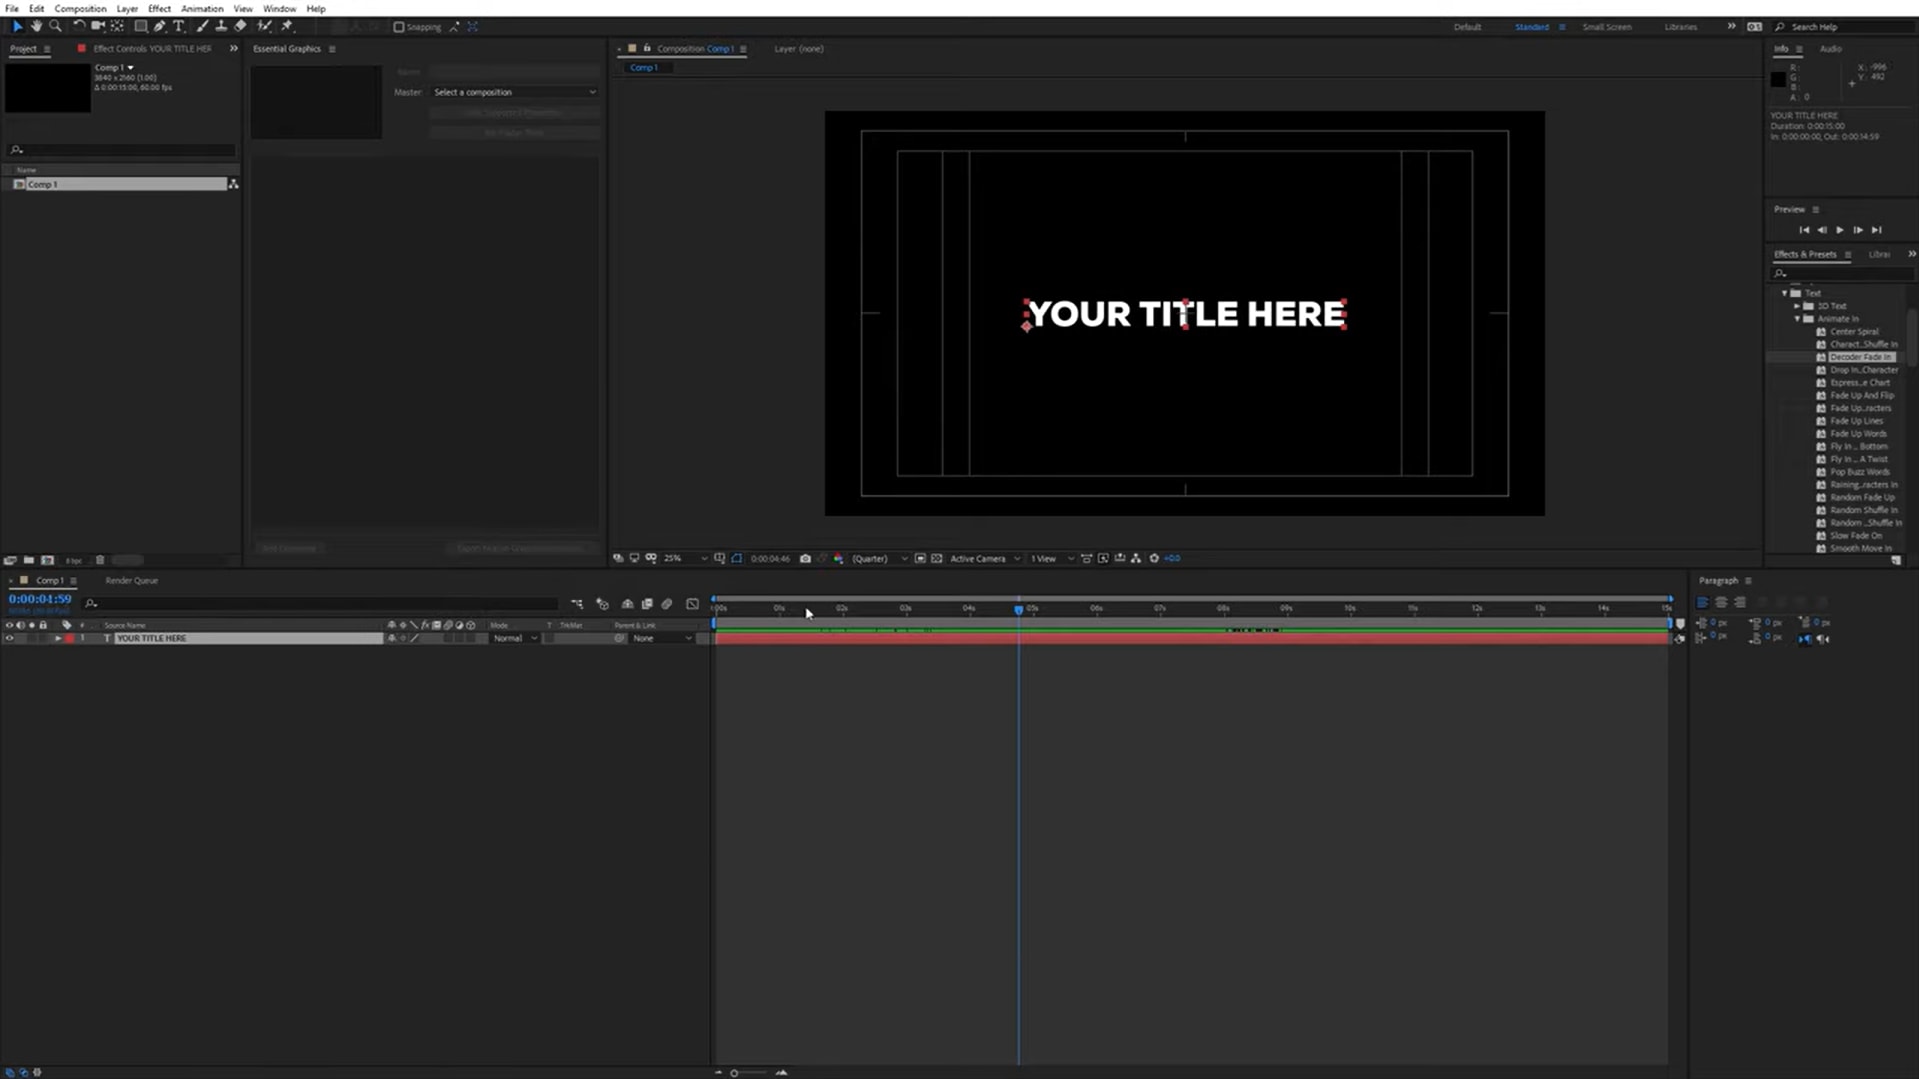
Step 4. Click on the text layer on the timeline, and go to “Effects > Generate > Fill” from the top menu bar.
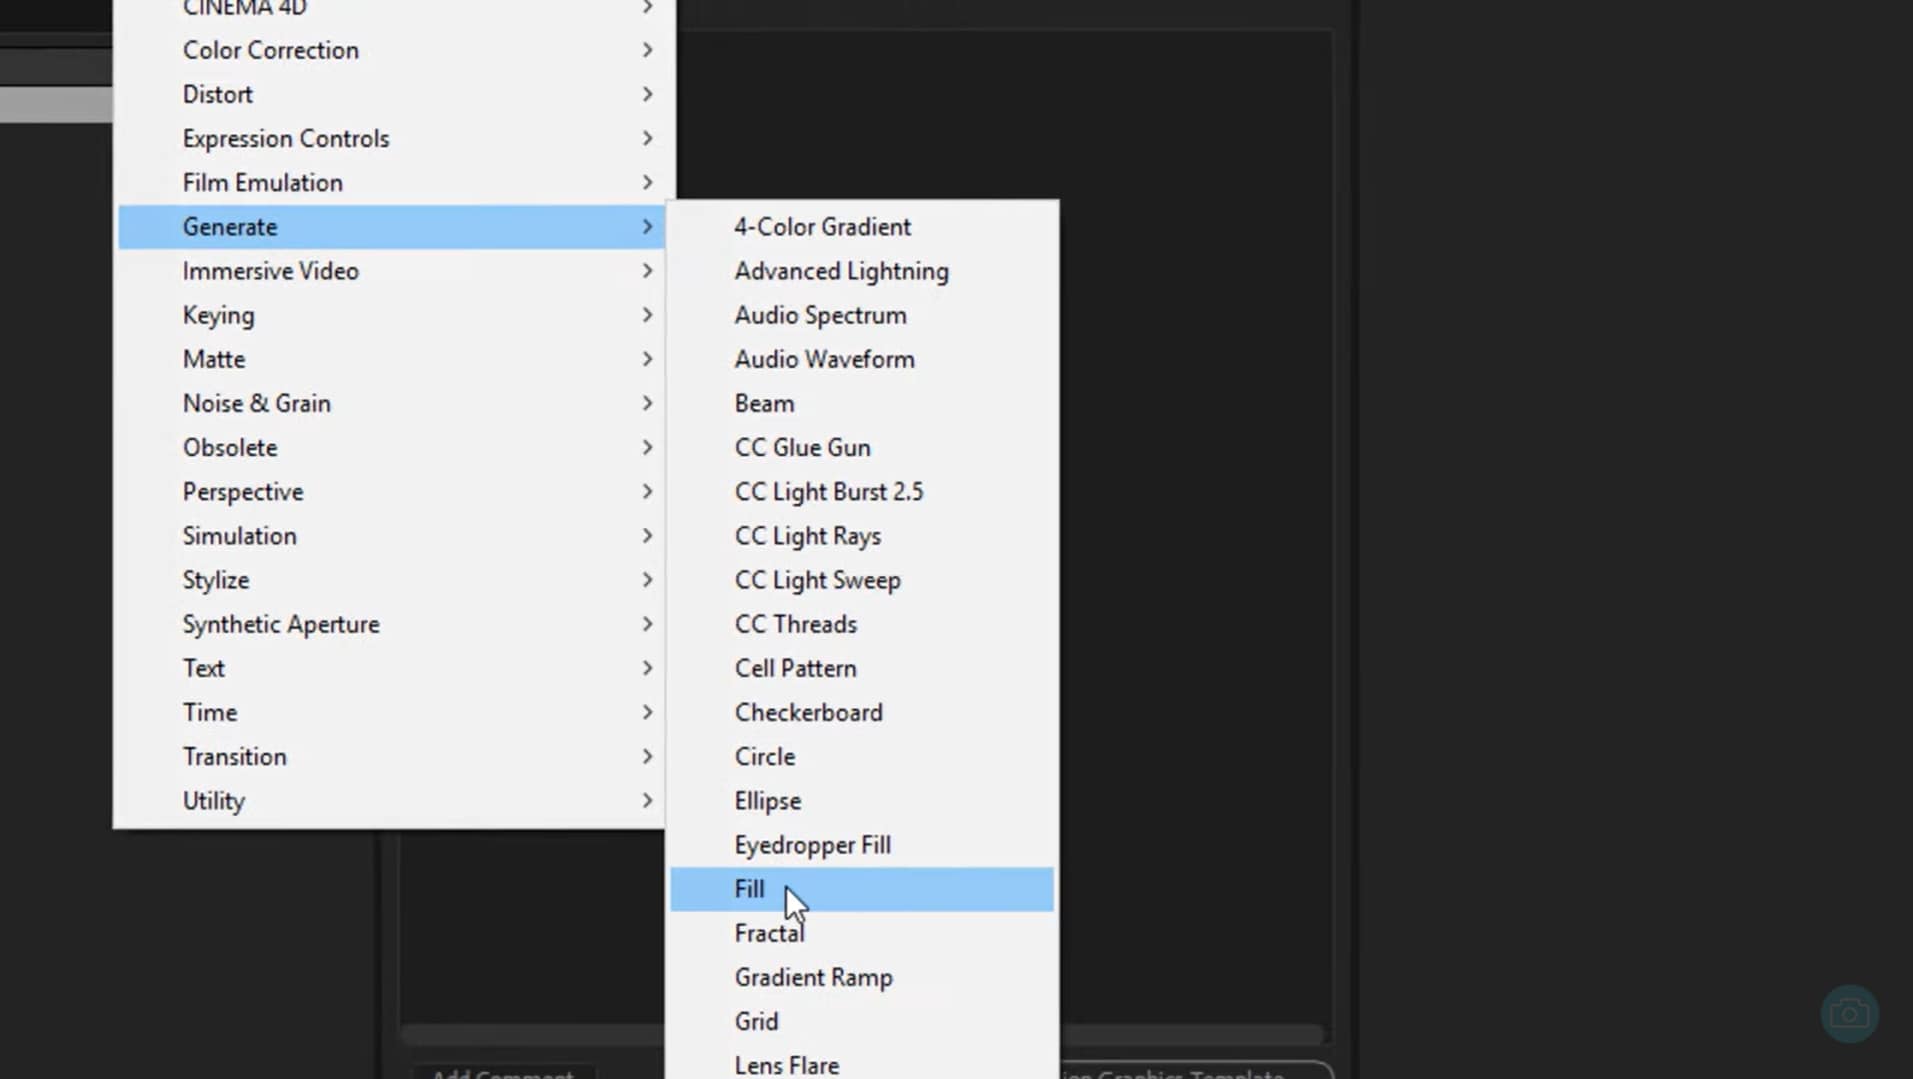
Step 5. This will turn the color of the text to the default Fill color, which, in this case, is red.
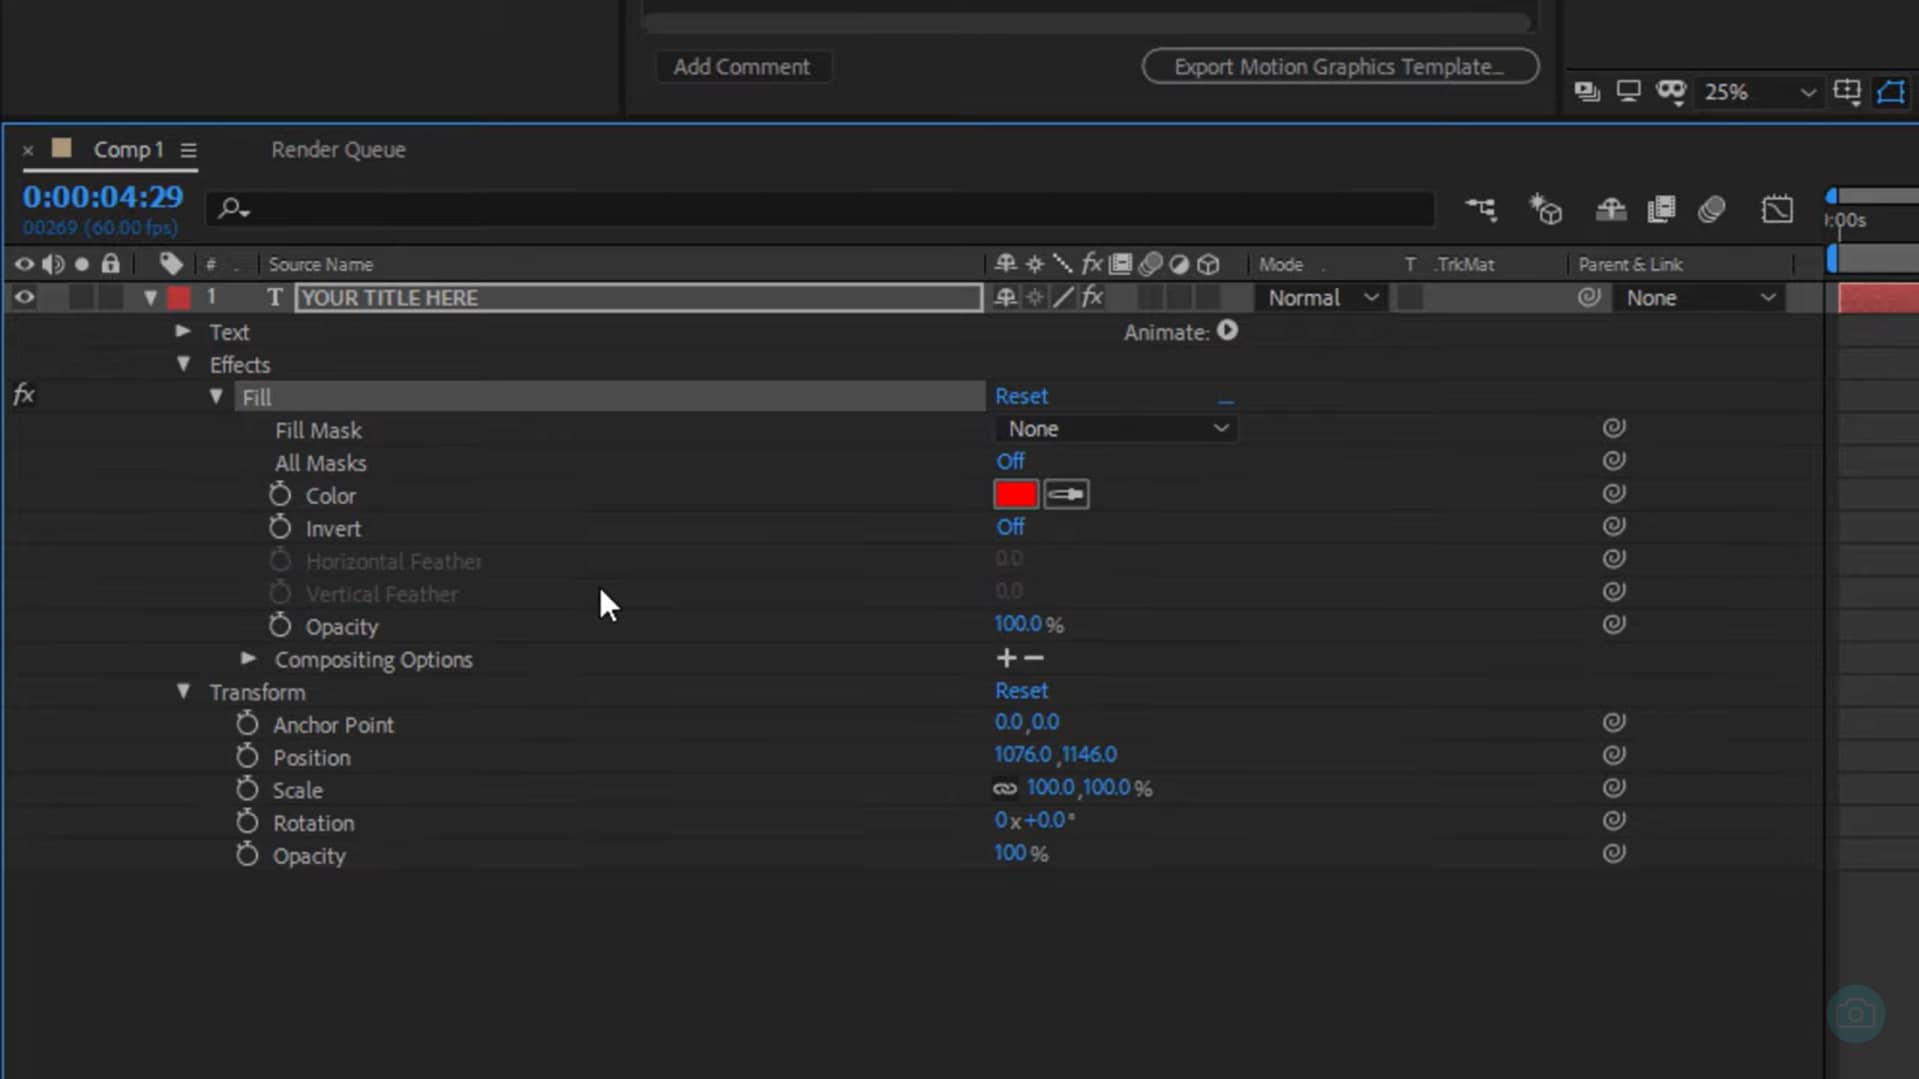
Step 6. Click on the default color option next to the text layer, click on “Effects > Fill” from the drop-down menu, and drag “Color” to the Essential Graphics panel.
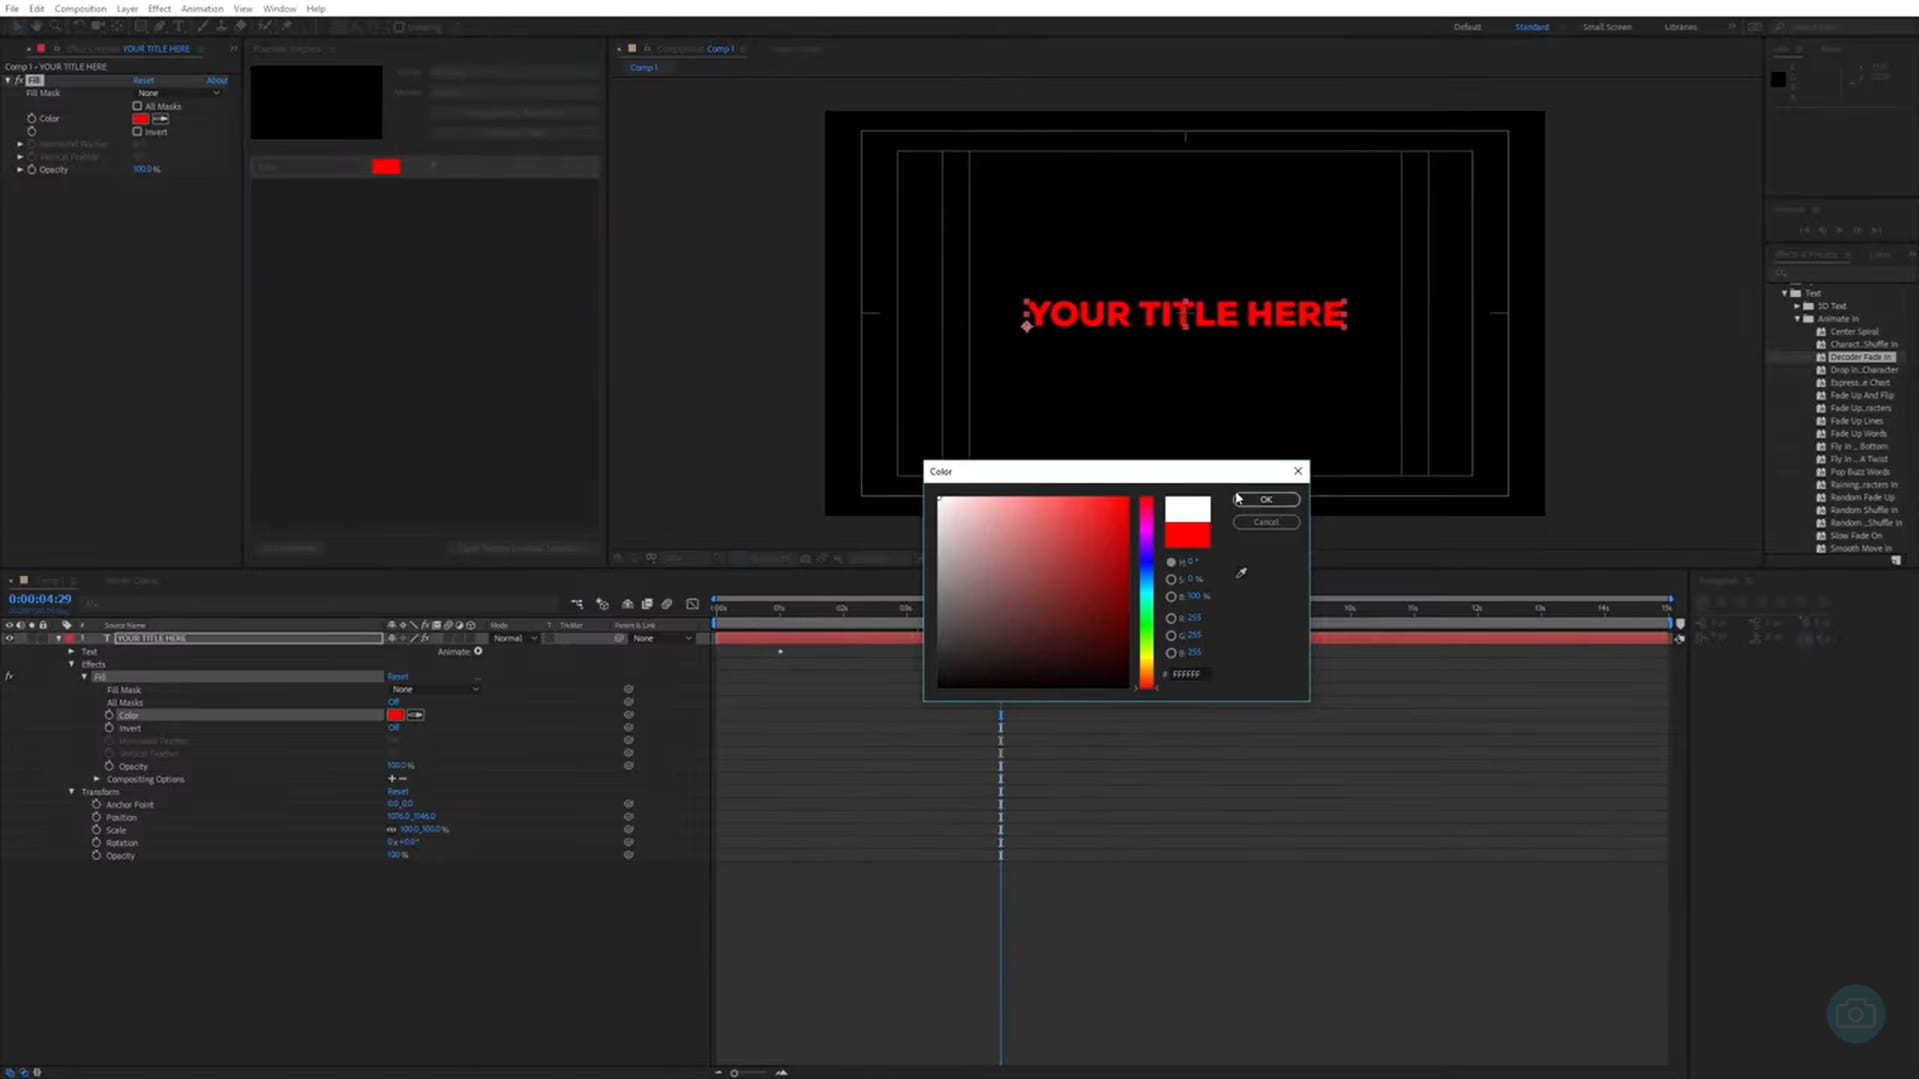
Step 7. Now, click on the “Color” option in the Essential Graphics panel to open the color picker, and select your desired text color.
Even though this method is a bit difficult, especially for beginners, it is one of the most effective ways how to change text color-premiere Pro.
And that’s how to change text color in Adobe Premiere Pro, using the Effects and Essential Graphics features.
Method 3: More Advanced Color Changes Using Title Properties
The previous 2 methods were for changing the color of the text as a whole; however, if you want to make some advanced changes to the text color, you’ll find several options in the Title Properties.
For instance:
To Add Gradient Fills
Follow these steps to add a gradient fill to your text:
Step 1. Add a text layer to your timeline and enter your text, as explained in the previous two methods.
Step 2. From the options on the left of the timeline, click on “Effects > 4-Color Gradient” and drag it to the timeline.
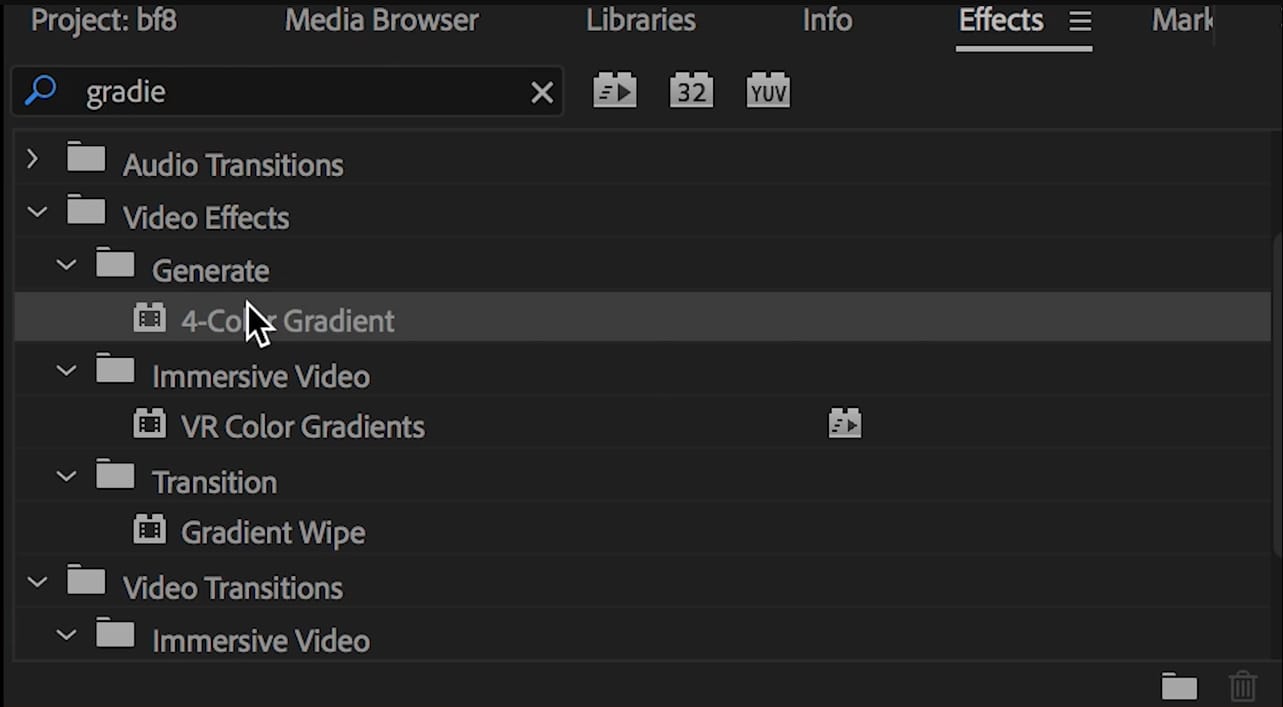
Step 3. Click on the 4-Color Gradient option to customize the color.
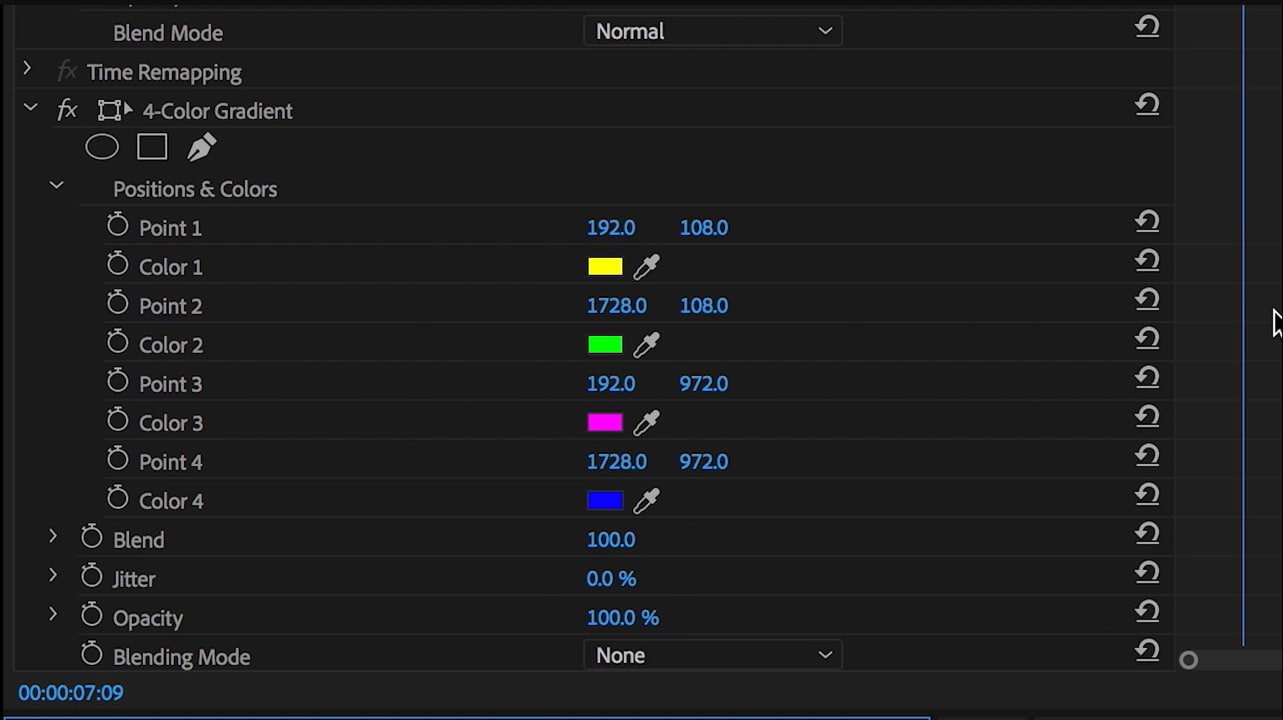
Step 4. Click on each color to open the color picker, and then choose the desired color.
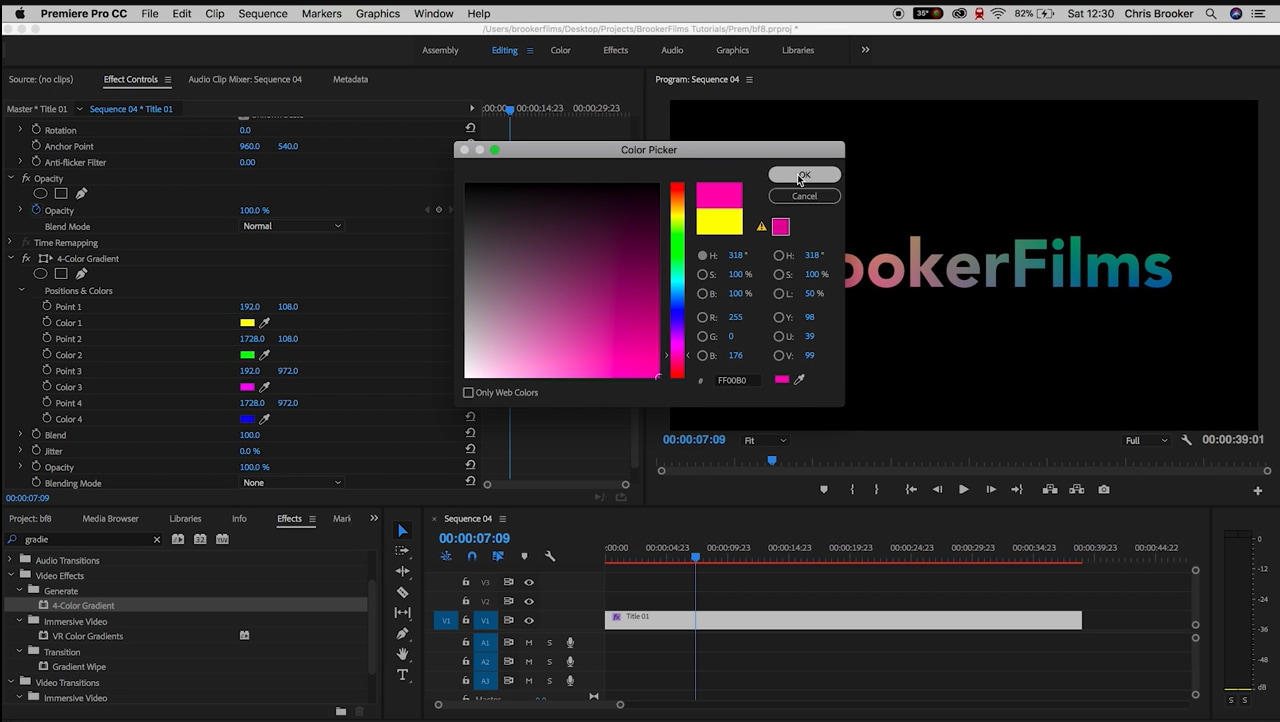
To Animate Color Change
If you want to change the color of your text from one color to another, here’s what to do:
Step 1. Once you have added a text layer to the timeline, press the “Alt” key on your keyboard and drag it to duplicate it. You can duplicate it as many times as you want.
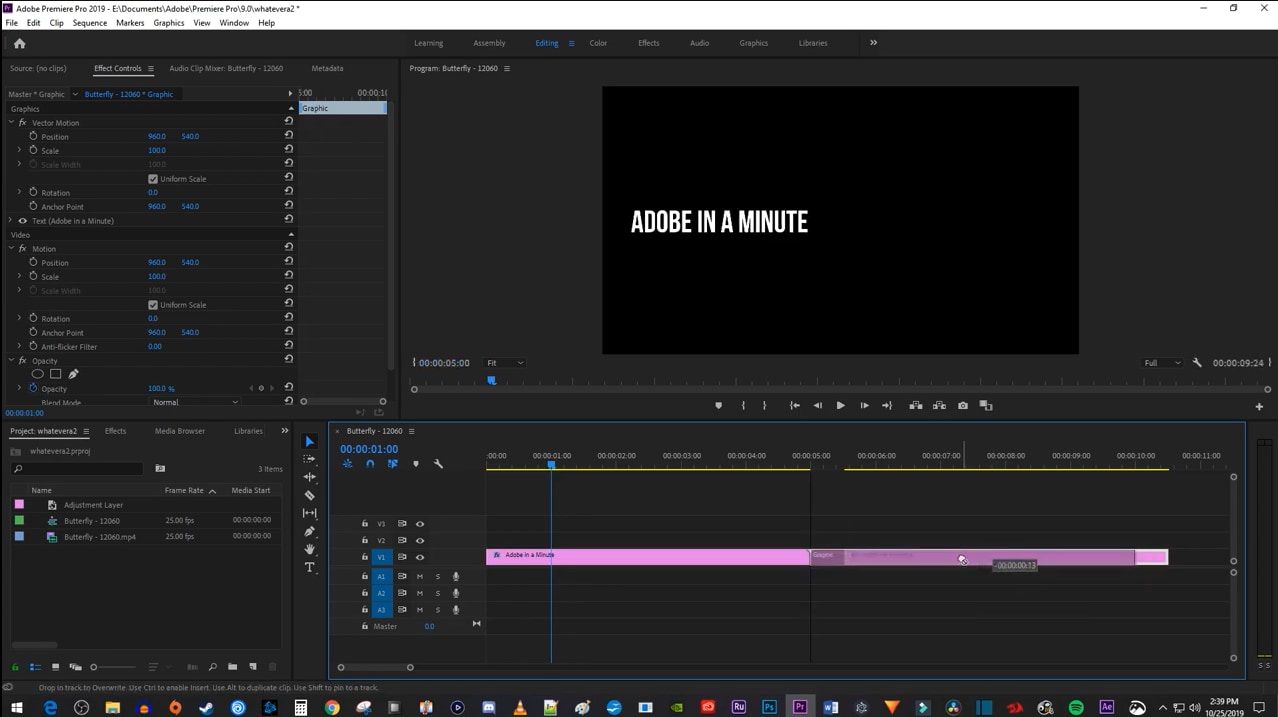
Step 2. Now go to the “Effect” tab on the left of the timeline, scroll to “Cross Dissolve,” drag it to the timeline, and place it between the two text clips.
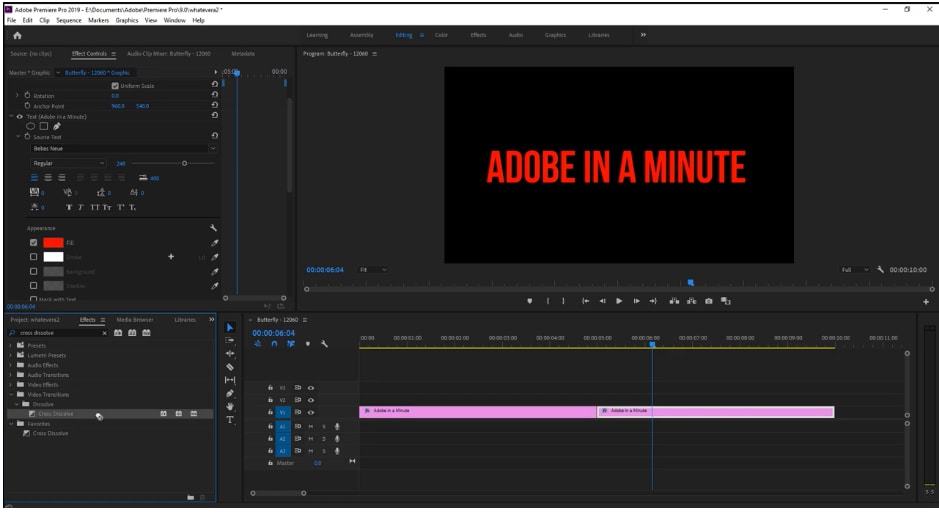
Step 3. Click on the duplicate layer, go to “Effect Controls” from the options at the top left, scroll to “Fill,” and select the desired color from the color picker.
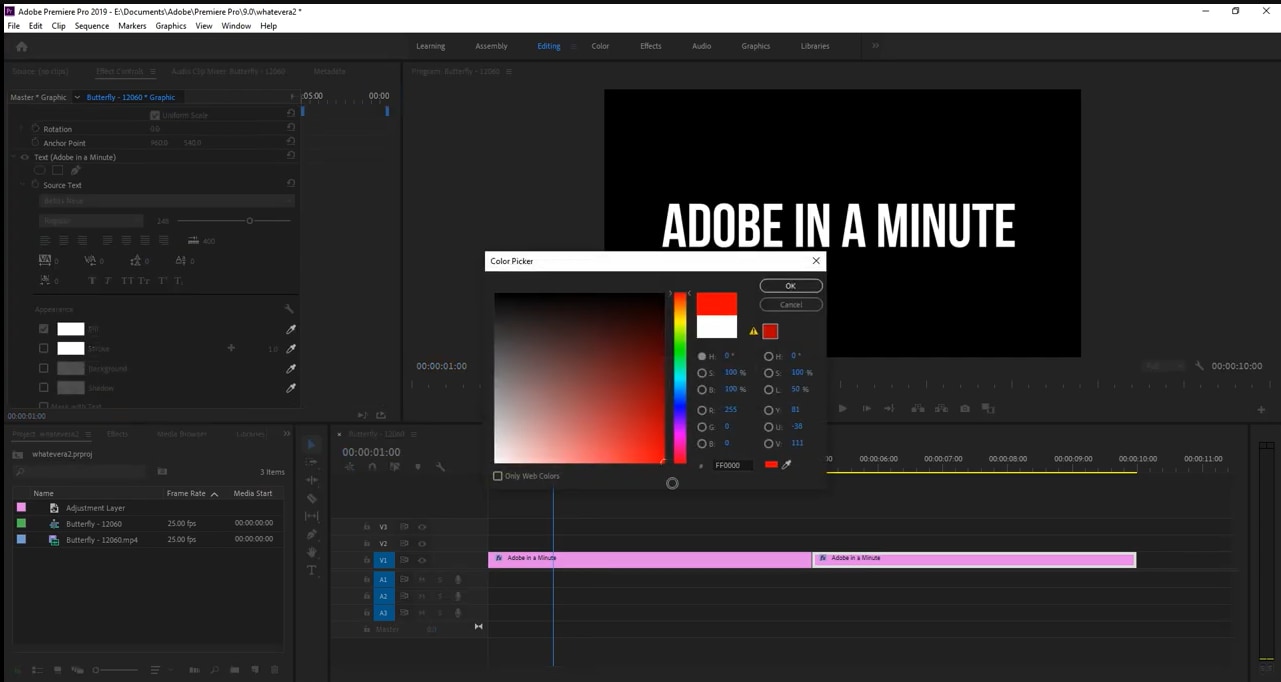
This will give your text a color effect that changes from one shade to another as the video plays.
Some Key Points to Remember
While the exact location of some controls may vary slightly between different versions of Premiere Pro, the general process remains the same.
For example:
- Controls: The location of text color controls is different in Premiere Pro 2024.
- Terminology: In newer versions, "Fill" is used instead of "Color" for text color.
- Essential Graphics Panel: This panel became more prominent in later versions for text editing, including color changes.
- Interface Layout: The overall layout and organization of the Effect Controls and Essential Graphics panels have been refined in newer versions.
- Color Picker: The color picker interface may have been updated between versions.
- Dynamic Color Adaptation: Newer versions (like 2024) introduced dynamic color text formulas that adapt based on background colors for better readability.
How Can I Change the Text Color for a Specific Word Within Premiere Pro?
To change the text color for one specific word in Premiere Pro, you can follow the same steps as discussed in method 1. However, instead of highlighting the whole phrase, simply select the word whose color you want to change and follow the steps.
Can I Use the Eyedropper Tool to Pick a Color from the Video for Text?
To use the Eyedropper tool to pick a color for the text, follow the steps below:
Step 1. Add text to your video using the text button.
Step 2. Now, use the “Selection Tool” from the tools on the left of the timeline to outline the text you want to change the color of.
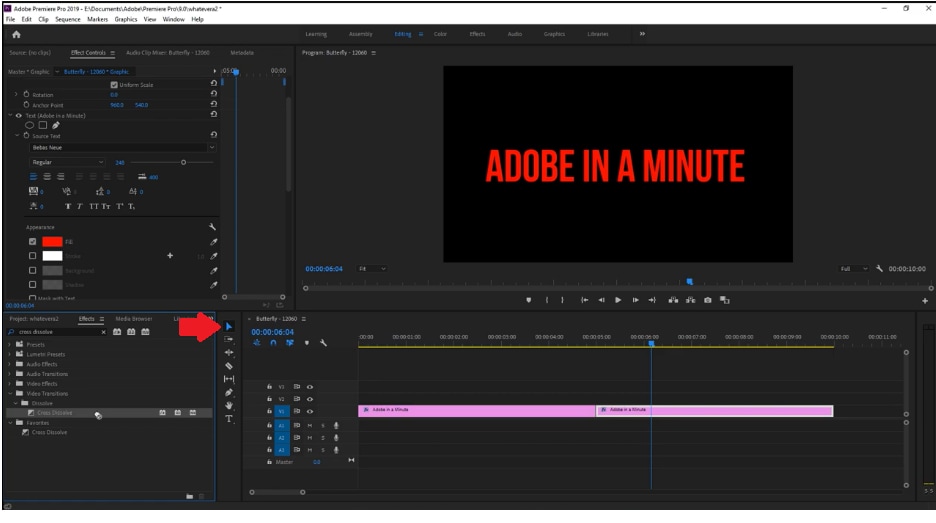
Step 3. Go to “Effect Controls,” select the Eyedropper tool, and use it on the target color.
Step 4. This will automatically change the color of the outlined text to the color selected via the Eyedropper tool.
How to Change Text Color in Other Video Editing Software
Adobe Premiere Pro is the go-to tool for video editors to spruce up their videos; however, it is quite expensive.
Therefore, if you want to make your videos interesting and watchable, why not use a tool that comes with several free features and affordable subscription plans? We’re talking about Wondershare Filmora.

Filmora is accessible video editing software designed for beginners and intermediate users. It offers a range of tools to help you create professional-looking videos easily and professionally. With its accessible interface and comprehensive features, Filmora makes video editing possible for everyone!
Features of Wondershare Filmora in terms of text editing
- AI tools: Filmora leverages advanced AI tools to simplify video editing, enabling users to create professional-quality videos with minimal effort.
- Wide Range of Editing Tools: It offers a wide range of basic and advanced editing functions, such as trimming, cutting, splitting, merging, and joining video clips.
- Impressive Visual Effects: Filmora has a vast library of eye-catching visual effects, transitions, and filters that enable users to enhance their videos creatively.
- Enhanced Audio Capabilities: Furthermore, this video editing software has several tools to improve audio quality, add background music, and adjust sound effects for a polished audio experience.
- Versatile Text and Titles: You can create professional-looking titles and captions with customizable fonts, styles, and animations to convey their message effectively.
- Efficient Export Options: Filmora makes it easy to share your videos on different platforms, as it supports various video formats and resolutions.
How To Change Text Color in Video Editor Filmora
Here are the steps to change video text color in Filmora:
Step 1. Download and install Filmora on your devices by click the button below. Launch it and click open the video you want to add text to by clicking on “Import.”
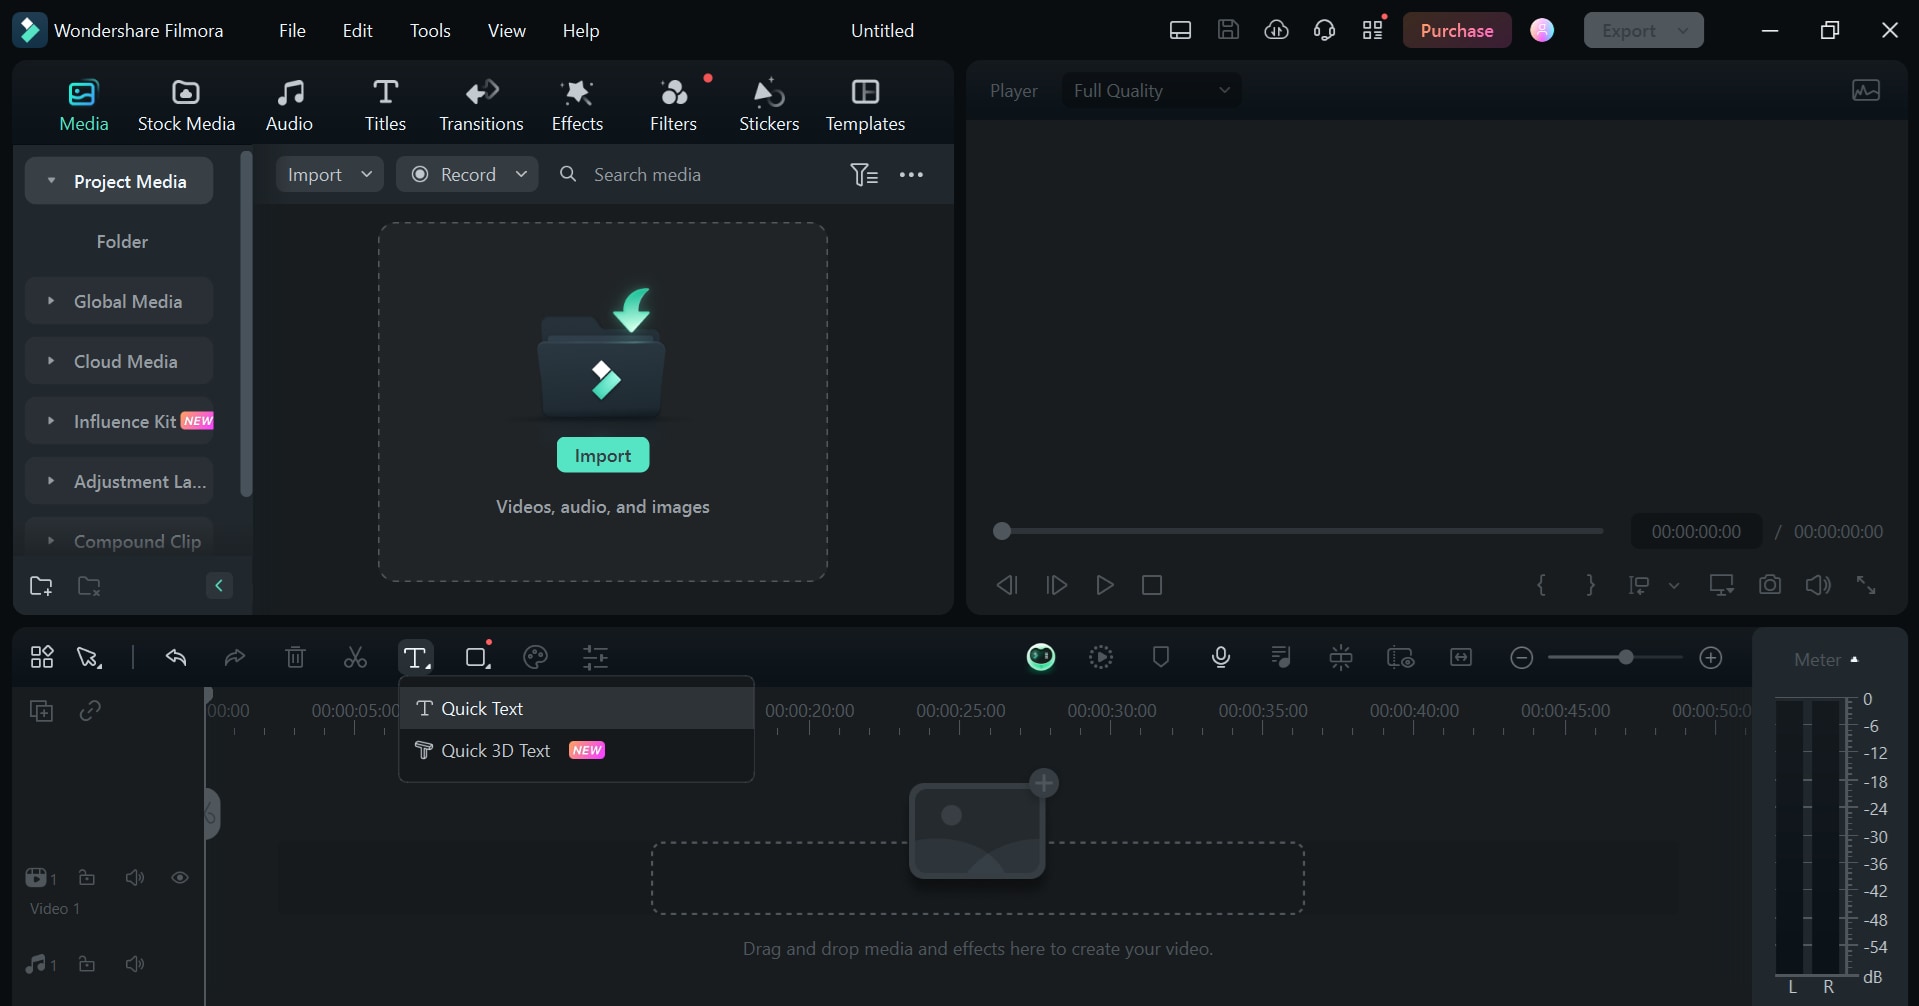
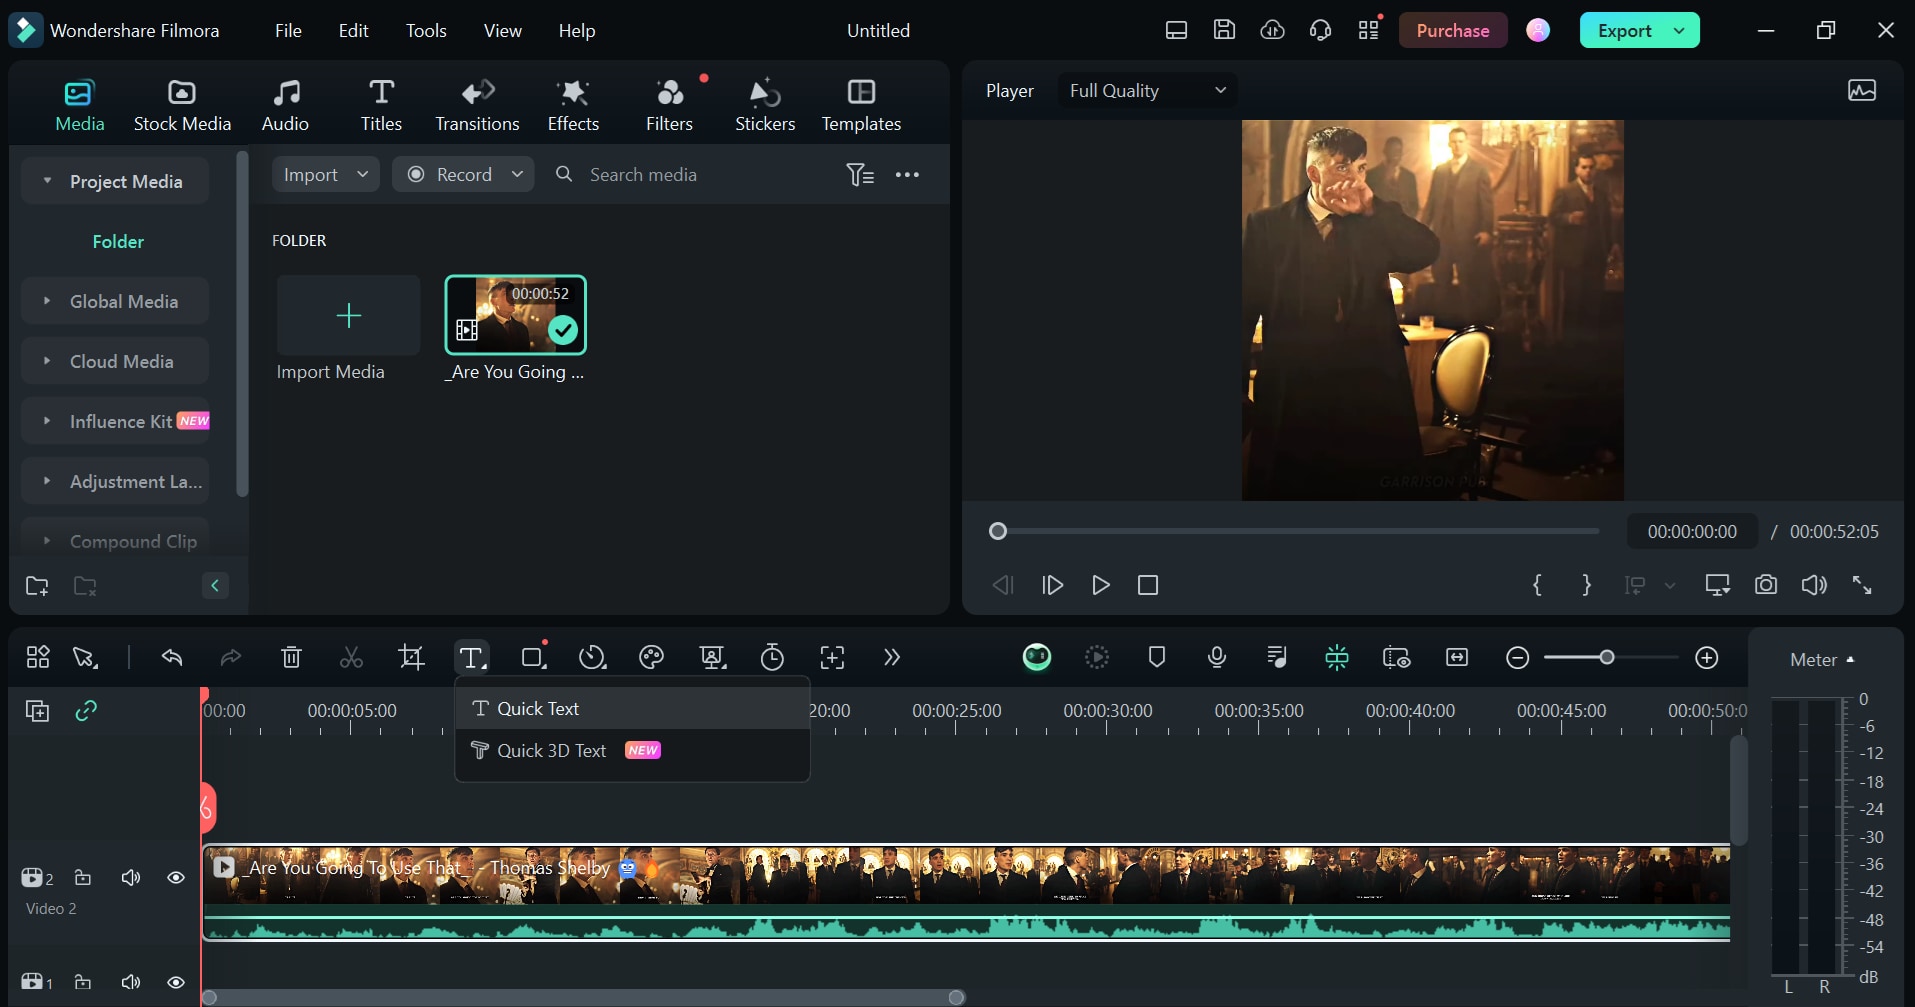
Step 2. Drag the video to the timeline, click on the Text icon indicated by a “T,” and select “Quick Text” or “Quick 3D Text.” For this example, we are selecting “Quick Text.”
Step 3. Double-click on the text layer and enter the desired text in the pop-up box that appears.
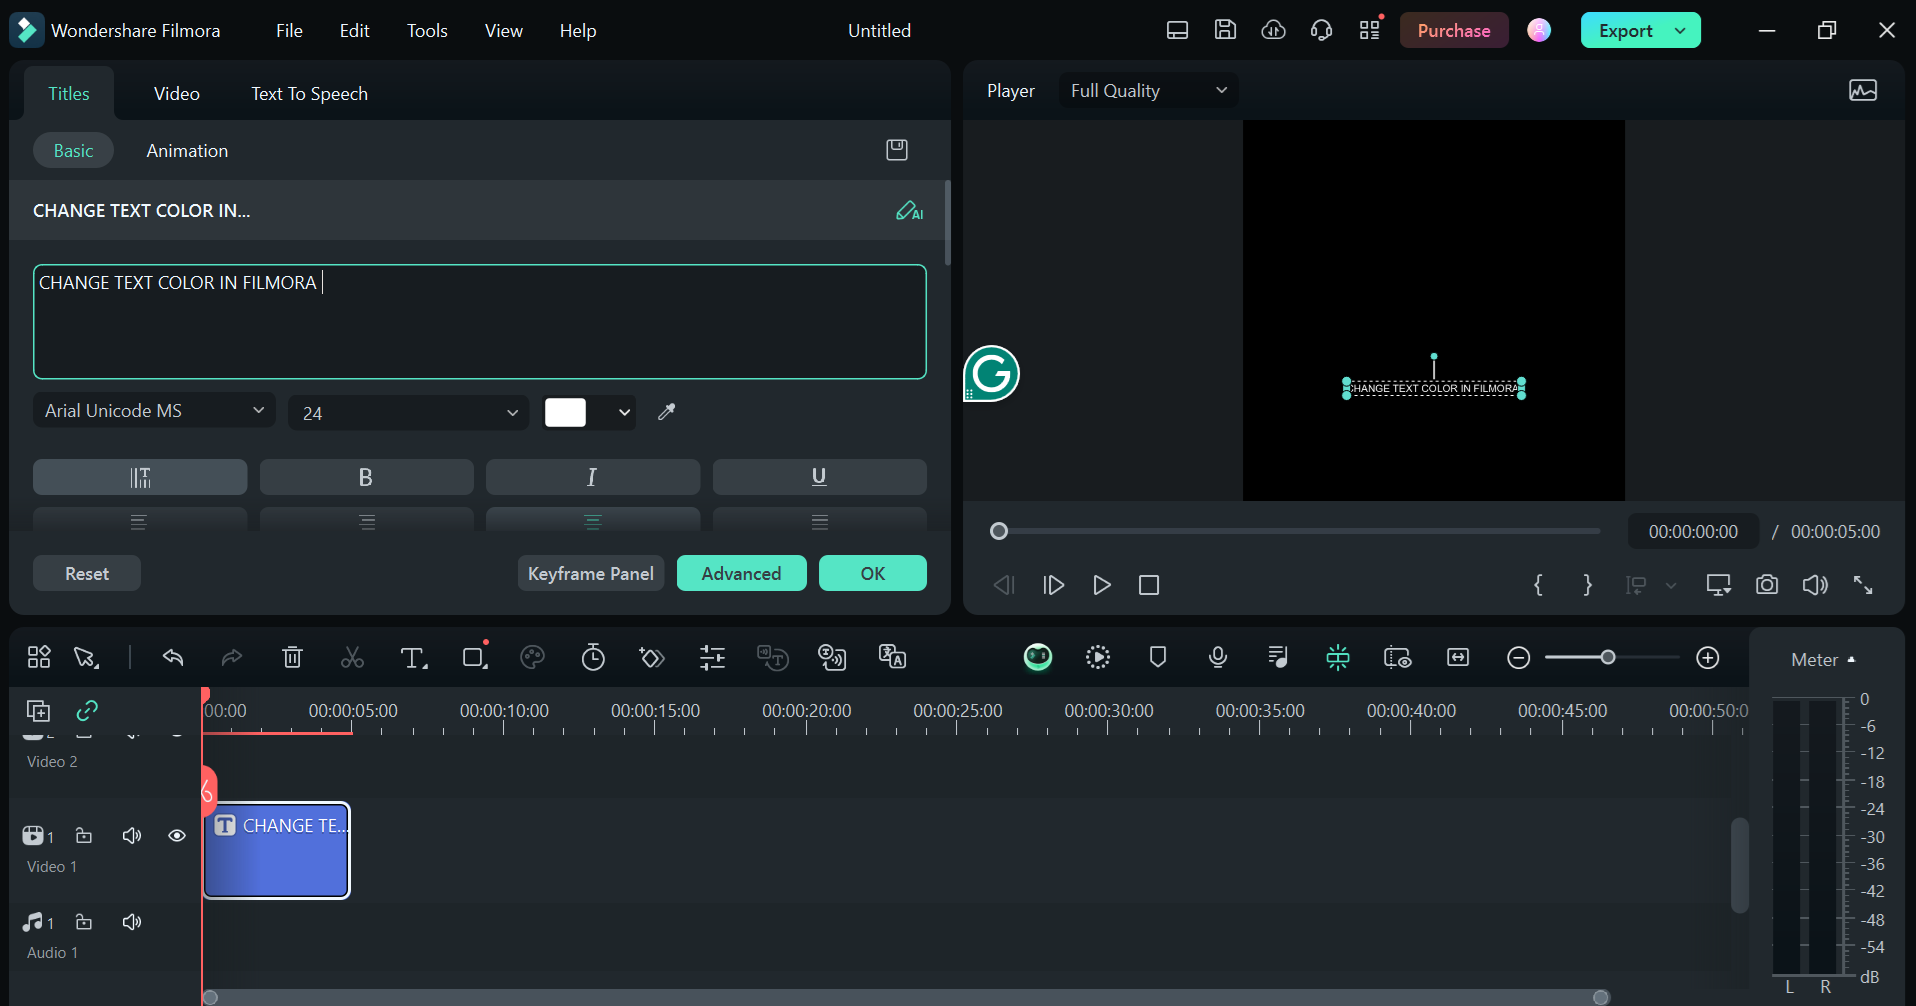
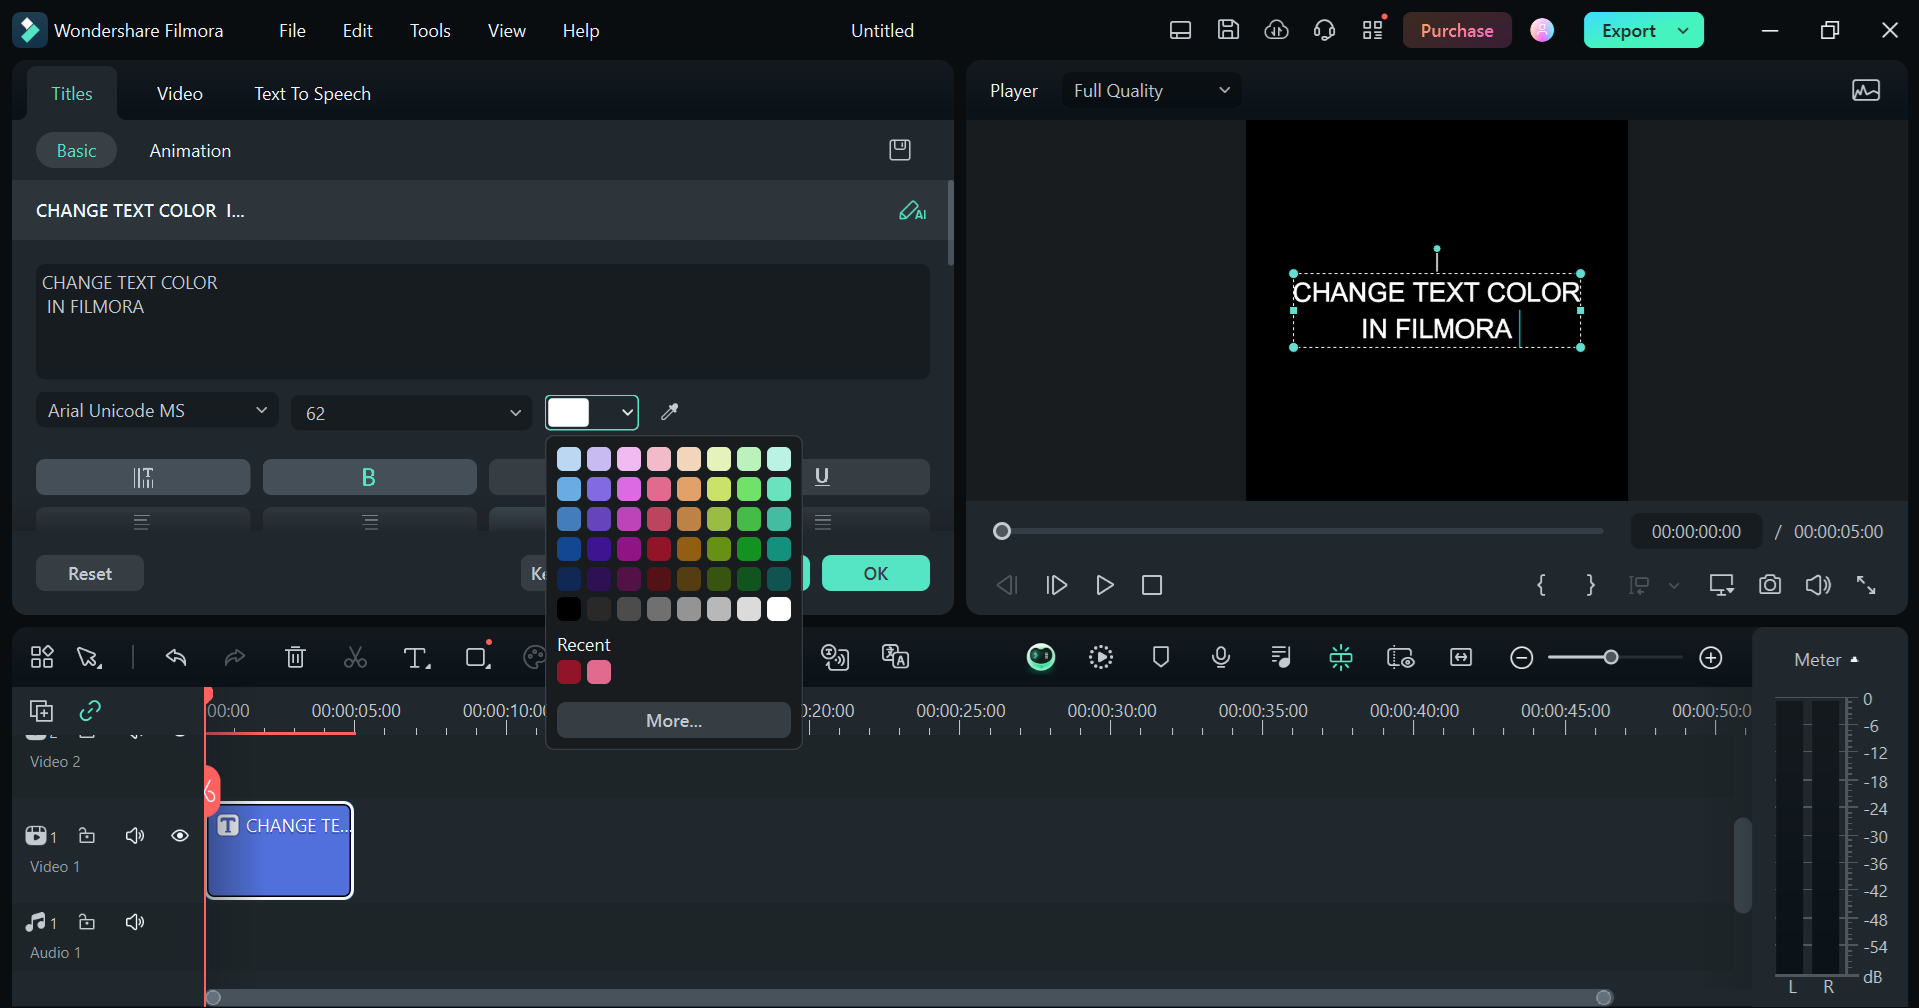
Step 4. In the same pop-up box, you can customize the text by changing its font, size, and color. Press “Ok” to make the changes.
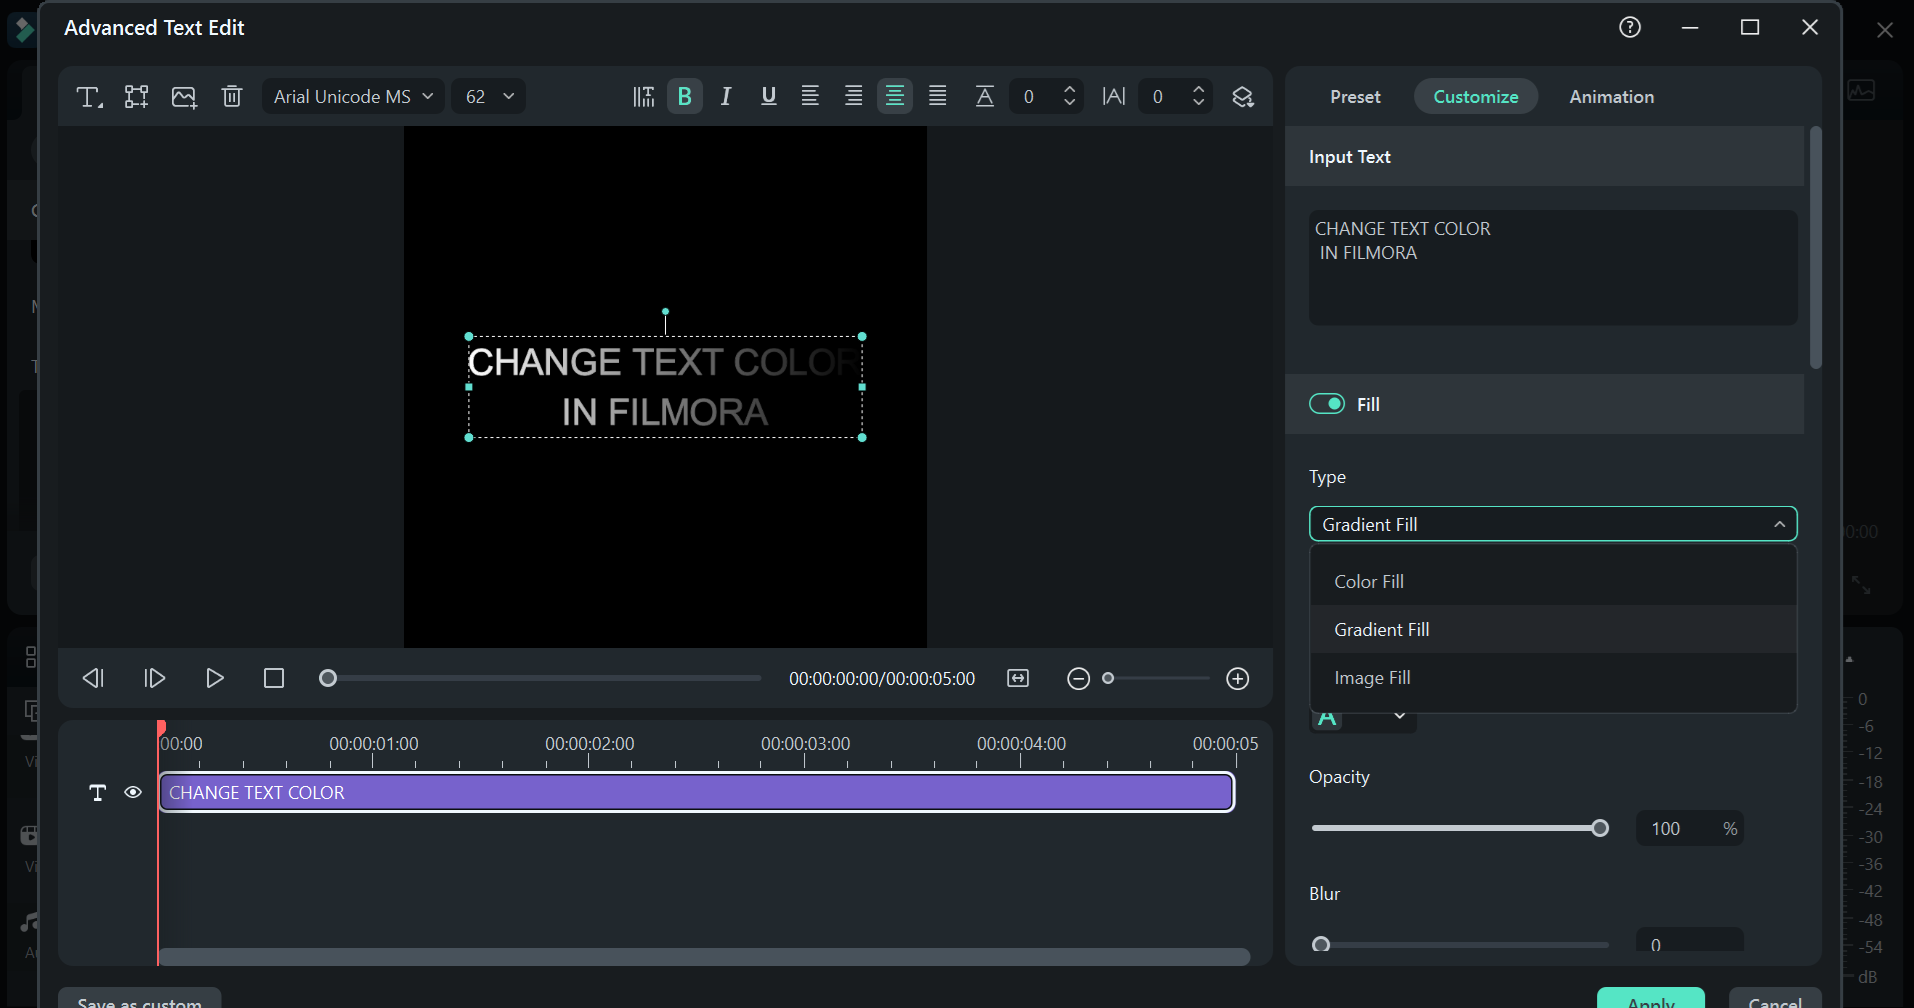
Step 5. You can also add gradient fill or image fill to the text by clicking on “Advanced” and selecting the type.
And that’s how you can change and customize the text color in Filmora.
Advanced Editing Techniques
If you want to make your text stand out, you can use the “Advanced” editing option for more techniques. Let us show you how to do it.
How To Apply Curved Text in Videos
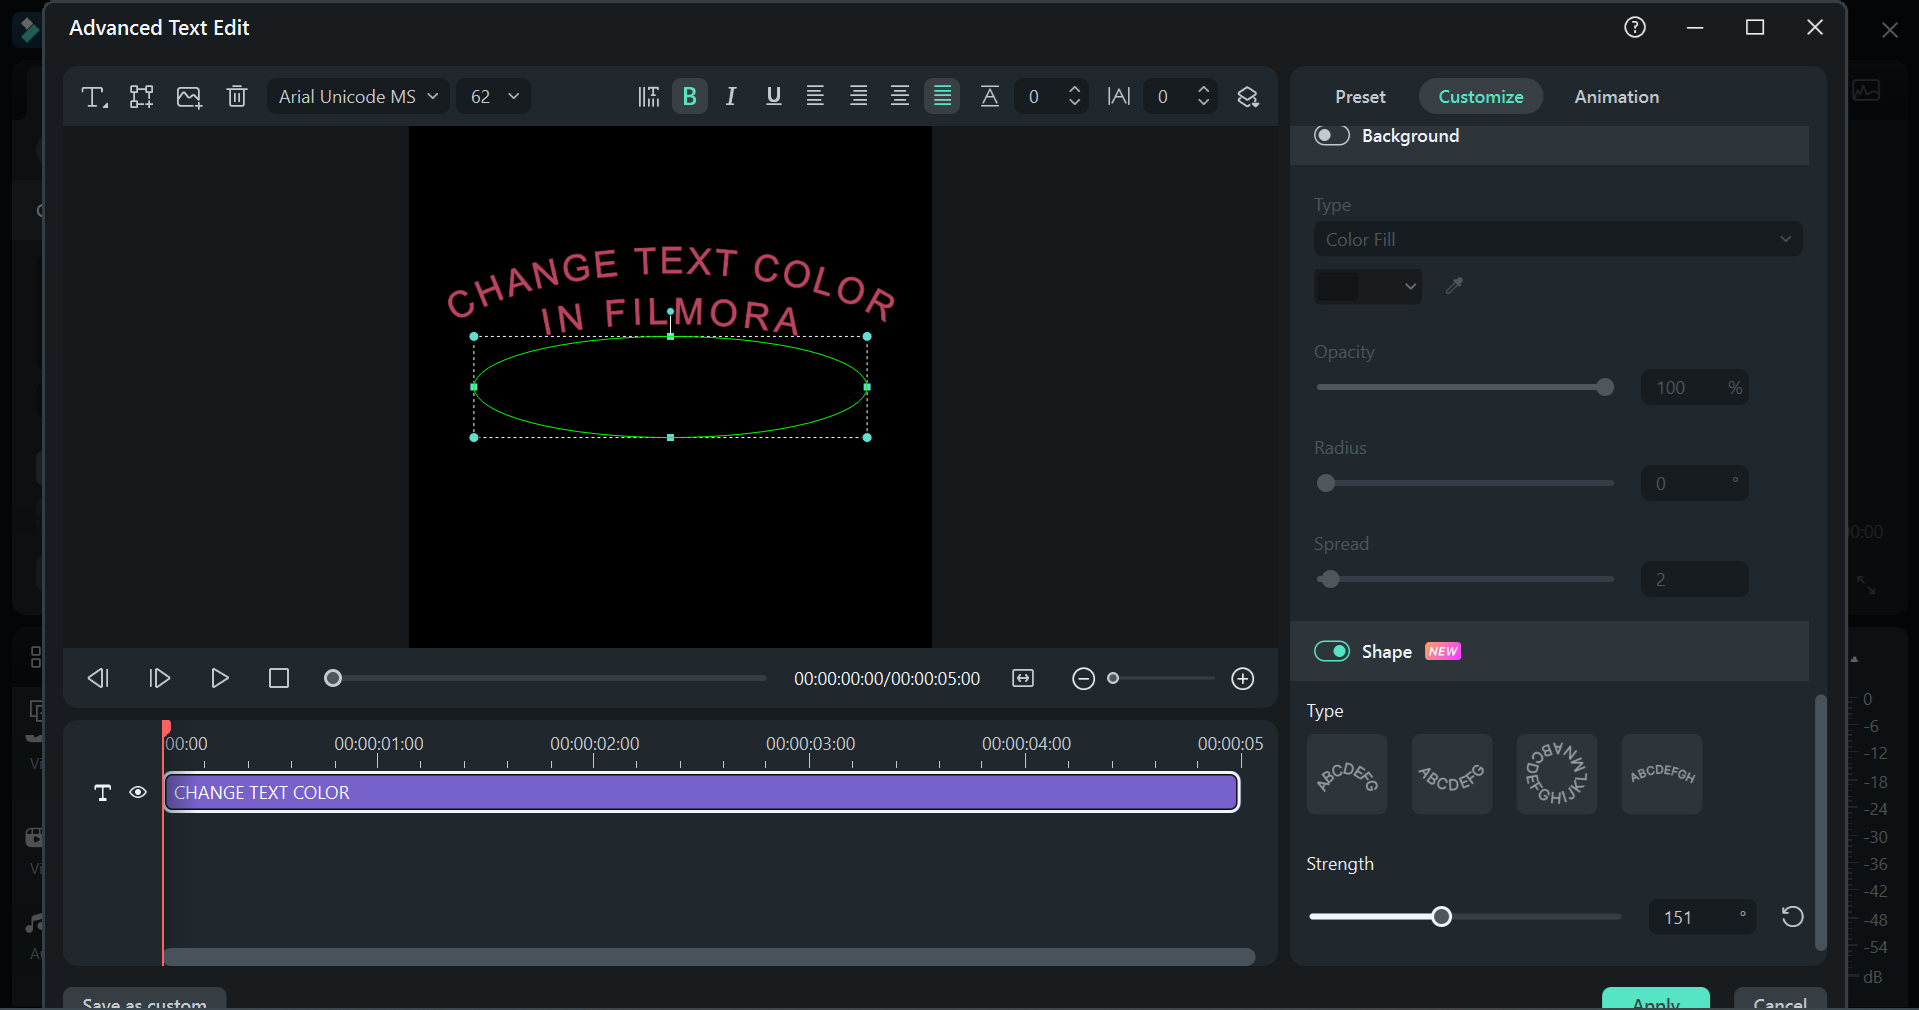
Make your text curved in Filmora by following these steps:
Step 1. Click on “Advanced” in the pop-up box, and scroll to “Shape” from the options on the right.
Step 2. Turn the toggle on for “Shape” and then select the curved option from the 4 available ones.
How To Add Caption on Video Automatically
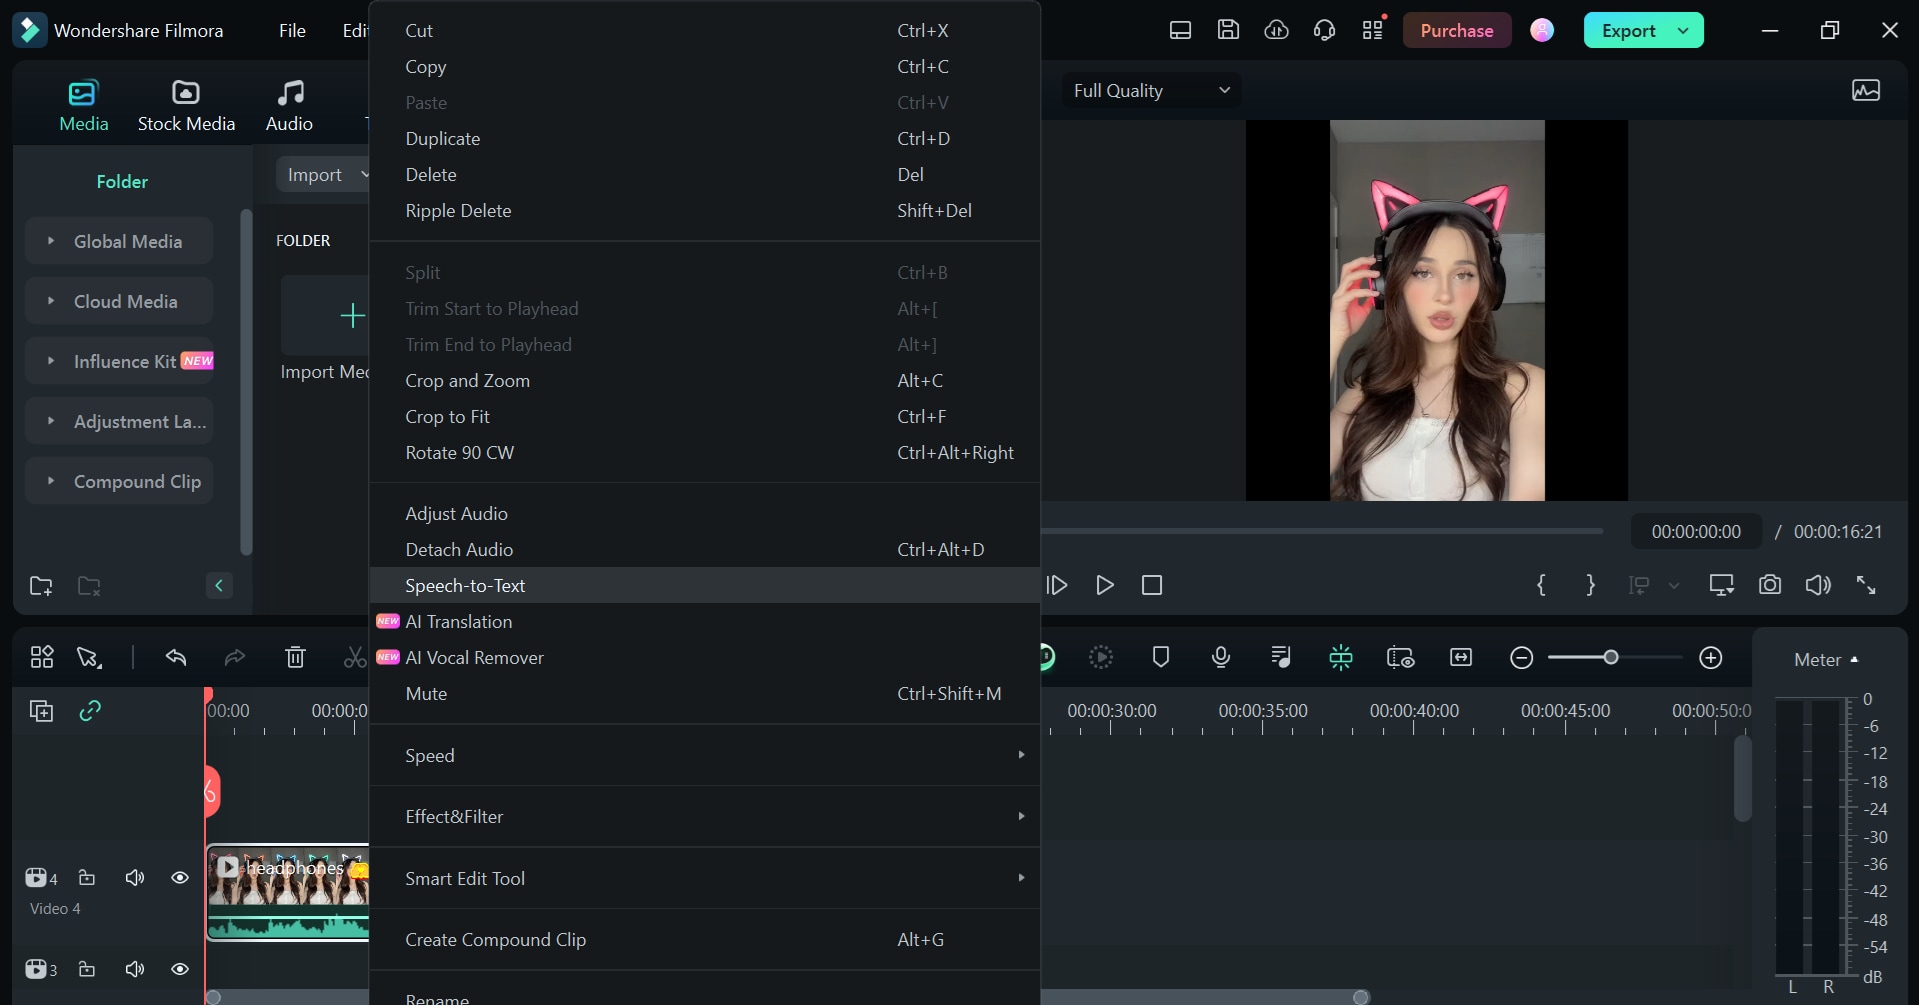
To add captions to your video, here’s what to do:
Step 1. Once you have imported your video and dragged it to the timeline, right-click on it and select “Speech-to-Text.”
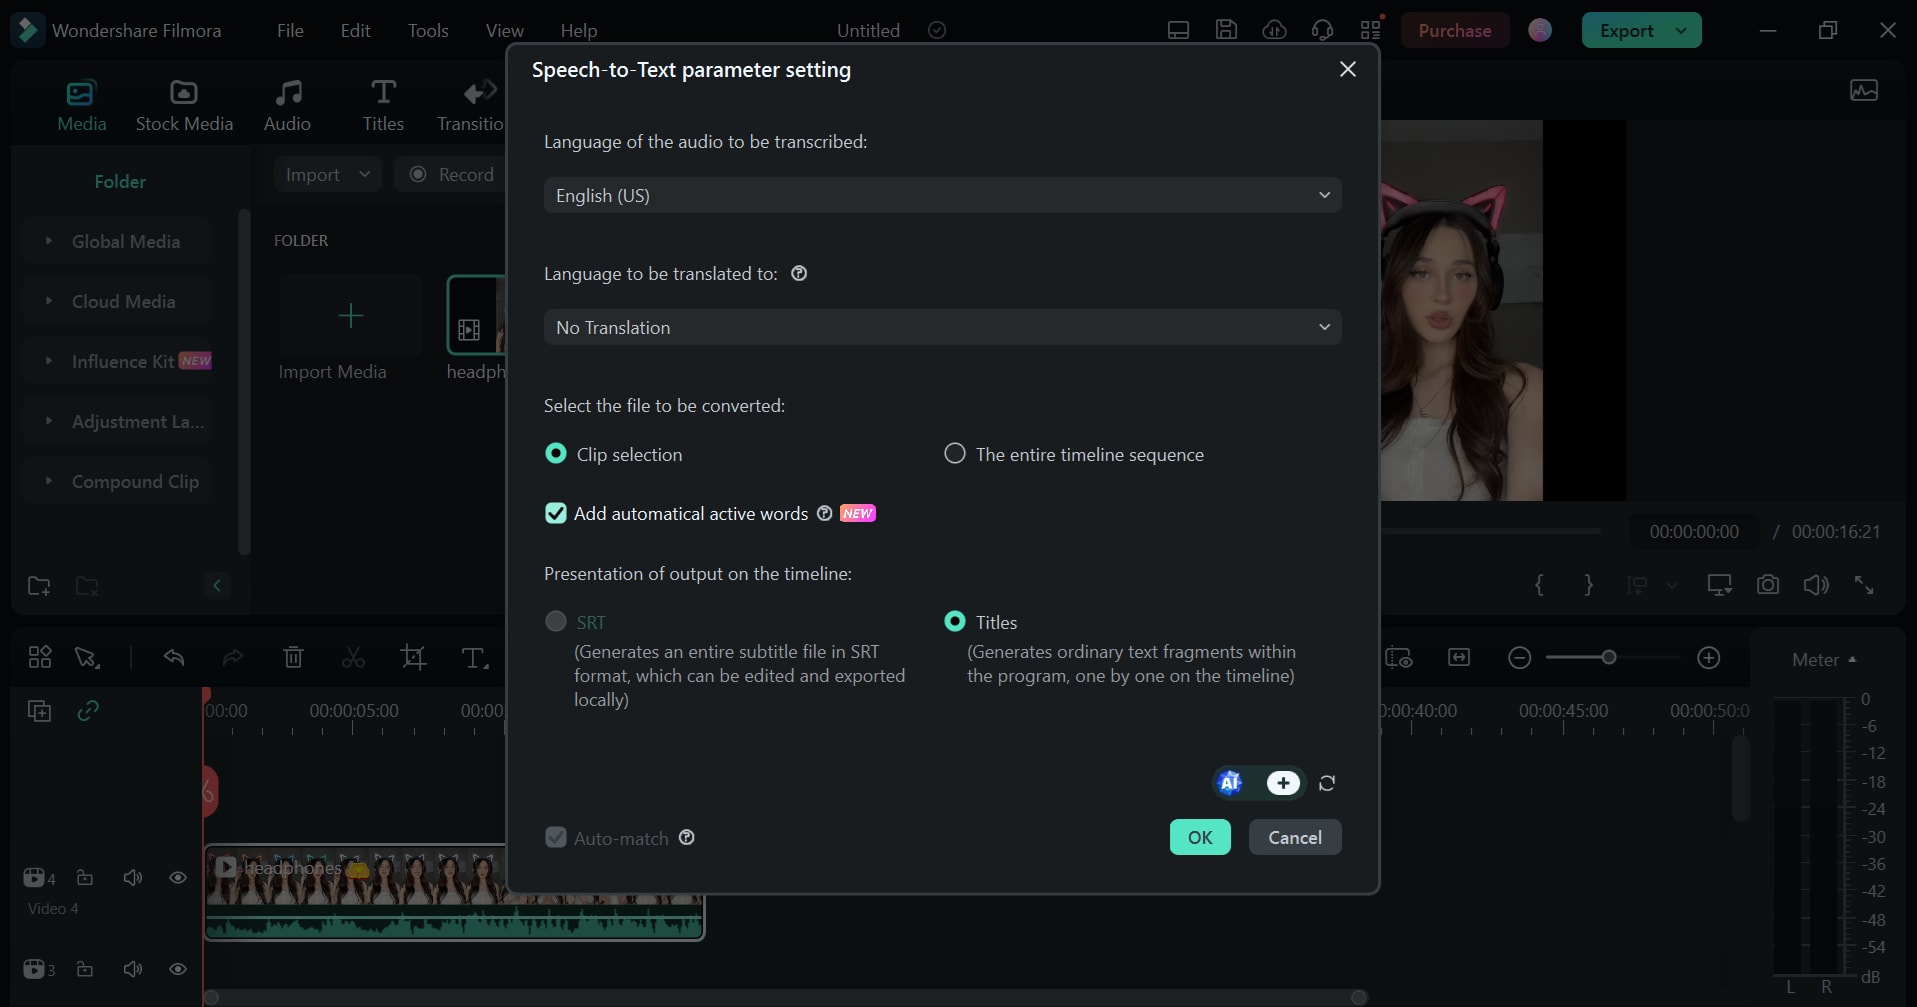
Step 2. Select the “Add Automatical Active Words” and click “Ok.”
Conclusion
If you want your videos to make a mark, we suggest adding text to it. However, plain old boring text won’t do any good; therefore, we recommend adding some color to it, changing its font and size, or even making it animated for greater impact!
In this comprehensive guide, we have discussed 3 ways how to change text color in Premiere Pro. From using the Effects panel to the Essential Graphics panel and Title Properties, we have listed all the possible ways.
However, if you’re looking for a video editor that offers the same results as Adobe Premiere Pro, we suggest Wondershare Filmora. It’s reasonably priced, has user-friendly options, and simple steps to change the text color and edit it using several other techniques.
So, get your video editing game on with Wondershare Filmora!


