Vertical videos have become more common today with more platforms such as Instagram, TikTok, and Snapchat being mobile-centric. The above mentioned platforms are intended majorly for mobile devices most of which are grabbed in an upright orientation. Therefore, current video creators are aiming at tapping these audiences through vertical video formats.
Most mobile devices record videos in portrait mode but cutting these videos and cropping them into specific sizes is quite complicated since most applications designed for video editing such as iMovie are optimized for landscape mode videos. This is a step by step guide on how to create and edit vertical video in iMovie on both Mac and your iPhone. We will also review some drawbacks of using iMovie and will briefly consider other video editing applications such as Filmora.
In this article
Part 1: What is a Vertical Video?
A vertical video is a video that is taller than it is wide most often with a 9:16 or 1:1 ratio. It also favors mobile devices, as most of the people who browse the internet using their phones tend to do it in portrait orientation. In contrast to the traditional landscape (16:9) orientation, the vertical videos occupy the screen of a smartphone without the users' need to switch the position of a device, and this makes the viewing experience on the mobile platforms more enjoyable and smooth.
A vertical video is a video taken or designed with either a camera or a computer to be viewed in portrait, leading to an image which is taller than it is broad. It means that it is the orientation which is the opposite of the multiple horizontal forms that films and television series use.
It does not make any sense to have to rotate the device just to be able to watch a video in full screen which is absolutely true. So if the video is vertical and a little bit engaging, you will keep scrolling through it and it just feels right.
Part 2: How to Make a Vertical Video in iMovie on Mac & iPhone
2.1. How to Make Vertical Video in iMovie on Mac
Even though iMovie cannot directly edit videos in a vertical format, you can create such a video, but it will be more of a workaround. Follow these steps to make or edit vertical videos in iMovie on your Mac:
- Step 1. Launch iMovie
Launch the iMovie App on your Mac computer. If you do not have iMovie already in your system then it can be downloaded free of cost from the Mac.
- Step 2. Start a New Project
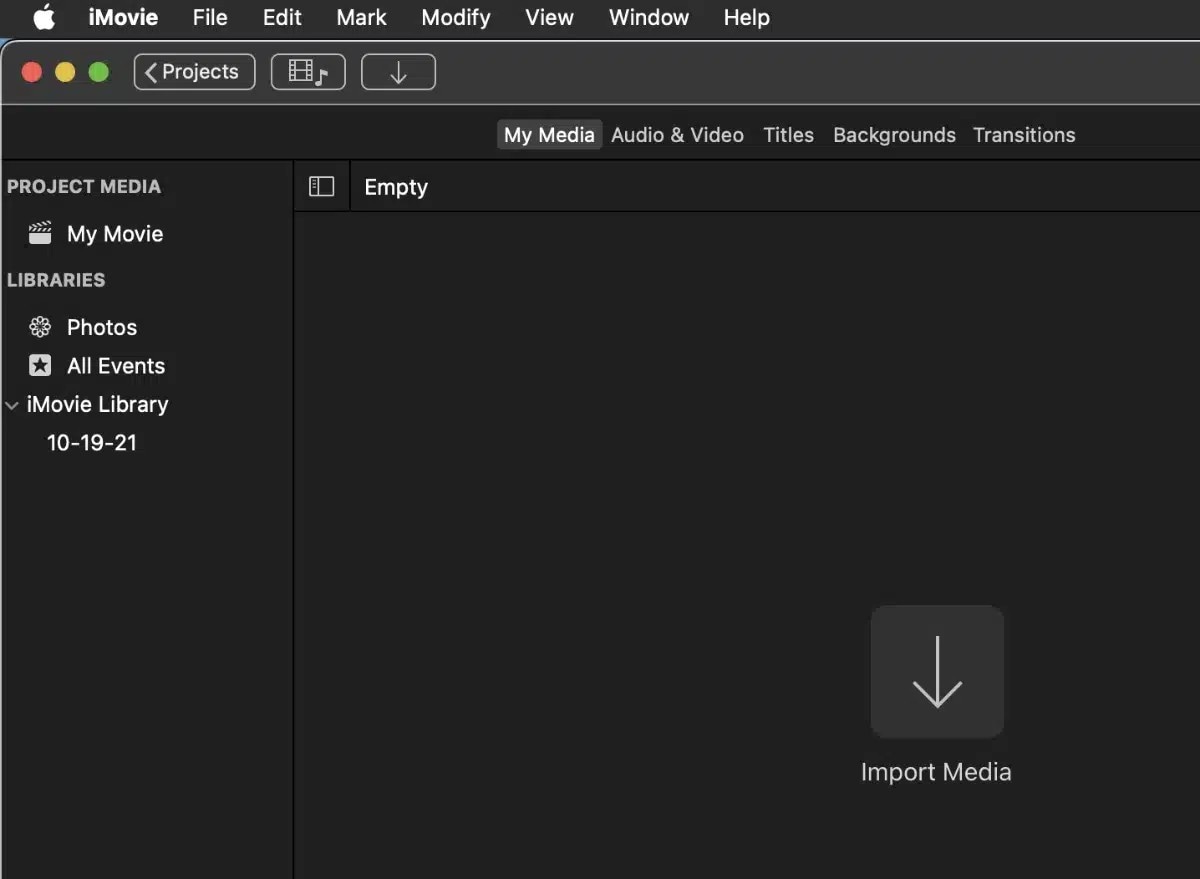
When the software is launched, one is required to select the "New Movie" option to start a new project. It is located on the main screen for your convenience. After that you can click the Import Media button to begin importing your video files for the library.
- Step 3. Import Your Video
Open a folder on your computer containing the video that you would like to convert from a horizontal format to a vertical one. After you have chosen the file and you want to import it to the iMovie project window, you can simply drag the video on the timeline at the lower part of the iMovie window.
- Step 4. Edit the Video Orientation
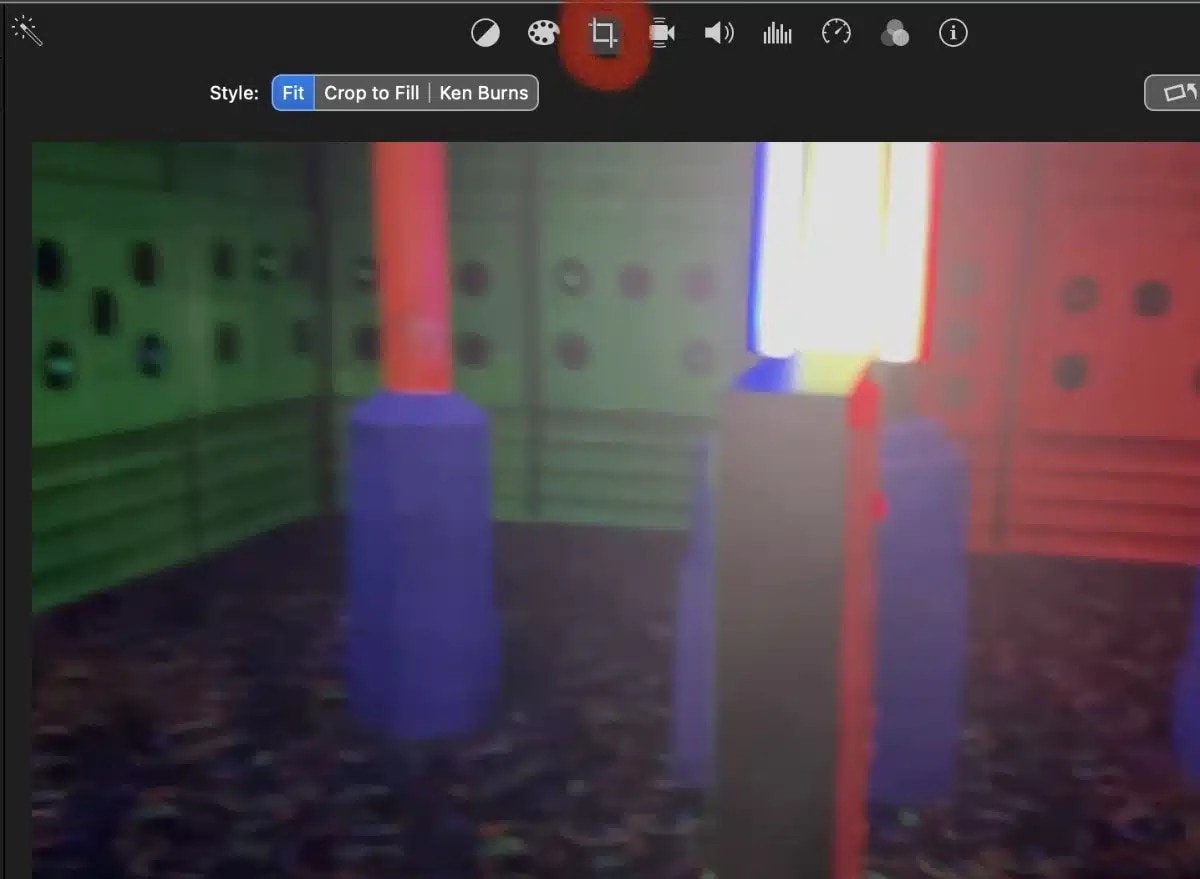
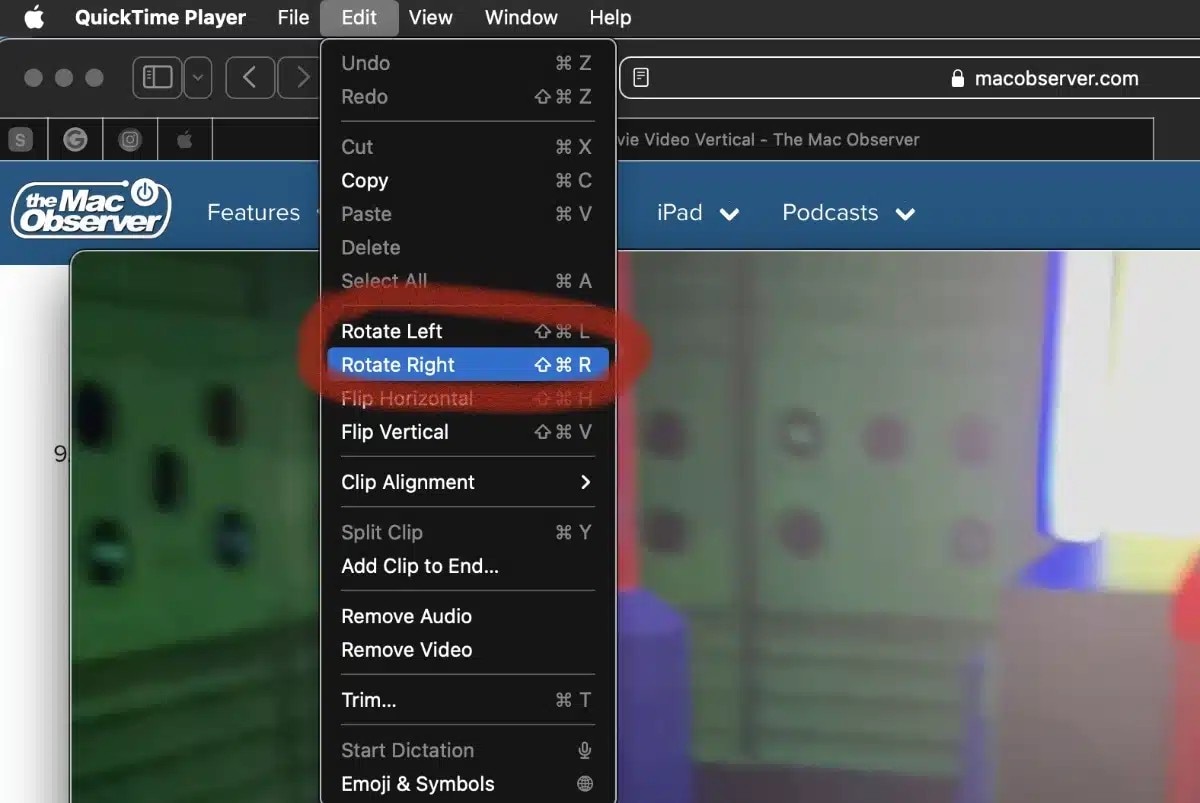
To make the video vertical, right on the screen find the Crop icon located in the right part of the Preview Window. In the example under style options, select Crop to Fill. After that, rotate the video by using the "Rotate Clockwise" button and you can do that by clicking at the button.
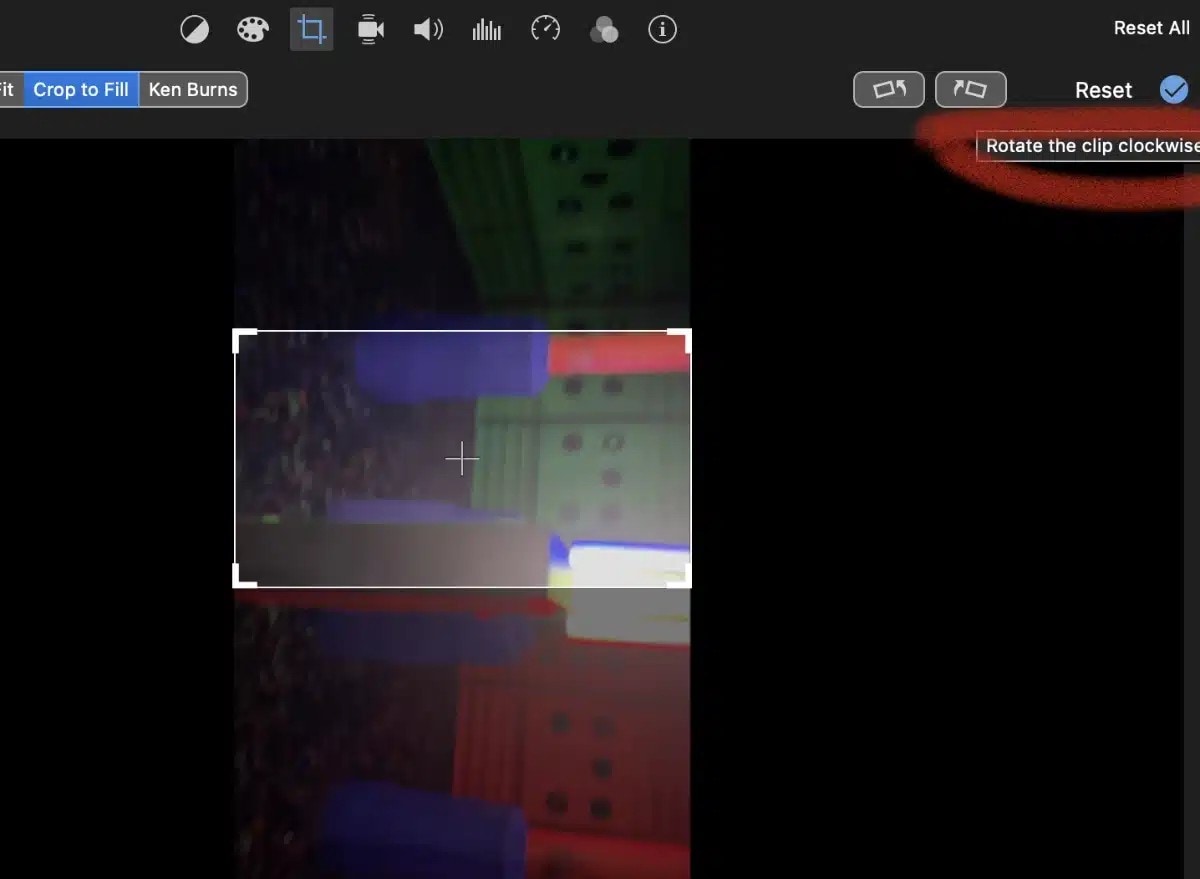
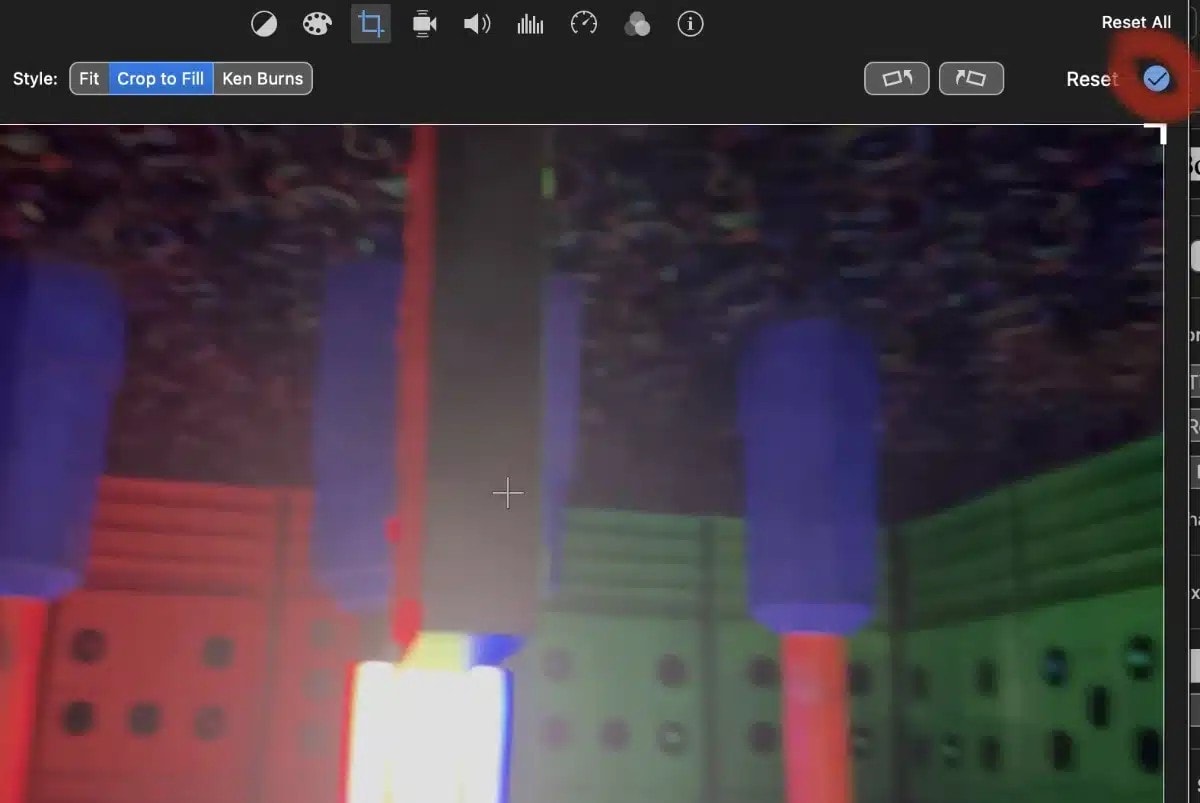
Here you might need to crop it in order to fit a subject of your video into a vertical format properly. In case you are done making the changes you wish, click the Check mark icon to accept the changes.
- Step 5. Export Your Video
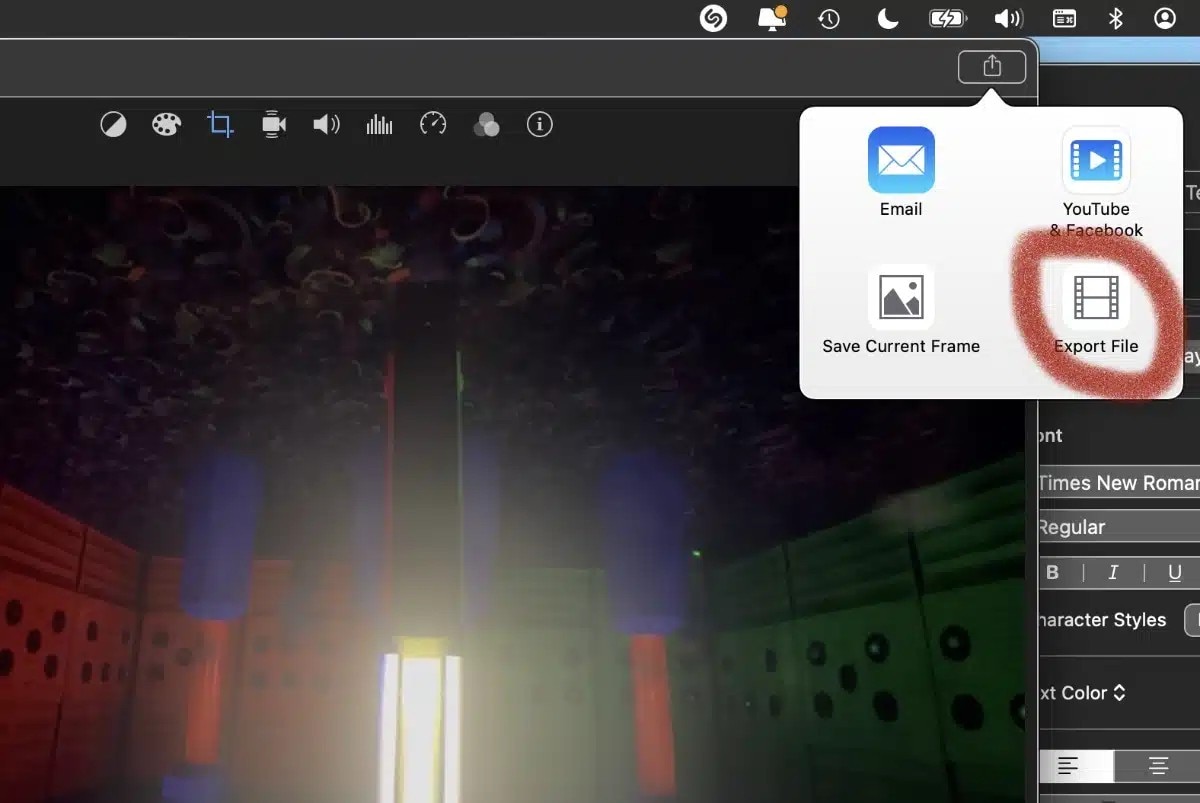
After changing the orientation right click on the Share button located at the top right part of the iMovie. As a result, on the bottom part of the menu, click on Export File in order to save the changes you made to your video.
- Step 6. Save and Preview
When you click on Next, you will be required to choose the location on your MAC where you want to store the file that is being created for the video. When saved, the file can be viewed in macOS Finder to preview the contents of the file. If you wish, you can rotate the video once more to resolve issues of orientation that may come with export.
2.2. How To Make iMovie Vertical On iPhone
The process of editing vertical video in iMovie on iPhone or iPad is almost the same as the second method in the case with Mac. Below is the step-by-step guidance:
- Step 1. Download and open the iMovie app
Open the iMovie application on your iPhone or iPad and click the Start New Project on the interface and choose the Movie.
- Step 2. Go to the vertical video option
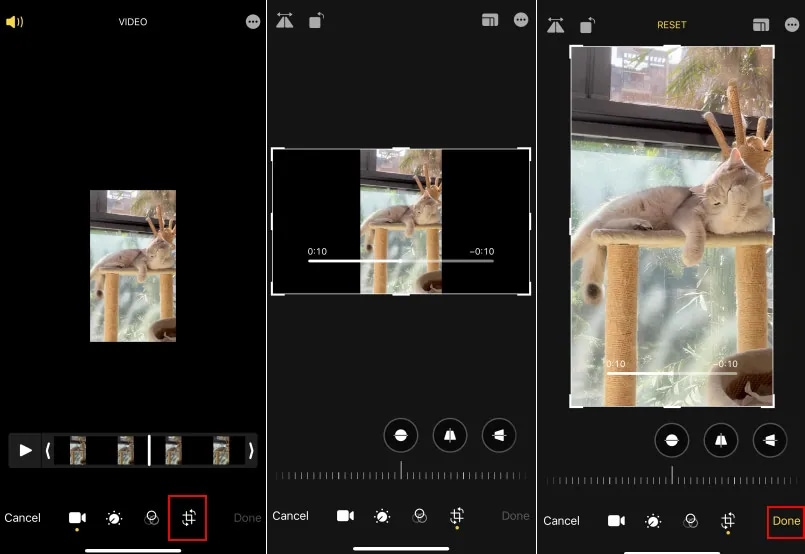
Select the Crop Video and click on the create Movie at the bottom of the screen. In the preview screen shot below, you can see that the vertical video has side black bars on both the left and the right side of the frame.
- Step 3. Turn the rotation of the video
Touch the timeline bar to select the timeline bar and turn the video at the same time. If not, a two finger tap submissive to the detector will move and rotate on its axis slowly in rotations – clockwise or anticlockwise. Then you can view a white curvy arrow.
- Step 4. Save vertical video
Make other changes as necessary and click on the Done button. After that, go to the share icon and select Save Video to save the video and share it.
- Step 5. Rotate the video
For the second one, go to the Photos app to locate the video you just recorded, tap on Edit, then Crop and look for the Rotate icon to do it. Finally, tap Done.
Part 3: Limitations of iMovie for Vertical Video Orientation
Even though iMovie is a quite effective application for simple video editing in Mac, it has some shortcomings when it comes to editing vertical videos. Here are a few challenges you may encounter:Here are a few challenges you may encounter:
- Aspect Ratio Constraints
iMovie is mainly suited for landscape videos in a 16:9 spread ratio, and this is an area of weakness in the program. What's more, it does not natively support vertical aspect ratios like the 9:16, mostly common in mobile phones. To get around this you have to position and adjust your video to have a vertical aspect ratio which consumes a lot of time.
- Limited Advanced Editing Features
Although it may be easy to use, there are some major functions missing as compared to other professional video editing software like iMovie. This can reduce creativity especially when developing more complicated vertical video projects thus undermining one's discretion.
- Potential Loss of Quality
Another drawback of cropping and rotating videos in iMovie is that the quality of the videos may decrease. Further, while cropping, the unwanted black bars may appear on the side of the video if the original video was not shot in a vertical position. This can be especially devastating for a video that requires high definition for display on such platforms or as a professional work.
Because of these constraints, some users may opt to use other video editing programs which are more versatile and provide proper support for the vertical videos.
Part 4: How to Make and Edit Vertical Videos Using iMovie Alternatives on Any Device
Filmora: The Perfect Solution for Vertical Video Editing
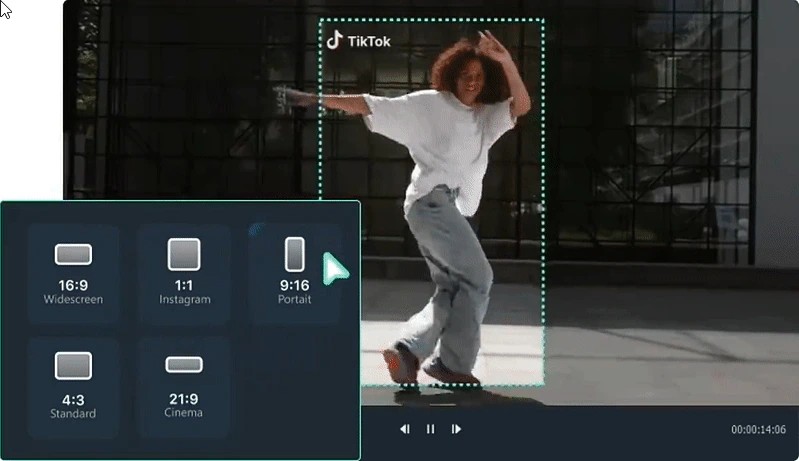
While iMovie is a useful tool for basic video editing on Mac, its limitations with vertical videos often leave creators frustrated. Wondershare Filmora, on the other hand, excels where iMovie falls short, offering a seamless experience for vertical video projects. Filmora offers native support for vertical aspect ratios like 9:16, 1:1, etc, making it possible to reduce time spent over requires bending, stretching, adjusting, or cropping. The Mac version of Filmora boasts a range of powerful features tailored to vertical content including auto reframe, crop, resize, zoom in and out, video resolution, frame rate adjustment, etc. You can add intricate transitions, filters, and effects designed specifically for vertical formats, making your videos more engaging and professional.
More importantly, Filmora makes certain that, as well as in Adjustments, the video quality is high and has 720P and 1080P HD format.
Some other features include:
- Auto Reframe: This feature helps in identifying the subject of your video and in turn, change framing especially for vertical videos. It is much time saving when you have to work with complex videos that need very careful cropping and framing.
- Custom Aspect Ratios: Filmora comes with support for most of the current aspect ratios, and this includes the 9:16 ratio, thus making it ideal to use when developing content to be used in most of the current avenues.
- Instant Mode: Another feature that for those who need to come up with videos in a hurry is the Instant Mode that comes with Filmora, this mode offers sets of predesigned templates. As stated above this feature can be very beneficial for the social media marketers who need to publish the content quickly.
How to Make Vertical Videos on Mac Using Filmora
Filmora is a versatile and user-friendly video editing software available for Mac, and it offers much more flexibility when working with vertical videos compared to iMovie. Filmora makes it easy to set up your project for vertical video editing and provides a variety of tools to ensure your video looks professional and engaging.
Here's a step-by-step guide to creating vertical videos using Filmora on Mac:
- Step 1. Launch Filmora
If you haven't already, download and install Filmora on your Mac. After launching the program, click on Create New Project to begin your vertical video project. Filmora makes it easy to work with vertical video formats.
- Step 2. Make your Vertical Video
Method 1: To adjust your project for vertical video, click on Aspect ratio in the top-left corner and then select Project Settings. In the Aspect Ratio dropdown, choose 9:16 (Vertical). This automatically sets your project to the correct dimensions for vertical video.
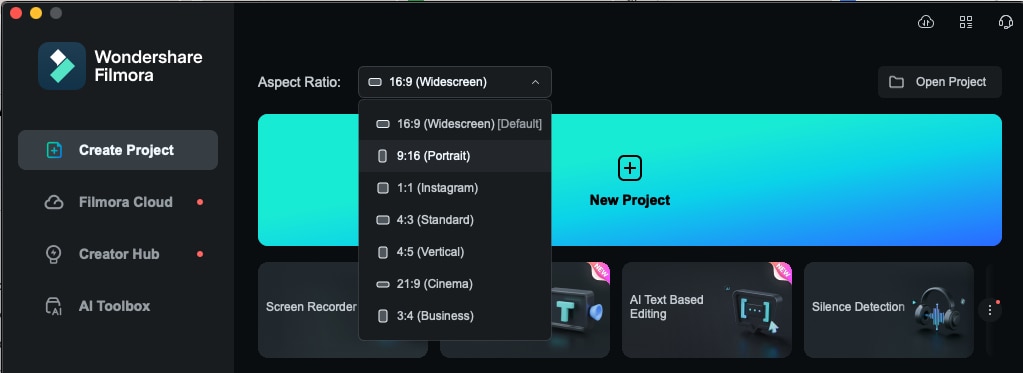
Once you're inside the Filmora interface, click Import Media Files Here or drag and drop your video file directly into the media library. After the video is imported, drag it down to the timeline to begin editing.
Method 2: Use Auto Reframe
The Auto Reframe option will also be displayed in the AI Toolbar on the right side of the screen.
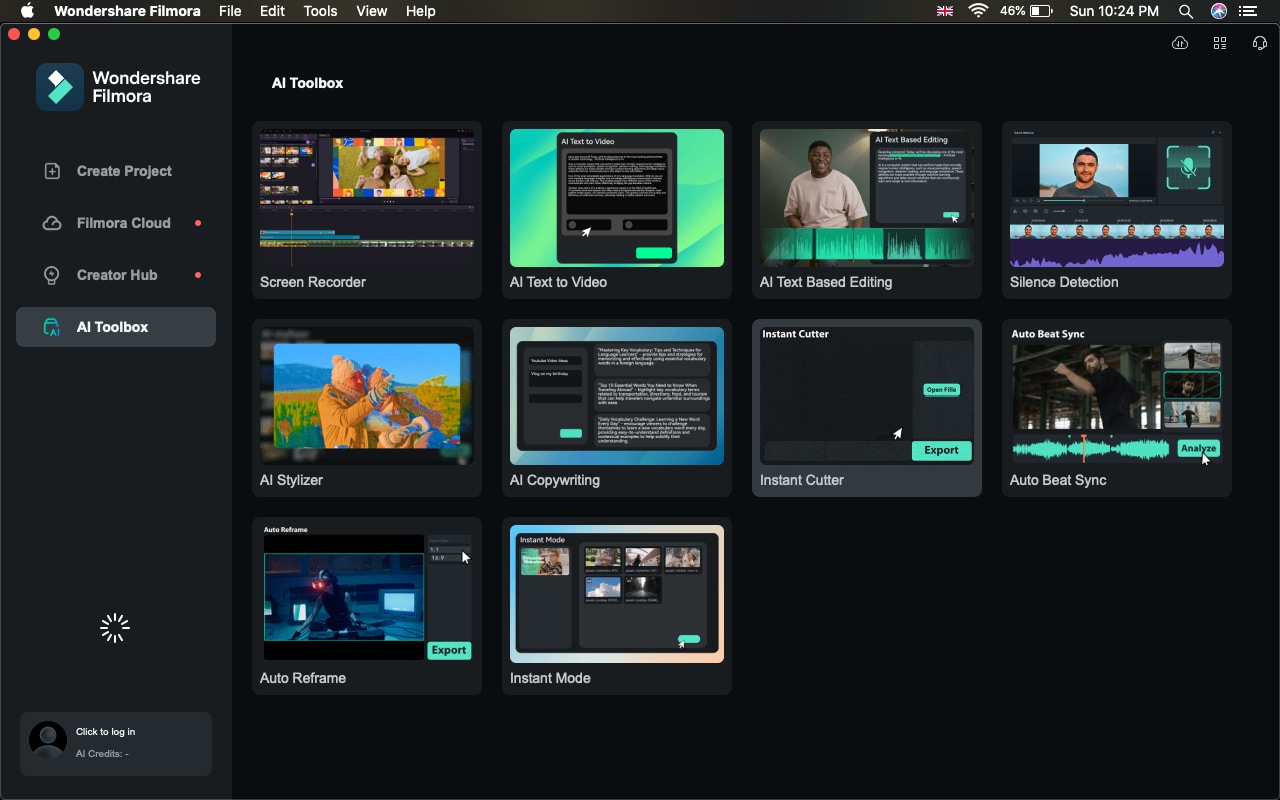
Click through and select to launch the reframing feature immediately. If necessary, you can utilize the Auto Reframe tool to adjust your video's size so that it fits any of the platforms and appears sharp on any device.
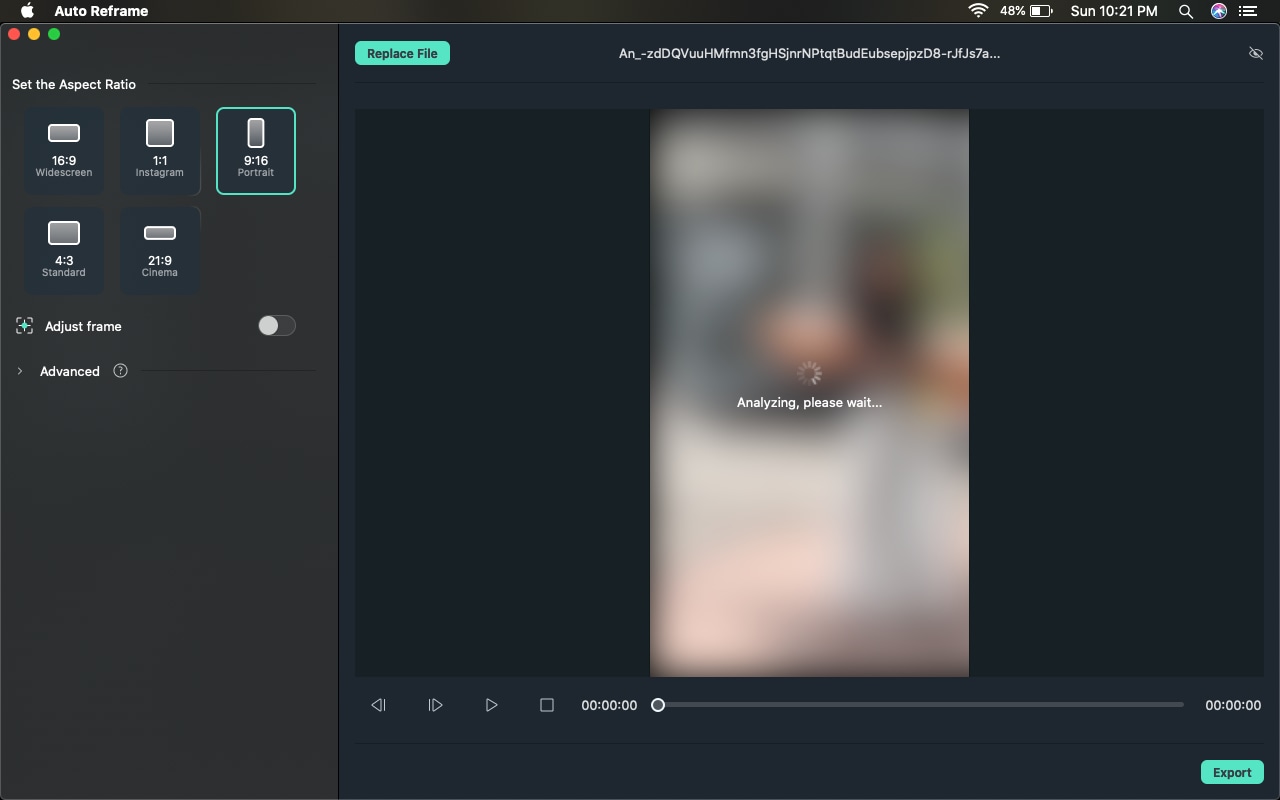
- Step 3. Adjust and Edit Your Video
With the vertical aspect ratio set, you can now start editing your video. You may need to further crop or reposition your video to ensure the subject fits well within the vertical frame. Filmora's crop, rotate, and zoom tools allow you to make these adjustments with ease. Additionally, you can add effects, transitions, and text overlays to make your video more dynamic.
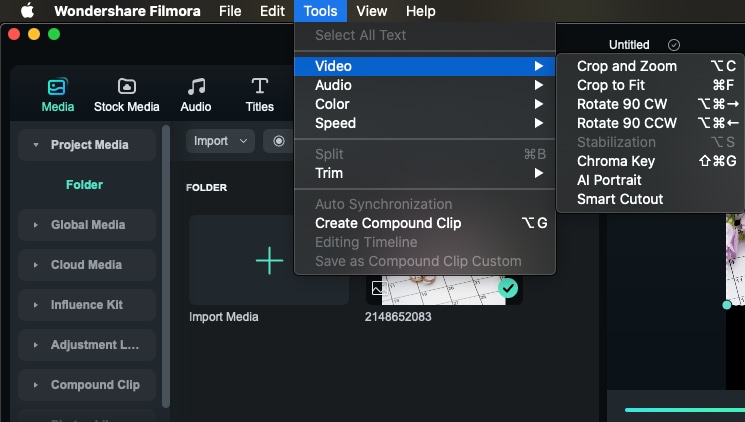
- Step 4: Edit Your Vertical Video by adding Effects, Stickers, Transitions, Filters
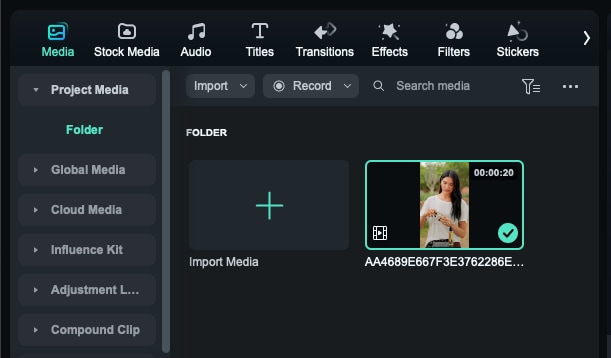
You can edit the video for there by adding stock media, audio or music, title, transitions, effects, filters, and stickers.
- Step 4: Add AI music
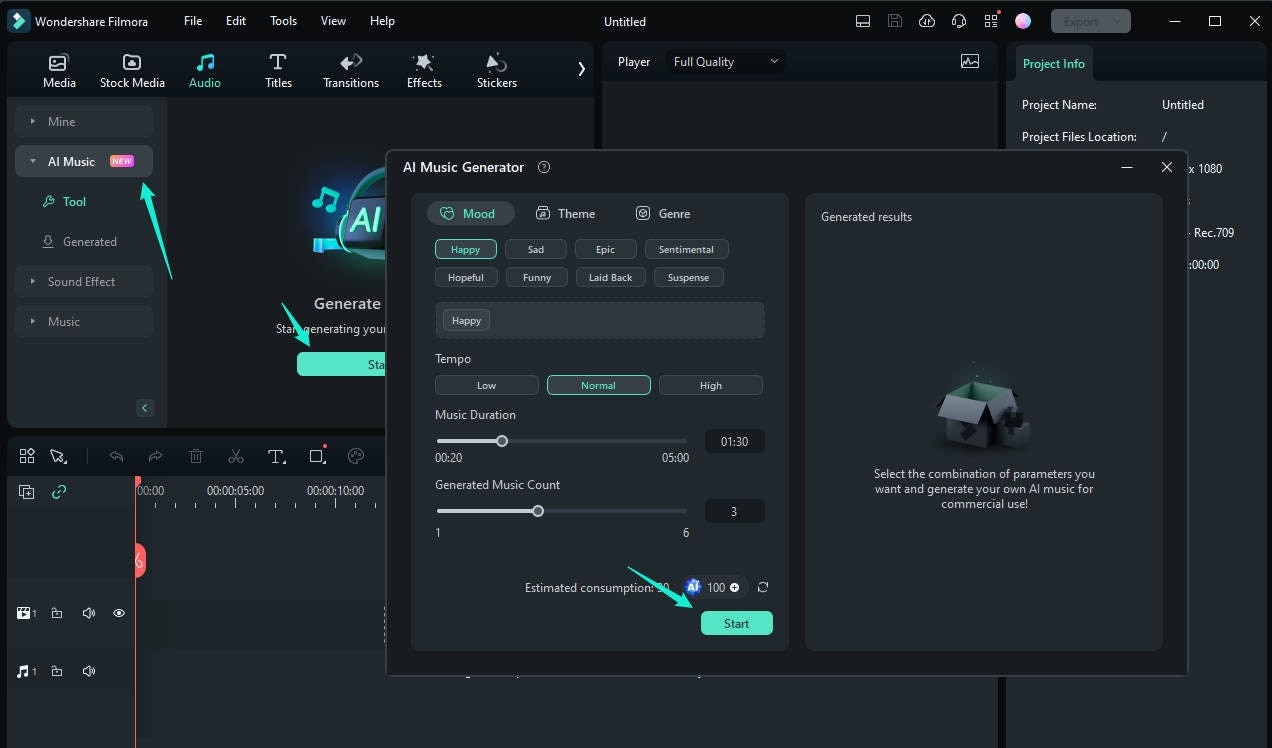
Along with various voice editing options, you. can also add AI music by clicking on main "Audio" tab in the upper part of the custom toolbar. On the left panel, click on the "AI Music" button, and then "Start".
Step 5: Export the video
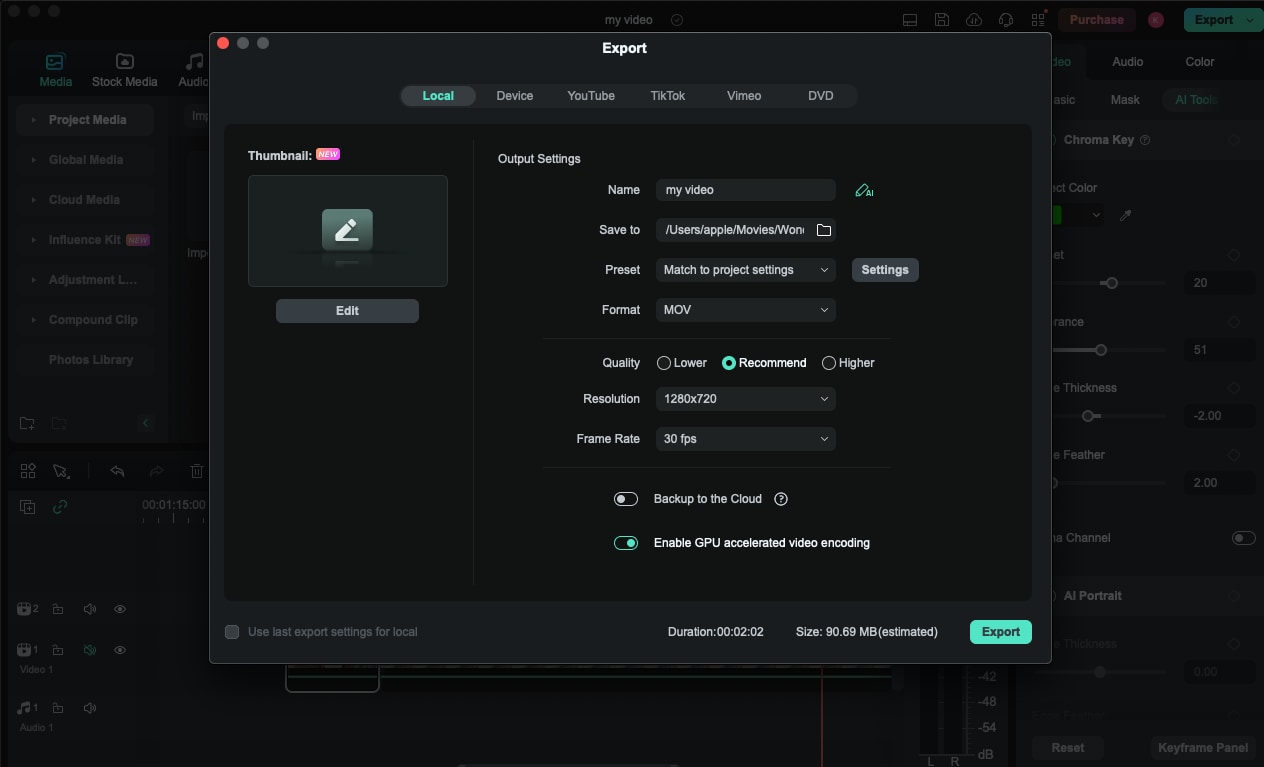
The last step is to click on the "Export" button to obtain the video with a changed or modified background. You will also be able to adjust the video frame and format here before exporting.
How to Make/Edit Vertical Videos on Mobile Using Filmora
It is just as relevant to be able to create the vertical videos on the go as it is to do them on a desktop. Filmora also has a mobile version that enables users to edit vertical videos on iPhone. Here's how you can use Filmora to edit vertical videos on your phone:
- Step 1. Download Filmora Mobile App for iphone
First, download the Filmora app from the apple store if you haven't already.
- Step 2. Import Your Video
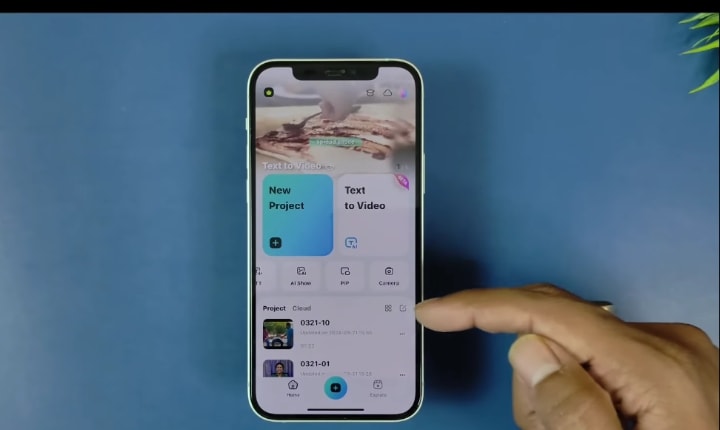
Once the app is installed, open it and tap New Project. Import the video you want to edit from your phone's gallery.

You will see the imported video in the timeline.
- Step 3. Adjust the Aspect Ratio if video in not vertical already
If you capture video using the mobile phone, then it is already in the vertical orientation.
You can also change the aspect ratio easily using the "Crop" option that is visible on the bottom of the screen.
Click on it and select Aspect Ratio and choose 9:16 for vertical videos.
- Step 4. Edit the Video
Use the editing tools in Filmora to crop, rotate, and adjust your video's orientation. The mobile app provides many of the same features as the desktop version, making it easy to edit vertical videos on the go.
Here are a few video editing features of the Filmora iPhone app that you can use.
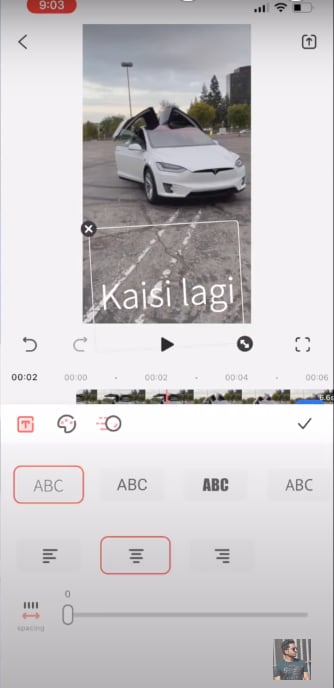
Add text
You can add text to a video as well in any color, font or style you want. The "Text" option is in the same bottom bar.
Add stickers

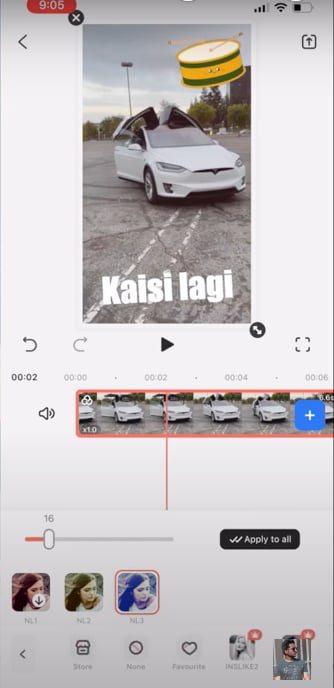
Use filters and effects
You can also use filters and further make adjustments for temperature, tint, brightness, etc.
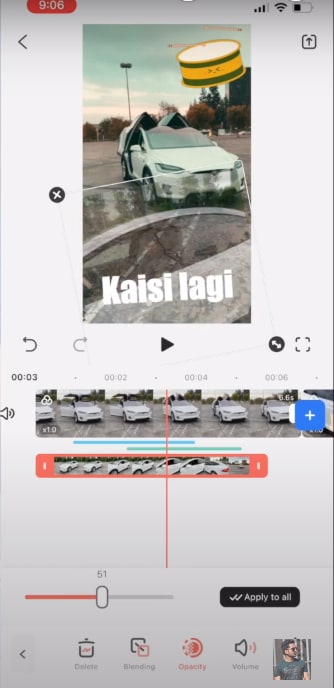
Add overlays
You can add overlay using the PIP option that lets you import another video that will be visible on the main video.

You can also adjust the opacity of the overlay video so the main video remains visible.
- Step 5. Export and Share
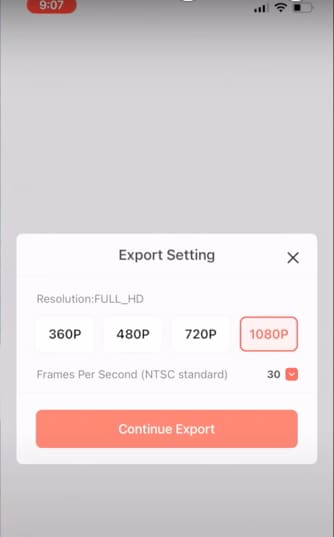
When you're done editing, export the video in the desired frame rate and resolution. You can share the video directly to social media platforms like Instagram or TikTok by exporting and sharing.
Filmora stands out as a robust video editing software for mobile and desktop that caters to vertical video creators, offering superior flexibility, advanced tools, and guaranteed video quality, solving the exact issues users face with iMovie.
Conclusion
Creating and editing vertical videos has become essential for social media content creators and marketers. While iMovie provides a simple way to edit videos on Mac, its limitations, such as aspect ratio constraints and potential loss of quality, can make it less than ideal to make vertical video in iMovie.
Filmora, on the other hand, offers a more flexible and powerful solution for vertical video editing. With its custom aspect ratios, Auto Reframe feature, and user-friendly interface, Filmora is a great alternative to iMovie for those looking to create high-quality vertical videos on both Mac and iPhone.
Whether you're using iMovie or Filmora, the key to successful vertical video creation is understanding the unique format and its advantages for mobile audiences.


 100% Security Verified | No Subscription Required | No Malware

