
 100% Security Verified | No Subscription Required | No Malware


 ChatGPT
 Perplexity
 Gemini
 Claude
 Grok
Grok
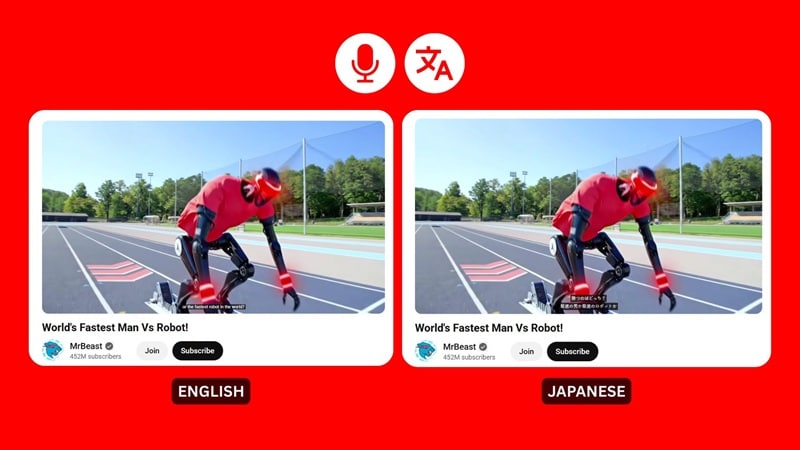
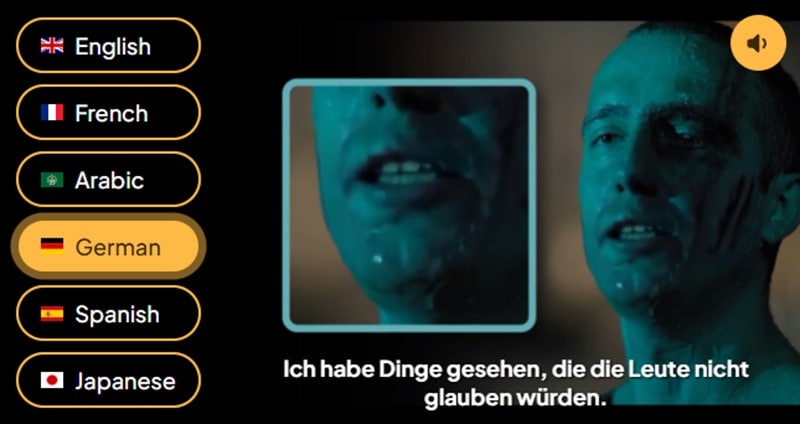
Wanna grow your YouTube channel fast and reach more viewers? The secret is simple: make your content accessible to anyone. This is exactly what a top creator like MrBeast has been doing.
If you look at how MrBeast runs his content, his use of audio dubbing through YouTube audio translator and engaging captions plays a big part in making his channel reach viewers far and keeps his global fanbase growing.
More creators are starting to follow his lead, which is what many now call the "MrBeast effect." But since hiring a voice actor can be slow and expensive, there are a few quicker routes to create multilingual versions of your videos. Let's break them down one by one.
In this article
Part 1. The "Speech-to-Text-to-Speech" Workflow Explained
The technology behind YouTube video audio translation usually comes down to two core tools: Speech to Textand Text to Speech. These two work together to turn your original audio into a new voice in another language without a human voice actor. It can also generate subtitles that you can pair with the new audio track.
The process can be broken down as follows:
- Speech to Text (STT): Using the audio in your video, the tool will convert your spoken words into text. The output becomes your original script or caption.
- Translation: The script is then translated into the language you want. A new version of the script or caption is ready for dubbing.
- Text to Speech (TTS): The translated script is turned into a new AI voice. Depending on the tools, you can choose from several voice options to find the one that fits your video's style the best.
During the process, other technologies may also come into play, such as AI lip sync. It's an optional feature that helps you adjust mouth movements to match the new voice so everything looks natural and in sync.
Part 2. How to Translate YouTube Audio Using Built-in Auto-translate
Before we move into a more advanced YouTube voice translator, YouTube actually has its own auto-translate feature, both for the audio and captions. It's not perfect, but it's the quickest way to translate or dub a video in another language without using extra apps.
Best for: Creators who need a quick way to offer translations without doing any editing.
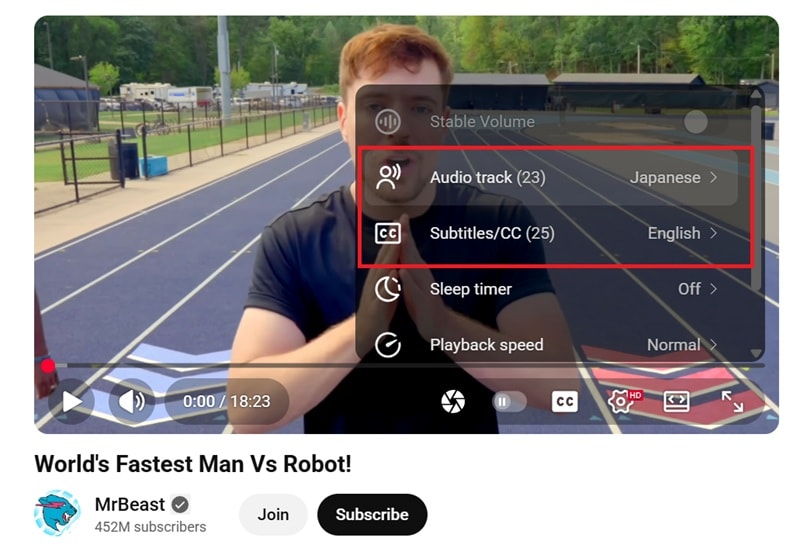
When you've published everything, your viewers can access it through the YouTube settings menu. From there, they can switch to the translated subtitles or audio track in the language they prefer.
Pros & Cons of Using YouTube's Auto-translate
How to Enable Auto-Translate on YouTube
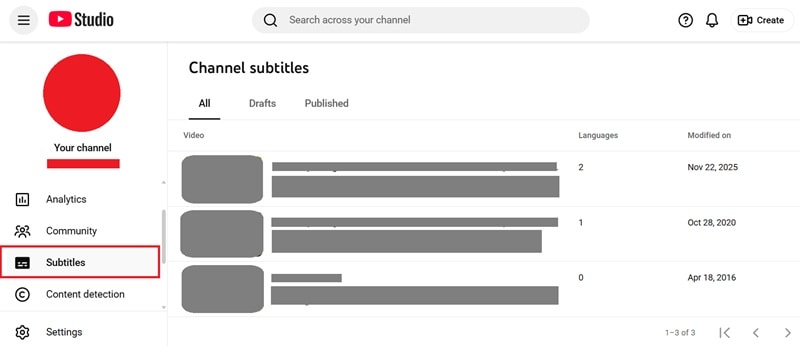
Step 1: Open YouTube Studio and Choose Your Video
Sign in to YouTube Studio and head to the Subtitles section. Pick the video you want to translate from your content list.
Step 2: Prepare and Publish Your Original Captions
Before you can translate audio from YouTube video, you need to publish the auto-generated captions for your main language.
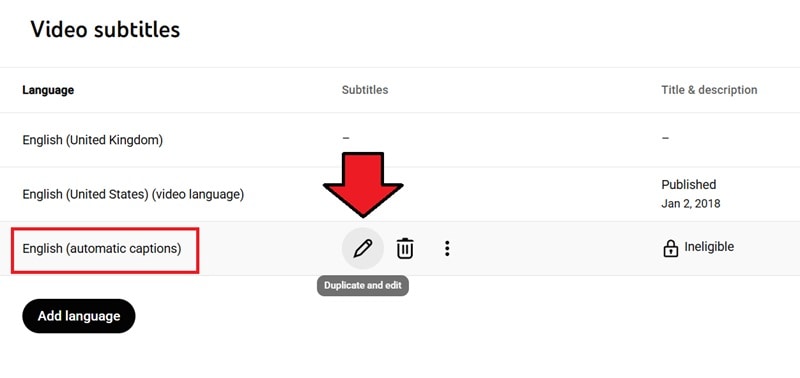
- Look for the row labeled automatic captions, then select Duplicate and Edit.
- On the subtitle editor, click Publish.
Step 3: Translate the Subtitles to Another Language
Once your primary captions are published, you can start generating subtitles in other languages.
- Go back to the Subtitles section.
- Select Add Language, then choose the language you want to add.
- Click Add under the subtitles column for that language.
- In the new window, choose Auto Translate.

YouTube will automatically create translated subtitles for you. Feel free to adjust any lines if needed, then hit Publish to save your new subtitle track.
How to Enable Auto Dub on YouTube
YouTube's built-in translator uses the original captions as the base, so if the video doesn't have subtitles, the feature may not show up.
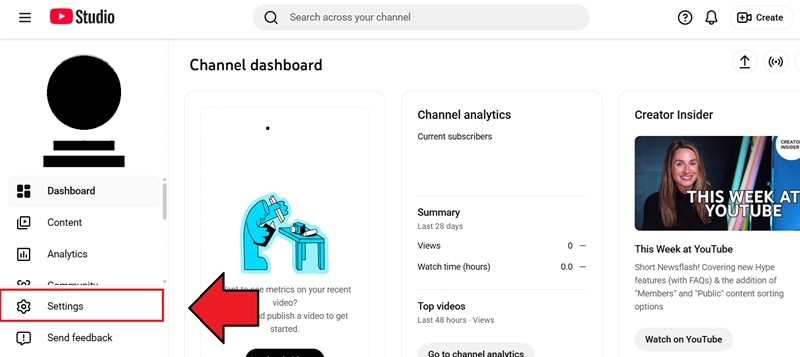
Step 1: Open YouTube Studio Settings
Open YouTube Studio and go to Settings.
Step 2: Enable Automatic Dubbing
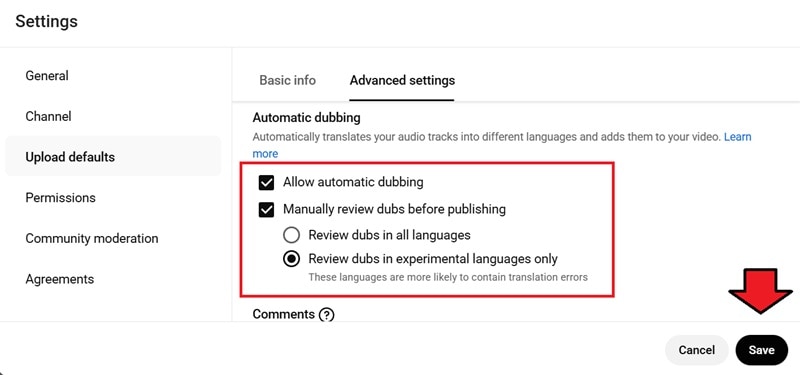
Select "Upload defaults" > "Advanced settings." Then, look for the Automatic Dubbing option and click Enable.

After that, you'll be able to adjust a few extra settings:
- Make sure you've checked the automatic dubbing option.
- Decide whether you want to review the dubbed audio before posting and which languages you want to review (all available languages or only the experimental ones).
Click "Save" to apply the changes.
Step 3: Remove or Unpublish the Dubbed Audio
If you want to remove or unpublish the dubbed audio:
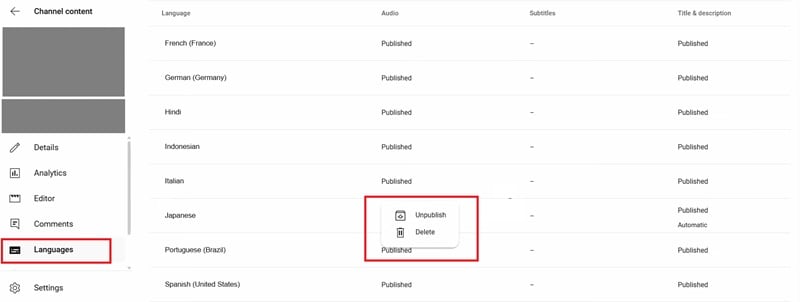
- Head to the Languages section in YouTube Studio.
- Select the audio track you want to change.
- Choose whether you want to remove it completely or unpublish the dub audio.
Part 3. How to Translate YouTube Video Audio into Text or Audio (Lipsync)
Since YouTube's auto-translate feature has limits in accuracy and customization, you might want a more flexible way to translate YouTube video audio. In that case, it's better to use a video voice translator software like Wondershare Filmora.
Filmora features an AI Translation tool, which can help you:
- Translate your video's audio into text.
- Generate a new dubbed voice.
- Lip-sync the translated audio so it matches the speaker on screen.
Everything happens in one workflow, so you don't need to jump between different settings or apps. And since the tool is built into the software, you can do more than just translate. You can also use Filmora to edit and refine your video.


Pros & Cons of Using Filmora
Best for: Creators who want high-quality multilingual videos with accurate timing, customizable voices, and a full editing workflow in one software.
How to Translate YouTube Video Audio with Filmora
Make sure you've installed or updated Filmora to the latest version to get the latest features and the most optimized performance. Then, follow the steps below.
Step 1: Start a New Project and Import Your Video
Open Filmora, create a new project, and bring in the video you want to translate.
Step 2: Access the AI Translation Tool
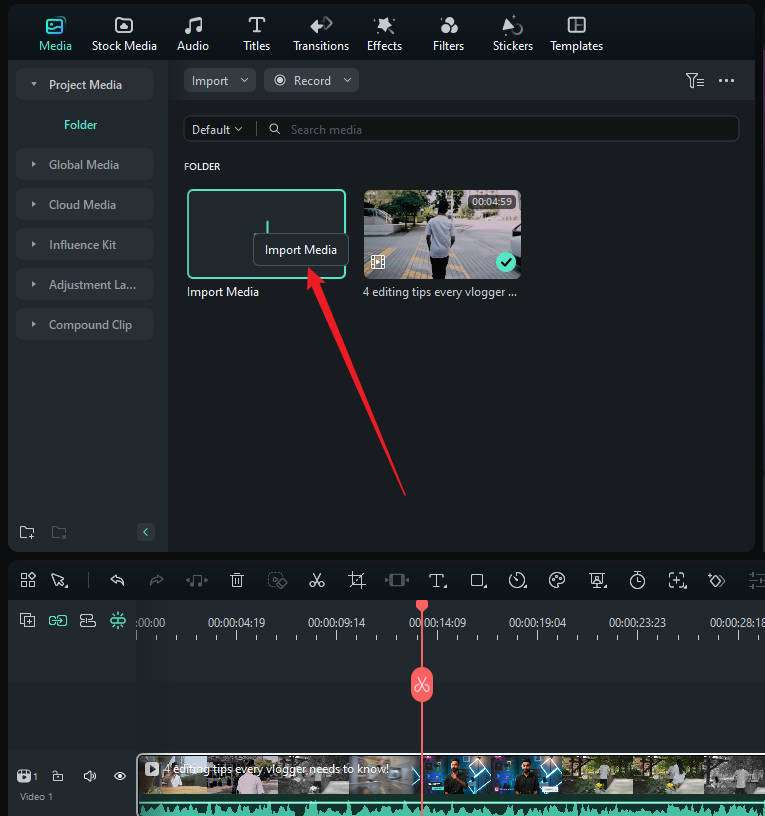
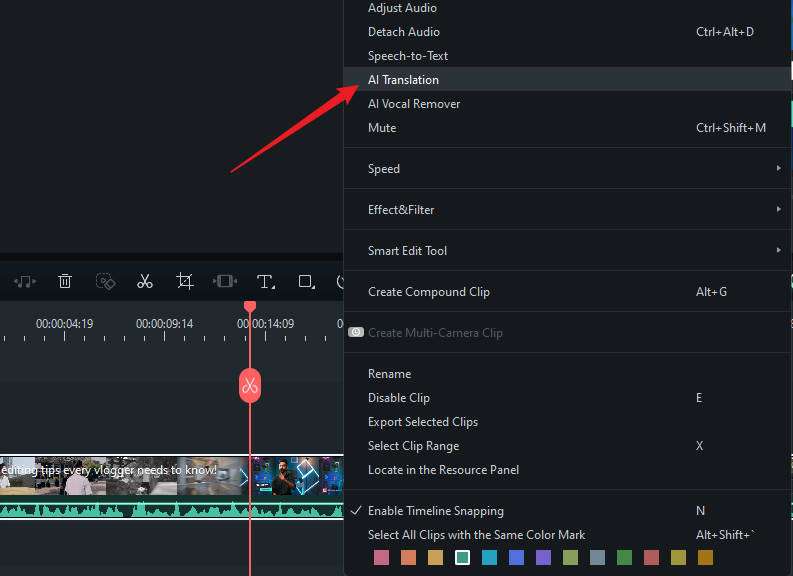
Right-click on your video in the Media panel or timeline, then choose AI Translation to open the tool.
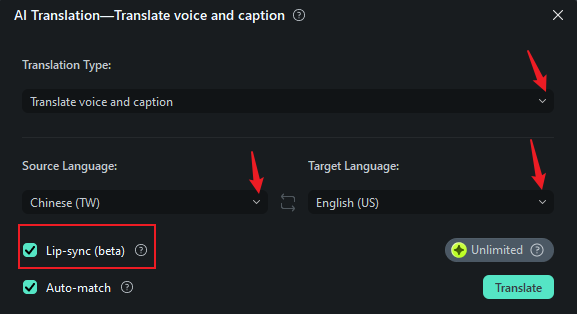
Step 3: Adjust the Translation Settings
Now that the AI Translation panel opens, set up the parameters:
- Choose whether you want to translate both the voice and captions, or captions only
- Set your source language and your target language
- Turn on Lip Sync if you want the mouth movements to match the new audio
When everything looks right, click Translate to start the process.
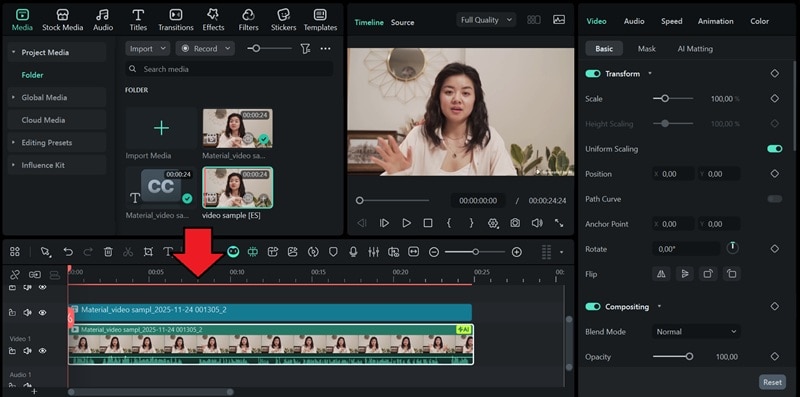
Step 4: Review the Results and Add Them to the Timeline
When the translation is complete, the newly generated media will appear in the Media panel. Drag the translated video (with lip sync, if enabled) to your timeline along with the translated captions.
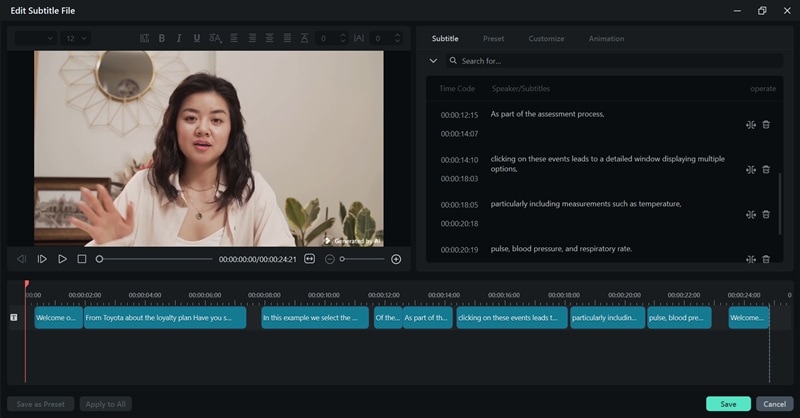
To customize the caption, double-click the subtitle track in the timeline. This will open the subtitle editing window, where you can adjust the text and styling.
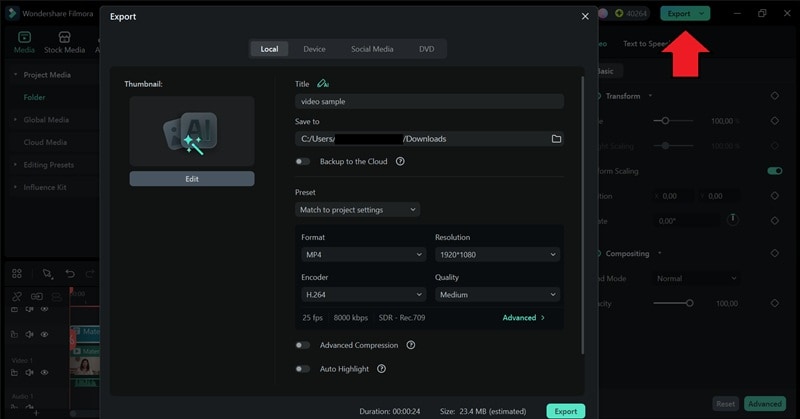
Step 5: Export the Video or Subtitle File
After everything looks good, you can export your final video or save just the subtitle file. If you're exporting the video, head to the Export button, choose your format, and finish the process.
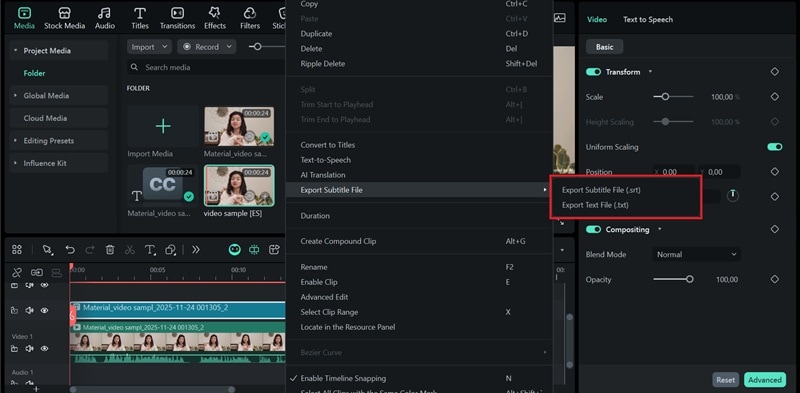
If you only need the subtitles, right-click the caption track and select "Export Subtitle File" > "Export Subtitle File (.srt)."
Tip 1: Change the AI Voice
If you play the result, Filmora will try to match the tone of the original speaker. But you can switch to a different AI voice if you wish. You can even use AI Modeling (AI Voice Cloning) to generate the translated audio in your own voice if the result doesn't feel right.
To change the voice:
- Select the caption track on the timeline.
- Open the Text to Speech section in the Properties panel.
- Choose the voice you want and click Generate.

After a moment, Filmora will create a new voice track that you can drag onto your timeline and replace the original translated audio.
Tip 2: Add Original Caption
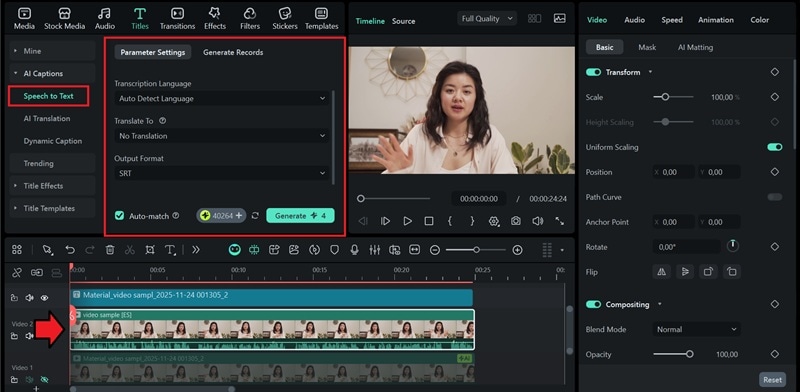
Since AI Translation only creates translated captions, you can still generate the original captions in Filmora.
- Add the original video to your timeline.
- Select Speech to Text under the Titles > AI Captions panel.
- Adjust the settings and choose No Translation, since you only need the original language.
- Click Generate to create the captions.
Filmora will then produce the subtitles in the original language. You can also export the captions as an SRT file if you want to upload them to YouTube Studio or use them on other platforms.
Part 4. How to Translate and Convert YouTube Audio to Text Online
The next practical way to translate your YouTube audio is by using a YouTube video voice-to-text converter online, such as Maestra. This tool can automatically convert your video's spoken audio into text, translate it, and even create an AI-dubbed version right in your browser.
Maestra supports translation in more than 125 languages, whether you prefer subtitles or full AI dubbing. It also includes lip-sync support, so the translated audio lines up more naturally with the speaker's mouth movements.
Pros & Cons of Using an Online Translator (Maestra)
Best for: Creators who want fast subtitles or AI dubbing in many languages and don't need advanced editing tools.
How to Translate YouTube Video Audio Online
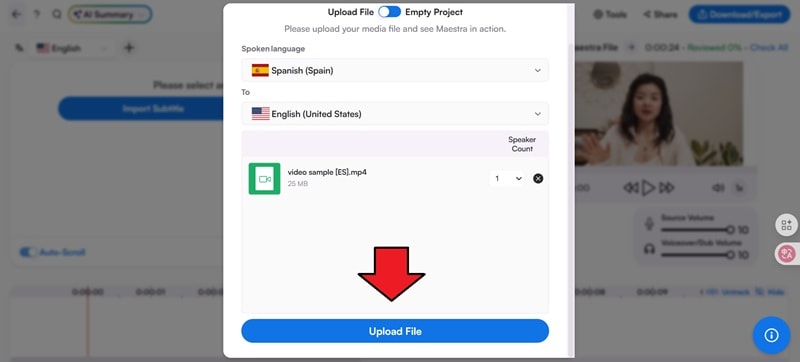
Step 1: Go to the Maestra Website and Upload the Video
Visit the Maestra AI Video Translator website and choose the source and target languages you want to use. For example, if you want to translate a YouTube video's audio into English, set the target language to English.
After that, click Upload Your File to import your video.

Step 2: Confirm Your Settings and Start Uploading
Make sure the correct languages are selected, then click Upload File to start the translation process.
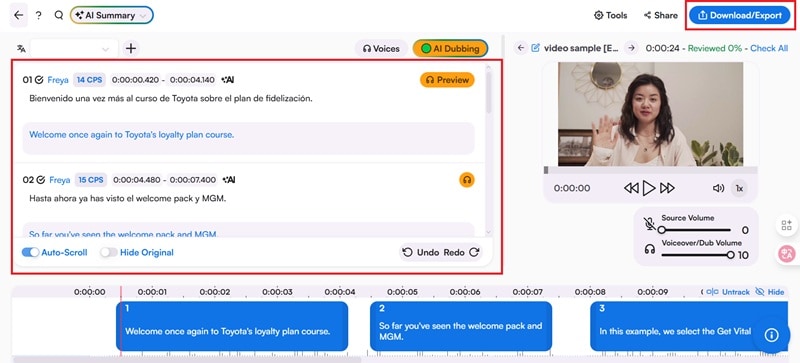
Step 3: Choose a Voice for the AI Dub
Next, you'll be prompted to pick a voice from Maestra's presets. Once you've selected a voice you like, click Voiceover to continue.

Step 4: Preview and Adjust the Translation
Maestra will process your video and generate the translated audio. You can preview the results, make adjustments, and fine-tune the mix between the original audio and the new voiceover.
When everything looks good, click Download/Export to save your results.
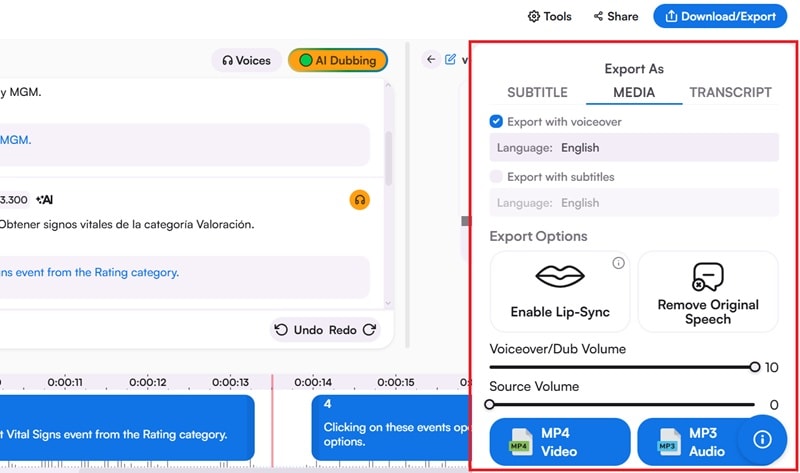
If you want to export the full video:
- Select Media as your export type.
- Choose whether you want the final video with the AI voiceover or just the subtitles.
- Enable Lip-Sync if you want
- Select your format (MP4 for video) and start downloading.
Note: The lip-sync feature requires additional credits and is limited to videos that are under 30 minutes in length.
But if you want to convert YouTube audio into text, you can select Subtitle as the export type.
Which Method Should I Go with?
Which Method Should I Go With? With different ways to translate YouTube audio, the right method depends on what matters most to you. Are you looking for speed? Control? Or pure convenience? Below is a full comparison of Filmora, YouTube’s built-in translator, and Maestra to help you decide.
| Tools | Filmora AI Tool | YouTube’s Built-in Translator | Maestra Online Translator |
| Main Strengths | Full editing workflow, AI voiceover, lip-sync, voice cloning, STT + TTS in one place | Instant audio and subtitle translation | Online access with lip-sync option |
| Languages Support | 23 languages | 100+ languages | 125+ languages |
| AI Voice Cloning | |||
| Customization | Extensive | Limited | Limited |
| Accuracy | High | Moderate | Moderate |
Conclusion
A lot of YouTube creators are already using audio translation to grow their channels and reach fans worldwide. Now, it’s your turn to do the same! With the guide above, you’ll have no trouble translating your YouTube video’s audio into different languages, even if you don’t speak them yourself.
Tools like Filmora make it super easy to dub voices, add subtitles, and keep everything in sync. Try it out on your next upload and see how far your videos can go!
