
 100% Security Verified | No Subscription Required | No Malware

If your stream in OBS Studio includes multiple scenes, you probably start thinking of using transitions to tie them together. Transitions in OBS are what make those switches look smooth instead of rough cut.
OBS Studio already comes with a few default transitions like Fade and Swipe. But if you want to give your stream its own style, adding custom transitions in OBS is the answer. With it, you can brand your stream and make it stand out from the rest.
If you are unsure where to start, this article will show you how to add custom transitions in OBS.
In this article
Part 1. Different Types of Transitions in OBS
For most streamers, OBS Studio (Open Broadcaster Software) is a familiar name, known as one of the most popular free tools for live streaming and recording. Despite being open-source, it offers features that easily rival those found in paid software, which is why many creators rely on it for their streams.
One of its standout features is scene transitions. Just like in video editing, OBS uses transitions to bridge between moments. They help you avoid awkward cuts, so you can move from one scene to the next without breaking the flow.

You’ll use the OBS transitions often, like when switching from your “Starting Soon” screen to live gameplay, or from your webcam view to a break or intermission scene. By default, OBS includes two basic transition types: Cut and Fade.
But that’s not all. OBS also offers other built-in options that you need to add manually, like:
- Swipe
- Slide
- Stinger
- Fade to Color
- Luma Wipe
For OBS custom transitions, you need to work with the Stinger transition. This transition lets you use a short video or animation to create a branded transition between scenes.
Custom Transition in OBS: Stinger
The Stinger is a custom animated transition available in newer versions of OBS Studio. It works by playing a short animation video you’ve uploaded that expands into a full-screen overlay. At a specific frame (called the transition point), OBS cuts to the next scene underneath the animation. Once the animation ends, the new scene is revealed.
Part 2. Prepare and Make Your Video Transition for OBS
To set up OBS custom transitions with Stinger, you need to import a video file (usually a .mov or .webm with transparency) in the Transitions section and time the Transition Point (ms), the exact frame when the new scene appears.
You can find many free and paid transition packs online that you can download and use right away. However, why not create your very own transition like this instead of settling for generic presets?

The tool we are using to create a custom transition in OBS in this tutorial is Wondershare Filmora. Filmora includes a wide selection of transitions and effect overlays that you can modify or use as a base. Or, you can also be creative and design your own transition from scratch.
The key is to make a short animation that starts and ends with transparency. Then, export it in a format that supports alpha channels. This transparency ensures OBS overlays the transition smoothly between scenes without any artifacts.
How to Make a Custom Transition for OBS
Step 1: Create a New Project in Filmora
Open Filmora and set the resolution and aspect ratio to match your OBS stream settings for a smoother transition later. Then, start a new project.

 secure download

Step 2: Add Solid Colors to the Timeline
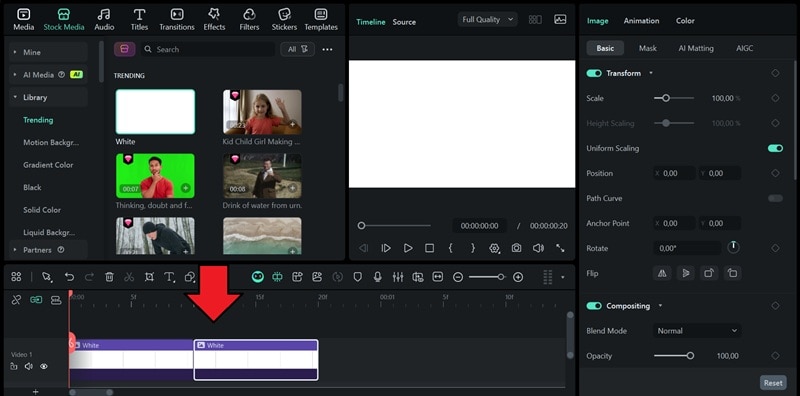
Import two solid color clips from Filmora’s Stock Media library and place them on the timeline. For example, we are going to use white here.
Step 3: Add a Transition Effect
Since Filmora already has tons of transitions, you can make use of it for your OBS transition. Head to Transitions and explore the available options.
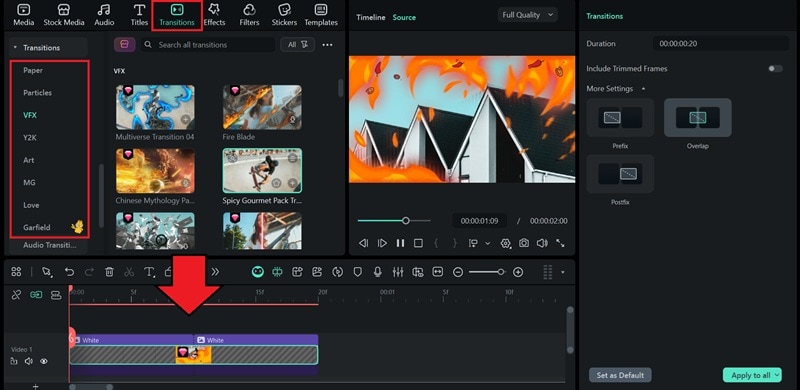
Experiment with VFX Transitions if you want something that looks more visually striking. Drag the transition you like to the timeline between the two clips and adjust its duration.
Tip: You can make your transition stand out even more by adding effect overlays, stickers, or other visual elements.
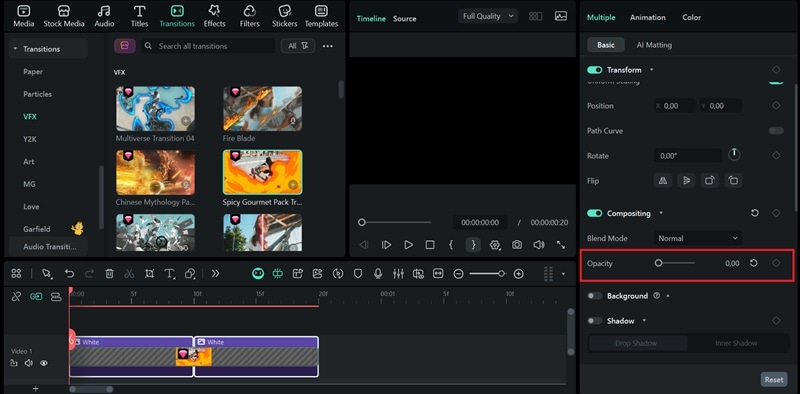
Step 4: Remove the Background
Once you’re happy with the animation, select both solid-color clips and lower their opacity to 0% so that only the transition animation remains visible.
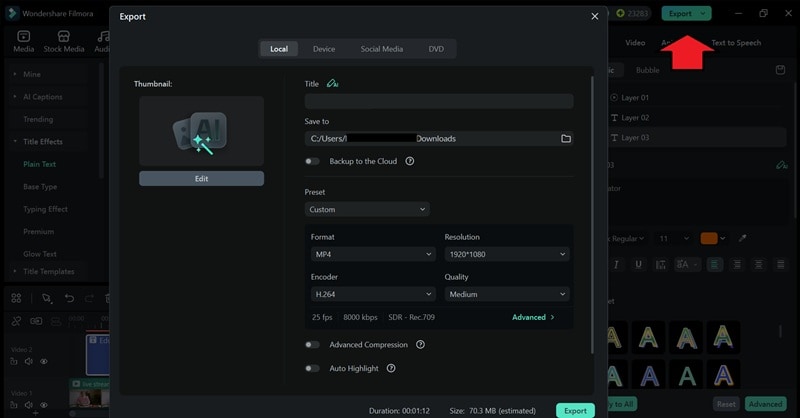
Step 5: Export with Alpha Channel
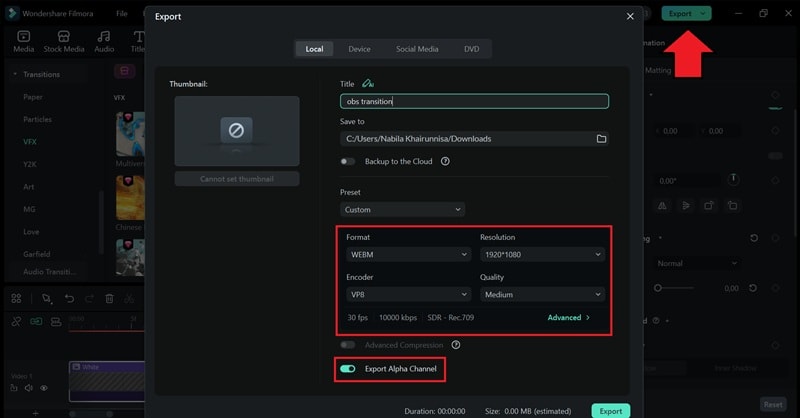
Because the transition includes a transparent background, it needs to be exported in a format that supports an alpha channel so OBS can overlay it correctly.
- Click Export, then choose either .MOV (ProRes 4444) or .WEBM as your file format.
- In the export settings, enable “Export Alpha Channel” to ensure the background remains transparent.
Even if you don’t want to use any of the built-in transitions, you can still design your own custom animation in Filmora. You can create motion graphics using keyframes, effect overlays, or shapes, then animate them however you like.
Part 3. How to Add Custom Transitions in OBS Using Stinger
With your custom transition ready, it’s time to import it into OBS Studio so you can use it during your streams.
How to Add Custom Transitions in OBS
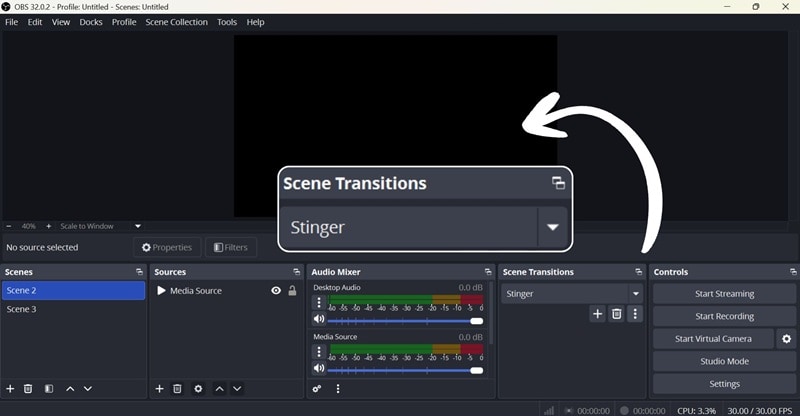
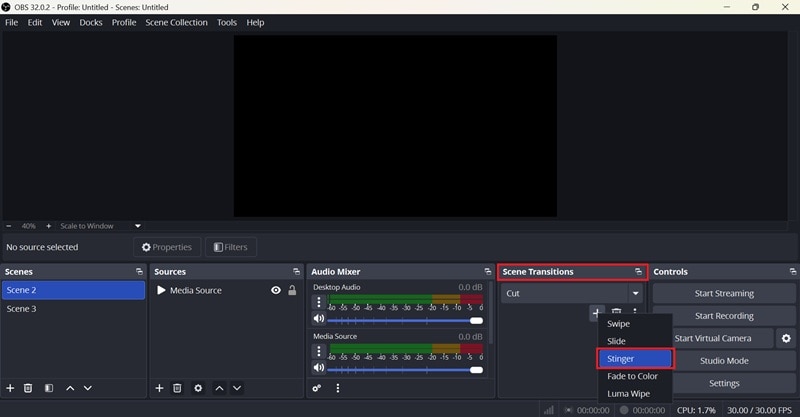
Step 1: In OBS Studio, look for the Scene Transitions panel. Click the Effect drop-down menu to see available transition types. If there’s no Stinger transition, select Add (+) > Stinger from the list.
Step 2: Next, click the three dots icon and select “Properties.”

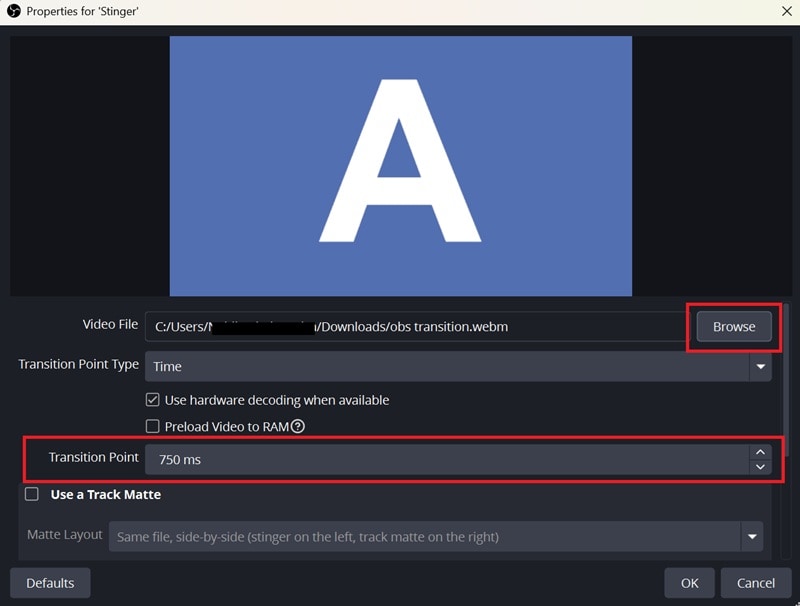
Step 3: In the Properties window, you can set up how your custom transition behaves.
- Next to Video File, click Browse and choose the transparent video animation you created earlier. This clip will play briefly before switching to the next scene.
- Under Transition Point Type, select Time. Then, adjust the Transition Point value to match your animation’s duration (usually around 750ms) so the scene changes right as the animation finishes.
Step 4: If your animation includes sound, open the Audio Monitoring section and choose Monitor and Output. For Audio Fade Style, select Crossfade for smoother sound blending.
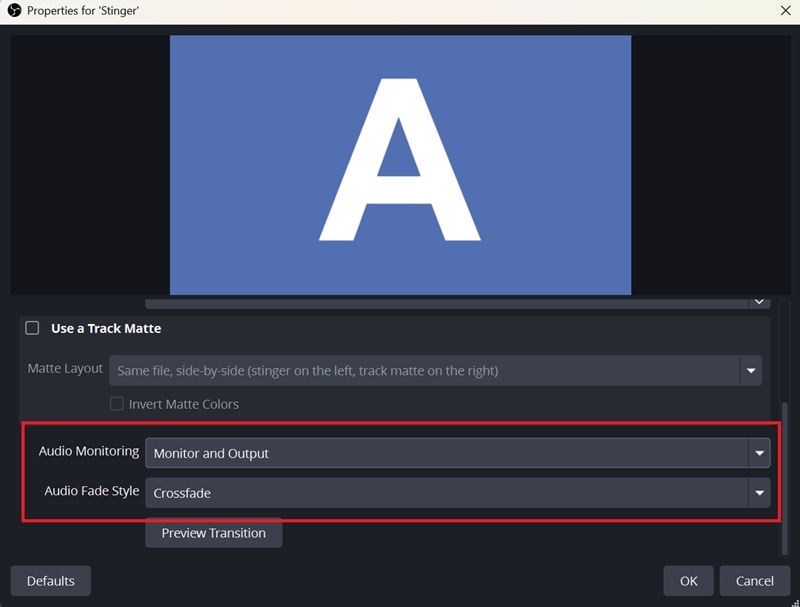
Step 5: Click Preview Transition to test how it looks. Adjust timing or other settings until it looks good.
When you’re satisfied, hit OK to save. Now, your stinger transition will play automatically whenever you switch scenes during your stream.

Part 4. How to Quickly Add Different Transitions for Each Scene in OBS
Now that you have learned how to add custom scene transitions in OBS, there is another quick way to add different transitions for each scene. Instead of using the same effect every time you switch scenes, having unique transitions for each scene gives you several benefits, such as:
- Branding and Style: Giving each scene its own transition helps your stream stand out and feel more “you.” You can give a visual signature that viewers recognize instantly.
- Viewer Engagement: Well-timed transitions keep your stream flowing and your audience focused, instead of being distracted by hard cuts.
- Mood Control: The type of transition you use can totally change the vibe. A slow fade works great for chill moments, while a quick slide or Stinger can add hype and energy.
To do it, you need to set the transition override feature in OBS. It lets you assign a transition for a specific scene. Follow the steps below.
How to Add a Scene Transition in OBS
Step 1: In OBS, right-click on a scene in the Scenes list, then select Transition Override. Choose the transition you want for that scene and adjust its Duration.
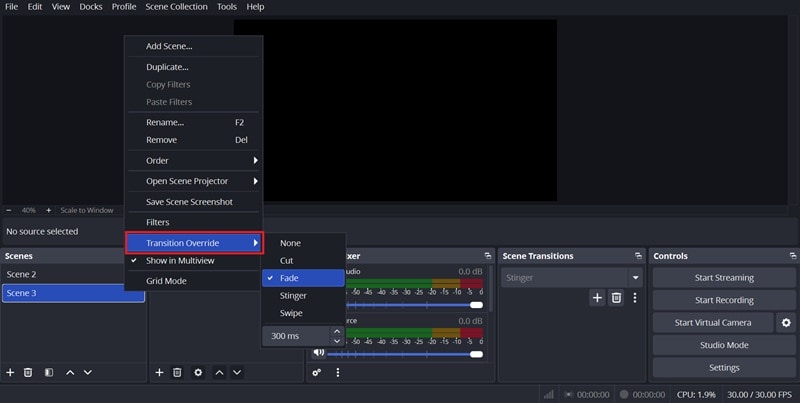
Step 2: Repeat this process for each scene where you want a custom transition. When you switch to that scene, OBS will use your chosen transition instead of the default one set in the Scene Transitions panel.
Part 5. Add Cool Transitions to Your Streams After Recording in OBS
If you feel like OBS transitions aren’t quite enough because the options are limited, meanwhile adding a custom transition can take time, and you want more control over how everything looks, you can always polish things up later in post-production using Filmora.

While Filmora can be used to design and export custom transitions for OBS, it’s also a powerful video editor on its own. You can use it to refine your recorded streams, add dynamic transitions, apply motion graphics, or even blend multiple effects.
Step 1: Import Your Recorded Stream
With Filmora open, click Import in the Media tab or simply drag your recorded OBS stream into the panel. Once imported, drag the clip onto the timeline to start editing.
 secure download
Step 2: Split the Clip Where You Want Transitions
Play through your recording and pause at the points where you’d like to add transitions. Use the Split (Scissors) tool to cut the clip at those points.
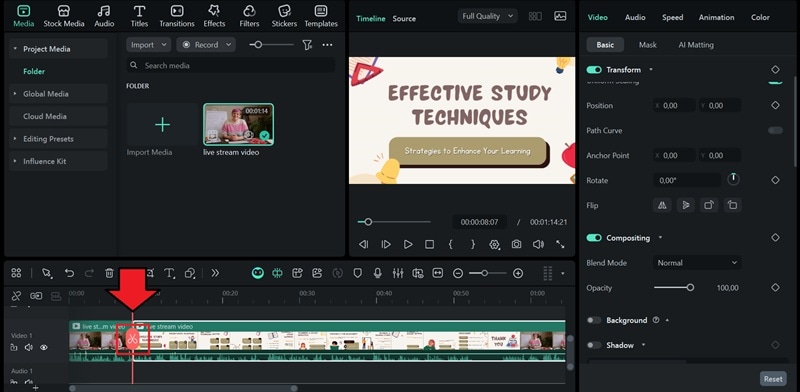
Step 3: Add Transitions Between Clips
Head over to the Transitions tab at the top. Drag your favorite transition and drop it between two clips on the timeline. Adjust the duration by dragging the edge of the transition.

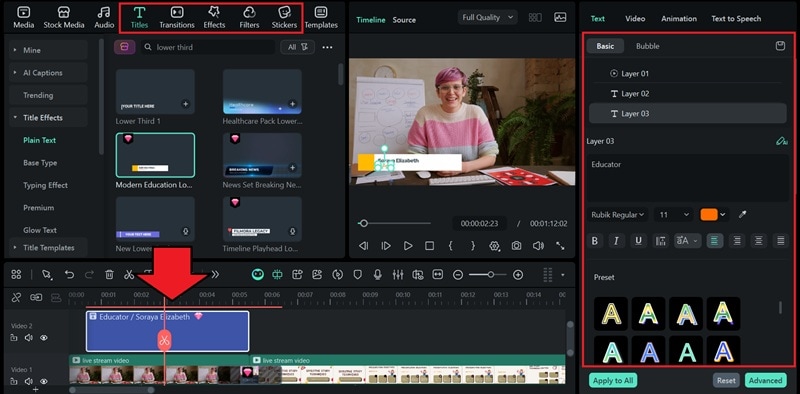
Step 4: Make Further Adjustments
Once your transitions are in place, it’s time to polish things up with a few more touches. You can add titles like lower thirds or captions, effects, and overlays to make your video more engaging.
Step 5: Export Your Final Video
When everything looks great, it’s time to export your finished edit. Click the Export button at the top, choose your format, resolution, and frame rate, and give your video a name. You can also share it directly to social media platforms like YouTube.
Conclusion
Now you know exactly how to add and make custom scene transitions in OBS Studio. It’s not that hard, right? The key is to use the Stinger transition in OBS to upload the short animation video you created and time it perfectly with your scene switch.
For the transition animation, you can design it any way you like using Filmora. You can easily experiment with stylized transitions, effects, and overlays to create something that truly matches your stream. A bit of effort in crafting your own OBS transition can completely change how professional your stream feels!
secure download
