OBS Studio is an open-source video editor that is widely popular for live streaming on online platforms. Even though OBS is a completely free application, its features are comparable to any premium video editor. We always look for available transition effects in a video editor and OBS takes it to the next level by allowing users to add custom transitions.
Among custom transitions, Stinger transitions have gained a lot of traction from the users. Stinger transitions are made popular by sports channels who use Stinger frequently whenever there is a change in the scene. We will illustrate how to add custom transitions in OBS and apply Stinger transitions in your video.
In this article
Part 1. What is Stinger in OBS
Stinger is a special type of customized animated video transition effect that is available in the latest version of OBS Studio. It is a combination of a transparent video animation and a cut transition. Stinger begins with the transparent video animation that grows into full-screen overlay, and it is followed by the cut transition. After the cut transition, you place the next scene or video clip. You will notice Stinger transition whenever sports channels show an instant replay during a live match.
The transparent video animation starts on top of the current video you are editing. When the animation expands and covers up the entire screen, you place the cut transition, and thereafter, you place the next video clip or scene as per your requirement. Some customized stinger effect also includes audio effects along with video effect.
Part 2. How to add stinger transitions to OBS
The Stinger transition is available on OBS Studio and Streamlabs, and both of them are open-source and free applications. Before you add stinger transition, you should have a video animation ready that you will play on top of the current video followed by the cut transition effect. You can download several stinger video animations from the internet and include any of them in OBS while adding stinger transition. Here are the steps on how to add a custom transition to OBS.
Step1 Go to Scene Transitions section and click on Effects option to open the drop-down menu.
Step2 From the drop-down menu, click on “Add: Stinger” option.

Step3 Give a name to the Stinger transition and click Ok button.

Step4 You will see Properties window now. Click on Browser button against Video file and select the transparent video animation file that you want to play on top of the current video before applying the cut transition effect.

Step5 For Transition Point Type, select Time(milliseconds) option. In the Transition Point field, add the duration of the transparent video animation so that the transition to the next scene takes place immediately after the video animation gets completed.

Step6 If your video animation has audio, go to Audio Monitoring and select Monitor and Output option from the dropdown. For Audio Fade Style, you can select Crossfade option for better output.

Step7 Scroll down and click on Preview Transition button to check if the stinger transition is taking place as expected. You can adjust the transition point and other parameters to get it perfect.

Step8 Finally, click on Ok button and play the video to check out the stinger transition on the big screen.
The steps on how to add a custom transition to Streamlabs OBS are almost similar, and therefore, you can add stinger transition using Streamlabs comfortably.
Part 3. OBS Alternative to Add Transitions
There is no denying the fact that OBS Studio has a complicated user interface. That is why most amateur video editors find OBS Studio difficult to learn quickly even though there is no dearth of features. Apart from add custom transition OBS, there are very limited effects available on OBS Studio. That is why many users look for an OBS alternative to add transitions to their videos.
We recommend Wondershare Filmora as the best alternative to OBS Studio when it comes to adding transition effects. That is because Filmora is a professional video editor with a wide range of effects. Most importantly, Filmora is widely loved by amateurs and professionals for its intuitive user interface. Here are the steps on how to add transitions to your video in Filmora.
How To Add Transitions With Filmora Desktop
Step1 Download and install Filmora as per your operating system. Open Filmora and click on New Project option.

Step2 Import or drop your video clips under Project Media folder. Then drag and drop them on Timeline and place them sequentially as appropriate.

Step3 Go to Transitions tab located at the top of the application screen. You will see different categories of transitions on the left side.

Step4 Check them out and once you have selected one to apply, drag and drop it in between the video clips.

Step5 Play the video and click on Export button to save the video.
How To Add Transitions With Filmora Mobile on iOS
Another alternative for adding OBS-like custom transitions is in your iPhone or iPad. Due to smartphones becoming more powerful, many developers have added desktop-class features to their mobile apps. This means you can now edit efficiently on the go, even when you don’t have a computer.
One such app is Wondershare Filmora’s iOS version, which you can learn easily just by following the steps below:
Step1 Download and install Wondershare Filmora through the App Store.
Step2 When you open the app, select New Project from the homepage.

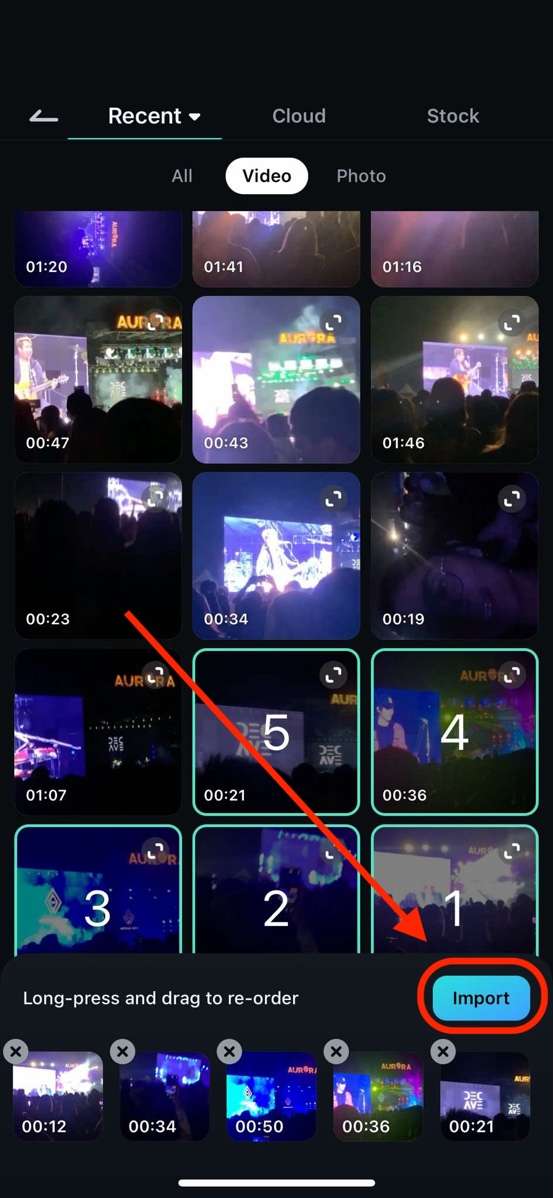
Step3 Choose the videos you want to use sequentially. Then, press Import.

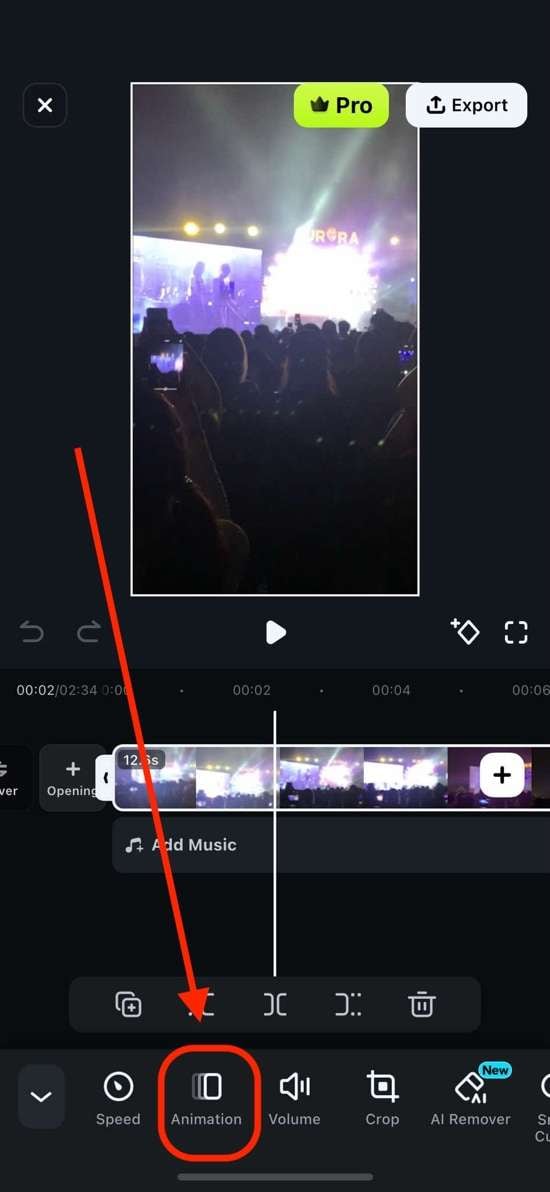
Step4 In the editing interface, select the clips you want to add a transition to. Look for Animation.

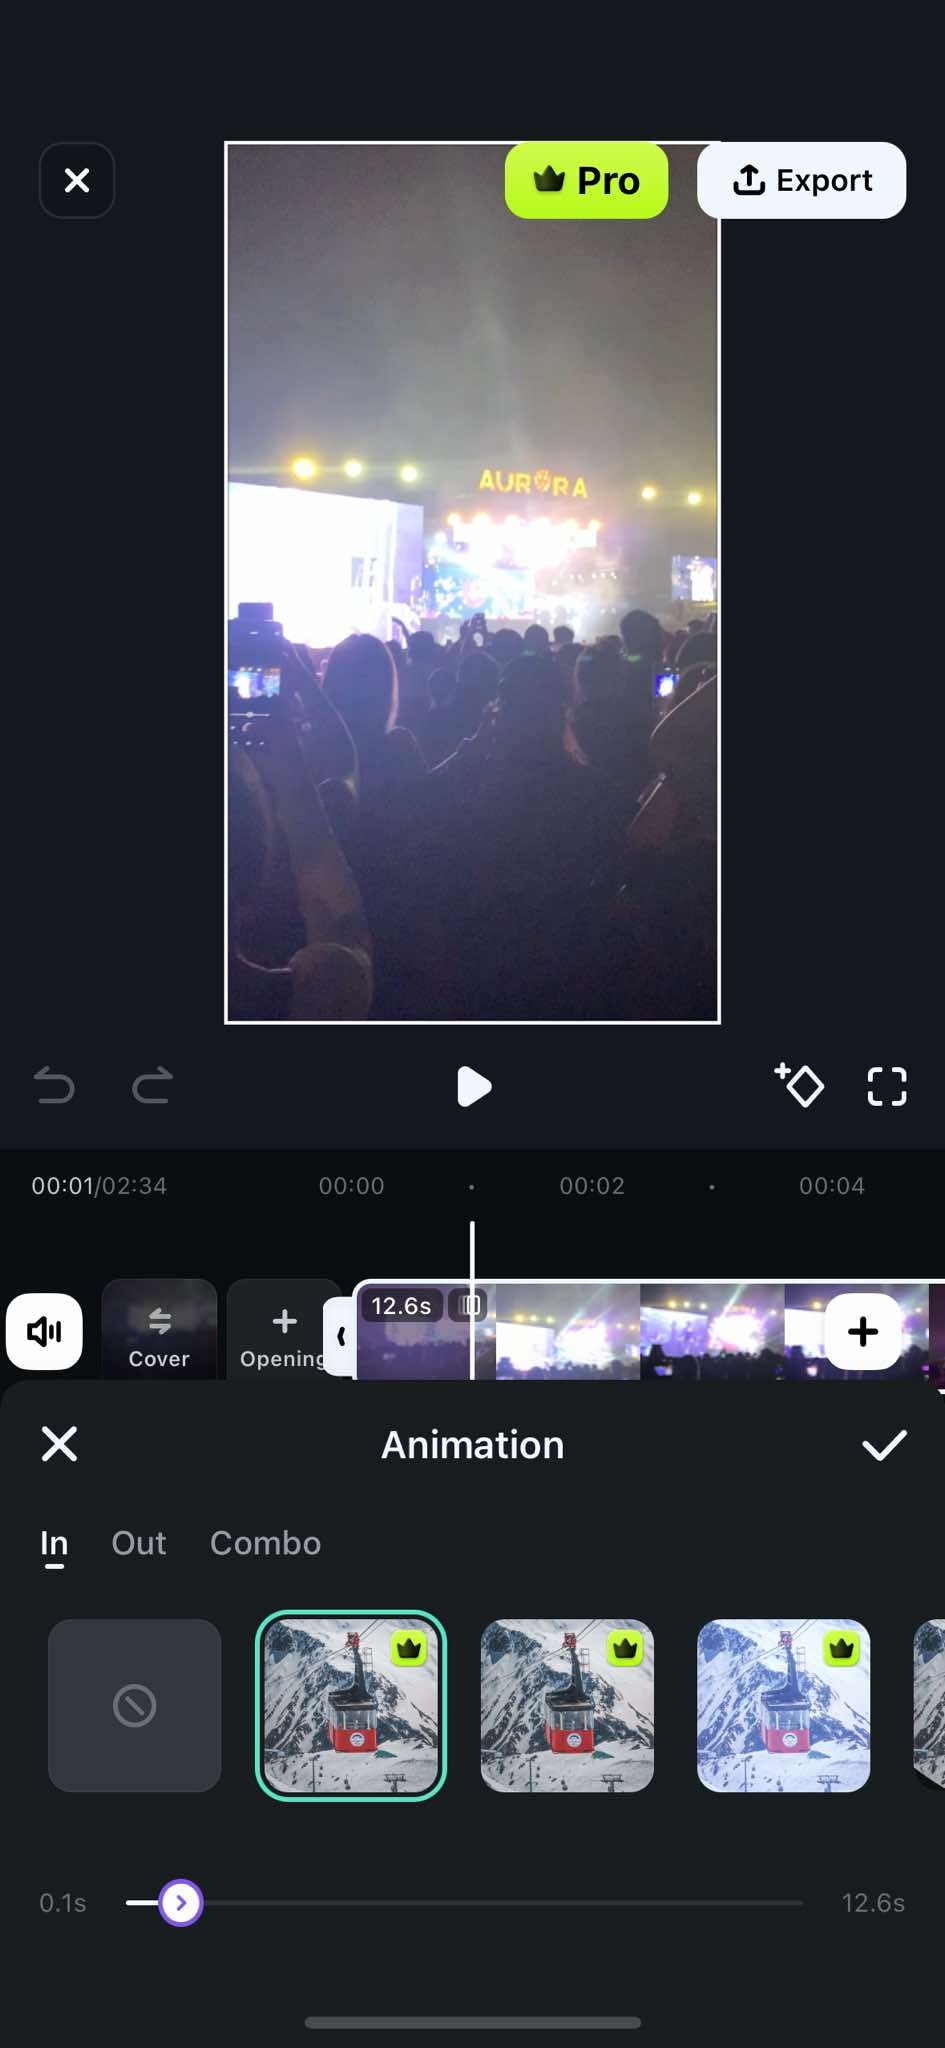
Step5Press the Animation style you want to use (like In, Out, or Combo.)

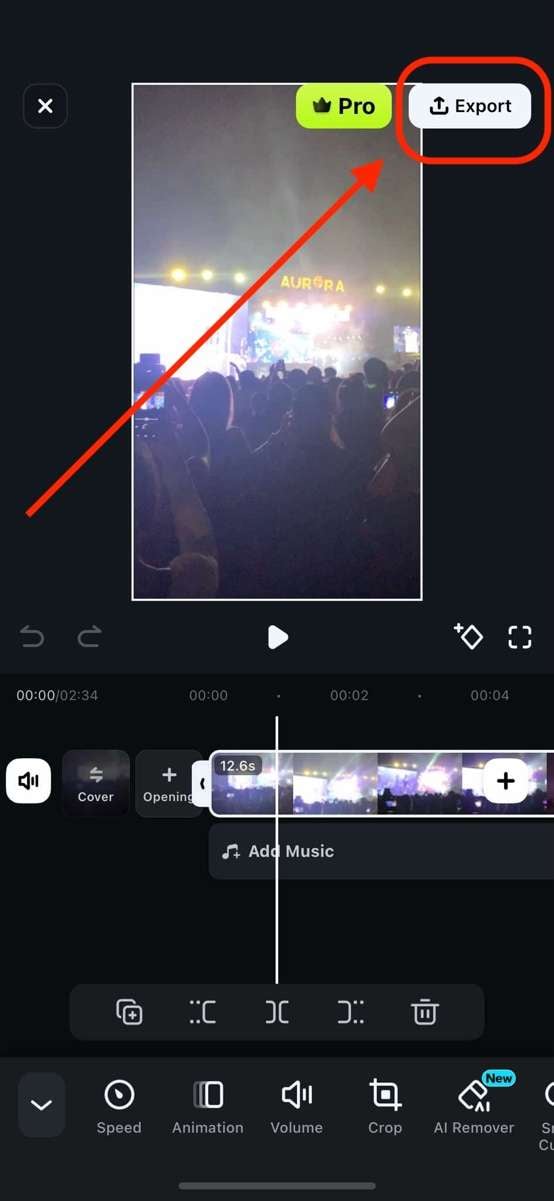
Step6Once satisfied, click Export.

With these simple steps, enjoy creating professional-looking transitions on your iOS device anytime, anywhere with Wondershare Filmora!
Part 4: Related FAQs about OBS Transitions
How do I add a transition overlay in OBS?
You need to go to Scene Transition tab and select any transition overlay effect that is available. Thereafter, you can change the settings and parameters to customize the transition effect as per your requirements. Apart from the built-in transitions, you can download and add plugins for more transitions.
Can you have different scene transitions in OBS?
Yes, you can have different scene transitions in OBS Studio. You can add them directly from Scene Transition tab one by one as per your requirements. You can add them in between scenes so that the transition effects play when you switch between scenes.
How do I download transitions in OBS?
Go to the OBS Forums from where you get to download transitions for OBS Studio. Click on Download button and download plugin installer as per your operating system. Double-click the installer file to install it on your computer. Go to OBS Studio and go to Scene Transition to use the installed transition.


