


Master Final Cut Pro keyframes to transform static clips into dynamic cinematic masterpieces. Whether you want to add keyframes in Final Cut Pro for smooth zooming or precise audio fades, knowing how to view keyframes in FCPX is the first step. This guide covers everything from basic motion to advanced animation paths.
In this article
Why Keyframes Are Essential for Visual Storytelling
Keyframe animation is a powerful technique to create captivating, engaging, and dynamic visual stories by manipulating how your scenes, objects, and characters change and move over time. You control the motion and these changes by using specific keyframes or points to determine the start and end of each action.
Keyframes allow you to personalize the movements and expressions of your characters, creating immersive visual stories in dynamic environments. That's where Final Cut Pro X comes into the picture.
The tool lets you use advanced keyframing techniques to your advantage:
- Final Cut Pro X uses advanced and sophisticated keyframing techniques to ensure smooth movement of the object across the frame, from the first keyframe to the last.
- Final Cut Pro X keyframes allow you to add movement to static shots and change camera angles seamlessly.
- Final Cut Pro X gives you more flexibility and control over your animations and visual effects, allowing you to express your style and convey your emotions.
- Final Cut Pro X keyframes empower your storytelling by adding suspense and tension throughout your animation using symbols, textures, shapes, and colors.
How to Add & Show Keyframes in Final Cut Pro X (Shortcuts Included)
Final Cut Pro X allows you to add and edit keyframes to make adjustments to your audio/video content. For example, you can make a video fade from visible to invisible at the beginning of an animation.
Alternatively, FCPX keyframes empower you to fine-tune the adjustments you make using sophisticated parameters of motion paths, transitions, visual effects, and more. Let's see how to add, edit, and remove keyframes in Final Cut Pro X.
Step 1. Launch Final Cut Pro X on your Mac and add your audio/video to the timeline;
Step 2. Select the clip in the timeline and navigate to Clip > Show Video Animation;
Step 3. Select the parameter or effect to which you wish to add a keyframe;

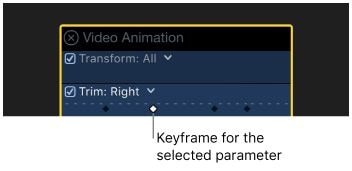
Step 4. Navigate to the Video Animation Editor and hit Option + K to add a keyframe to the specific point on the horizontal effect control;
Step 5. After adding a keyframe to the desired point on the horizontal effect control, you'll notice a white diamond-like icon.
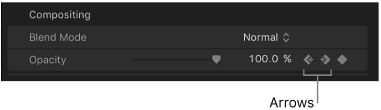
Step 6. If you add a keyframe for more than one parameter at the same position, you'll see a double-diamond icon. Use the arrow keys to navigate through newly added keyframes.
Step 7. Go to the Video Animation Editor and select a keyframe you wish to edit;
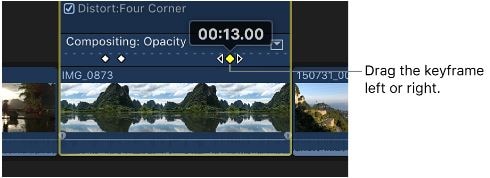
Step 8. Drag the keyframe left or right to change its time position;
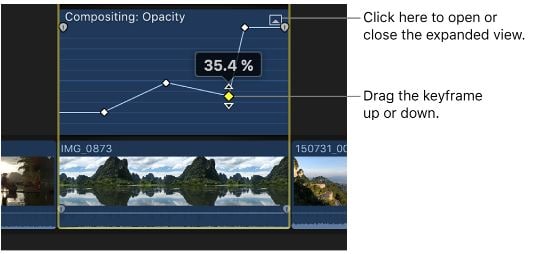
Step 9. Drag the keyframe up or down to adjust the parameter value;
Step 10. If you wish to delete a keyframe, navigate to the Video Animation Editor, select the keyframe you wish to remove, and hit Option + Shift + Delete.
Creating Camera Movements with Final Cut Pro Keyframes
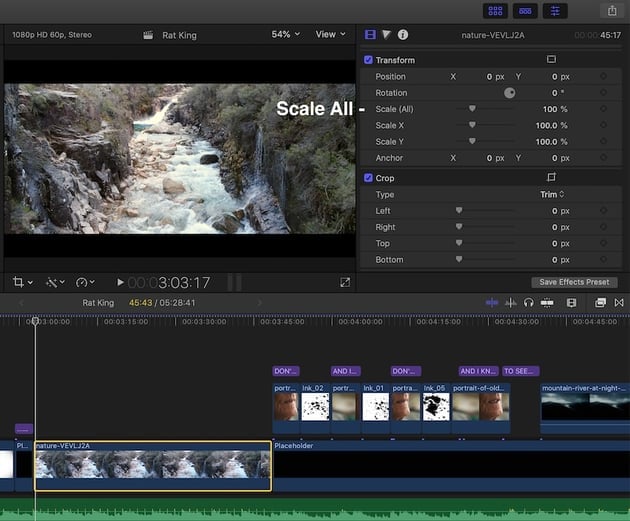
Final Cut Pro allows you to leverage keyframing and the Transform tool to create a camera movement effect to turn static shots into dynamic motion graphics. The Transform tool is a powerful feature that enables you to adjust and manage the rotation, position, and size of an image or a video clip within the selected frame.
You can combine the tool with keyframing to rotate clips, move static shots and clips around in the frame, and resize your visuals.
- Zoom In/Out
You can use the Transform tool to create a zoom-in/out effect by adjusting the Scale parameters:
Step 1. Import your content in Final Cut Pro and drag it to the timeline;
Step 2. Click the clip and position the playhead to the starting point of your animation;
Step 3. Add keyframes to create the start and end points;
Step 4. Go to the Viewer panel and enable Transform;
Step 5. Adjust the Scale parameters to create a zoom effect.
- Camera Tilt
Use the Transform tool to create a camera tilt effect by moving a keyframe up or down:
Step 1. Import a clip in Final Cut Pro and drag it to the timeline;
Step 2. Position the playhead over the clip and open the Viewer;
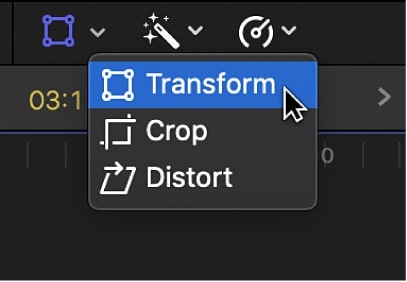
Step 3. Select the Transform tool from the menu in the lower-left corner;
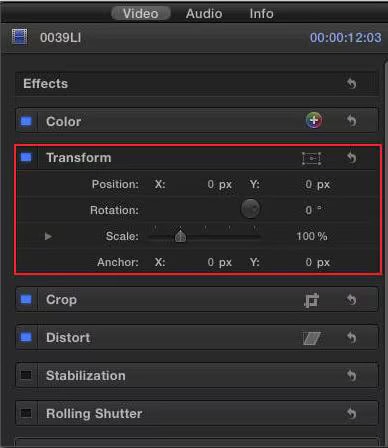
Step 4. Go to the Video Inspector and adjust the Position Y value to make the image move up or down.
- Camera Pan
To create a camera pan effect, use the Transform tool and keyframing to make the image move left or right:
Step 1. Select the clip in the timeline and position the playhead over it to open the Viewer;
Step 2. Select Transform and navigate to the Video Inspector;
Step 3. Adjust the Position X parameter to make the image move left or right.
Creating Video Animation with Final Cut Pro Keyframes
Final Cut Pro keyframes allow you to create video animation by moving objects up or down to create an animation path by changing the curve shape between keyframes. You can also use keyframes to add visual and color effects to your animation.
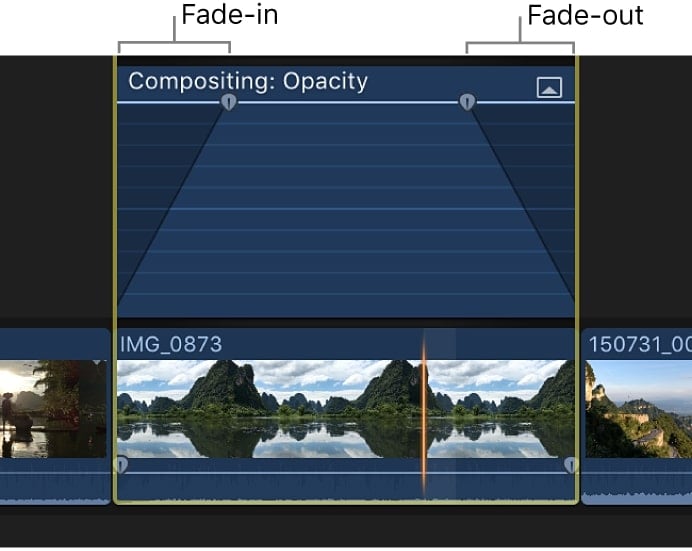
- Fade In/Out (Opacity)
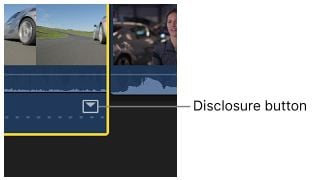
Step 1. Go to the Video Animation editor and select the Disclosure button to expand the chosen effect;
Step 2. Select and drag the fade handle to the specific point in the clip where you wish the fade to begin or end;
Step 3. Experiment with different Opacity settings to create a smoother fade-in/out effect.
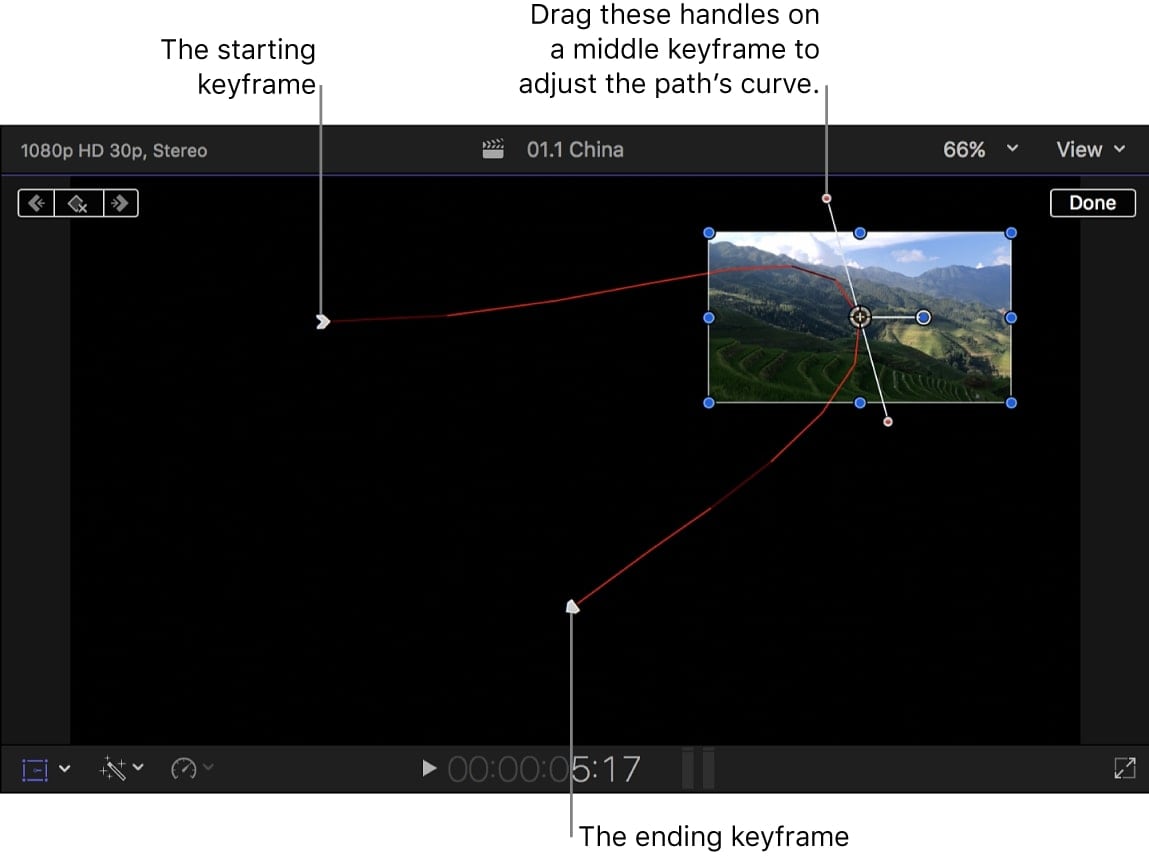
- Animation Path
Step 1. Import a clip in the timeline and position the playhead at its start;
Step 2. Navigate to the menu in the lower-left corner of the Viewer and select Transform;
Step 3. Use the onscreen controls to place the animation in the desired position;
Step 4. Click the Add Keyframe button and position the playhead to the middle of the animation;
Step 5. Move the image to the upper-right corner to automatically add a keyframe;
Step 6. Position the playhead to the end of the animation;
Step 7. Move the image to the bottom center using the Transform tool;
Step 8. Use keyframe controls to adjust the curve of the animation path.
- Color Grading
Final Cut Pro comes with an array of color grading and correction tools to help you enhance the visual appeal of your content by adjusting the levels of highlights, midtones, shadows, colors, and everything in between.
You can automatically balance colors to accomplish a desired look, white-balance your animation, manually adjust exposure and saturation, and more.
Here are the steps to color grade your content in Final Cut Pro:
Step 1. Import a clip in the timeline and drag the playhead over it to open the image in the Viewer;
Step 2. Navigate to the Color Inspector and select the Enhancements pop-up menu;

Step 3. Select Color Adjustments;
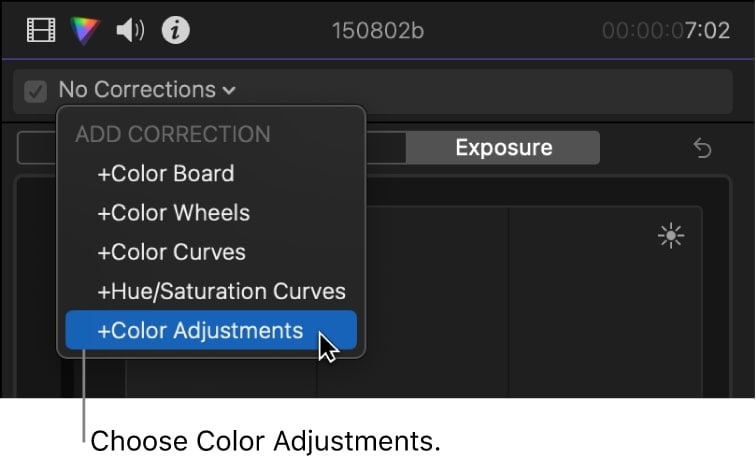
Step 4. Create a color-grading effect using the Color Adjustment controls to adjust Light, Exposure, Contrast, Brightness, Highlights, Black Points, Shadows, Saturation, Tint, and more.
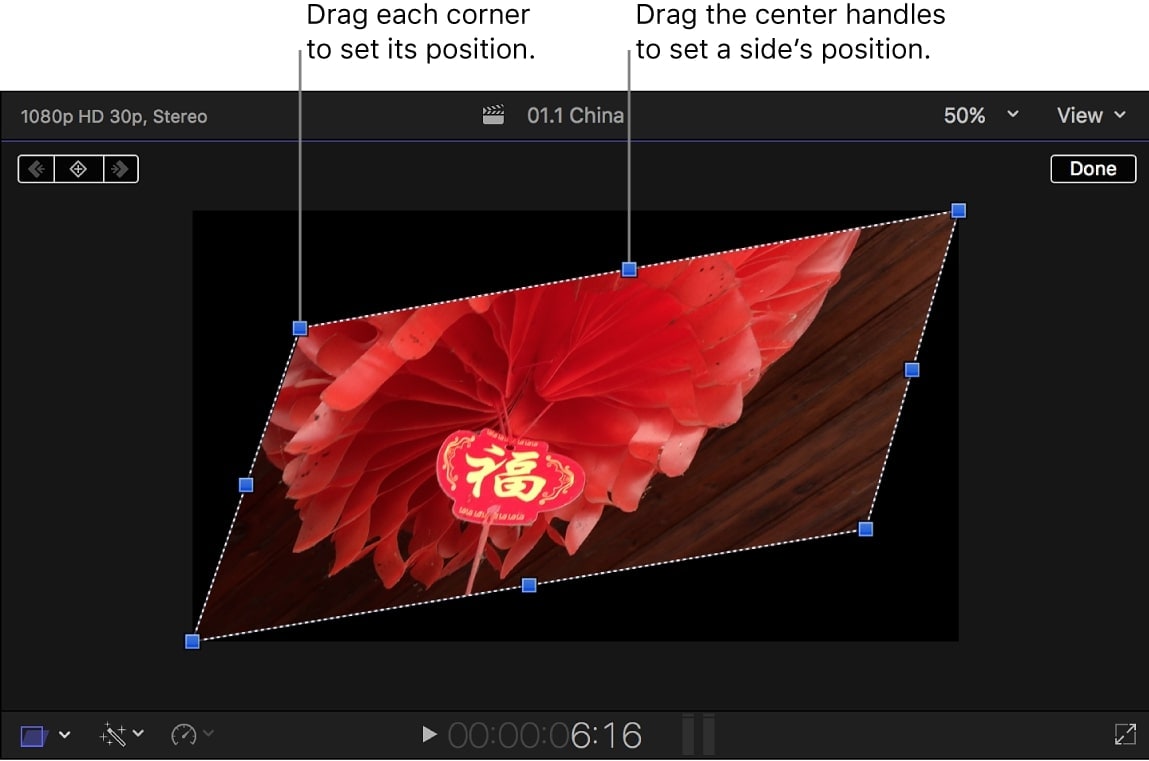
- The Distort Effect
The Distort effect allows you to animate the shape of your video by distorting or skewing the image. Thanks to that, you can use this effect to add a 3D effect or a distorted appeal to the image by manipulating each edge and corner of your video frame independently.
Here's how:
Step 1. Import a clip and drag it to the timeline;
Step 2. Select the clip and position the playhead over it to display it in the Viewer;
Step 3. Navigate to the lower-left corner and select Distort from the menu;
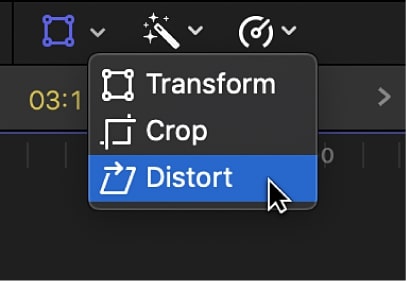
Step 4. Manipulate the blue handle controls to adjust the position of each corner, side, and edge thus creating a 3D perspective using a skewed visual appearance.
Step 5. Click Done to complete the process.
Adding Audio Effects with Final Cut Pro Keyframes
Final Cut Pro allows you to leverage keyframing to add audio effects and create simple changes to the sound levels, such as fade-in/out effects in the middle of your clip. You can use keyframes to determine specific points in your clip where you wish to apply the audio fade effect.
- Audio Fade In-Out
Here's how to use keyframes to create audio fade-in or fade-out effects in Final Cut Pro:
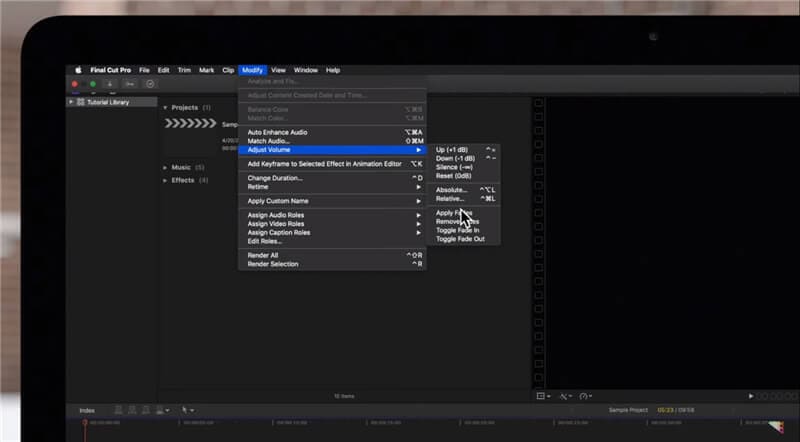
Step 1. Click the clip in the timeline and select the section where you want to create the fade effect using the menu command;
Step 2. Navigate the top menu bar to Modify > Adjust Volume > Apply Fades;
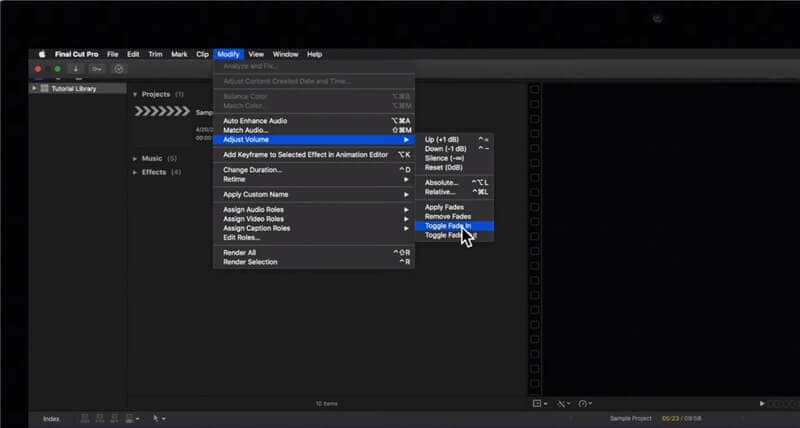
Step 2. Select the fade in and fade out positions and select Toggle Fade In and Toggle Fade Out.
Final Cut Pro X Alternative: Wondershare Filmora
As you can see, Final Cut Pro X offers advanced keyframing options, settings, and tools you can leverage to animate objects and create smooth and lifelike video animations. However, getting ahead of the Final Cut Pro X keyframing requires a decent level of know-how and tech-savvy skills.
If you're new to FCPX keyframing, consider a more user-friendly alternative for beginners, such as Wondershare Filmora. Filmora is the ultimate keyframing alternative solution to Final Cut Pro. It can do all the above more easily.
More importantly, Filmora can lend you the power of advanced keyframing on both macOS and Windows. Because of that, Filmora is the perfect tool for honing your keyframing skills before you move to Final Cut Pro X. The secret of Filmora's unprecedented keyframing power lies in its intuitive interface and transparent features.
Thanks to that, Filmora streamlines the keyframing process, allowing you to use keyframe animations to create photorealistic videos. In addition, Filmora lets you create custom-tailored keyframe presets, which you can enhance using creative assets, visual effects, text animations, and much more.
Using keyframing in Filmora is straightforward and requires completing a few simple steps. Download and install Filmora on your computer, then follow the steps below to create immersive keyframe animations.
Step 1. Launch Filmora and navigate to the main menu;
Step 2. Click Create Project > New Project and import your media;
Step 3. Add your media to the timeline and click it to open the Editor;
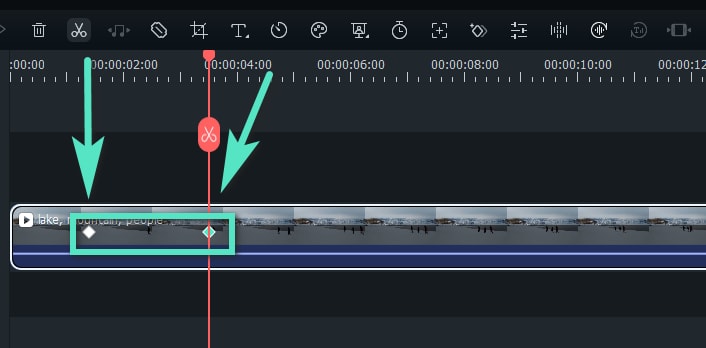
Step 4. Access the Keyframe feature in the timeline toolbar;
Step 5. Position the playhead to where you wish to add a keyframe and click the Keyframe icon to select the keyframe values automatically;
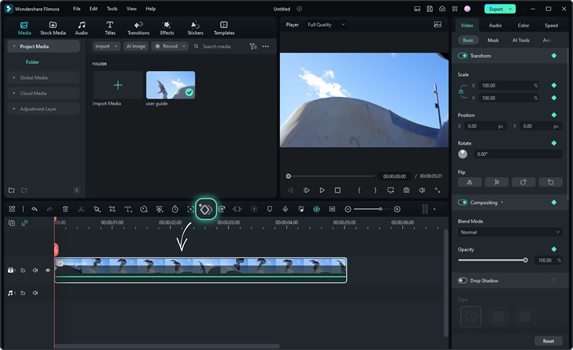
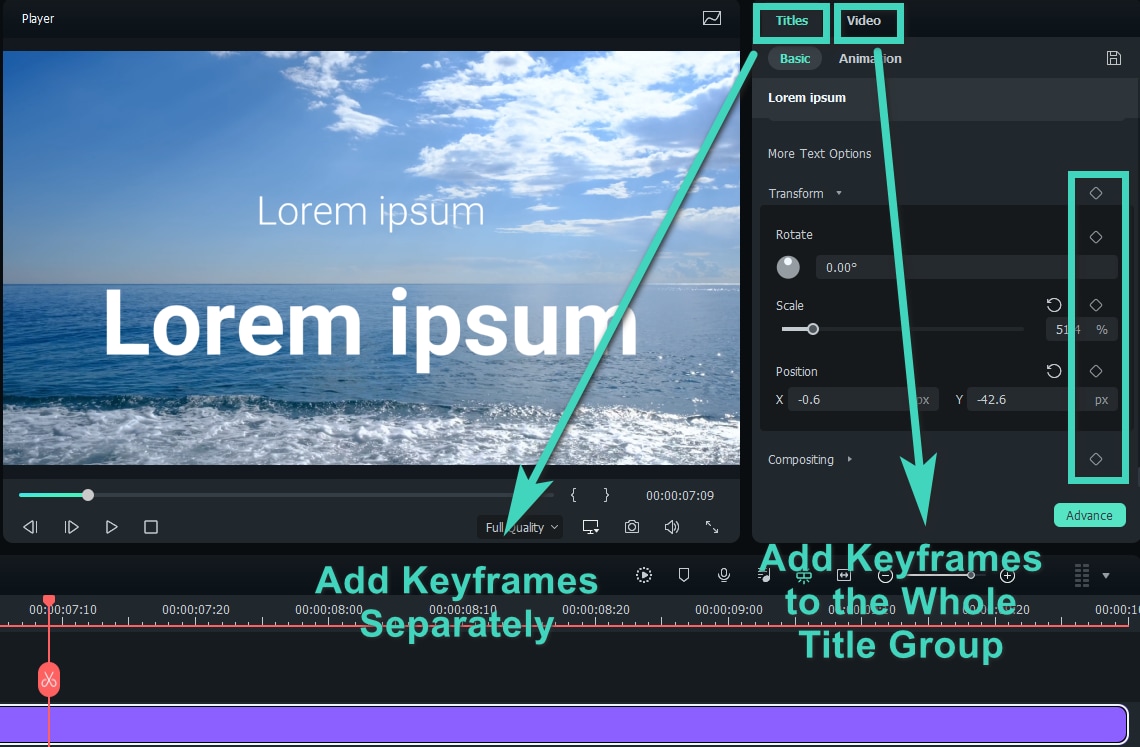
Step 5. Alternatively, navigate the Editor sidebar to Video > Basic to access the Keyframe settings panel;
Step 6. Drag the slider to the position where you wish to add the start keyframe;
Step 7. Click on the diamond icon to set a keyframe;

Step 8. Drag the slider to adjust the keyframe parameters and edit the added keyframes by making audio and video adjustments;
Step 9. Access the Titles panel to add keyframe animations;
Step 10. Customize your keyframe animations with stickers;
Step 11. Once you're with keyframe editing, you can add one or more keyframes according to your requirements;
Step 12. Click OK when you're done, then click Export to save your file on your computer.
Conclusion
Keyframes are the very lifeblood of immersive animations. Getting ahead of keyframe animation techniques empowers your animation creation skills with unprecedented creative freedom, allowing you to create visually stunning masterpieces.
Keyframes are vital to taking your visual storytelling to the next level with top-rade motion graphics. You can produce custom-tailored animated effects and creative assets to polish your content to perfection and optimize it for online sharing.
Final Cut Pro X is an excellent keyframe animation software tool to enhance your animations according to your unique needs. The tool harnesses the power of advanced keyframing techniques and algorithms to help you create smooth animations and dynamic visual stories, allowing you to convey your message and express your style.
However, the tool also requires a somewhat steep learning curve to get ahead of its keyframing capabilities. If you have no experience with FCPX keyframing, consider using a more streamlined keyframing solution such as Wondershare Filmora.
Filmora can do everything that Final Cut Pro X can, only better, allowing you to upgrade your keyframing skills with an intuitive interface, streamlined navigation, and transparent keyframing options.
