
 100% Security Verified | No Subscription Required | No Malware


 ChatGPT
 Perplexity
 Gemini
 Claude
 Grok
Grok

Adobe Illustrator is one of the world's most popular design and graphics editor software. It can produce various 3D effects, filters, animations, and graphics. You can also use Illustrator to create 3D letters.
If you’re interested in learning all the steps for making 3D text in Illustrator, you’ve come to the right place. In this post, we’ll be sharing all the different methods you can use to generate 3D text, along with detailed steps.
3D text letters are often used for branding, video aesthetics, creating depth, promoting various logos, etc. As a video editor, you should learn how to create 3D letters and use them properly.
In this article
Benefits of Creating 3D Text in Illustrator

These are some of the main benefits of using a 3D text illustrator:
- Making custom 3D typography designs – Adobe Illustrator lets you create custom 3D texts you can save and use whenever needed. In other words, learning how to create 3D texts also teaches you to customize letters and develop interesting typography designs.
- Creating 3D Animations – 3D text doesn’t have to be a static 3D element that pops up on the screen. Adobe Illustrator lets you turn your text into animations. For example, you can create a 3D circle text that revolves around itself.
- Mapping artwork over 3D text – Mapping artwork over 3D text means adding graphic designs, images, or textures on the surface of 3D text to create more interesting visual effects. This technique is commonly used in animation and videography to create unique text.
As you can see, there are lots of reasons to use a text illustrator, but how do you choose the right fonts?
What Are the Best Fonts for Creating 3D Text in Illustrator?

Selecting the right font is essential when making 3D text in Illustrator. Look for fonts with enough spacing between characters to create shadows and effects. At the same time, the fonts themselves should have clean and bold lines.
Here are some of the best fonts you should use:
- Arial Black
- Avenir
- Roboto
- Impact
- Futura
- Gotham
- Bebas Neue
- Monserrat
- Helvetica Neue
- Cooper Black
Take the time to find bold fonts with good spacing and simple designs. Finding the right font weight is always important to get the best results.
How to Create a 3D Text Effect in Illustrator
As mentioned, you can create 3D text in Illustrator in multiple ways. Today, we will introduce the four best methods.
Method 1: Using the 3D Extrude & Bevel Effect
Step 1: Launch Adobe Illustrator, click File, and select New to create a blank document.

Step 2: Click the Type Tool and type in the text you want to turn 3D.

Step 3: Click on the text and go to Effect > 3D > Extrude & Bevel.

Step 4: Move the view cube around to change the position. You can also change the rotation options like front, back, front, right isometric right, etc. Once you’ve configured everything, click OK to get a 3D text.

Method 2: Using the Blend Tool
Step 1: Launch Illustrator and create a new project.

Step 2: Click on the Type tool and type your text.

Step 3: Select the text and click Edit > Copy > Edit > Paste in Place.

Step 4: Change the color of the copied text and move it up and to the left/right. Go to Object > Arrange > Send to Back.

Step 5: Select both texts, click on the Blend Tool, and click on both texts once.

Step 6: Double-click the Blend Tool set spacing to Specified Steps and click OK.

Step 7: Select the text, click Effect, then 3D, and select Rotate.

Step 8: Adjust the text according to your needs and click OK.

Method 3: Using the Perspective Grid Tool
Step 1: Click the Perspective Grid tool icon and adjust the grid by moving around all the points.

Step 2: Click the Type tool and type your text within the grid.

Step 3: Select the text, click the Perspective Grid tool, and drag and drop the text onto the grid.

Step 4: Click View, click Perspective Grid, and select Hide Grid.

Method 4: Using the Type on a Path Tool
Step 1: Click on the Elipse Tool and create a perfect circle by clicking on the screen, holding Shift, and dragging across the screen.

Step 2: Go to the Type tool and select Type on a Path Tool.

Step 3: Click on the circle's outline and write your text.

Step 3: Click on the text and go to Effect > 3D > Extrude & Bevel. (refer to the Method 2)
Step 4: Adjust the rotation and other 3D customization options and click OK.
Disadvantages of Using Illustrator to Create 3D Text
You can use These four methods to make 3D text in Illustrator. However, remember that we’ve given you simple workflows and that you can make many customizations and tweaks along the way. Even these easy methods can sometimes be confusing and difficult.
You might have issues getting the desired results if you don’t have experience using Adobe video or graphics editing software. Furthermore, Adobe Illustrator is one of the most popular graphics editing software and is expensive.
Adobe Illustrator costs $59.99 per month, which makes sense only for professionals who are sure they want to use it. That’s why I recommend considering an alternative like Wondershare Filmora. Read below to understand why.
A Time-Efficient Alternative To Create a 3D Text for Video: Wondershare Filmora
Wondershare Filmora is a video editing and recording software designed for beginners and semi-professionals. It has a very intuitive user interface, straightforward controls, and intuitive navigation. All functions are easy to use and deliver instant results in just a few clicks.
At the same time, many of its functionalities are AI-powered and help you create amazing effects with little technical knowledge. However, although it’s simple software, it has many advanced features that match Illustrator’s capabilities.
Compared to Illustrator, Filmora is more affordable, costing you much less per month. To demonstrate its ease of use, here are the steps you must go through to create 3D text in Filmora.
Introduce Wondershare Filmora and explain why it’s an excellent alternative to Adobe Illustrator.
How to Make 3D Text in Filmora with Presets
Step 1: Click the button below to download and install the software.


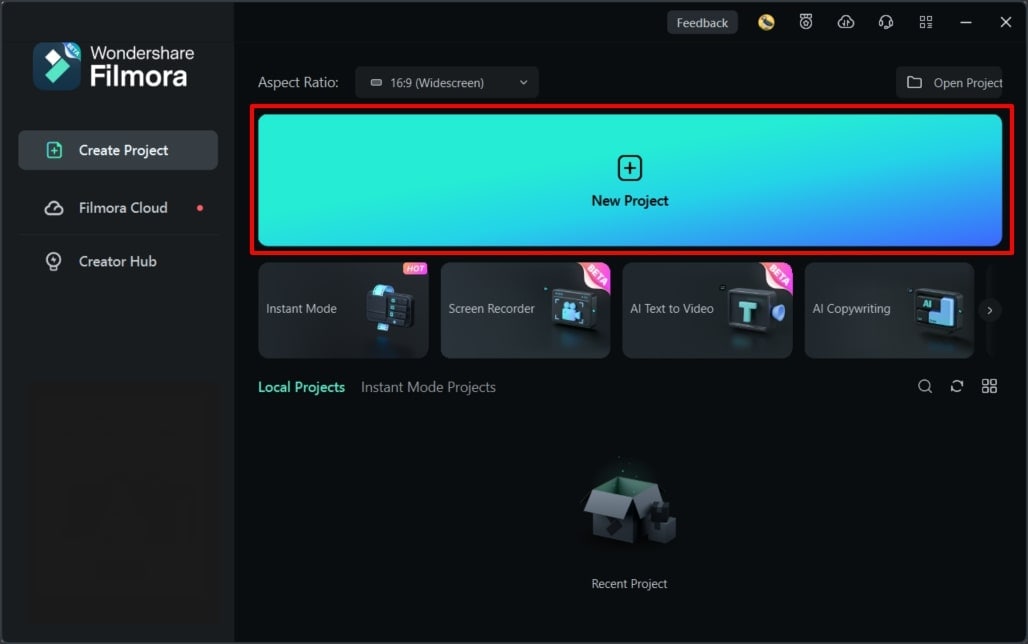
Step 2: Start Filmora and select New Project.
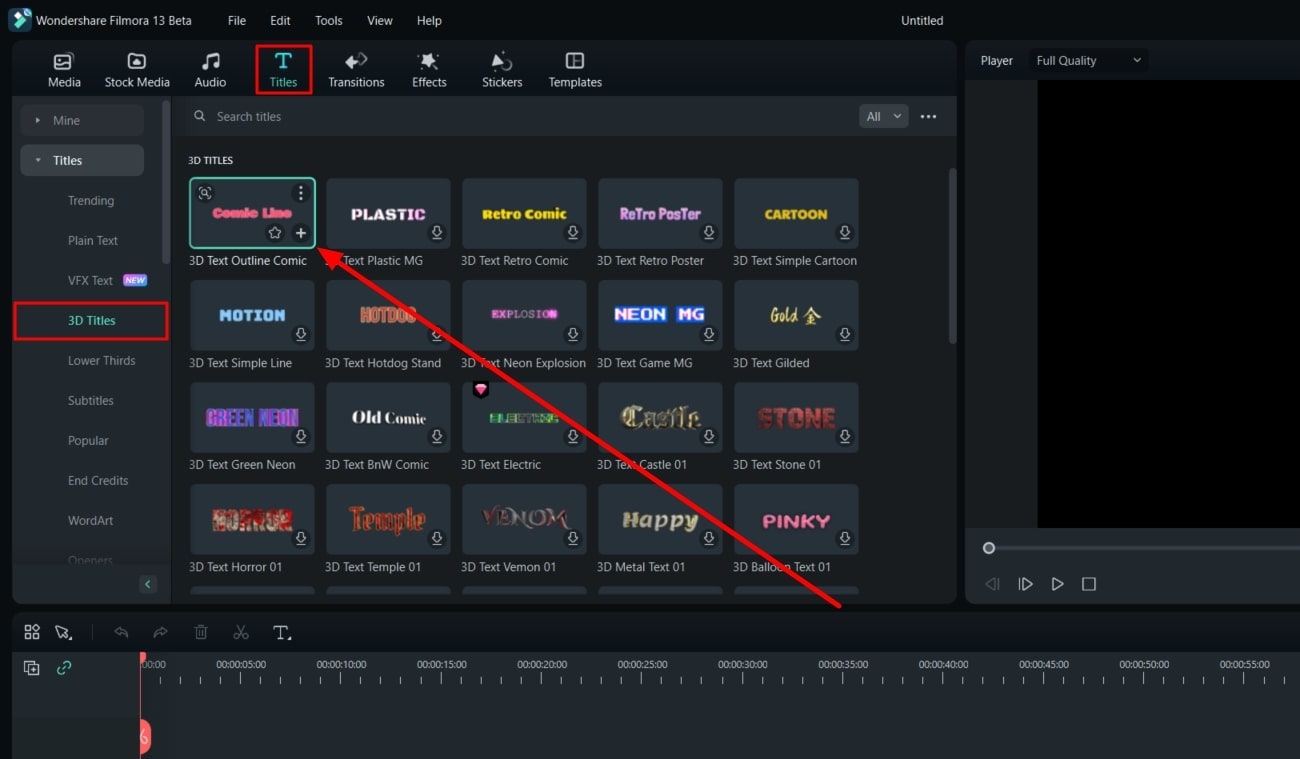
Step 3: Go to Titles, click 3D titles, and customize the text style. If necessary, download the text and drag and drop it on the timeline.
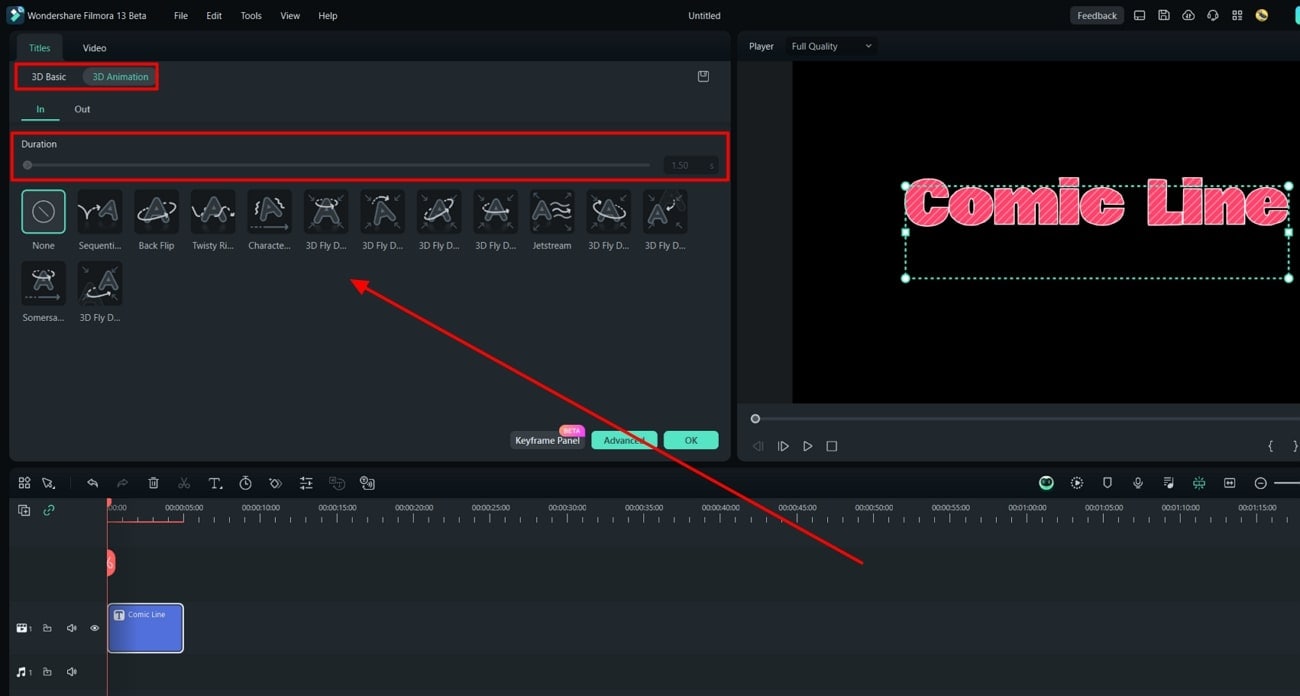
Step 4: In the settings panel, enter the text you want to use. Select 3D animation and configure the animation by adjusting the “In” and “Out.” You can also customize other elements like the duration of the animation.
How to add Custom 3D Texts in Filmora
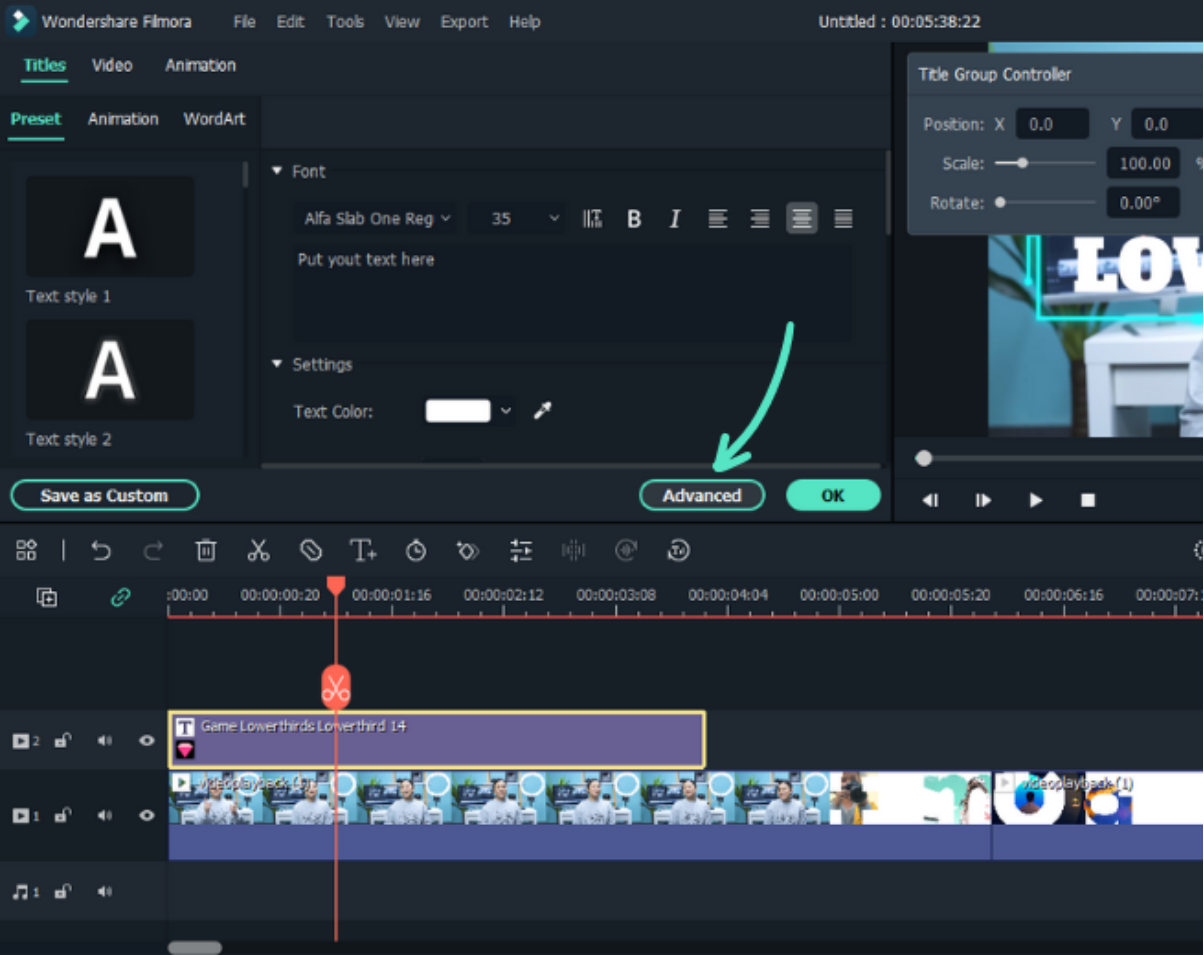
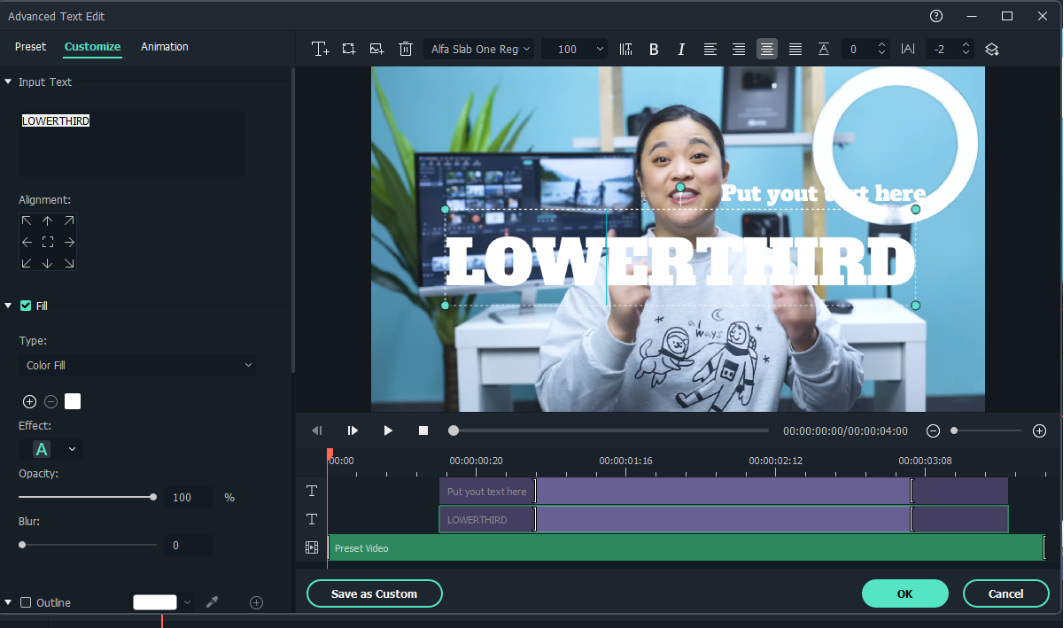
Step 1: Add a text to your timeline and double-click it to access the editing panel. Here, you can edit your text's font, size, color, and alignment. It’s also possible to add animations to your text.

Step 2: Select Advanced to access the advanced editing panel to find additional configurations.
Step 3: Here, you can customize animation, opacity, color, shadow options, fill, borders, and fonts with utmost detail.
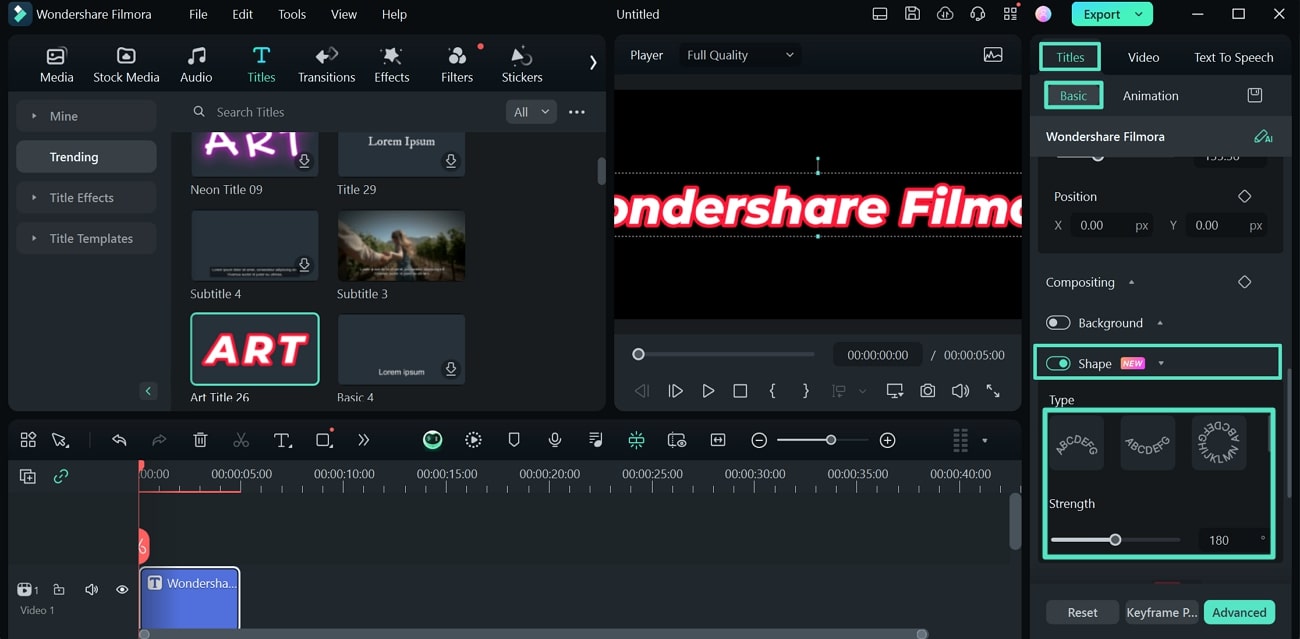
Step 4: Select Titles, click Basic, and turn on the Shape Option feature. This feature lets you change text intensity and shape options.
All Text Editing Capabilities and Features of Filmora
Filmora has a database of over 5000 text templates that can be customized. Users can even create custom text according to their exact needs. Multiple text categories include cinematic text, memes, 3D titles, credits, etc.
Filmora also offers 80+ text animations you can use right away. If you want to import specific SRT files, add them to Filmora, animate them, or edit them. Filmora also has text-to-speech and speech-to-text functionalities to generate text quickly.
Once the text has been generated, you can edit and customize it according to your needs. Check out Filmora for text editing and many other video editing features.
Conclusion
Take the time to follow these steps carefully. Make sure to change different customizations and get creative with your settings. Not only will this help you get unique results, but you will also learn more about how Illustrator and its features work.
If you find it overwhelming, we recommend using a simpler alternative like Filmora. It can do a good job with simpler workflows. We hope this guide helps. Good luck!
