


Bandicam is a popular screen recording software; however, it has limited features and does not support macOS. Luckily, several alternatives can provide similar functionalities and even additional features that Bandicam may lack. This article will present the top 10 Bandicam alternatives for both Mac and Windows users. Whether you're a gamer, educator, or professional, the correct recording software can make a big difference in your content creation.
Table of Content
Why You May Need a Bandicam Alternative
Bandicam is a popular screen recording software that allows users to capture their computer screen and gameplay and create high-quality videos. However, despite its popularity and valuable features, Bandicam has disadvantages that may prompt users to seek alternatives. These drawbacks include relatively high costs, limitations in the free version, and compatibility issues with specific operating systems.
| Drawbacks | Explanation |
| Device Compatibility | Bandicam is only for Windows, so Mac users are excluded. This can be a big problem for those who work on multiple OSs or are Mac users only. The lack of cross-platform compatibility makes Bandicam inaccessible to many potential users who need recording software for their Mac devices. |
| Feature Gaps | Bandicam is excellent for screen recording but lacks some features other software has. Advanced editing tools are one of them. Users also need to export their recordings to other editing software to do comprehensive edits. Also, Bandicam's interface is functional but not as intuitive and user-friendly as some of its competitors. These gaps can slow down content creators who need more integrated and advanced features. |
| Performance Issues | Some users sometimes experience lag or crashes, especially when recording high-resolution videos or long recording sessions."Why is Bandicam so laggy?" is a frequently asked question on Reddit. These can disrupt workflow and result in lost footage, which is terrible for professionals and gamers who rely on smooth recording. Consistency and reliability are essential, and if software fails in this aspect, users will look for other options. |
| User needs | Different users have different needs that Bandicam may not cover. Gamers need a high frame rate and streaming platform integration. Professionals might need high-resolution and editing features. Educators need live recordings and an easy-to-use interface to create tutorial content. |
| Budget | Budget is another factor that comes into play. Bandicam offers a free version with a watermark and a 10-minute recording limit. To access the full features and remove the watermark, users can purchase a yearly license for $39.95. Many recording software out there offer great features at lower or no cost. |
The 10 Best Bandicam Alternatives for Mac & Windows
Choose from the best Bandicam alternatives to record high-definition videos.
1. Wondershare Filmora
Availability: Windows and Mac
Wondershare Filmora is a reliable screen recording and video editing software for creating gaming videos, tutorials, presentations, and demos. It is easy to use, even for beginners who want to record screen, webcam, and audio. Besides, it has AI video editing and audio enhancement features to make the videos stand out from other screen recorders.
Key Features
- Record webcam, screen, and audio simultaneously or separately
- Record videos and audio with separate tracks for easy post-production
- Noise reduction for clear audio
- AI speech-to-text to generate subtitles automatically for your video
- Massive library of stickers, animations, text templates, and video effects
- Professional features, including video speed control, video background remover, color grading, 4K output, and cursor modification.
Pricing
Filmora offers a 3-day free trial for new users. Cross-Platform plan starts at $29.99.
Pros and Cons
| Pros 👍 | Cons 👎 |
|---|---|
| Easy to use | No real-time screen drawing and annotation tools during the recording |
| Shows mouse clicks in recording | |
| Supports multi-format | |
| AI editing tools for fast video creation and professional editing features for optimal result |
How Does It Compare to Bandicam
Compared to Bandicam, Filmora has more advanced editing features and simultaneous screen recording capabilities, making it better for more complex video projects. Plus, it works on Mac and Windows.
Overall Rating: 4.8/5
2. ShareX
Availability: Windows
ShareX is an open-source, free recording tool that records screens on Windows. The platform makes it easy to share recorded videos with built-in platforms like Dropbox, Pastebin, GitHub, and Imgur. It has many customization and automation features, so it's a great alternative to Bandicam. There are multiple filter options and editing and uploading tools on this free Bandicam alternative platform.

Key Features
- Screen capture and recording (full screen, region, or window)
- GIF creation
- Customizable workflow
- Remove cursor from video recordings
- Built-in image and video editing tools
- Upload to GitHub, Dropbox, Imgur, etc
- No ads
Pricing
Free and open-source. Updates regularly.
Pros and Cons
| Pros 👍 | Cons 👎 |
|---|---|
| Free and open-source | Not available for Mac |
| Regular updates | Complex interface for beginners |
| No advertisements |
How Does It Compare to Bandicam
ShareX has more customization and is free, but it may be less intuitive than Bandicam for new users.
Overall Rating: 4/5
Read our full ShareX review
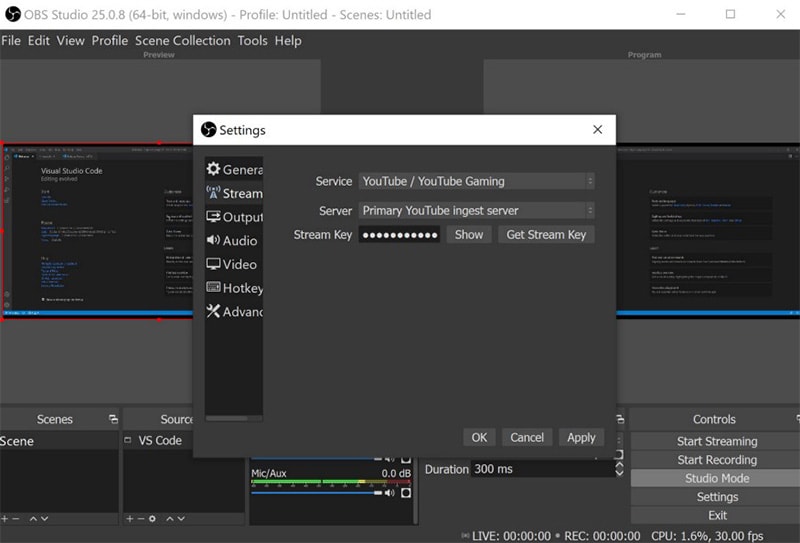
3. OBS Studio
Availability: Windows, Mac, and Linux
OBS Studio comes with powerful built-in video editing and can record videos for free. Quick editing allows users to transform their videos and publish them quickly. Users can choose to record games, webcam videos, and microphone audio in the videos. OBS supports YouTube, HitBox, and Twitch, which is ideal for those who upload on these platforms. With live streaming features, gamers can broadcast live games at their convenience.
Key Features
- Easy audio recording and mixing
- Sophisticated UI and functioning
- Multiple themes in the library
- Live capturing and mixing of videos
- High-capacity configuration option
Pricing
Free and open-source.
Pros and Cons
| Pros 👍 | Cons 👎 |
|---|---|
| Lots of features | It may be confusing for beginners |
| Great recording and streaming | Too much setup time |
| Free and open-source | |
| Available for Mac, Windows, and Linux |
How Does It Compare to Bandicam
OBS Studio is a Bandicam alternative for all platforms. It offers more streaming capabilities and customization options but has a steeper learning curve. Because it is free for all features, OBS is a choice for users on a budget.
Overall Rating: 4.6/5
Read our full OBS Studio review.
4. Loom
Availability: Windows, Mac, and Chromebook
Loom is a unique screen recording tool with a video messaging feature. Loom's instant video message feature makes it convenient to share small snippets and video feedback with others. Users can record webcam videos and desktop audio efficiently. The free started plan has a five-minute video recording feature and 25 video limit storage, proving good for newbies. Start, pause, and stop recording in one click. You may choose to record full screen or part of the video.

Features:
- Quick video-sharing feature
- Customize thumbnails
- Built-in editing and trimming tool
- Share videos with specific people with a safe sharing option
- Emojis and comments section for users to respond.
Pricing
Free starter pack for individuals; $12.50/Creator/mo (billed annually)
Pros and Cons
| Pros 👍 | Cons 👎 |
|---|---|
| Easy to use | Limited advanced editing tools |
| Quick sharing options | The free version has a video limit |
| Secure sharing |
How Does It Compare to Bandicam
Compared to Bandicam, Loom is free for quick video messaging and is easy to use, while Bandicam offers more advanced recording features.
Overall Rating: 4.2/5
Read our full Loom screen recorder review.
5. Mango Recorder (formerly TinyTake)
Availability: Windows and Mac
Mango Recorder works for both Windows and macOS. Users can screen record and add comments while recording to make the video more informative. The recorded videos and screenshots are stored in the cloud, which makes them easy to access. These videos can be shared easily via links, which also prevents videos from adding to the device storage. It's a good alternative to Bandicam for business use.

Key Features
- 120 minutes screen-recording
- Annotation options for previously recorded images and videos
- Custom shortcuts for users
- Cloud storage and sharing via link
Pricing
Free with fast all recording features except for storing, sharing, and embedding media in the cloud. The premium plan starts at $99/per month.
Pros and Cons
| Pros 👍 | Cons 👎 |
|---|---|
| Cloud storage | 120-minute recording limit |
| Completely free recording features | Limited advanced features |
| Easy to use | Premium plan expensive |
| Annotation tools |
How Does It Compare to Bandicam
Mango Recorder offers cloud storage and easy sharing options, making it ideal for businesses and team collaboration. However, its price is significantly higher than that of Bandicam. If you're searching for a screen recorder for personal use, Bandicam is a more suitable option.
Overall Rating: 4.0/5
Read our full Mango Recorder review.
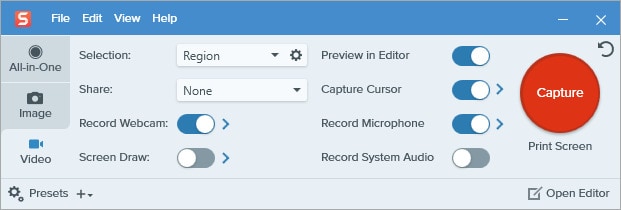
6. Snagit
Availability: Windows and Mac
Snagit is a professional video recorder with advanced video quality. Apart from screen and audio recording, Snagit has panoramic features to capture long web pages and screens. Moreover, it has features such as trimming clips and smart move stamps. Users can scroll down to the point they wish to screenshot and capture an image containing all the information with one click. Snagit is a popular choice for memes and GIF makers.
Key Features
- Panoramic screenshots
- Meme and GIF creation
- Arrows and stamps for video editing
- Optical character Recognition technology
- Intuitive interface
Pricing
Free trial with watermark; individual plan $39.0.year.
Pros and Cons
| Pros 👍 | Cons 👎 |
|---|---|
| Editing tools | Pricey |
| High-quality output and panoramic recording | |
| Easy to use |
How Does It Compare to Bandicam
Snagit excels in editing capabilities and OCR, while Bandicam offers more comprehensive recording features.
Overall Rating: 4.2/5
Read our full Snagit review
7. ScreenPal (formerly Screen-o-Matic)
Availability: Windows and Mac
ScreenPal is among the popular screen recording programs that work both on Windows and Mac. A simple, intuitive interface can be great for individuals just starting out to screen record content. An advanced feature includes adding narration to the screen recording so you don't need to edit it later in the video. Moreover, there's an option to import images, music, and text from external sources to enhance videos.

Key Features
- Record screen and capture images in one window.
- Annotate the edited images using the software.
- Copy and use text from screen captures.
- Share videos directly to YouTube and Facebook.
- Built-in image editor.
Pricing
The basic free version; the Pro plan starts at $36/year.
Pros and Cons
| Pros 👍 | Cons 👎 |
|---|---|
| User-friendly interface | Advanced features require a subscription |
| Cheap premium plans | |
| Share directly |
How Does It Compare to Bandicam
ScreenPal is more accessible for beginners and has cheaper premium plans but more advanced recording options.
Overall Rating: 4.3/5
Read our full ScreenPal review
8. ActivePresenter
Availability: Windows and Mac
ActivePresenter is a free authoring tool for eLearning design that can record high-definition videos without any watermark. It allows users to edit, change video layouts, and annotate videos. Users can also add videos, graphics, and callouts to make the screen recordings more impactful.
With this Bandicam alternative for Mac and PC, users can send videos directly to others or upload them to video-sharing platforms. Moreover, there's an option to convert the files to AVI, WMV, WebM, and MP4.

Key Features
- It comes with a lifetime license
- No watermark on the videos
- High-definition videos, even in the free version
- Different video formats
- Templates for editing and video layout
- Multilingual
- Built-in audio/video editor
Pricing
Free for personal and non-commercial use; professional version starts at $199/one-time fee.
Pros and Cons
User Reviews: Users like the features, and there are no watermarks, but they need help to learn.
| Pros 👍 | Cons 👎 |
|---|---|
| No watermark in the free version | Beginners may need more time to learn |
| Many export options | |
| Professional tools |
How Does It Compare to Bandicam
ActivePresenter has more features for e-learning and editing, while programs like Bandicam are easier to use for basic recording.
Overall Rating: 4.4/5
Read our full ActivePresenter review.
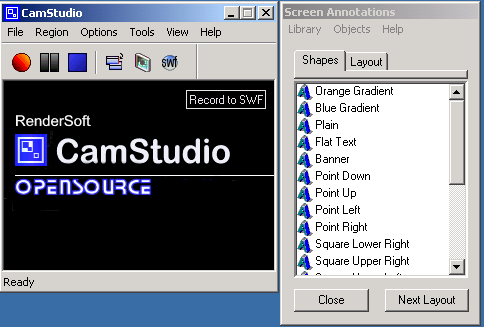
9. CamStudio
Availability: Windows
CamStudio is a highly functional software for recording screens. Many use it to create product demos, software tutorials, and educational videos. A single click allows the users to record, stop, and pause the video. The simple interface ensures it's easy for beginners to record AVI/SWF videos. The annotation feature allows easy video improvisation. Besides, users can edit videos for time stamps, watermarks, time-lapse, and add captions. CamStudio software is lightweight, so it can work even on low-performing PCs.
Key Features
- Convert video to flash files (SWFs)
- Simple interface for recording and editing
- Built-in lossless codec for HD videos in small size
- Video and audio synchronization
Pricing
Free and open-source.
Pros and Cons
| Pros 👍 | Cons 👎 |
|---|---|
| Free and open-source | Occasional performance issues |
| Basic editing features | Outdated UI |
| Annotation and cursor effects | Potential malware concerns (There have been reports of some versions of CamStudio bundling with unwanted software or malware.) |
| Customizable video quality and file size |
How Does It Compare to Bandicam
CamStudio focuses on basic screen recording with limited editing capabilities, such as adding captions and customizable cursor effects, while Bandicam allows users to capture their computer screen, gameplay, and even external devices like webcams or gaming consoles. Bandicam also offers real-time drawing, customizable hotkeys, and various video codec options. Besides, Bandicam has a more modern and user-friendly interface than CamStudio.
Overall Rating: 3.9/5.0
Read our full Camstudio review
Conclusion
Severallike Bandicam are available, each offeare ring their unique set of ares to cater to different user needs. People search for Bandicam alternatives for various reasons, such as seeking more affordable options, needing additional features, or compatibility with being compatible dating systems. By exploring these top 10 alternatives, you can find the perfect screen recording tool that meets your requirements.
Wondershare Filmora offers effortless video recording and AI video editing features. It works both on Mac and Windows. If you're looking for free options, ShareX and CamStudio are great for Windows and OBS Studio for all platforms. Consider your recording needs and video editing features before opting for software. Try a few first before purchasing a plan.
