


 100% Security Verified | No Subscription Required | No Malware


 ChatGPT
 Perplexity
 Gemini
 Claude
 Grok
Grok
When editing videos, it is not recommended to render the raw clips without enhancing them. You really have to check the color register of each footage very well and make some necessary adjustments. This modification process is called color grading. It’s a post-production procedure that aims to improve the color and general appearance of the video output. Is it difficult to facilitate? At present, we can confidently say that it’s not. You just need to choose a video editing software that allows you to perform such color modification procedures with ease and convenience.
One of the best video editing software you can use for color grading is Sony Vegas Pro. It offers a well-equipped color grading panel that lets you correct and refine the color tones of your videos. To a certain degree, we can claim that Sony Vegas Pro color grading is much more advanced compared to others. Therefore, you should study this feature thoroughly, especially if you’re a beginner. Explore its main functions and try to find out how to do color grading on Sony Vegas efficiently.
In this article, we’ll delve into the main elements that make up the Vegas Pro color grading and color correction. We will also provide a short guide on how to use this feature quickly and easily. Lastly, we will suggest an alternative in case you want to search for other options. Continue reading below to learn more.
In this article
The Important Elements of Sony Vegas Pro Color Grading
As mentioned earlier, color grading is a video editing procedure that aims to give your output a better look. It is directly associated with various techniques that deal with the modification of tone color on your video clips. At a glance, color grading seems very simple. Well, it’s fairly true. Sony Vegas Pro color grading is not that hard to perform. However, it’s important to point out that some video coloring elements must be considered in order to optimize the results. Do you want to know what specifically those are? If so, check out the list provided below and learn more about color grading on Sony Vegas Pro.
Color Curves

In essence, color curves are the specific tool for brightness and tonality adjustments. It is literally represented by a graph with several curves assigned to a particular color. By moving these curves around the diagram, you can precisely modify the level of brightness and tone of your videos. Is it difficult to navigate? Well, it’s really not if you’re familiar with color correction on Sony Vegas. But don’t worry. The basics of Sony Vegas Pro color correction are actually not that hard to understand. Once you get a comprehensible idea about this function, you’ll find it easy to do color grading on Vegas Pro. Just wrap your head around the individual role of color curves in the graph to get started in this regard.
Saturation
In a nutshell, saturation refers to the fullness or depth of colors in the video clips. As the saturation level goes higher, the clips appear to look more vibrant. On the one hand, the footage seems paler if saturation is set lower. Sure. It’s much easier to configure compared to color curves. But hold on. At some point, you still need to keep everything in the right proportion. Otherwise, the clips may not look as good as you expect if saturation goes too high or too low. As for Sony Vegas Pro color grading and correction, it’s recommended to set it in the middle. Just enough to bring out the natural colors of your footage.
White Balance

As the name suggest, white balance pertains to the use of white color in your video. You can calibrate its intensity in order to raise or reduce the video temperature. If you wish to register warmer colors in your video, you may set the white balance high. On the contrary, set it lower to make your video look cooler. White balance plays a crucial role in Sony Vegas Pro color grading. That’s why you should study this element very well. Keep in mind that indoor and outdoor lighting must be considered whenever you adjust the white balance. Make sure that your adjustments correspond very well with how the white light is distributed in your video clips.
Color Wheel
As for Vegas Pro color grading, there is a set of color wheels dedicated to this particular function. You can use it to alter the hue, shade, and tint of your videos according to your liking. Each wheel is assigned to certain groups of colors. All you have to do is adjust it until you get your desired color scheme for your video project. Once you find the right color wheel configuration, don’t forget to apply it to all the clips in your timeline. Don’t worry. You don’t have to do the process again and again for each footage. Color grading on Sony Vegas is much easier than that. You can simply export it as a custom LUT and apply the effect to the next clips or other projects.
Custom LUT

Simply put, LUTs or Lookup Tables are ready-made color grading filters. You can use them to apply the same effect from one clip or project to another. Yes. Color grading on Sony Vegas Pro supports this kind of function. If you want to make your videos look consistent in this aspect, you can definitely use custom LUT. As mentioned earlier, you just need to export the LUT and apply it to your projects. It’s just as simple as that.
How to Use Sony Vegas Pro For Color Grading?
In actuality, there are no definite steps for Sony Vegas Pro color grading. It totally depends on your preferred style and technique. You can adjust the color wheel, white balance, and other elements according to your liking. However, there is a universal guide you can follow to get started and make your way. Do you want to try it now? Check out the quick tutorial provided below on how to do color grading on Sony Vegas Pro.
Step 1: Download and install the Sony Vegas Pro software on your computer. After that, launch it and wait until the dashboard fully loads up.
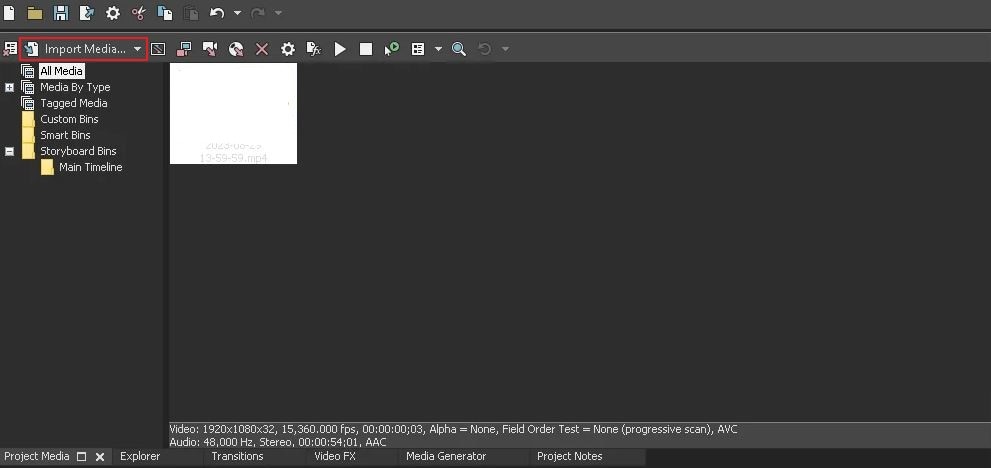
Step 2: The first thing you need to do is upload the media files you need for your video project. To do that, simply click Import Media and select the assets you’re going to use.
Step 3: From the media panel, grab and drag the clip to the timeline section. Do it one by one for multiple clips if you want to arrange them accordingly.
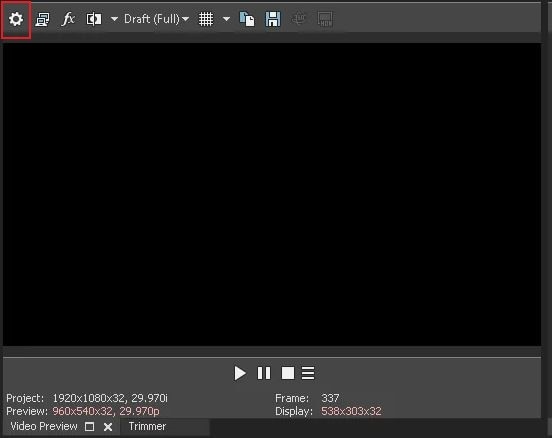
Step 4: If your raw clips are HDR, don’t forget to set the property settings appropriately. Simply navigate to the preview panel and tap the Gear icon at the top-left corner.
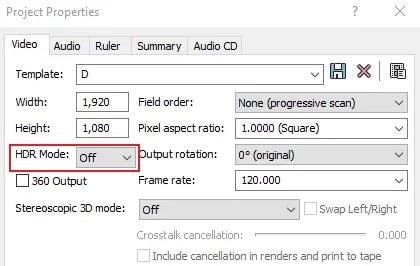
Step 5: The property settings will immediately pop up on your computer screen. From there, find HDR Mode under the Video tab. Click on the drop-down menu next to it and then select HDR10 or HLG.
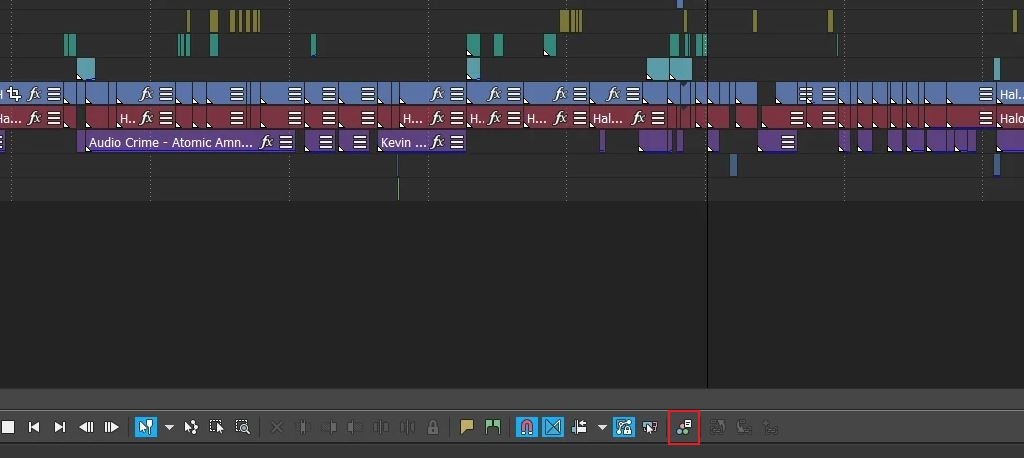
Step 6: Once done, it’s about time to start the actual color grading process. Now, go to the timeline and then select the clip you want to use for color grading. As previously mentioned, you just need one clip to start the process. Afterward, you can simply apply it to others by means of custom LUT.
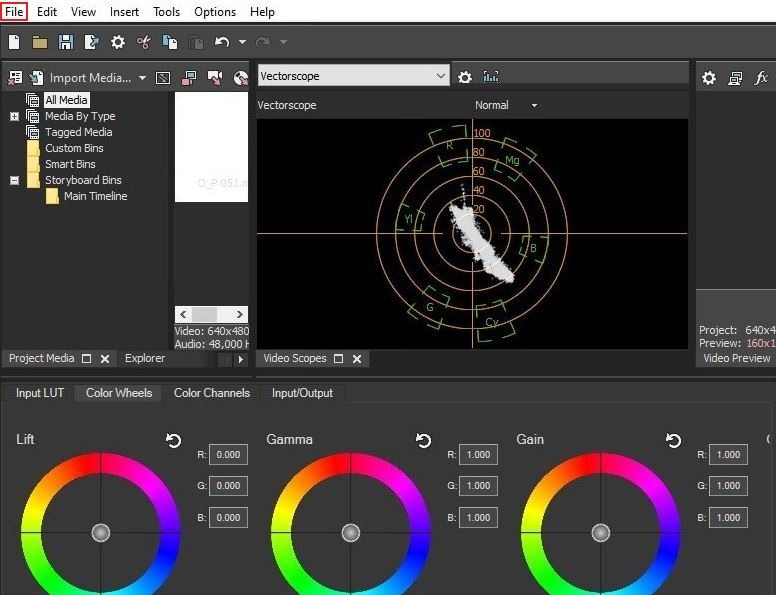
Step 7: Bring out the Sony Vegas Pro color grading panel. Simply click the Color Grading on the control menu below the timeline. Immediately, the panel will be displayed on your computer screen. It is composed of various tabs containing specific options for Vegas Pro color grading and correction. Among them are Input LUT, Color Wheels, RL Color Wheels, and Utilities. A separate panel for Color Curves tabs is displayed on the right-side corner of the screen. To do color grading on Sony Vegas Pro, you just need to make use of the tools provided. Touch the lift wheel on the color wheel to configure the settings based on your preferences. As for the color curves, do the same thing using the curves on the graph. If you have LUT available, simply go to the Input LUT tab and import it there to apply the custom-tailored changes.
Step 8: After calibrating the color grading panel, play the video and watch it properly. Check the color consistency in each clip. If you’re satisfied with the result, you can now render the output and save it to your computer. Don’t worry. It’s a piece of cake. Simply navigate to the top menu bar and then tap File. After that, click Render As. Choose your desired format, template, and location. Finally, click Render to proceed.
Step 9: Once completed, a pop-up window will appear on your computer screen. From there, click Open Folder or Open to locate and play the video file. Review the output very carefully. If you need more improvements, just repeat the same process for Vegas Pro color grading. Don’t worry. You’re allowed to do it until you get promising results.
Wondershare Filmora: The Best Alternative to Sony Vegas Pro Color Grading Tool
There is no denying that Sony Vegas Pro color grading features are one of the best out there. It is equipped with tons of color modification tools that can help you achieve your desired effect in a snap. However, we cannot deny that color grading on Vegas Pro is not for everyone. Some people prefer to explore other options available that might be more convenient and accessible. Are you one of them? That’s fine. If you’re also looking for suitable Sony Vegas Pro color grading alternatives, there is one video editing software you can try. Wondershare Filmora can absolutely help you a lot in this regard. Do you want to know more about this specific tool? If so, check out the discussions below.
![]()
Key Features
Similar to Sony Vegas Pro color grading features, Wondershare Filmora also provides lots of tools for this procedure. Learn about them and try to take advantage of their wonderful benefits. Read the list below.
- The color grading panel of Wondershare Filmora is very easy to navigate. Most of the tools can be easily adjusted by simply dragging the sliders from left to right or vice versa. Don’t worry. Despite the ease of use, you can still be sure that it does a great job in this regard. You just need to configure the settings properly in order to obtain good results.
- Wondershare Filmora gives users a variety of options to enhance the color registers of video clips. Among them are contrast, saturation, brightness, and tint. You can experiment with these tools and make necessary adjustments until you get your desired outcome. On the one hand, Wondershare Filmora offers numerous selections for 3D LUT. You can apply them to your video projects in case you don’t want to work from scratch.
- Similar to Vegas Pro color correction features, Wondershare Filmora also has tons of advanced and professional tools for it. Among them are color histogram, white balance, vignette, color and light, 3D LUT, and HSL. You can use them all to bring out the best color in your video clips. Just make sure that everything is set in the right proportion to avoid potential complications. Do not set them too high or too low. Just the right amount for each channel.
- Apart from color grading and color correction tools, Wondershare Filmora has a lot more to offer. It is actually a completely packed video editing software that can help you with basic and professional content creation procedures. You can complete the video editing process there and render your output in the highest quality available. No need to use another app to perform certain steps. For sure, Wondershare Filmora can efficiently handle all your creative needs.
Step-By-Step Guide
Let’s say you finally want to try Wondershare Filmora as a substitute to Sony Vegas Pro color grading. Then so, it’s to explore the platform and begin the process. Don’t worry. It’s very easy to do color grading on Wondershare Filmora. To help you get started, check out the tutorial below. Read the instructions and follow them accordingly.
Step 1: Download Wondershare Filmora from its official website. Right after, install it on your computer.
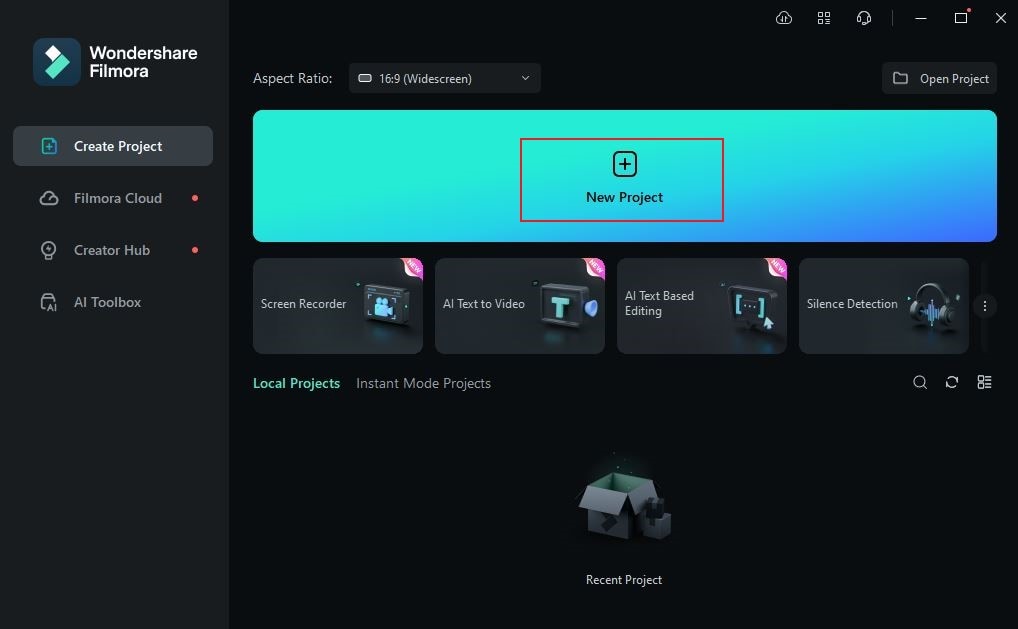
Step 2: Run the newly installed video editing software on your desktop afterward. Once it fully loads up, navigate to the main dashboard. Click New Project to start editing. Alternatively, open an existing session under the Recent Projects section if there are any.
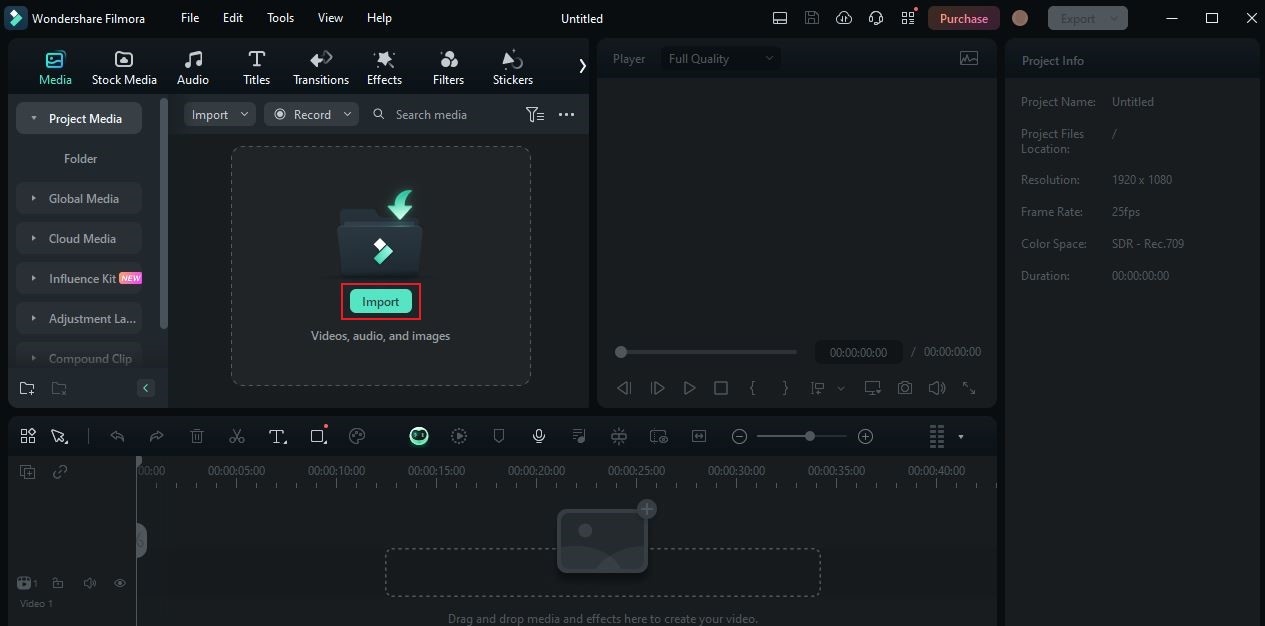
Step 3: Click Import on the Elements Panel and then select the video clips you want to use on this project. Wait until the files are uploaded to the platform.
Step 4: Once done, grab and drag the assets to the Editor Timeline. Similar to the Sony Vegas Pro color grading tutorial above, drag the files individually to arrange them in proper order.
Step 5: Click on a video clip in the Editor Timeline to bring out the video settings. It will then be displayed on the right corner of your screen. From there, tap on the Color tab.
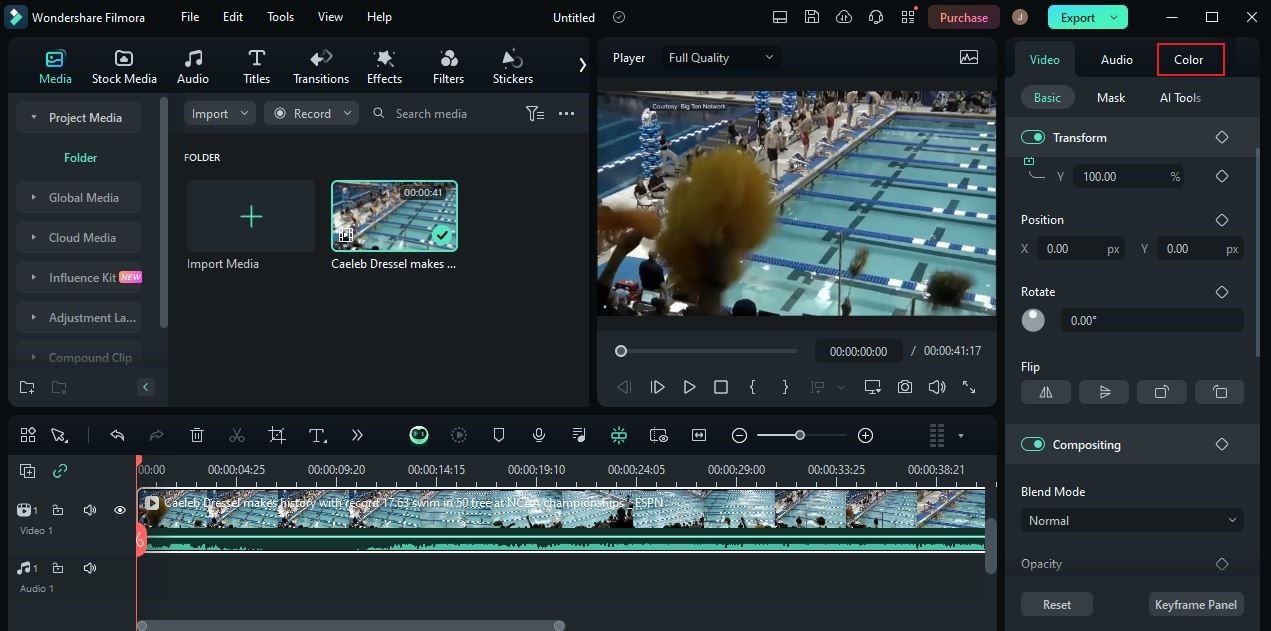
Step 6: Select the Basic tab afterward to access the available color settings. From there, you can manually do color grading and correction for your video clip. Just toggle on the radio button next to Color, Light, Sharpness, and Vignette to enable your desired effect. Each of them has a specific group of settings you can use in this regard. Make the adjustments you need until you get a promising result. Aside from basic color settings, you can also access other tabs for more options. Among them are HSL, Curves, and Color Wheels. Yes. They are almost the same as the Vegas Pro color grading and correction controls.

Step 7: Once completed, go to the Preview Panel and play the video. Watch it once or twice and check each part of the output. If you’re satisfied with the result, you can now render and export the video. Simply click Export and then configure the necessary settings based on your preference.
Conclusion
It’s true to say that color grading and color correction are essential in the video editing process. In essence, they make your outputs more visually and functionally effective. That’s why you should not disregard it whenever you edit videos on your end. For starters, you can use Sony Vegas Pro color grading features. It is capable of assisting you well in this regard. One the one hand, try Wondershare Filmora if you wish to explore other potential options. It is well-equipped and very easy to use. All you have to do, for the most part, is simply adjust a slider to your desired level.
