

 TL;DR:
Alight Motion handles masking entirely through layer grouping, requiring the mask layer to sit directly above the base footage for standard transparency effects, or directly below the content layer for clipping masks.
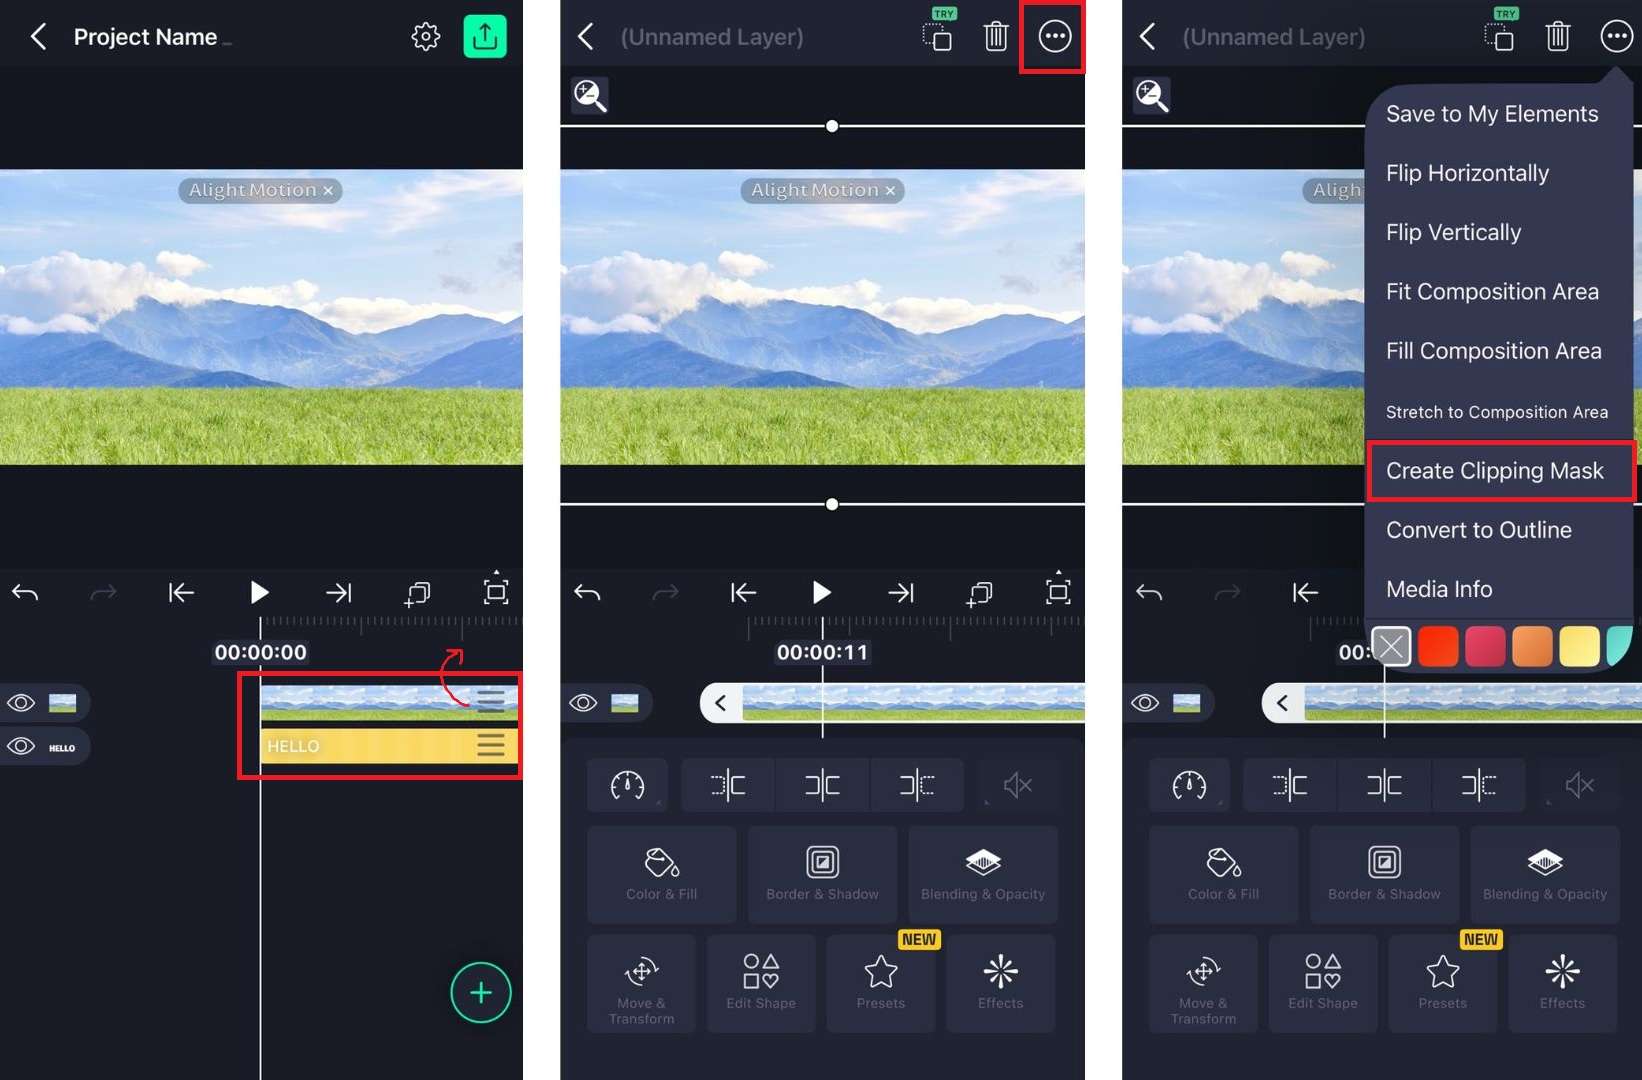
● To apply a standard mask, you must highlight both layers simultaneously before tapping the Masking Group icon, whereas clipping masks only require selecting the top content layer and choosing the Create Clipping Mask option.
● You can animate mask positions and properties over time using keyframes, or utilize text layers as clipping boundaries to create typography filled with moving video footage.
● Alight Motion is best for quick mobile edits requiring simple geometric boundaries, while Wondershare Filmora is recommended for desktop users who need precise anchor point control and AI auto-tracing for irregular subjects.
Ask AI for a summary
 ChatGPT
 Perplexity
 Gemini
 Claude
 Grok
Grok
Masking in Alight Motion is built entirely into its layers, but the interface isn't always intuitive the first time around. Small missteps, like masking the wrong layer or forgetting to group it, can leave you stuck with a shape that just won't move.
If you're just learning about Alight Motion, this tutorial will walk through exactly how masking in Alight Motion works, the different mask types available, and a step-by-step process you can follow on your first try.
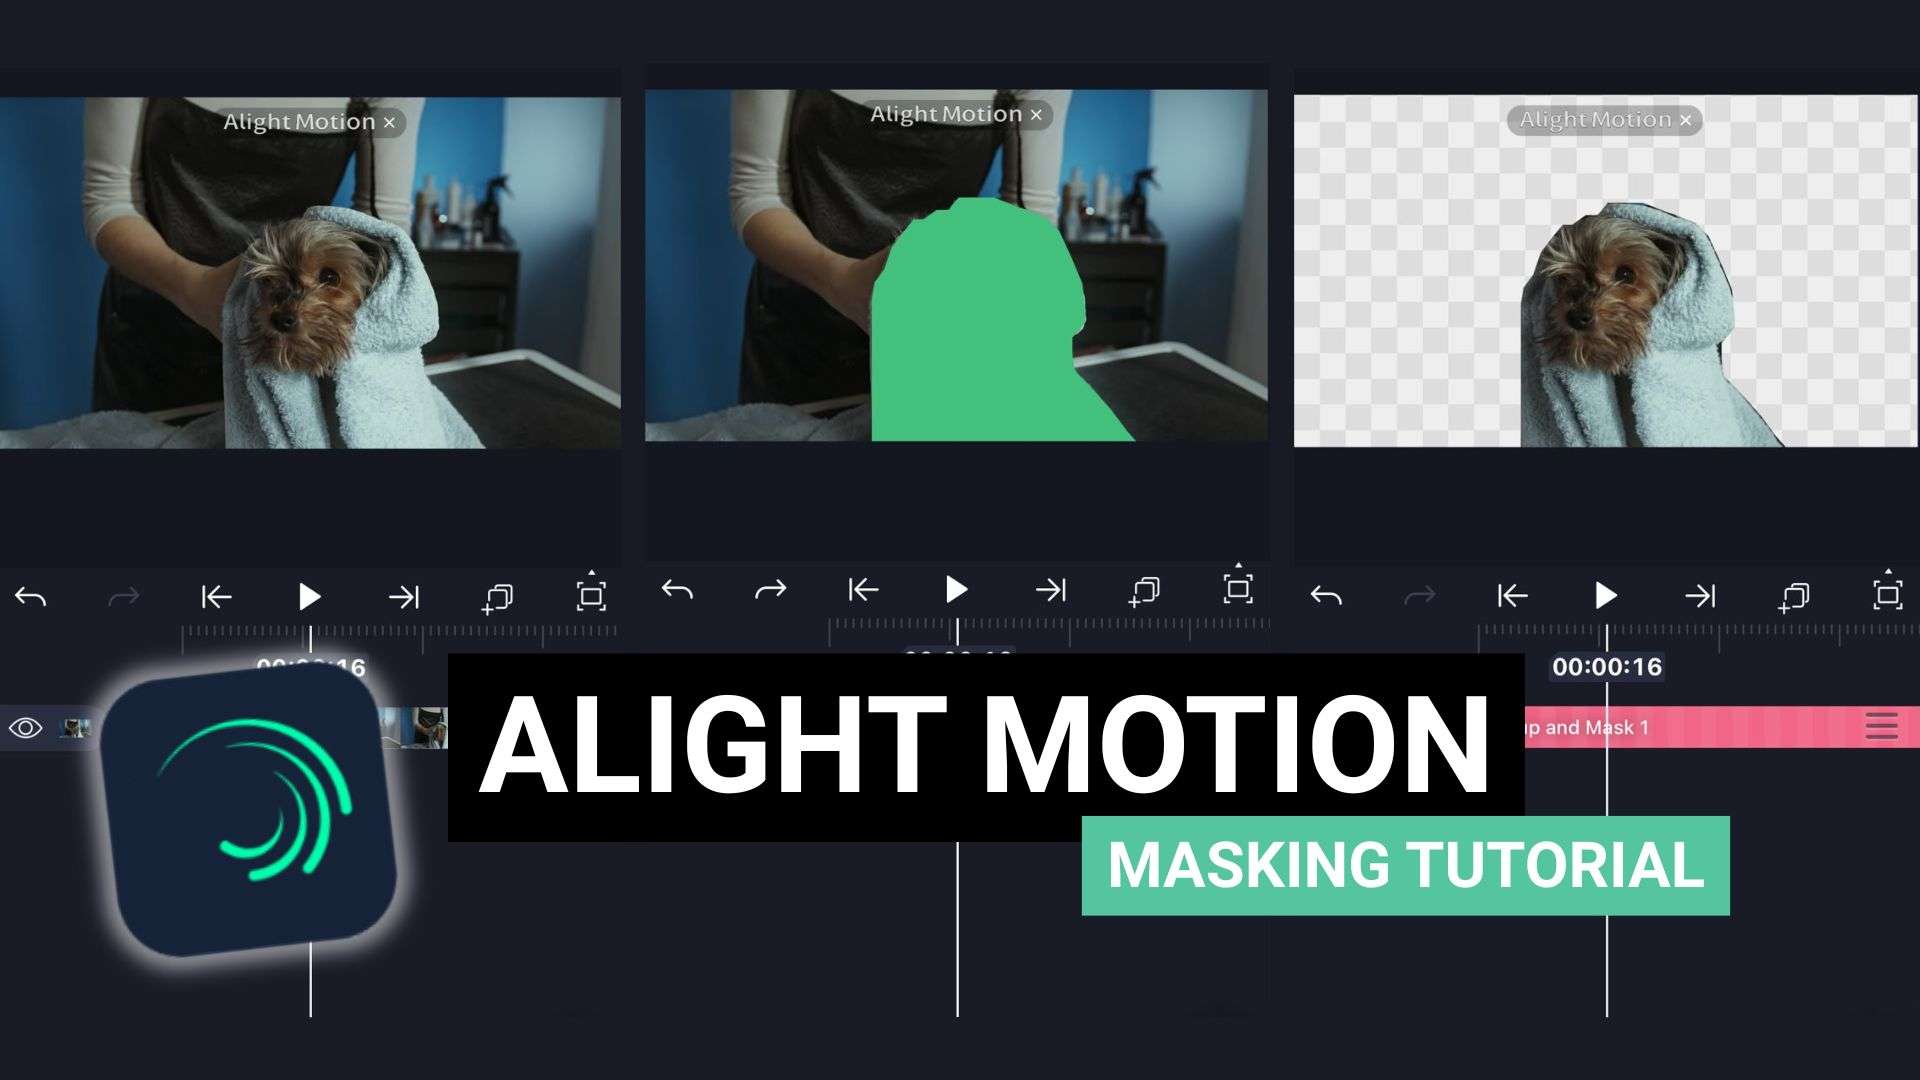
Part 1. What Is Masking in Alight Motion?
Masking is a video editing technique used in many video editors, and Alight Motion is no exception. Editors have used it for years to control which part of a layer shows on screen.
What Masking Does
At its core, masking means using one layer to control what part of another layer is visible. You draw a shape or boundary around the part you want seen, and everything outside it gets hidden.
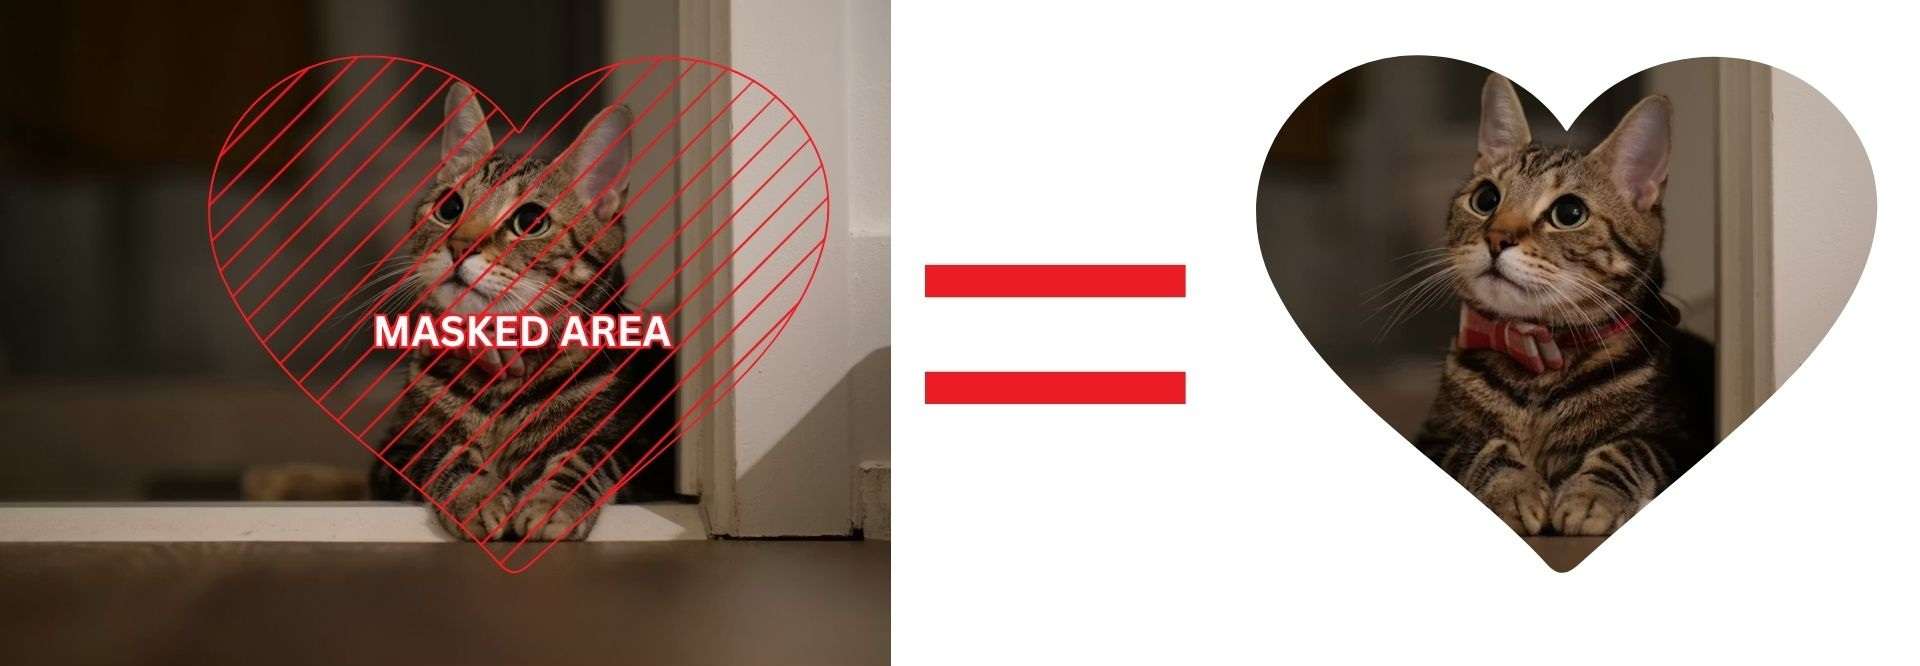
Alight Motion actually gives you two ways to do this: a standard mask and a clipping mask. They look similar on the surface since both hide and reveal parts of a layer, but they work differently and are built for different jobs.
Mask vs Clipping Mask in Alight Motion
The biggest difference between a standard mask and a clipping mask is how they control visibility. A standard Alight Motion mask uses a dedicated mask layer and supports different masking modes. A clipping mask, on the other hand, uses one regular layer to define the visible area of another.
| Regular Mask | Clipping Mask | |
| How It Works | Uses a mask layer to control transparency. | Uses another layer's shape to crop the content. |
| Best for | Reveal animations and fade effects. | Filling text or shapes with images or videos. |
Part 2. How to Use Standard Mask in Alight Motion
Alight Motion is a mobile app that works the same core way whether you're on Android or iOS. So, for the Alight Motion masking tutorial we are about to walk through, the steps across versions shouldn't differ much. Menu labels might shift slightly between updates, but the overall process stays the same.
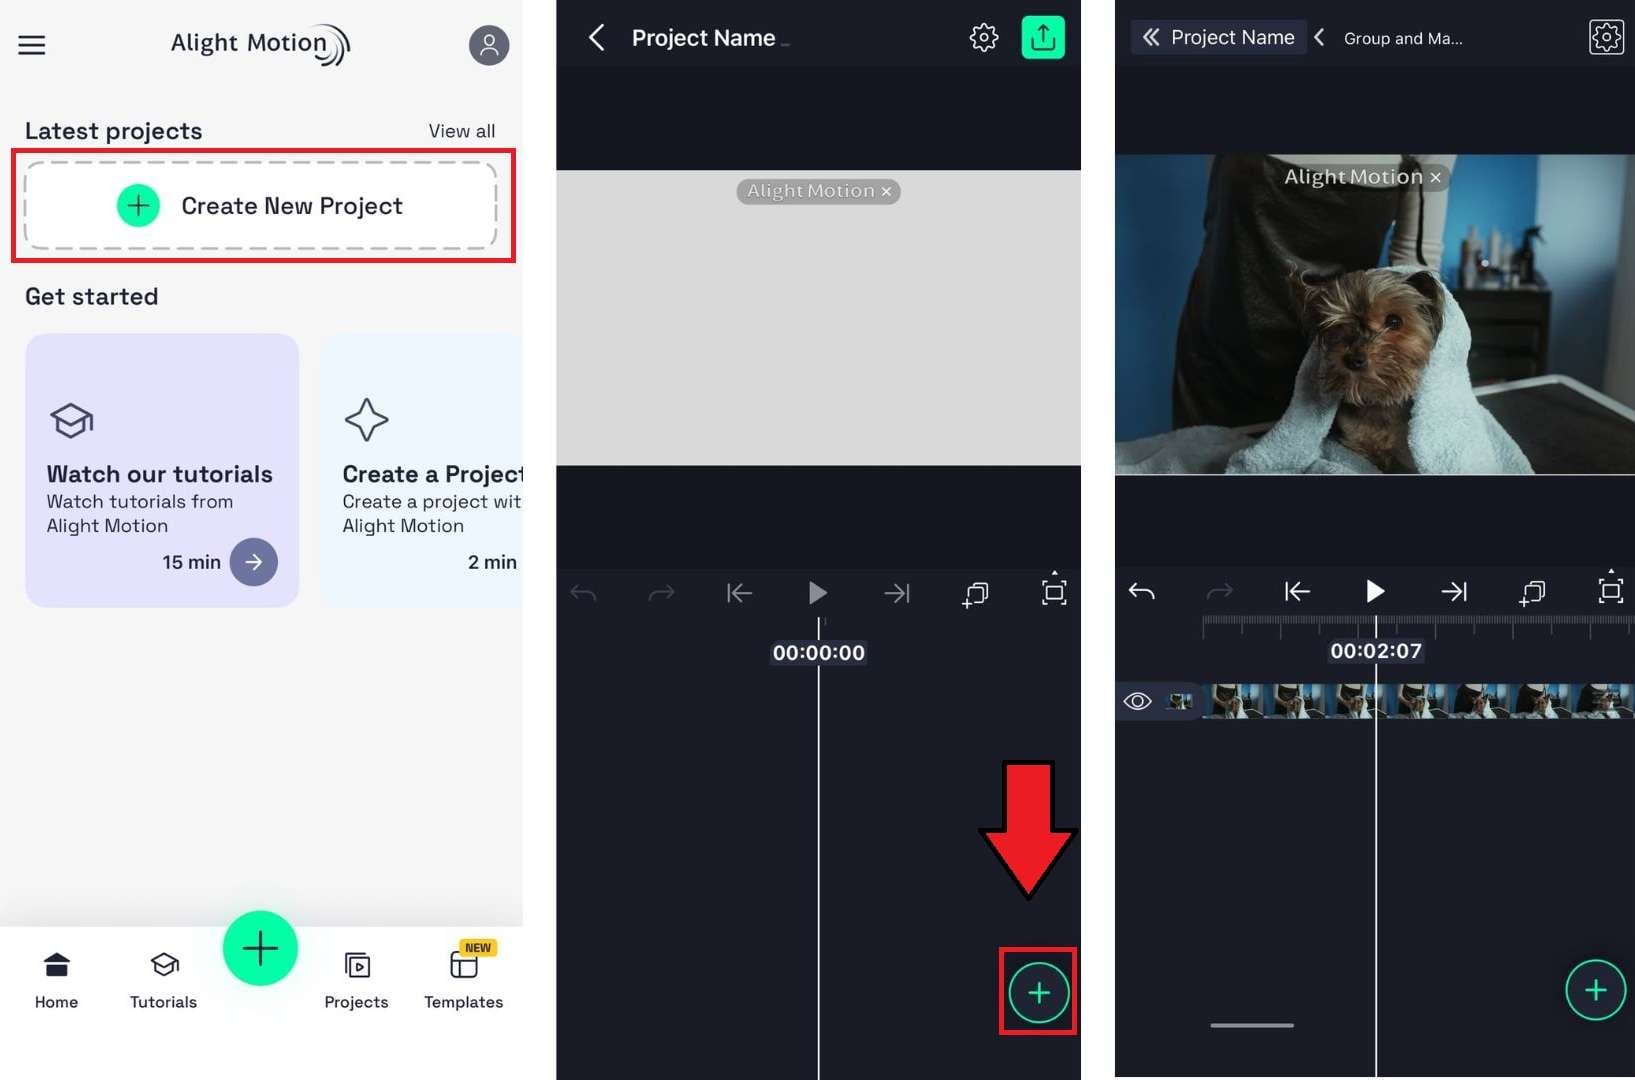
Follow the steps below on how to mask in Alight Motion in your own project.
Step-by-Step: How to Use Standard Mask in Alight Motion
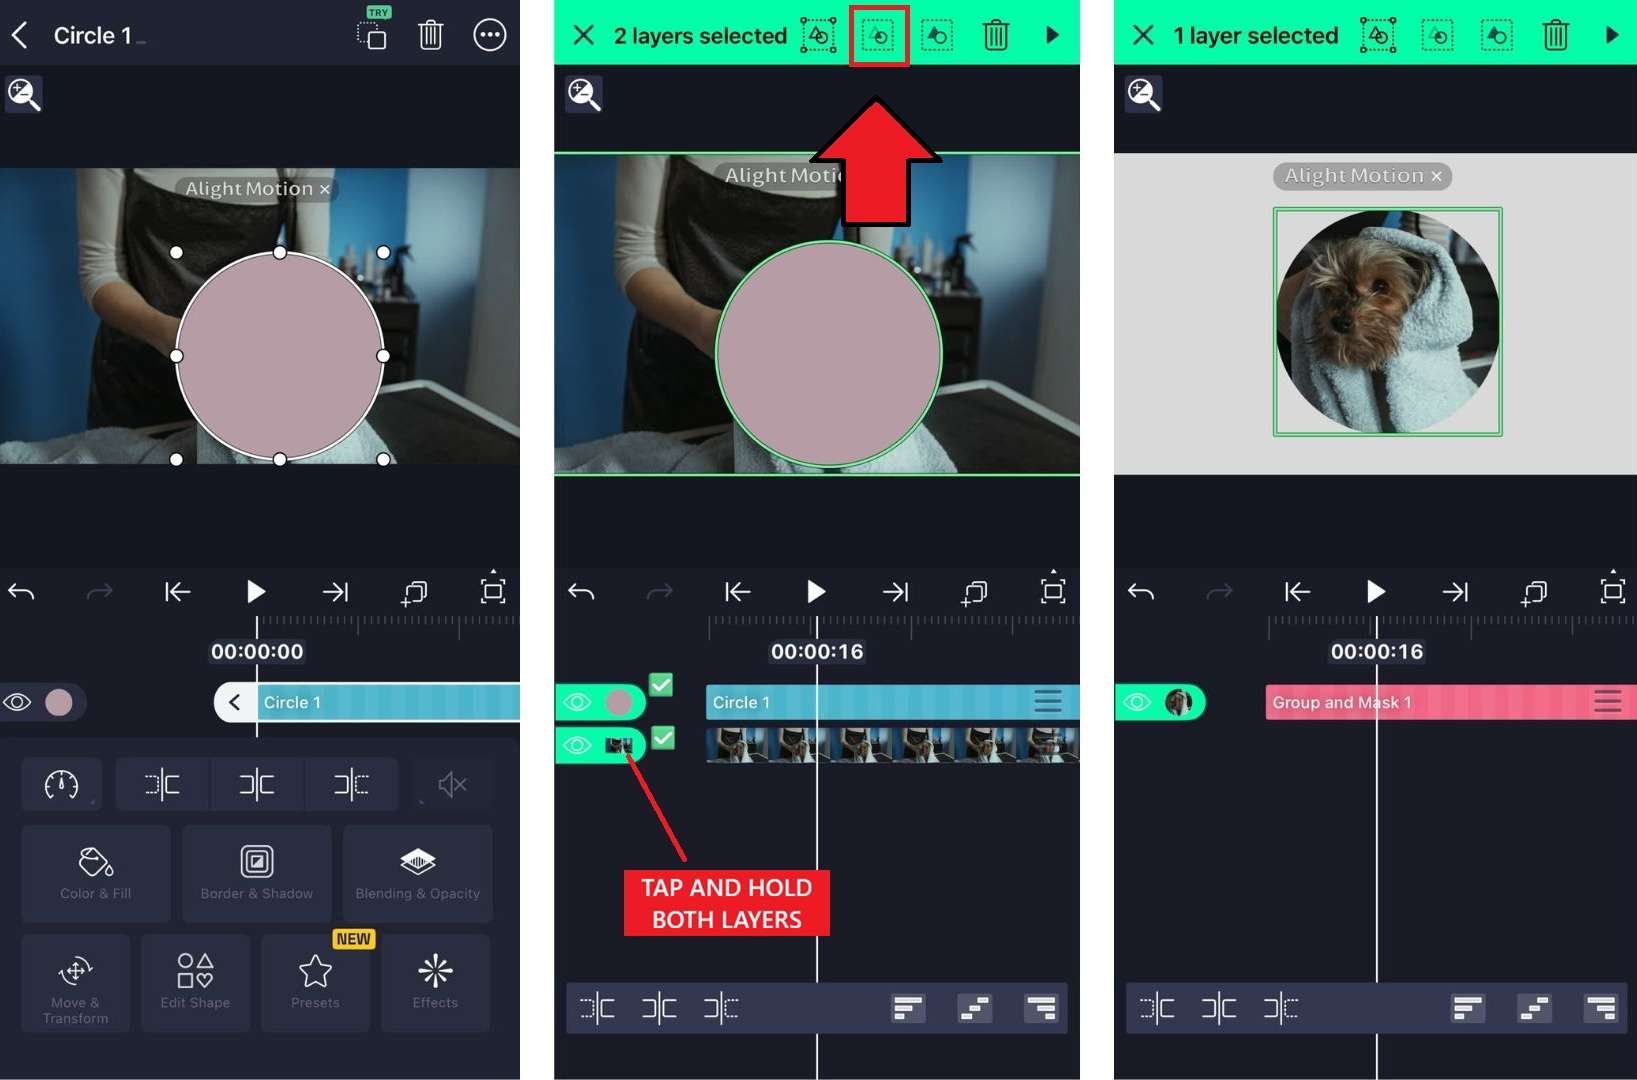
If you want to create a smoother transition around the masked area, apply a Feather effect to the mask and adjust the feather amount. A higher feather value softens the edges, while a lower value keeps the edges well-defined.
Best Uses for Standard Mask in Alight Motion
- Spotlight or vignette effects that draw focus to one part of the frame
- Soft transitions between two clips
- Gradual reveals of text or graphics
- Object tracking, where the mask follows a moving subject through the shot
- Blending two pieces of footage together at the edges instead of a hard cut
You May Also Like
Part 3. How to Use Clipping Mask in Alight Motion
The next Alight Motion masking tutorial we are going to cover is the clipping mask. Since it uses the shape of one layer as a hard boundary for another, you will need to get the layer order right before switching it on. This is how you do it.
Step-by-Step: How to Use Clipping Mask in Alight Motion
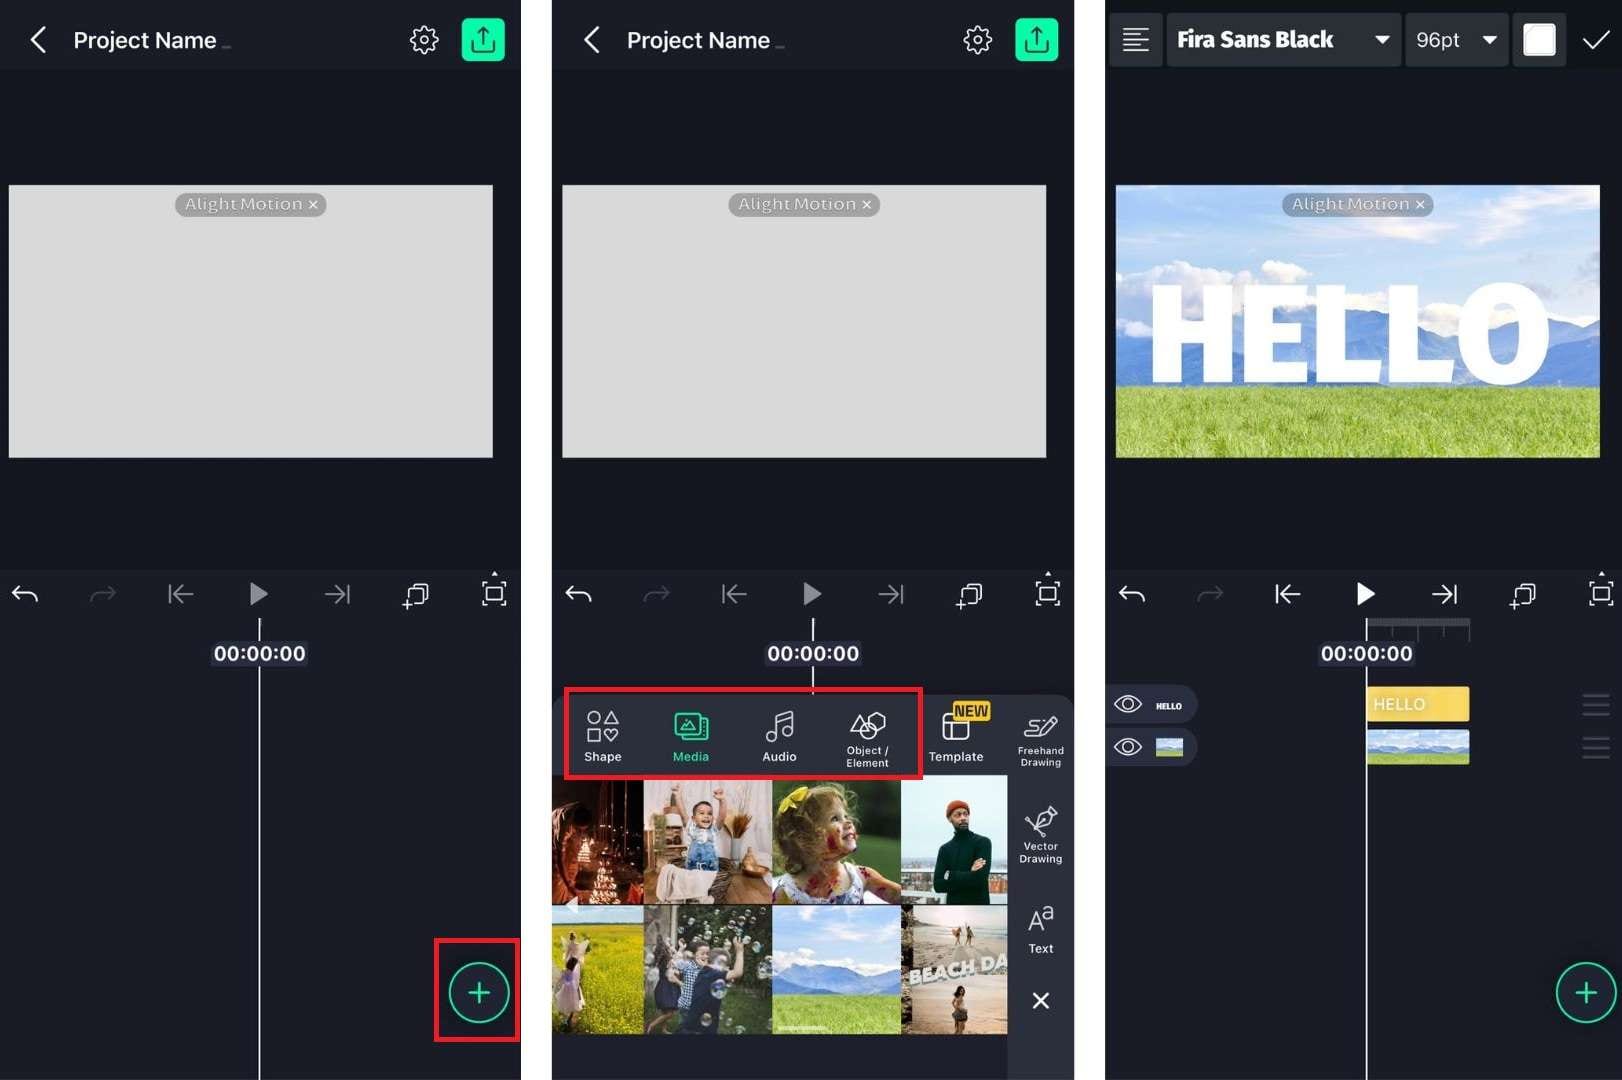
- Top layer = the content that gets clipped.
- Bottom layer = the shape or text that defines the visible area.
Best Uses for Clipping Mask in Alight Motion
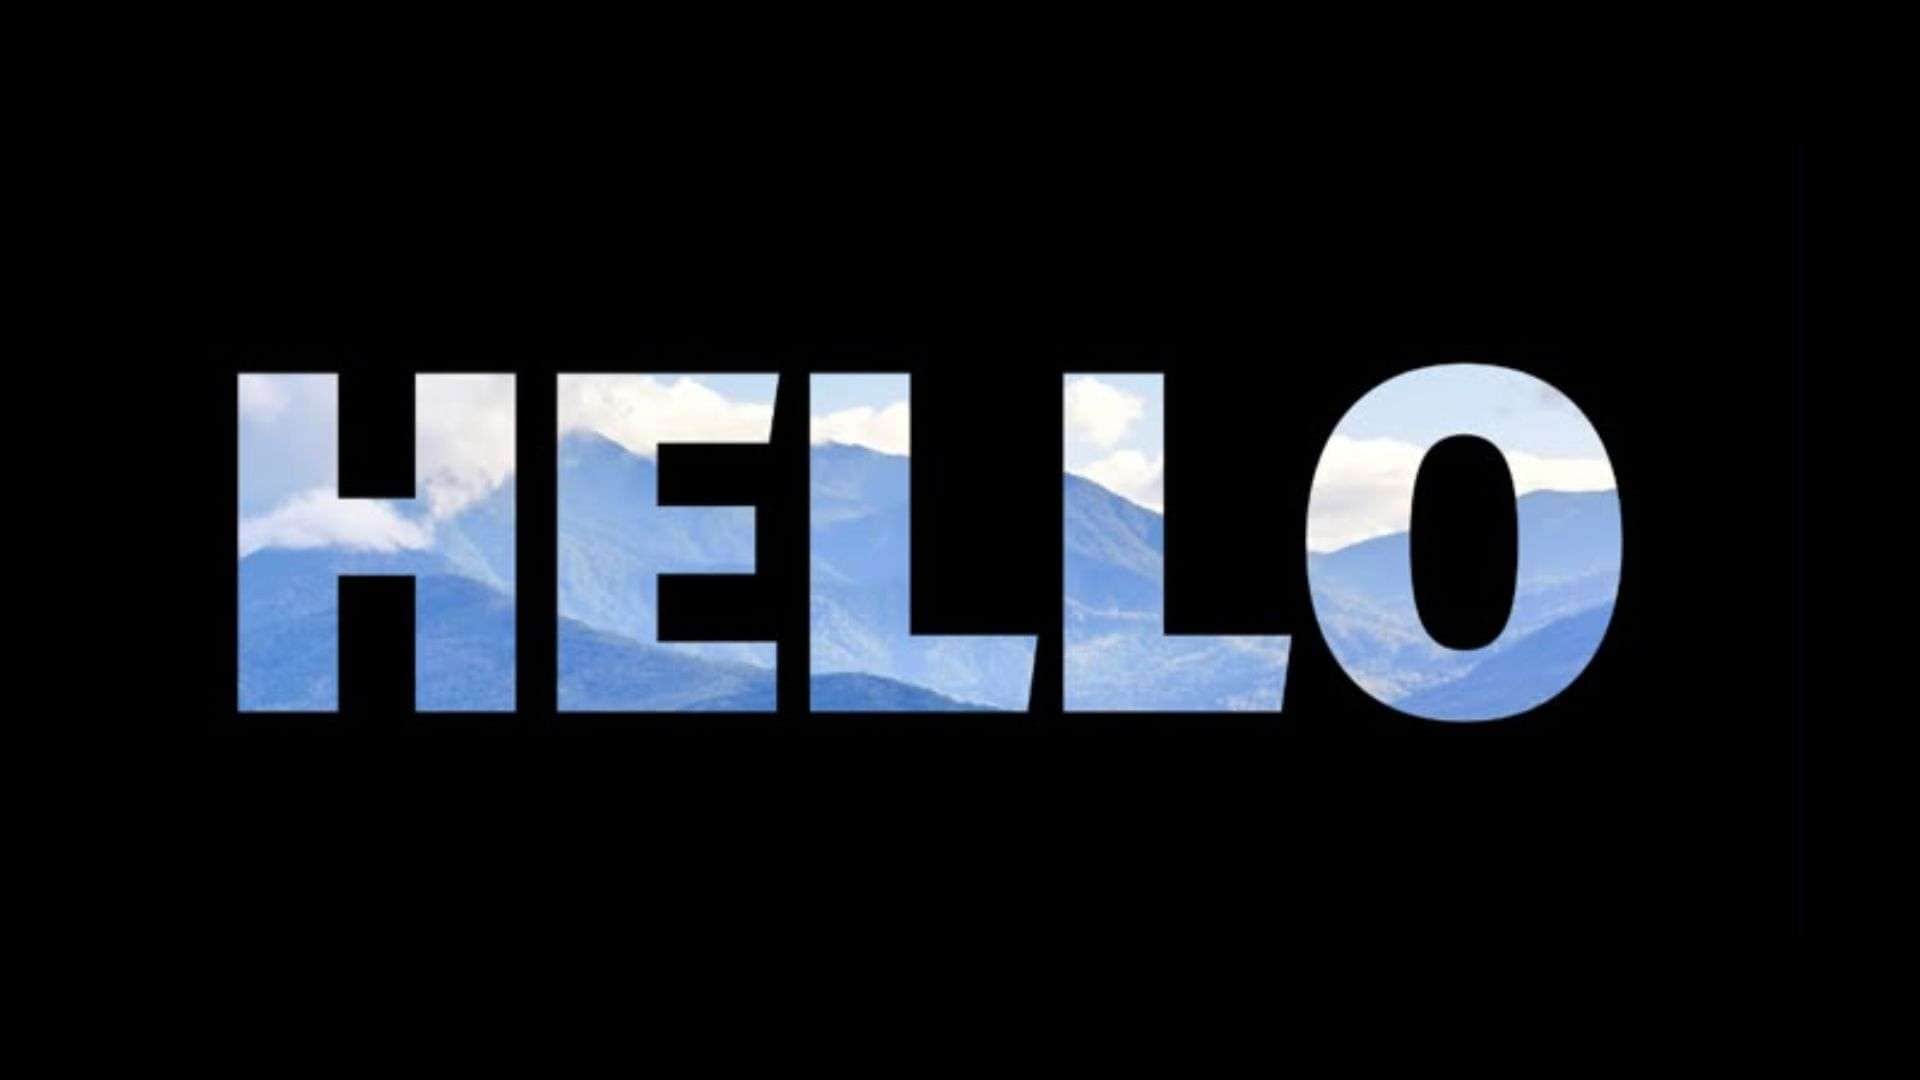
- Text filled with video or moving footage
- Photo or video collages where each clip needs to stay inside its own shape
- Logo or title reveals with a clean, defined edge
- Layering effects only within specific shapes, like applying a color grade inside a logo outline
- Any effect where a sharp, geometric boundary looks better than a soft blend
Part 4. Looking for Easier Masking? Try Filmora Instead
Masking is not always simple, especially if you're editing on a small phone screen and need precise control over every anchor point. If how Alight Motion handles masking feels limiting, or you're still struggling to get good results after some practice, try a desktop editor like Wondershare Filmora instead.

 Secure Download
Why Many Editors Prefer Filmora for Masking
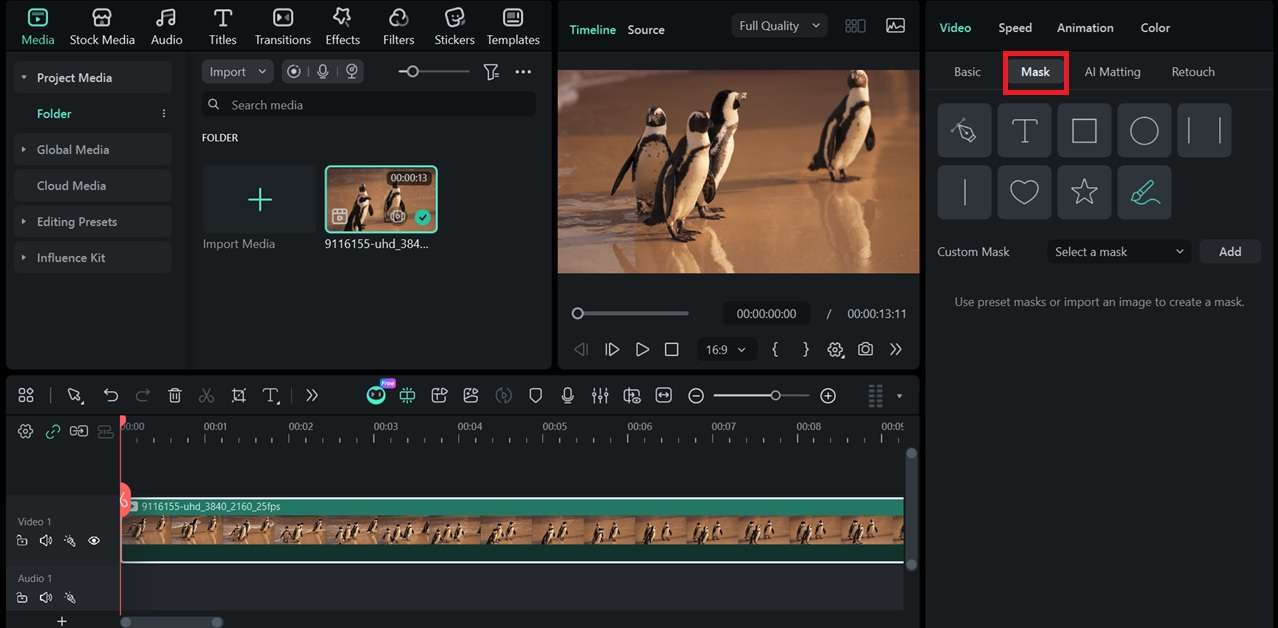
Filmora has a masking tool built on a larger canvas, which makes fine adjustments easier than dragging anchor points with a finger. Getting started is just as simple, thanks to a set of built-in tools that help you level up your masking without spending hours figuring out the tool first:
- Built-in masking presets that apply common shapes without building them from scratch
- Draw a custom shape with a pen tool when a preset doesn't fit what you need
- For subjects with a difficult or irregular shape, Filmora can auto-shape the mask to fit the subject, and still gives you adjustable anchor points to fine-tune it manually
- Combine and manage multiple masks within the same project
- Live preview of the mask as you adjust it, so you can see the result before exporting

Step-by-Step: How to Add and Customize Masks in Filmora
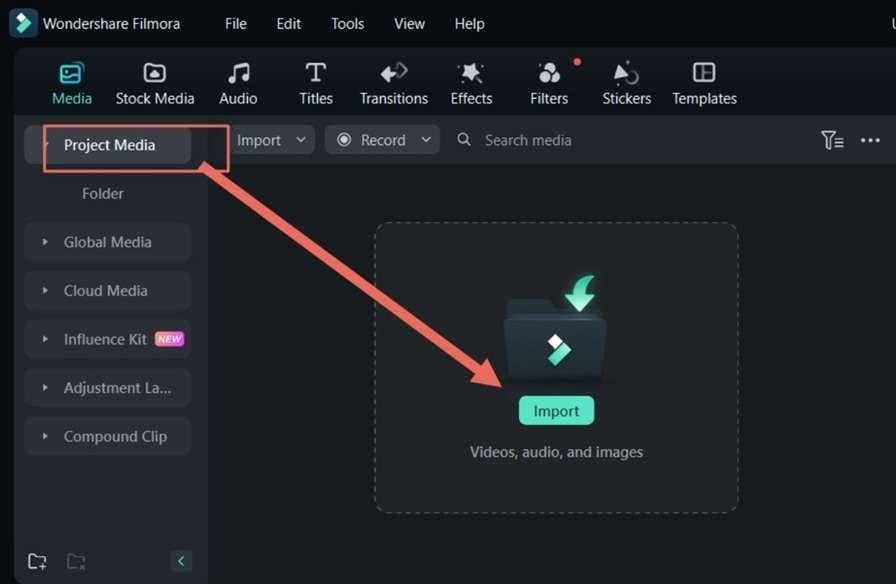
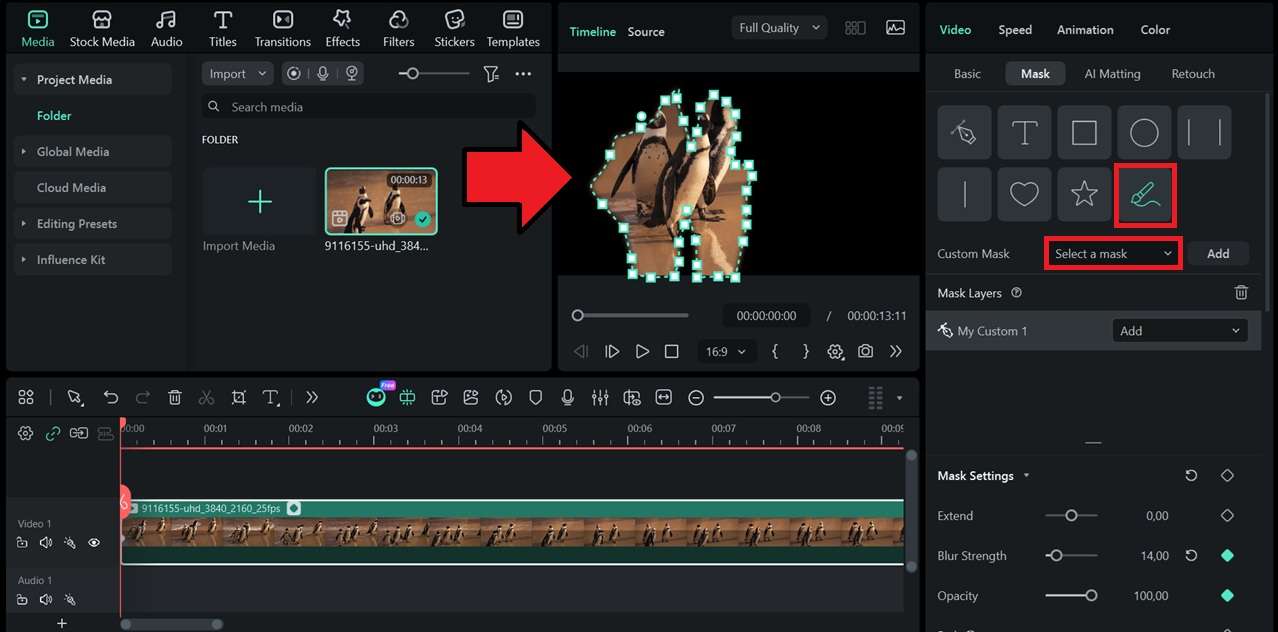
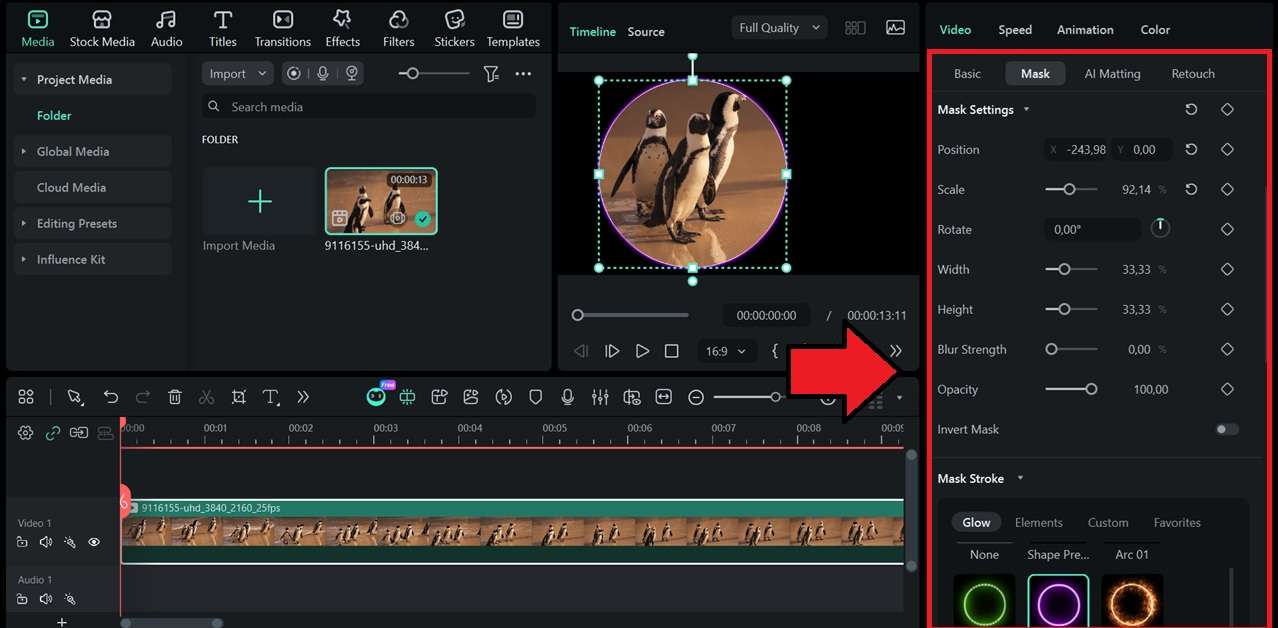
- Extend: grows or shrinks the mask area slightly beyond its original outline
- Blur Strength: softens the edge of the mask so it blends into the background
- Opacity: controls how transparent or solid the masked area appears
- Path: sets a keyframe and lets the mask move or change shape over time
- Invert Mask: flips the effect, so the area that was hidden becomes visible and vice versa
Part 5. Alight Motion vs Filmora: Which One Is Better for Masking?
Presented with two options, which one you should go for comes down to your device, your patience for fine detail work, and how complex the effect needs to be. Alight Motion and Filmora handle masking a bit differently:
| Alight Motion | Filmora | |
| Platform | Mobile (Android, iOS) | Desktop (Windows, Mac) |
| Best for | Quick edits on the go, simple masking | More detailed masking on a larger screen |
| Auto-shaping Mask | Not currently available | Available |
| Custom Shapes | Yes, with vector/drawing tool | Yes, with mask pen tool |
| Mask Shape Presets | Requires adding a shape layer | |
| Cost | Includes for free with watermark | Includes for free with watermark |
To sum up:
- Choose Alight Motion if you're editing on your phone and just need quick masking for simple shapes.
- Choose Filmora if you're working with detailed or irregular subjects, want more precise editing, or prefer masking on the same timeline as the rest of your edit.
Secure DownloadConclusion
Masking in Alight Motion can be done either with a regular mask or a clipping mask. They both control what part of a layer shows in their own way. You can refer to our Alight Motion masking tutorial above on how to do it.
While Alight Motion handles most everyday masking needs right from your phone, it does have its limits. If you're working with a subject that has an irregular shape, or you'd rather have a better setup for better precision, Filmora is worth trying alongside it.
Frequently Asked Questions
-
1. Can you animate a mask in Alight Motion?
Yes, using keyframes. Set keyframes at different points on the timeline and adjust the mask's position, size, feather, or opacity to create moving or gradual reveal effects. -
2. Is Alight Motion masking free?
Yes, masking in Alight Motion is part of the core app and not locked behind a paid tier. But to use some advanced effects or export without a watermark, it requires a subscription. -
3. Why isn't my mask showing up correctly?
This is usually a layer order issue. The mask layer needs to sit directly above the base layer before you group them. If the mask still doesn't apply, double-check that both layers were selected before choosing the masking option. -
4. Can you use text as a mask in Alight Motion?
Yes. A text layer can act as a mask, which is how text-behind-video or typography reveal effects are made. The video or image underneath only shows through the shape of the letters. -
5. Can I remove a mask once it's applied in Alight Motion?
Yes. Ungrouping the masked layers or deleting the mask layer removes the effect.
