Want to make your audience addicted to your content? Add texts with catchy animations to your videos. It keeps viewers engaged and makes videos more captivating. OpenShot video editor is perfect for making better videos with its text animations and effects.
Filmora is an alternative to OpenShot if you want to use multiple tools for this purpose. These tools combined can add a huge value to your content. Get ready to boost the visual effects of your videos by learning how to add text in OpenShot.
In this article
Where You Can Add Catching Text Effects To Your Videos
Text effects can be added to any part of a video. However, for some parts, text effects are a must to make video more attractive and engaging. The following areas of a video should contain text effects.
- Captions
- Intro
- Closing Credits/Ending of the video
- Subtitles
In conclusion, you can add texts and text effects anywhere in the video to give some information
Methods To Add Texts Using OpenShot
OpenShot is a simple and user-friendly video editor. It can add text to videos in different ways. Here is the step-by-step guide on how to add text in the Openshot video editor. So, let's get started!
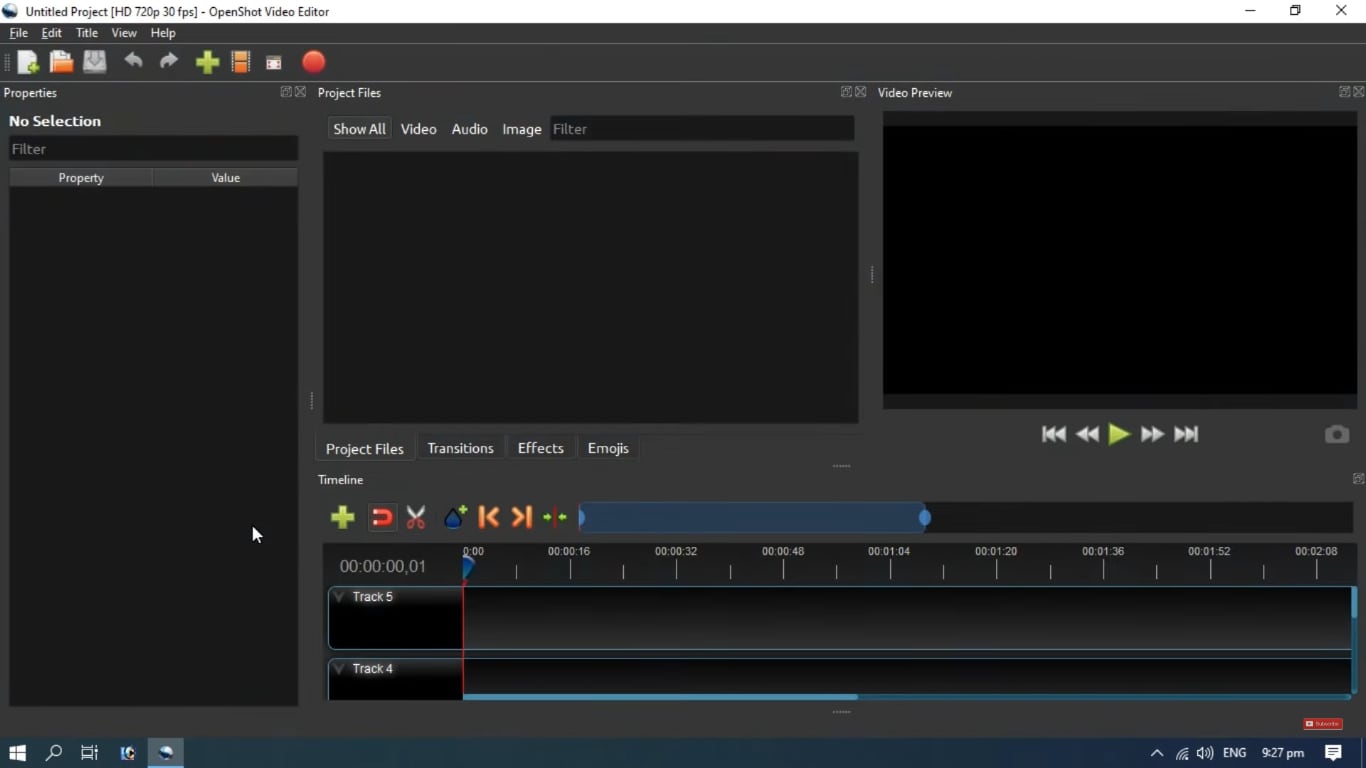
Method 1: Add Texts Using OpenShot In-Built Title Template
OpenShot comes with a variety of animated title templates that can make your text stand out. Go to the “Title” menu and choose from templates like:
- Blinds (Two Titles): Features a blind effect opening to reveal text.
- Blur: Blurs text in and out for a dynamic look.
- Bounce: Bounces text onto the screen.
- Zoom: Zoom text in or out.
These templates allow you to quickly customize the text, font, size, colors, and animation. For your convenience, every step is explained below with screenshots.
Step 1. Import the video to OpenShot. Then click on the titles option in the top left corner.
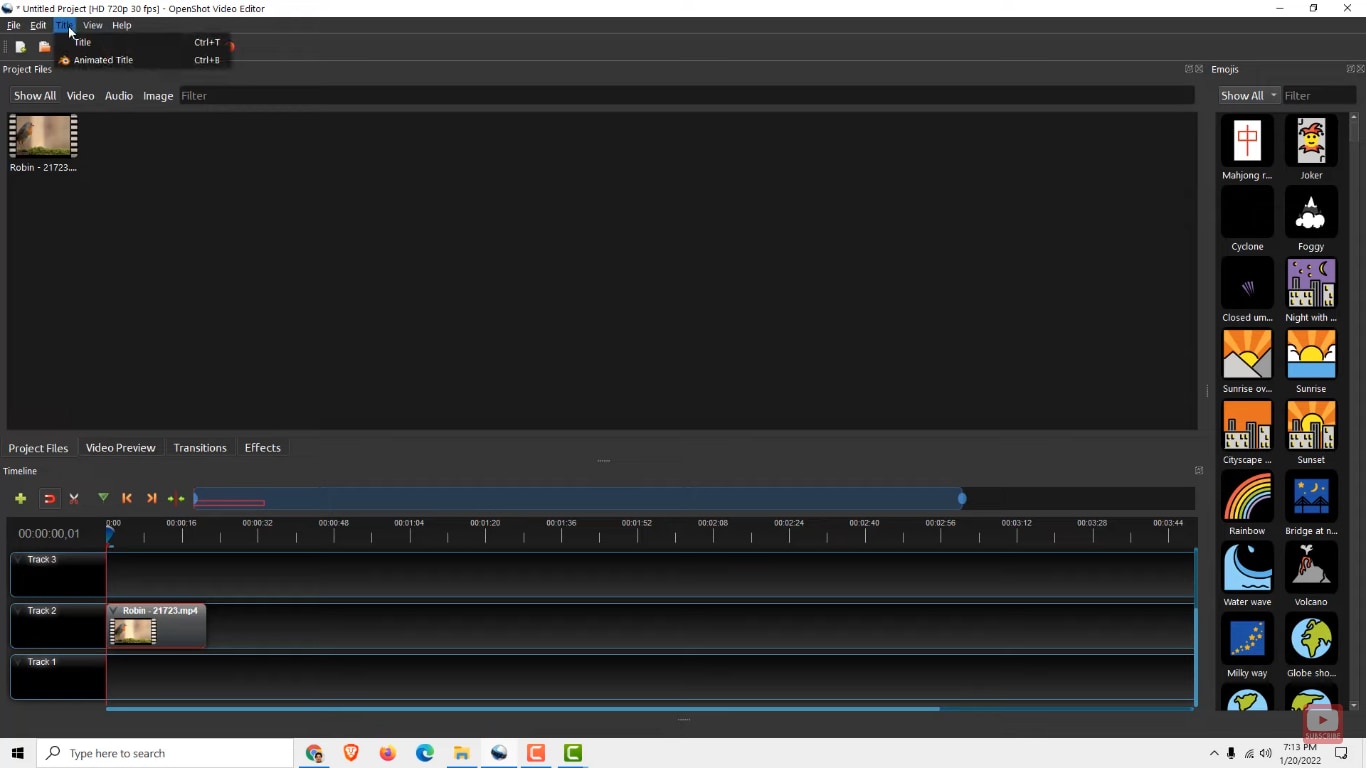
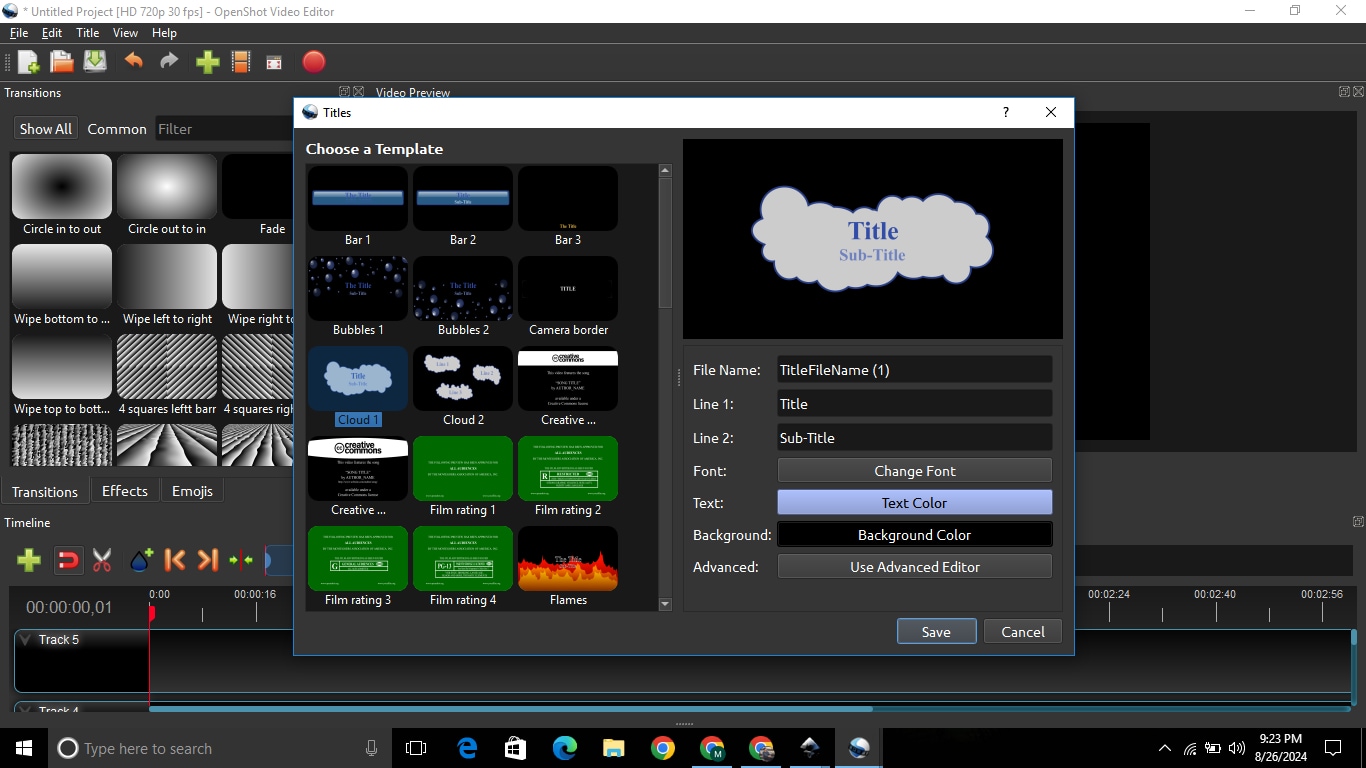
Step 2. Select a template of your choice. Write the title in "Line 1". Write the subtitle in the "Line 2" section.
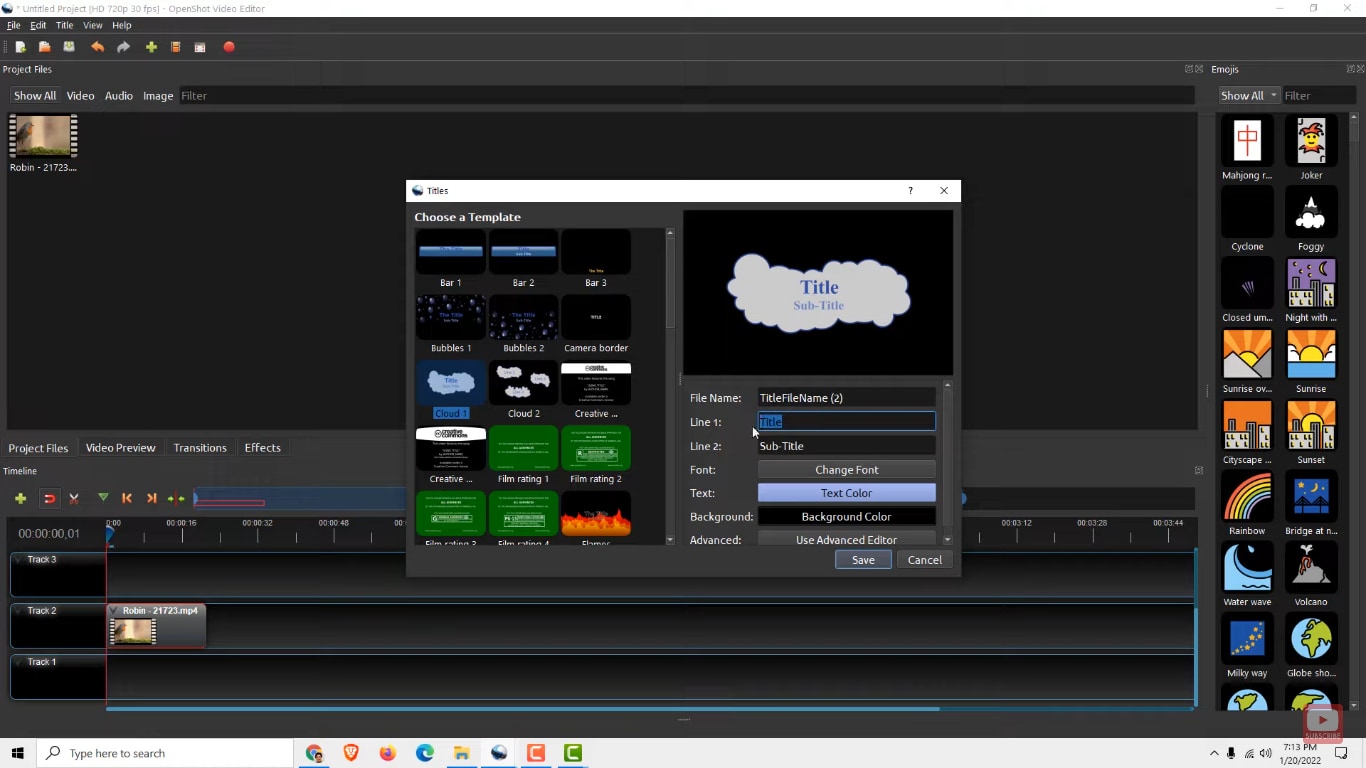
Step 3. Select the font according to your preference. Click on the “Text Color” to change the color.
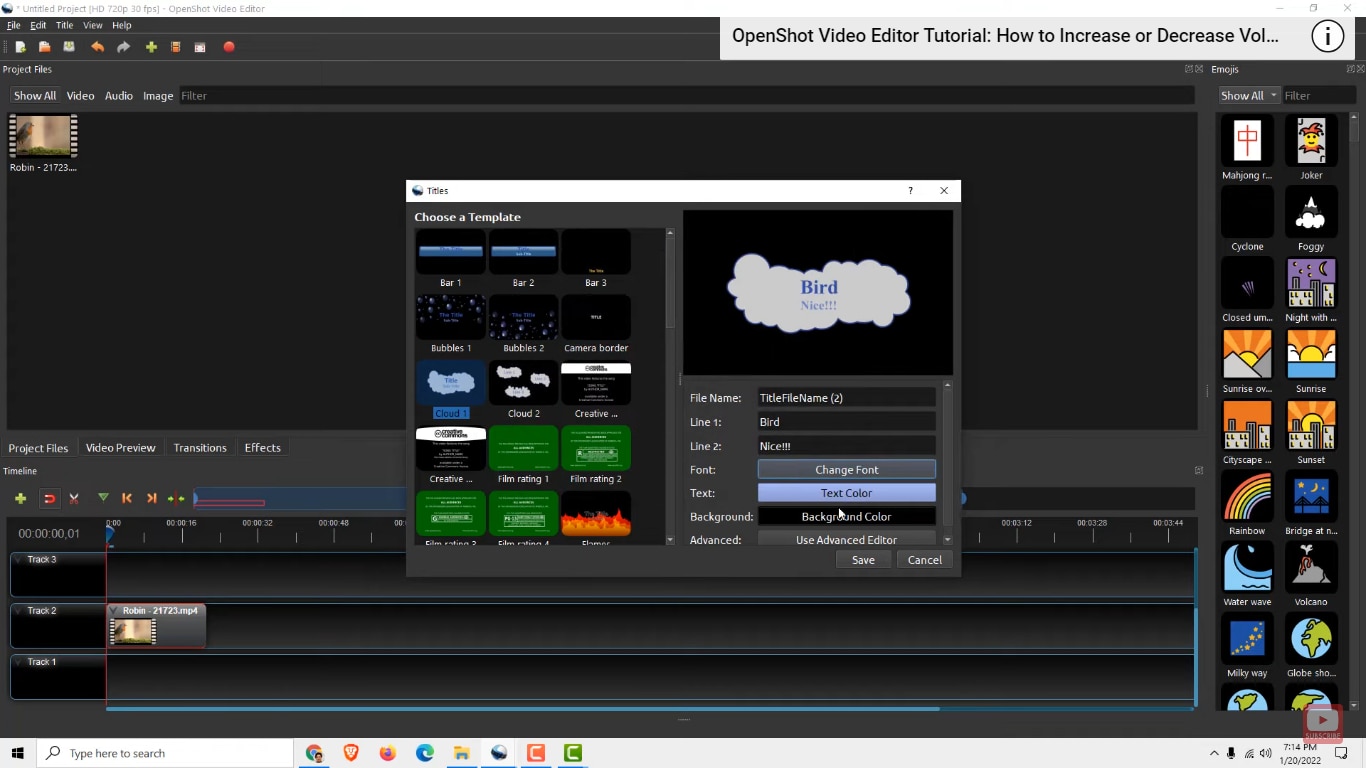
Step 4. Click save and your text will be created. Drag and drop it to a track as shown below.
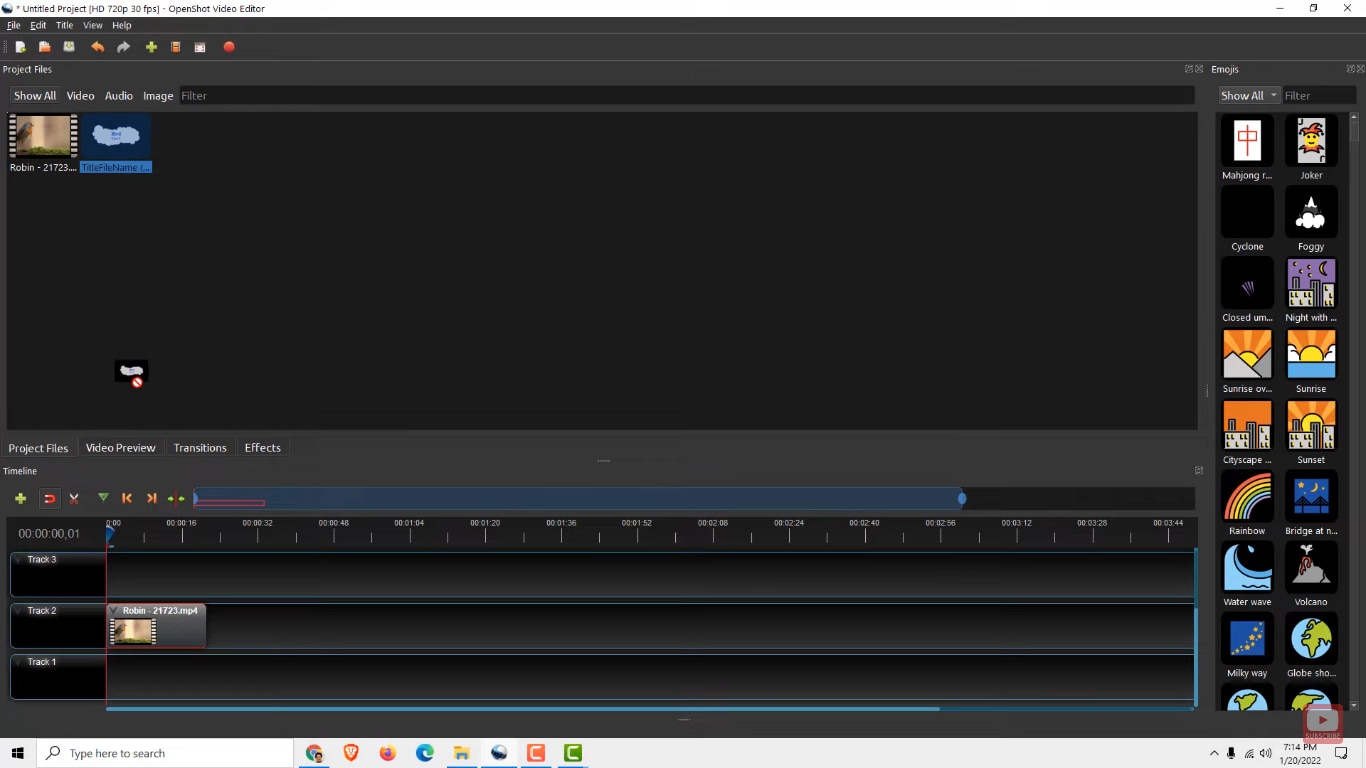
Step 5. Click on the "Video Preview" button and adjust the size of your text accordingly.
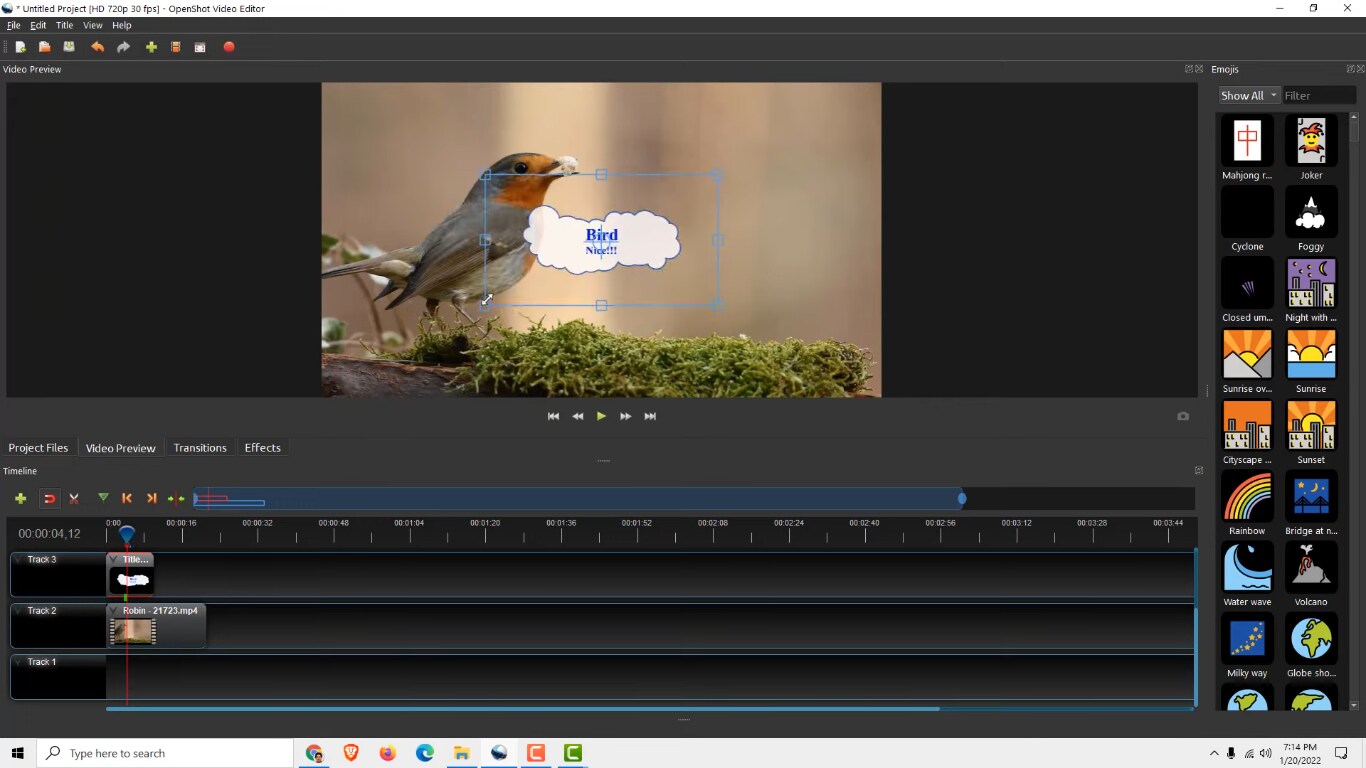
Now you know how to add text in OpenShot. Some other methods to add text are also available.
Method 2: Create A Text Overlay And Utilize Advanced Text Editing
For better control, use the “Advanced Editor” in OpenShot, which launches Inkscape. The steps for this method are explained below.
Step 1: Select a title template and click the "Use Advanced Editor" button.
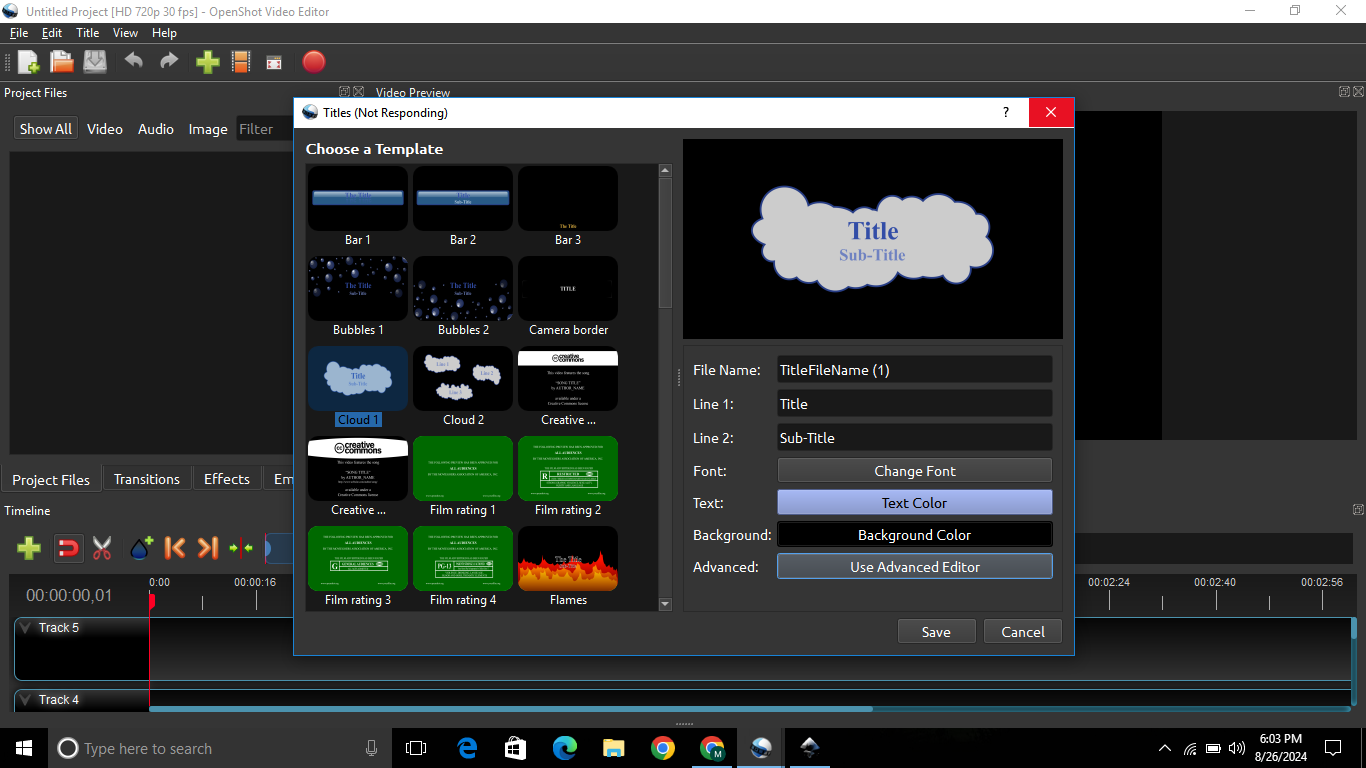
Step 2: Edit the text using any font installed on your system in Inkscape
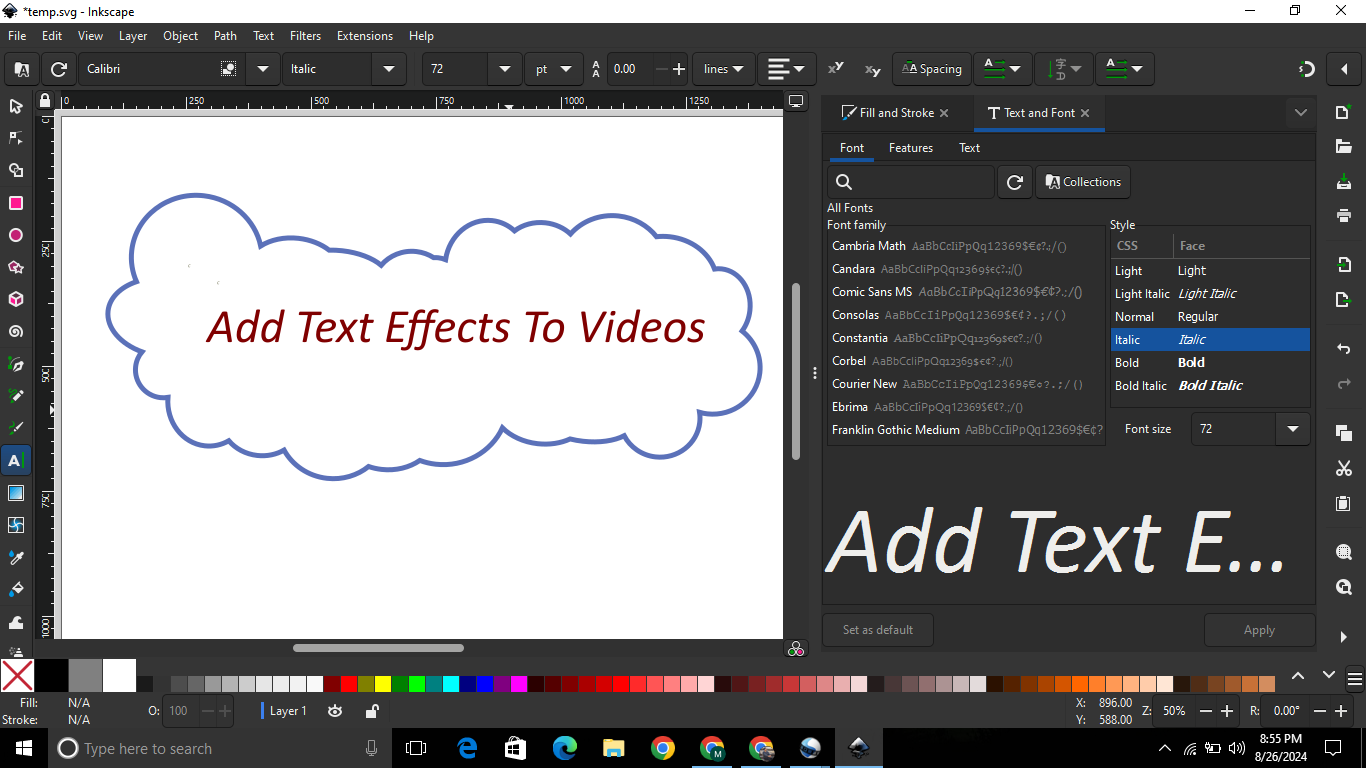
Step 3: Convert the text to paths to ensure the font appears correctly in OpenShot.
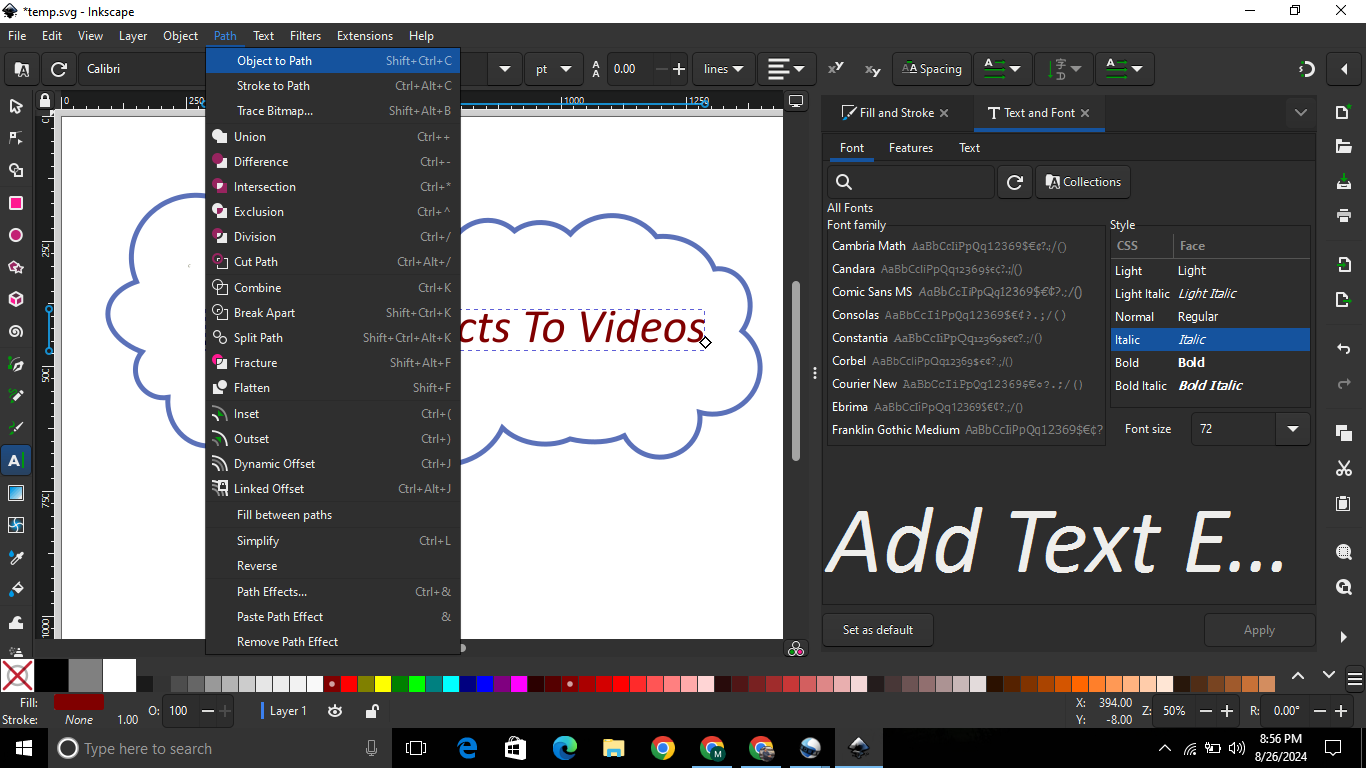
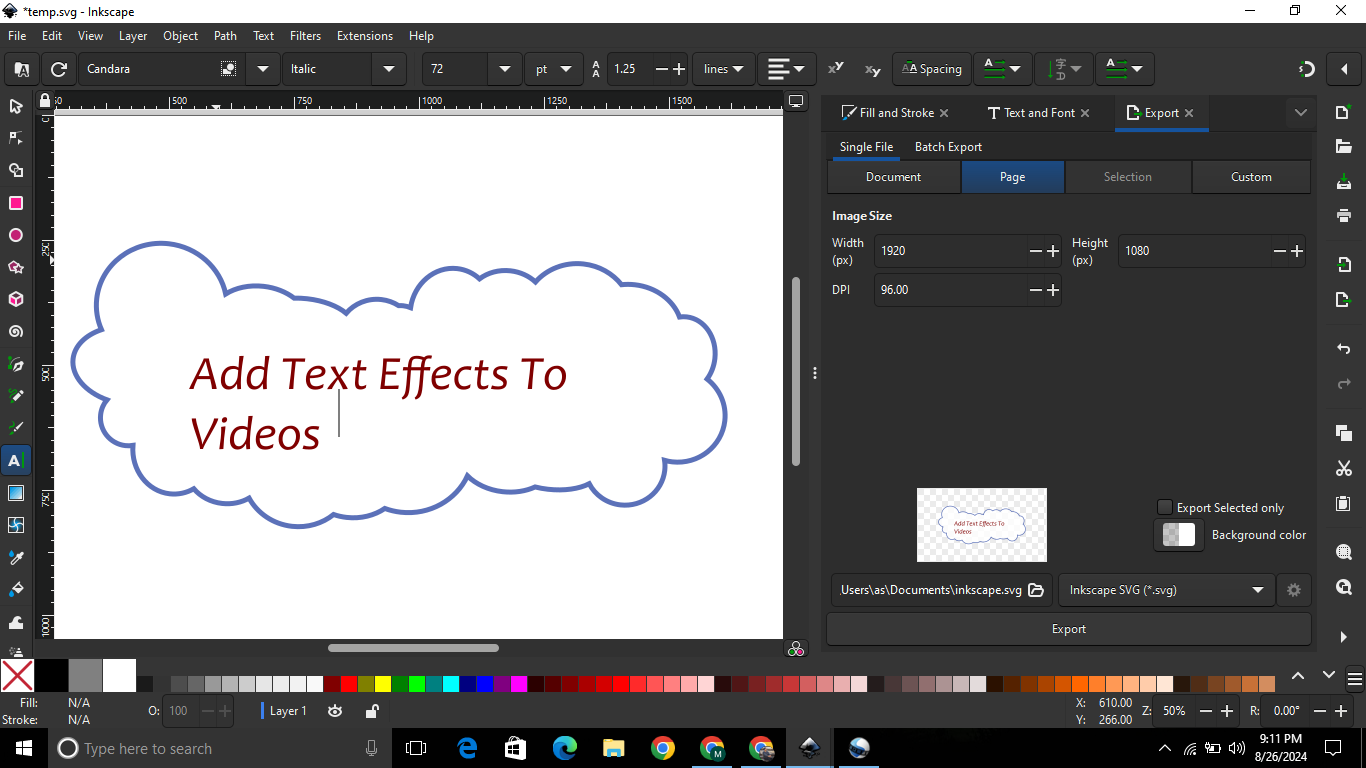
Step 4: Export the SVG file to your computer.
Step 5: Now go to OpenShot. Click on the Import file option and import the text image you created with Inkscape.
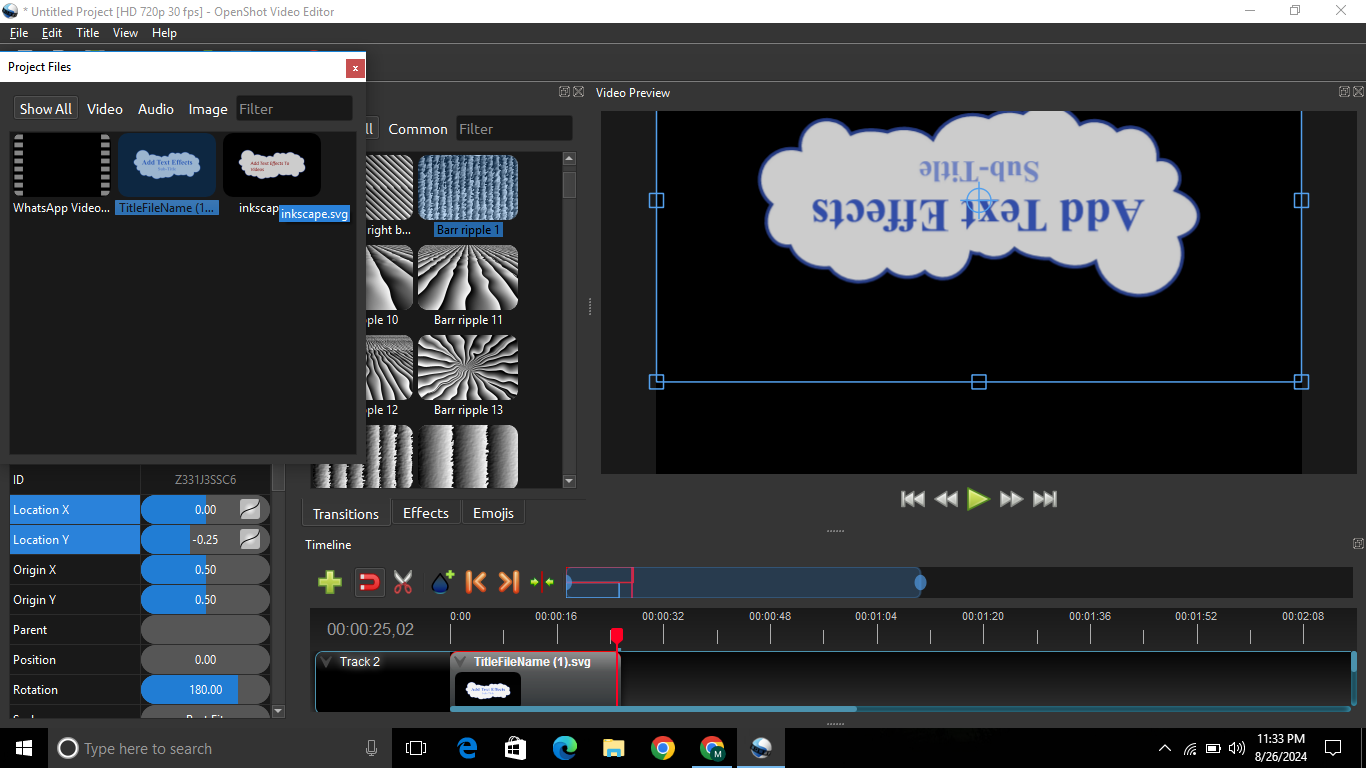
You can use this text in your videos. This gives you full creative freedom to design unique, eye-catching text overlays.
Method 3: Import Text Images in OpenShot
You can design Image name according to your liking. Use an external editor to create text images. Here is the step-by-step guide.
Step 1: Create a text image with a transparent background. It should be in the.pngor.pngformat.
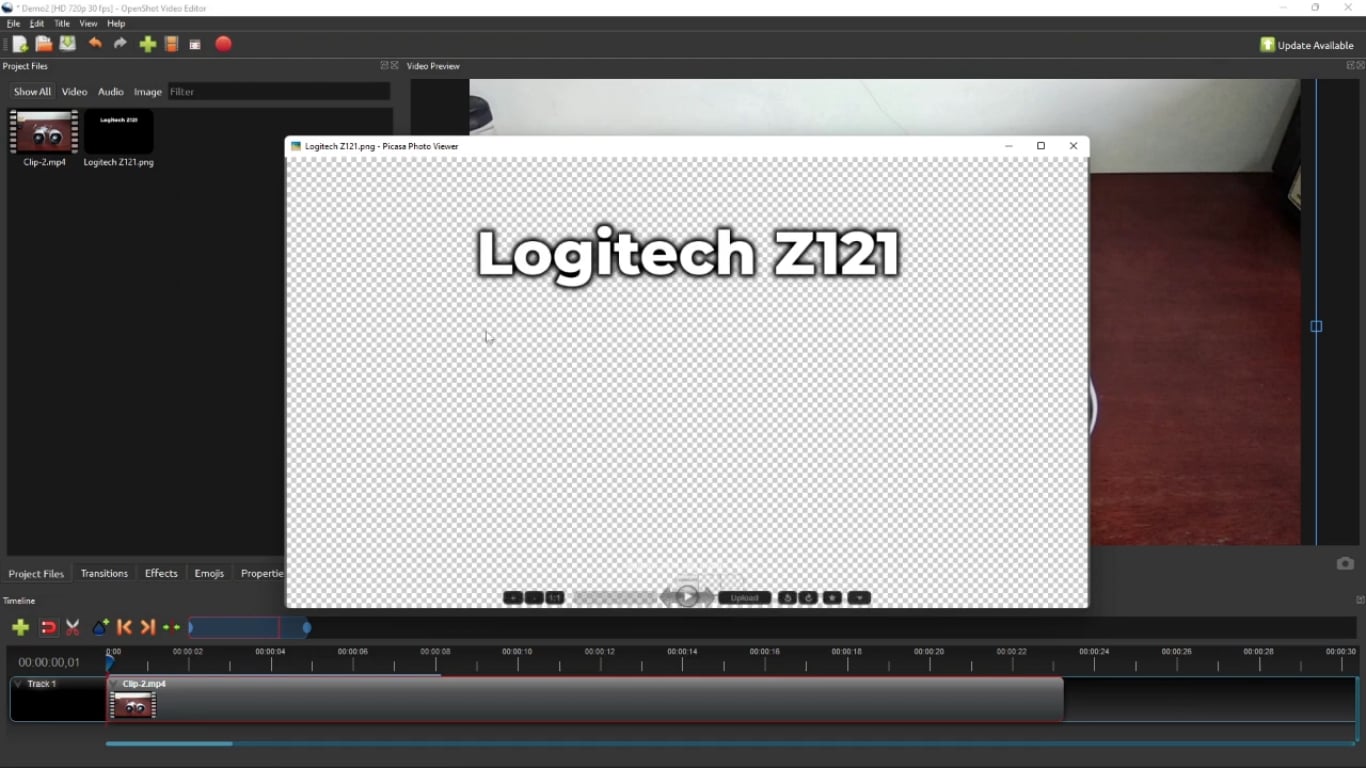
Step 2: Import the main video to which you want to add text on track 1.
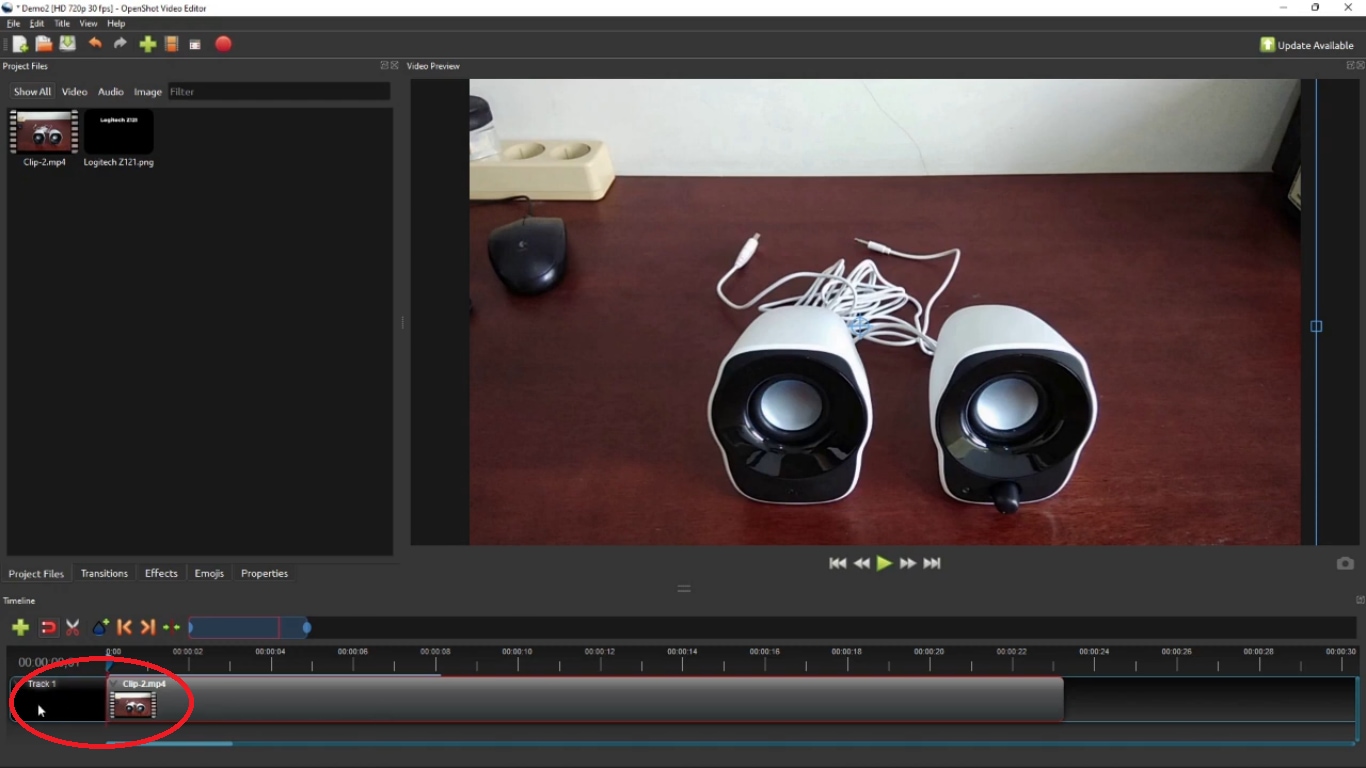
Step 3: Add the text image you created to the project file. Create a new track for text, i.e., Track 2.
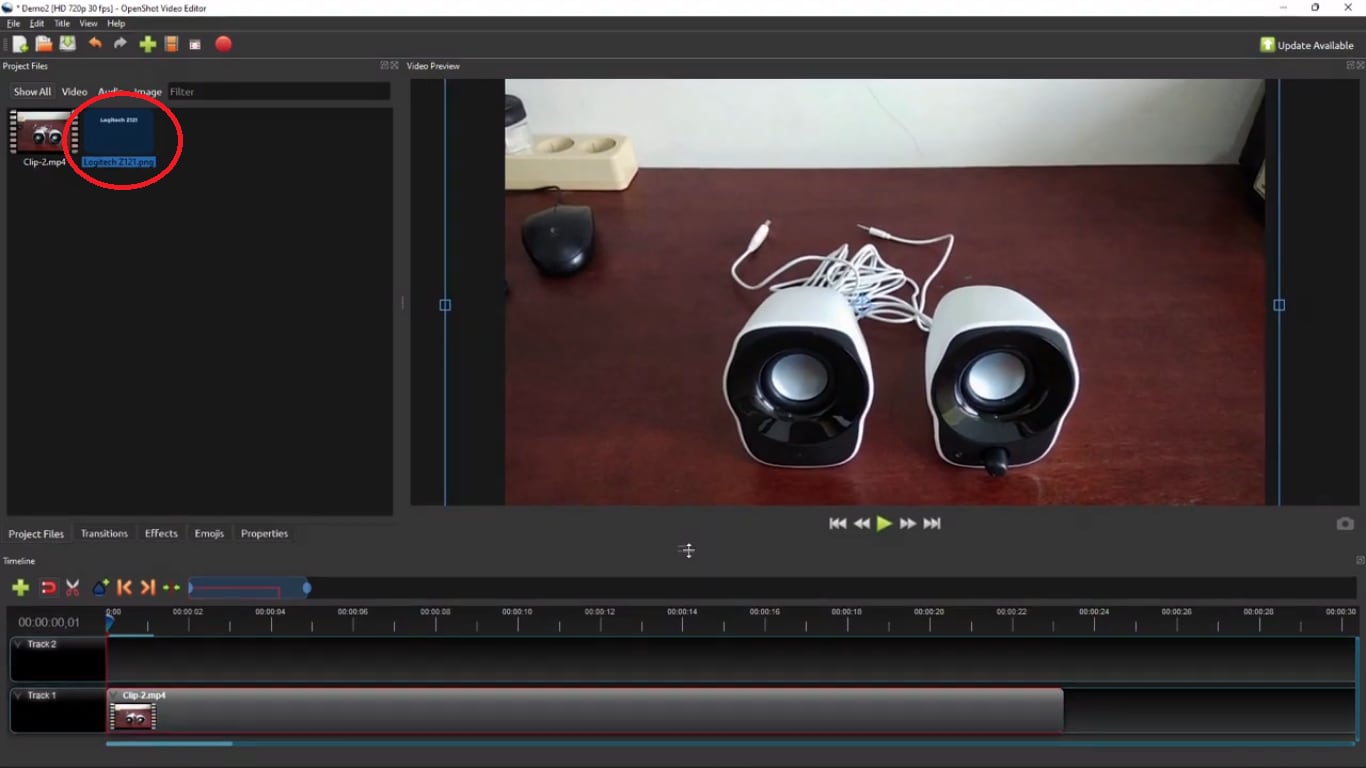
Step 4: Drag the text image file to track 2.
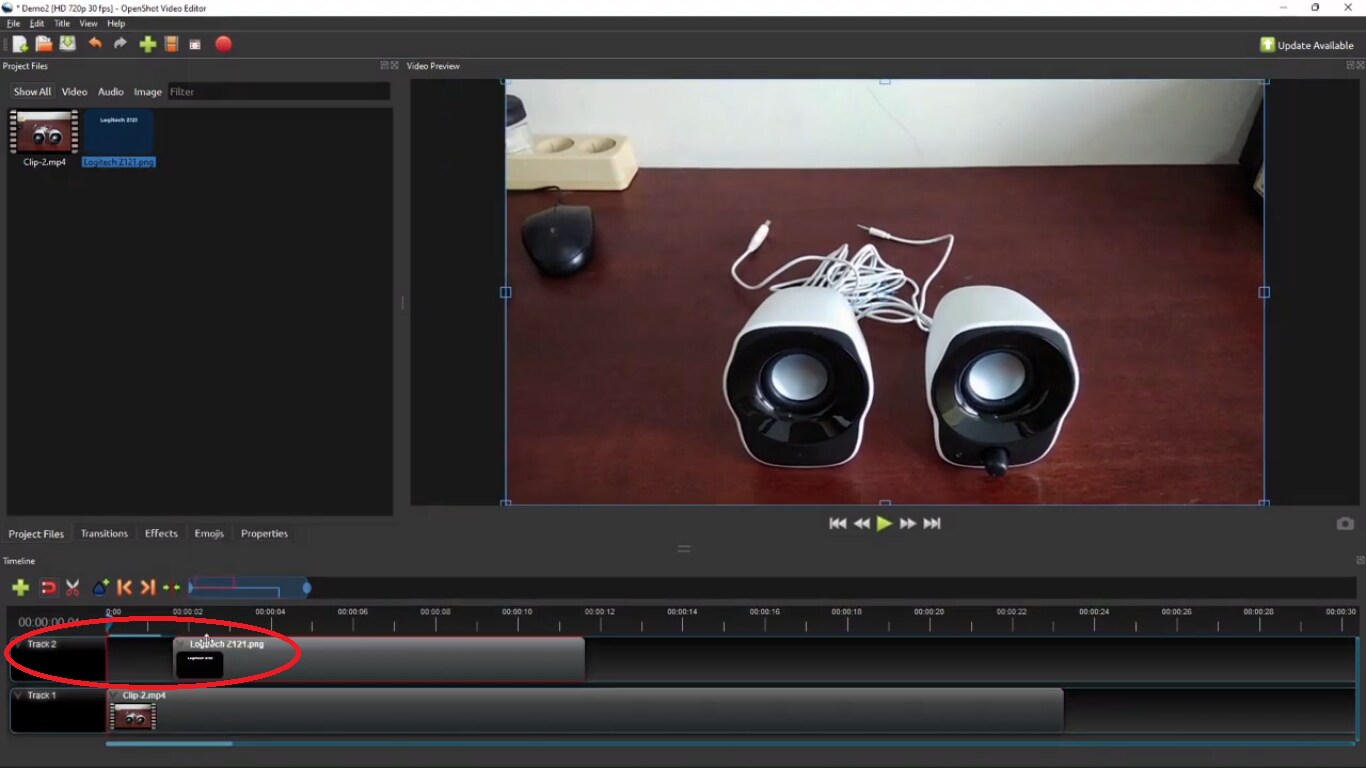
Step 5: Set the time frame for which you want to text to your video.
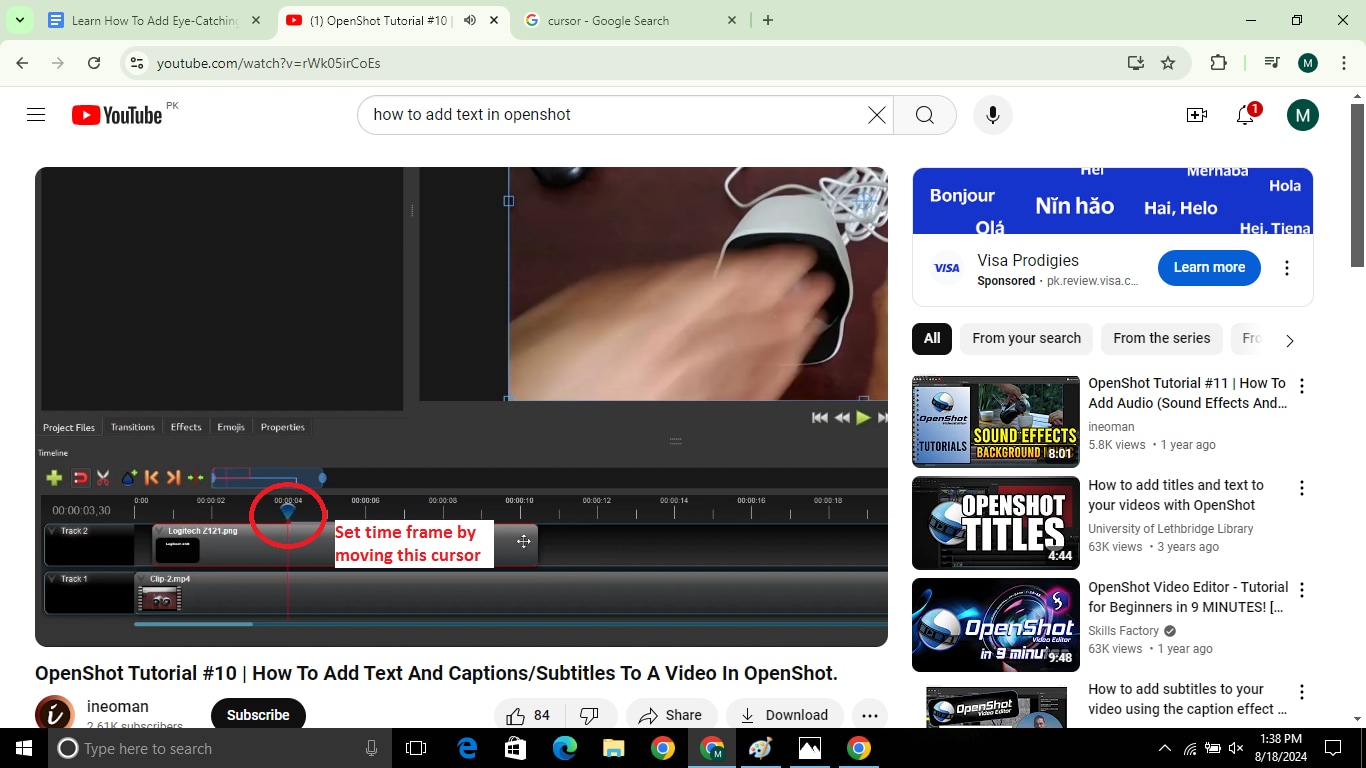
This way, you can add an externally created text image to your videos.
Method 4: Adjust Color Saturation
You can also adjust the color saturation of the text using OpenShot. It is quite easy and explained below.
Step 1: Launch OpenShot and press “Title”
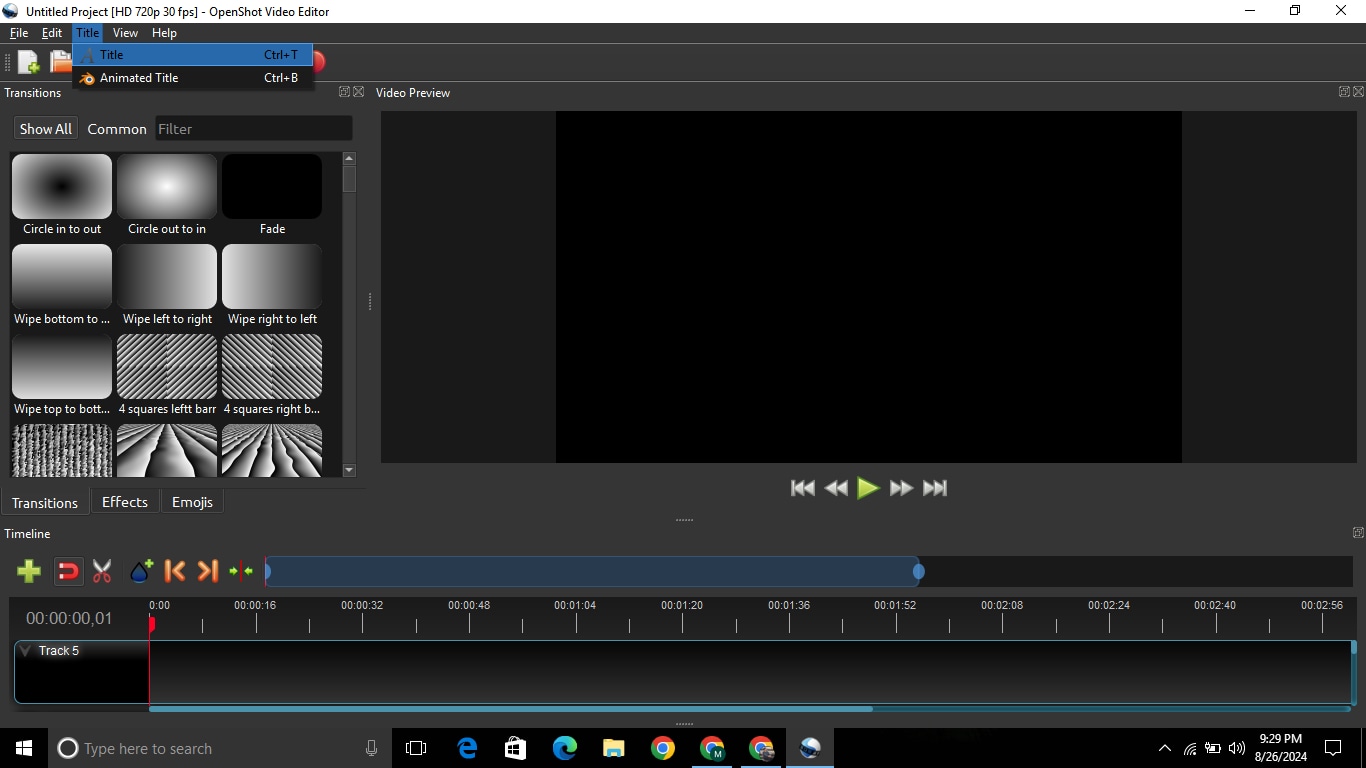
Step 2: Select a title of your choice. Then click the “Text Color” button.
Step 3: Adjust the color saturation and Press “OK.”
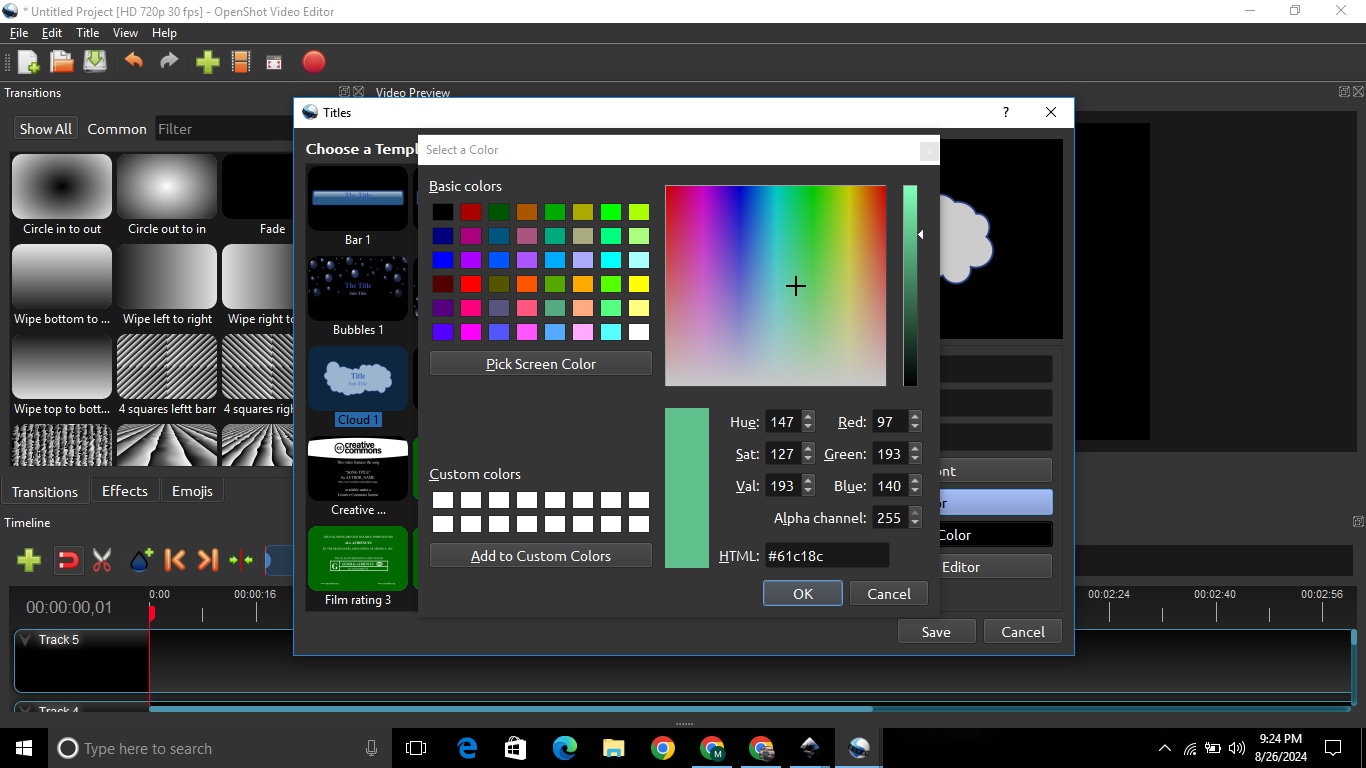
This way, you can adjust color saturation in OpenShot.
Method 5: Animate Text With Keyframes
Use OpenShot's keyframe animation to make text move in creative ways:
Step 1: Add a title template and customize the text.
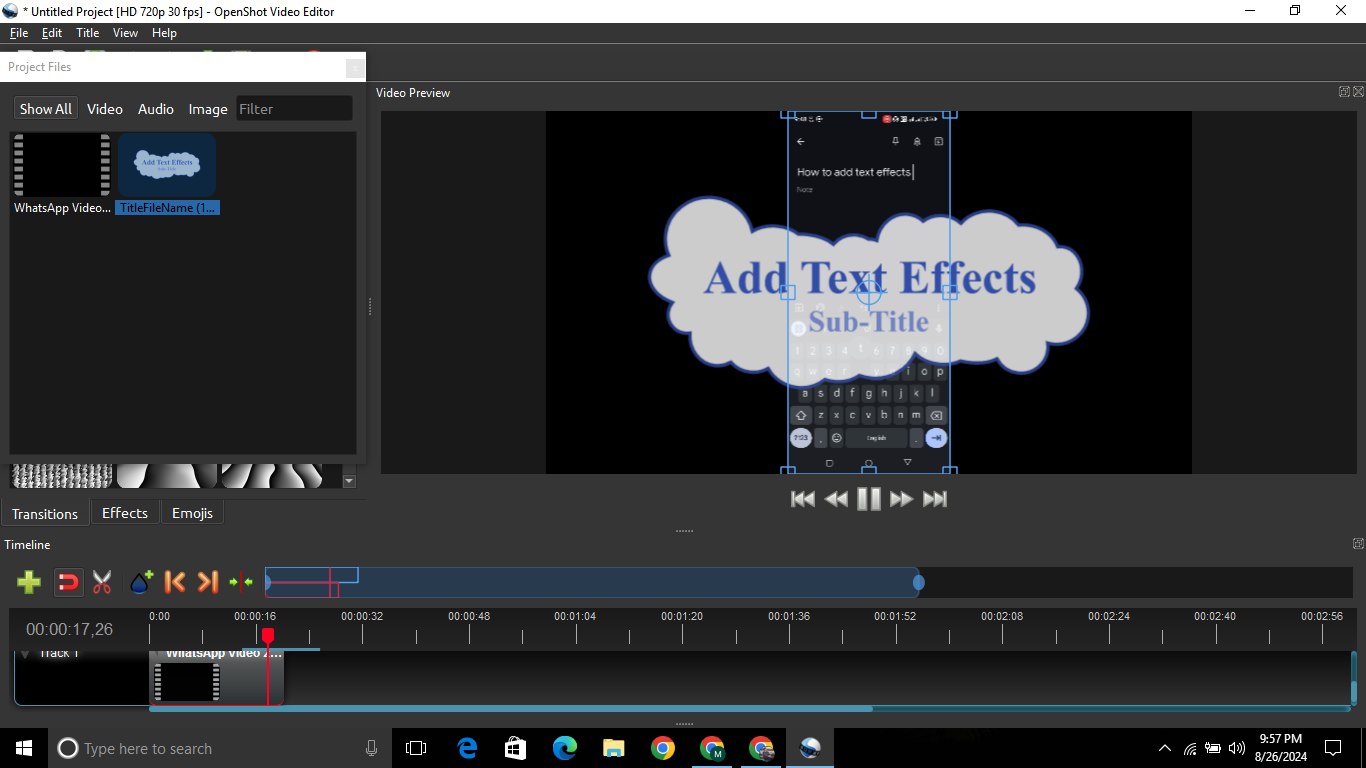
Step 2: Click the "Animate" button in the properties panel.
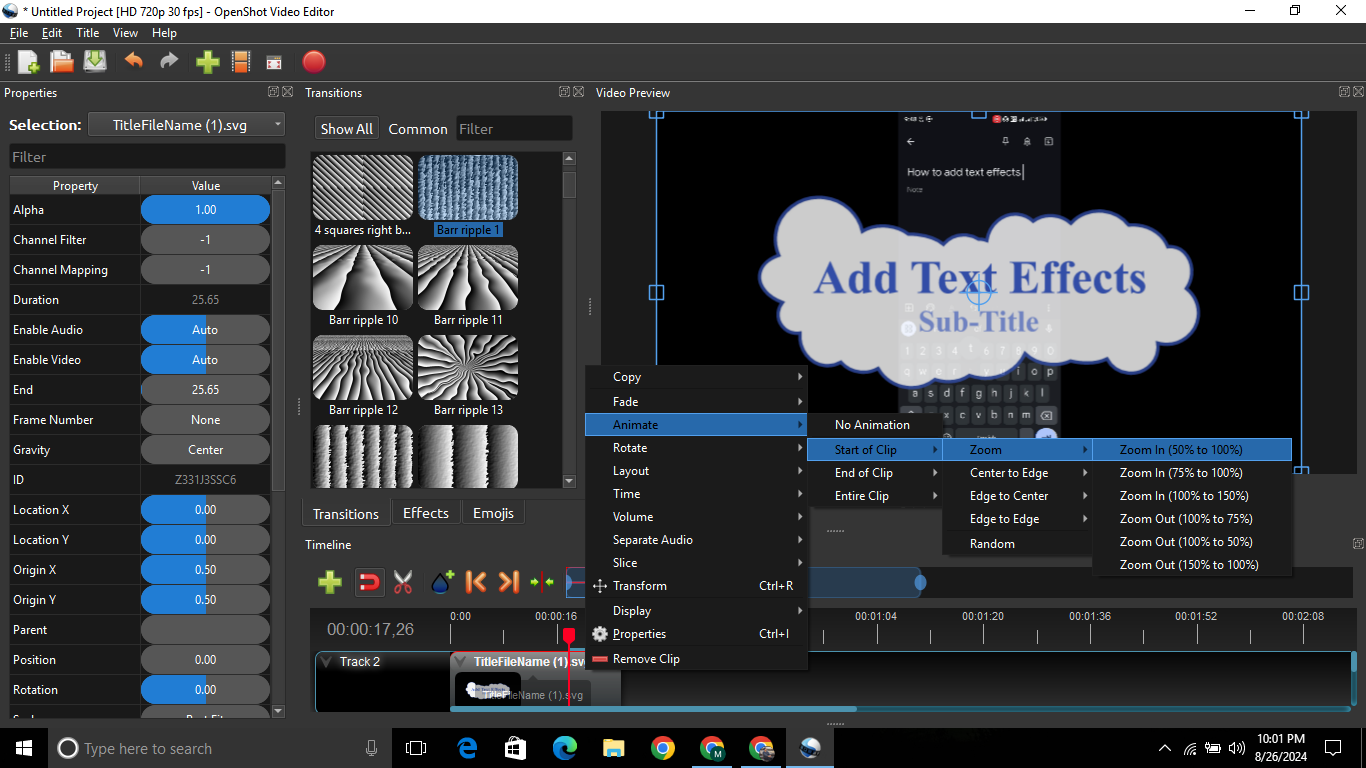
Step 3: Set keyframes at different points of the timeline. You can also turn the text upside down like I did.
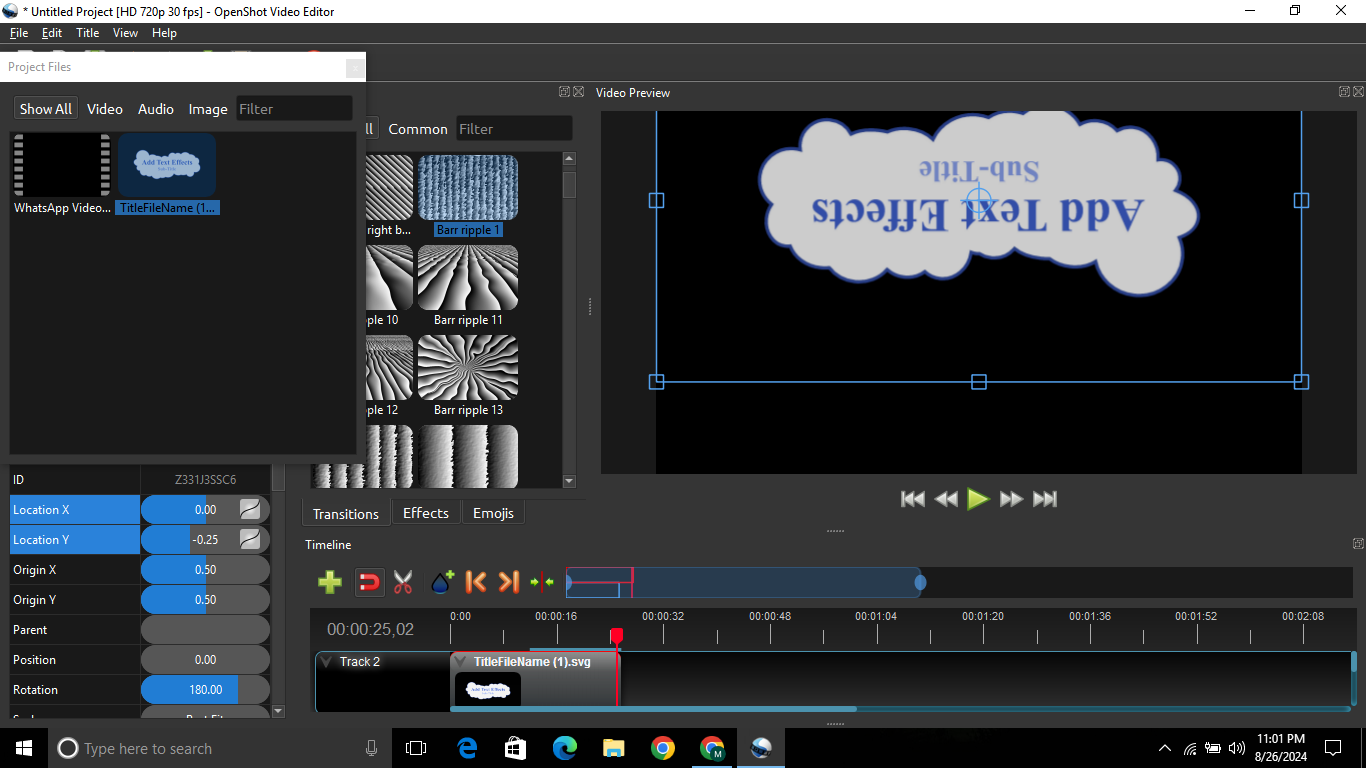
Step 4: Adjust the text position, rotation, scale, etc., at each keyframe. Here, I have turned the text upside down.
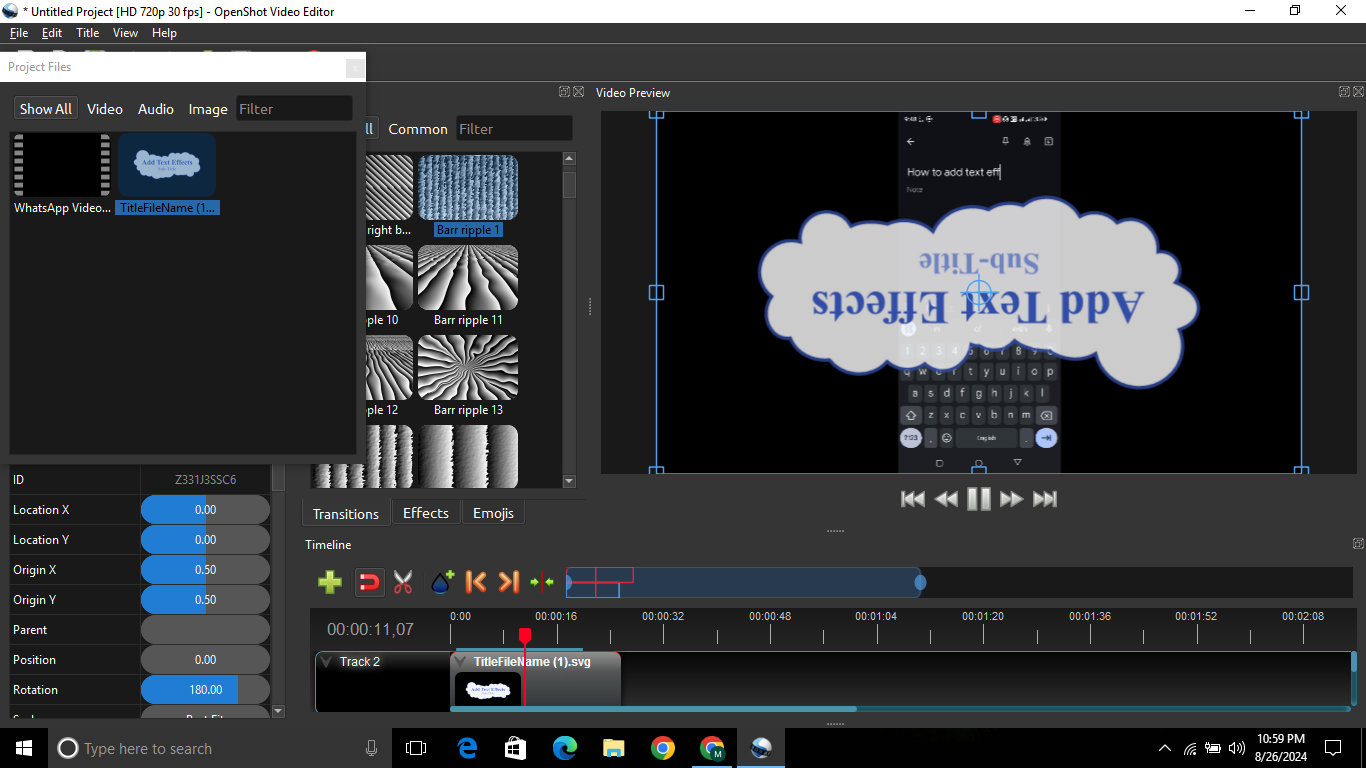
OpenShot will smoothly interpolate the animation between keyframes. This allows you to make text fly in from off-screen, rotate, scale up, and many more.
Issue Faced While Adding Text Using OpenShot
When adding text in OpenShot, you may encounter the following issues:
- Limited Title Templates: OpenShot has a limited number of title templates. You have to import text images from external sources. Inkscape can be used for this purpose.
- Limited Animations: There are limited text animations in OpenShot. To use the latest trendy animations, you have to opt for other editing software.
- Some Words Don't Appear On The Screen: A major issue you might face is limited space in some titles. When you increase the font size, some words disappear. So, you have to choose the fonts wisely.
- Unstable Performance: It can crash or close unexpectedly on its own. You can lose all your work this way. It is quite frustrating when you are working on a big project.
- Other Software Support: You need to install other software, such as Inkscape and Blender, to get more out of OpenShot.
- Compatibility Issues: OpenShot Video Editor does not currently have a dedicated mobile version for Android or iOS devices. So if you hope to add text on your mobile phone, using Openshot is not a good idea.
Solutions often include updating the software, checking layers, and using simpler text options or third-party tools for more advanced text editing.
A Good Alternative To OpenShot Adding Eye-catching Texts - Filmora
Wondershare Filmora is a both desktop and mobile video editor. It has several built-in video editing features that can add text to your videos. It is the best option for both professionals and amateurs. You can use it as an alternative to OpenShot to add text to videos. Let’s thoroughly read about the functioning of Filmora.

Features Of Filmora That Make It A Better Option
Some features of Filmora that make it a better choice than Openshot are discussed below.
- 100+ best title templates to use in your videos.
- 80+ animations to add to texts in your videos.
- Supports 50+ input formats and 15+ output formats.
- AI-supported features include AI object removal, AI voice cloner, AI stickers, AI music generator, and many more.
- Stock media And audio files to use in your videos.
- With video editing capabilities on your mobile device.
- It has a more stable performance and does not crash.
Filmora VS. Openshot, Which One Will You Choose to Add Text to Videos?
| Feature | Filmora | OpenShot |
| Text Customization | Extensive options for fonts, colors, and animations | Limited text editing with basic styles |
| Text Animation Effects | Various text animations available | Minimal animation options for text |
| Easy of Use | ||
| Presets and Templates | Over 200 text and title templates | Only 40 title templates available |
| Audio Integration | Supports audio tracks with captions | Basic audio editing features |
| Export Options | Multiple formats including direct to Instagram | Limited export formats |
| Platform Availability | Windows, macOS, Android, iOS, and iPadOS | Windows, macOS, Linux |
| Cost | Paid with a free trial | Free and open-source |
How To Add Texts To Videos Using Filmora
Adding texts to your videos using Filmora is easy and fun. Follow the steps below to learn how.
Step 1: Import your video to Filmora. Here, I used a video from Stock Media.
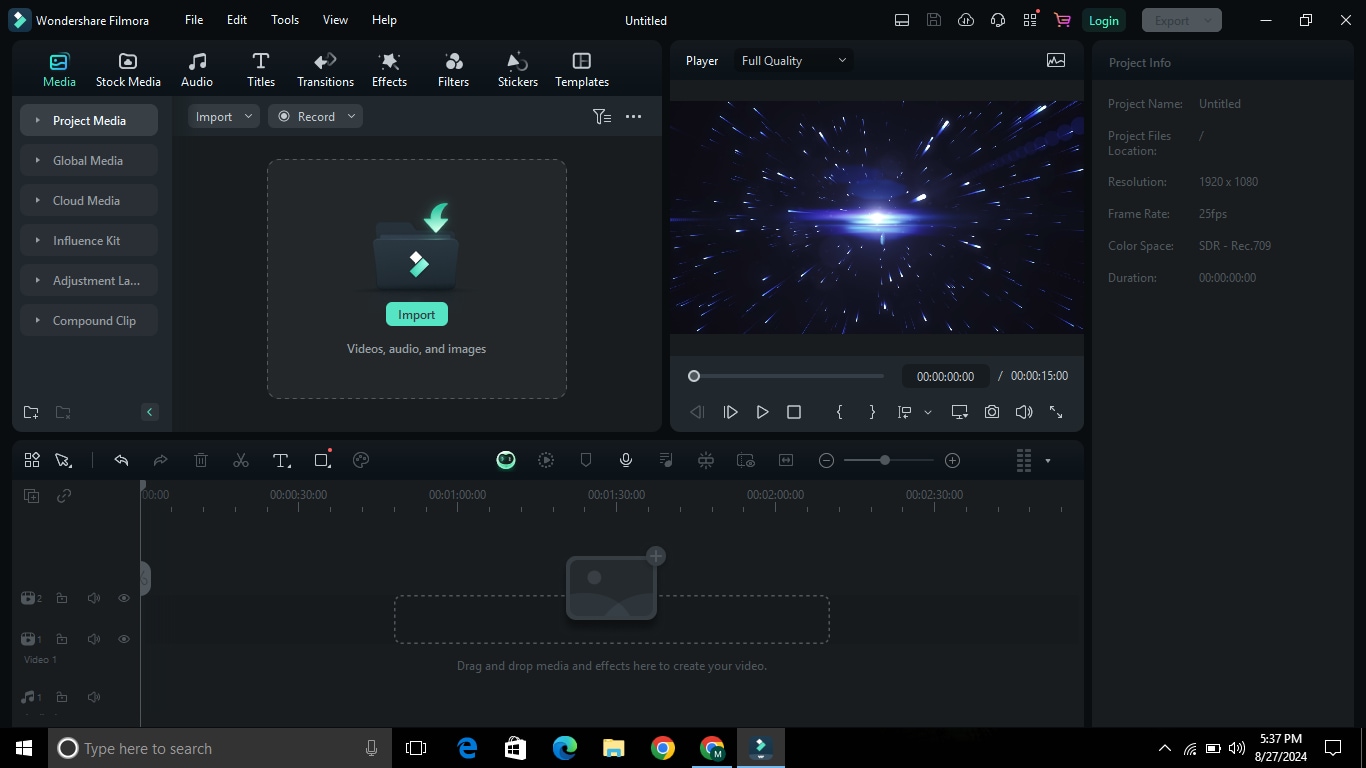
Step 2: Click “Titles” to add title text to the video. Skip this step if you don’t want to add a title.
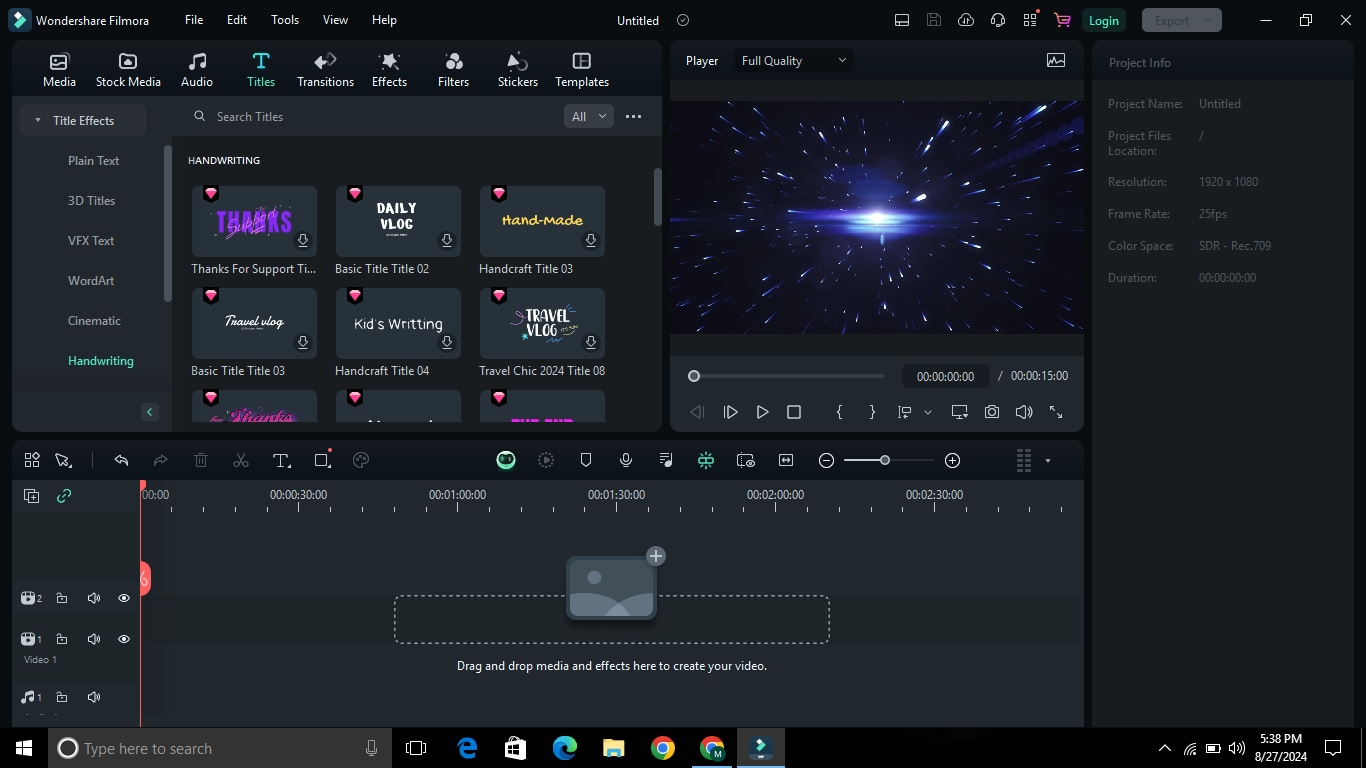
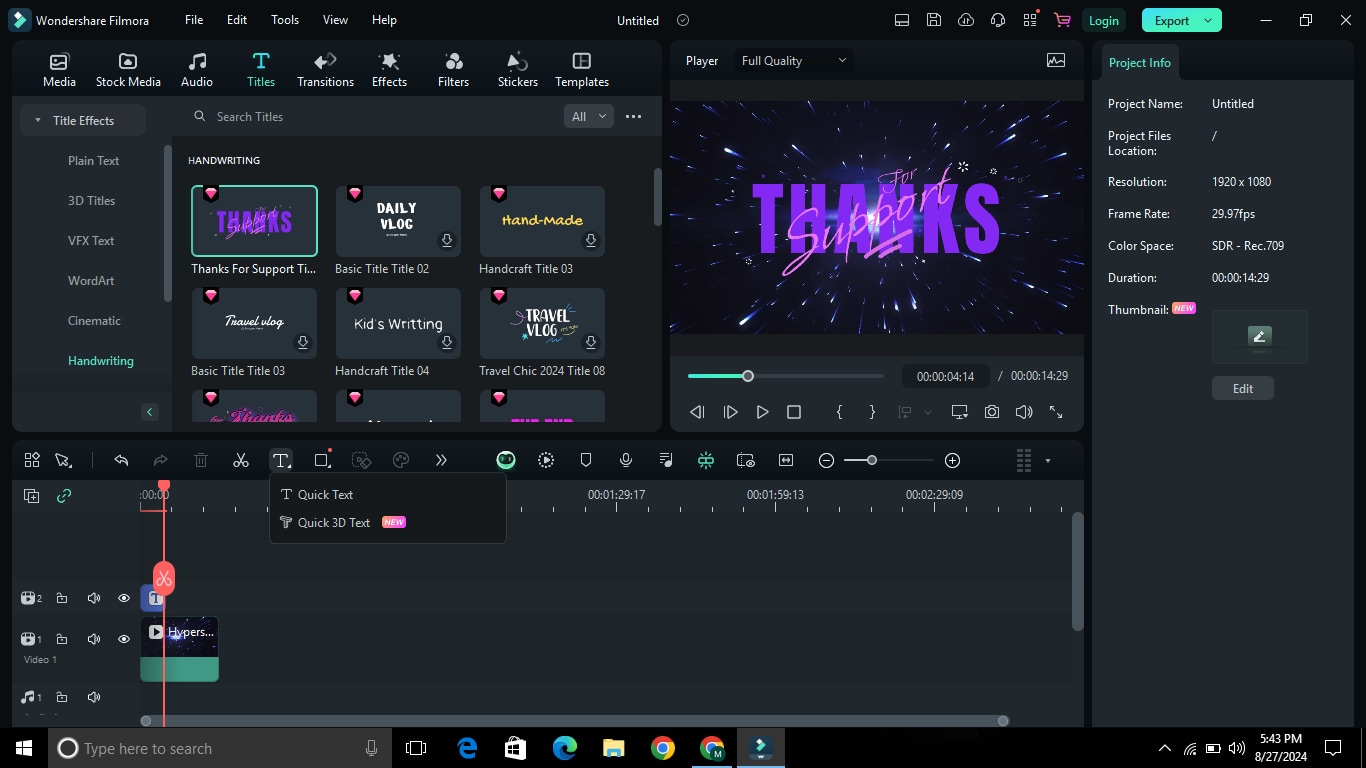
Step 3: Now press the “Text” option and choose whether to add simple or 3D text.
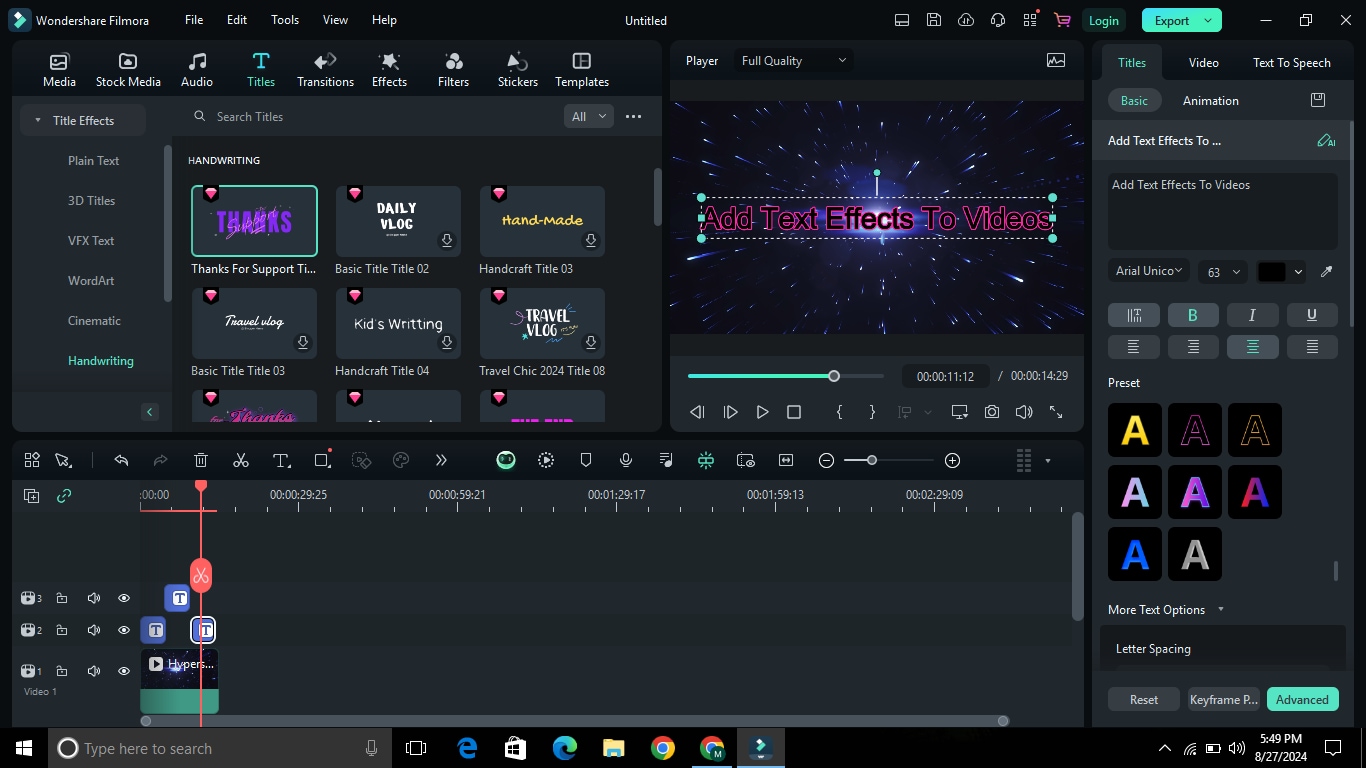
Step 4: Write the text in the text box. Adjust text position and size.
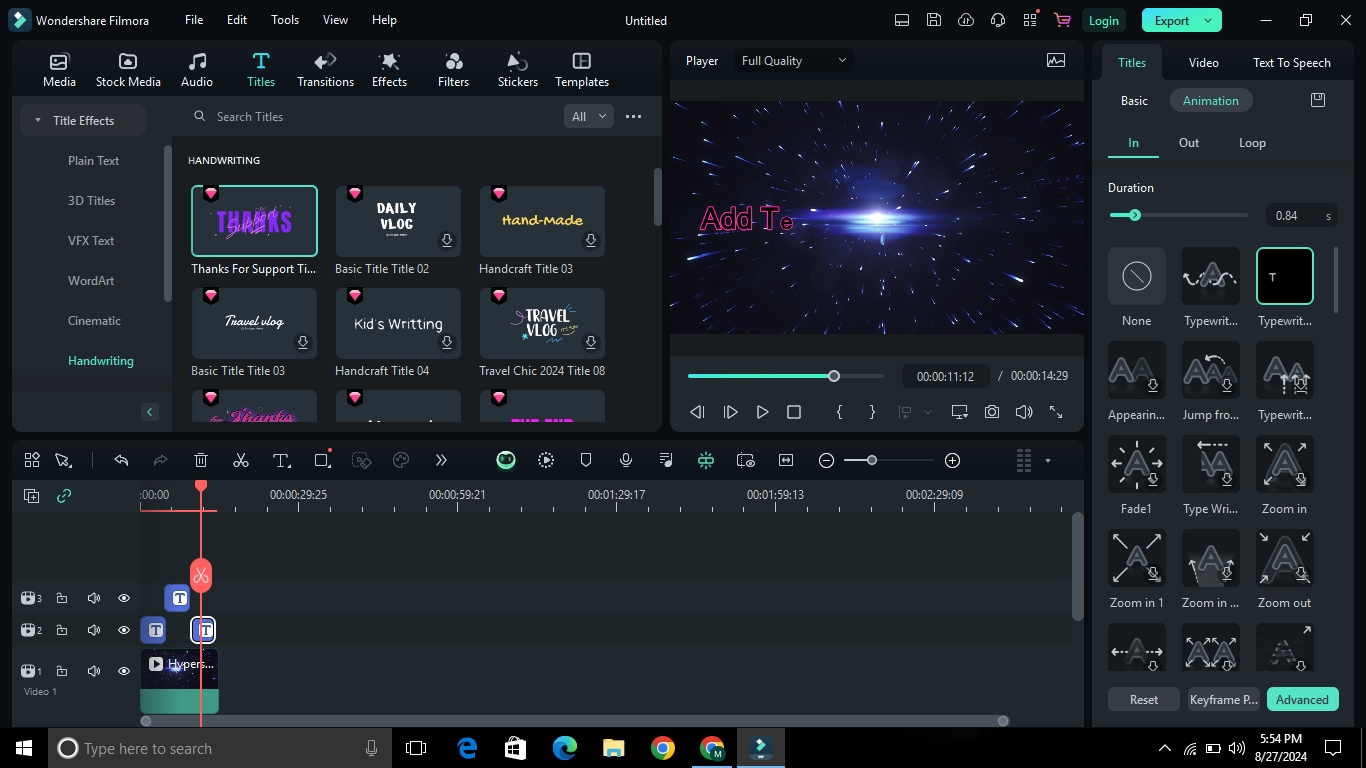
Step 5: To add animation to the text, press “Animations.” Then, select the animation of your choice. Here, I have added typewriting animation.
You can add multiple text lines and animations by following the above steps. Then press “Export” to save the video to your computer.
Trending Text Presets In Filmora
Filmora has many in-built trendy text presets. You can use these text presets in your videos. It is pretty handy and gives the texts a better look.
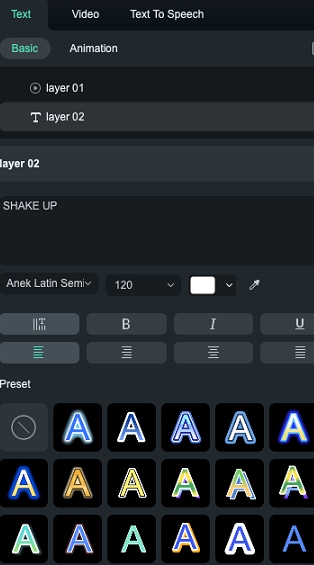
Create Highly-Accurate Video Captions With Filmora:
Video captions add significant value to a video. With captions, videos become better understandable. Here comes Filmora again to fulfill your needs. It supports 26 languages for captions. The steps to add captions are as follows.
Step 1: Launch Wondershare Filmora. Import the video to which you want to add a caption.
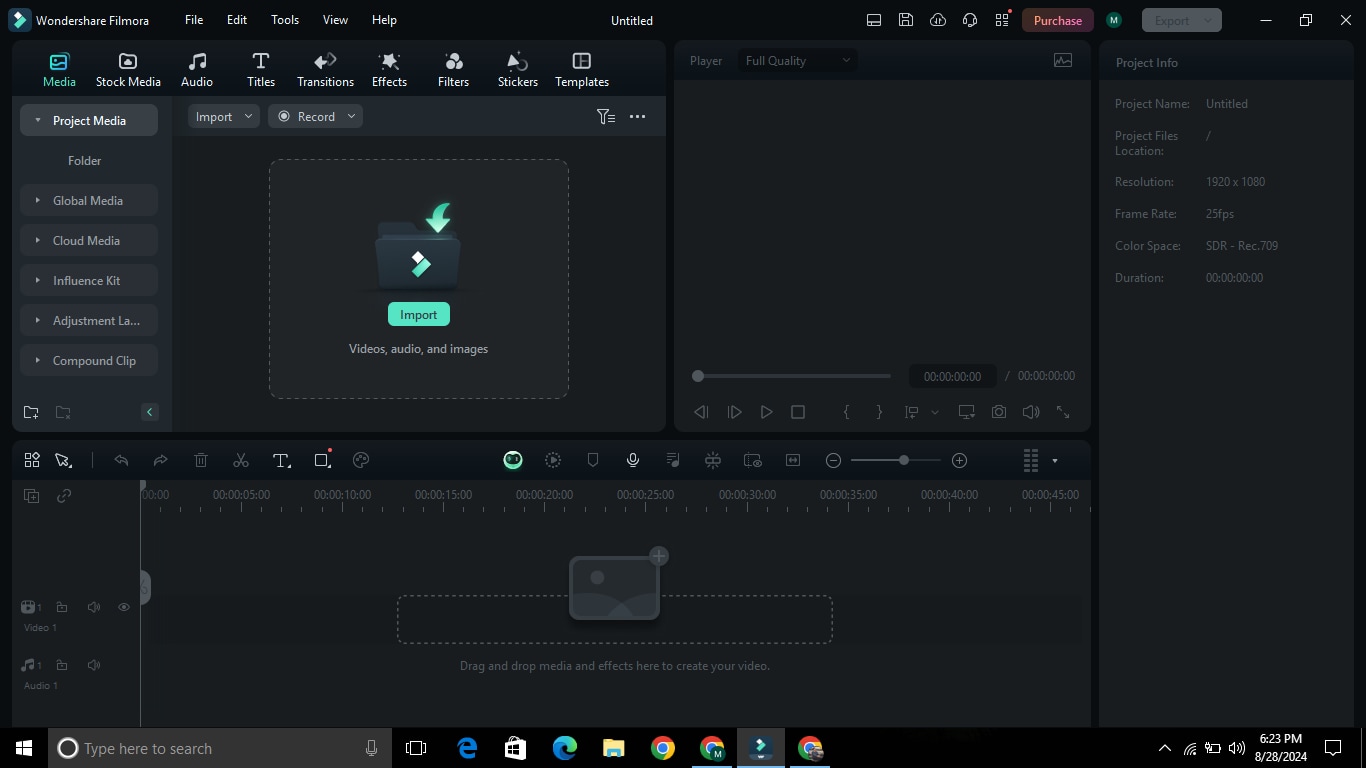
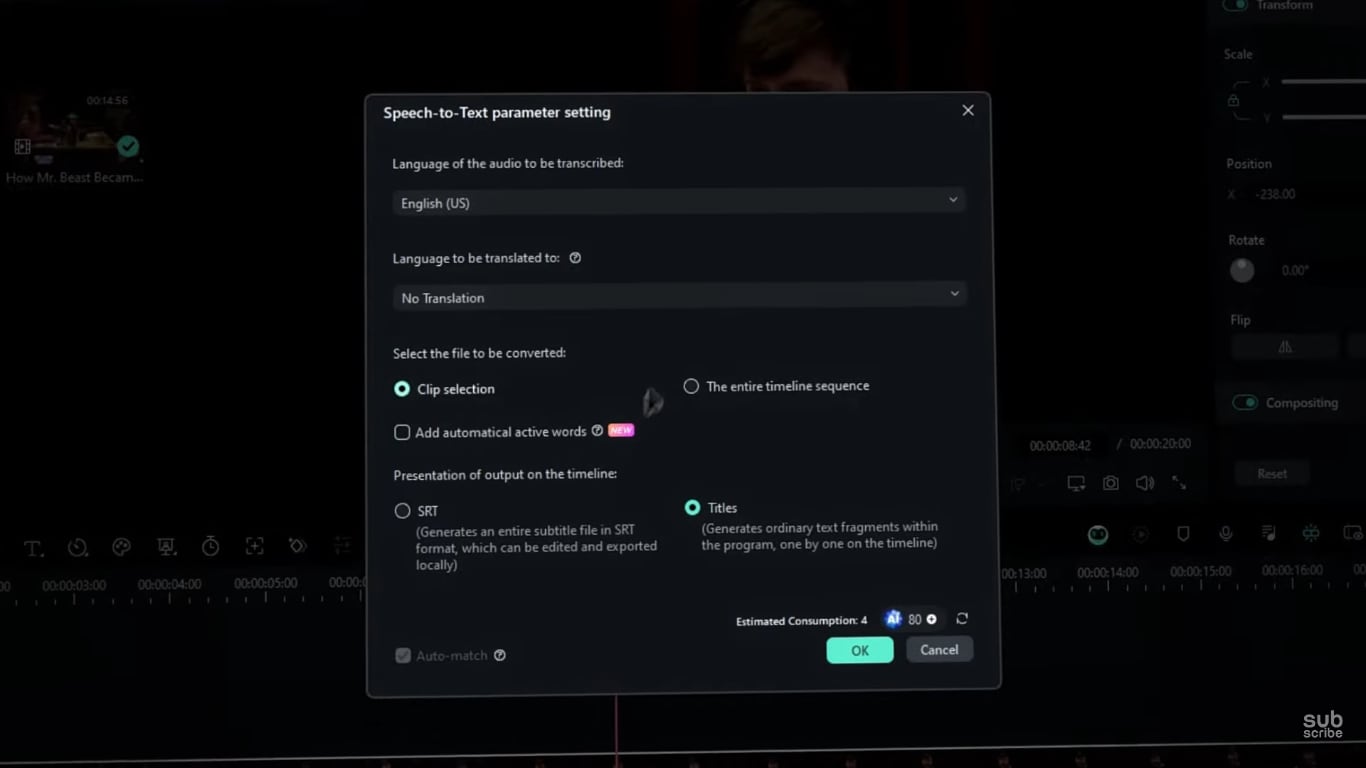
Step 2: Click on the “Speech to Text” tool. This will open a new window.

Step 3: In this window, select the language in which you want to add captions. Tick on “Add Automatical Active Words” to automatically generate captions. Then press the “OK” button.
Step 4: Wait a few seconds until AI generates the video's caption. Close this window and your captions will be created in Filmora.
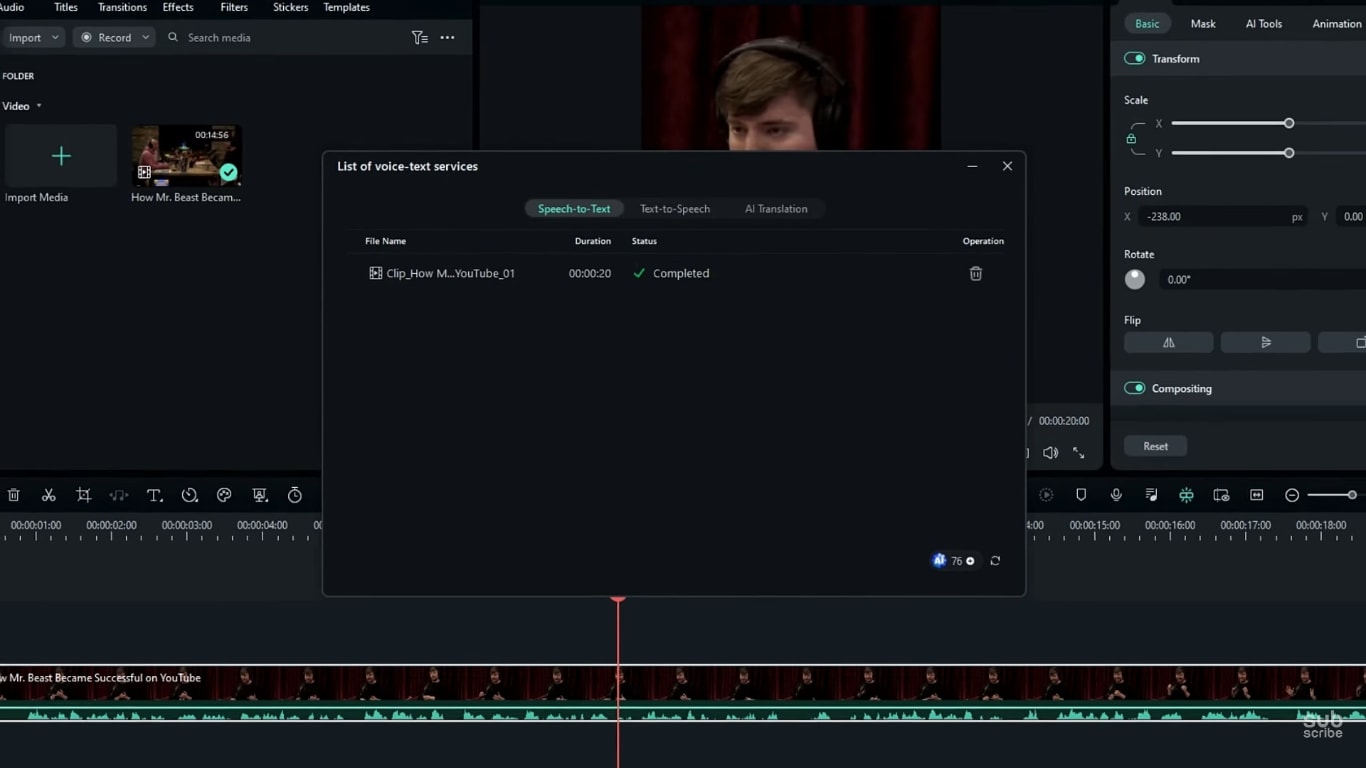
You can also customize these AI-created captions. Follow the next steps to customize captions.
Step 5: Select any part of the caption. Go to the template section and choose any template you want for your captions. You can also merge word-by-word captions into a line.
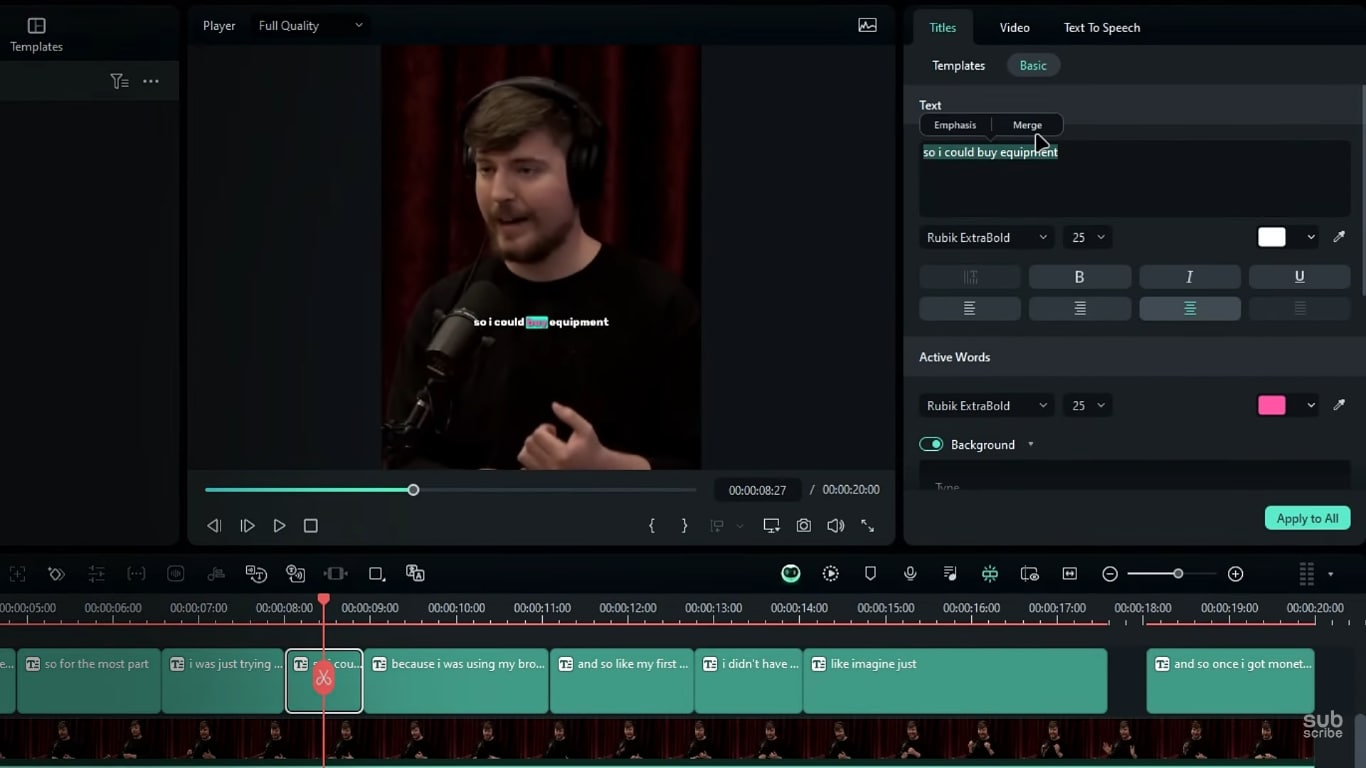
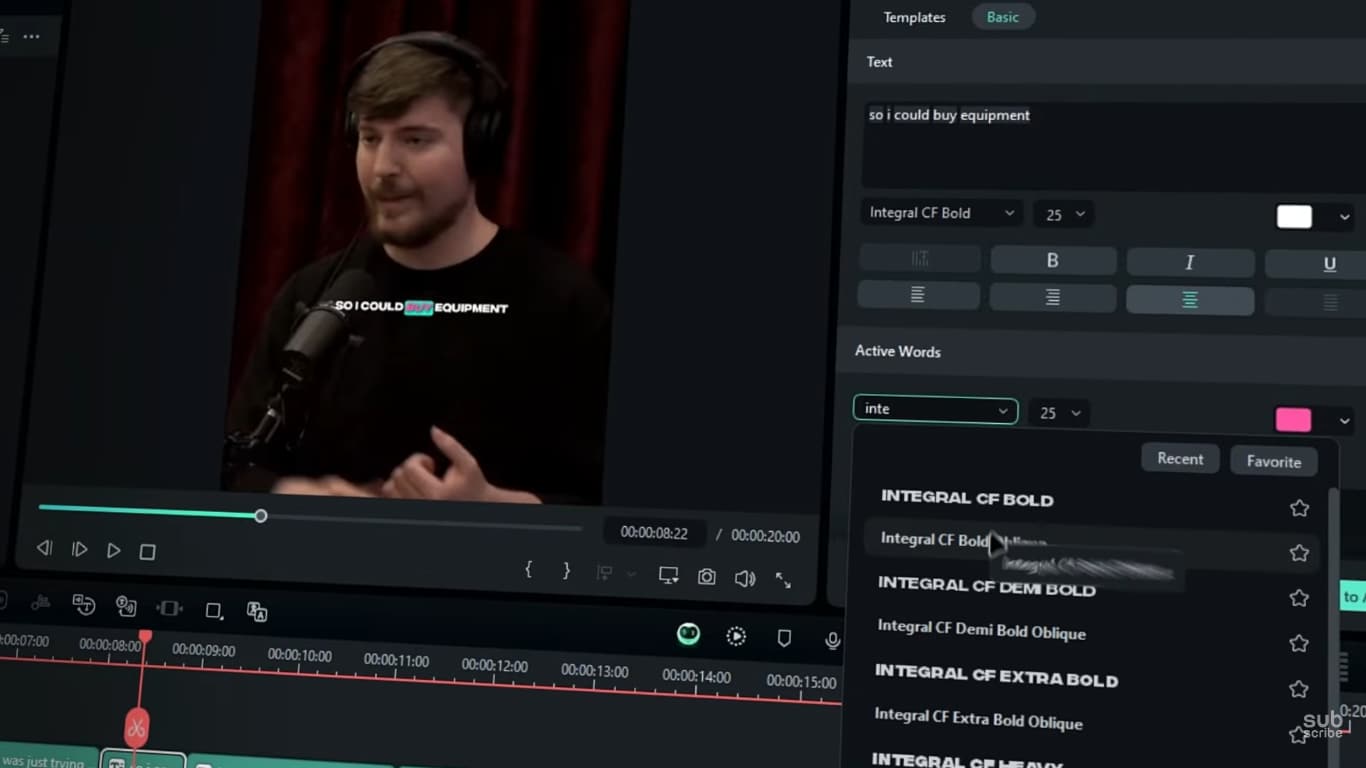
Step 6: Now select any font style and size. The next step is to change the color of the captions.
Step 7: Select the primary text color and active text color. Active text is the word being spoken at the moment.
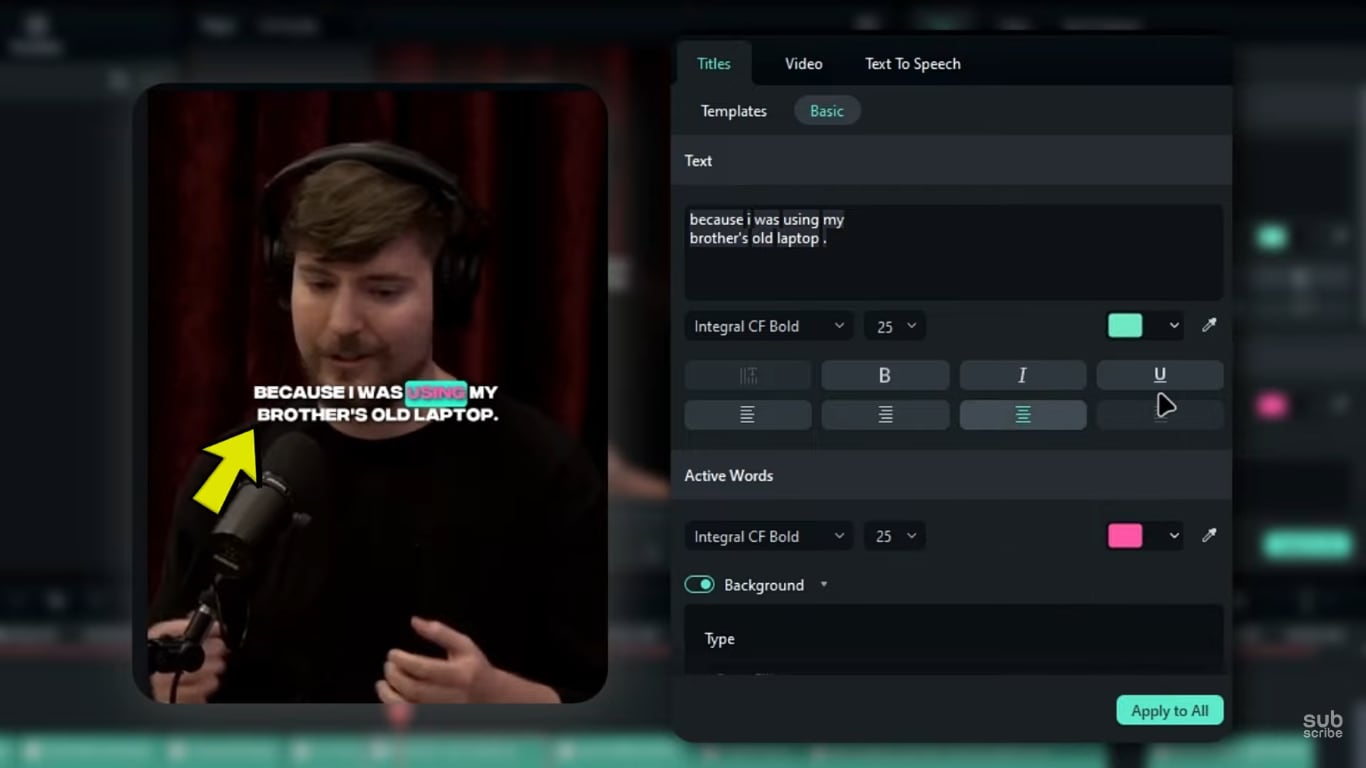
Click on the Export option and export the video to your computer. This way, you can create and customize captions in Wondershare Filmora. These captions will surely enhance your video style.
Conclusion
Adding text to your videos makes them catchy and attractive for the audience. We learned how to add text in OpenShot and Filmora. In addition to adding simple texts, use animations or add 3D texts. This adds much value to your videos. Wondershare Filmora is all-in-one software that can help you in doing so. We hope this blog is helpful for you. If you have any queries, comment below.
If you find this blog helpful, do not forget to leave a positive review.


