
In video storytelling, split screens are incredibly useful because they allow you to show multiple scenes or perspectives at the same time. Split screens can make storylines more complex, highlight important differences, and create a more immersive viewing experience.
However, to effectively use split screens, you need the right video editing tool. Among all the video editing tools available, Wondershare Filmora stands out as a top choice due to its versatility and ease of use.
The split screen feature on Filmora is simple for both beginners and experienced editors to create impressive split-screen effects and enhance the overall storytelling in your videos. Take a look at this Wondershare Filmora split screen tutorial to find out more about how to use split screen in Filmora.
In this article
Part 1. What is Split Screen and Why It’s Useful
Simply put, split screen is a video editing technique that divides the screen into multiple sections, letting different video clips play at the same time within one frame. This technique gives viewers a richer, more immersive experience, adding depth and complexity to videos and making them more engaging and informative.
Split screen is particularly popular in genres such as vlogs, reaction videos, gaming commentaries, and multi-camera interviews. Here are a few reasons why the split screen is useful:
- Comparing products or scenes
A split-screen video lets viewers see two or more products or scenes side by side, making it easier to compare features, performances, or outcomes. For example, in a tech review, you can show the performance of two smartphones at the same time, helping viewers compare their speed, display quality, and camera performance.

- Showing multiple perspectives
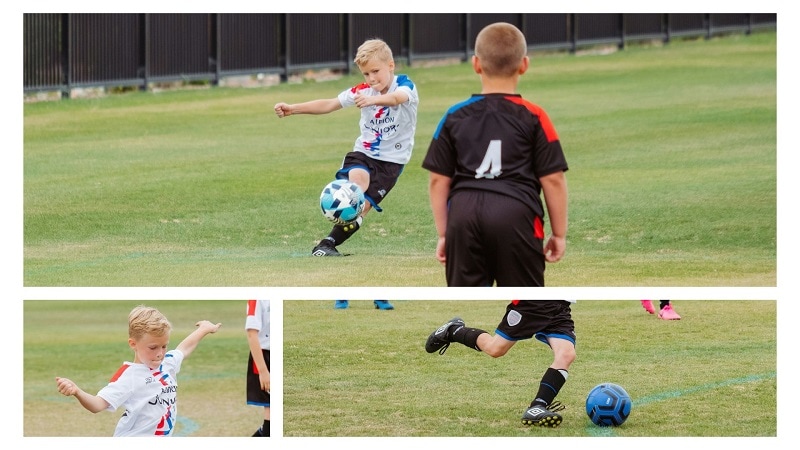
This split screen technique is ideal for displaying different viewpoints at the same time. For instance, in a sports video, you can show the game from various angles or perspectives, enhancing the viewer's understanding and enjoyment of the event.
- Enhancing storytelling
Split screen can be used to show parallel storylines or actions happening at the same time. For example, in a vlog, you might use a split screen to show your reaction alongside the event you're commenting on, providing a more immersive experience for your audience.

- Tutorials
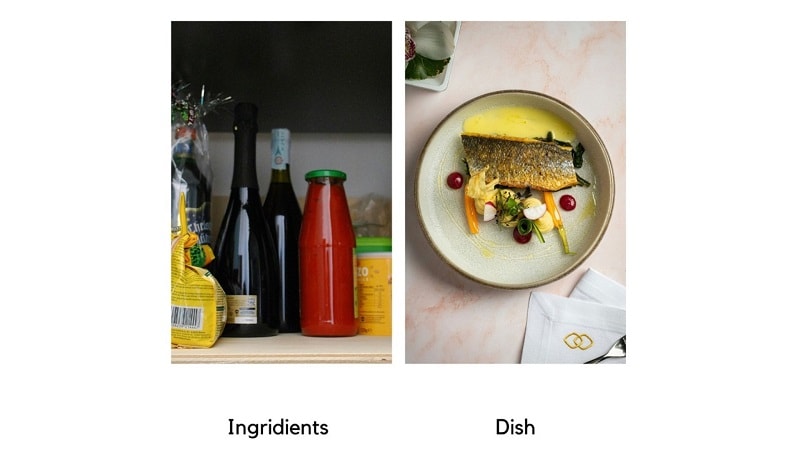
For instructional videos, a split screen is excellent for showing the steps of a process from different angles. For example, in a cooking tutorial, you could show the chef preparing ingredients on one side and the final dish on the other, helping viewers follow along more effectively.
- Highlighting differences
A split screen can emphasize differences or contrasts. For instance, in a travel video, you might show the differences between two destinations at the same time, such as urban versus rural settings, helping viewers appreciate the unique qualities of each place.

Part 2. How to Implement Split Screen in Filmora
Now that you understand the advantages of split screen in video storytelling, it's time to learn how to implement it using the split screen feature in Wondershare Filmora. Filmora is one of the easiest software to create split-screen videos, thanks to its user-friendly interface and split-screen templates.
Since Filmora offers pre-made split-screen templates, you can place multiple videos side by side and play them simultaneously in just a few clicks. You can also create picture-in-picture effects, making it an excellent choice for both beginners and experienced editors.
Key Features:
- Choose from over 250 pre-made templates, allowing you to display up to six scenes on one screen effortlessly.
- Special Effects Templates tailored to various themes such as social media, game commentary, vlogs, sports, comics, mock-ups, love, festivals, and YouTube end screens.
- Compound Clip tools combine multiple clips into a single, easy-to-manage clip, streamlining your editing process and keeping your project organized.
- Auto Synchronization tools to synchronize audio and video tracks automatically, ensuring seamless and professional-looking split-screen effects.
- A wide range of filters, effects, and stickers that match your video's main theme, adding a creative touch.
- Quick Split Mode tools to speed up your editing workflow with Quick Split Mode, allowing you to create split-screen videos efficiently and effectively.
You can access the split screen feature in Filmora by downloading it from the Filmora website. Filmora is compatible with Windows and macOS. A free version is available, with subscription plans starting at just $29.99.
- Follow these step-by-step tutorials to utilize the split screen feature in Filmora:
Step1Import your videos and place them on the editing timeline
Before we begin, make sure you have the latest version of Wondershare Filmora. After opening Filmora, create a new project and import the videos you want to edit. Once your video is uploaded, drag and drop it onto the editing timeline.
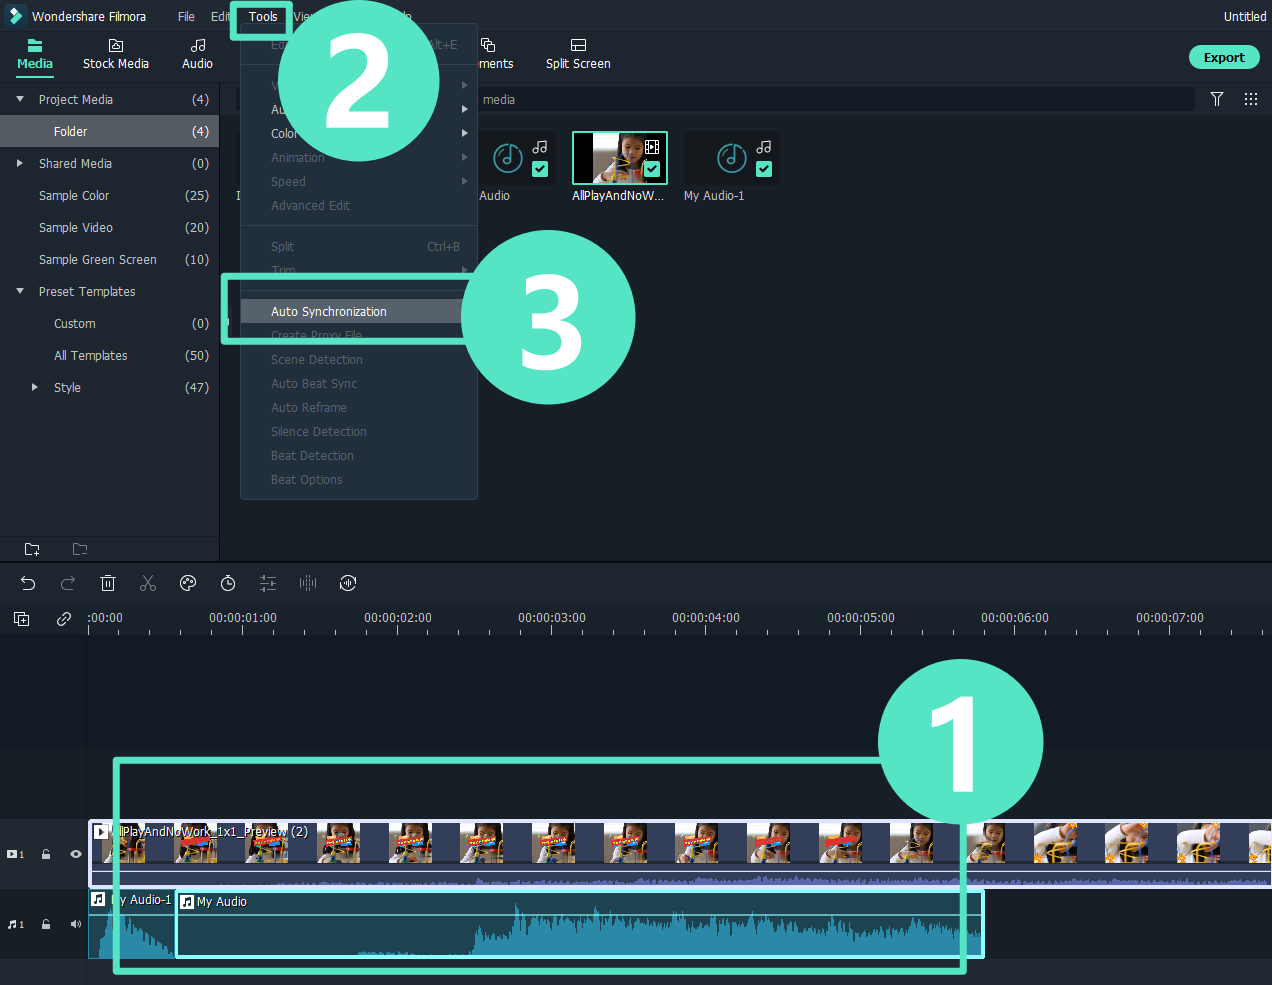
Step2Auto-synchronize your video
Make sure your audio and video sync properly to prevent any mismatch that could create a disjointed listening experience. To automatically sync audio and video tracks, you can use the Auto Synchronization tool.
Select the video and audio tracks together on the timeline. In the top menu bar, click "Tools" > "Auto Synchronization."
Step3Choose a preset for your split-screen
Select the perfect preset for your split screen in Filmora by clicking on the Templates > Split Screen option to open the layout library. There, you can pick from over 250 templates and display up to six clips at once.
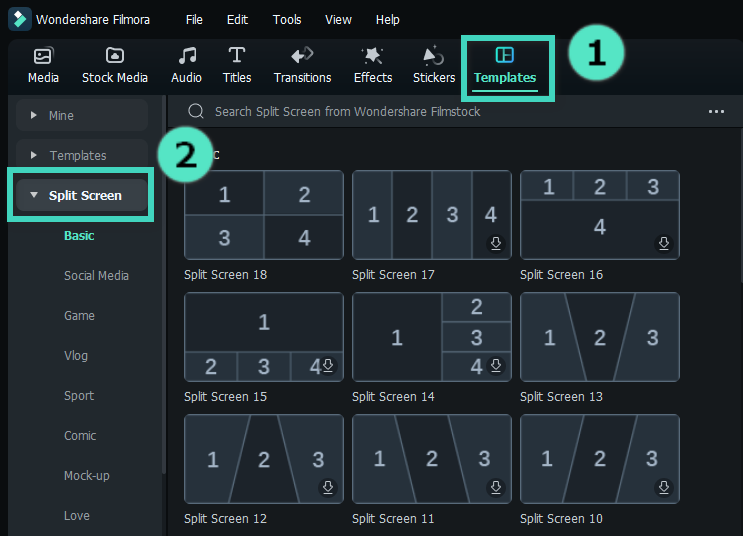
To preview layouts, double-click the preset thumbnails. Drag your chosen layout to the timeline to select it. The default duration of the split screen is 5 seconds, but you can change it by dragging the edges on the timeline.
Step4Edit your split-screen video
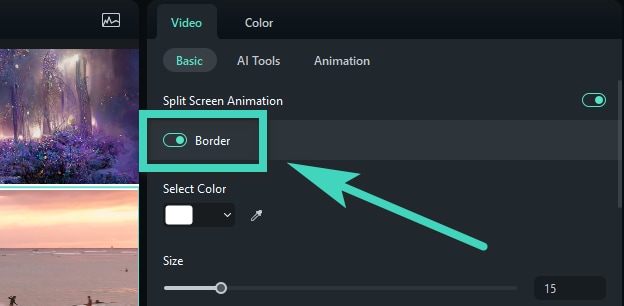
Let’s add borders to your split-screen videos in Filmora. First, go to the "Video" tab in the Property Panel and enable "Border." Then, you can customize the color and size of the borders between clips in your split screen.
The Video tab also offers options to rotate, scale, and change the size of your split-screen videos, giving you full control over their appearance.
Step5Use filters, effects, and stickers
Next, enhance your split-screen video by adding overlays and effects from Filmora's extensive library. Choose from a wide range of filters, effects, and stickers to match your video's theme and add a creative touch.
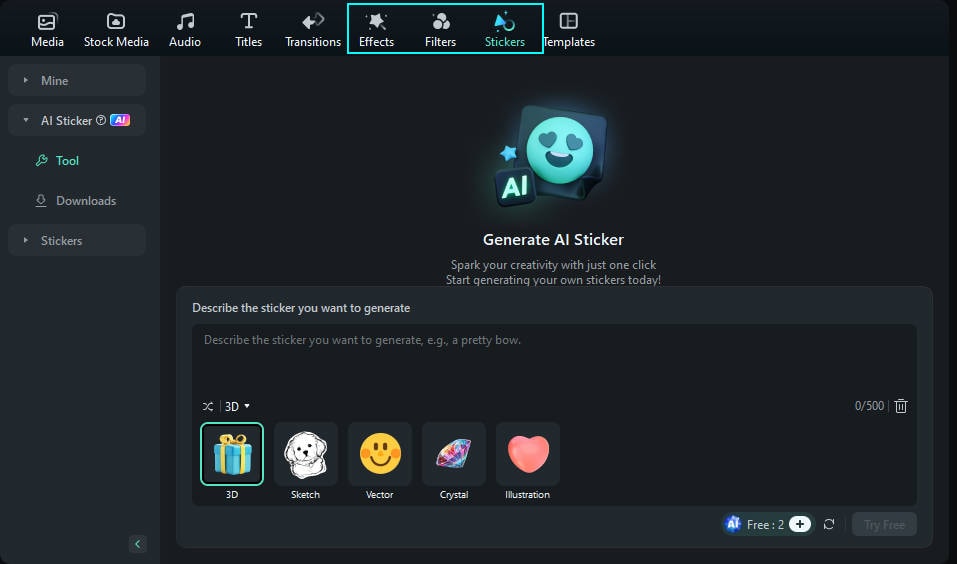
You can also use the "AI Stickers" feature in the left toolbar to add personality and create custom stickers without copyright concerns. Just type in your prompts and get fantastic results.
Note: When applying effects, filters, or stickers, they will be applied to all clips in the split-screen video.
Part 3. Practical Tips and Tricks for Effective Split Screen Videos
After mastering the basics of implementing split screen in Filmora, it's important to focus on best practices to make your split screen videos stand out and effectively convey your message. Attention to detail and thoughtful design can transform a simple split screen into a powerful storytelling tool.
Here are some best practices to follow:
- Plan Your Layout: Before editing, decide how you want your split screen to look. Choose the number of sections and where each video clip will go to keep the composition balanced and visually appealing.
- Maintain Consistency: Keep the visual style consistent across all sections. Use similar colors, filters, and effects to create a cohesive look that enhances your video's overall aesthetic.
- Use Clear Borders: Define each section with clear borders to help viewers distinguish between different clips. This can be done by adjusting the border thickness and color to match your video's theme.
- Sync Your Audio: Make sure the audio tracks are in sync, especially if multiple clips are playing at the same time. This helps keep your video seamless and professional.
- Test Different Templates: Try out various split-screen templates to see which one best fits your content. Luckily, the split screen feature in Filmora offers many options, so take the time to find the most effective one for your video.
Moreover, it's also important to avoid common mistakes that can detract from your video's impact. Stick to these guidelines and steer clear of pitfalls to make your split-screen videos compelling and professional.
Here are some common mistakes to avoid:
- Overcrowding the Screen: Resist the temptation to overcrowd the split screen with too many elements or sections. An overly busy screen can overwhelm viewers and make it difficult to focus on the main content.
- Inconsistent Quality: Make sure all video clips have the same quality in resolution, color balance, and clarity. Different-looking visuals can make your video seem less professional and impactful.
- Neglecting Audio Balance: Pay attention to audio levels across all clips to avoid discrepancies that could distract from the video's message. Make sure the audio is clear, balanced, and appropriately synchronized with the visuals.
- Ignoring Aspect Ratios: Maintain consistent aspect ratios across all sections of the split screen to prevent distortion or awkward visual proportions. Consistency in aspect ratios contributes to a polished and cohesive look.
- Lack of Focus: Make sure each part of the split screen serves a clear purpose in your video's story or comparison. Every element should help explain information or help viewers understand without extra distractions.
Conclusion
Split screens are invaluable tools in video storytelling. They can be used to compare and contrast scenes, show interactions between characters in different locations, or highlight different aspects of a single event.
We have included a tutorial on using the split screen in Wondershare Filmora, known for its user-friendly interface and powerful split screen capabilities among video editing tools. Along with advanced options like auto synchronization and a variety of stickers that match your video's theme, split screen in Filmora also offers pre-made templates and intuitive tools to make it easy to create creative split screen effects.
