Call us: +1-60-4343-8521
Mon-Fri 6:00 PM to 11:00 AM Pacific Time
International phone rates may be charged by your service provider
What is the Split Screen Effect in Video Editing?
The split screen effect is a video editing technique where the screen is divided into two or more sections, with each section displaying a different video or image simultaneously.
Sometimes, telling a compelling story requires more than one scene to convey all the meanings and emotions of the narrative correctly. In these instances, you need to divide the screen into two or more parts and show different actions happening simultaneously. That way, you have the option to show twice or even four times as much to the audience, letting them feel completely immersed in your story.
That's how the split-screen effect was born. Let's take a closer look at this concept, define it, and see how to use it in your work.
Definition
A split screen is defined as a compositional and editing technique that divides the frame into two or more sections. Each section displays different images or videos simultaneously. You can divide the screen vertically, horizontally, or you can experiment with different grids. The ultimate goal of this effect is to show a particular contrast or parallel between various actions in a single frame. Artists use this effect to show comparisons, contrasts, viewpoints, and several narrative juxtapositions.
History of the Split-Screen Effect
The first instance of this effect in movies was a silent film released in 1903. Directed by Edisn S. Porter, The Great Train Robbery featured an early version of the split-screen effect that experimented with different visual perspectives. However, the split screen as we all know it today appeared in movies made six or more decades later, in films like The Boston Strangler from 1968 and Brian De Palma's movie Carrie from 1976. These directors used this effect artistically, showing parallel actions and creating a visual contrast.
While this was happening, TV adopted this technique wholeheartedly, especially in live broadcasts and sports coverage, allowing them to show the speaker on one side and the live event on the other.
Today, the split-screen method is very popular. You can see it in dramas, sci-fi, action, and even horror movies. Creators on YouTube, Twitch, and other platforms use it when streaming or making videos. It is all over the place.
The Top Three Visual Characteristics of Split Screen
To better define the split screen effect, we have identified its most important visual aspects and what makes it unique.
Multiple Recordings Within One Screen
Splitting the screen into four parts quadruples the amount of information you can convey in one sequence. It gives you a lot of freedom to express your artistic side.
Simultaneous Action Display
Depending on the story you are working on, you can use the split-screen effect to display similar or contrasting actions.
Defined Borders or Dividers
Depending on how you decide to split your screen and the grid you want to use, you will also need to define borders between these scenes.
After discussing the visual aspects of split screens, let's examine a short section on when to use the split screen.
When and Where Should You Use Split Screen
You can use split screen in various genres and for many different actions. Here are the most common scenarios where the split-screen effect is more than welcome.
Application of Split Screen Effects
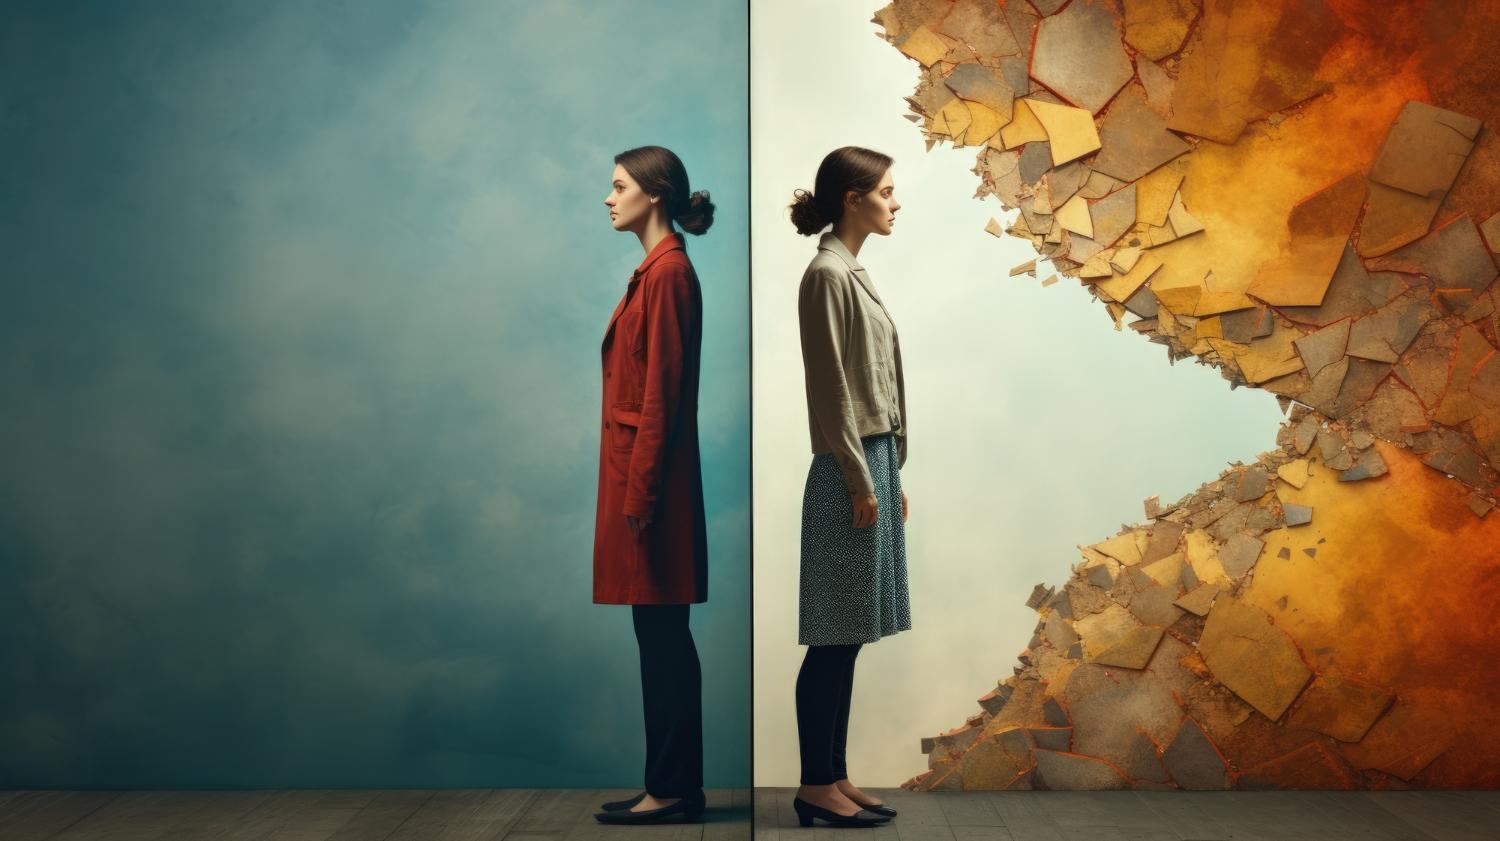
Compare Two or More Subjects
The split-screen effect can be used for different comparison shot types. You can compare people, products, locations, and time periods, and the side-by-side comparison makes it ideal for identifying differences. This makes it perfect for documentaries, analysis videos, or before-and-after transformations like the example below.
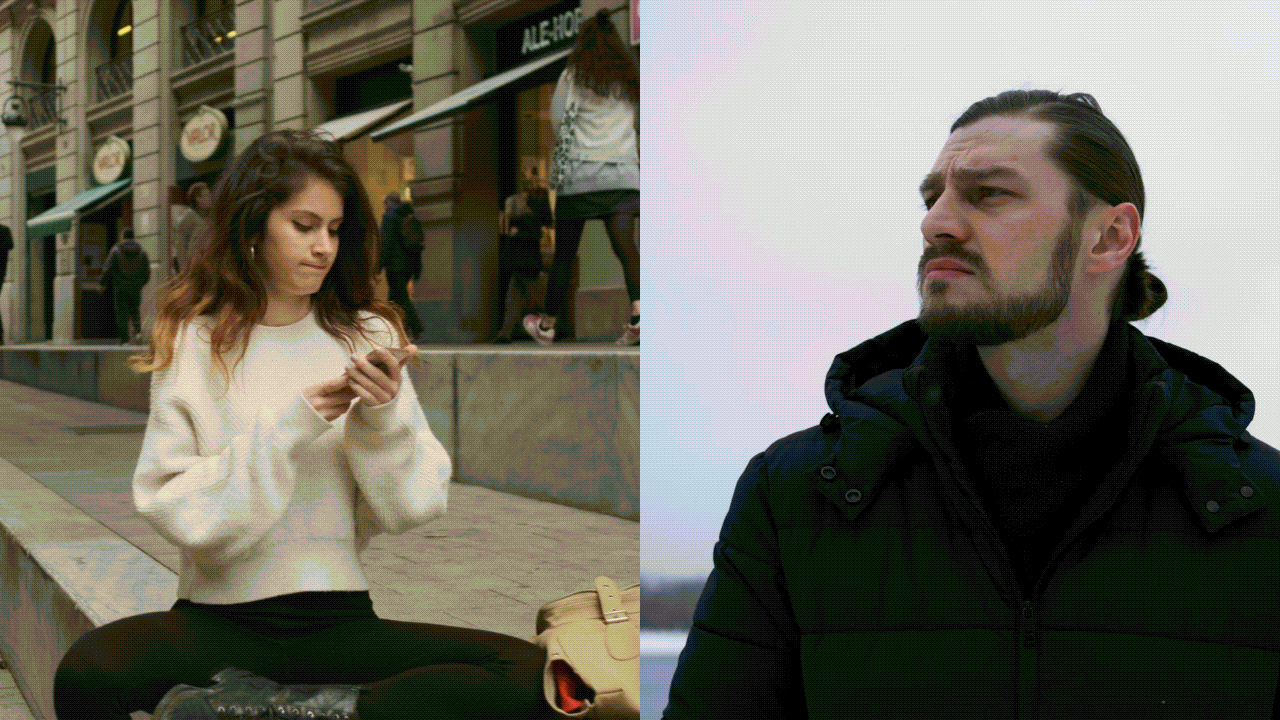
Show Simultaneous Actions
If the story you are trying to tell features two separate actions happening simultaneously, then you can use split screen to show these actions side by side. This type of effect is excellent for action movies, where you can show several actors preparing for a fight, or romance scenes, where two people are thinking about each other, like in the example below.
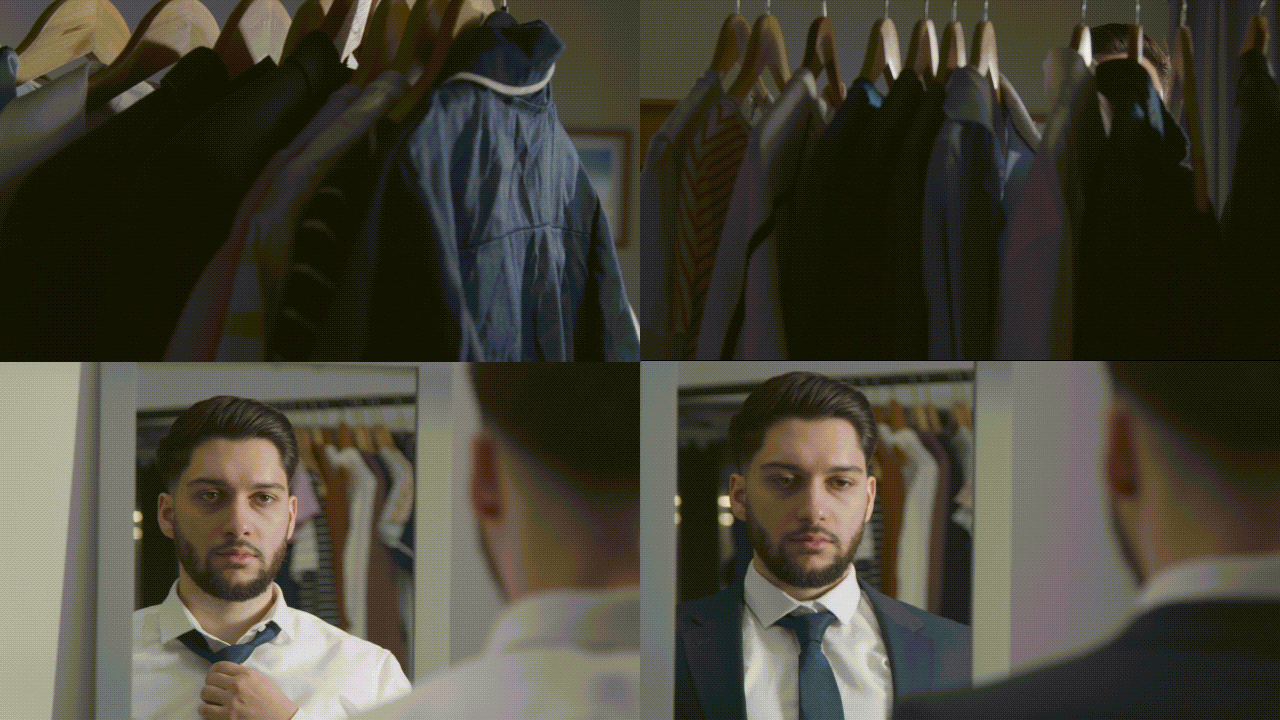
Save Time or Space
If you are working on a show that has limited time for every episode, you can use split screen to save time. Instead of cutting to a different shot, you can save double the time by showing both actions on the screen side by side. For example, instead of spending time on a montage of a person preparing for work, you can divide the screen into four parts and condense this scene to save time.
How do You Combine the Split-Screen Effect with Other Creative Techniques
Now that you understand the most common uses of split screen, let's see how this technique can be used with other creative video editing techniques to achieve the best result.
A match cut blends two scenes with similar compositions by fading the former scene out while the latter fades in. Let's assume you are matching two scenes of two people preparing to meet each other. You can use the match cut and merge two scenes where both characters are brushing their teeth. Then, in the middle of the match cut transition, use keyframing to move the clips on different sides of the screen, and then show a contrasting preparation routine for both characters.
Motion tracking tracks movement across the screen and keeps the subject in motion, always at the center, or wherever you decide. It adds a more dynamic element to the technique and makes it look better. For instance, in a sports video, you can use motion tracking on two running athletes to ensure they are always in focus, and then add the split-screen effect to compare their speed and technique.
Time lapses are videos where long periods are condensed into a few seconds. A popular example is a recording of the Sun going through the sky for 12 hours, night falling, and the moon coming out, condensed into 30 seconds. After such a time lapse, you can add a multiple split-screen effect showing different characters preparing for work in the night shift. That way, you have shown an entire day in only a minute.
A Few Artistic Considerations Concerning Split Screen
Since split screens have been used in movies and TV shows for decades, artists have agreed that you must consider these two pro tips to create a good split-screen effect.
Visual Balance and Composition
Before you combine two scenes with the split screen technique, you need to ensure that they look good together side by side. This means that the composition of one part of the screen should complement the next in a visually pleasing way. Also, when you add this effect, two or more scenes merge into one, and you need to ensure the overall composition works. Resolve this issue when making the storyboard to make shooting easier.
Narrative Clarity and Purpose
There are instances where the split-screen effect will not fit the narrative. If this is the case, then it does not have a purpose in your video. The story should call for it and require it. If you add it somewhere where it doesn't belong, you will risk losing the clarity of your narrative, as the audience will have a hard time following the story. Use split screen when it serves the narrative.
And, with that, we have learned the most important theoretical aspects of this effect. Now, let's consider the best tool you can use to create it on your own.
How to Create the Split Screen Effect?
If you want to combine two videos and create a split-screen effect, you need a tool that lets you easily upload videos, organize them in the timeline with simple actions, and edit their size and position to fit the screen. One of the best tools for that is Filmora.
Create a Split-screen Effect Using Filmora
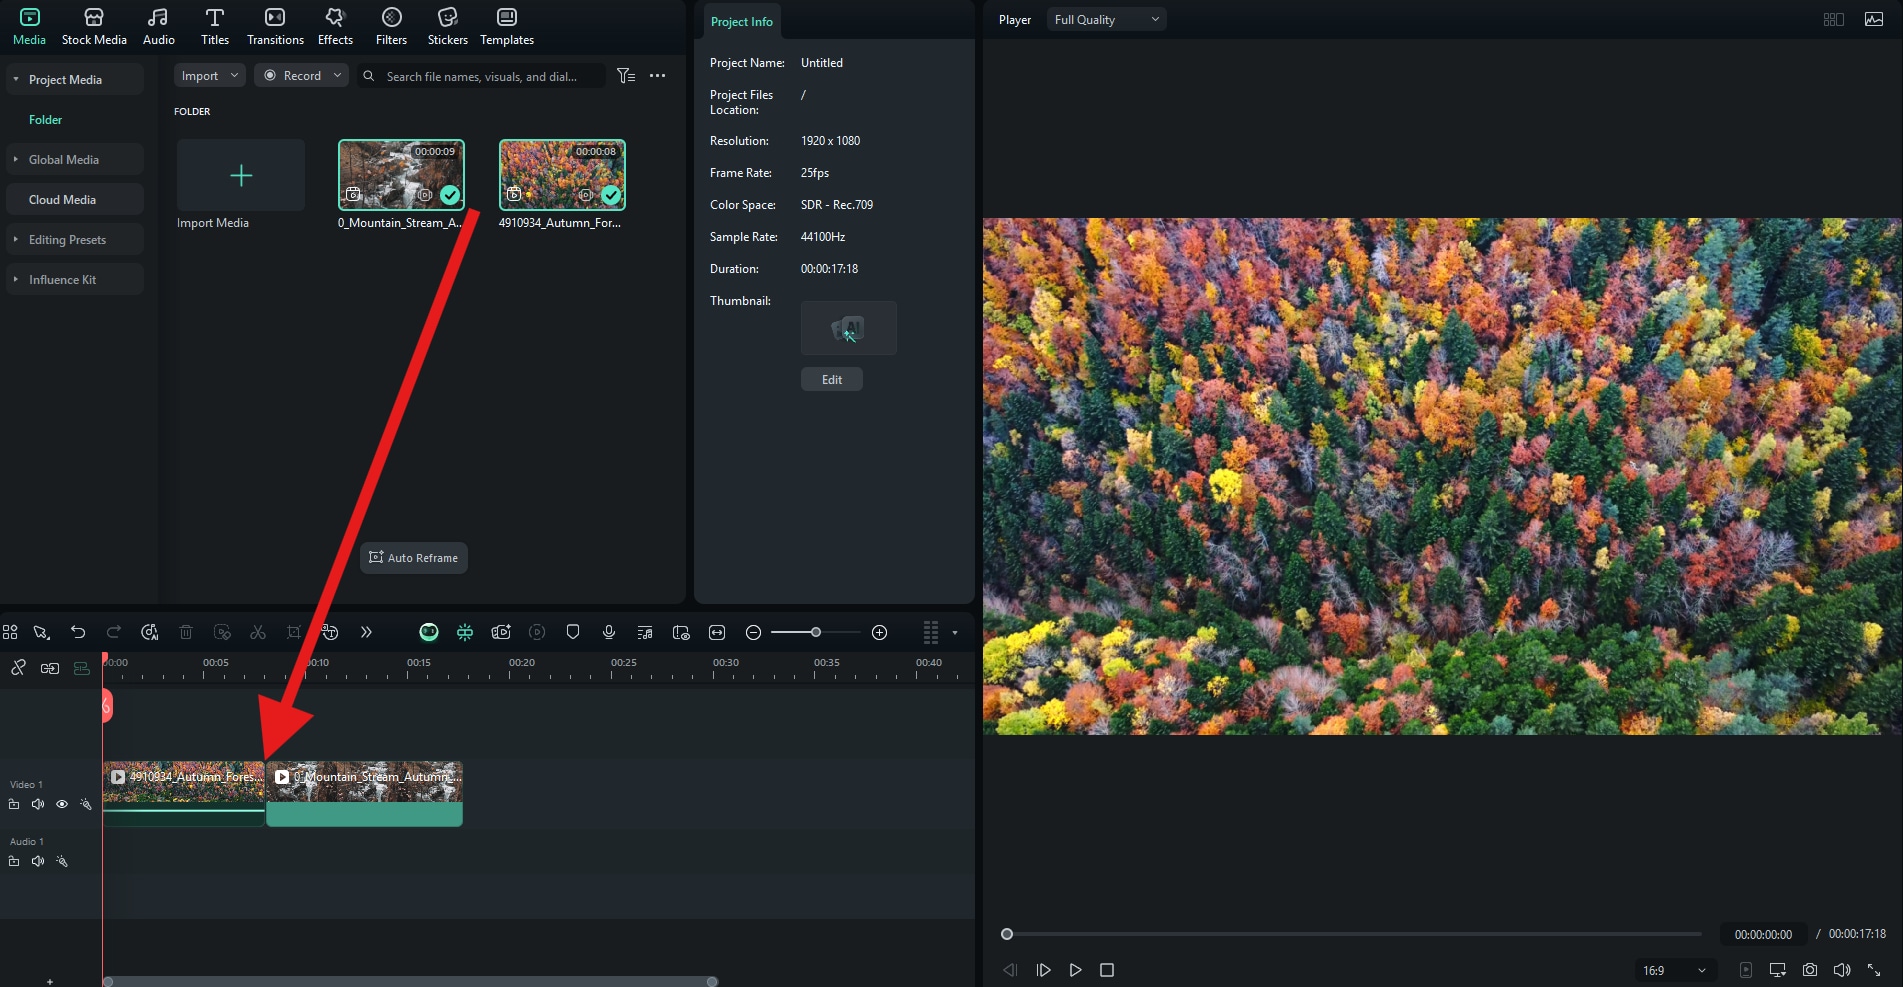
To create a split-screen effect using Filmora, download and install the software on your PC or laptop, then create a new project and import at least two videos. Then, follow the simple 3-step tutorial below.
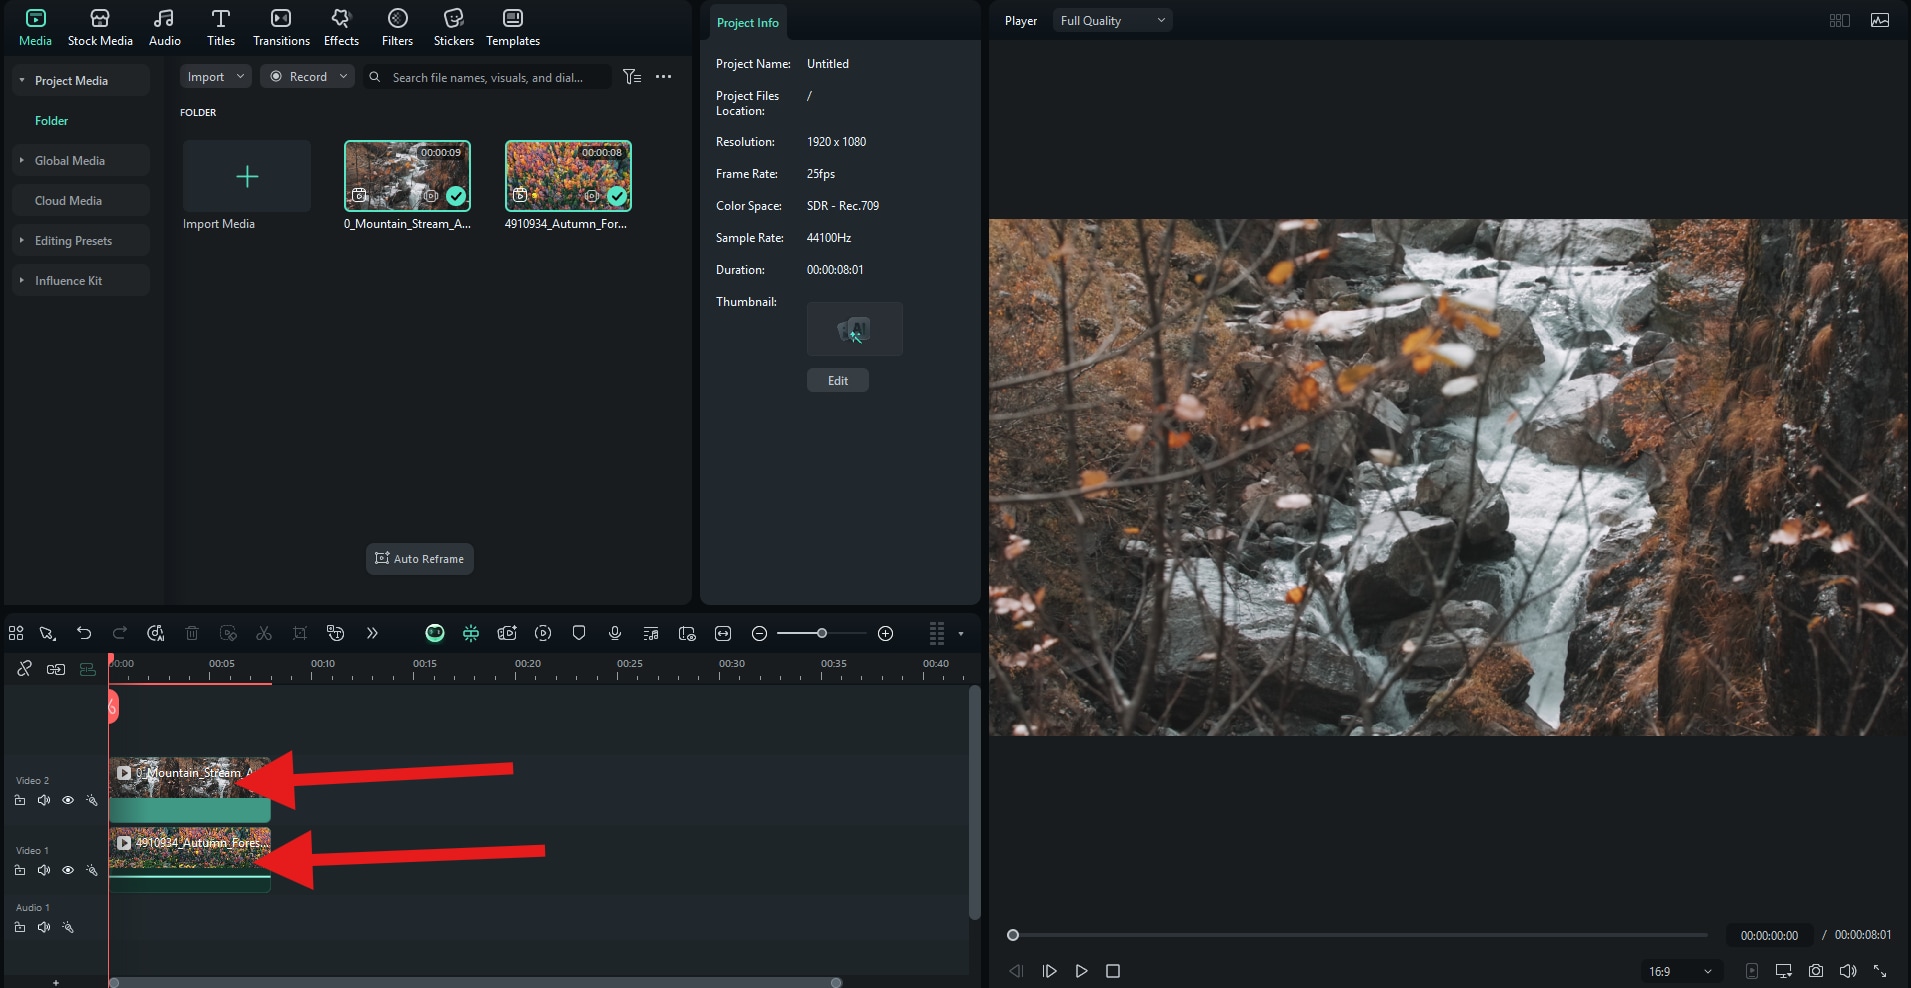
Select two (or more) files and drag them to the timeline.
Step 2
Move the videos to be on top of each other in the editing timeline.
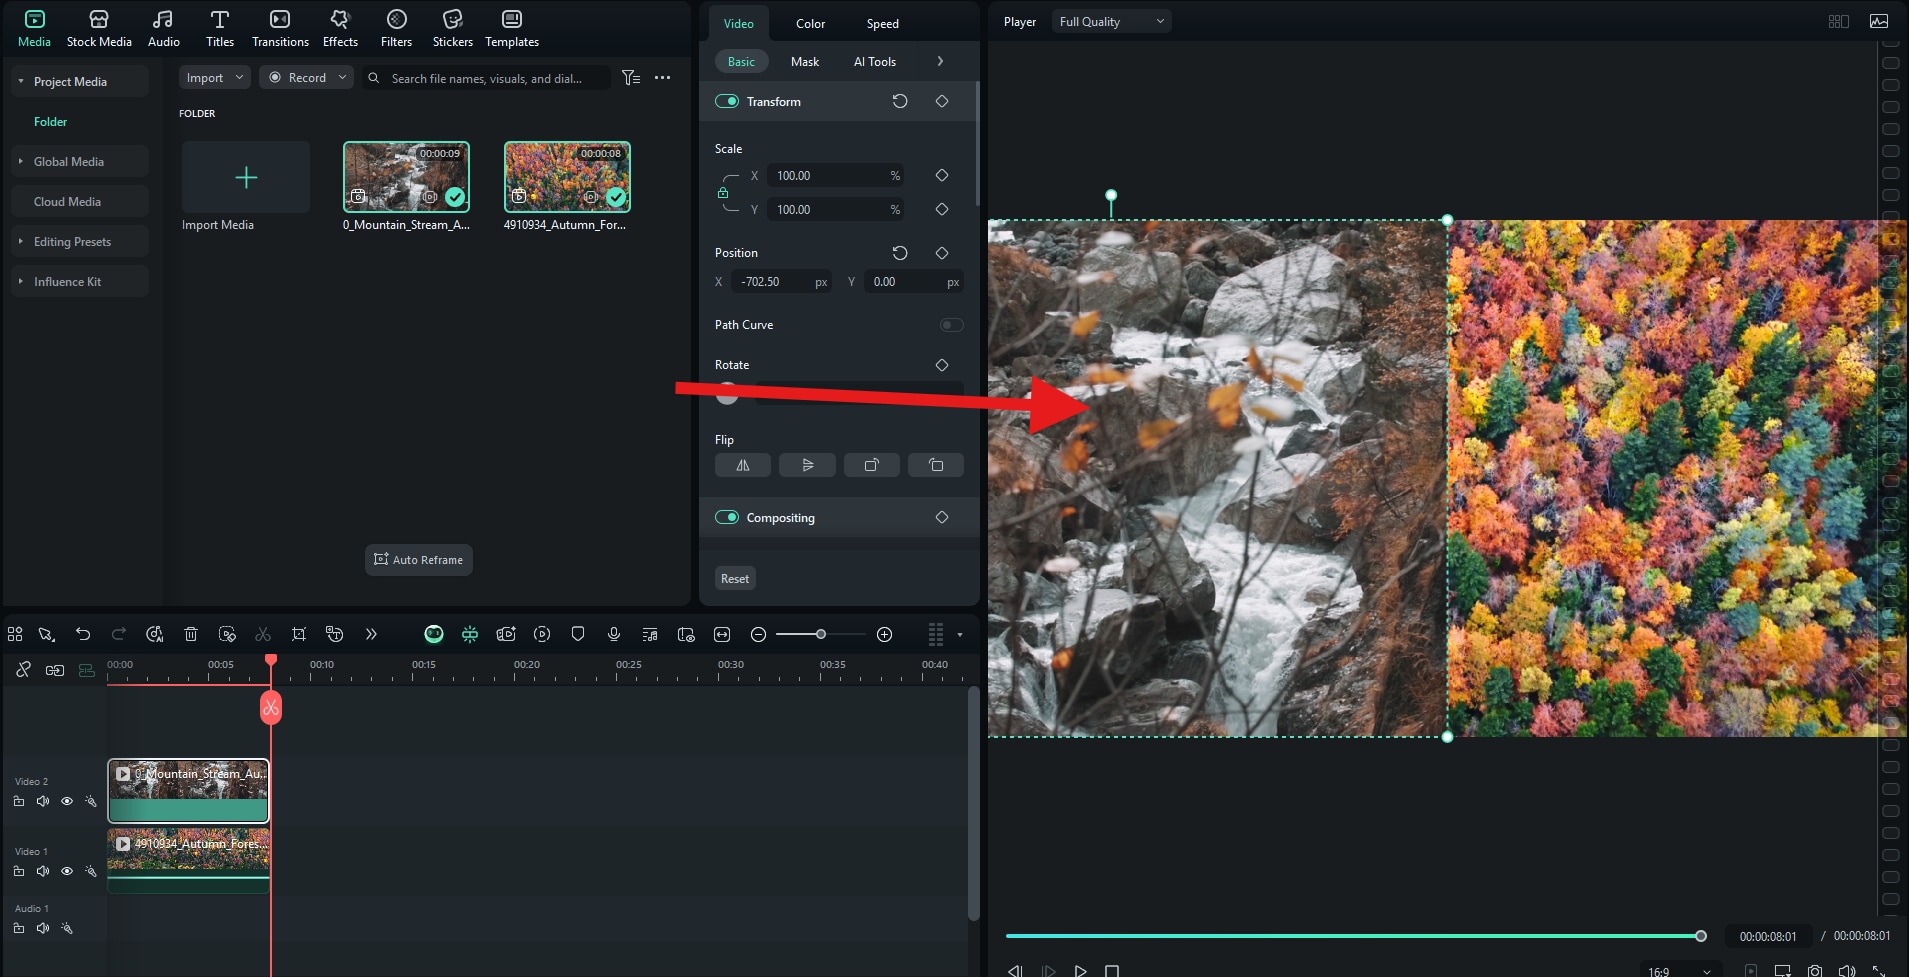
Step 3
You can adjust the size and position of each clip in the video preview section. Just split them in the middle to create the split-screen effect.
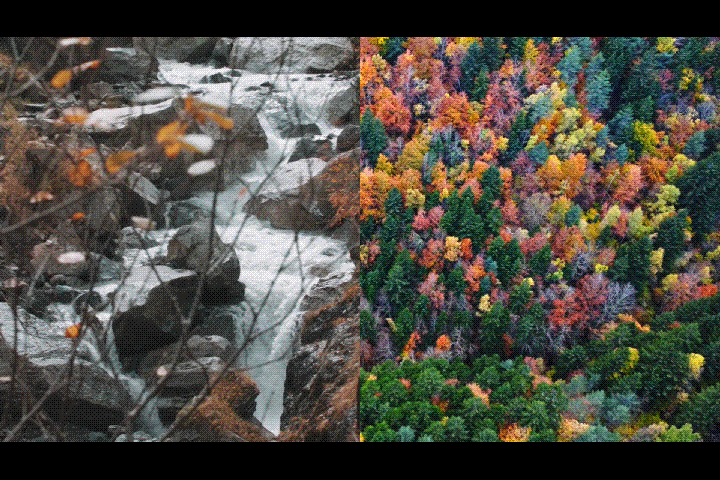
As you can see, in Filmora, you can create the split-screen effect in three simple steps. Here is the result we got, showing the contrast between autumn and spring.
There is one more way to get this effect in Filmora.
Use Templates to Split the Screen in Two Parts
On top of all the creative assets that you can use, Filmora also comes packed with thousands of templates. Here's how you can use them to create a stylized split-screen video.
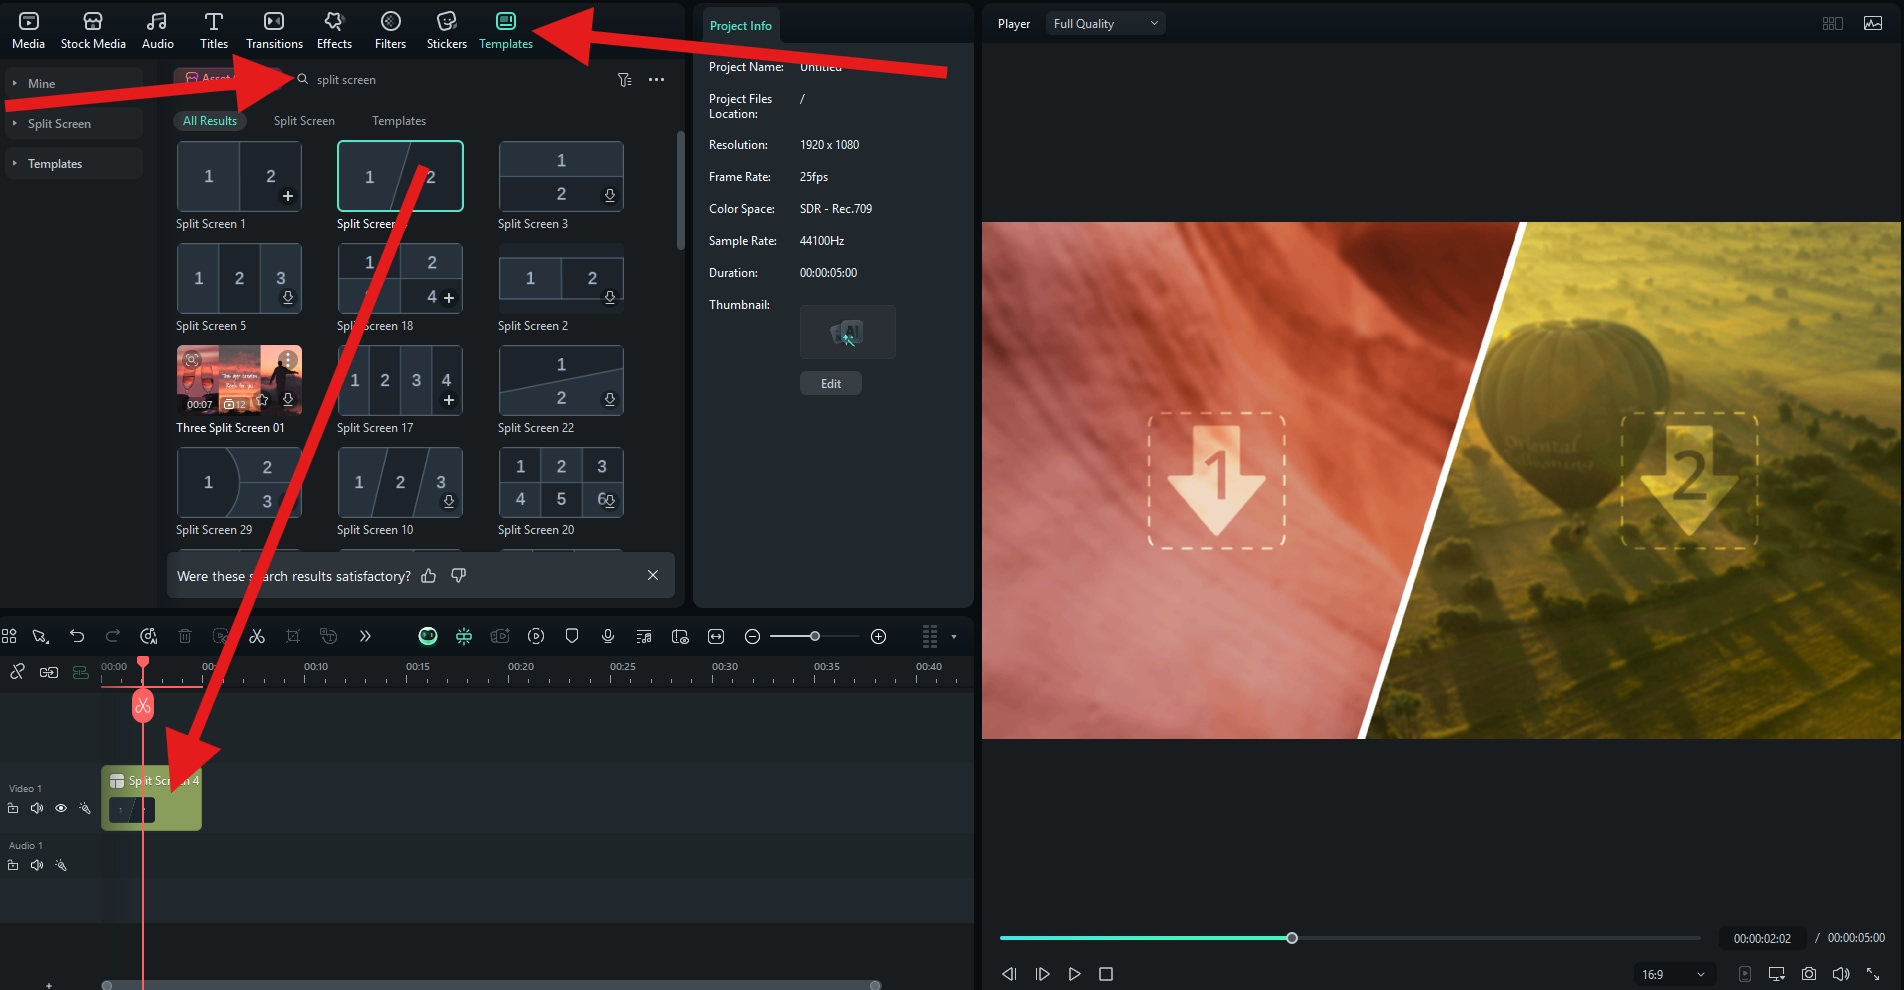
Open the Templates section, and use the search bar to find split-screen templates. Then, pick the one that you like and drag it to the timeline.
Step 2
Click on the split screen template in the timeline and then, click on Advanced.
Step 3
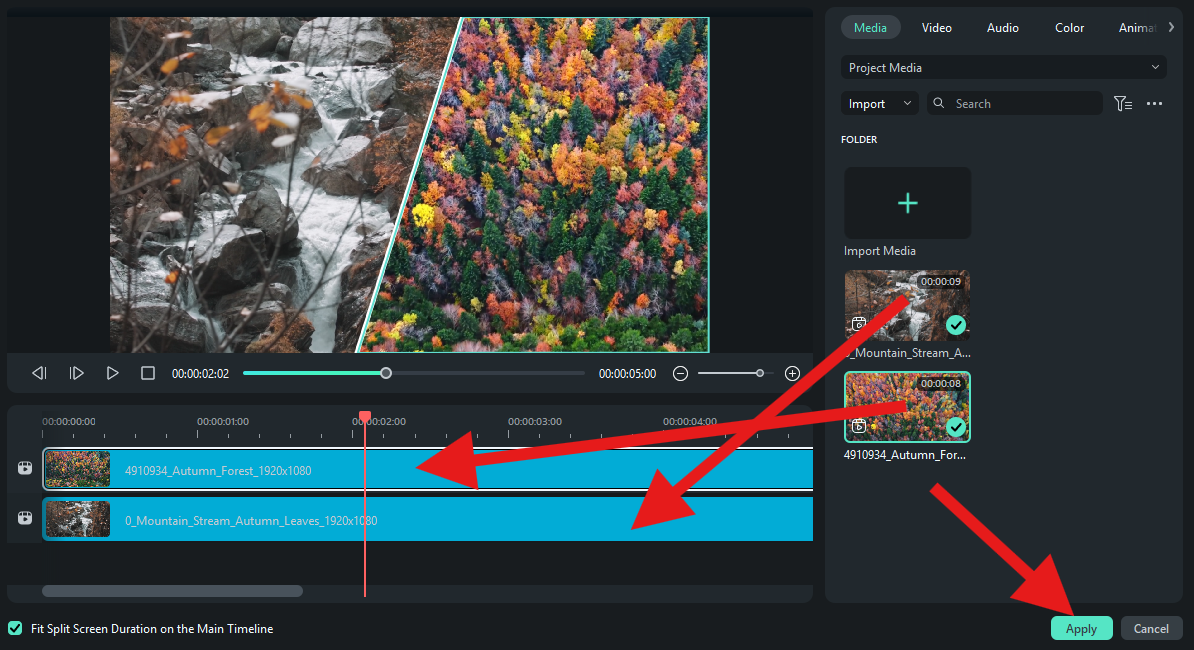
Import two (or more) videos and drag them to replace the template videos. After that, simply click on Apply.
Here is the result we got now. It's more stylized and features some transition effects.
Avoid These Two Common Issues with Split-Screen Video Editing
In our final section, we will address a few common issues with this technique and provide suggestions on how to address them.
Issue 1: Visual Overload
You have divided your screen into too many parts, which will not create a cohesive scene.
How to avoid
Unless there is a specific reason, refrain from dividing the screen into more than four parts. In 90% of cases, two parts will be more than enough. And, whenever you use split-screen, make sure that the scenes on both sides of the screen are connected and can be followed simultaneously.
Issue 2: Audio Confusion
Two people are talking at the same time in different locations with the split screen turned on, and the audio from the first clip obscures the audio from the second.
How to avoid
A good tip is to mute audio from both clips, add a song on top of the clip, and ensure that there is no dialogue during the split screen. Of course, you can avoid this tip, but be careful.