In this article
-
What Does Transcode Mean?
-
Application Section - When/Where to Use
-
Guide to Professional Transcoding Workflow
Understanding Transcode
What is transcoding, and why does it matter in video and audio workflows? This section breaks it down so you understand how it fits into modern media production.
Transcoding is the process of converting a media file from one format to another.
This method plays a central role in video production, streaming, and content delivery. It ensures that content remains compatible across devices, maintains quality where necessary, and reduces file sizes whenever possible. Editors, broadcasters, and streamers rely on transcoding to meet format requirements and playback standards.
Core Principles of Metadata Management:
Transcoding vs Other Media Processes
After learning what does transcode means, you might wonder how it differs from encoding, compression, or transmuxing. This breakdown clears up the confusion:
| Process | What It Does | Re-encoding | Changes File Size or Format | Typical Use |
| Transcoding | Converts format, codec, bit rate, or resolution. | Yes | Yes | Ensures compatibility for editing, playback, or streaming. |
| Encoding | Turns raw data into a digital format. | Yes | Yes | Prepare original content for storage, editing, or distribution. |
| Compression | Reduces file size by removing data. | Sometimes | Yes | Saves storage space or improves stream speed. |
| Transmuxing | Changes the container without re-encoding. | No | No | Repackage content for device compatibility (e.g., MKV to MP4). |
Transcoding as a Broad Process
Transcoding covers several related actions that serve specific technical needs:
- Standard Transcoding: Converts format, resolution, or codec to meet playback or platform requirements.
- Transrating: Adjusts bitrate to reduce file size or optimize for slower internet connections.
- Transsizing: Changes video resolution or frame rate to suit different device or platform requirements.
Types of Video Transcoding
Transcoding comes in different forms depending on your goals. It can be categorized based on how it treats quality, frame data, and file format. Does transcoding reduce video quality? Here are the most common types of video transcoding you’ll encounter:
- Lossless vs. Lossy Transcoding
This distinction refers to how much of the original data the transcoding process retains.
| Type | What It Does | When to Use |
| Lossless | Maintains full quality; large file sizes. | Archival or master file preparation. |
| Lossy | Reduces file size by removing some data. | Streaming, web sharing, or mobile use. |
- Interframe vs. Intraframe Transcoding
These methods differ in how they handle compression across frames.
| Type | What It Does | Best Use Case |
| Interframe | Compresses using frame-to-frame differences. | Streaming or storage. |
| Intraframe | Encodes each frame independently. | Fast editing or high-motion scenes. |
- Format-Specific Transcoding
Some transcoding workflows focus on converting files into or out of certain formats. This depends on the platform or editing requirements. For example:
- To ProRes or DNxHD: Ideal for non-linear editing systems, keeps editing fast and smooth.
- To MP4 or WebM: Great for online delivery due to wide compatibility and smaller file sizes.
- To AV1 or HEVC (H.265): Best for high-efficiency streaming with reduced bandwidth usage.
Choosing the right format ensures smooth playback, efficient storage, and compatibility with the target platform or device.
Application Section - When/Where to Use
Transcoding plays a vital role throughout the video production workflow. It helps ensure smooth delivery across devices and platforms. This section breaks down the workflow stages and highlights the 3 most common use cases of transcoding.

Workflow Stages
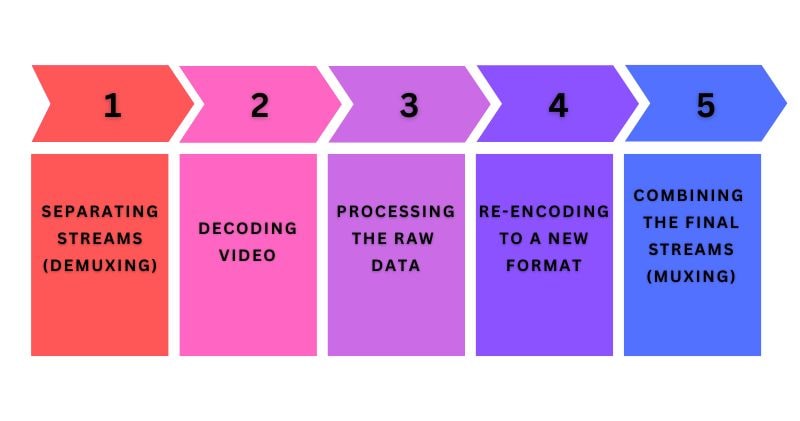
Each stage in a transcoding workflow serves a clear purpose. It goes through a series of technical steps to convert a video from one form to another. Let’s break down what happens step by step:
| Stage | What Happens |
| Separating Streams (Demuxing) | ● This step extracts individual components, like video, audio, and subtitles, from a media container. ● By pulling streams apart, the system can process and modify each one without affecting the others. |
| Decoding Video | ● The system decodes the compressed video into raw, uncompressed data. ● This step prepares the file for editing, reformatting, or quality adjustments by removing any existing codec structure. |
| Processing the Raw Data | ● At this stage, the raw video changes, such as resizing, adjusting frame rate, switching codecs, or adding filters. ● You can also change resolution, frame rate, codec, add effects, or update metadata here. |
| Re-encoding to a New Format | ● Once changes are complete, the system compresses the file again using a target codec and format. ● This stage makes the media smaller, more compatible, or more efficient for playback. |
| Combining the Final Streams (Muxing) | ● The final step rebuilds the container format by combining the video, audio, and any subtitle streams into one playable file. ● The result is a clean, finished video ready for delivery or upload. |
Common Use Cases
Transcoding supports a variety of real-world scenarios in video production:


Bottleneck Identification and Resolution in Transcoding
Even well-designed transcoding workflows can run into problems. Here are common issues and how to fix them:
Out-of-sync playback often comes from misaligned timestamps during demuxing or re-encoding.
To fix this, check sync settings during muxing or adjust timecodes in editing software.
Not all devices support every format or codec. If a video won't play, check if the original file used unsupported codecs.
Transcoding fixes this by converting the file into a universally compatible format, like MP4 with H.264.
Low-quality output may come from incorrect bit rate settings or codec mismatches.
Make sure to select the right settings during re-encoding to preserve detail and avoid over-compression.
Guide to Professional Transcoding Workflow
To transcode video smoothly, you need the right tool. Wondershare Filmora makes the process simple for beginners and efficient for advanced users. It supports multiple formats, resolutions, and export presets.
Works on Windows and macOS devices, Filmora can help you convert and optimize your videos without needing complex settings. You can use it to compress video for social media or convert video for editing.
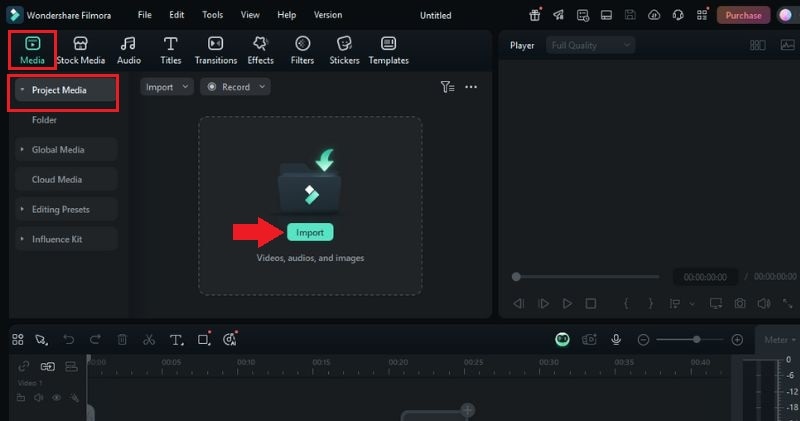
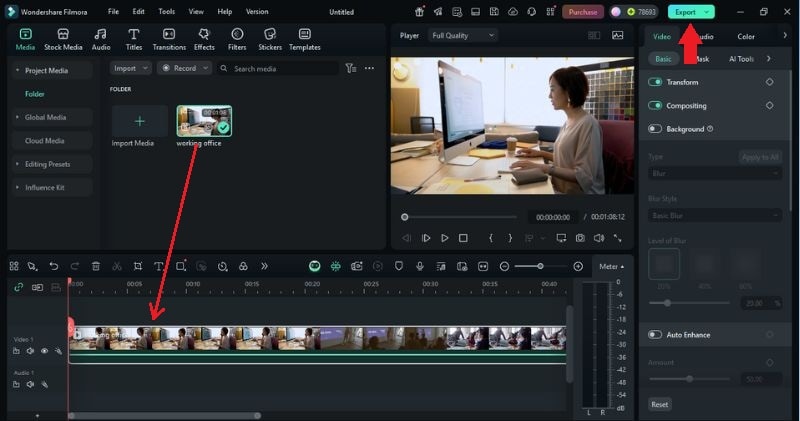
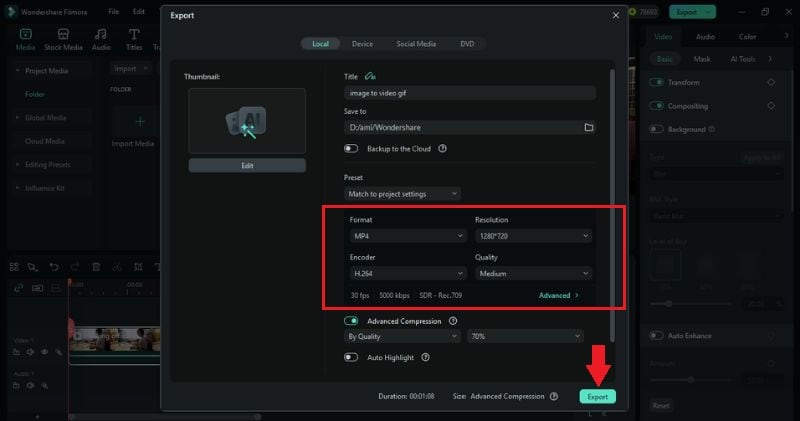
Setting Up Transcoding in Filmora: Step-by-Step
Follow these three simple steps to transcode a video using Filmora:

Best Practices for Video Transcoding
To get consistent and high-quality results, follow these best practices during your transcoding process:
- Use Two-Pass Variable Bitrate (VBR)
- Choose the Right Bitrate
- Understand Your Target Devices and Platforms
- Use Hardware Acceleration When Available
Two-pass VBR runs the encoding process twice. The first pass analyzes the content, and the second adjusts the bitrate based on that analysis. This helps balance file size and quality.
Bitrate directly affects your video’s quality and size. Too low, and you lose detail. Too high, and you waste space. Use this table as a guideline:
| Resolution | Frame Rate | Recommended Bitrate (Standard) | Bitrate (High Quality) |
| 480p (SD) | 30 fps | 1,000–2,500 kbps | 2,500–3,000 kbps |
| 720p (HD) | 30/60 fps | 2,500–4,000 kbps | 4,000–5,000 kbps |
| 1080p (Full HD) | 30/60 fps | 4,000–6,000 kbps | 6,000–8,000 kbps |
| 1440p (2K) | 30/60 fps | 8,000–12,000 kbps | 12,000–16,000 kbps |
| 2160p (4K) | 30/60 fps | 14,000–20,000 kbps | 20,000–35,000 kbps |
Match your export settings to the platform or device. For example, YouTube prefers MP4 with H.264 codec and AAC audio. Meanwhile, high-end editing tools work better with ProRes or DNxHD.
Hardware acceleration speeds up encoding by using your GPU instead of your CPU. Filmora supports GPU acceleration on compatible systems. It reduces render times and improves performance during export.