In this article
-
What is Proxy Video in Filmmaking?
-
Application Section - When/Where to Use
- Practical Demonstration - How to Set Proxy Videos in Filmora
Understanding Proxy Video
Editing high-resolution videos can slow down even the most powerful computers. If you’ve experienced laggy playback or crashing software, editing with proxies may be the solution. It replaces heavy original files with lightweight duplicates during editing. This technique speeds up your workflow without affecting the final video quality.
Let’s explore how proxy video works, when to use it, and why it’s a game-changer for video editors at every level.
Proxy video is a low-resolution duplicate of a high-resolution video file used temporarily during the editing process to boost performance.
This professional approach to video production helps editors work faster and more efficiently by reducing the strain on their computer’s resources. Editing with proxies ensures smooth playback, quicker editing response times, and overall stability, especially when handling 4K+ footage or working on long-form and multi-cam projects. When the editing is done, the software automatically replaces the proxies with the original high-quality files during export, preserving full visual fidelity.
Core Principles of Proxy Video:
Benefits of Implementing Proxy Video:
-
Efficiency Gain in Multi-Cam and Long Projects: Projects like documentaries, wedding videos, or music videos with multiple angles benefit from reduced lag when switching between clips.
-
Non-Destructive Workflow: All edits apply only to proxy files during the process. Your original footage remains untouched until final export.
-
Reduced Risk of Crashes or Freezing: Proxy editing lowers the burden on RAM and GPU, preventing software freezes when working with heavy transitions or multiple timelines.
-
Faster Editing on Lower-End Systems: Ideal for editors working on laptops or desktop computers with integrated graphics or older specs, proxies keep the project running smoothly.
Limitations of Implementing Proxy Video
Types of Proxy File Formats
Before diving into proxy editing, it’s important to understand which file formats and codecs work best for proxy workflows. Below are some of the most commonly used proxy formats and their advantages.
| Format | Codec Type | Note |
| MP4 | H.264 | Widely supported, lightweight, and great for smooth playback |
| MOV | DNxHD / DNxHR | Preferred in professional workflows for stability and high fidelity |
| AVI | Various (e.g., CineForm) | Used in some older or Windows-based editing environments |
| WMV | WMV9 or VC-1 | Occasionally used for compatibility with older Windows systems |
Application Section - When/Where to Use
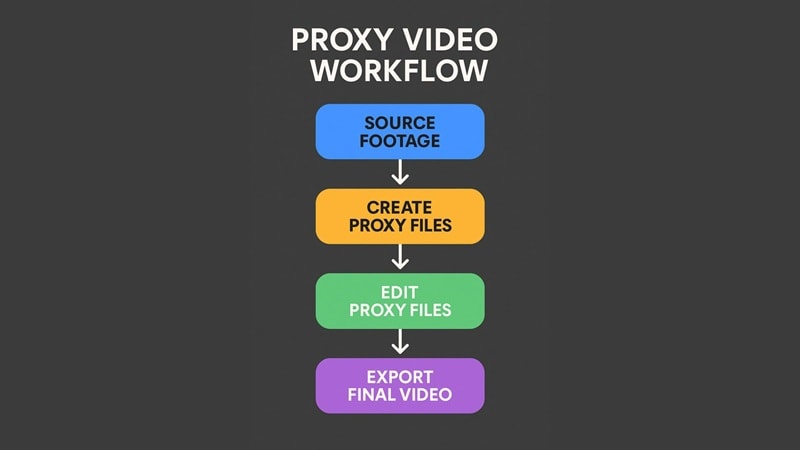
Implementing Proxy Video in Video Production:
Proxy editing is not always required. But when it is, it can dramatically transform your workflow. Knowing when to activate proxy mode helps avoid unnecessary processing while maximizing your editing speed.
When to Use Proxy Video:

High-resolution formats like 4K, 6K, or even 8K offer stunning detail, but they’re also demanding on your system. If you're editing travel vlogs shot on a GoPro, cinematic footage from a RED camera, or smartphone videos in 4K HDR, your editing software might lag or stutter during playback. Proxy editing lets you work with compressed 720p or 1080p versions while preserving the original 4K footage for export. This keeps your timeline smooth and responsive.

Projects with long timelines or multiple camera angles can quickly become heavy, even with standard HD footage. For example, wedding videos, podcast recordings, or corporate panel interviews often involve 2-4 video streams running in parallel. Proxy video helps manage this complexity by minimizing CPU and memory usage, so you can switch angles, sync clips, and scrub timelines faster without delay.
If you're editing on a laptop without a dedicated graphics card or a desktop with limited RAM (e.g., 8GB), editing high-res video directly can cause crashes or freezing. In this case, the benefits of editing with proxies for slow computer is noteworthy for users. You can still work with professional footage, just via proxy, and avoid hardware bottlenecks.
Bottleneck Identification and Resolution:
If your proxy files are taking too long to generate, especially after importing multiple high-resolution clips, it's likely due to limited system resources. This is common on older computers or when using slower hard drives.
To speed things up, try using an SSD instead of an HDD, which significantly improves file writing speed. You can also lower the proxy resolution to 1280x720 for faster processing and avoid importing too many large files at once. Closing unnecessary background programs will also free up CPU power for proxy rendering.
Sometimes proxies are generated correctly, but your editing software continues to play the original high-resolution files. This leads to the same playback lag you were trying to avoid.
To fix this, ensure the proxy mode or "Use Proxy Media" setting is turned on in your preferences. Also, confirm that your original media files are large enough to trigger proxy creation (usually above 1080p). If you've moved or renamed your source files, the software may no longer be linked to the proxy versions, so relinking the media might be necessary.
If your timeline still lags even after enabling proxy editing, other factors might be at play, like GPU overload, real-time effects, or timeline complexity.
You can improve performance by lowering the playback preview resolution and disabling real-time effects during editing. Rendering preview sections manually can also help with smoother playback. Lastly, make sure your graphics drivers and video editing software are fully updated to ensure they’re optimized for proxy handling and hardware acceleration.
How to Set Proxy Videos in Filmora
Setting up a proxy workflow may sound technical, but most modern video editing software makes it easy. Wondershare Filmora is one of the most user-friendly tools that supports proxy video editing right out of the box. This tool helps streamline the process by automatically generating and managing proxy files. With just a few quick settings, you can enjoy smoother playback and faster editing.
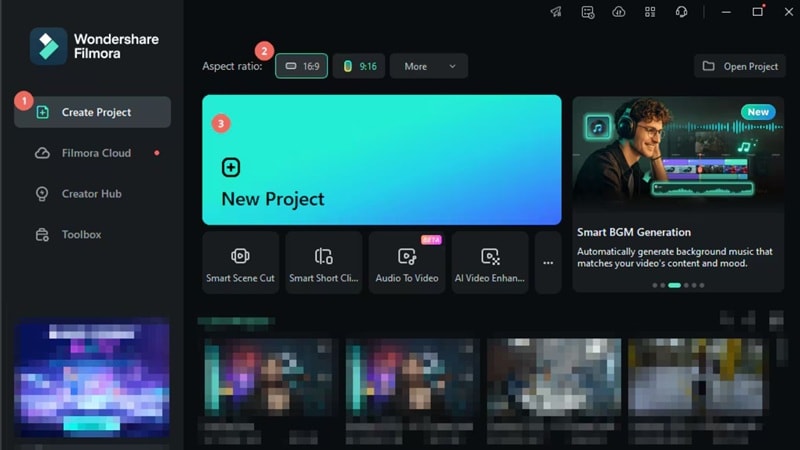
Start a New Project: Open Filmora on your computer and click New Project from the welcome window. This takes you to the main editing workspace where you’ll import and edit your
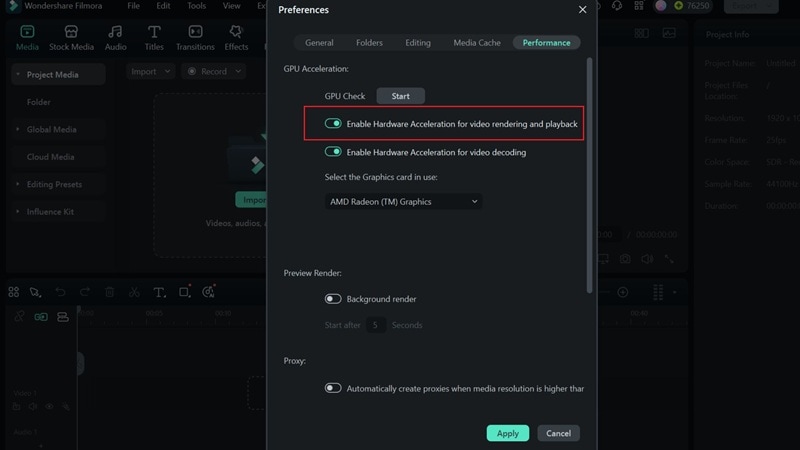
Enable Proxy Editing in Preferences: Go to the File menu and select Preferences, or press Ctrl + Shift +, as a shortcut. In the Performance tab, make sure GPU Acceleration is checked.
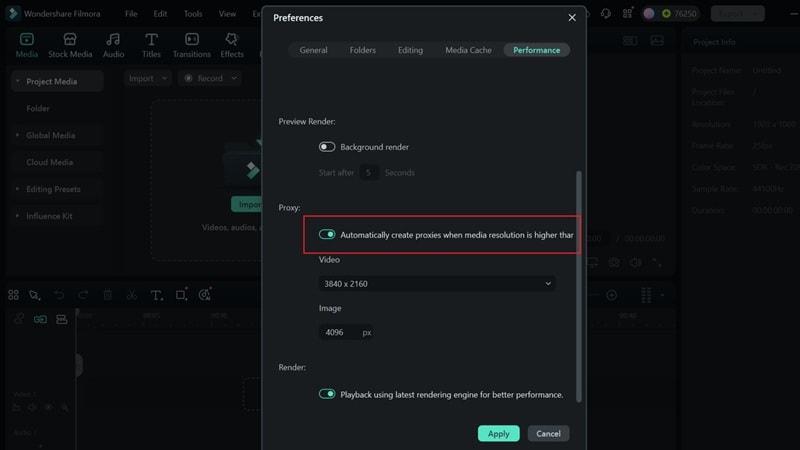
Import High-Resolution Footage: Under the Proxy section, check Automatically create proxies when media resolution is higher than, and select your preferred threshold, either 1280×720 or 1920×1080. You can also choose a folder where proxy files will be saved.
Once proxy settings are enabled, go to the Media Panel and import your original video files. Filmora will automatically generate proxy files for videos that exceed the resolution you specified. From here, you can begin editing with smooth playback while the original high-res files remain untouched and ready for final export.