- Support high quality video preview without slow playback
- Support low system requirement
- Customizable worktable
8 Proven Ways to Fix Premiere Pro Playback Lag (2026 Update)

Jan 06, 2026• Proven solutions
Experiencing disruptive Premiere Pro playback lag? Before trying random fixes, it's crucial to understand the cause. This performance issue isn't just about dropped frames; it can stem from inadequate hardware specs, unoptimized media, or bloated cache. We'll first uncover why your playback is choppy, then walk you through 8 proven methods to fix it for good.
You may also like: Final Cut Pro VS Adobe Premiere: Which Is the Best?

Part 1: Why Is Premiere Pro Lagging? Common Causes
Before diving into the fixes, it's crucial to understand why your Premiere Pro is lagging. The issue often stems from a mismatch between your project's demands and your system's capabilities. Here are the most common culprits:
- Insufficient Hardware: Your CPU, GPU, or RAM may not be powerful enough for high-resolution footage (4K, 8K) or complex effects.
- Unoptimized Media: Editing with highly compressed codecs like H.264 or H.265 directly can cause significant Premiere Pro playback delay as your computer struggles to decompress them in real-time.
- Heavy Effects & Lumetri Scopes: Real-time effects, color grading (Lumetri), and active scopes demand substantial processing power, leading to dropped frames.
- Full Playback Resolution: Playing back your timeline at 'Full' resolution requires rendering every single pixel, which is often unnecessary during the editing process.
- Media Cache Issues: A full or corrupted media cache can slow down performance significantly.
Identifying the cause helps you choose the most effective solution from the list below.
Part 2: How Do I know If the Video Is Lagging
Sometimes, it's obvious that Premiere Pro has dropped frames during playback because the footage is not smooth and because of how the playhead moves along the timeline. If the playhead makes small jumps or skips instead of gliding smoothly along the timeline, that could be a sign that some frames have been dropped.
Another way to tell if frames have been dropped is to activate the 'SHOW DROPPED FRAME INDICATOR' which can be found under program monitor settings (the wrench icon at the bottom right of playback screen). The indicator turns yellow when frames are dropped during playback.
Part 3: 8 Ways to Fix Premiere Pro Playback Lagging Issue
Here's a quick overview of the fixes we'll cover. Choose the one that best fits your situation.
| Solution | Best For | Difficulty |
|---|---|---|
| 1. Change Playback Resolution | Quickly reducing general playback choppiness on any system. | Easy |
| 2. Turn Off High-Quality Playback | When you need smoother playback and don't need a pixel-perfect preview. | Easy |
| 3. Use Proxy Videos | Editing high-resolution footage (4K, 6K, 8K) on less powerful computers. | Medium |
| 4. Mute FX | Isolating lag caused by heavy visual or audio effects. | Easy |
| 5. Increase Memory Allowance | Fixing system-wide performance issues if you have enough RAM. | Easy |
| 6. Render Preview Videos | Eliminating lag in specific, complex sections of the timeline (red/yellow bars). | Medium |
| 7. Optimize Rendering for Performance | A one-time setting change to prioritize speed over memory conservation. | Easy |
| 8. Close Lumetri Scopes | Reducing lag specifically when doing color correction and grading. | Easy |
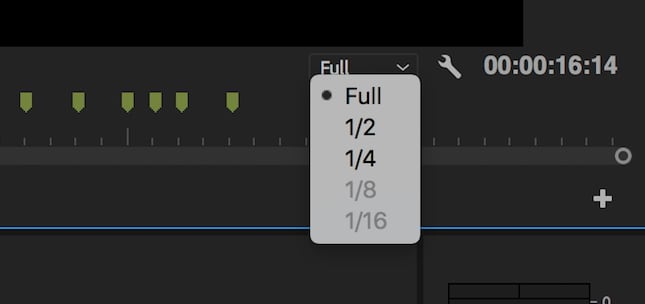
1. Change playback resolution
You can change the playback resolution for your video without altering its export resolution. This can reduce Premiere Pro playback lag significantly. To make this change, click the playback resolution dropdown menu (the 'full' button) and select any of the 4 options to reduce the playback resolution to a fraction of the native resolution (1/2, 1/4, 1/6, or 1/8).
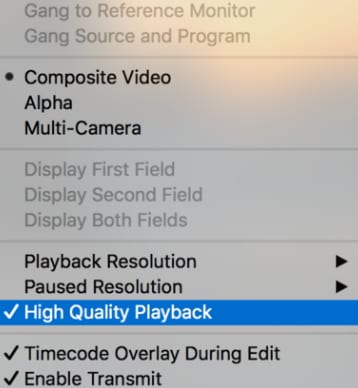
2. Remember to turn off quality playback
While high-quality playback is desirable as it lets you see your video in a resolution closest to how it will look when exported or uploaded to YouTube. This option can reduce the performance of Premiere Pro. Disabling the high-quality playback option is also another way to quickly resolve playback lag or playback slow. Simply go to the program monitor settings and deselect the high-quality playback option.
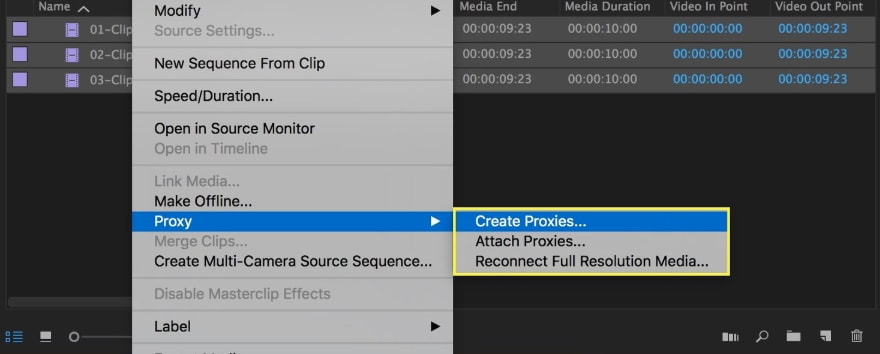
3. Use proxy videos in your workflow
Proxy videos are lower-resolution copies of an original video and Premiere Pro supports proxy files. Working with a proxy can ensure you'll experience no lags during playback. More information on using the proxy.
There are 2 ways to create a proxy video in Premiere Pro. The first is through the new project window. Go to the 'ingest settings' tab, tick the 'ingest' button and select 'copy and create proxies' from the dropdown menu beside the ingest button. The second is through the project menu. Simply highlight and right-click the projects you want to create proxies for and in the context menu, select 'proxies' and then 'create proxies'.
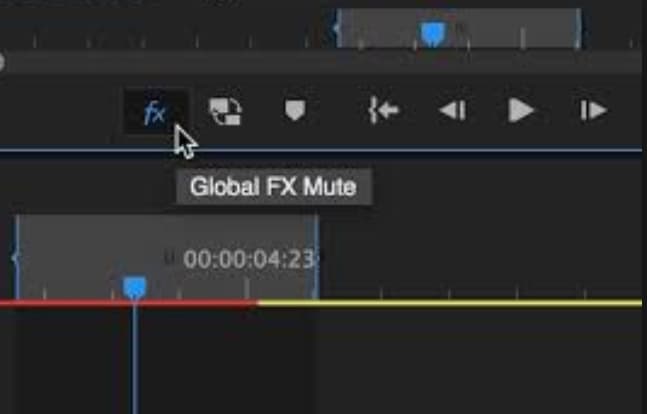
4. Mute FX
Visual and audio effects can increase the working size of a video file significantly. This is why turning off effects can improve playback quality and eliminate lag.
To turn off effects, click the 'Global FX Mute' button which should be one of the icons on the play toolbar below the playback screen. If the FX button isn't in the toolbar, click the '+' button at the lower right side of the screen and drag the FX button to the toolbar.
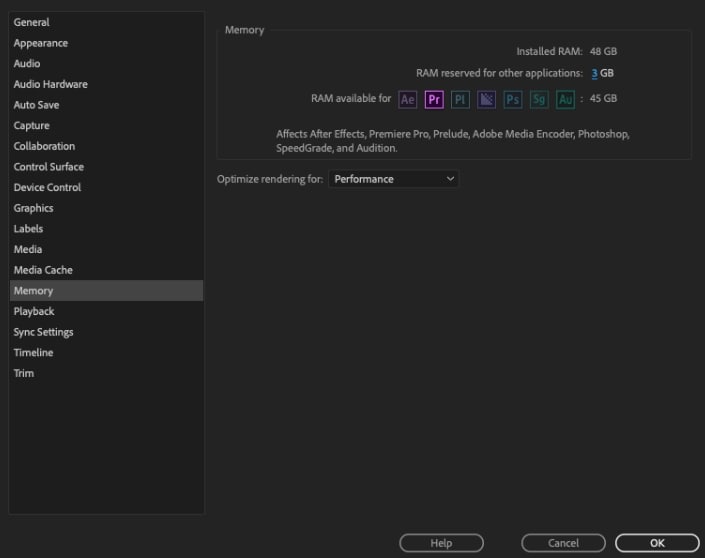
5. Increase memory allowance
Under the memory option within the preferences menu, you'll find that a certain amount of RAM has been reserved for other applications. Unfortunately, the higher the reserved RAM, the lower the amount of RAM available for Premiere Pro. So, reducing the reserved RAM will increase the memory allowance for Premiere Pro and any other Adobe programs you may have installed. Also, you need to know the maximum memory storage in Premiere Pro.
To increase memory allowance, go to the memory option within the preferences menu and reduce RAM reserved for other apps to the lowest possible level.
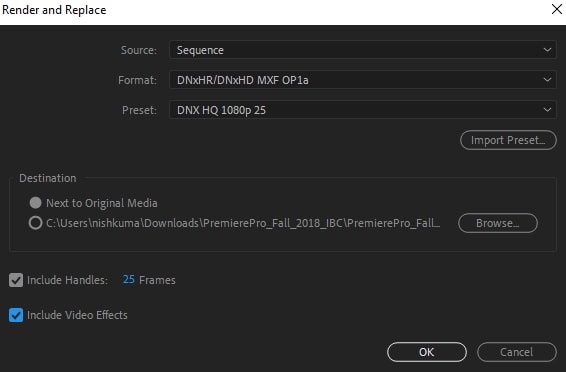
6. Render preview videos
Premiere Pro color codes the video timeline to show when playback is real-time or not. The color green means that playback is real-time while yellow and red show that playback is not real-time. Choppiness and lag increase when playback is not real-time.
By rendering preview videos of all or parts of your footage, you can reduce playback lag. To render previews, start by setting in and out points for the preview video you want to create. Then, go to the sequence menu and select 'render in to out'. When rendering is complete, the color of the timeline should change to green.
7. Optimize rendering for performance
Premiere Pro lets users optimize rendering for performance or memory. Optimizing for memory can be useful if you are experiencing memory errors. Otherwise, it is best to optimize rendering for performance. To do this, go to memory settings within the preferences menu, and select performance in the dropdown menu beside the 'optimize rendering for' option.
8. Close the lumetri scopes panel
The Lumetri Scopes Panel is one of many scopes available in Premiere Pro to support compliance with industry standards. If it is active during playback, the Lumetri panel actually analyses the color and lighting of the footage. This is not always needed and can increase the amount of work Premiere Pro has to do during playback, resulting in performance issues.
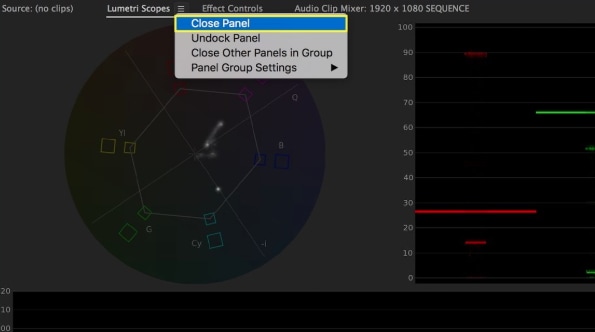
So, by closing the Lumetri panel, you can reduce playback lag. To close the panel, click the menu button beside the panel's name and select 'close panel'.
Frequently Asked Questions About Premiere Pro Lag
1. Will lowering playback resolution affect my final export quality?
No, absolutely not. The playback resolution setting only affects the preview quality within your timeline. Your final exported video will always use the full resolution defined in your export settings.
2. How much RAM is enough for smooth 4K editing in Premiere Pro?
While Adobe's minimum is 16GB, we recommend at least 32GB of RAM for a smooth 4K editing experience. For complex projects with many effects, 64GB is ideal to prevent playback lag and ensure system stability.
3. Is there an easier alternative if Premiere Pro is always lagging on my PC?
Yes. If you consistently face performance issues due to hardware limitations, you might consider a more lightweight yet powerful editor. Wondershare Filmora is optimized to run smoothly on a wide range of computers, offering a professional feature set without the heavy system requirements. You can learn more about Filmora here.

Best Alternative to Premiere Pro for Video Editing - Filmora
- Cut, Trim, Split and Deatch audio from videos
- Edit Videos with AI tools,key frame, motion track, green screen ect.
- Built-in plentiful video templates and effects
- Export to MP4, MOV, MKV, GIF and multiple formats
 Secure Download

Conclusion
These are some ways to improve the performance of Premiere Pro and speed up your workflow by reducing Premiere Pro playback lag. Note that sometimes, it may be more effective to apply a combination of these settings instead of just one.
Other things you can do to improve Premiere Pro's performance include disabling the 'automatically refresh growing files' option under media preferences and applying effects to an empty timeline, so you can disable them easily during playback.
Do you want to make video metadata on Mac? Here you will know 8 best video metadata editors for Mac. They are easy to use for beginners. Check it out!
by Benjamin Arango Jan 06, 2026 11:37 AM
Benjamin Arango
staff Editor
