There is no doubt that YouTube is among the biggest media streaming sites nowadays. People from different parts of the world are using this platform to find entertainment, information, and opportunity. Should you consider publishing video content on YouTube? Practically speaking, it’s indeed a wise move. Producing content for YouTube is not rocket science. You can surely get started with just the snap of a finger. However, don’t forget that video quality matters. That’s why you should ensure that your YouTube video frame rate is well-configured to obtain promising results. Don’t worry. Such procedures are indeed a walk in the park.
In this article, we will talk about the best frame rate for YouTube videos. We will also suggest some tips and tricks that can help you a lot in this regard. Lastly, we will provide a short guide on how to set an ideal frame rate for YouTube videos. Continue reading below to learn more.
In this article
How to Configure the Frame Rate For YouTube Videos?
Frame rate is one of the configurations that you should always take into consideration, especially when publishing content on YouTube. But fret not. Making such changes is not a tough nut to crack. In this respect, Wondershare Filmora can be of great help to you. It’s a powerful video editing application that provides access to this type of tool and feature. Do you wish to try it on your end? If that is so, check out the details provided below to learn more.

Key Features
Wondershare Filmora has tons of useful functions to offer to users. To give you a glimpse, see the list provided below.
- Frame rate configuration: It allows you to change the frame rate settings according to your liking. There are many options to choose from. Among them are 24 FPS, 30 FPS, 60 FPS, 25 FPS, and more. Just choose and use the best frame rate for YouTube videos.
- Simple and advanced video editing: It is equipped with highly advanced tools that can help you perform a variety of video editing techniques within the platform.
- Useful creative resources: It is home to a large library of creative assets that you can access and use within the Wondershare Filmora workspace. Among them are stock images, video clips, audio bits, effects, filters, and many others.
- Ready-to-use video templates: It offers tons of high-quality video templates that you can easily customize if you don’t wish to start from scratch.
- Artificial intelligence: For convenience, it gives you access to numerous AI-powered tools that you can use to streamline your creation process. To name a few, these are AI Voice Enhancer, AI Smart Cutout, AI Copywriting, AI Text-Based Editing, and many others.
- Flexible export options: It allows you to render and export video content in different formats. Among the supported file types are MP4, WMV, AVI, MOV, F4V, MKV, 3GP, MPEG-2, WEBM, GIF, and MP3.
Step-By-Step Guide
Wondershare Filmora is not that complicated to use and navigate. That is one thing for certain. Therefore, you’ll find it very easy to configure the YouTube video frame rate. It will only take you a few minutes to complete such procedures. Do you want to give it a shot? If that is so, check out the tutorial below. Read the instructions very well and follow the indicated steps accordingly.
Step 1: Download the Wondershare Filmora application from its official website. Right after, install it on your computer.
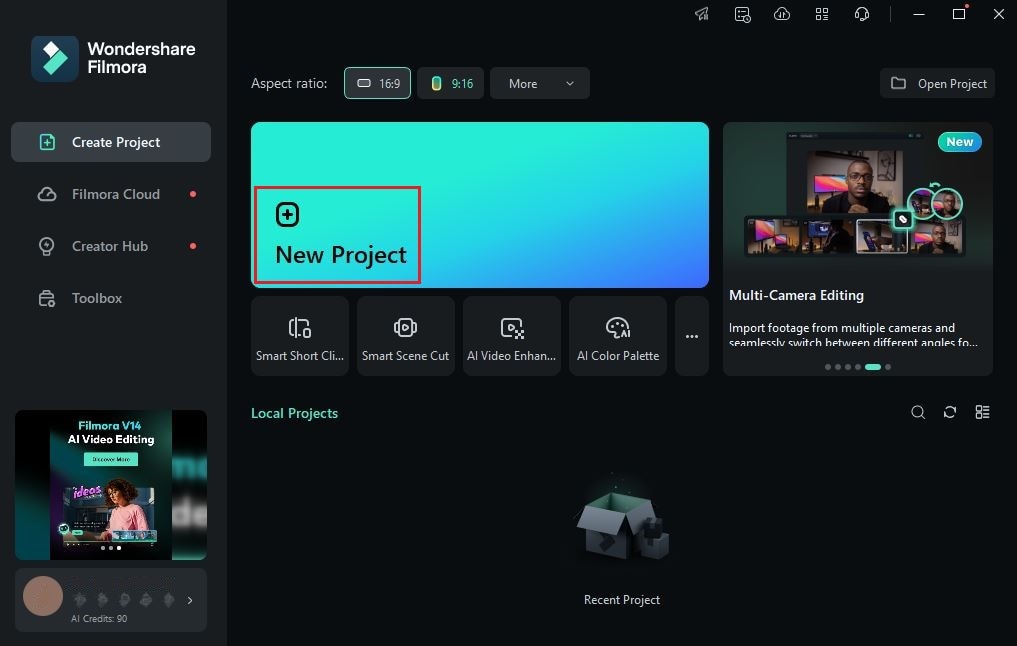
Step 2: Launch the newly installed video editing software on your desktop afterward. Once it fully loads up, head over to the main dashboard and click New Project to start editing. Alternatively, scroll down a little to the Local Projects section and open an existing session if there are any available.

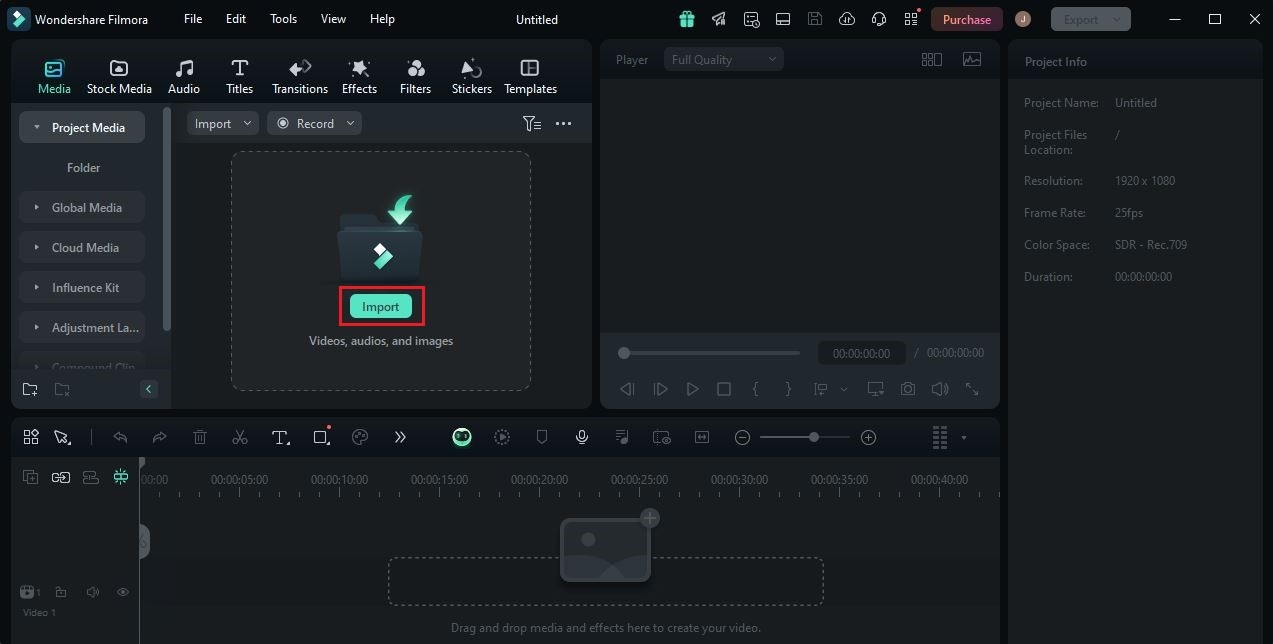
Step 3: After that, navigate to the Elements Panel and click Import under the Media tab. Select all the files you are going to use and upload them to the platform. Once completed, grab the files one by one and drag them from the Elements Panel to the Editor Timeline.

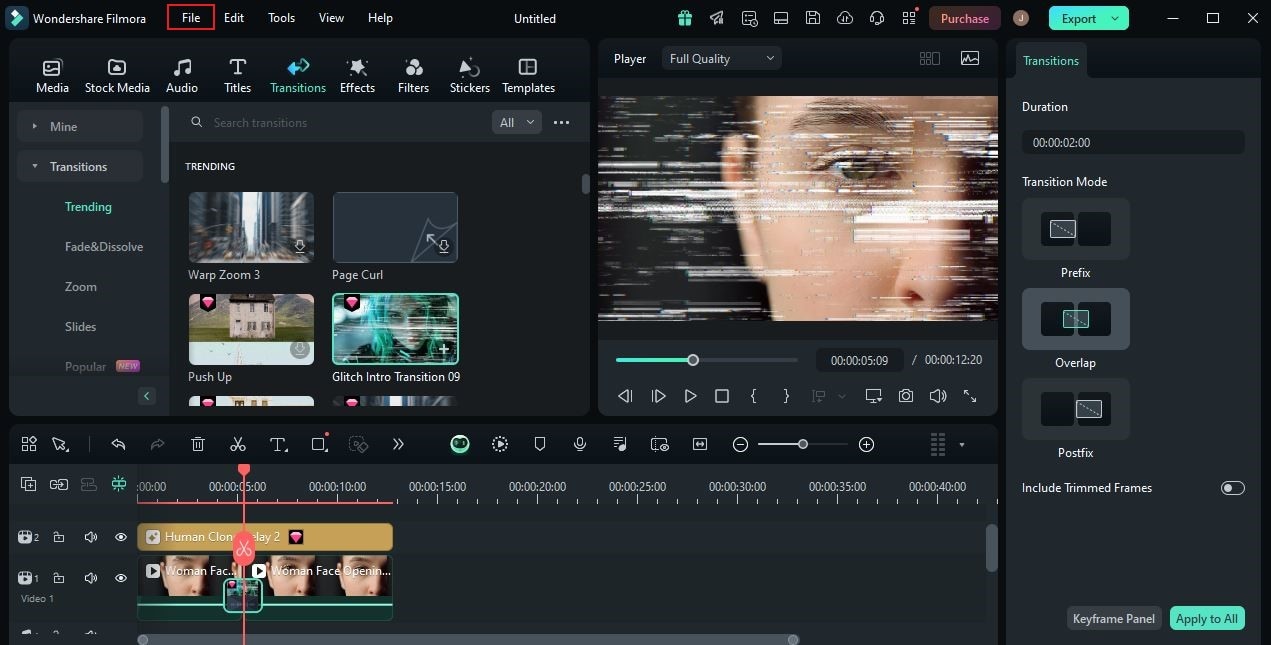
Step 4: At this point, you may now commence the actual video editing. Start by finalizing the arrangement of the assets based on your preferences and making all the necessary adjustments. For instance, you may do color grading, fix video and audio issues, or apply a visual effect.

Step 5: Once done, it’s about time to reconfigure the frame rate for your YouTube videos. Don’t sweat it. This process is indeed a piece of cake. To get started, head over to the top navigation bar and click File.

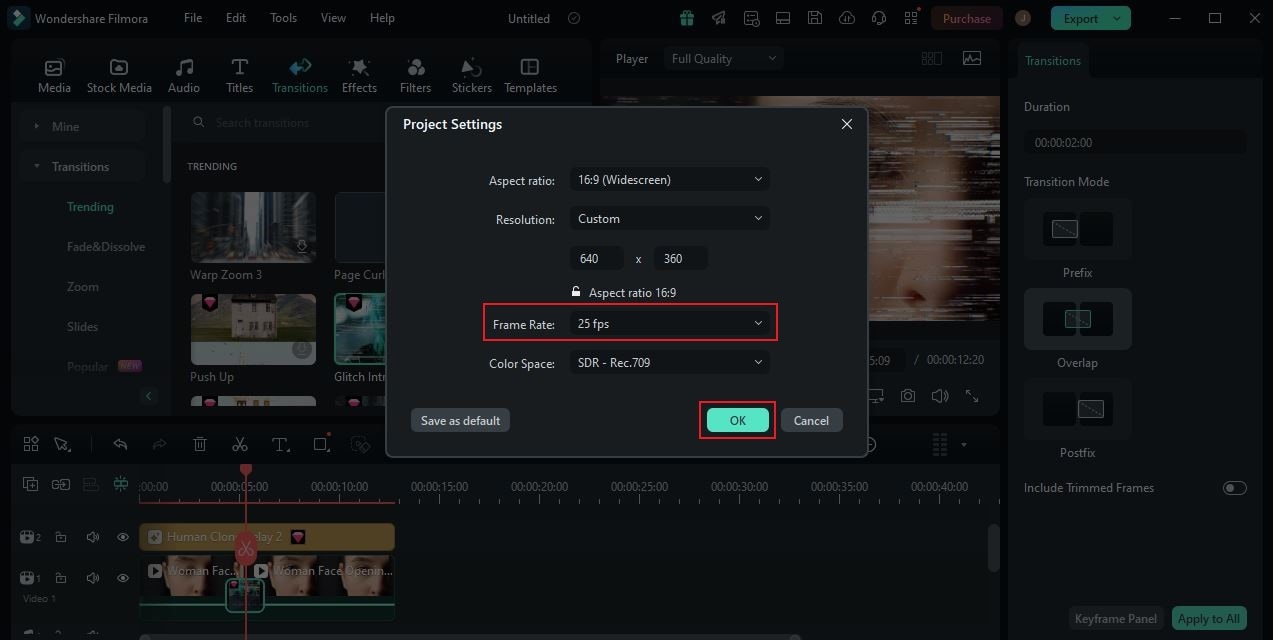
Step 6: Choose Project Settings from the list of options. Immediately, a new window will be displayed on your computer screen. From there, find Frame Rate and click the drop-down menu next to it. Select the YouTube frame rate you prefer to use. Once done, click OK to apply the changes and proceed.

Step 7: Finally, play and review the output. Check if the YouTube frame rate you set works best on your end. If you’re satisfied with the result, click the Export button right above the Preview Panel to render the video and save a copy to your computer. Otherwise, continue making changes until you obtain a desirable outcome.
How to Choose the Best Frame Rate For YouTube Videos?
Evidently, different types of video content are there on YouTube. You can find personal life narrations, inspirational videos, informative tutorials, and many others. No extreme restrictions are currently imposed on YouTube publications. So long as your content is held within the bounds of YouTube’s community guidelines, you can post almost anything. But hold on. Don’t forget that the YouTube frame rate must be configured based on the type of content you’re about to post. To help you get started in this regard, check out the list below. Read the provided details and keep them in mind.
Educational YouTube Video
First on the list are educational YouTube videos. As the name suggests, this type of content intends to share valuable information with the viewers. They generally need no complex video editing most of the time. That said, you don’t have to set the YouTube frame rate so high for these videos. 24 or 30 FPS is already enough.

Talk Shows
Are you doing interview videos and planning to publish them on YouTube? If that is so, it’s best to set the YouTube frame rate to 30 FPS. This type of video content is apparently focused on two or more people talking in front of the camera. There are some movements and gestures that might be recorded during the show. Thus, it is recommended to use the standard YouTube video frame rate for a smooth display of action.
Tutorial YouTube Videos
Tutorial YouTube videos are different from educational content because the former often includes actual demonstrations in the video. That’s why you should set a different YouTube video frame rate for each of them. As for tutorial videos, it’s best if you use a high YouTube frame rate, like 60 FPS. Why so? Simply because the demonstration clips might display too many actions. As a result, you may need more frames to make them appear smoother. 60 FPS is enough for tutorial videos. You may reduce it to 30 FPS if your tutorial video is not that long.

Travel YouTube Videos
Last on the list are travel YouTube videos. Of course, this type of YouTube video is filled with actions and extremes. Some footage uses complex techniques to capture various sceneries from tourist spots and destinations. That being the case, it is highly recommended to use at least the standard YouTube video frame rate. You may consider 40 FPS to 60 FPS in this regard. For sure, it can already make your video content appear smooth and flawless.
3 Online Tools That Can Help You Configure the YouTube Video Frame Rate
It is true to say that calibrating the frame rate for YouTube videos is a walk in the park. As presented in the tutorial above, you can surely do it with just the snap of a finger. But that’s not the only way to set the YouTube video frame rate. In fact, you can also facilitate such procedures online. Just choose an internet tool that converts the frame rate from one option to another. Don’t worry. You will not run out of options in this regard. To get you started, check out the list below and find the best tool that suits your preferences.
Videobolt

The first online tool that you can use to recalibrate the YouTube video frame rate is Videobolt. It is a popular web-based video maker known for short intro or outro videos. Of course, you can use it as well to make a few video settings reconfigurations. If you need to change the YouTube frame rate of your content, Videobolt can surely help you with that. All you have to do is upload the video and pick the new frame rate you wish to use.
FlexClip

FlexClip is another online tool that can assist you well in this regard. It is a fully functional internet-hosted video editor that offers tons of amazing features to users. One of which is its built-in video frame rate converter. Similar to Videobolt, it’s very easy to use and navigate. You just basically have to upload the video file and choose the new frame rate you wish to set for your YouTube video. Yes. It’s just as simple as that. No complex configuration is required.
Neural Love

Last but not least is Neural Love. It is a popular online video editor that provides various AI tools to help you enhance your content. Can you use it to reconfigure the YouTube video frame rate of your materials? The short answer is absolutely yes. Neural Love is equipped with a high-performing frame rate converter that recalibrates this setting in a snap. To get started, simply upload the video file to the platform and choose your preferred frame rate.
Conclusion
Many people from different parts of the world have access to YouTube.That is one thing for certain. Hence, you need to make sure that the video content you publish on this platform carries the highest quality available. Don’t worry. The modern video editing apps nowadays can surely help you craft one. Just make sure that you set all the configurations right. As for the YouTube video frame rate, you may use a specific option based on the type of your videos. Refer to the tips provided above in order to make a great choice. After that, use Wondershare Filmora to reconfigure the frame rate settings of your video content. It’s a powerful video editing software that provides access to such tools and calibrations. Explore this platform on your end and make the most of its amazing benefits.


 100% Security Verified | No Subscription Required | No Malware


