Adobe After Effects is an ever-growing product, with new features introduced almost every year. One of these features is the 3D Camera Tracking, which allows you to take your motion graphic effects to the next level.
Camera Tracking is extracting the camera movement from a recorded video sequence. This process allows filmmakers to add computer-generated elements to a live action shot, track objects throughout a shot for compositing, and estimate camera movements for virtual reality applications.
In this article, we will explore what Camera Tracking is and Motion Tracking in After Effect. We'll also show you how to use 3D Camera Tracking in After Effects on a Windows PC.
In this article
Part 1. What Is Camera Tracking
Camera Tracking is a process that determines the movement of a video clip. This information can be used to add certain effects to the video, such as objects that seem to follow the camera or text that appears to be stationary in the frame.
Camera Tracking is a relatively simple process, but it can be time-consuming. However, the results are often worth the effort, as it can add a whole new level of realism to your footage clips.
For example, you have taken a video clip of a zoo and want to add an object to it while making sure it gives a realistic look. This is where the Camera Tracking feature can help you make a smooth transition and add the element as if it was there.
Part 2. Why Use Camera Tracking?
Now that you know what Camera Tracking is, let's have a look at some benefits of using it:
- Add a 3D object or element to a 2D video clip.
- Embed objects, texts, etc., to a video.
- Stabilize a shaky camera/video clip.
- Create special effects.
- Apply color grading.
- Replace a TV or PC screen with some information.
Thus, if you need some basic compositions or advanced ones, the Camera Tracking feature will help you track your videos, embed anything you want, or create special effects to make your clip different.
Part 3. Motion Tracking In After Effects
The Motion Tracking capability is Adobe After Effects' feature that allows you to track the movement of the camera/an object in a video clip and use the data to add effects to objects.
Motion tracking can be used for various effects, like creating realistic text animations or adding special effects to objects in a video.
There are four main types of Motion Tracking in After Effects, each with its own advantages and disadvantages:
Single Point Tracking
Single Point tracking tracks a single position in a video clip. You can use it for composing a video clip with a single point of focus, and it is suitable for following the movement of an object with right-left or up-down motion.
Advantage: Single Point Tracking is perfect for tracking a single position or motion of a single object.
Disadvantage: No scale or rotation properties and needs a clear contrast point for effective results.
Two Point Tracking
Two Point Tracking is a feature that allows you to track two points in a footage clip and can be used for scale, motion, and rotation tracking.
Advantage: Two Point Tracking can track scale and rotation along with the motion.
Disadvantage: It doesn't give effective results with a shaky video clip.
Four Point Tracking
The Four Point Tracking feature lets you track four different points (corners) in your footage and apply the tracking data to a layer in your composition.
The four points can be placed at the screen's corners in your shot, and new footage is applied to cover the screen.
Advantage: Directly pins the data to each corner of the image.
Disadvantage: Cannot be used to create a 3D object.
3D Camera Tracking
With 3D camera tracking, you can track the movement of a camera in a video and place 3D elements in the scene that match the camera's movement. This is a great way to add realism to your graphics and make them look like they're part of the scene.
Advantage: 3D Camera Tracking can help you add shapes, texts, or 3D objects to 2D footage.
Disadvantage: A bit tricky and needs an expert grip on the tool to use effectively.
Part 4. How To Use 3D Camera Tracking In After Effects Of Windows
Here's a simple and quick rundown of how to use 3D camera tracking in After Effects:
Step1Import Your Video Footage
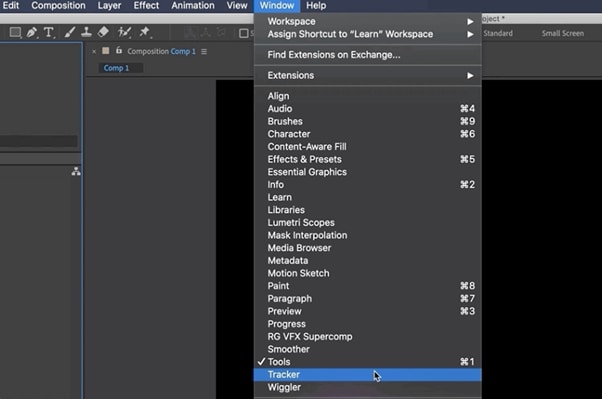
Launch Adobe After Effects, create a new composition, and import your footage. Once your clip is uploaded, click the Window Menu. Scroll down and choose "Tracker."

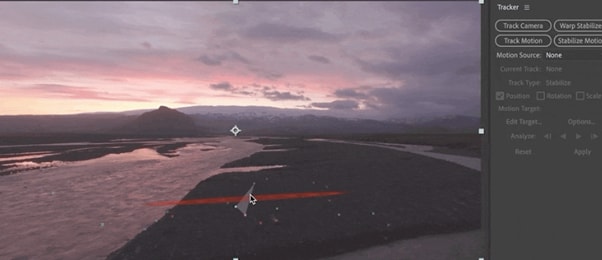
Here you will see four tracking options:
- Track Camera
- Warp Stabilizer
- Track Motion
- Stabilize Motion

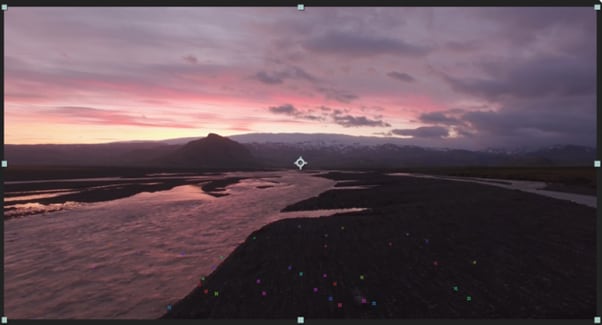
Click "Track Camera" to add the 3D Camera Tracker effect to your selected layer. After Effects will start analyzing the layer, show the percentage, and count the total frames of clips tracked.

Step2Establish The Tracking Points
You have to select the tracking points and a plane to which it must be tracked. To do this, hover over the tracking point references in the After Effect compositions window. Between the three tracking points, a triangle will form, and a red "target" will appear to help you better visualize the plane.
Now, you have to find a tracking point that lays the red "target" parallel to your selected plane. Next, select the triangle that lines up best for your surface. Move the arrow away to disable the picker and stop the red "target."

Step3Add The Text To Your Video Clip
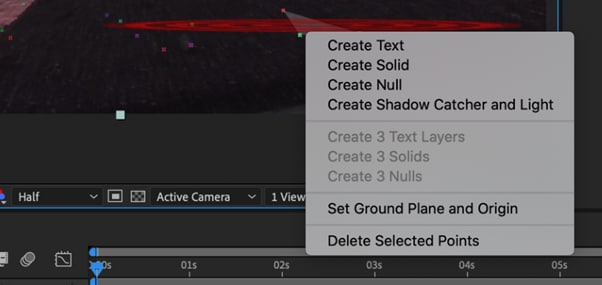
Once you define the plane, it's time to add text to your video clip. To do this, right-click on the triangle you have set previously, and a window will appear, allowing you to create new layers.
Click "Create Text" to place the text on your tracked video clip. A new text layer will be added using the tracking data.

Step4Align Text On Tracked Footage
Now you have to align your text. In the timeline, locate the tracked text layer and click the arrow to the left to unveil all the editable properties for the layer.
Click the "Transform" option to use the transform options and use the layer lines to adjust the X, Y, and Scale values afterward.
Your text will now be added to your video footage. The method is similar to adding solid or null to your clips. However, the exact steps might differ a little.
Video - Learn 3D Camera Tracking In After Effects
Conclusion
In this article, we've discussed what Camera Tracking is and why to use it. We also provided information regarding Motion Tracking, its four types, and their advantages and disadvantages.
Furthermore, we walked you through the step-by-step process of using 3D Camera Tracking in Adobe After Effects for Windows.
We hope this guide helps you to add text to your video footage without much effort, and you now have complete knowledge of the Camera Tracking feature.


 100% Security Verified | No Subscription Required | No Malware

