Many people across the globe are very familiar with Kodak. Why so? Let’s just say that the camera products of this company have become an important part of filmmaking’s rich history. Are they still available today? Unfortunately, the answer is no. But don’t worry. If you want to try some similar visual effects, you may use some free Kodak LUTs. Yes. There are lots of them online that you can download for free and import to your video editing software. Just choose the best one that fits the style you want to achieve.
In this article, we will talk about the highlights and benefits of the free Kodak LUTs. We will also provide some tips on how to find and download the Kodak 2383 LUT and similar variants. Lastly, we will give you a short tutorial on how to apply one to your video projects. Continue reading below to learn more.
In this article
How to Apply and Use the Free Kodak LUTs with Wondershare Filmora?
The visual effects that Kodak products have introduced to the world are still relevant up to this day. Many video editors out there are exploring its style and trying it once in a while. Although Kodak cameras are no longer accessible at present, you can still somehow replicate its video filters. How so? It’s very simple. You can use some LUTs. Yes. As previously indicated, there are tons of free Kodak LUTs. Just find them and download your preferred style. After that, you can now apply it to your video projects. Don’t worry. Wondershare Filmora can help you do such configurations in a snap. It’s a powerful video editing software that provides advanced features and useful tools to content creators. Of course, you can easily import some free Kodak LUTs into this platform and apply them to your video. Do you want to give it a shot? If that is so, check out the details provided below.

Key Features
Wondershare Filmora has a lot to offer to video editors and content creators. For sure, it can help you take advantage of the free Kodak LUTs and produce stunning outputs. To get you started, below are the key features of Wondershare Filmora that you should check out.
- 3D LUTs: It allows you to apply LUTs to your video content. By default, Wondershare Filmora provides several selections of LUTs. You can use any of them if you want to. Meanwhile, you can also import some LUTs from external sources and use them in your project.
- Simple and advanced video editing: It is equipped with numerous tools that can help you perform a variety of video editing techniques.
- High-quality creative assets: It offers a huge library of creative resources that you can access and use when editing videos on the platform. Among them are stock images, video clips, audio bits, effects, filters, and many others.
- Ready-made video templates: It has tons of custom-tailored video templates that you can easily customize if you don’t want to start your project from scratch.
- Artificial intelligence: It gives you access to AI-powered tools that you can easily integrate into your creation process. Among them are AI Text-Based Editing, AI Copywriting, AI Smart Cut Out, AI Voice Enhancer, and many others.
- Flexible video export options: It allows you to render and export videos in different formats. Among the supported file types are MP4, WMV, AVI, MOV, F4V, MKV, 3GP, MPEG-2, WEBM, GIF, and MP3.
Step-By-Step Guide
Wondershare Filmora is very easy to use. If you wish to use free Kodak LUTs in your video project, you can do it in a snap. Do you want to give it a shot? Then so, check out the tutorial below. Read the instructions very well and follow the indicated steps accordingly.
Step 1: Download the Wondershare Filmora application from its official website. Right after, install it on your computer.
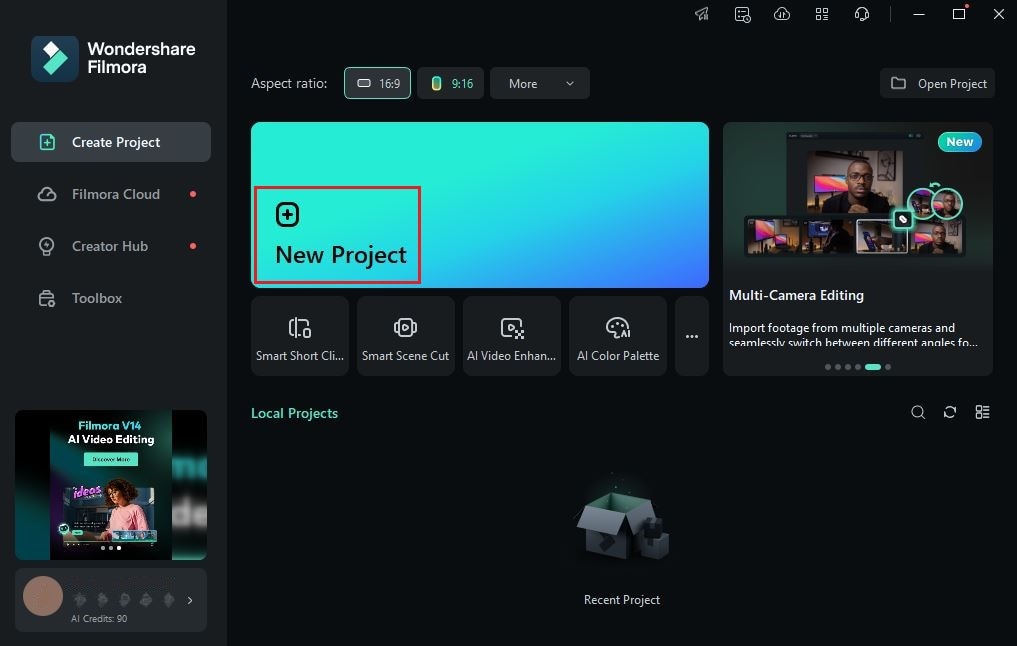
Step 2: Run the newly installed video editing software on your desktop afterward. Once it fully loads up, head over to the main dashboard and tap New Project to start editing. Alternatively, scroll down to the Local Projects section and open an existing session if there is any available.

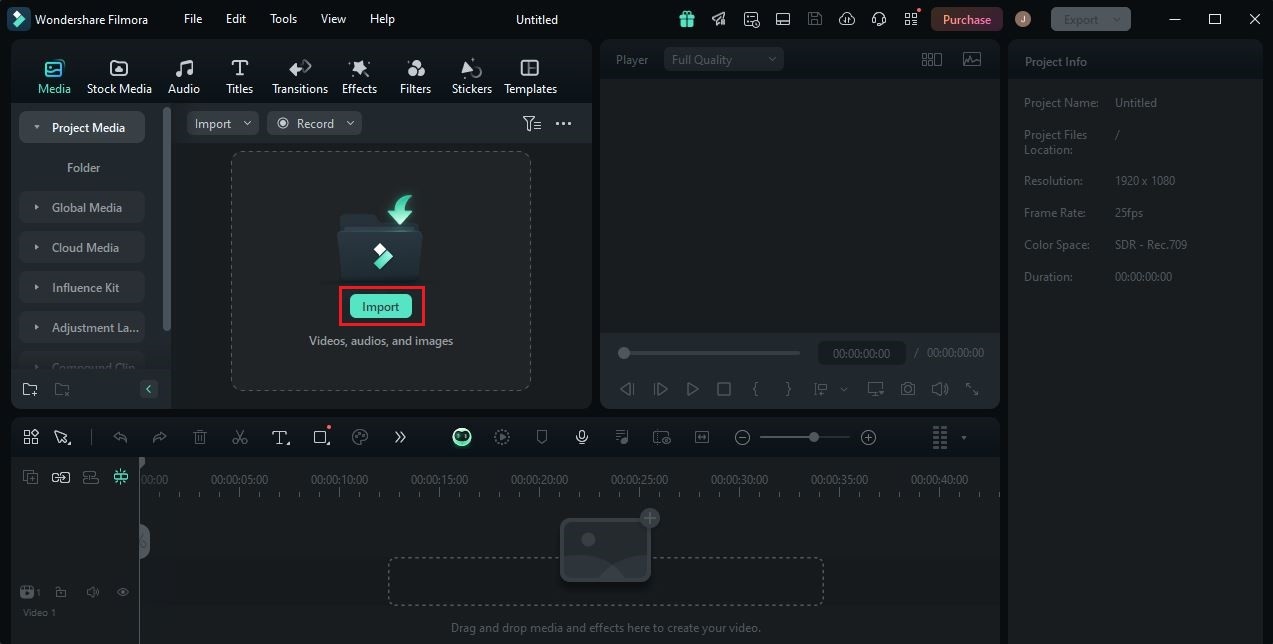
Step 3: After that, go to the Elements Panel and click Import under the Media tab. Select all the files you are going to use and then upload them to the platform. Once completed, grab the assets one by one and drag them from the Elements Panel to the Editor Timeline.

Step 4: At this point in time, you may now commence the actual video editing. Start by finalizing the arrangement of the assets based on the creative style and structure you wish to follow. Simultaneously, make all the necessary adjustments. For example, you may trim the unnecessary parts of your clips, fit the music to your video timeline, and more.

Step 5: Once done, you may now proceed with the color grading procedure using LUTs. Don’t worry. After you download the Kodak 2383 LUT you wish to use, the process will be very easy. To get started, head back to the Editor Timeline and choose a video asset.
Step 6: A new panel will then appear on the right-side corner of your workspace. From there, click the Color tab to access numerous settings related to color grading and correction. Find LUT from the given options and then switch on the toggle button next to it. By default, Wondershare Filmora offers several selections of color LUTs. You can use any of them in case you find an option similar to the free Kodak LUTs. On the one hand, tap the Add button beside the LUT Preset menu if you wish to import the Kodak 2383 LUT you downloaded from somewhere else.

Step 7: Wondershare Filmora provides a couple of options to help you customize the appearance of your video after applying the LUT. To make changes, simply drag the Strength and Protect Skin Tones sliders to your desired level or enter your preferred percentage into the provided input field.

Step 8: Finally, play and review the output. Check if the free Kodak LUTs you apply to your video project suit the specific style you wish to achieve. If you’re satisfied with the result, click the Export button right above the Preview Panel to render the video and save a copy to your computer. Otherwise, continue making changes until a desirable outcome is achieved on your end.
What are Kodak 2383 LUTs?
Aside from cameras, Kodak had also produced film print stock before. It was used to store and reproduce copies of film back in time. The Kodak film print stock had various types. Among the most popular variants is the Kodak 2383. At the time, most filmmakers were inclined to use this Kodak print stock due to its incredible features. According to the known users, Kodak 2383 produced richer and warmer colors that improved the quality of films a lot. Apart from that, it exhibited unique highlight and shadow configurations that created beautiful visual aesthetics for video content. Overall, Kodak 2383 had become well-known for its distinct style that induced nostalgic and emotional vibes.

Print stocks are no longer considered nowadays due to the advancement of our technology. At present, our modern camera devices are using digital storage to keep our media files. But fret not. It’s no big deal. In a way, you can still incorporate certain visual effects similar to Kodak’s. There are lots of free Kodak LUTs online that you can download and install on your video editing software. Should you try one? Well, it’s highly recommended. If you wish to try it, you can download the Kodak 2383 LUT and apply it to your video content. This common Kodak LUT can certainly help you decide which is which.
Truly, the free Kodak LUTs can elevate the visual and functional quality of your video content. But hold on. That’s not the entirety of it in terms of benefits. There is surely a lot more. Do you want to know what those are? If that is so, then check out the list below.
It has a wide selection of video colors.
When you download the Kodak 2383 LUT or other LUTs in general, you’ll be actually given tons of choices. Yes. The free Kodak LUTs are actually a package consisting of various video colors. That being the case, you will not run out of options. For sure, you’ll find one that best fits your content.

It keeps the skin tones looking natural on videos.
The majority of free Kodak LUTs are adaptive to the skin tone of the video subject. Yes. They are equipped with such features. Therefore, you can be sure that you will look natural regardless of the lighting conditions and video compositions. Are you looking for such effects? Then so, you should download the Kodak 2383 and try to apply it to your video content.
It goes well with various video effects.
Aside from skin tones, the free Kodak LUTs are also capable of displaying a variety of video effects. For instance, you can add film grains or halation to your videos and obtain promising results. Just make sure that the settings are configured very well in case an adjustment is necessary.

It can help you produce professional and high-quality videos.
Doubtlessly, the free Kodak LUTs are among the most sophisticated video filters out there. They provide an incredible visual effect that takes video content to another level. That’s why you should explore these creative assets and try to find out how they can help you. Get started with Kodak 2383 LUT and download it on your end. One of its variants will surely fit your video content well if configured accordingly.
Tips When Adding Free Kodak LUTs
We have previously learned that importing and applying free Kodak LUTs is a walk in the park. It only takes a few minutes to complete such procedures. However, there are some important tips that can help you gain promising results. Do you want to know what those are? If that is so, then check out the list below.

- The exposure settings are directly related to video color, brightness, and contrast. Hence, you have to make sure that it is properly calibrated before you apply the free Kodak LUTs. Otherwise, the result will be affected.
- Before you proceed, the first you should do is fix all the color issues. You may first do some color correction and make all the necessary adjustments. One way or another, this step is going to help you achieve the specific style you desire to achieve.
- As previously mentioned, the free Kodak LUTs come in variations. When you download the free Kodak 2393, you’ll get access to tons of choices. That’s why you should choose your preferred Kodak LUT very well. Find the perfect option that suits your video content perfectly.
- Last but not least is to browse all the available options at your disposal. Ensure that you get to check them before selecting one.
Conclusion
The video aesthetic that Kodak has introduced to the world is unparalleled. Hence, it comes as no surprise that the free Kodak LUTs are very popular nowadays. Don’t worry. When you decide to give it a try, you’ll not have a hard time implementing the effect. Just choose your preferred preset and import it into the video editing platform. For convenience, download Wondershare Filmora. It’s a powerful video editing software that provides advanced tools and allows such configurations. Explore this app on your end and take advantage of the benefits it has to offer.


 100% Security Verified | No Subscription Required | No Malware

