Are you interested in making movies? Well, If your answer is yes, you're in luck! Windows Movie Maker is a great way to make movies on your computer. You can use it to create family videos, school projects, or even movies for fun. This might seem like too much work, but trust us, it's not! With this amazing program, anyone can make movies on windows. There are only a few things to keep in mind, and you'll be on your way to becoming a movie maker in no time.
Video Windows Movie Maker makes it easy to put your movies together. You just have to drag and drop the video clips you want to use into the movie maker. Then, you need to follow certain steps to complete your project. In the section below, we will discuss in detail the steps to make a movie from Windows Movie Maker.
Let's get started.
In this article
How to Make a Video with Windows Movie Maker
Here are the steps you need to take to make movies on windows 10:
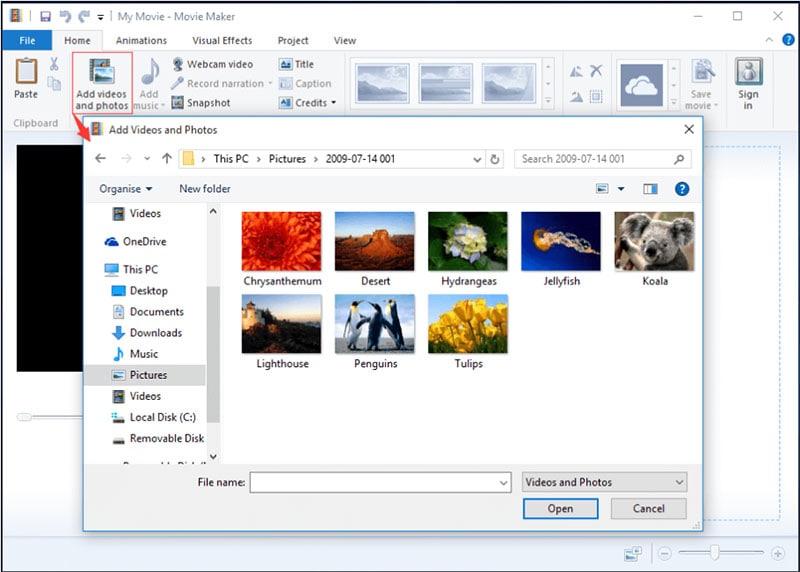
Step1 Import Media Into Movie Maker

The first thing you need to do is get all of your video footage and images into Windows Movie Maker.
Media file formats can be imported into this program:
- Audio Files: aif, .aifc, .aiff, .asf, .au, .mp2, .mp3, .mpa, .snd, .wav, and .wma
- Image Files: .bmp, .dib, .emf, .gif, .jfif, .jpe, .jpeg, .jpg, .png, .tif, .tiff, and .wmf
- Movie Files: asf, .avi, dvr-ms, .m1v, .mp2, .mp2v, .mpe, .mpeg, .mpg, .mpv2, .wm, and .wmv
To import media:
- Click "File" > "Import into collections."
- Browse to the location of the file you want to import, select it, and then click "Open."
Your selected file will now appear in the "Collections" pane. You can double-click on the imported file to preview it. If you're happy with what you see, great! You can now move on to step two. If the files are not good, no worries - you can always delete them and try again. Just right-click on the file and select "Delete," or press the "Delete" key on your keyboard.
Step2 Basic Editing from Timeline

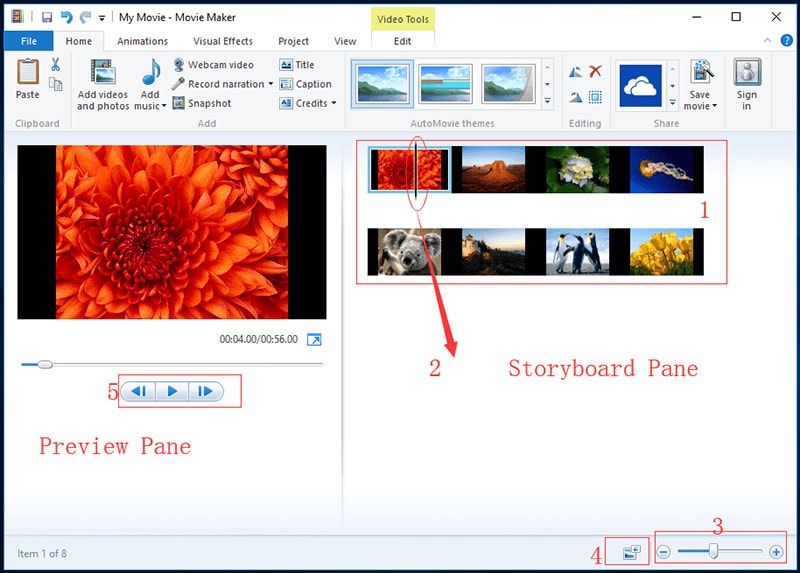
After you have imported all of your desired clips and images into Windows Movie Maker, it is time to start editing them into your movie. Here are the things that you need to do to edit your clips and images:
- For cutting the image, you need to select the part of the image that you want to cut. To do this, just click on the image and drag it to where you want it to be cut. The cutting process will automatically happen when you release your mouse button.
- To combine the images, you need to select the images that you want to combine. To do this, click on one image and then hold down the "Ctrl" key while clicking on the other images that you want to combine. Once you have selected all the images you want to combine, just right-click on any of the selected images and choose "Combine Clips."
- To split clips in the timeline, select the clip you want to split by clicking on it. Then, position your mouse cursor to where you want to split the clip and click on the "Split Clip" button. The clip will be automatically split into two separate clips.
By doing these minor things, you can edit your clips and images in the timeline according to your preference. Now, you are one step closer to creating your very own movie!
Step3 Add Video Effects

Video effects are a great way to make your movies look more professional. Windows Movie Maker has various built-in effects that you can use to improve the quality of your videos. These effects can be applied to your movie's video and audio tracks. Moreover, they can add transitions between clips and even change the way your video looks.
There are hundreds of different effects that you can use in Windows Movie Maker. So experiment with them until you find a style that suits your needs. With a bit of practice, you'll be making movies that look like they were made by a professional in no time!
To add video effects in the video movie maker windows:
- Select the clip you want to modify, and then click on the "Effects" tab. From there, you can browse through the available effects and preview them before adding them to your project.
- Once you've found an effect you like, simply drag and drop it onto the clip.
- You can also add multiple effects to a single clip if you want.
- Just remember that too many effects can make your video look cluttered and difficult to watch. So be sure to use them sparingly.
When you're happy with your added effects, click on the "Ok" button to save your changes.
Step4 Edit Audio & Titles

Audio and Title are both crucial aspects when you want to make movie windows 10 movie perfectly. You can edit both of these in Windows Movie Maker. Editing is one of the most creative aspects of making a movie. In Windows Movie Maker, you easily edit your audio and titles in the video. Even if you want to do the editing multiple times, you can do so without any problem. All you need to do is have the latest version of Windows Movie Maker installed on your computer.
To Edit the Audio & Tiles:
- Go to the ‘Home’ tab and click on the ‘Add music’ button.
- Find the audio file that you want to add to your movie. You can either use a song from your personal collection or look for one online.
- Once you have found the perfect audio, drag and drop it into the timeline.
- If you want to edit the audio, right-click on it and select ‘Edit’. You can then make changes to the audio, such as volume, duration, etc.
- To add titles, go to the ‘Home’ tab and click on the ‘Add title’ button.
- A new window will open where you can type in the text for your title. You can also change the font, color, and size of the text.
- Once you are happy with your title, click on the ‘OK’ button, and it will be added to your timeline.
- If you want to edit the title, simply double-click on it and make changes as needed.
Step5 Export and Save Video
The last step that you need to follow after completing the video is to export and save it. It is always important to save your work so that you can access it later or make changes if needed.
To export and save the video:
- Click on File
- Click on Save movie
- Choose the quality and file size that you want
- Give the video a name
- Save it to your computer
Movie Maker Alternative to Create Videos
Filmora is a video creating and editing software developed by Wondershare. Although it is not as widely known as some of its competitors, it has many features that make it a great alternative to Windows Movie Maker. Anyone can use this software to create high-quality videos, from beginners to professionals. The software is compatible with both Windows and Mac operating systems.
One of the great things about Filmora is that it is very user-friendly. The interface is straightforward and easy to navigate and comes with top-notch editing features and rich effects. So, if you have never used video editing software before, you can figure out how to use Filmora easily. Another plus is that free trials are available to try out the software before you commit to buying it.
Steps to Edit Video with Filmora
Now that you know a little bit more about this movie maker alternative, let's go over the steps to edit videos with Filmora.
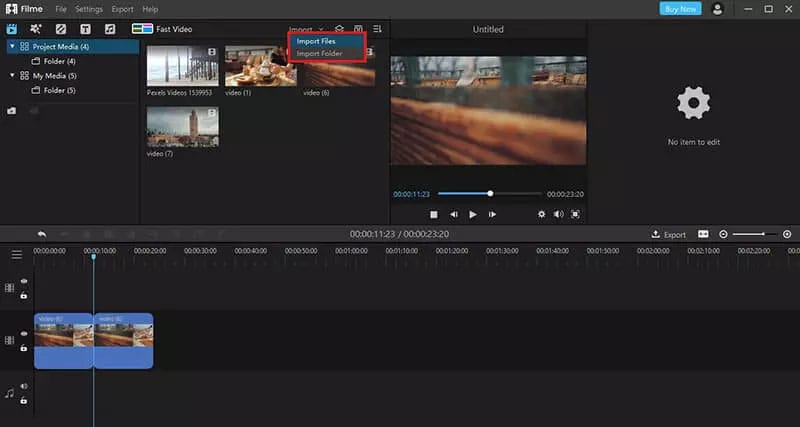
Step1 Import your video into the software. You can do this by clicking on "Import" and selecting the file from your computer.

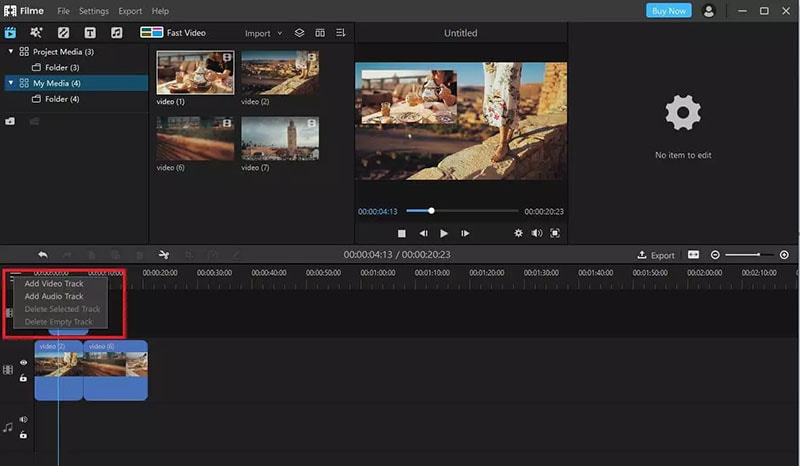
Step2 Once your video is imported, you can see it in the "Project Library". You can drag and drop it from here into the "Video Timeline" located at the bottom of the screen.

Step3 Now that your video is in the timeline, you can start editing it. To do this, simply click on the item in the timeline you want to edit and then make your changes in the "Video Inspector" panel on the screen's right-hand side.

You can make changes, including cropping the video, adjusting the volume, adding filters and effects, and more.
Step4 Once you are happy with your edits, you can preview your video by clicking on the "Play" button in the tight and save it if it seems perfect to you.
If you are satisfied with what you see, then you can go ahead and export your video. To do this, click on "File" located in the top left-hand corner of the screen and then select "Export". From here, you can choose what format you want to export your video and where you want to save it on your computer.
Conclusion
If you're looking for an easy way to make movies on your Windows computer, then you should definitely check out Windows Movie Maker. This free from Microsoft makes it simple to create and edit videos, and it's perfect for beginners. Another alternative for making movies on Windows is to use the Filmora video editor. This program is more robust and has multiple features just like Movie Maker.


 100% Security Verified | No Subscription Required | No Malware

