You may be familiar with speed-up videos. Video editing practice commonly uses this technique as it serves many purposes. It can condense time to show progression, focus on key moments, create art, and build urgency.
An example of a sped-up video is a cooking tutorial video. The complete process can take about two hours. But to engage the audience and match typical YouTube videos, creators should keep the video under 10 minutes. This is where speeding up videos comes in handy to condense the tutorial process.
To achieve this effect, you can use Final Cut Pro. Learn how to speed up video in Final Cut Pro in this article.
In this article
Part 1. Common Methods for Speeding Up Video in Editing
It's worth noting that speeding up can also be achieved through various methods. For a fast-motion effect, you can use in-camera techniques such as time-lapse photography. In post-production, you can adjust playback speed to speed up the video.
Another technique is speed ramping, which varies the clip's speed to create a more dynamic effect. Finally, frame blending helps create smoother transitions between frames and reduces choppiness in fast-motion sequences.

Therefore, to apply these post-production speed-up video techniques, the video editing tool you are using must support speed-up adjustments, speed ramping, and frame blending. That’s why Final Cut Pro can be one of your best options. In the next section, we will provide a guide on how to speed up a video in Final Cut.
Part 2. How to Use Speed Up Video Using Final Cut Pro
You must be familiar with Final Cut Pro especially if you are a macOS user. Final Cut Pro is a professional video editing software developed by Apple. It is well-known among filmmakers, video production, and content creators for its advanced features, easy-to-use interface, and seamless integration with other Apple products. Here is a brief overview of its capabilities:
- Magnetic Timeline lets you arrange clips easily. You won't worry about gaps or sync issues.
- Compound clips bundle separate video and audio clips into a single movable package.
- Synchronized clips to align video with second-source audio automatically.
- Multicam Editing lets you edit multi-camera projects. It syncs them automatically using audio waveforms or time codes.
- 360° graphics and effects to easily add 2D and 3D titles to your video and apply blurs, glows, and other 360° effects.
To speed up your video, Final Cut Pro has a feature to adjust clip speed for fast-motion effects. You can also reverse a clip, rewind a segment, apply variable speed effects (speed ramping), and create instant replays and jump cuts.
Whether you're looking to create a dramatic time-lapse effect or simply speed up a sequence for pacing, the Retime Feature on FCP provides the tools you need. With a few clicks, you can change a clip's playback speed. You can make it play faster or slower.
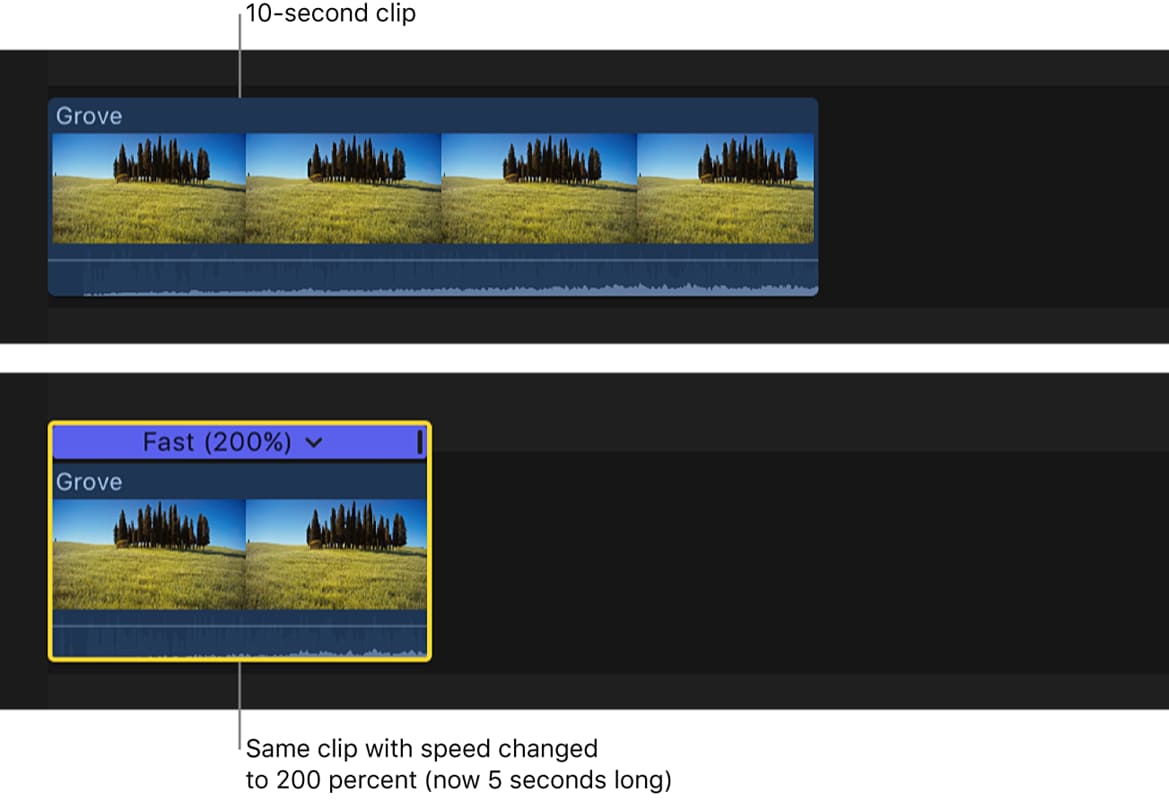
How to speed up video using Final Cut Pro
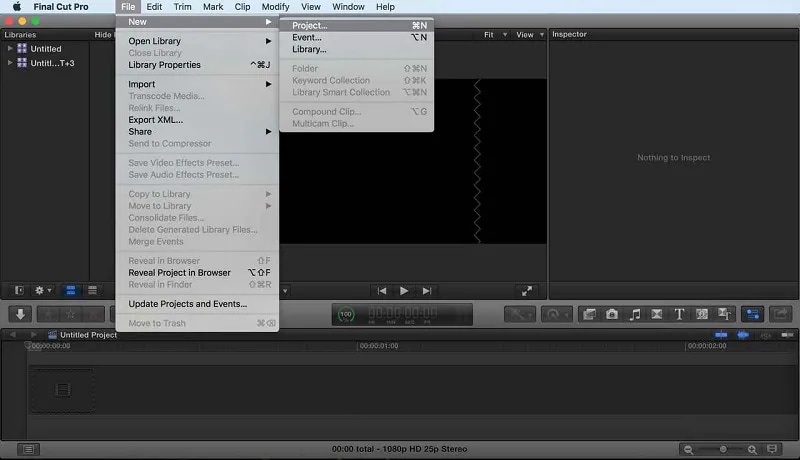
Step 1. To speed up the video, start by creating a new project on File > New then tap Project.
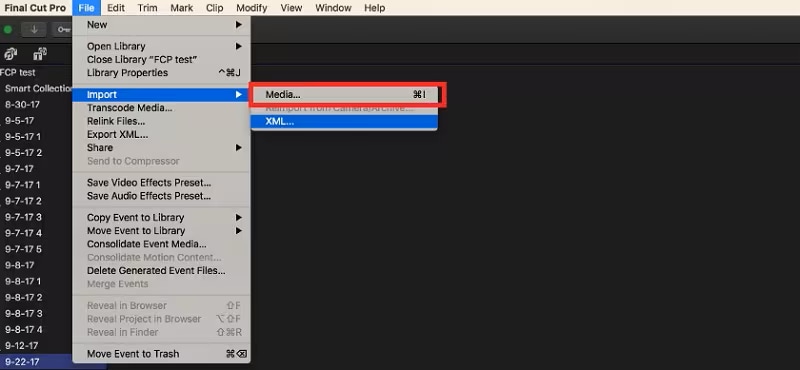
Step 2. Choose video clips you want to speed up on File > Import > Media. Then drag the video clip into the timeline.
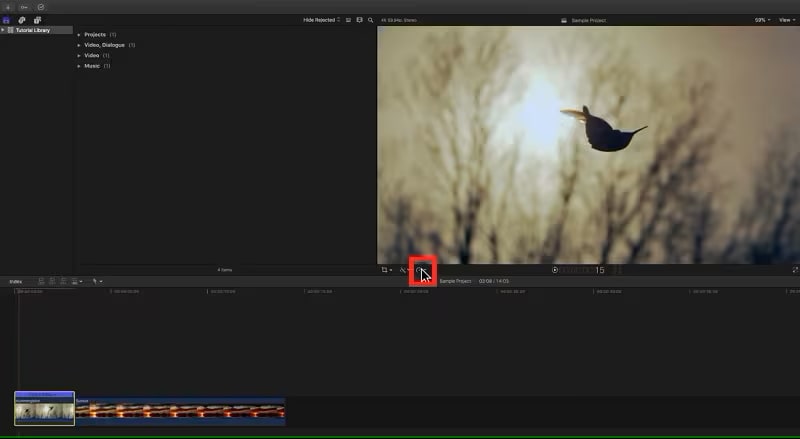
Step 3. Tap the video clip you want to speed up. Click the Speedometer (Retime) icon at the top of the timeline.
Step 4. After you click on the Speedometer icon, you can choose the speed you want. Click Fast, and then select the speed from 2x to 20x.
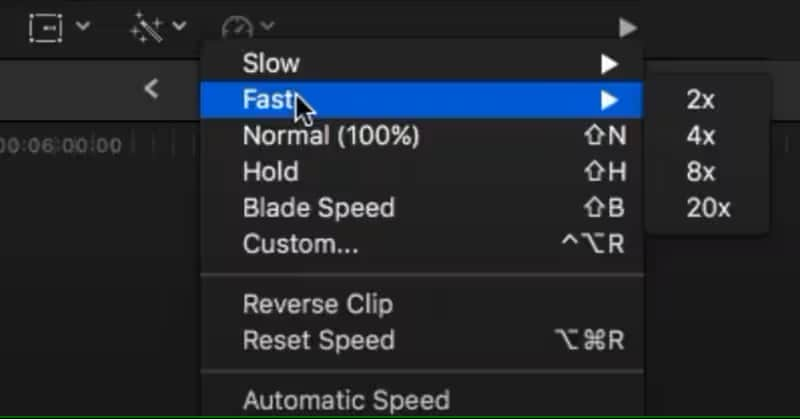
If you want to customize the speed level, click on the Custom option. Enter the desired speed percentage.
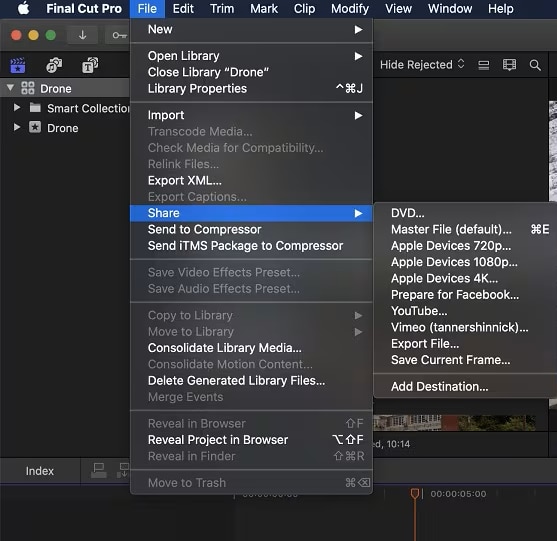
Step 5. Once you are done speeding up your video, you can preview and then Save the video in your Library. You can also share your video on YouTube, Vimeo, or other destinations.
Part 3. Tips When Speeding Up Video in Final Cut Pro
When speeding up videos, maintaining high-quality output can be a challenge, but with the right techniques, you can get excellent results. Here are some suggestions you can try:
1. Using keyboard shortcuts
Final Cut Pro provides Shortcut Keys to change the playback speed of clips. In Final Cut Pro, the J, K, and L keys are used to control playback speed and navigate your project or clip.
- Press L = forward playback at normal speed (1x).
- Press J = reverse playback at normal speed (1x).
- Press K to pause playback.
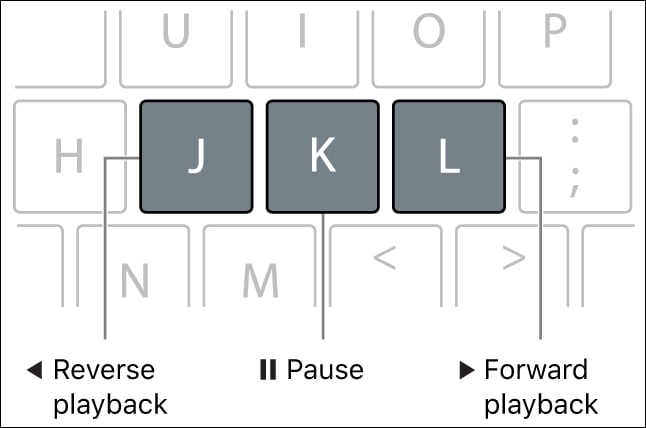
- Double press L or J to double the current playback speed.
- Press J to instantly reverse playback or L to continue forward playback.
- Hold K and press J or L to move the playhead one frame all at once.
- Hold K while simultaneously holding J or L to move the playhead at 1/2x speed.
2. Adjusting Frame Rate
Adjusting the frame rate is a key factor for achieving smooth, high-quality videos, especially when speeding up video. If possible, record your video at a higher frame rate, such as 60fps, 120fps, or even higher to make the video appear smoother.
Moreover, you can use Speed Ramping to increase or decrease your recording speed gradually. You should also consider the platform's requirement in the desired frame rate. Most online platforms prefer 30fps or 60fps for smooth playback.
3. Smoothen Out the Sped-Up Video
To smoothen up sped-up videos and maintain high quality, several techniques can be used during the editing process. You can try these methods to get smoother results:
- Use gradual speed transitions. You can use Speed Ramping to increase the speed of your video gradually. This creates a smoother transition between different speeds.
- Stabilizes the footage before speeding it up. This helps minimize shaking from the start. It results in a smoother final product.
- When rendering the video, use high-quality settings. Choose a high bit rate, maintain the original resolution, and use a high-quality codec like H.264 or H.265. This preserves the smoothness and overall quality of the video.
Part 4. Alternative Video Speed-Up Tool for Windows
Since Final Cut Pro is only available on Mac, Windows users can explore other editing software options for their desktops. Some of these tools are also compatible with both Mac and Windows, allowing you to compare their speed-up features.
For a powerful and easy-to-use video editor for Windows, try Wondershare Filmora. This software aims to cater to both beginners and experienced editors. It balances simplicity with advanced features. This can be an alternative for those of you who need a speed-up video tool. You can install Filmora's app on your Windows or Mac device.
Filmora key features:
- Speed Ramping feature to control the pace of your videos with precision. You can adjust your clips' speed and create smooth transitions between different speeds, such as slow or fast motion
- AI Frame Interpolation feature that helps with smooth transitions between frames by generating intermediate frames, making your slow-motion footage look fluid and natural
- Playback Speed Adjustment where you can easily adjust video speed from 0.01x to 100x to achieve the desired effect
- Access a variety of speed presets and effects to quickly apply common speed adjustments
You can watch this video to understand how to change video speed in Filmora.
Here’s also a step-by-step guide on how to change video speed on Filmora using different methods.
Method 1. Change Video Speed with Uniform Speed
In Filmora, use the Uniform Speed feature to adjust the speed of the selected clips to the same rate.
Step 1: Go to the Uniform Speed Panel
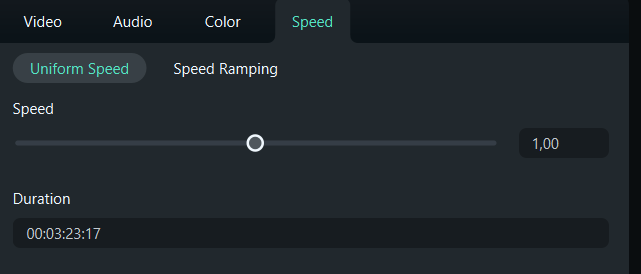
Once you have imported and dragged the video you want to speed up into the timeline, and then, click the video in the timeline and click the Speed icon. Select the Uniform Speed option.
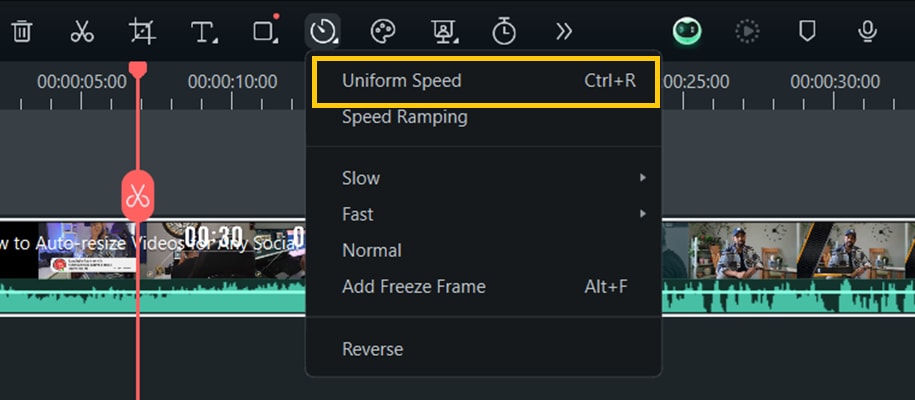
Step 2: Changing Video Speed to Constant Speed
In this section, you can adjust the Speed slider to speed up the playback speed or enter your preferred value in the Duration column to get a more precise output.
Step 3: Preview the Video and Save
Once you are satisfied with the results of speeding up the video, you can preview it first and then save it.
Method 2. Speed Ramping
In Filmora, you can choose to change the speed uniformly or speedily. To change the speed of a video or audio clip variably. You need to use the Filmora Speed Ramping feature.
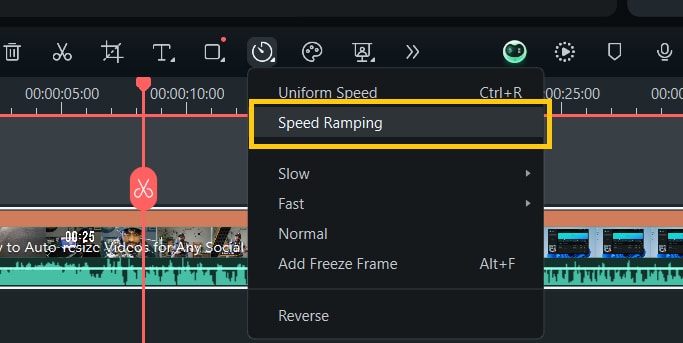
Step 1. Click the video in the timeline then click the Speed Ramping icon, select the Speed Ramping option.
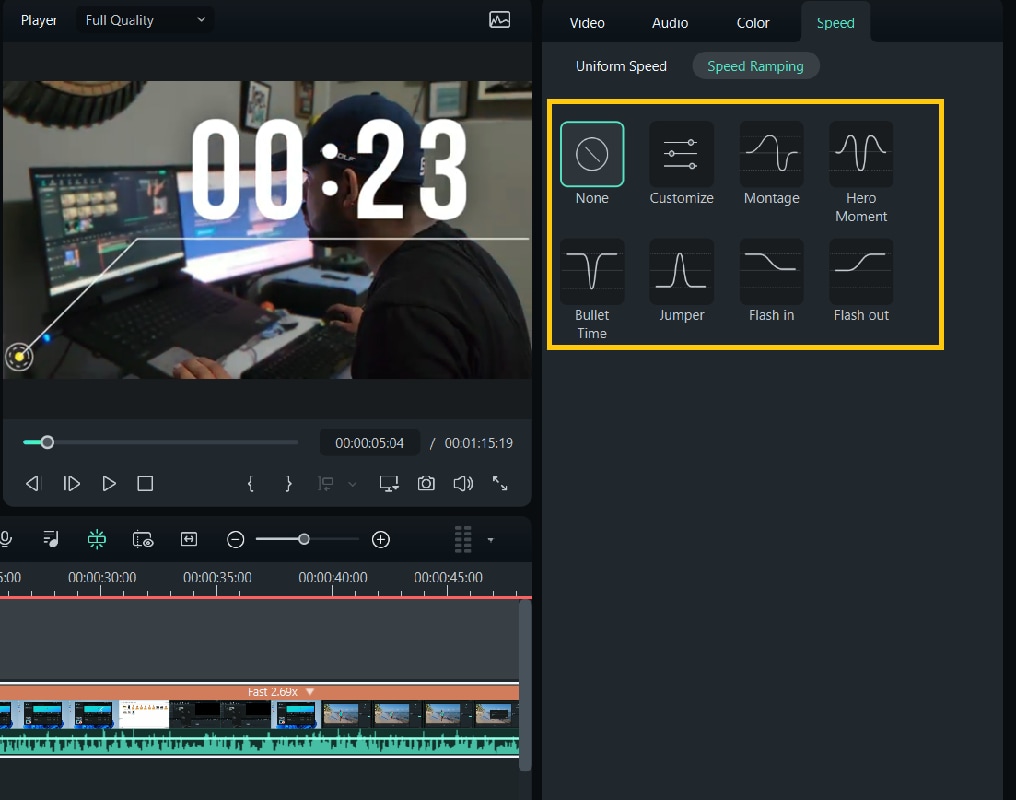
Step 2. Select one of the presets to apply variable video speed and customize it based on your needs. The speed change will be applied until the playhead reaches the next speed point. As the playhead moves between speed points, the video speed will gradually transition between the different speeds.
You can customize the speed ramping as you want. Drag the speed point up or down to increase or decrease the speed of the section.
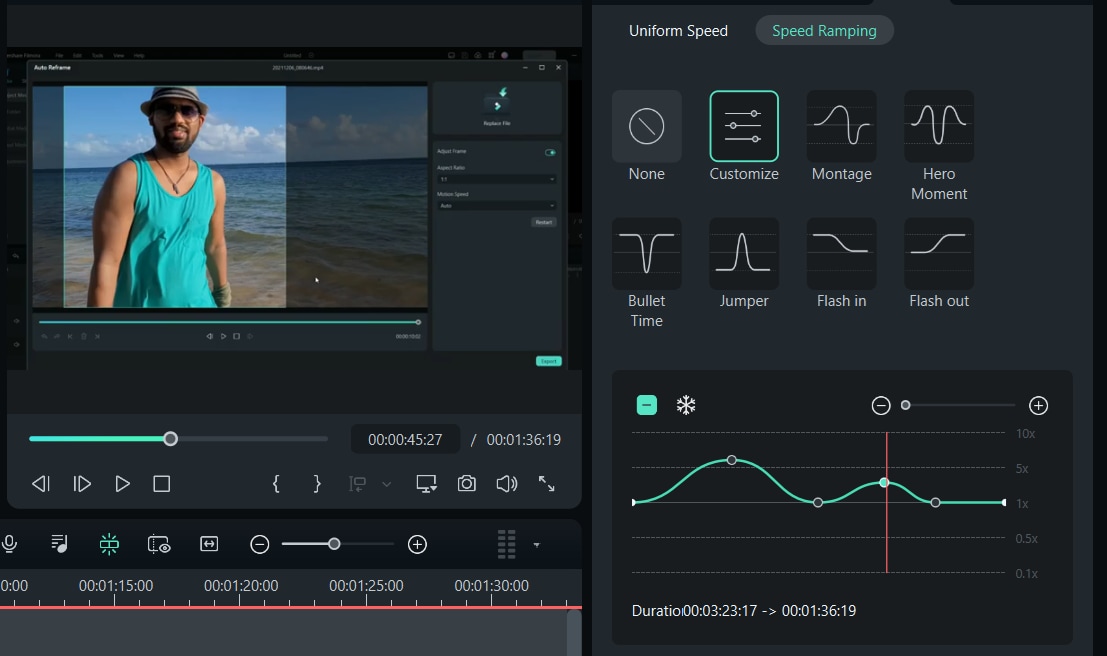
Step 3. Preview the video and save the speed ramping settings by clicking the Save as a Custom button or Reset to remove the settings.

Method 3. Change Speed in Timeline
Step 1: Press the Ctrl key on your keyboard, then point the mouse to the end of the video on the timeline. You will see the speed change icon.
Step 2: While holding down the 'Ctrl' key, drag the edge of the clip backward to slow down the clip or forward to speed it up.
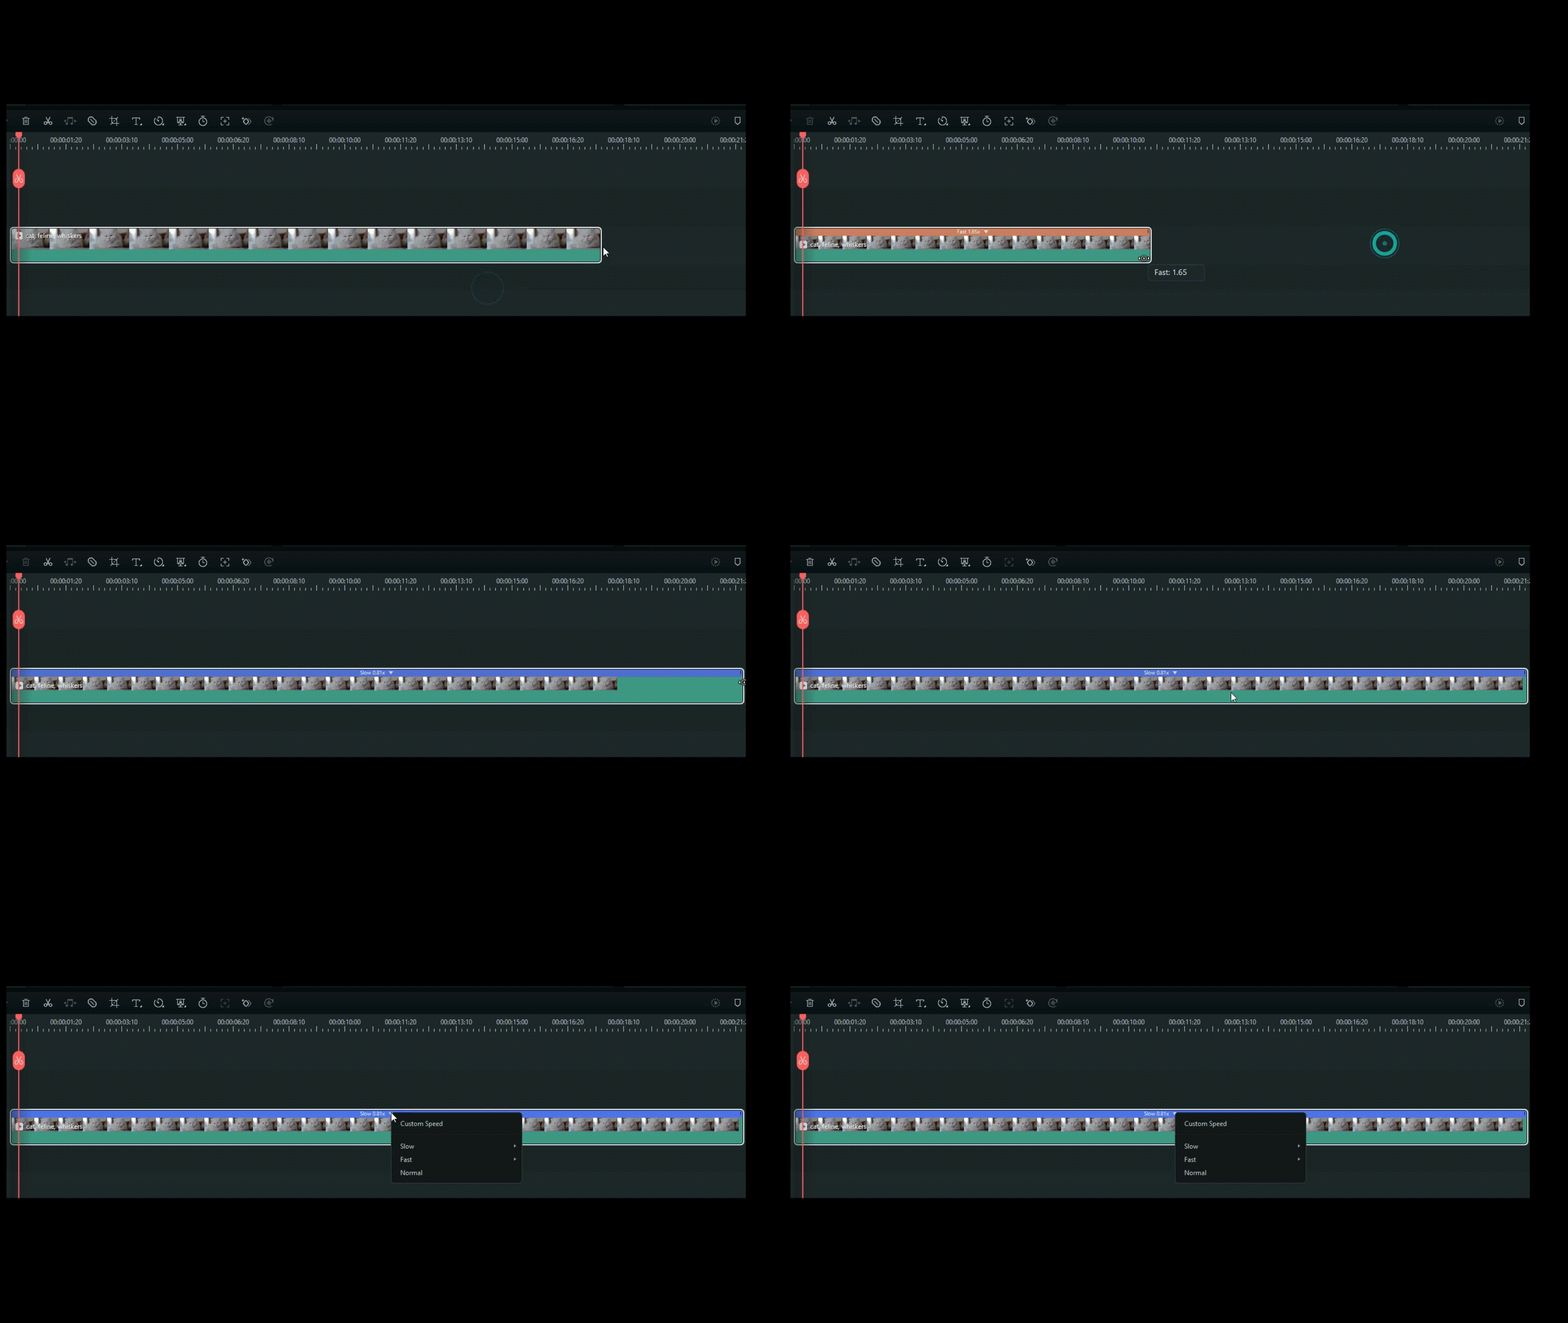
After you speed up the clip, you will see a red strip showing the speed change.
Conclusion
In video editing, speeding up or slowing down a video can be important. It can tell a story well, focus on key moments, and adjust the speed to fit a time limit. You can use the speed-up video feature with editing tools and techniques.
Final Cut Pro is one such video editing tool that offers ways to speed up your videos. One way to speed up Final Cut Pro videos is quite easy, But, it's only for macOS users. Besides paying attention to how to speed up video in the Final Cut Pro. You also have to ensure that your speed-up video results are high-quality.
If you are a Windows user, perhaps you are also looking for what tools you can use to speed up your videos. Filmora has three ways to speed up videos. They include using Uniform Speed, Ramping Speed, and changing speed in the timeline.


 100% Security Verified | No Subscription Required | No Malware

