Are you wondering what Track Mattes is? In After Effects, this tool adds an invisible layer that is used to mask or reveal parts of a layer, including video, graphics, text, shapes, and images. This feature is in the arsenal of any visual effects artist or motion graphic designer.
For After Effects editors, Track Mattes can be an incredibly helpful tool for managing multiple layers and creating complex animations.
In this article, we'll explore everything you need to know about Track Mattes. We'll cover topics like the difference between a mask and Track Matte, finding this tool in After Effects, and its four options: Alpha Matter, Alpha Inverted Matte, Luma Matte, and Luma Inverted Matte.
In this article
Part 1. What Are Track Mattes In After Effects?
A Track Matte is an element used in video editing to control the opacity of a layer. Essentially, it lets you create a "hole" in a layer so that underlying layers can show through. This tool can be used with video and audio layers, which is essential for creating complex composites in After Effects.
You can use Track Mattes to generate shapes, reveal part of a layer, or keying outs. Interestingly, it remains independent of all layers in your projects, which means you can get visual effects and animations more efficiently than with the masks tool.
Moreover, Track Mattes uses Alpha or Luma channels as a layer mask to determine what parts of the layer to reveal. For instance, you can make a top layer that provides an Alpha or Luminous effect and a bottom layer consisting of the image that will be revealed or shown.
Thus, if you want to use an image to hide your video until you want to unveil it or add a picture in your text, Track Mattes will help you to shape the appearance of a layer above it.
Part 2. Differences Between A Mask And A Track Matte
In Adobe After Effects, there are two types of masking tools: Masks and Track Mattes. Both are used to hide or reveal a portion of a layer.
Here're some key differences between a Mask and a Track Matte:
- A mask is dependent on a specific layer, while the Track Matter is independent of any layer.
- A mask is applied directly to a layer having an image or a video and transforms with the layers. On the other hand, Track Matte is a stationary mask applied to the composition rather than a layer.
Part 3. Finding The Track Matte Tool In After Effects
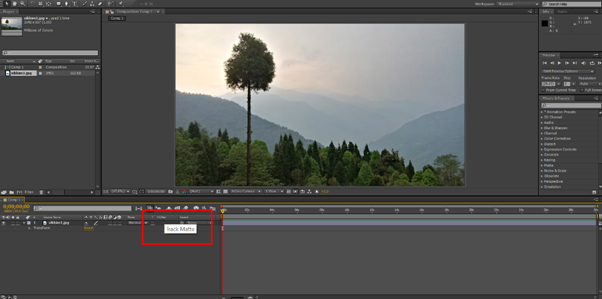
Track Matte is located by default in the Timeline Window of the After Effects interface, but if it is unavailable there for some reason, toggle the Transfer Control Pane button on the bottom-left of the timeline.

If you are still unable to find the Track Matte option, press the F1 key or do the following steps in sequence:
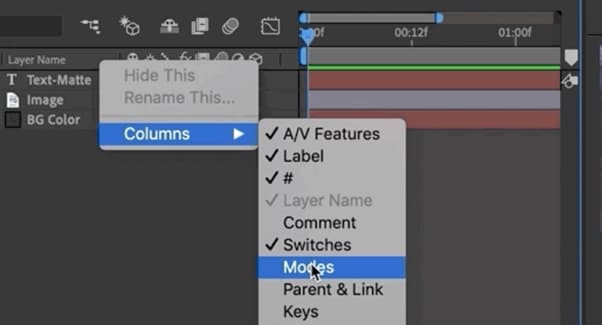
- Right-click on the area above your layers and select "Columns."
- Scroll down and click the "Modes" option to enable it.

- Track Matte mode, Preserve Underlying Transparency, and Blending Modes will be available now.
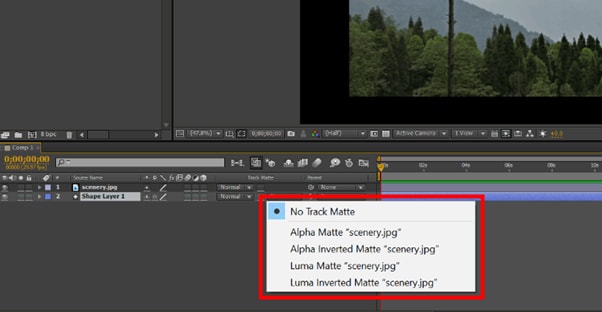
Under Track Matte's drop-down menu, you can find four further options, two with Alpha and two with Luma. We'll discuss these options in detail in the next section.
Part 4. All Four Track Matte Options In After Effects
After Effects provides four types of Track Matte options: Alpha Matte, Alpha Inverted Matte, Luma Matte, and Luma Inverted Matte, each has its own specific use case. But first, you need to understand what Alpha and Luma are:
Alpha: This Track Matte type uses the layer's Alpha channel to determine the layer's opacity.
Luma: This Track Matte type uses the top layer's brightness to mask the bottom layer.

Let's find out the functions of each option one by one:
Alpha Matte
Alpha Matte is an important option under the Track Matte menu, as it allows you to create a mask based on the transparency of the layer you are using it on. Like the mask, it will use any pixel above 0% opacity and can be useful for various purposes, such as creating a vignette or isolating a certain area of the frame.
Alpha Inverted Matte
The Alpha Inverted Matte option is quite the opposite of the Alpha Matte, and around the Alpha channel, it uses negative space from the above layer and will therefore use pixels with 0% opacity as it had 100% opacity.
Luma Matte
Instead of using the Alpha channel, Luma Mattes uses the brightness level or Luma channel of the upper layer to create a mask for the bottom layer.
Luma Inverted Matte
Opposite of the Luma Matte, the Luma Inverted Matte uses dark or low luminance areas of the upper layer to create a mask for the lower layer.
Differences Between Alpha Channel and Luma Channel
When altering the opacity of a layer, it may look like the brightness settings are changed. This might confuse some users, as both Alpha and Luma channels carry the same information. However, they differ in how they are used.
Alpha channel is a type of Track Matte that stores transparency information. This information determines how opaque or transparent a layer will be when superimposed over another layer.

On the other hand, a Luma channel is a video track that stores brightness information. This information is used to determine how bright or dark an image will be and is further divided into three channels, i.e., Red, Green, and Blue (RGB). Their value ranges from 0 to 255, where 0 represents the darkest value while 255 represents the brightest value.

Video – How to use Track Mattes in Adobe After Effects - Tutorial
Conclusion
In this article, we've discussed what Track Matte is in After Effects and how it differs from the mask tool. We also explored where to find the Track Matter option and its four options, i.e., Alpha Matte, Alpha Inverted Matte, Luma Matte, and Luma Inverted Matte. In the end, we discussed the difference between the Alpha and Luma channels to provide a clear view of the two.
Hopefully, this guide resolves your queries, and you now have a better understanding of the Track Matte tool in After Effects.


 100% Security Verified | No Subscription Required | No Malware

